Homemade cranberry sauce is easier to make than you might think, and it takes your turkey dinner to another level. And don’t get me started on how delicious it is on Thanksgiving leftover sandwiches (which I happen to love more than the dinner itself.) This cranberry sauce is also delicious used in dessert recipes, like bars and cookies, such as my Cranberry Orange Crumb Cake Cookies.
In a medium saucepan, combine the cranberries, granulated sugar, brown sugar, orange juice, water, orange zest and cinnamon. Bring to a boil over medium heat. Turn the heat down to medium-low and simmer until the cranberries soften and the mixture thickens to a jam consistency, about 18-25 minutes. Stir in the honey and salt. Transfer the mixture to a bowl and set aside to cool to room temperature. The sauce will thicken a bit as it cools.
I recently enjoyed a girls’ day out at Universal Studios Hollywood. My daughter is a Harry Potter fan, so of course we beelined straight to the Wizarding World of Harry Potter upon arrival at the theme park. We were spellbound by the ominous looking Hogwart’s Castle and the sparkling snow-topped shops of Hogsmeade. My daughter was in Harry Potter fan heaven, flitting around Hogsmeade, testing out her interactive wand and sipping some refreshing Butter Beer. It’s definitely a must-try
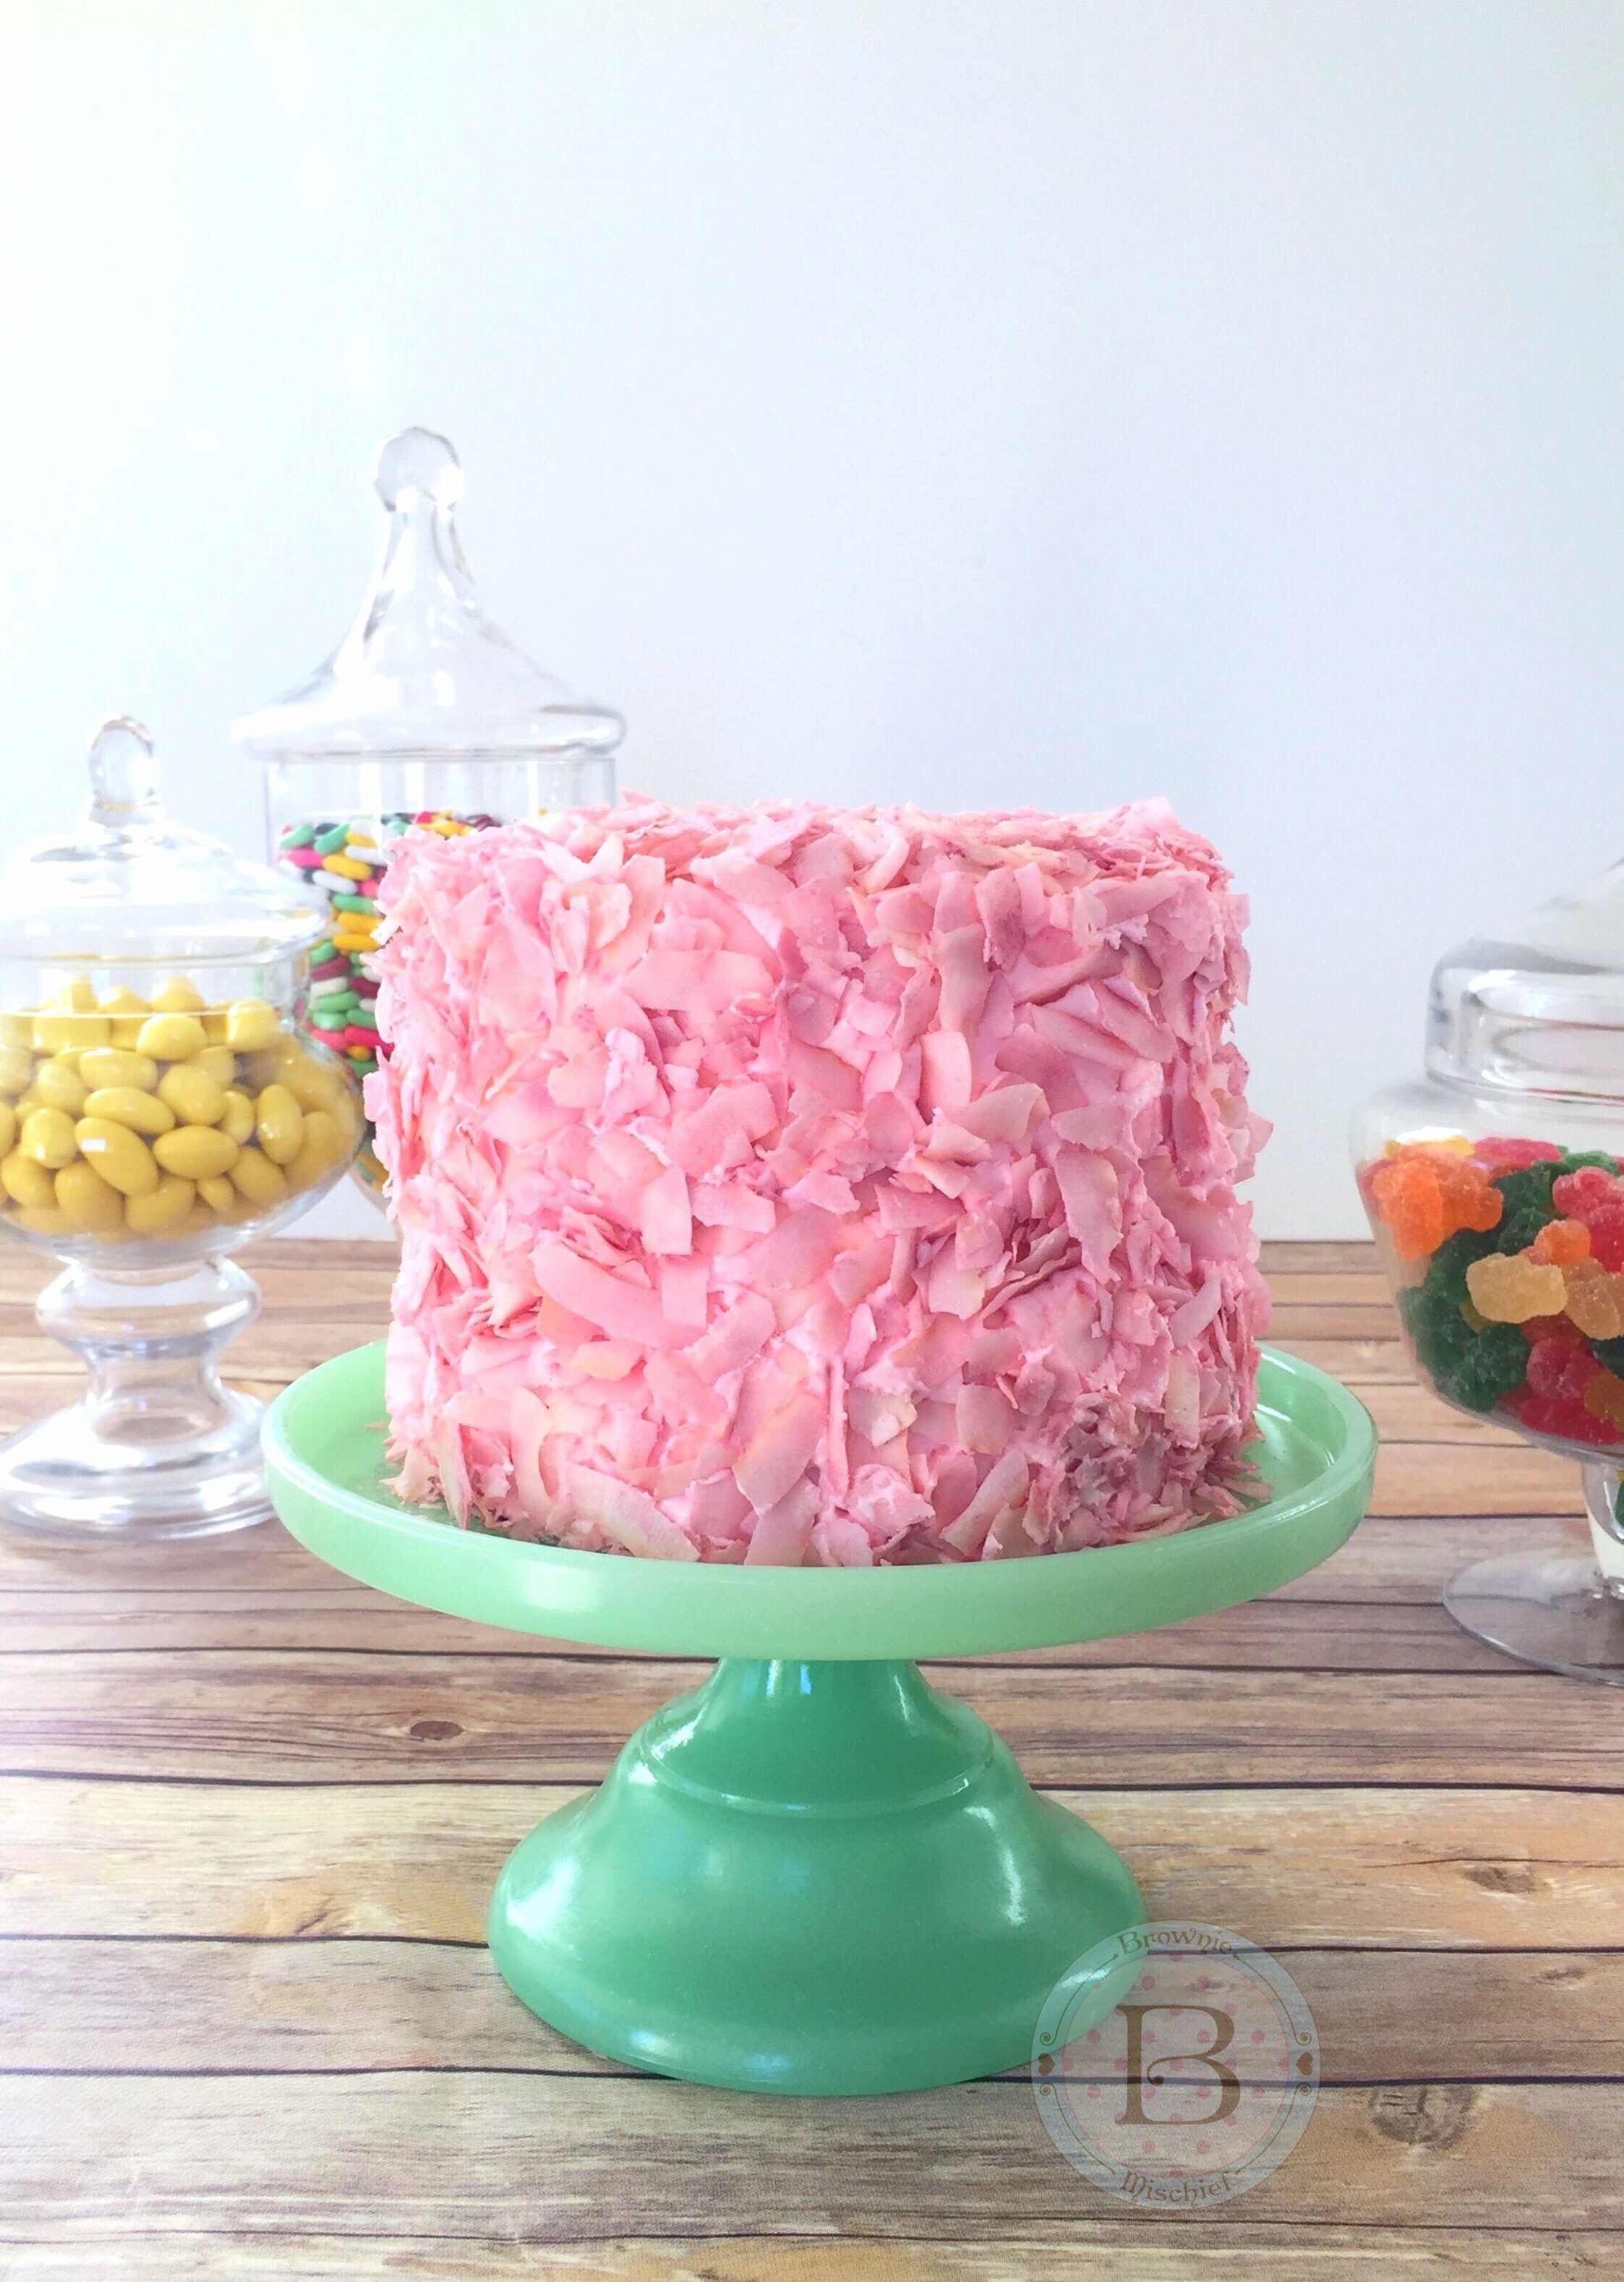
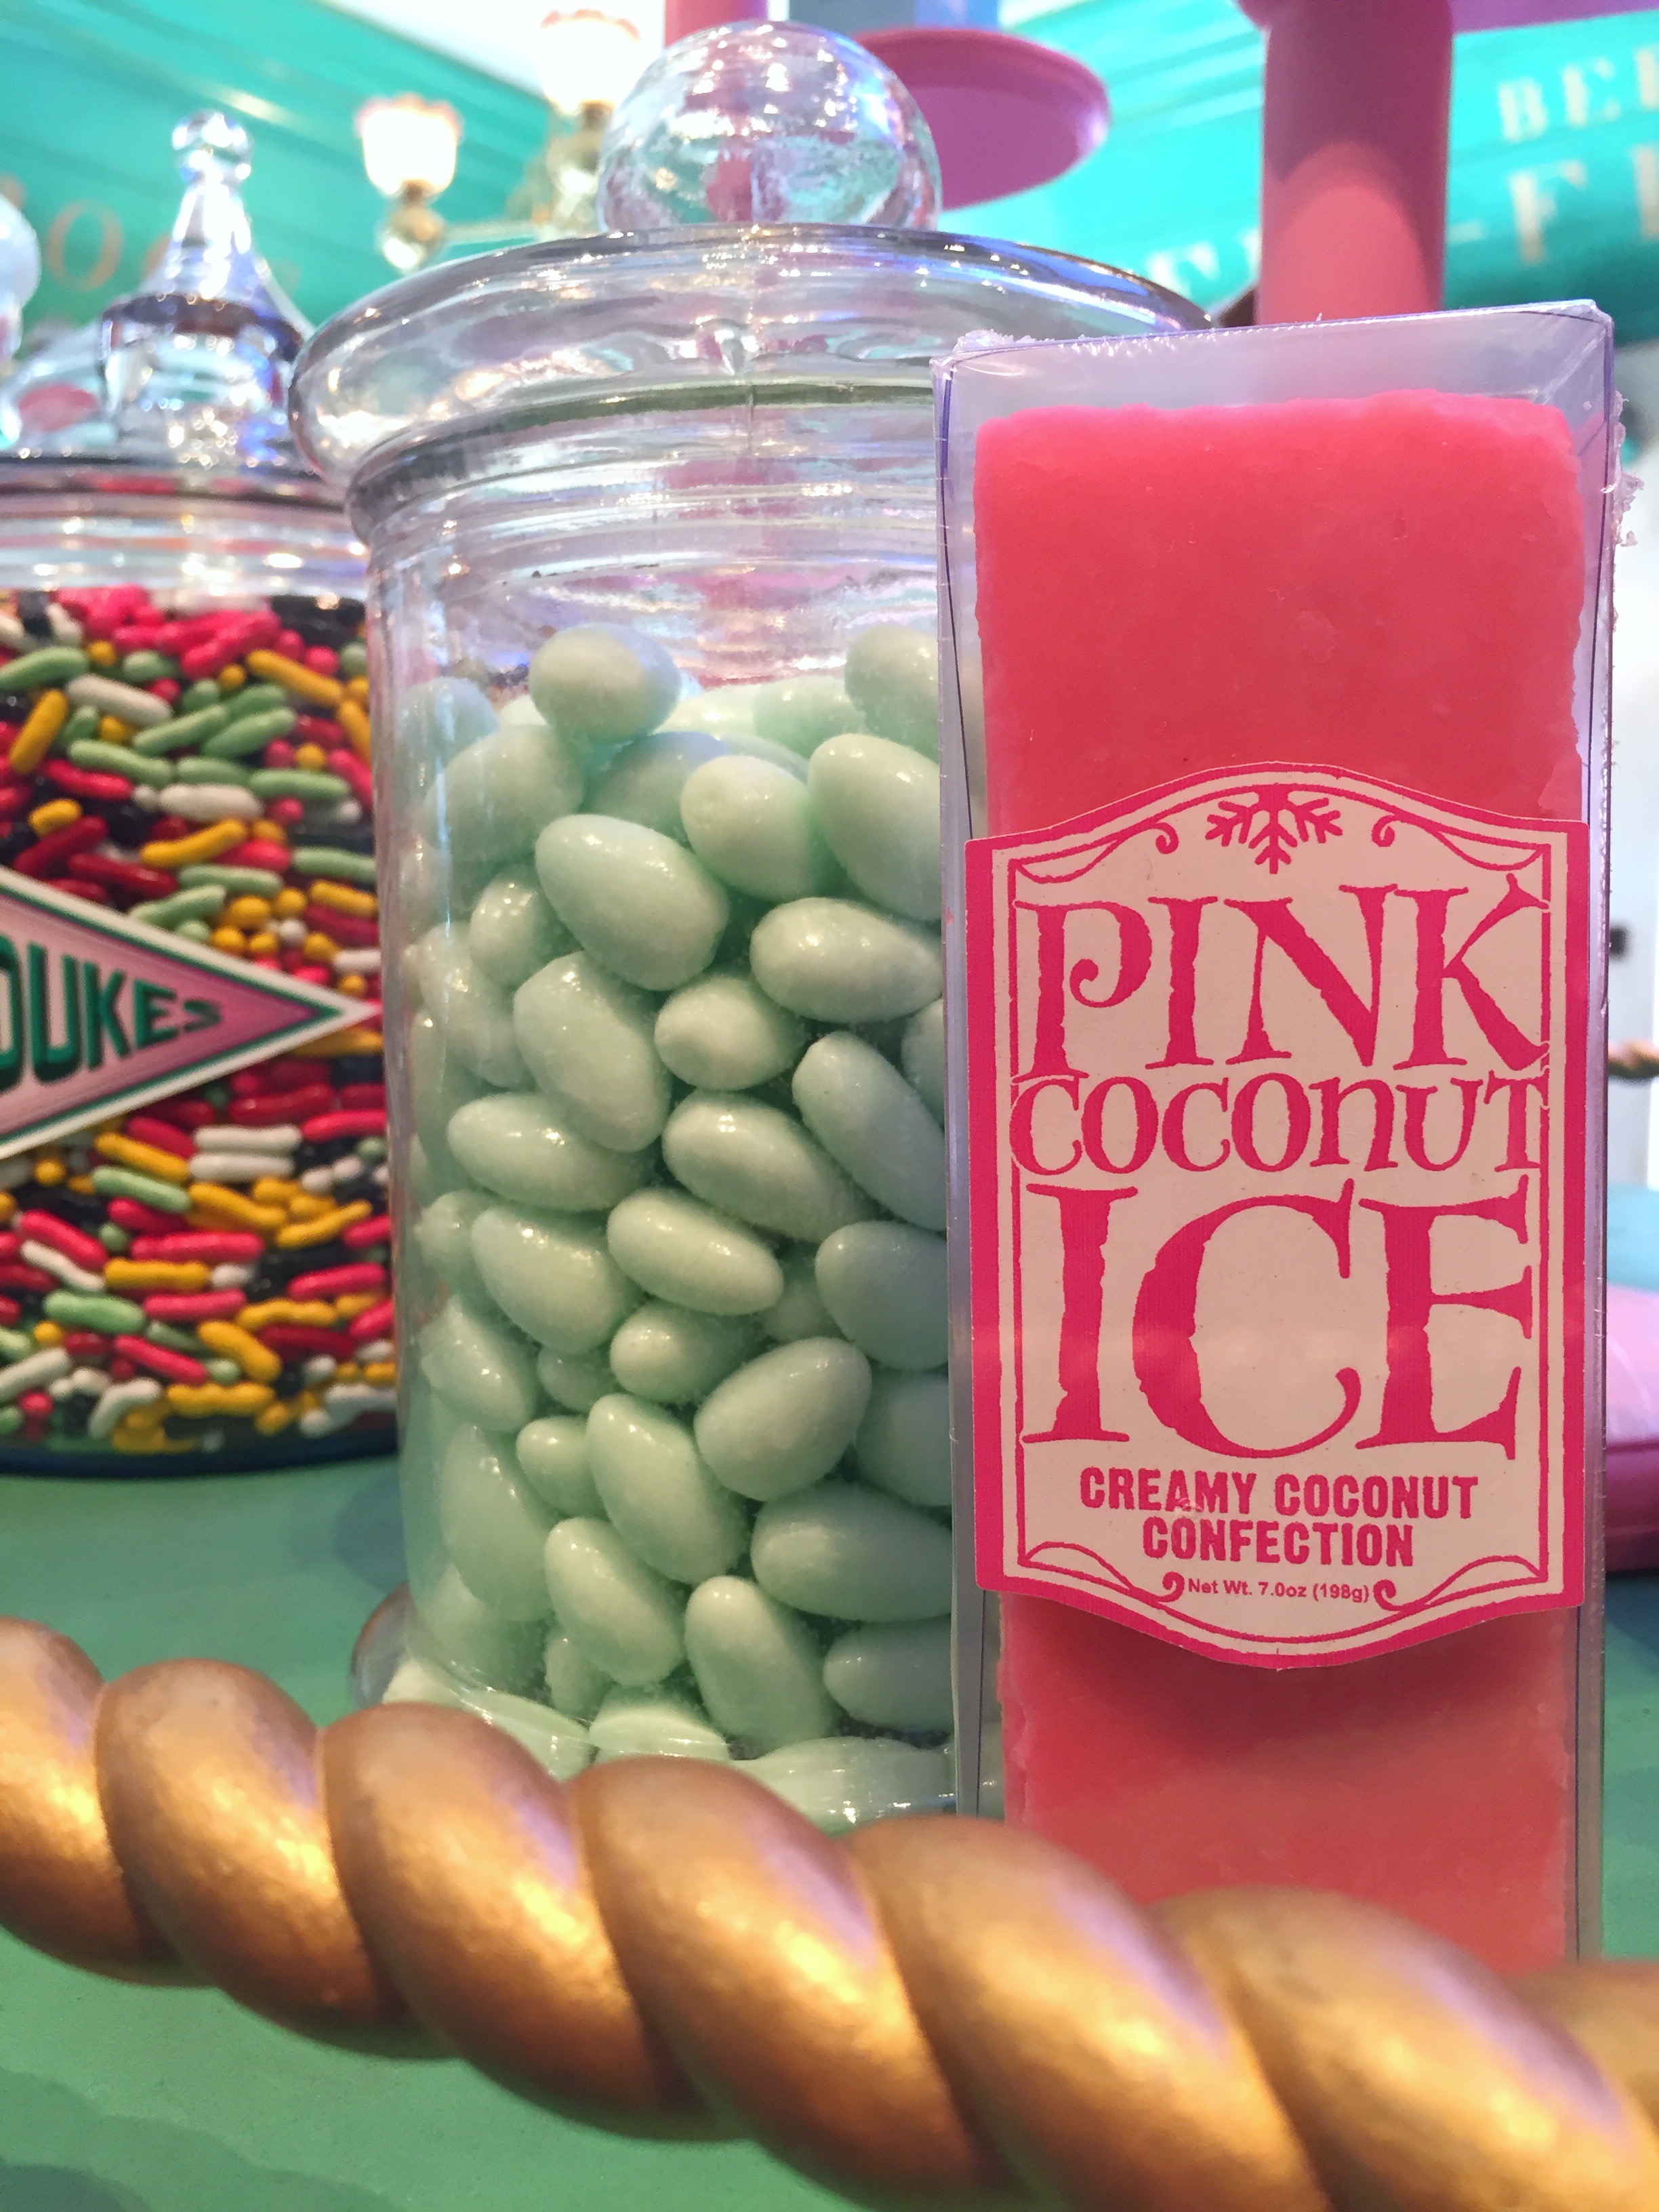
Our favorite shop was Honeydukes sweet shop, where anyone with a sweet tooth can get his or her candy wishes fulfilled. The candy selection was nothing short of magical. We picked up some Chocolate Flies, a Chocolate Frog and some Pink Coconut Ice candy.
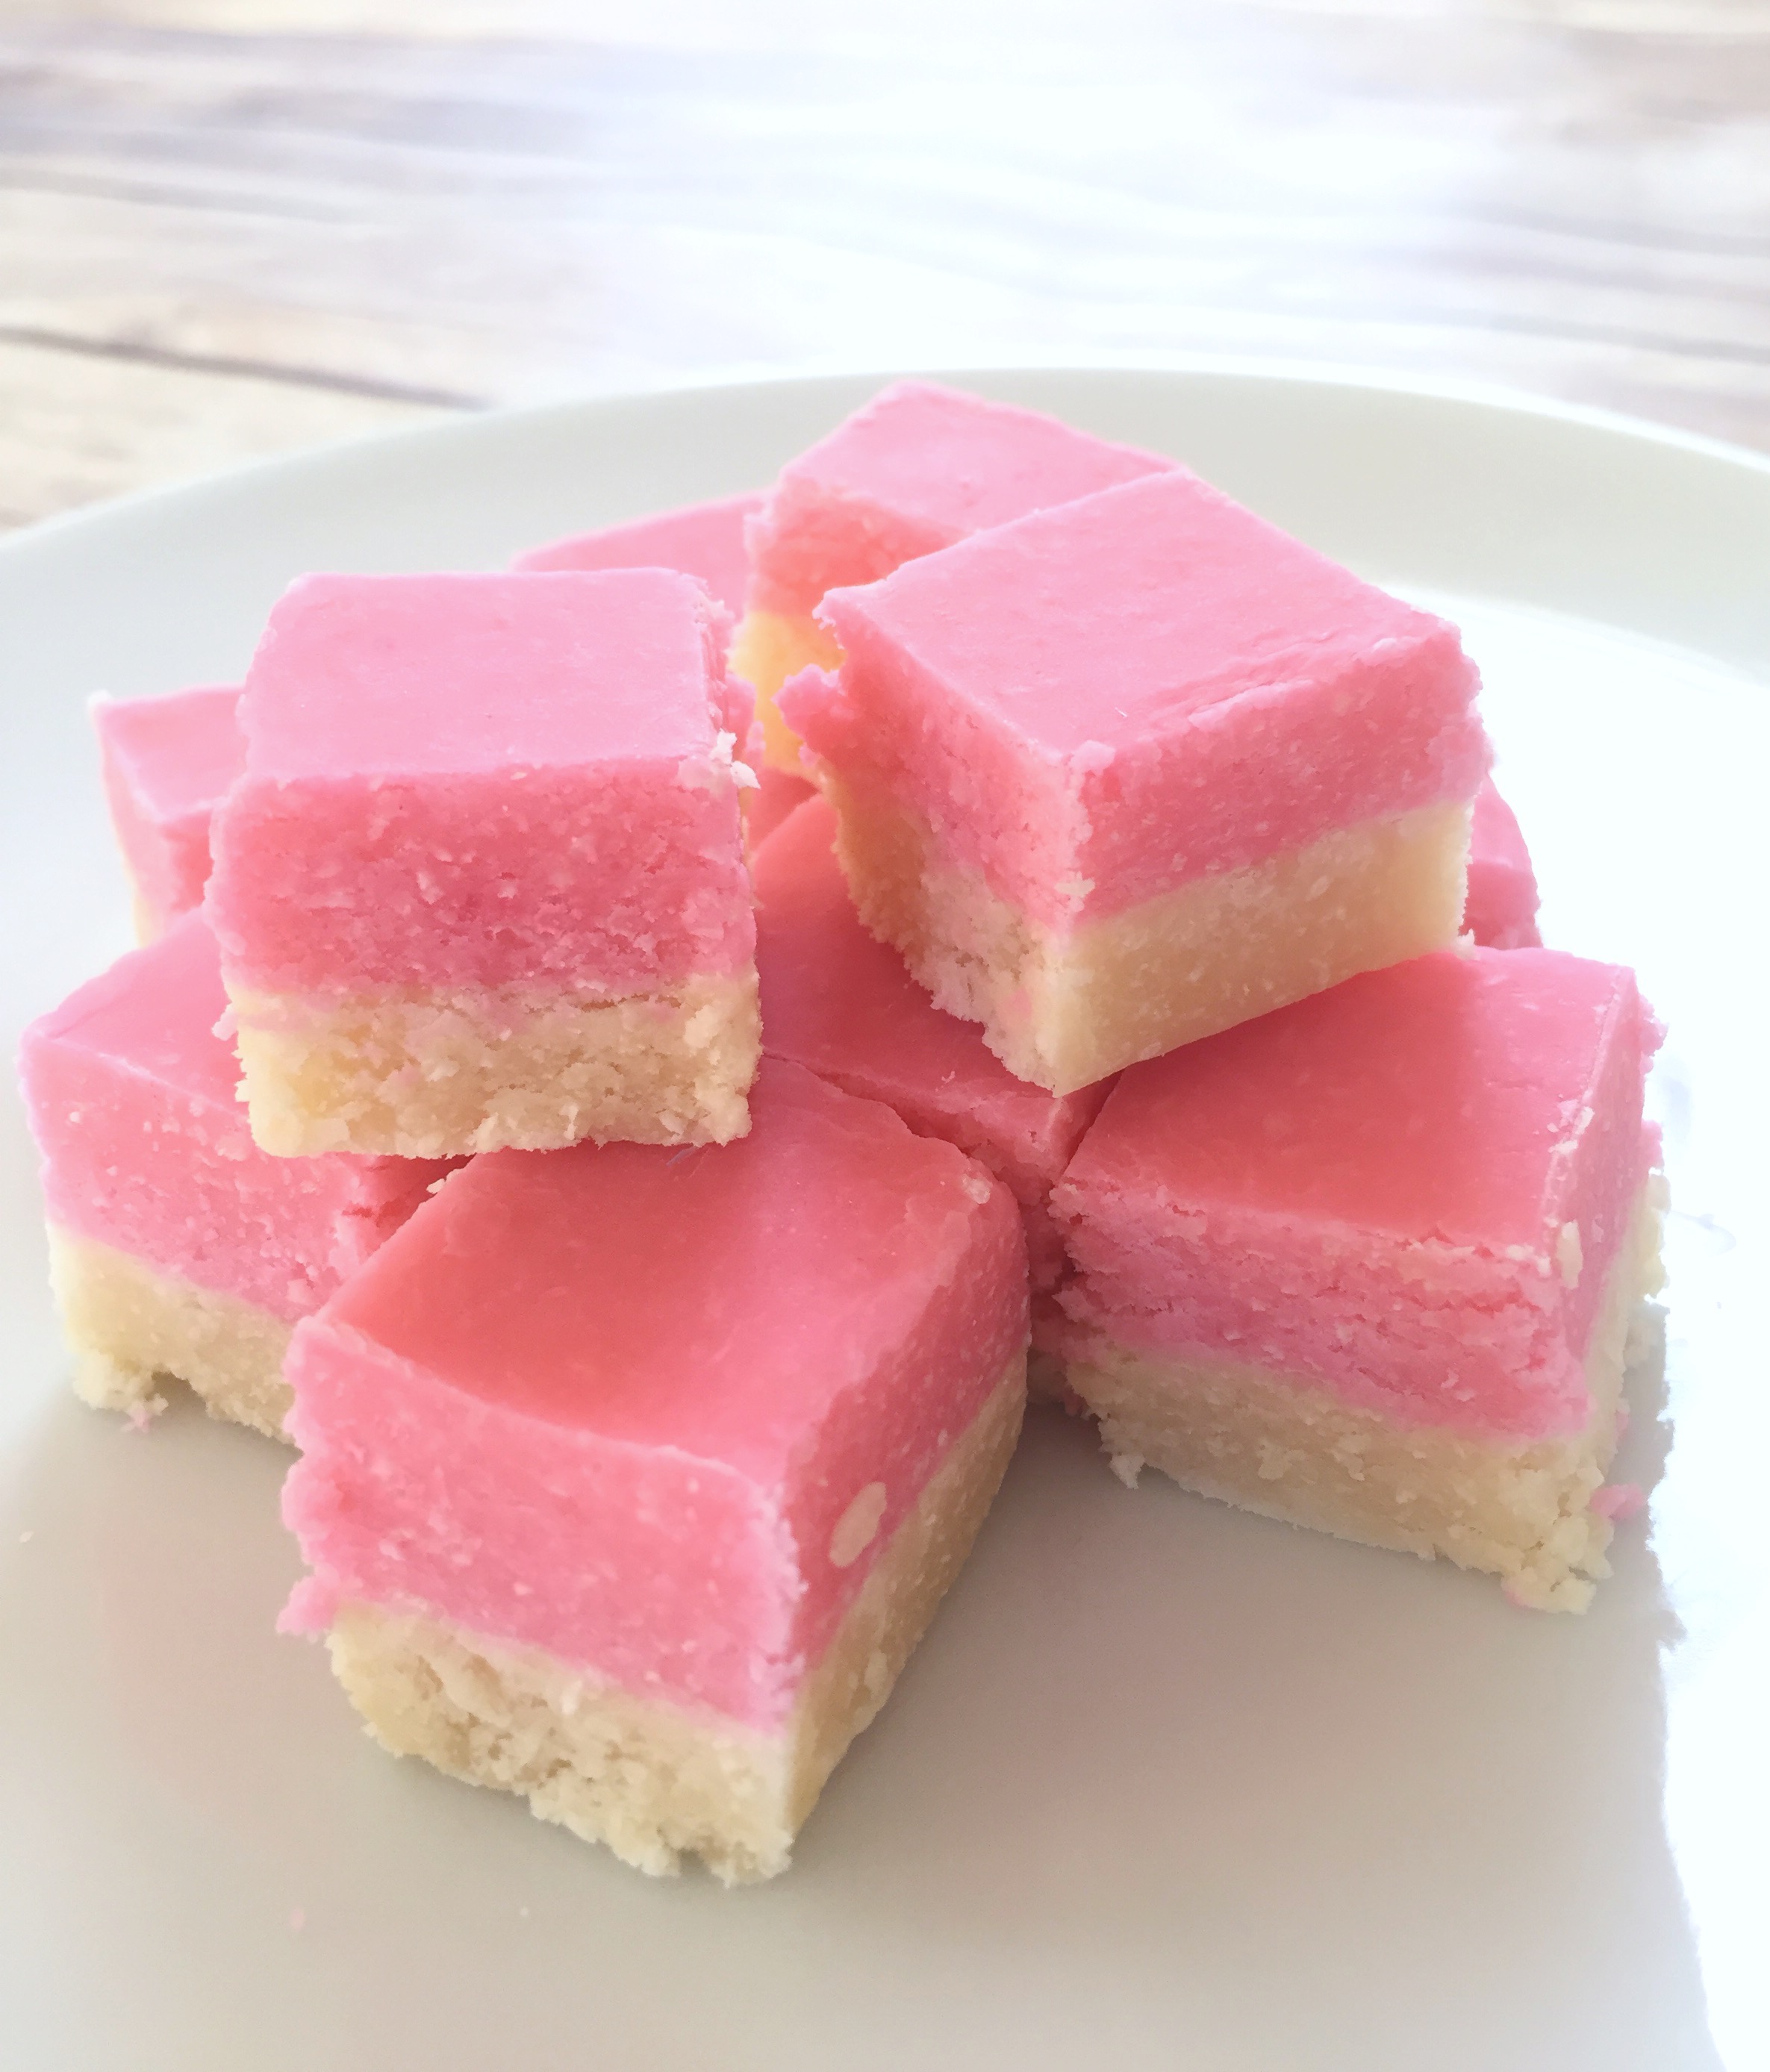
I was most excited to try the Pink Coconut Ice. I’ve been intrigued by the thought of this candy ever since it was mentioned in the book, Harry Potter and the Prisoner of Azkaban by J.K. Rowling. The Pink Coconut Ice candy is similar to a stiff fudge. It’s very sweet, so you can cut it into small squares and have plenty to share with friends.
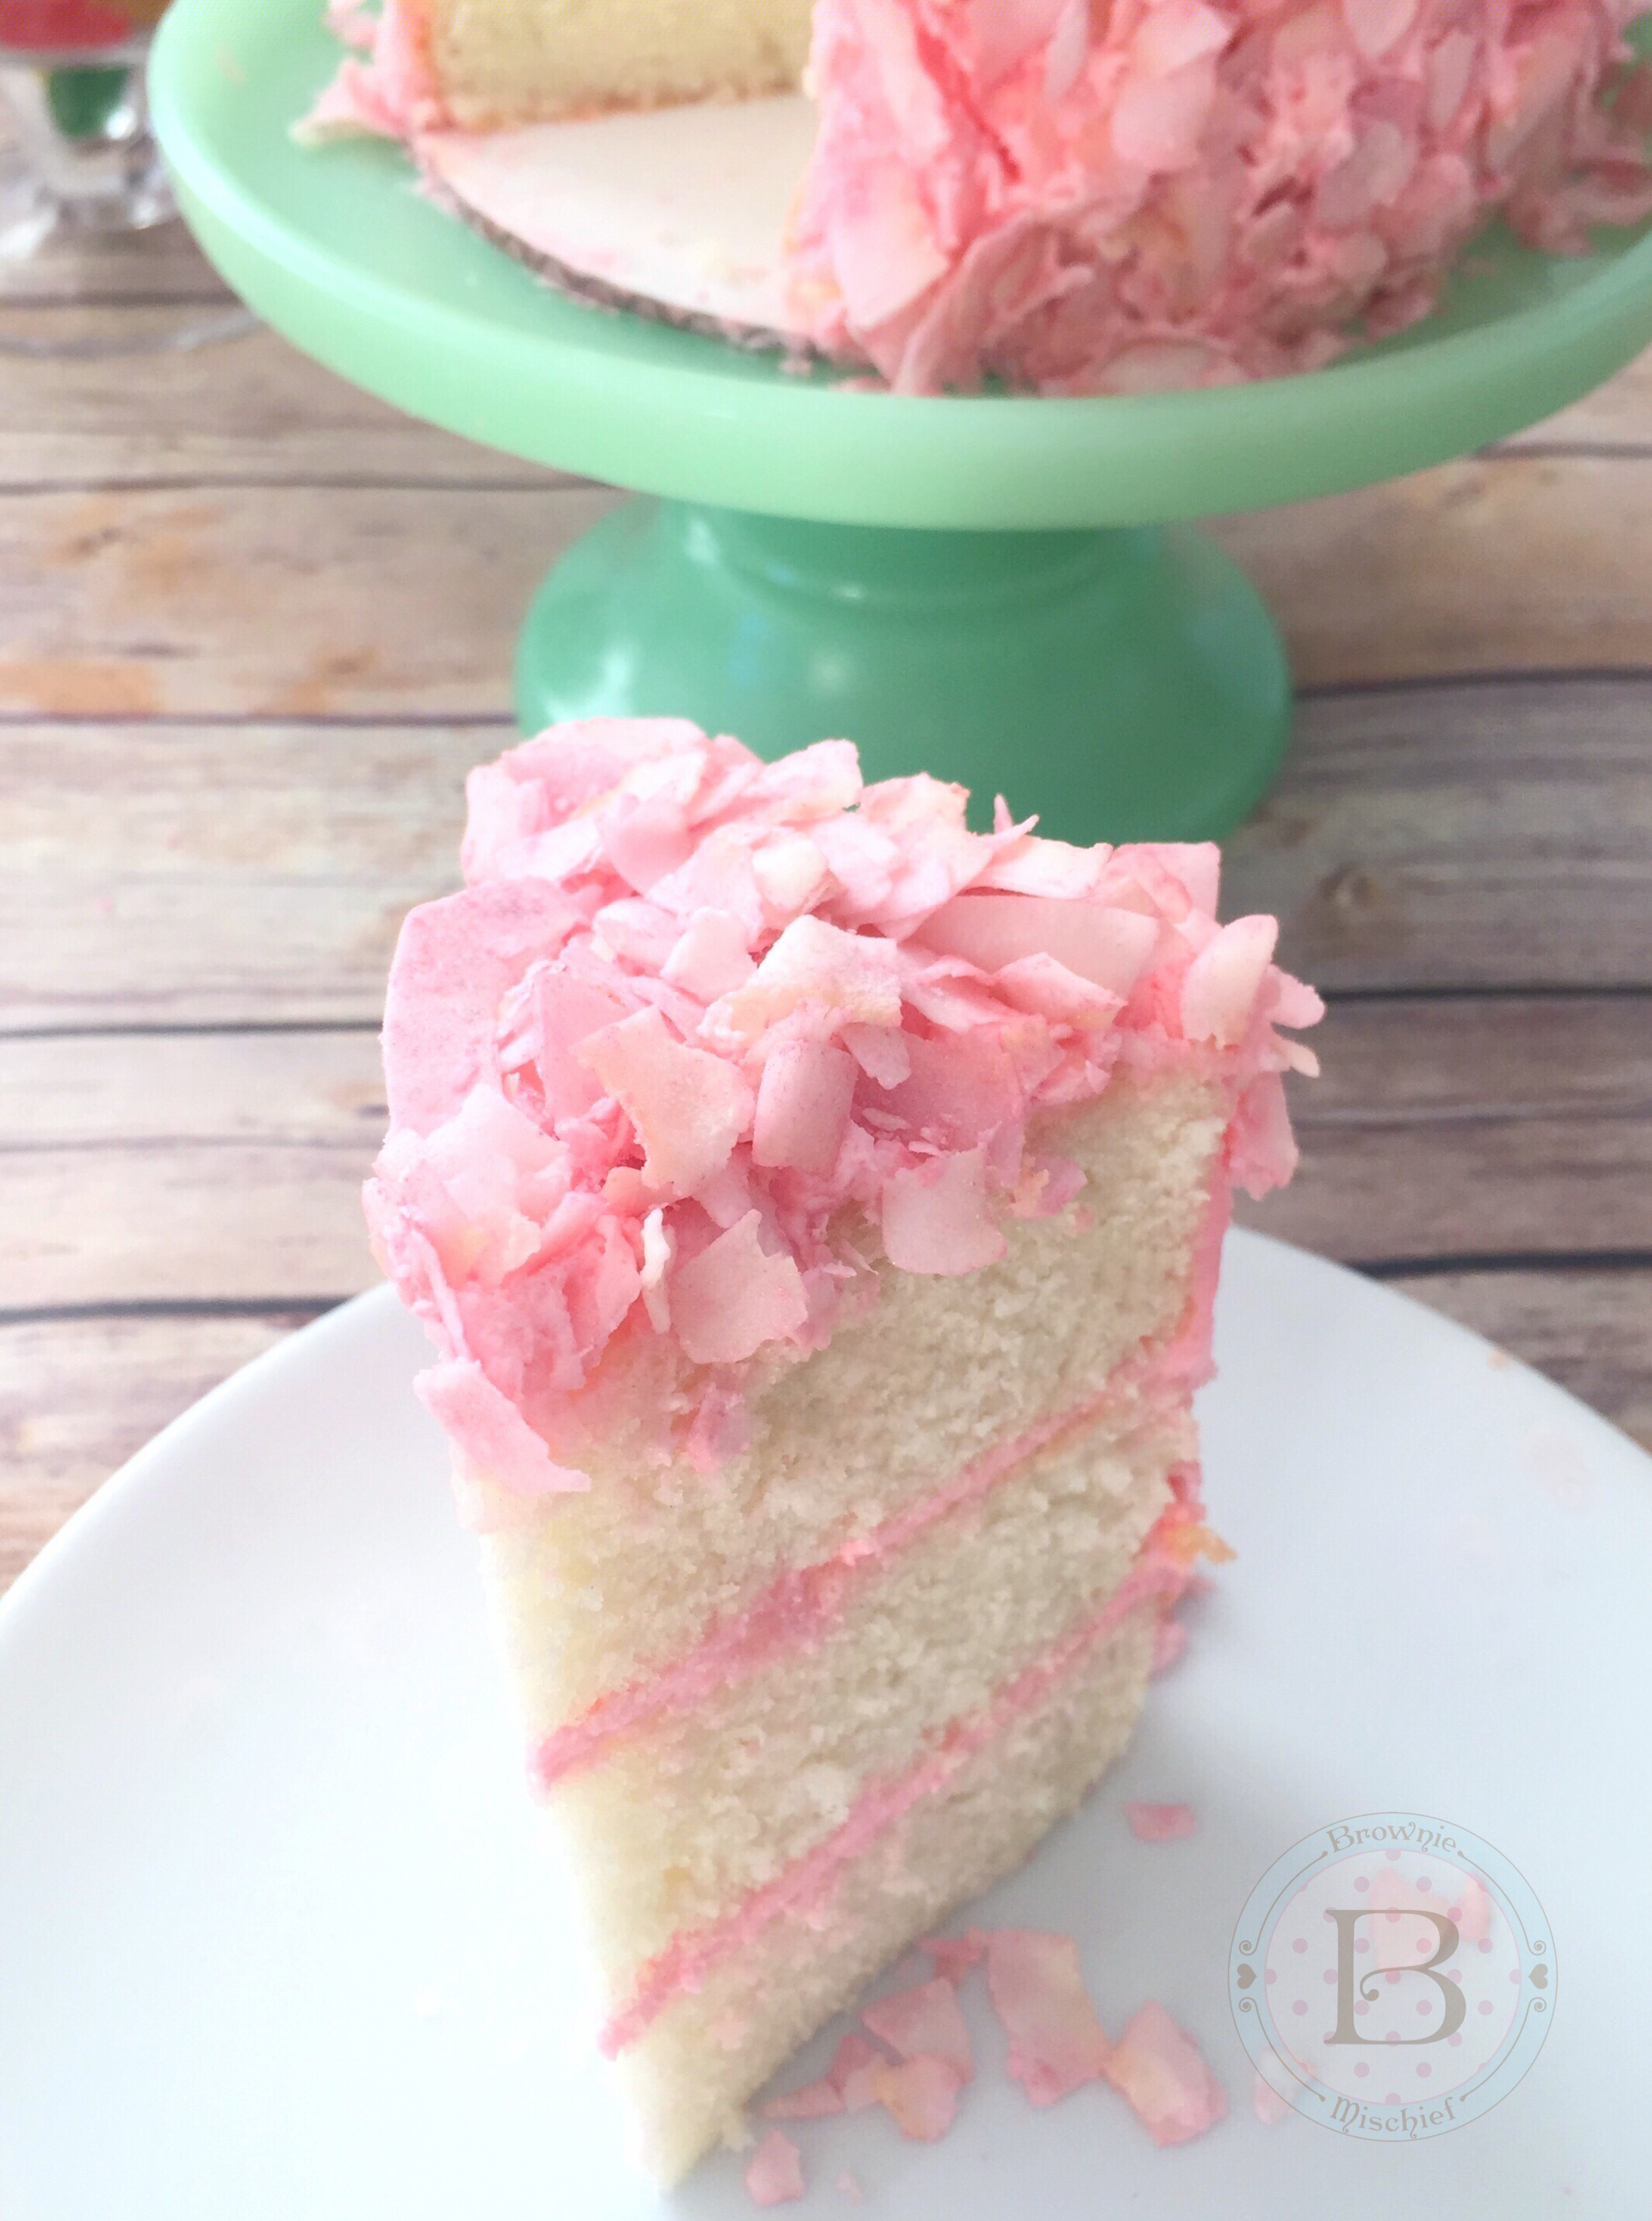
I imagined the “shimmery pink squares” a little differently so, I decided to build on my imagined version of the coconut candy by making a shimmery pink coconut cake. I used my favorite coconut cake recipe and pink coconut buttercream. I tinted my buttercream with Americolor gel food color soft pink. I covered my cake in large flakes of unsweetened coconut. To find unsweetened coconut flakes, click here. I think the large flakes look more whimsical and add texture, but feel free to use whatever kind of coconut you prefer. I colored my coconut a shimmery, soft pink. Click here to see how I colored my coconut flakes.
You don’t have to be a Harry Potter fan to appreciate this pink, fluffy, coconut-covered cake. I can imagine this pretty cake at any party or event with a pink theme. I hope you enjoy this perfectly Pink Coconut Ice Cake as much as we did!
Print Recipe
Pink Coconut Ice Cake
Moist, fluffy coconut cake with pink buttercream and coconut flakes
Preheat oven to 350º F. Grease three 6-inch cake pans.
In a large bowl, sift together flour, baking powder and salt. Set aside.
In a large bowl, beat butter, sugar and oil together with an electric mixer at medium speed, until light and fluffy, about 2-3 minutes.
Beat in coconut extract. Gradually beat in egg whites until mixture is well combined, stopping to scrape the sides of the bowl.
Beat in flour mixture in three additions, alternating with coconut milk, stopping to scrape the sides of the bowl.
Pour batter into prepared pans, evenly distributing batter between the pans. Bake for 28-32 minutes, until a toothpick inserted into the center of pans comes out clean.
Place pans on wire rack to cool for 10 minutes. Remove cakes from pans and place on rack to cool completely.
Pink Coconut Buttercream
In a large bowl, beat butter with an electric mixer on medium speed, until light and fluffy.
Add salt. Beat until combined.
Turn off mixer. Add powdered sugar. Mix on low speed until sugar is moistened, then turn up to medium speed and beat until combined.
Add coconut milk a little at a time, until desired consistency is reached. Add coconut extract and beat at medium speed until buttercream is smooth.
Add gel food color with a toothpick, a little at a time, until desired consistency is reached. Beat at low speed until well blended.
Fill and frost cake with Pink Coconut Buttercream.
Pink Coconut Flakes
Place powdered sugar in a small bowl. Add a small amount of petal dust. Whisk together with a small whisk. Add additional petal dust until desired color is reached.
Spread coconut flakes out onto a large shallow dish. Sprinkle powdered sugar mixture over coconut with a small sieve. Toss gently with gloved hands.
Place cake on a baking sheet to catch excess coconut. Press colored coconut onto sides and top of cake.
Summer is nearly over, and after the recent heatwave here in Southern California, I’m more than ready to welcome fall weather. But before I put on my fluffy sweater and dive into pumpkin spice everything, I want to enjoy the tail end of peach season, don’t you? Farmer’s markets and stores near my home are still brimming over with fresh peaches, so I picked up some peaches and decided to give them a proper goodbye and send them off in style.
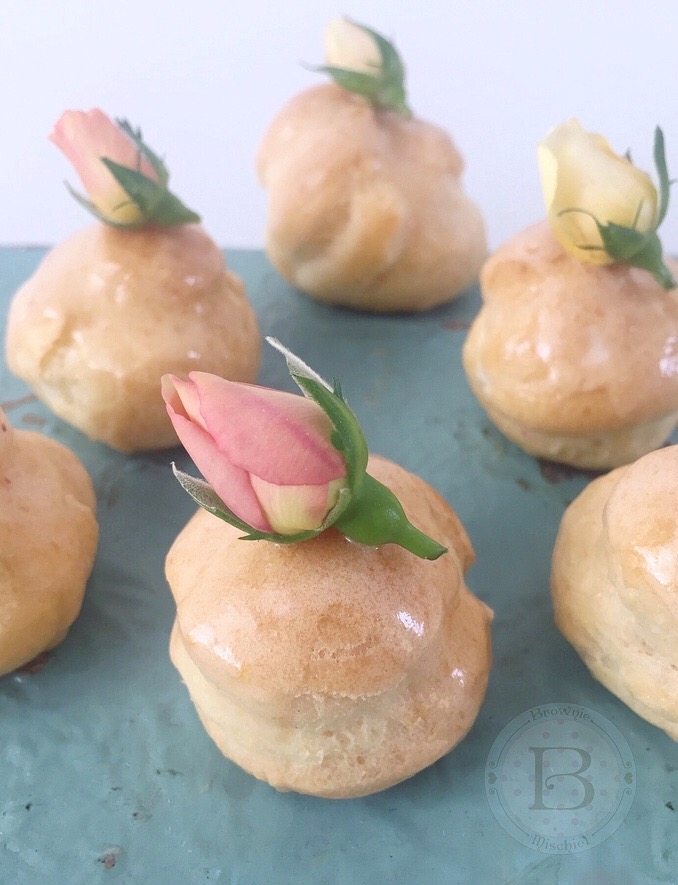
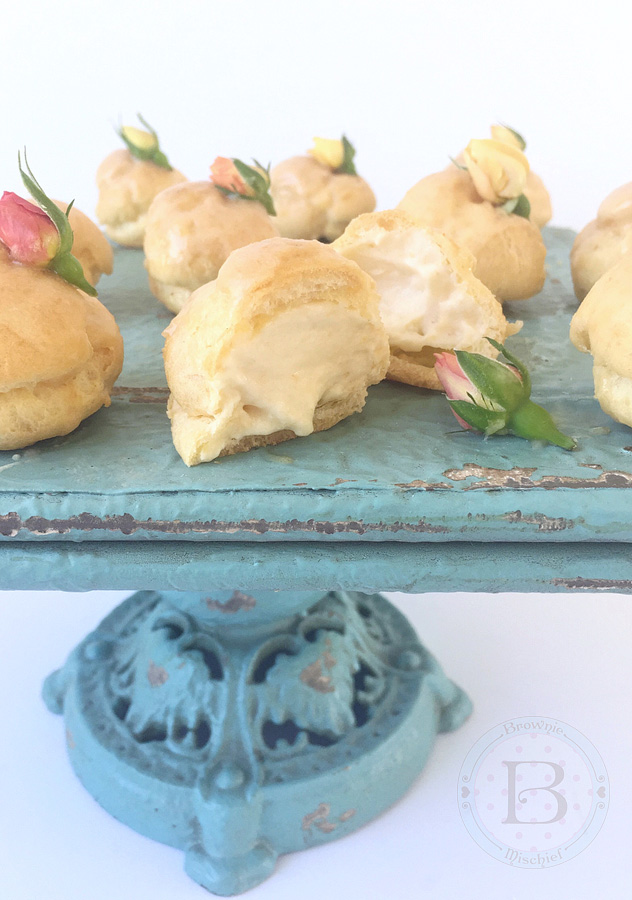
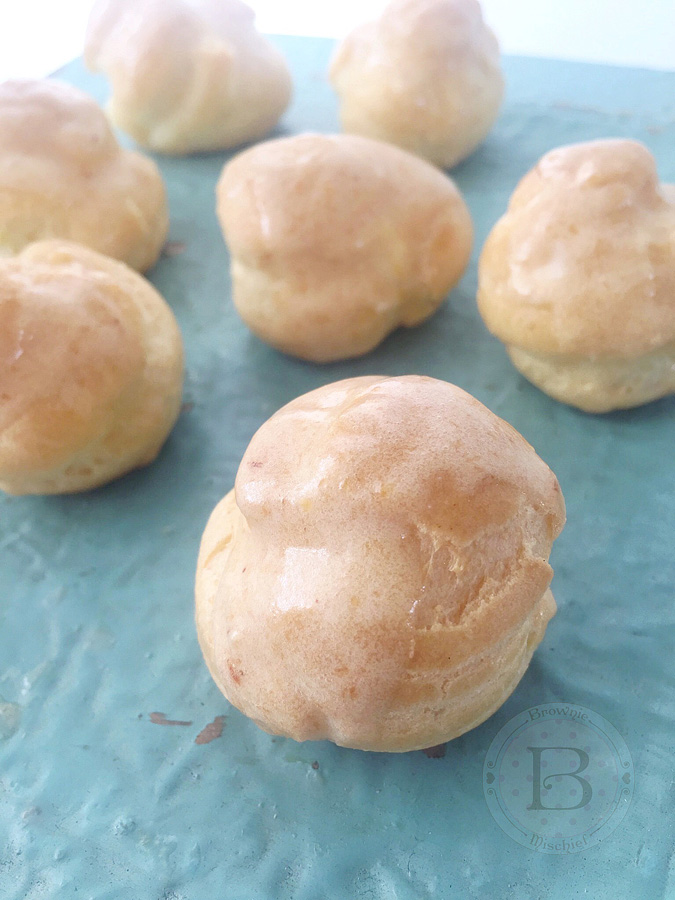
I created some luscious peaches and cream filled, bite-size puffs of choux pastry, called profiteroles. They’re like cream puffs, only smaller. The filling is creamy, but so light and airy that I’m convinced that these profiteroles have no calories! The recipe I’m sharing with you uses fresh peaches, but feel free to substitute frozen peaches if fresh peaches aren’t available. There are a lot of steps to this recipe, but the steps are done in stages and are very easy to do.
I decorated my profiteroles with fresh, pesticide-free miniature rosebuds, also known as spray roses. If you can’t find miniature rosebuds, pesticide-free rose petals would be a good substitute. You may not get a chance to embellish these little beauties. They have a way of popping into people’s mouths even before you can decorate them!
Print Recipe
Peaches & Cream Profiteroles
Bite-sized puffs of choux pastry filled with a creamy, fresh peach filling and topped with fresh peach icing.
Purée peaches in a blender or food processor. Strain puréed peaches through a sieve. Stir in lemon juice.
Place puréed peaches in a small saucepan. Bring to a boil over medium heat.
Reduce heat and simmer until peach purée is reduced by half.
Remove from heat. Stir in peach flavoring and set aside to cool completely.
Peaches and Cream Filling
Bring milk to a boil in a small saucepan over medium heat.
Meanwhile, whisk sugar, cornstarch and salt together in a medium bowl. Add the egg and whisk until smooth.
When milk starts to boil, remove from heat and pour 1/3 of the hot milk into the egg mixture and whisk to combine.
Pour the egg mixture into the remaining hot milk and cook over medium heat, stirring continuously, until the mixture comes to a boil and thickens.
Remove from heat. Stir in butter and extracts.
Pour mixture through a sieve placed over a bowl. Cover the surface of pastry cream with plastic wrap. Let cool.
Set aside 2 tablespoons of cooled peach purée. Add remaining peach purée to cooled pastry cream and stir to combine. Chill in refrigerator.
In a medium bowl, whip heavy cream to stiff peaks with an electric mixer at high speed. Fold whipped cream into peach pastry cream mixture. Set aside in refrigerator.
Profiteroles
Preheat oven to 400ºF. Line two large baking sheets with parchment paper.
Combine water, butter and salt in a medium saucepan and bring to a boil over medium heat.
Reduce heat. Add flour and stir vigorously with a wooden spoon until mixture pulls away from sides of the pan and forms a ball.
Transfer mixture to the bowl of a stand mixer. Mix on low speed until steam dissipates and mixture cools to lukewarm.
Add eggs one at a time and beat with an electric mixer at medium speed, until smooth, stopping to scrape down bowl.
Transfer mixture to a piping bag, fitted with a large round tip. (**I used Ateco tip 808.)
Pipe 1 1/4 inch mounds, about 2 inches apart onto prepared baking sheets. Smooth tops with a wet finger.
Bake for 15 minutes, then turn oven temperature down to 350ºF and continue baking until golden brown, about 8-10 more minutes. Using a toothpick or skewer poke a small hole in each profiterole to let steam escape. Place on a wire rack to cool completely.
Using the tip of a paring knife, poke a pilot hole in the bottom of each profiterole.
Place peaches and cream filling into a piping bag fitted with a medium round piping tip. (***I used Wilton tip 12.)
Place piping tip into the pilot holes and fill each profiterole with filling.
Peach Icing
In a small bowl, whisk all icing ingredients together and spoon over filled profiteroles. Refrigerate until ready to serve.
Recipe Notes
*To make peaches easy to peel, blanch them in boiling water for about 30 seconds, then dunk in ice water.
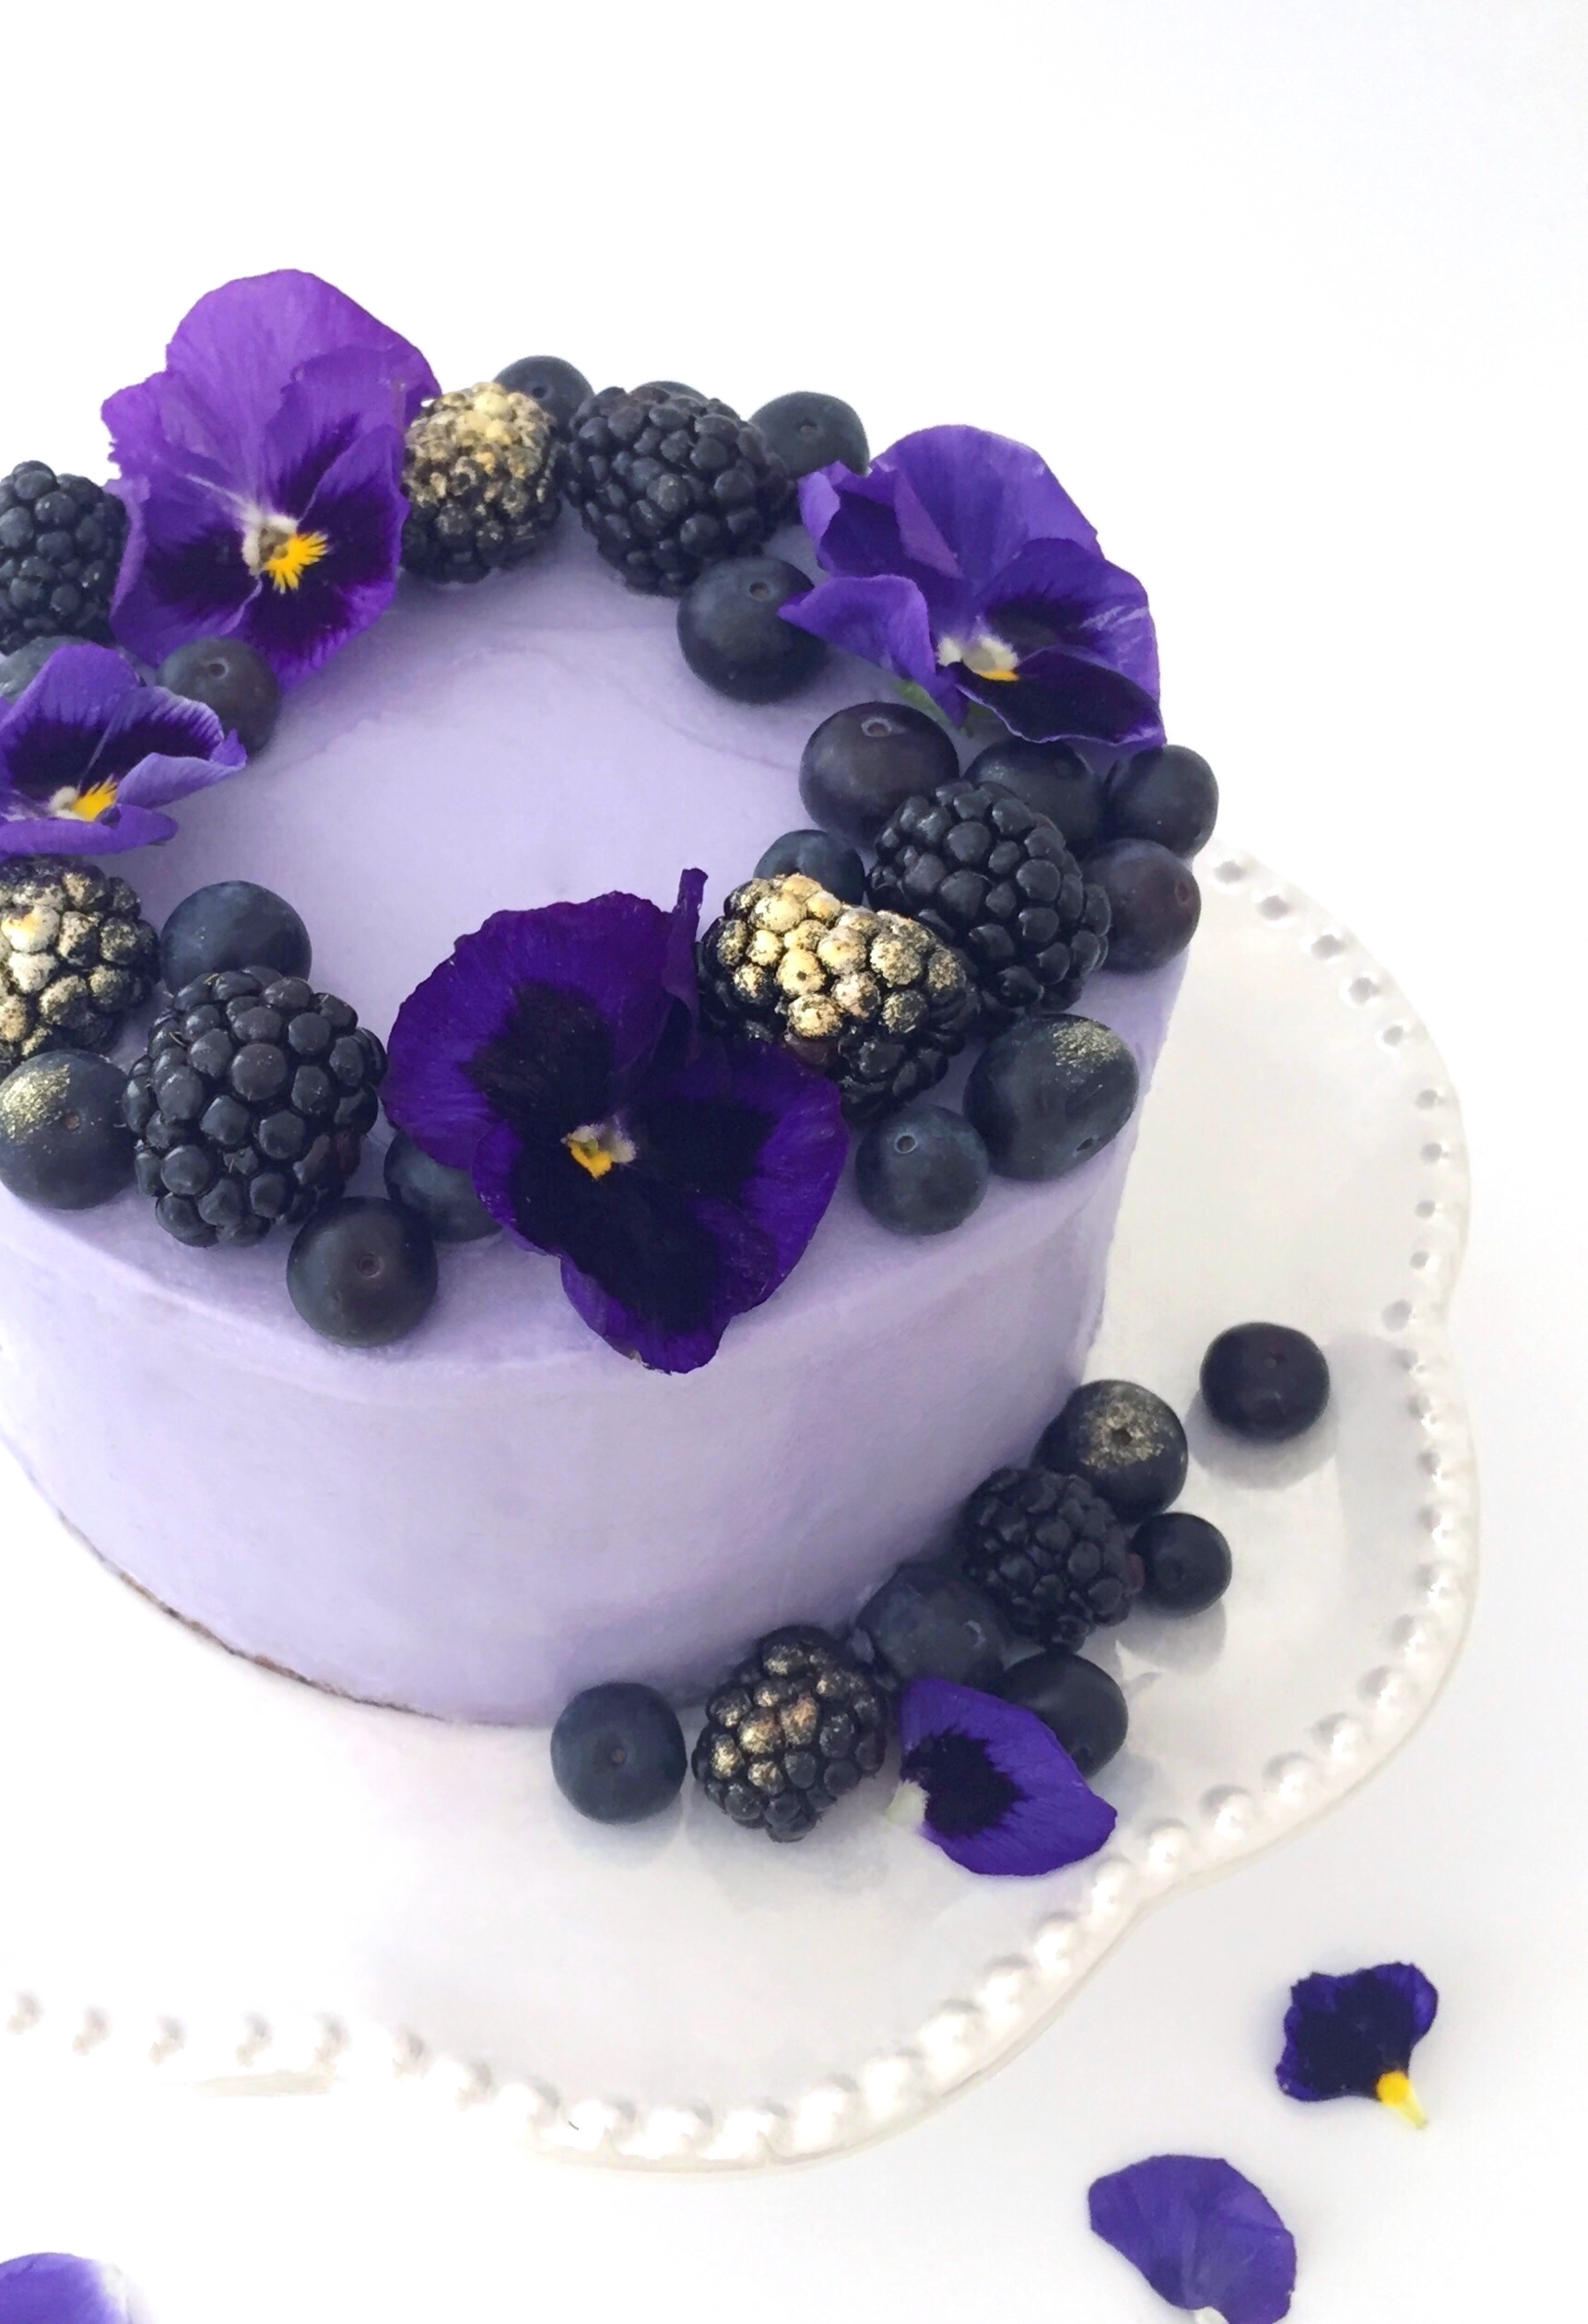
Purple is passionate. It’s mystical. It’s regal. Don’t we all know someone whose favorite color is purple? It’s painfully obvious. They can’t hide it. They don’t want to hide it. They can’t just be friends with purple. They’re in a relationship with purple. The first time I made this Purple Berry Cake, a purple lover I know said that when she saw it, it spoke to her soul.
Fresh berry purée is added to the batter, creating a soft, moist cake. The layers are brushed with berry syrup, which helps keeps the cake moist and gives it a nice punch of berry flavor. I used blackberries and blueberries, but you can use any combination of purple berries that you like. After baking, the color of the cake layers will be a brownish gray with a hint of purple, depending on your berries. I think I need to come up with name for this color. How about Silverberry? You can see tiny flecks of the berries in the cake and I think the color is lovely, especially with the lavender frosting. If you want a more purple cake, feel free to add some gel food color to the batter. I used Wilton Violet gel food color to achieve the pretty lavender cream cheese frosting. The extra butter and the addition of heavy cream makes this frosting silky and spreadable.
I’m obsessed with edible flowers lately, so I garnish my baked goods with them whenever I can get my hands on some. I found these pansies in the produce department of my local food market. If you can’t find pansies, pesticide free violets or rose petals would also be pretty. Make sure to apply them to your cake right before serving, since they are delicate and will wilt over time. Brush some of your berries with a little dab of edible gold luster dust for an extra regal touch.
Print Recipe
Purple Berry Cake with Silky Cream Cheese Frosting
A soft, moist cake made with berry purée and topped with silky lavender cream cheese icing
Preheat the oven to 350º F (180ºC). Like the bottoms of two 6-inch round cake pans with parchment paper circles. Grease and flour the insides.
Purée the berries in a blender or small food processor. Strain the puréed berries through a sieve. Reserve 2/3 cup (150g) of the berry puree. Set aside the remaining puree for the syrup.
In a medium-size bowl, whisk together the flour, baking powder, baking soda, and salt until well combined.
In a large bowl, beat 1 1/4 cups (250g) of sugar with the oil, eggs and vanilla extract, with an electric mixer on medium speed, until light and fluffy. Stir in the reserved 2/3 cup berry purée. Add the flour mixture in two additions, alternating with the buttermilk, beating at low speed just until combined.
Pour the batter evenly into the prepared cake pans. Bake until a toothpick inserted into center of cakes comes out clean, about 30-35 minutes. Cool the cakes in the pans for 10 minutes. Remove the cakes from pans and transfer them to cooling racks to cool.
While the cakes are baking, make the berry syrup. In a small saucepan, heat the remaining berry purée with the remaining 1/4 cup sugar (50g) and 1/4 cup (59ml) of water over medium-low heat. Stir together and cook until sugar is dissolved. Set aside to cool.
Split each cooled cake llayer into two and brush with berry syrup. Fill and frost the cake with Silky Cream Cheese Frosting.
Silky Cream Cheese Frosting
In a large bowl, beat cream cheese with an electric mixer on speed or by hand with a spatula, until smooth. Add the butter and beat until smooth and well combined. Add the vanilla extract and salt and beat until combined.
Gradually add the powdered sugar and beat at medium speed until combined. Add the heavy cream and beat at low speed until smooth and creamy.
Add the food color with a toothpick, a little at a time, until the desired shade is reached. Beat at low speed until well blended. Smooth out any air bubbles by stirring slowly by hand with a spatula.
Garnishes
Garnish the top of the cake with fresh berries. Brush a few of the berries with edible gold luster dust. Garnish with fresh flowers immediately before serving.
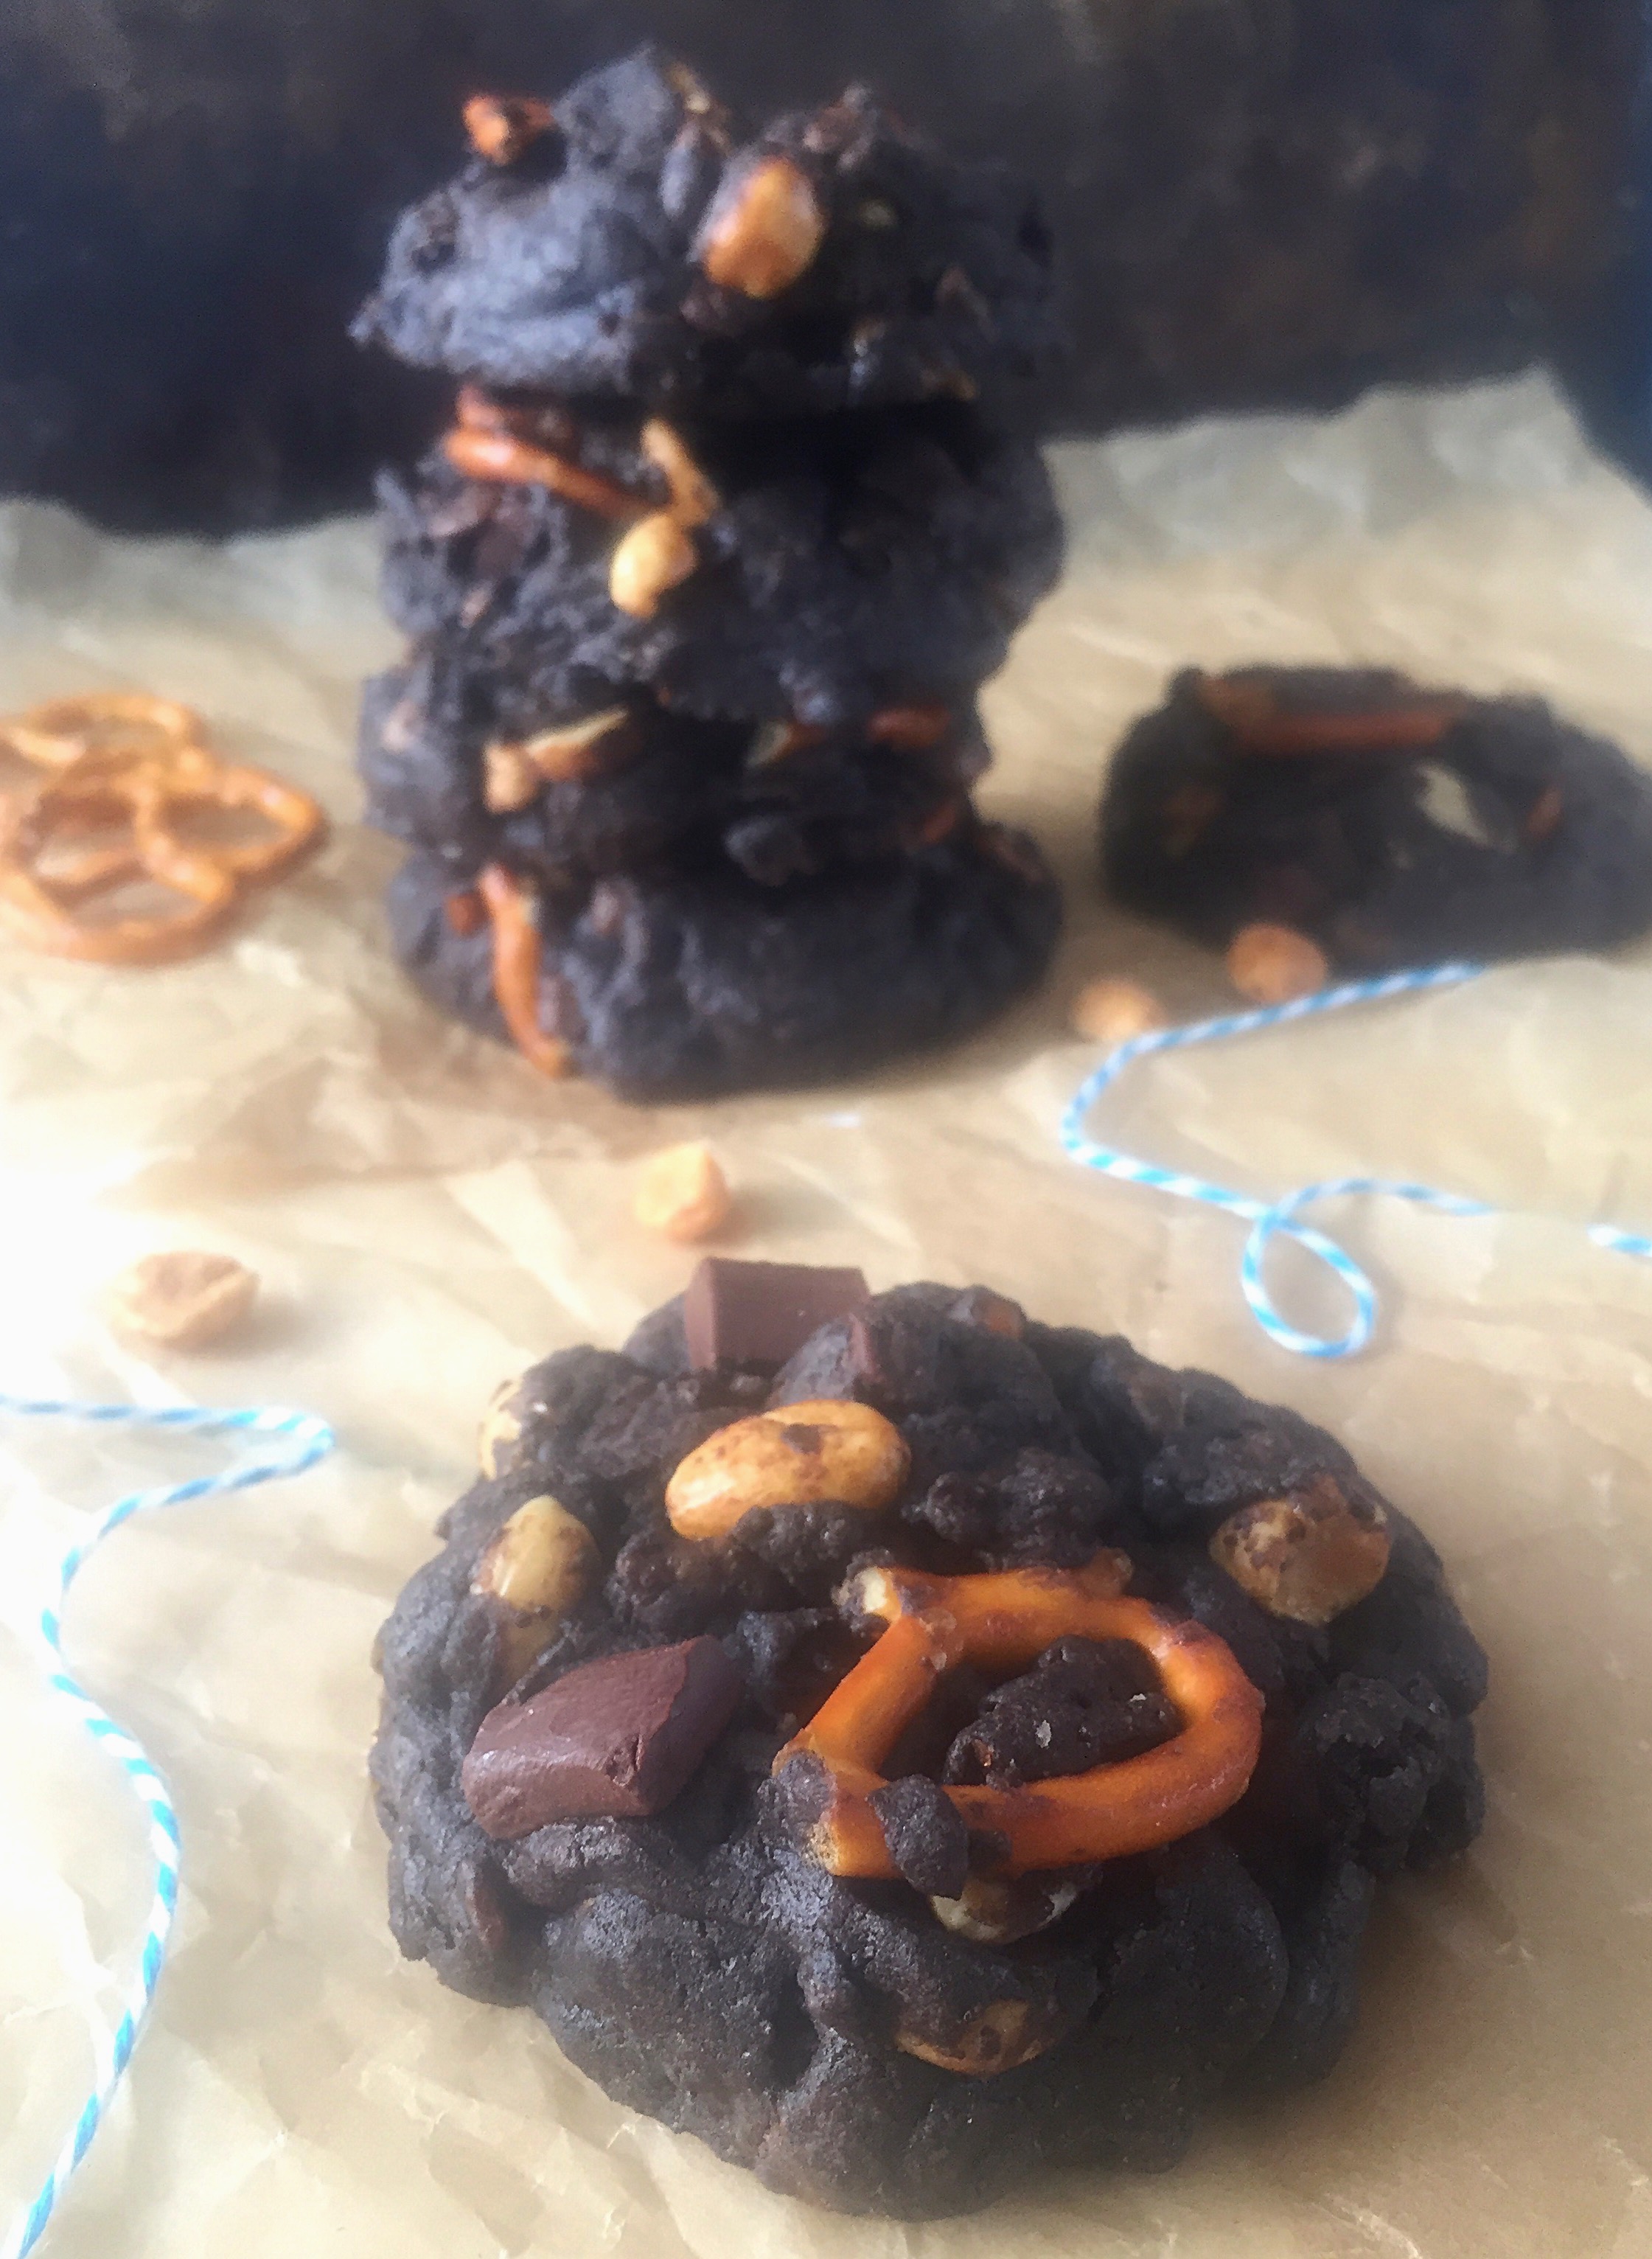
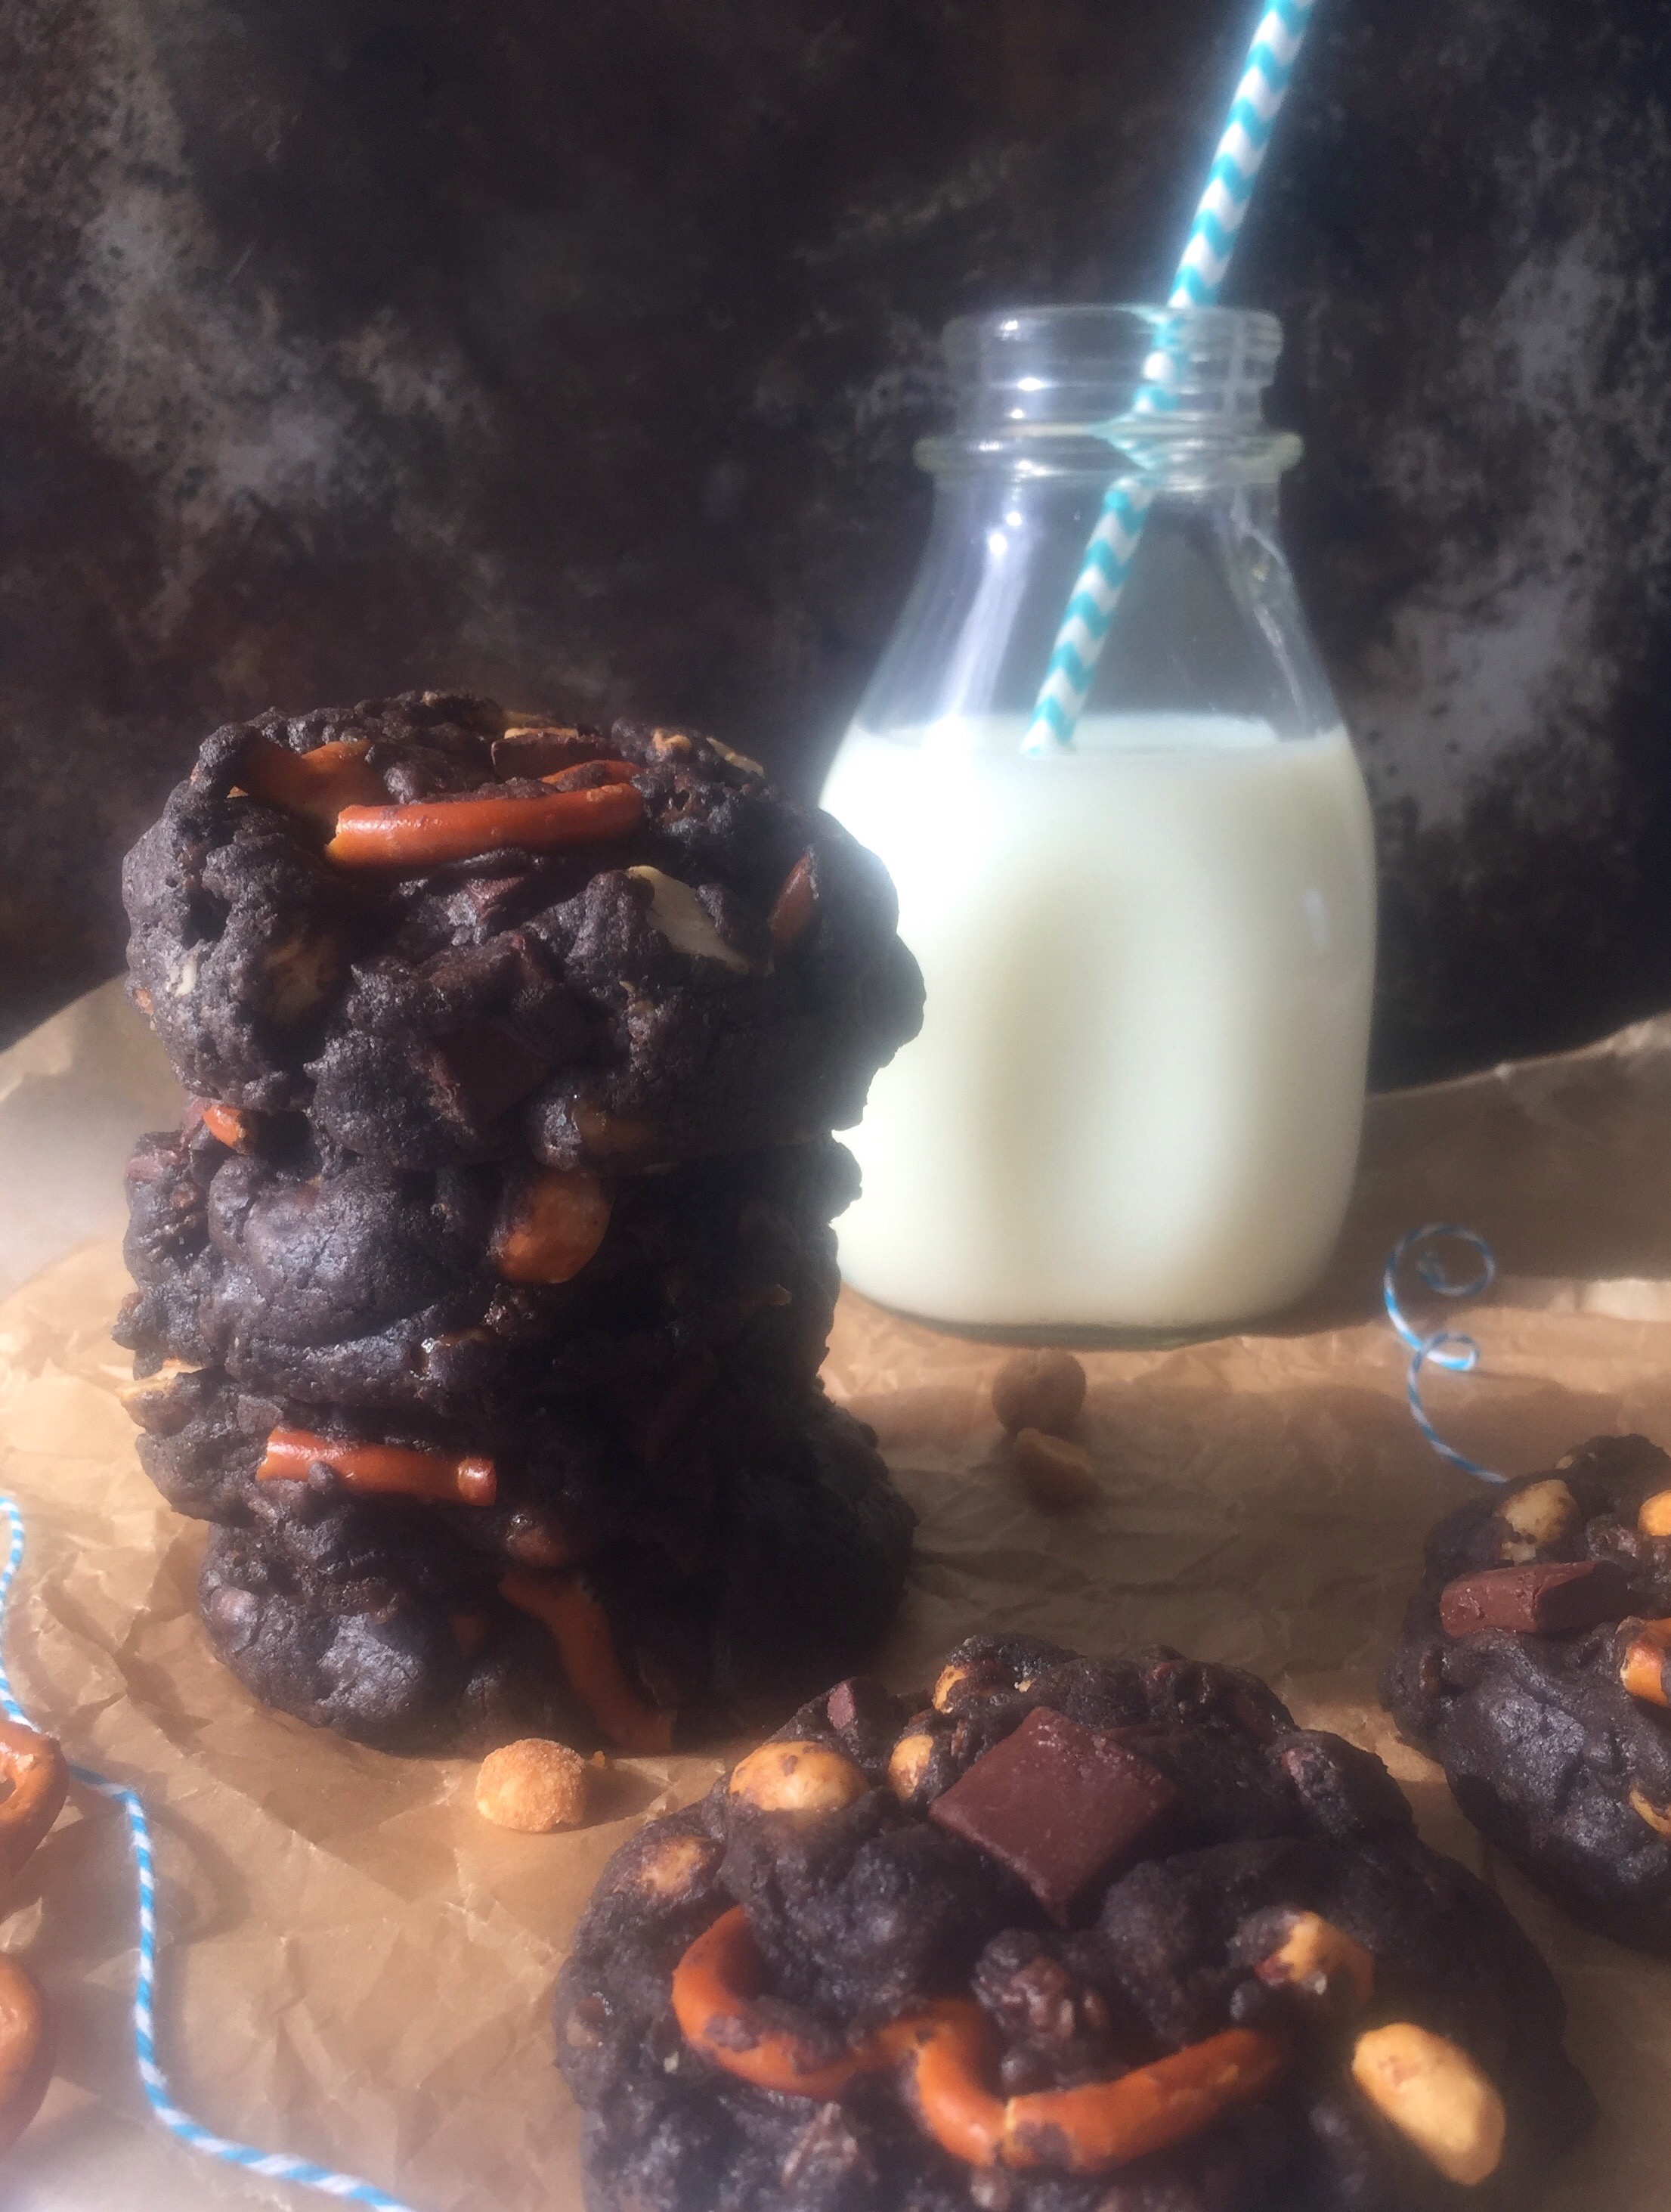
I’ve seen some fully-loaded cookies out there, but these extreme cookies just earned the title! They’ve got enough chunky, chocolatey, sweet and salty glory to satisfy the most ravenous cookie craving!!! (Yes, all of those exclamation points are necessary.) But, before we even go one step further, I must mention a few disclaimers. I strongly urge you to make sure your fridge is stocked with milk. Please change into your comfiest pants before attempting this recipe. Canceling all plans for the rest of the day is recommended, as a nap may ensue immediately following consumption of these cookies. OK, now that we got that out of the way, let’s jump in with both feet!
Did you notice how serious the mood got? We need a moody photo that looks like it was taken in a rustic cabin to emphasize the seriousness of these chocolate cookies. It’s no coincidence that I’m sharing this recipe with you right before Father’s Day. Every Dad I know is an accomplished snacker. Dad will love these cookies for his personal snack stash! Package them up and deliver them to your Pop with a jug of milk or a thermos of coffee. You can probably skip the straw. We all know that Dad is going to chug his milk, but every respectable blog photo of milk must contain a pretty straw.
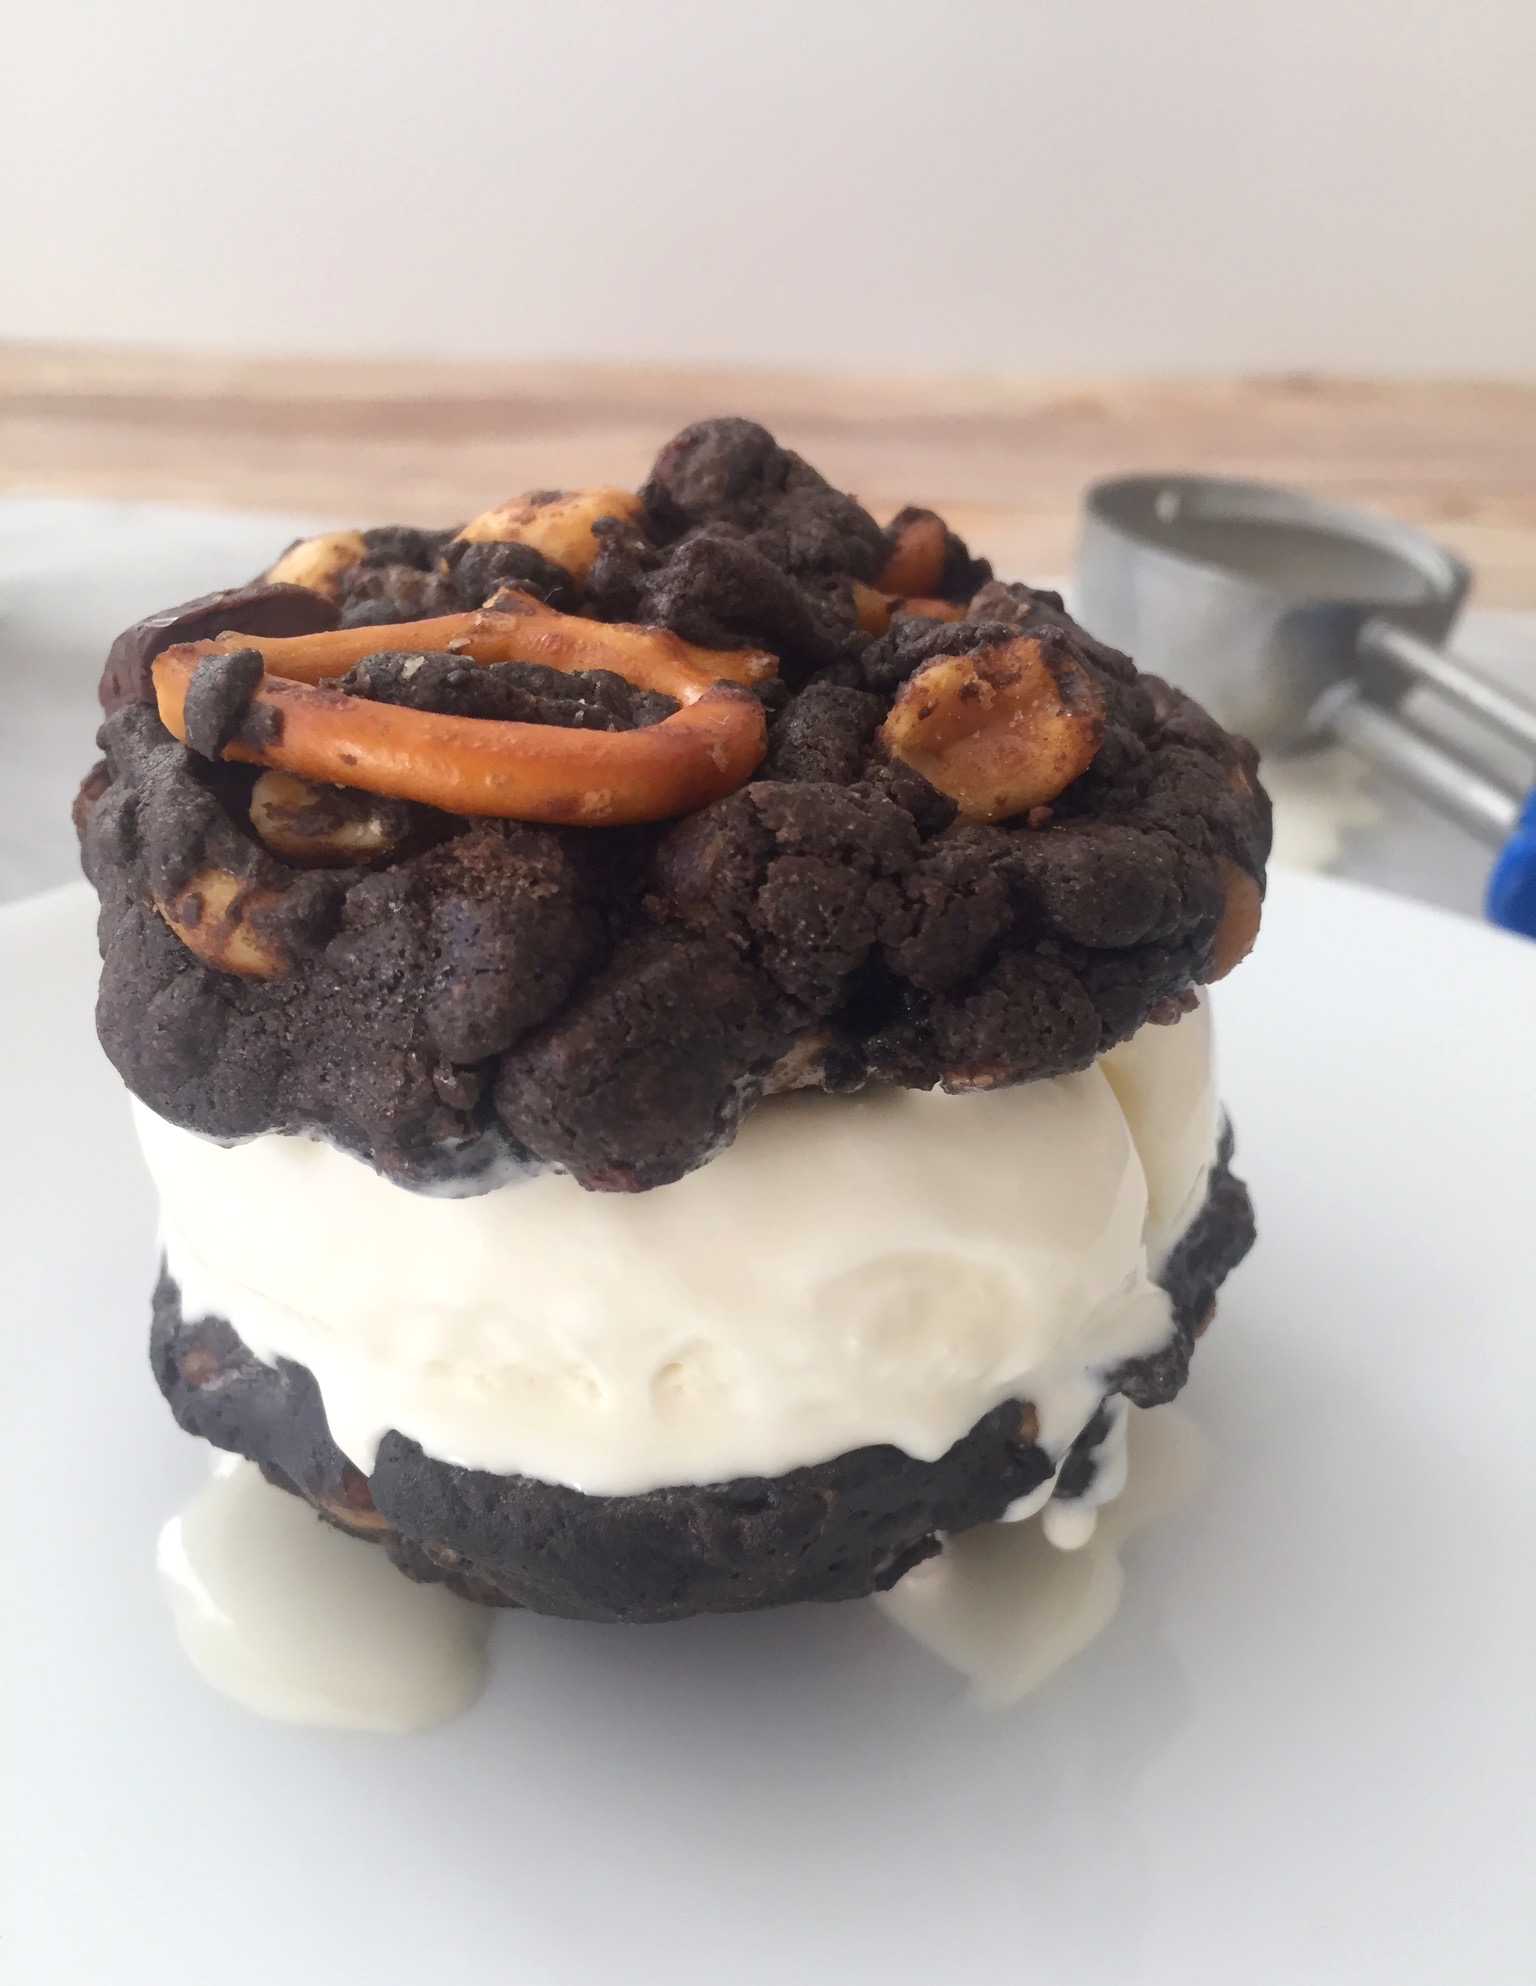
These cookies make amazing ice cream sandwiches, too. Press a scoop of softened vanilla ice cream between two cookies and pop it in the freezer. If you want to make these cookies picture perfect, use a scoop to portion out your dough. This will make them uniform in size and they’ll bake more evenly. Click here to find the scoop I used. For even more visual appeal, don’t crush the pretzels before adding to the cookie dough. Some of them will break when you are mixing them into the dough and this is fine, because the large pieces help make these cookies chunky. This recipe makes eighteen large cookies. That’s one dozen for Dad plus six for you to snack on, because when these babies come out of the oven with their melted chocolate chunks and little pools of caramel, resisting will be impossible! Now it’s cookie time…you’ve got this!
Print Recipe
Fully Loaded Chocolate Snack Attack Cookies
Large chunky, sweet and salty chocolate cookies loaded with chocolate chunks, pretzels, caramel, rice cereal and nuts.
Preheat oven to 350º F. Line 2 large baking sheets with parchment paper.
In a medium bowl, sift together flour, cocoa powder, baking powder, baking soda and salt. Set aside
In a large bowl, cream butter, granulated sugar, and brown sugar together with an electric mixer at medium speed until light and fluffy, about 2-3 minutes.
Add eggs, one at a time, beating at medium speed until smooth. Add vanilla and beat just until combined.
Add flour mixture and beat at low speed, just until combined.
Stir in chocolate chunks, pretzels, caramel bits, chocolate rice cereal and peanuts.
Scoop 1/4 cup portions of cookie dough and place 2 inches apart on prepared baking sheets. Bake for 13-15 minutes, until set. Cool on cookie sheets for 1 minute before transferring to wire rack to cool.
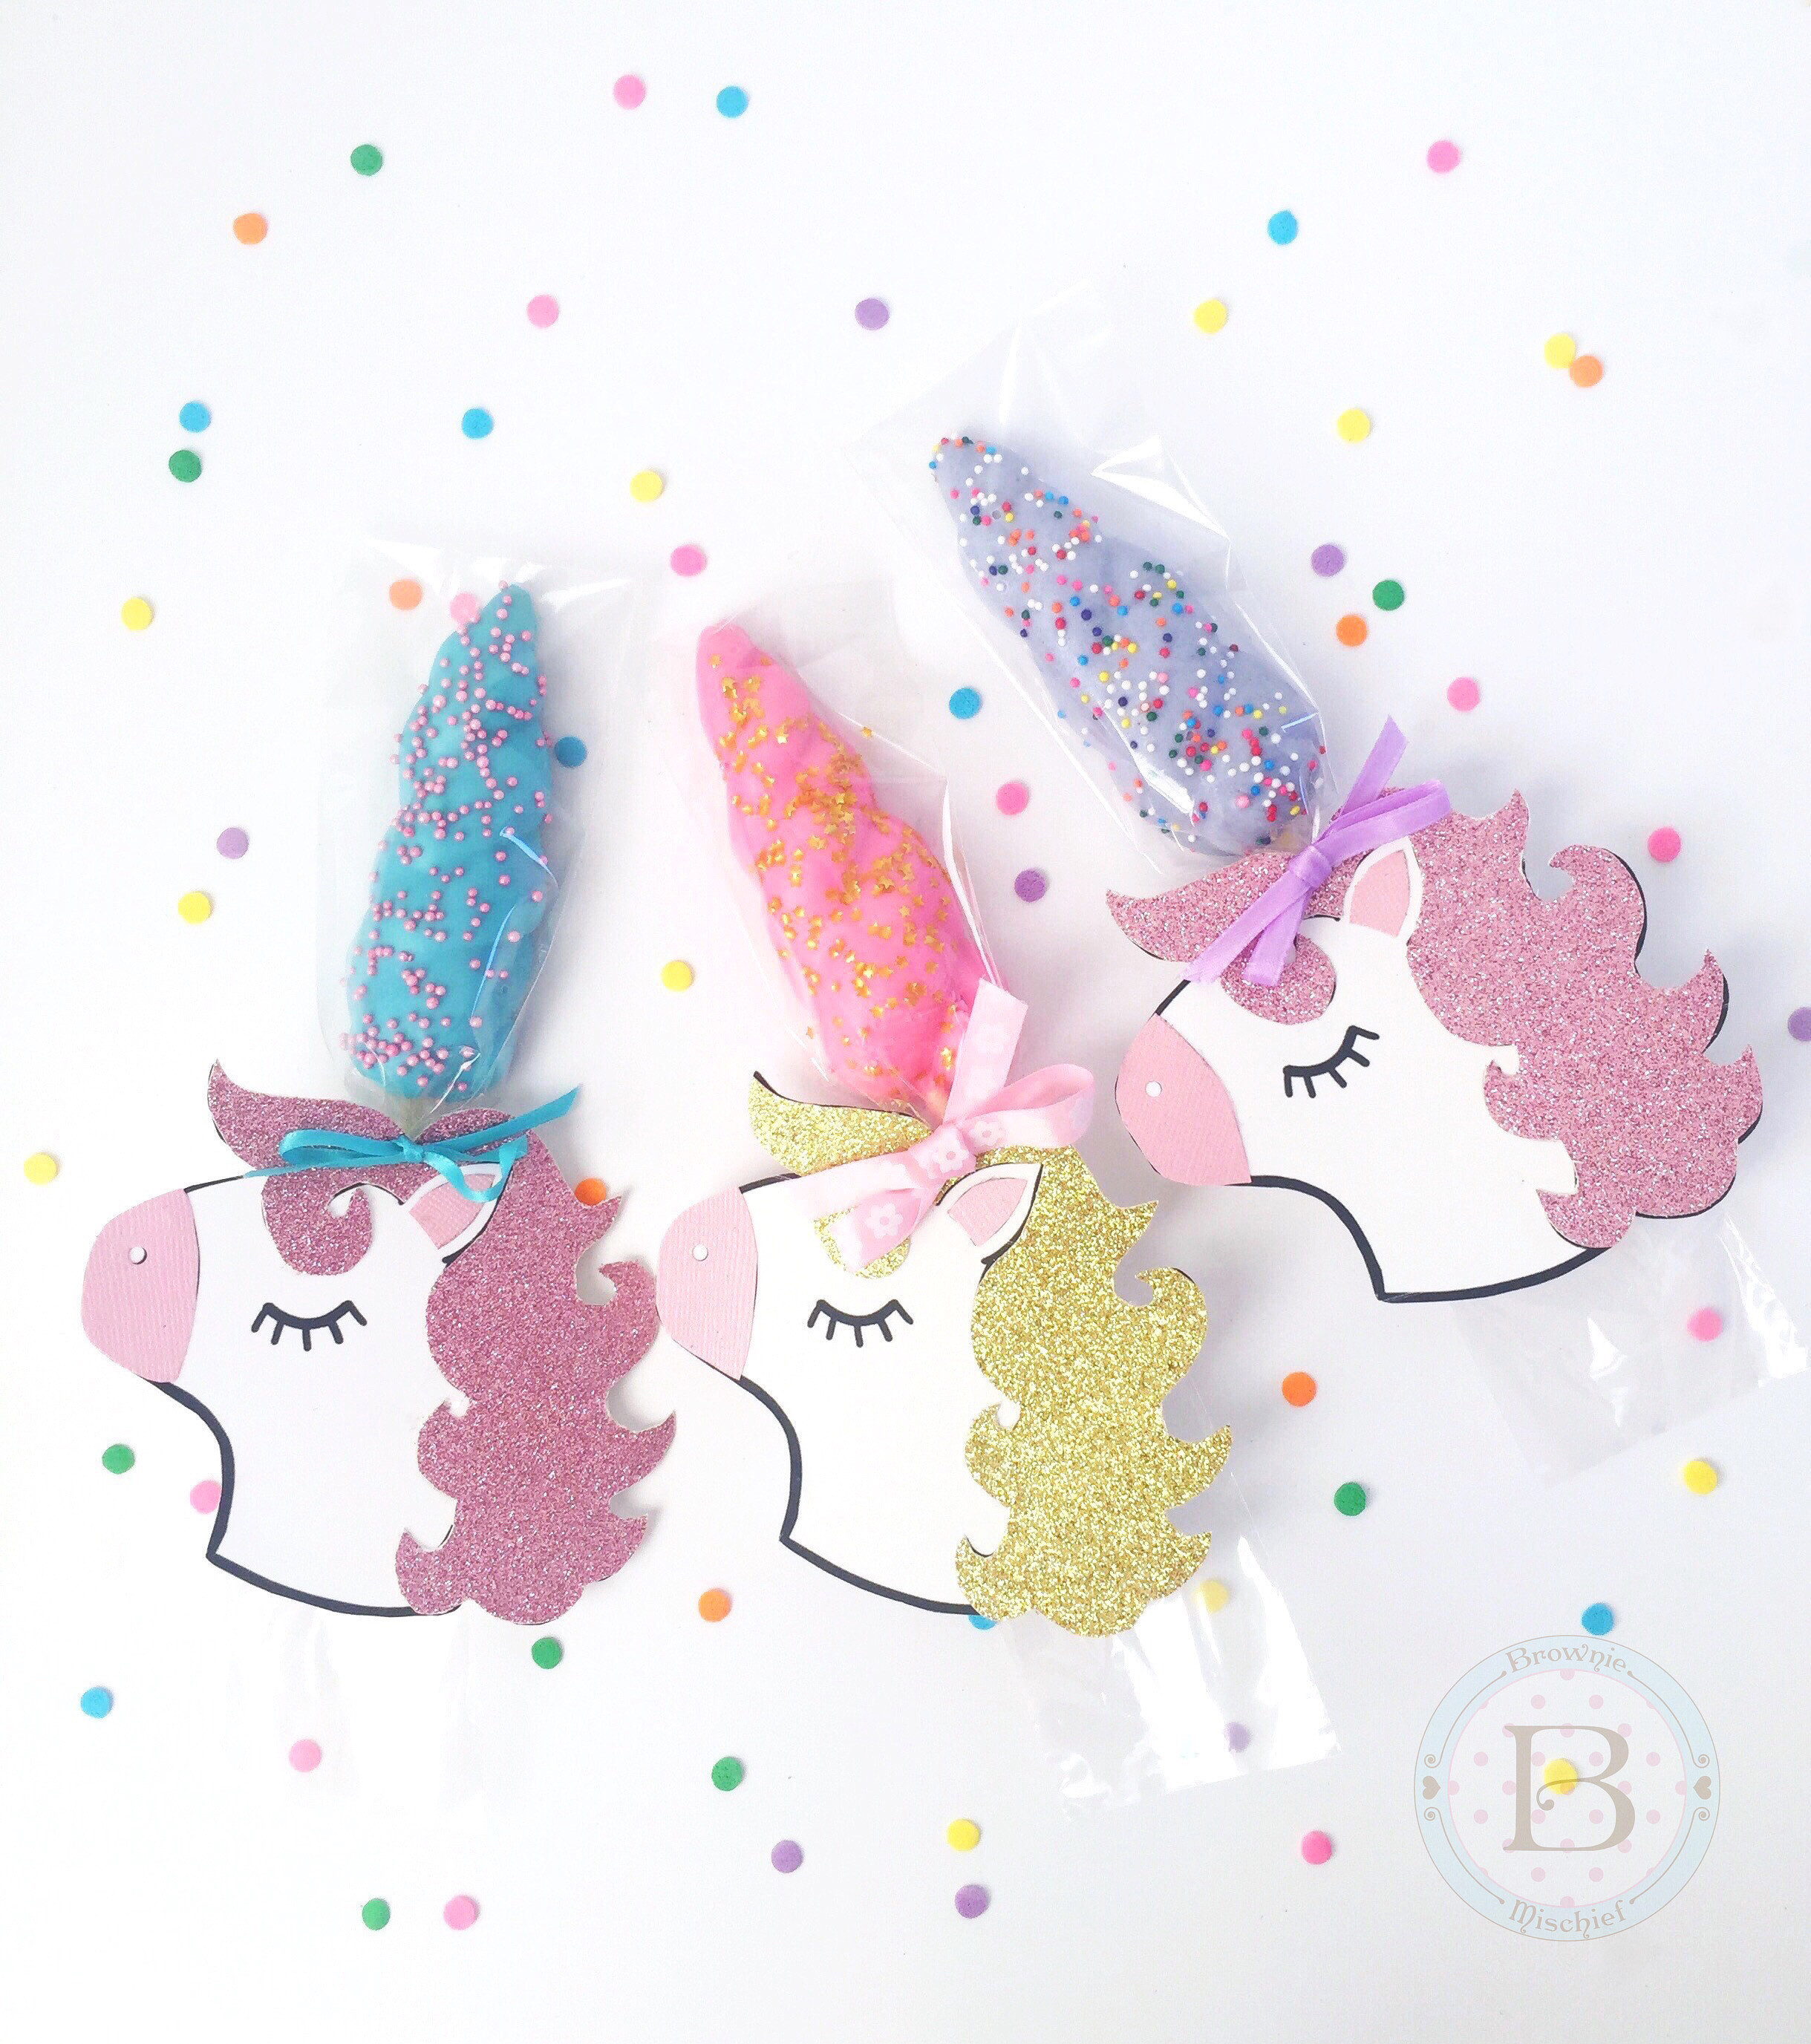
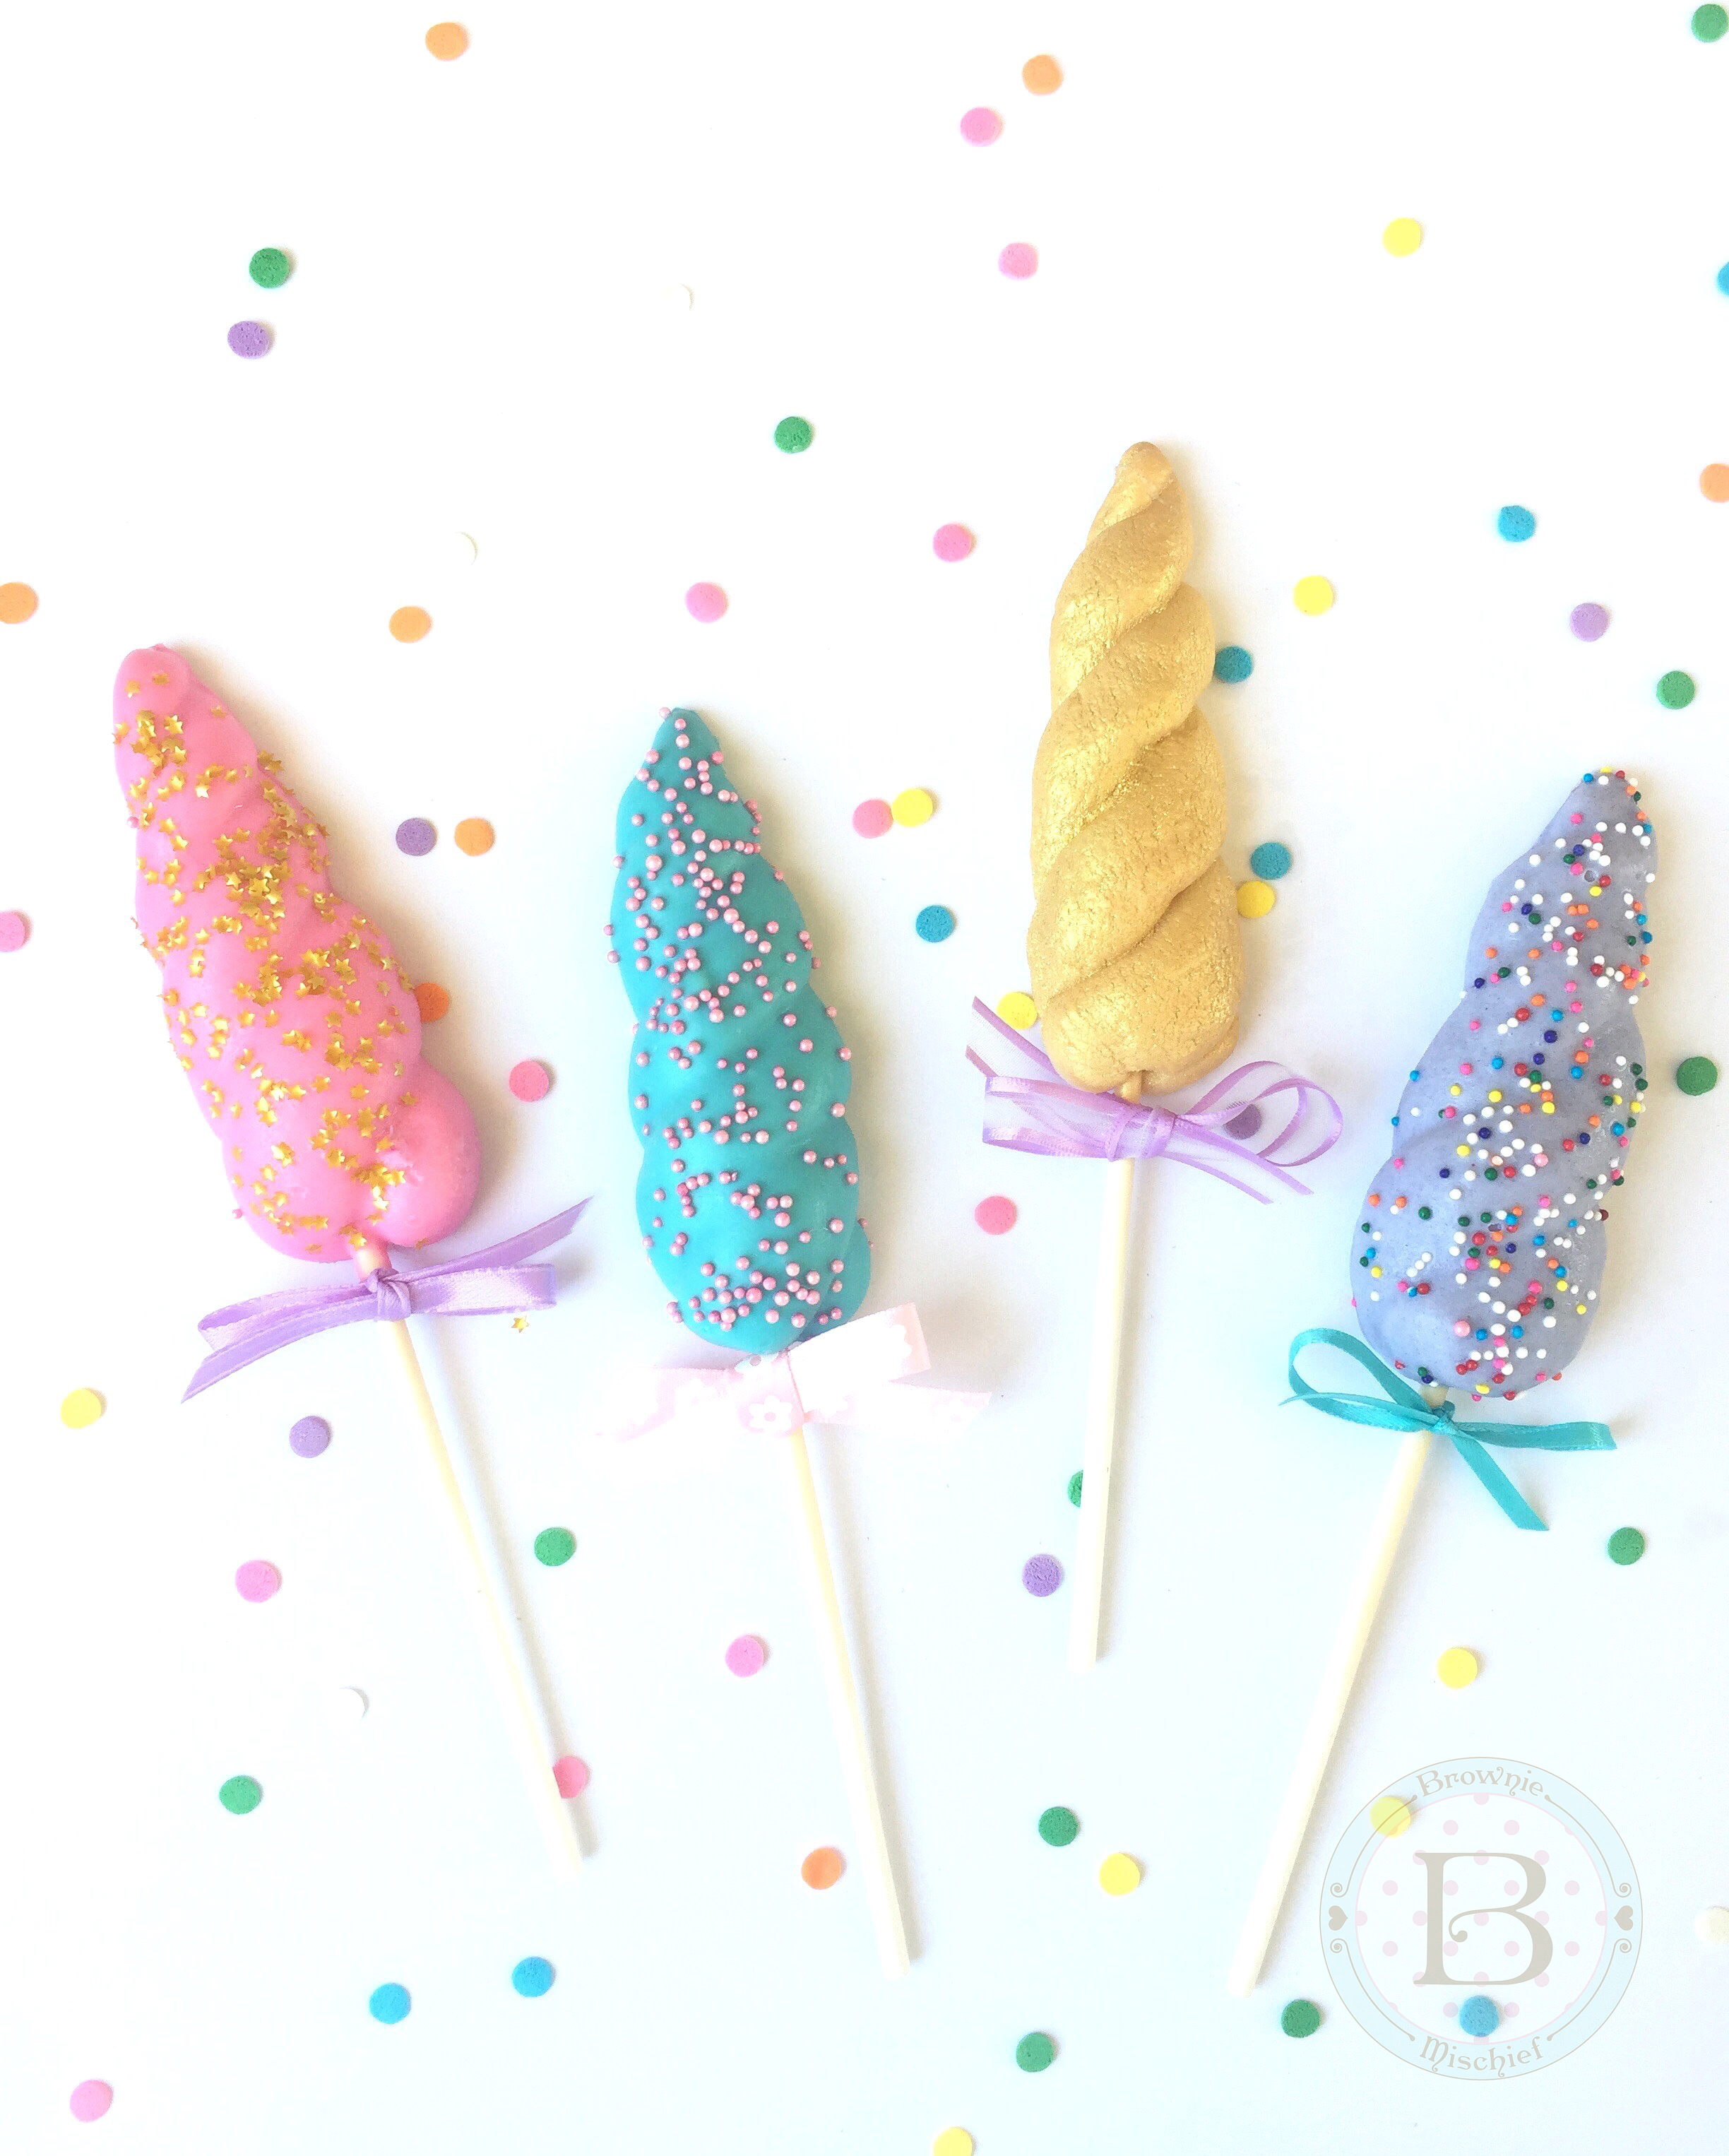
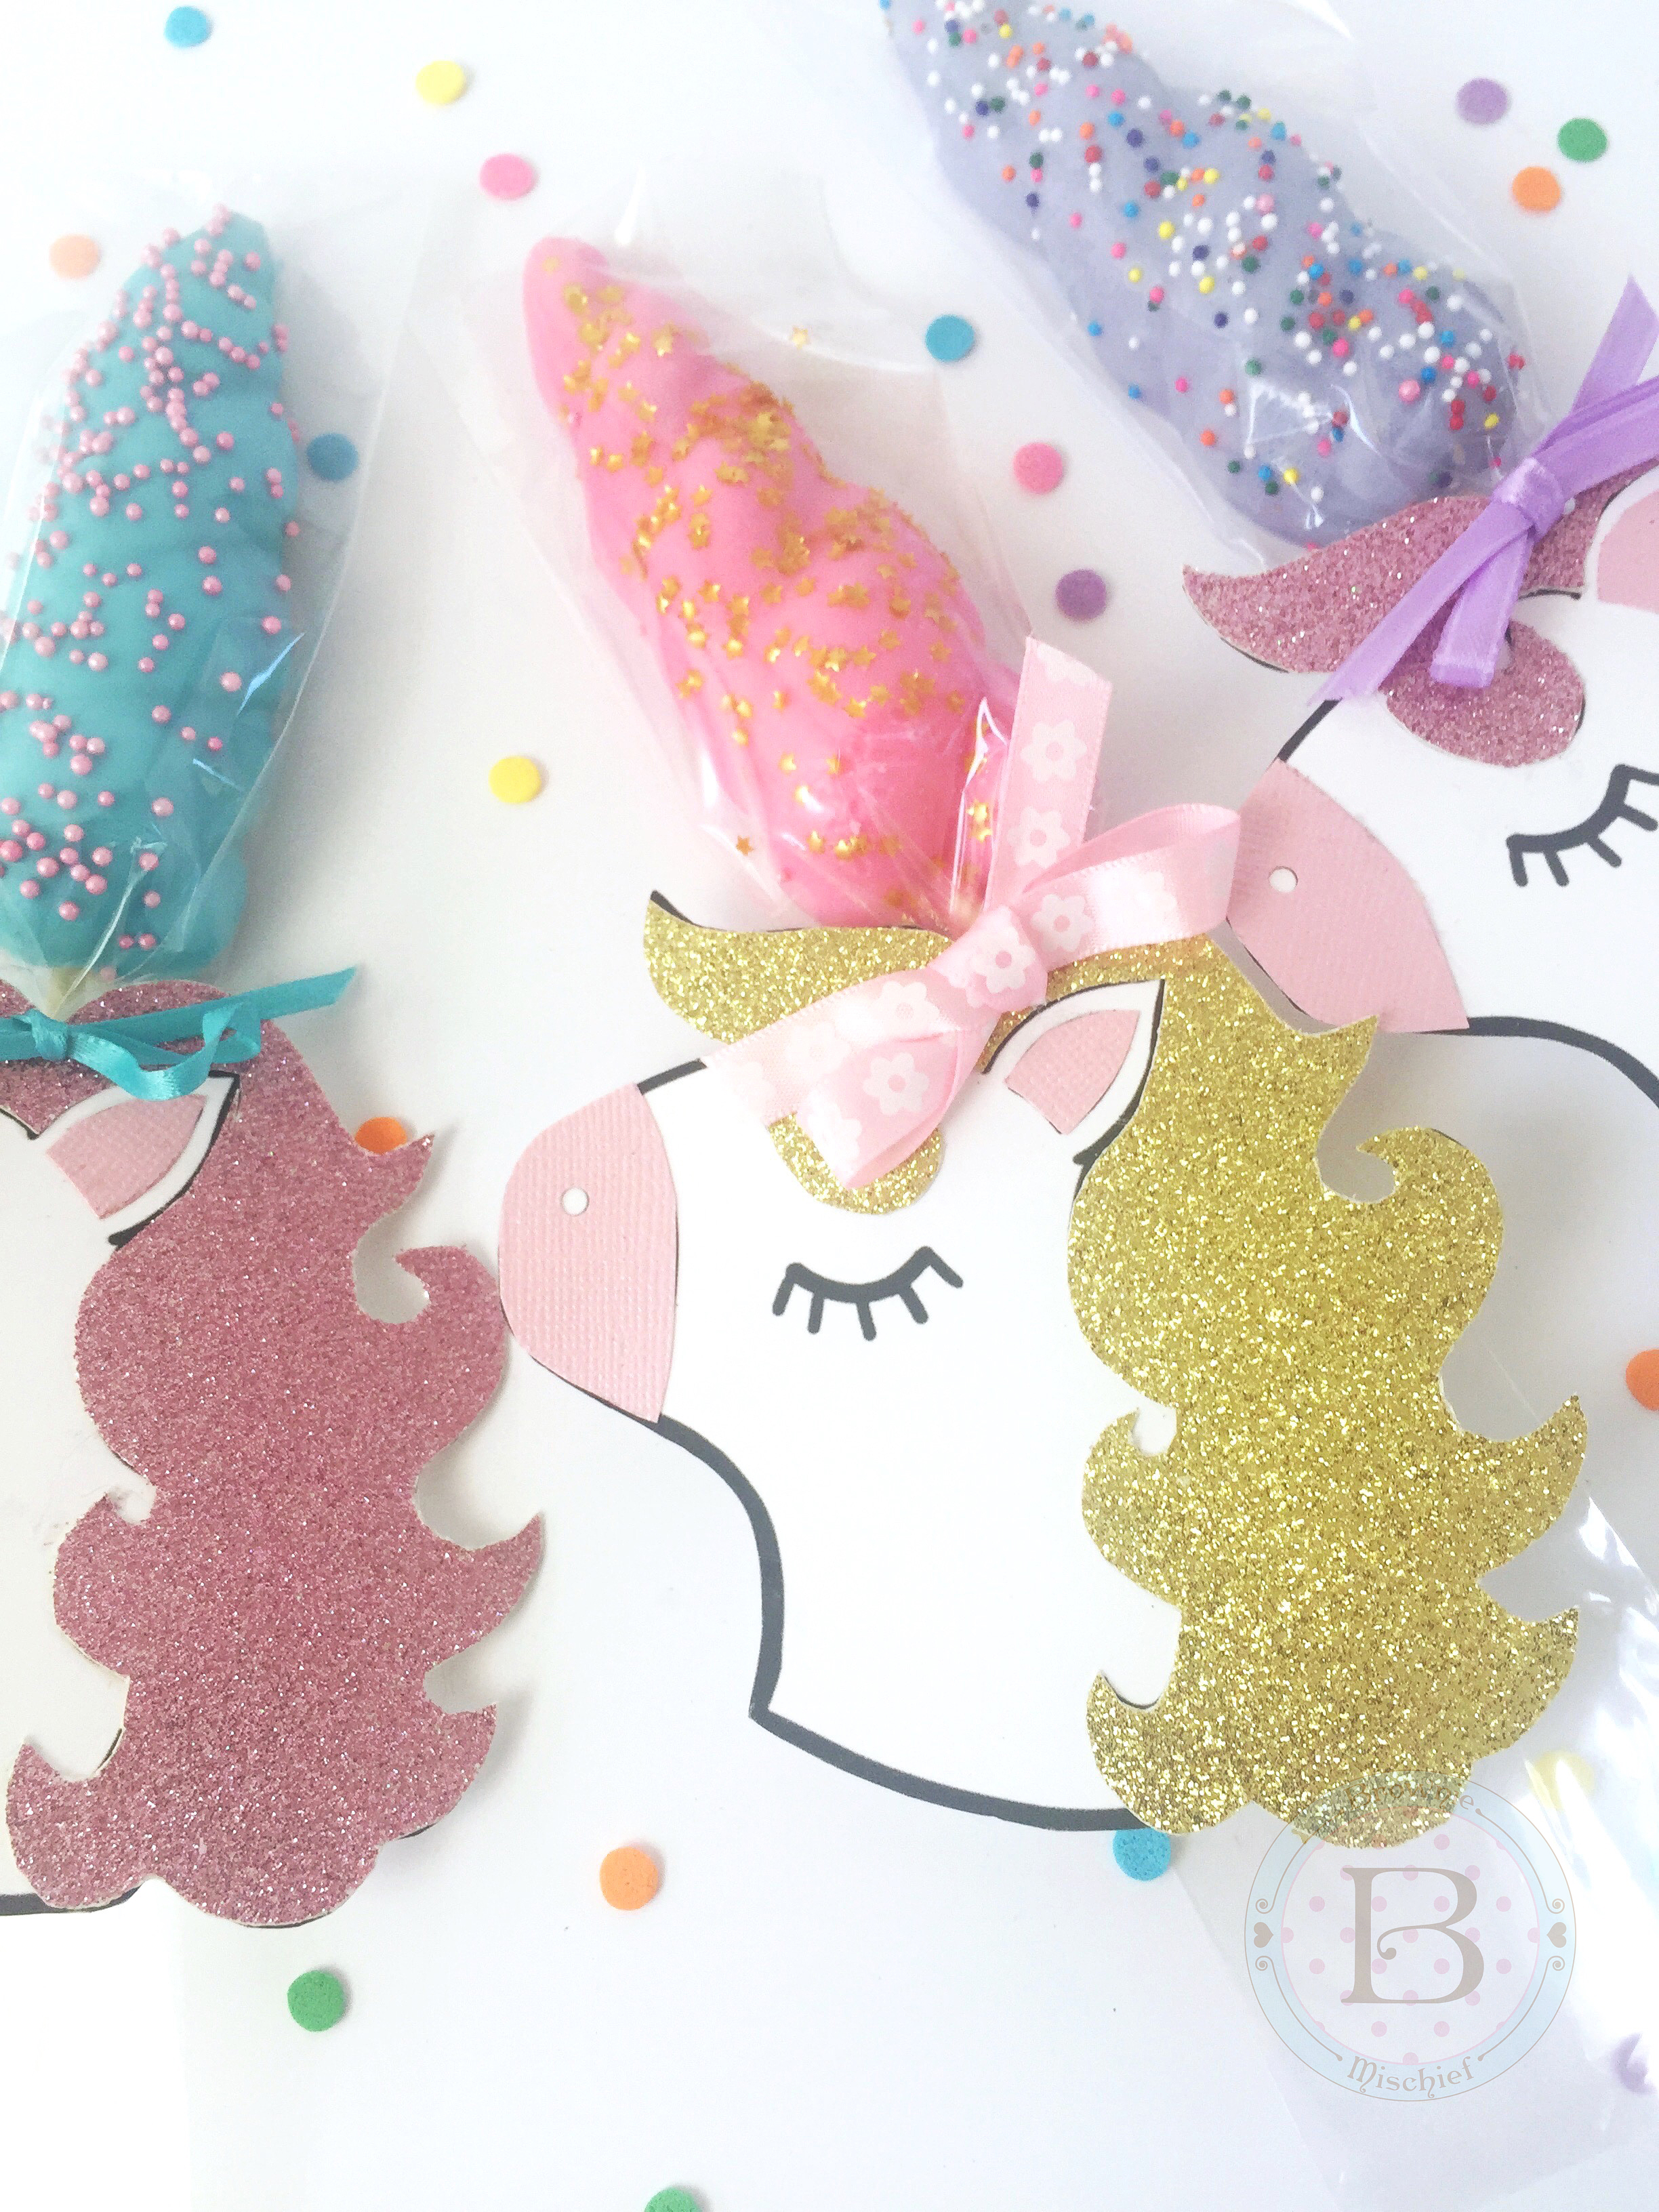
Have you noticed a unicorn or two around lately? The unicorn craze is still going strong and it’s no wonder that unicorns have become so beloved. Unicorns are beautiful, majestic creatures with just the right amount of mystery and elusiveness, and they symbolize the spirit of individuality. So it’s no surprise that so many people, adults and children alike, are clamoring for unicorn-theme parties. If you’re planning a graduation party or a summer birthday party for your unicorn fan, you’ve probably searched the internet for some ideas. Every unicorn party will likely have a unicorn head cake. By the way, does anyone know who the original designer of that cake is? Just wondering. A unicorn party also needs some unicorn treats. Look no further! These Unicorn Horn Cookies make perfect party favors. They’re fun to make and don’t require any special skills. You can also make them ahead which means they’re stress-free!
I came up with Unicorn Horn Cookies when making a Unicorn Rainbow Milkshake. I had extra cookies left, so I decided to take them up a notch by dunking them in candy melts and adding sprinkles. They looked so festive, that they instantly became official party favors. I designed some unicorn gift tags to go with them and I’ve created a free printable to share with you! Click here for free unicorn gift tag printable. You can find the cookie recipe at the bottom of the Unicorn Rainbow Milkshake post. Click here to find the Unicorn Horn Cookies recipe.
To make Unicorn Horn Cookie Party Favors, you’ll need:
Bake unicorn cookies and cool completely. Place candy melts in a microwaveable container and heat in a microwave at 50% power for 1 minute. Stir and heat for 20 second intervals until melted. If the melted candy is too thick, add melted vegetable shortening a half teaspoon at a time until desired consistency is reached. Dip cookies into melted candy and tap off excess. Place cookies on a tray lined with wax paper. Decorate with sprinkles before the candy sets. Place cookies in refrigerator for a few minutes, until set.
Print unicorn gift tags on card stock. Click here for free unicorn gift tag printable. Cut out desired number of unicorn gift tags. Cut out one extra to use as a pattern. Cut mane, muzzle and ear out of scrapbook paper. Affix with craft glue. (Alternately, you can omit the scrapbook paper step and simply print out the unicorn gift tags and color them with colored pencils or markers.) Punch two holes, about 1/2-inch apart near the top of each gift tag.
Place cookies in treat bags, if using. Tie ribbon onto the lollipop sticks at the base of the cookies. Thread ribbon through the holes of the gift tags and tie into bows.
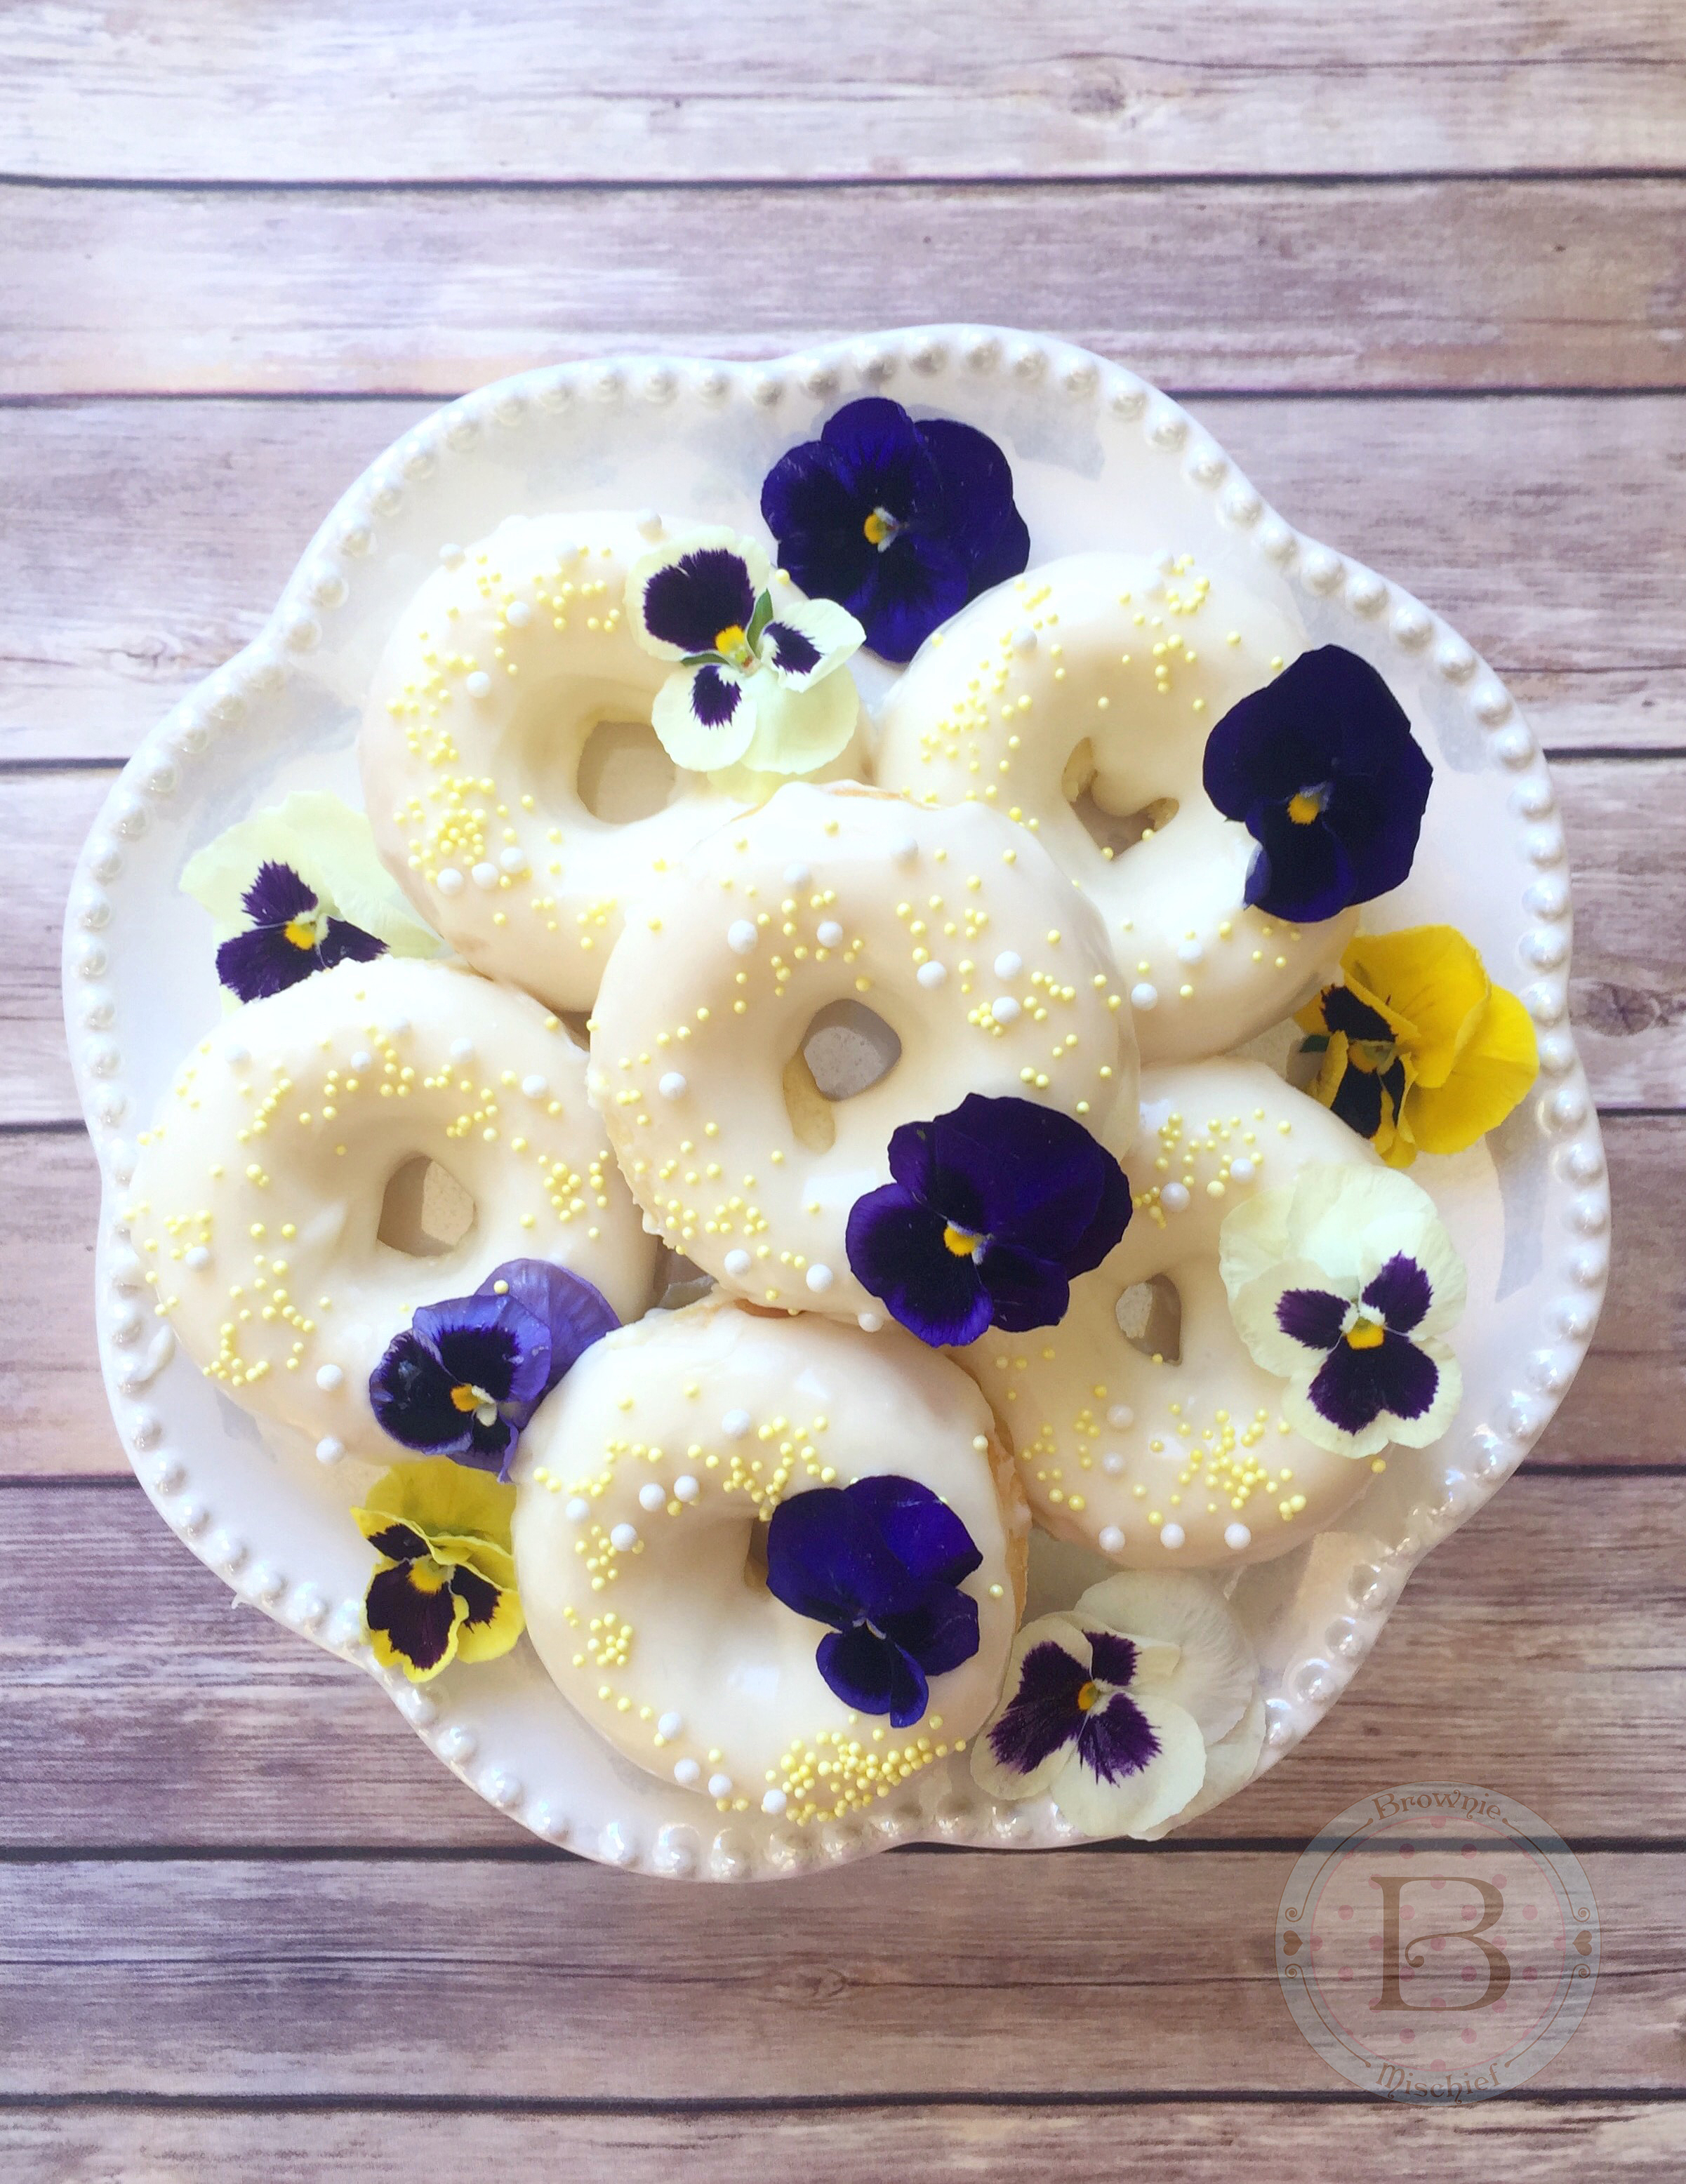
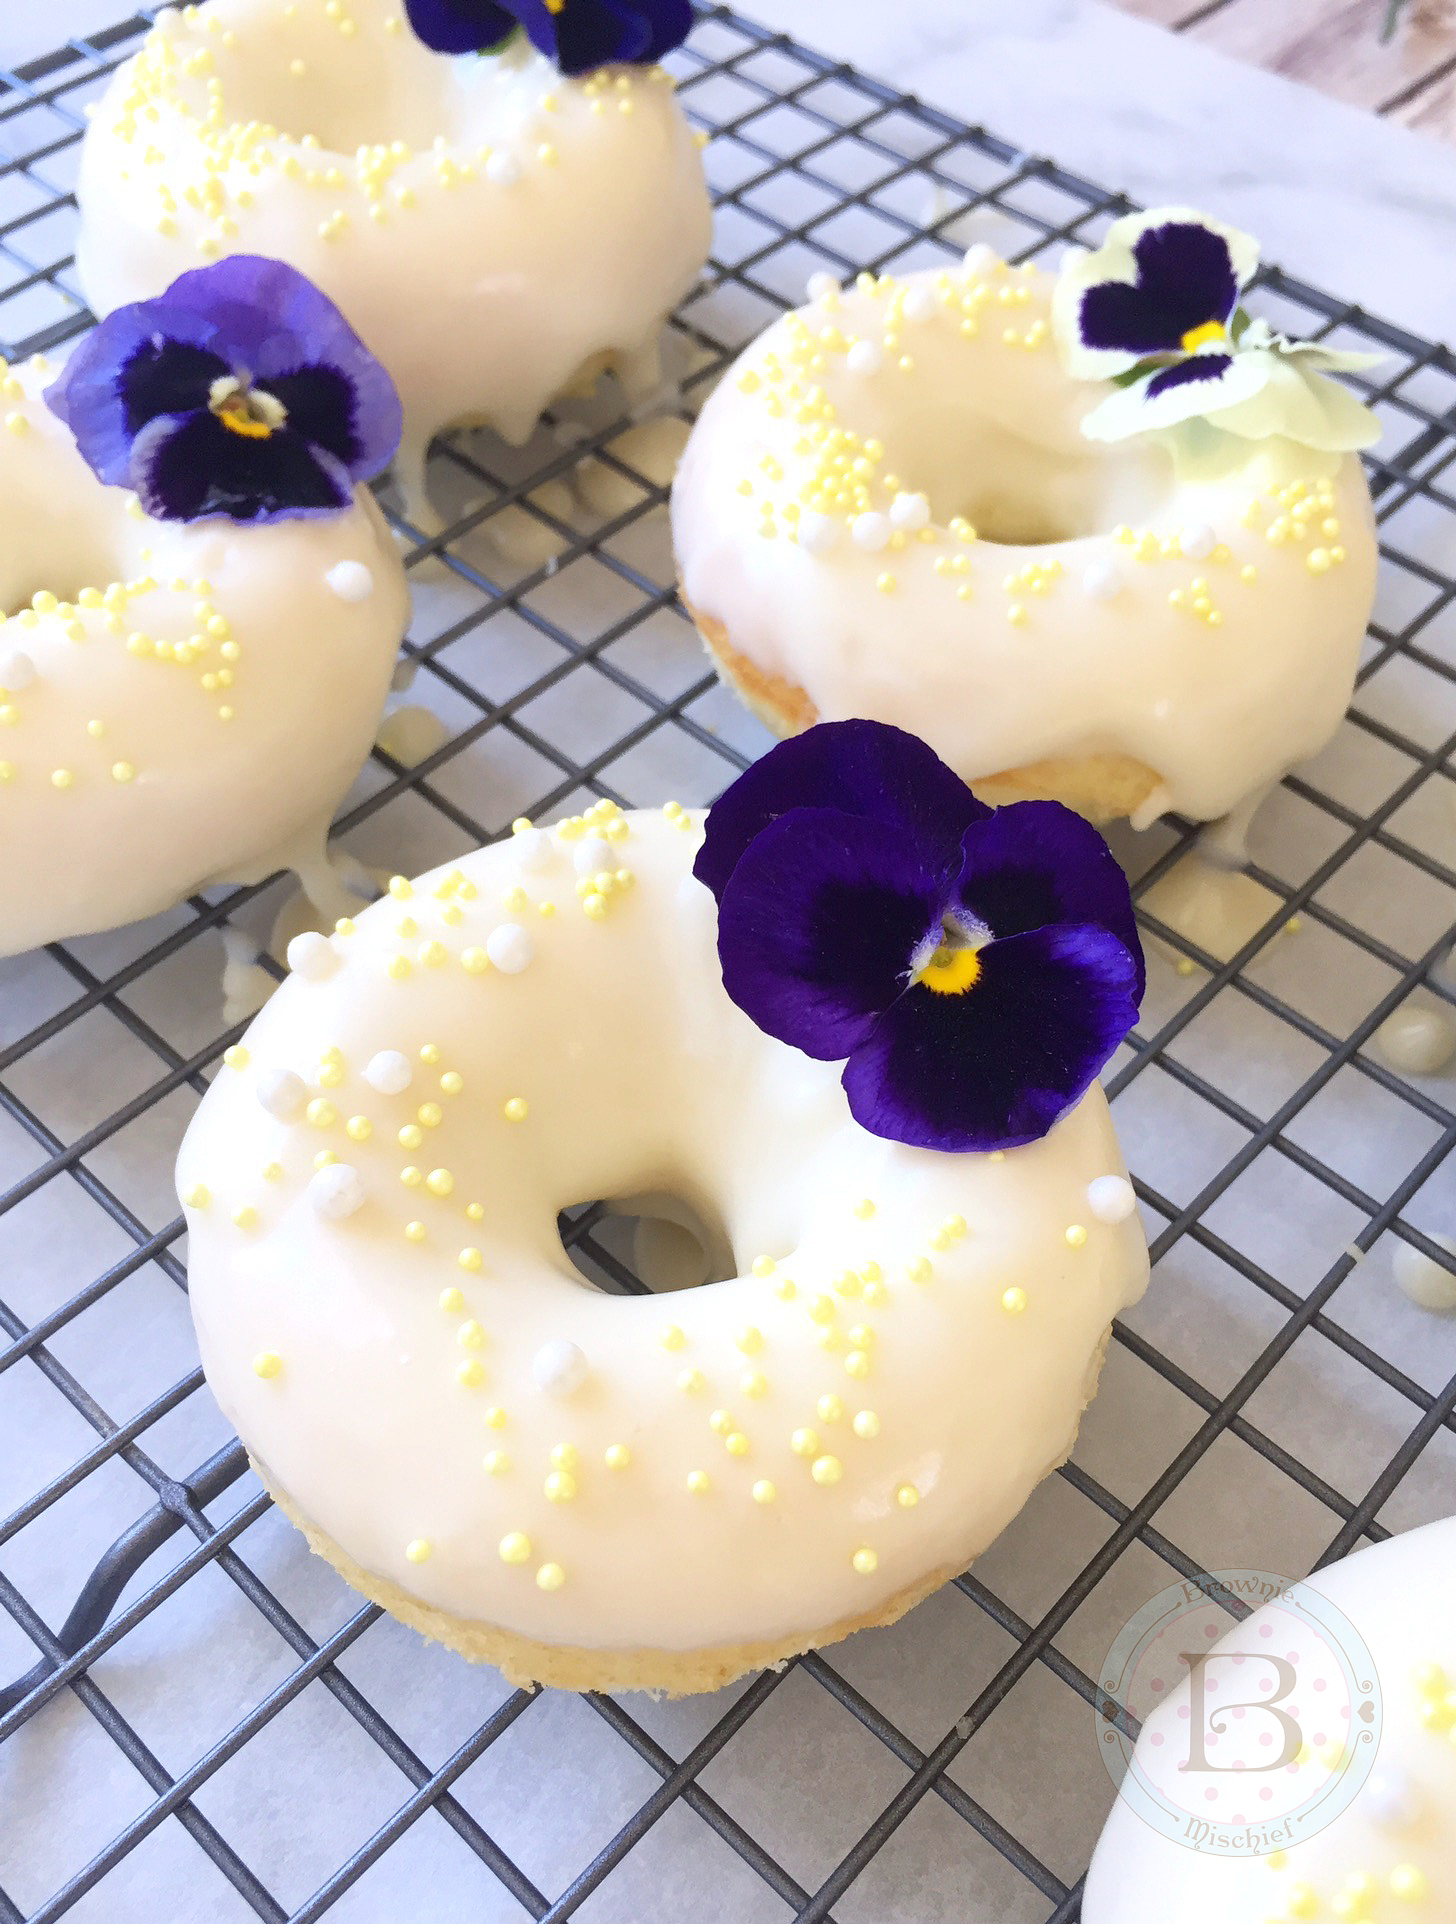
I was seriously happy when I started seeing donuts appearing at weddings, bridal showers and occasions other than work meetings. I’ve always felt those sweet, fluffy rings of dough had a higher calling. They had such potential! And honestly who doesn’t love donuts? They’re delicious, but they can also be beautiful. These Lemon Buttermilk Donuts could certainly win a beauty contest. They would make a gorgeous edition to any breakfast, brunch or dessert table. The fresh lemon zest and the earthy flavor of honey will bring springtime right into your kitchen.
If you’re on the lookout for a Mother’s Day recipe, any mom will love these pretty, fragrant treats. This is a very easy recipe and the donuts bake up quickly, so you’ll have time to fix mom a cup of her favorite tea. If you don’t have a donut pan, and you’ve been reluctant to buy one, I can honestly say I love mine. It was very affordable and I’m pleased with the performance and ease of clean up with the pan I purchased. To find the donut pan click here.
In keeping with the springtime feel, I decorated my donuts with pesticide-free edible flowers. I used pansies, but if you’re unable to find them, you can substitute pesticide-free rose petals. I found these edible pansies at my local food market in the produce department, near the fresh herbs. You can also find edible flowers at farmers’ markets and online. For a list of edible flowers, click here.Note: The above pictured orange ranunculus flowers on the table are not edible.
Print Recipe
Lemon Buttermilk Donuts with Honey Cream Cheese Icing
Preheat oven to 375ºF. Spray the wells of a ***donut pan with non-stick cooking spray.
In a medium bowl, whisk together cake flour, sugar, baking powder and salt.
In a small bowl, whisk buttermilk, egg, melted butter, and lemon zest together. Add to flour mixture and stir until combined.
Transfer batter to a piping bag or plastic zip bag. Snip off the tip of the bag and pipe batter into prepared donut pan, filling the wells 2/3 full.
Bake for 7-8 minutes or until toothpick inserted into donuts comes out clean. Let cool in pan for 5 minutes, then remove donuts to a rack to cool completely.
Prepare Honey Cream Cheese Icing while donuts are cooling.
Dip tops of donuts into icing and decorate as desired. Serve immediately.
Honey Cream Cheese Icing
In a medium bowl, beat cream cheese and butter with an electric mixer at medium speed until smooth.
Add vanilla extract and salt. Mix until combined.
Add powdered sugar and mix on low speed until moistened. Turn mixer up to medium speed and mix until combined.
Add honey and beat on medium speed until smooth. Add milk, a little at a time until desired consistency is reached. Beat until smooth.
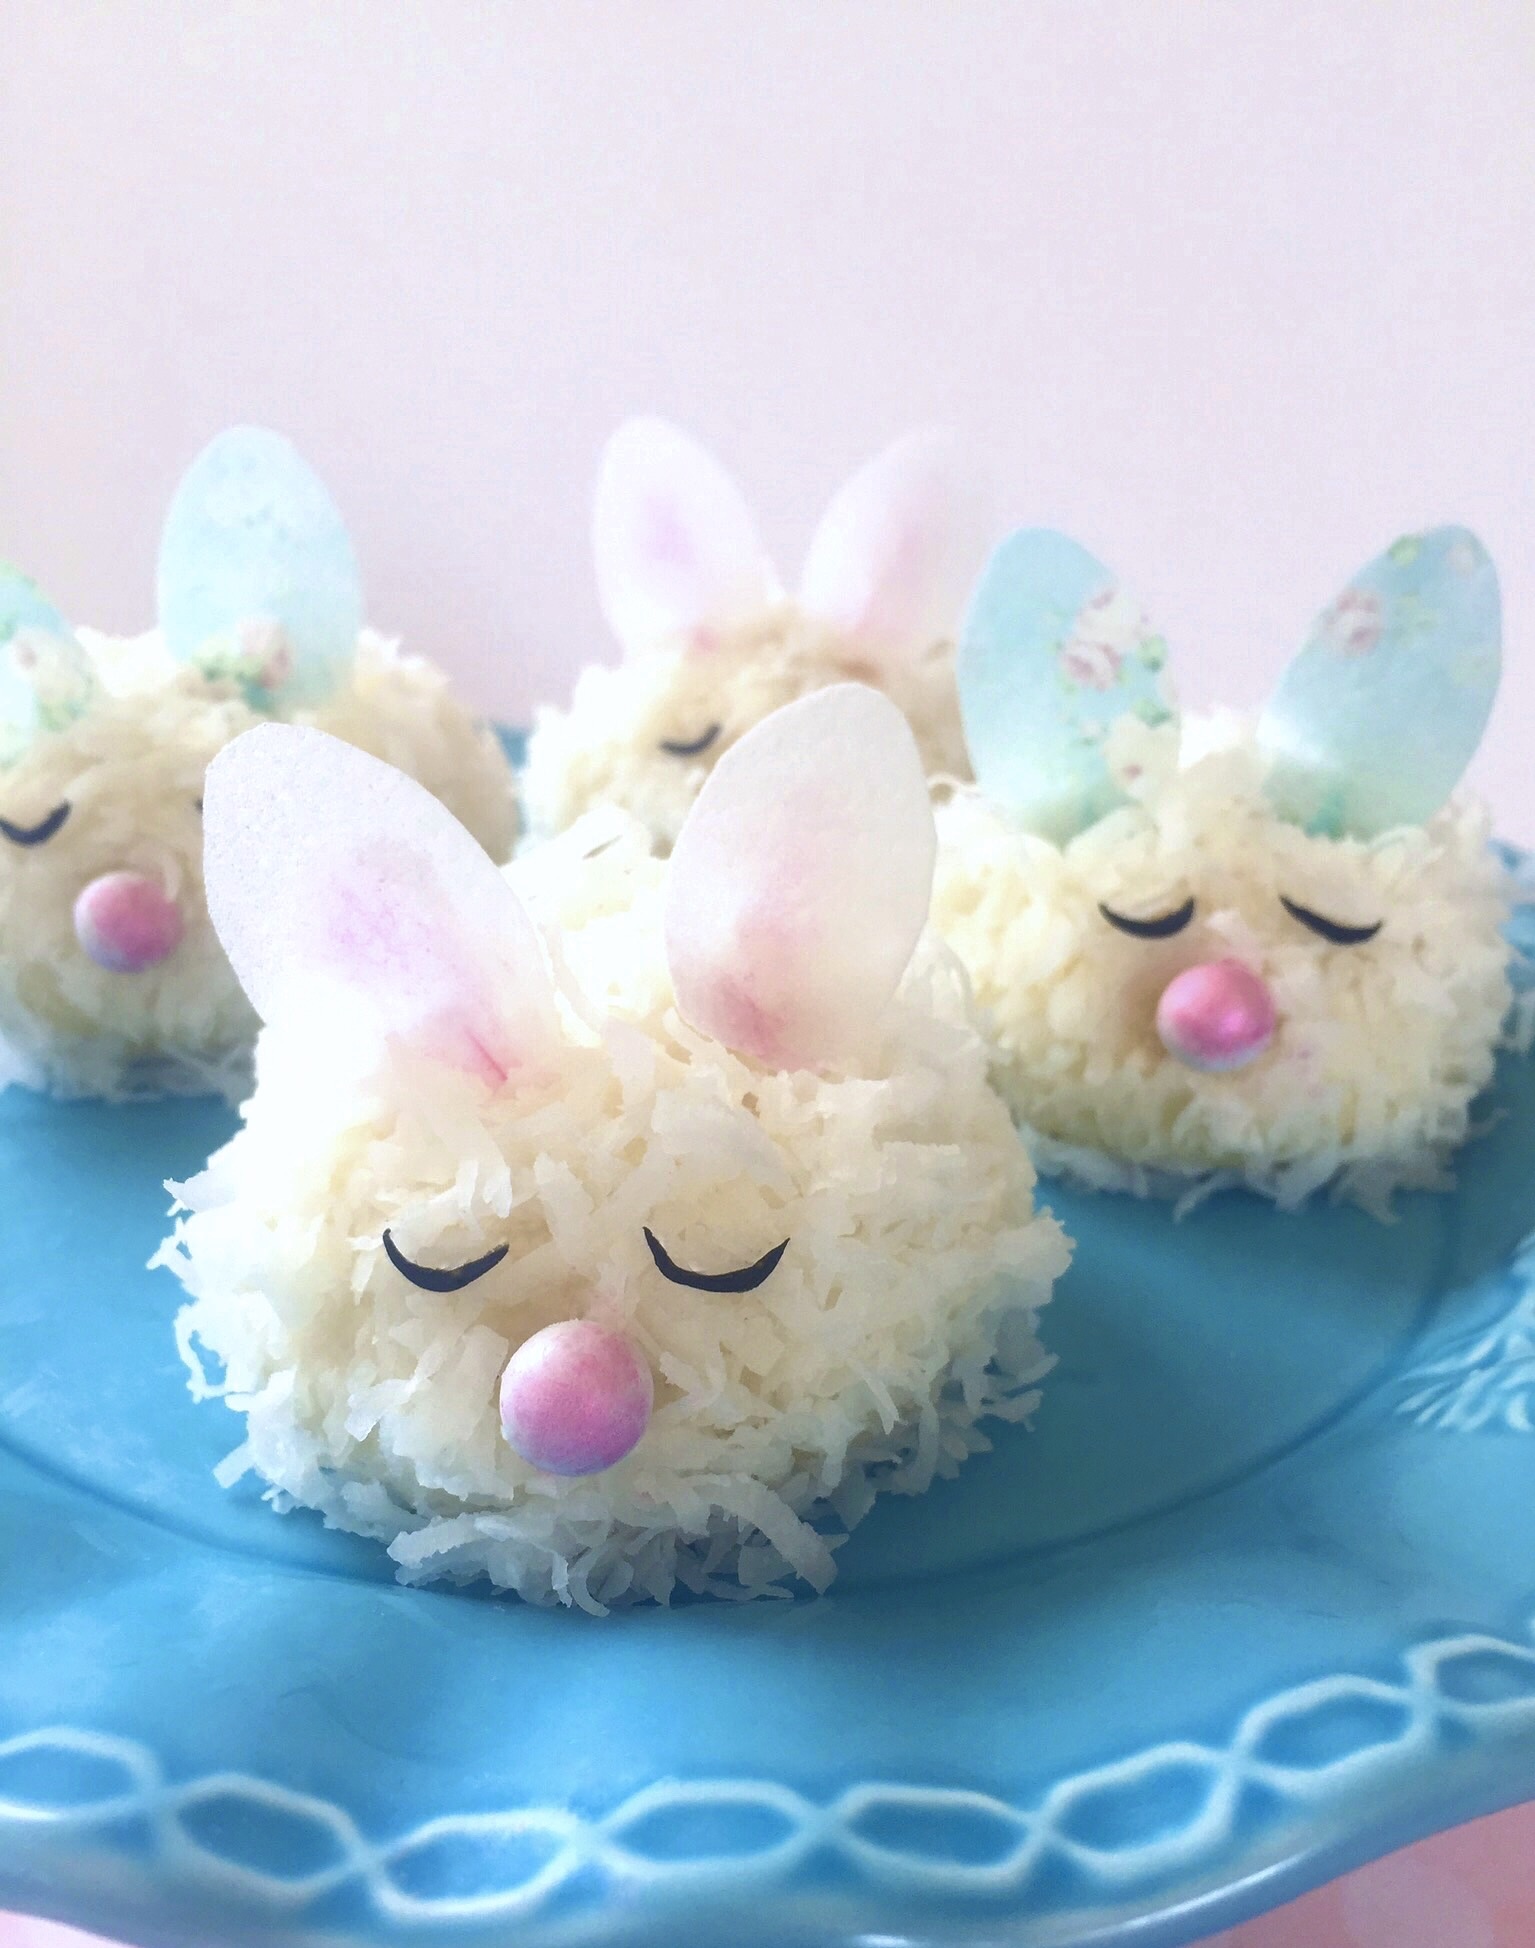
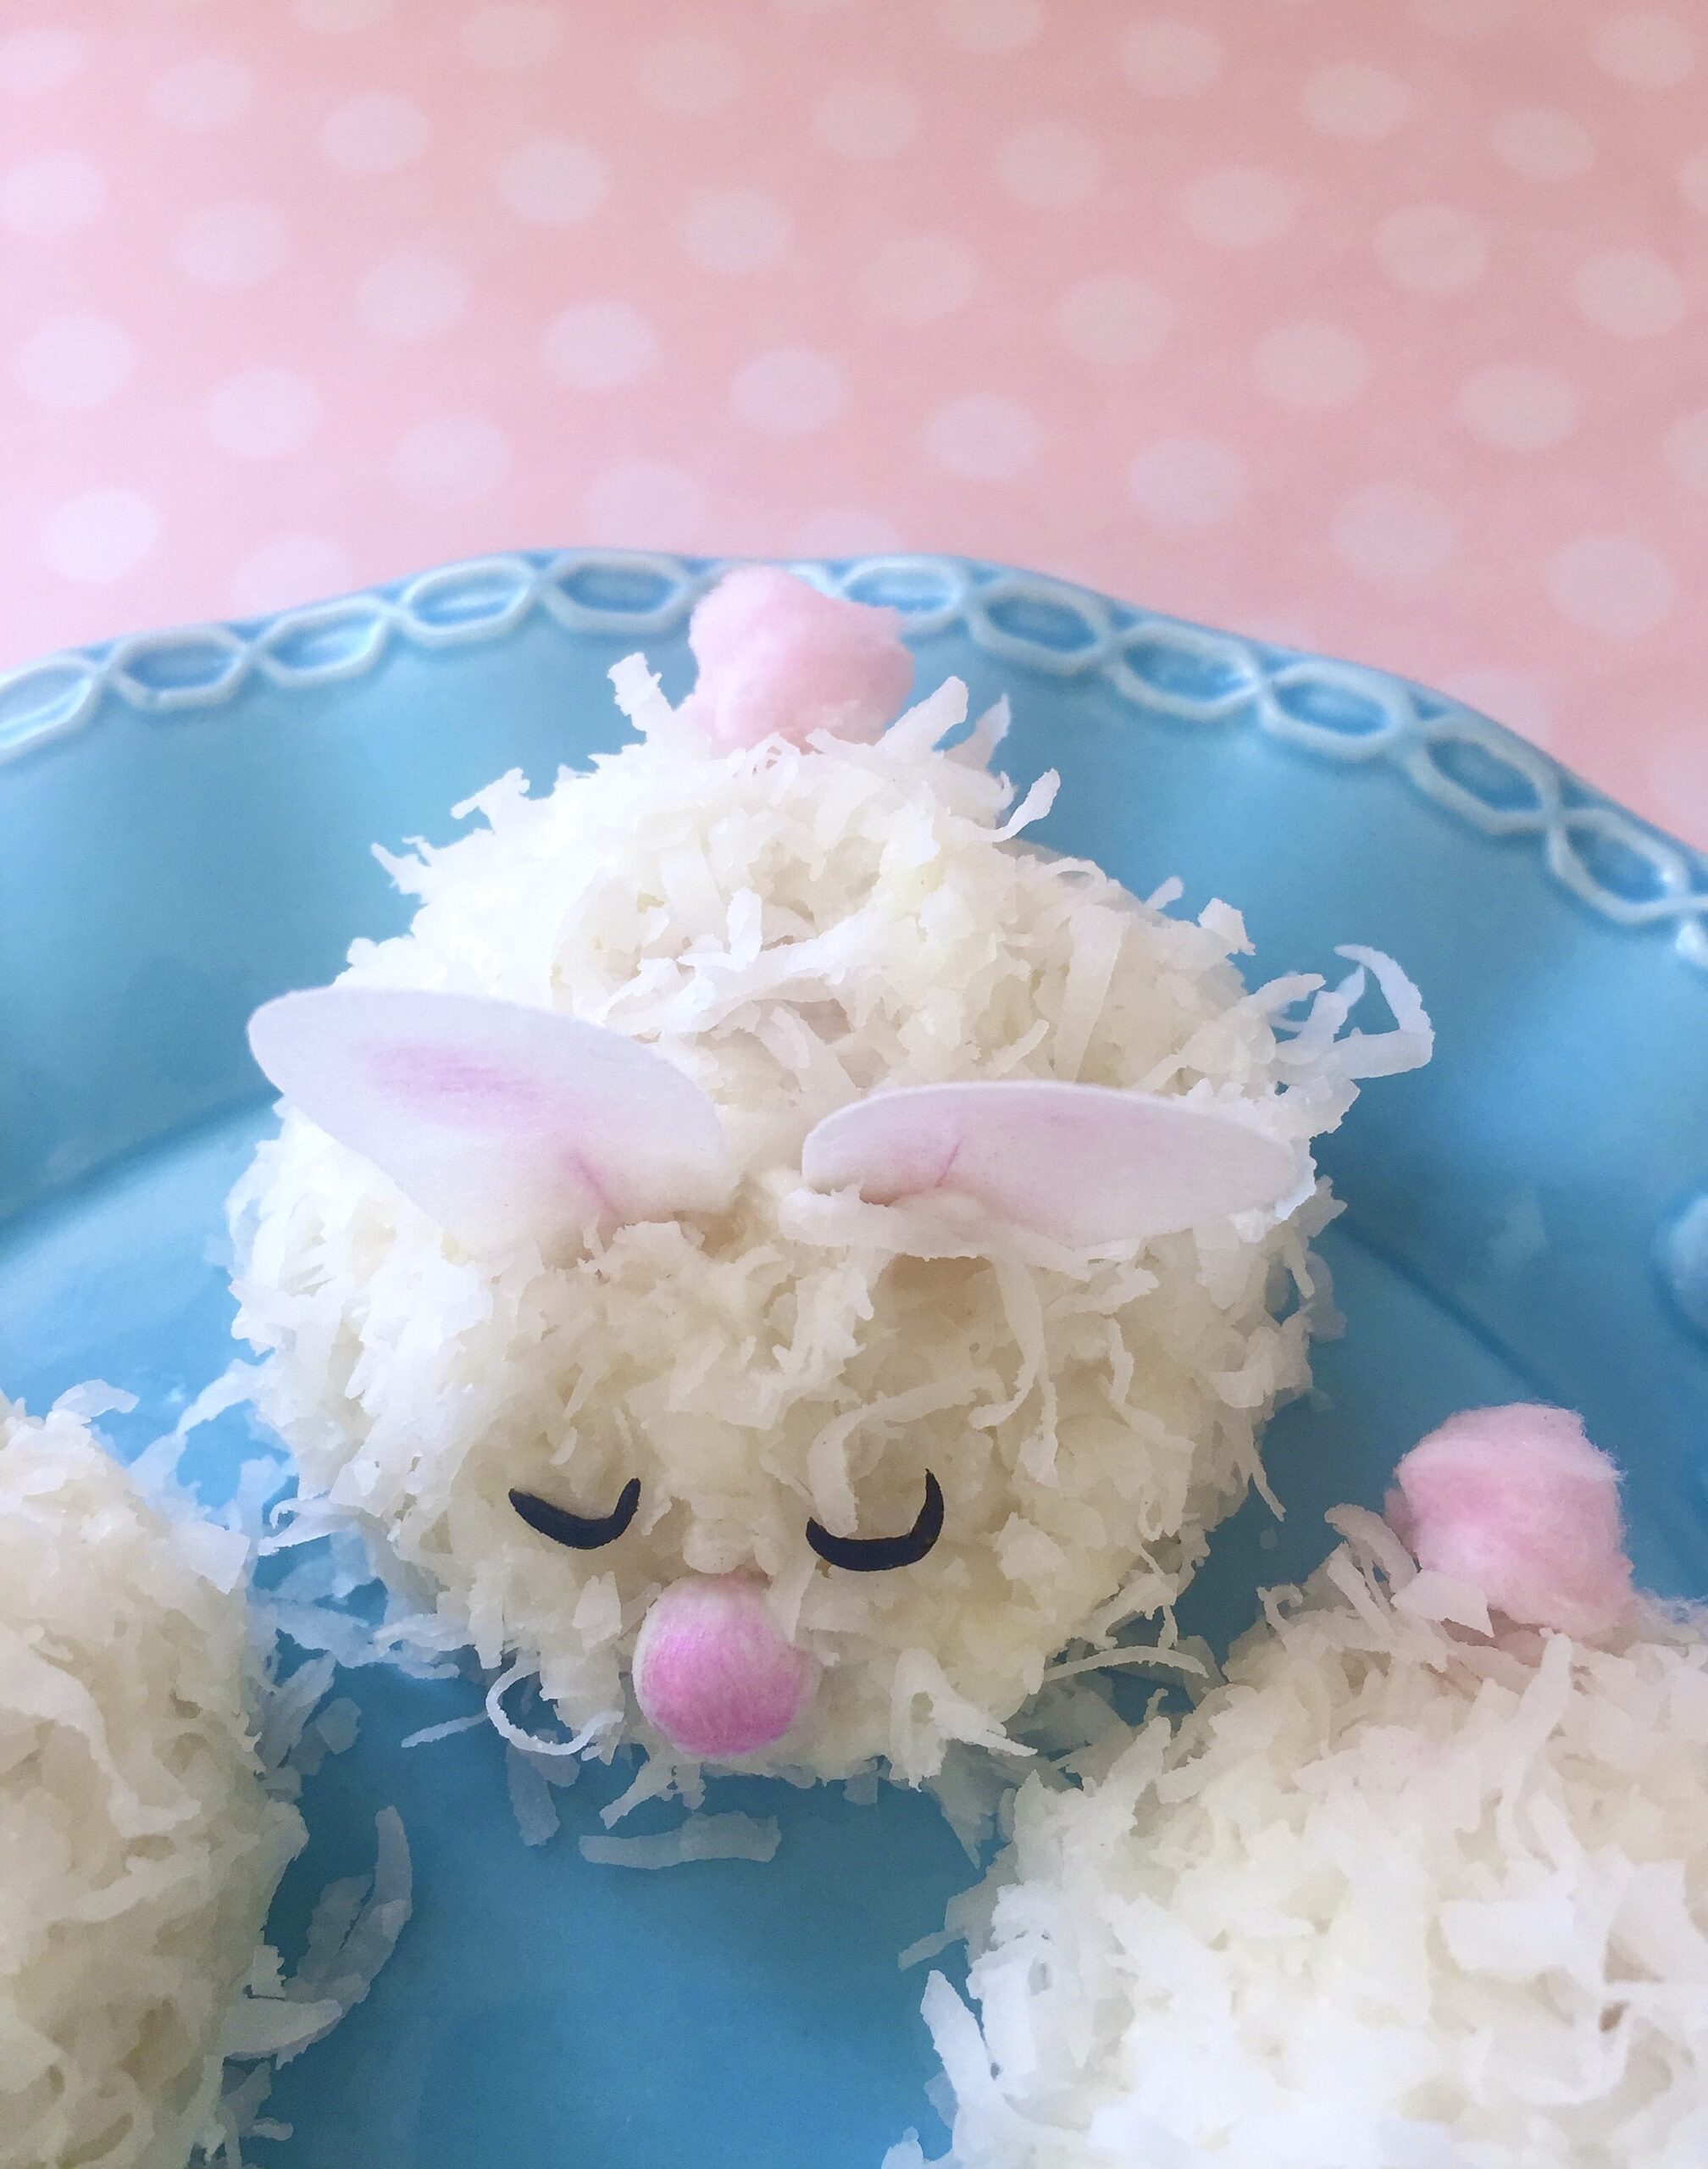
Spring is the time for blue skies, flowers blooming, bunnies scampering around and Easter celebrations. What better time to make cute Baby Bunny Coconut Cakes? I wanted to make them look like newborn bunnies curled up peacefully for a nap, so I decided to use a hemisphere pan.
When I was shopping around for hemisphere pans, also know as ball pans, I considered metal pans and silicone pans. In general, I prefer metal pans for baking cakes, but I decided on silicone, hoping to get more use out them. I plan on using them for frozen and refrigerated desserts as well. You can find hemisphere pans at kitchen stores, craft stores, baking supply stores and online. To find the pan I chose, click here.
My next dilemma was whether or not to coat the pans before baking. From what I’ve read, many people seem to have trouble getting their baked goods out of silicone pans, even though the majority of these pans claim to be non-stick. I decided to experiment, trying three different ways. I coated some of the wells with grease and flour, some with only grease, and some were left uncoated. I found that when I inverted the pan, the cakes released effortlessly from the coated wells. The cakes in the uncoated wells took a slight amount of prodding and a bit of residue was left behind, but the cakes were in tact. All three ways seem to work fine, but I decided that, for my own peace of mind, I will grease all of the wells in the future.
Decorating these bunny cakes is fun and easy, so this would make a great project for the little ones. You can use the candies of your choice to make eyes and noses. I used white candy pearls for the noses and colored them pink with edible petal dust. I made sleepy eyes out of black fondant. Black fondant is difficult to make, so I always buy it. It’s available for purchase in small quantities. I used edible wafer paper to make the bunny ears, but fondant would also work. A little puff of cotton candy makes a sweet tail. So many possibilities! Whether you make Baby Bunny Coconut Cakes for Easter, a child’s birthday party, a baby shower or simply to celebrate spring.
Print Recipe
Baby Bunny Coconut Cakes
Fluffy, moist mini hemisphere coconut cakes with coconut buttercream frosting, topped with shredded coconut.
Preheat oven to 325ºF (165ºC). Grease 2 silicone 6-serving mini hemisphere pans. Place the pans on large baking sheet.
In a medium bowl, sift together the flour, baking powder and salt. Set aside.
In a large bowl, beat the butter, sugar and oil together with an electric mixer at medium speed, until light and fluffy. Beat in coconut extract. Gradually beat in egg whites, until mixture is well combined, stopping to scrape the sides of the bowl.
On low speed, beat in the flour mixture in three additions, alternating with the coconut milk, stopping to scrape the sides of the bowl as needed.
Fill the hemisphere pan wells, 2/3 full with batter. Bake for 20-24 minutes, until a toothpick inserted into the center of cakes comes out clean.
Place the silicone pans on a cooling rack to cool for 10 minutes. Invert the pans to remove mini cakes and place on cooling racks to cool completely.
Coconut Buttercream
In a large bowl, beat the the butter with an electric mixer on medium speed, until light and fluffy.
Add the powdered sugar and mix on low speed until smooth and well combined.
Add the coconut extract and salt. Beat until combined.
Add the coconut milk a little at a time until desired consistency is reached. Beat at low speed until the buttercream is smooth.
Frost the domed tops of the mini cakes with a small offset spatula. Cover with shredded coconut, pressing lightly to adhere. Decorate as desired.
Finishing Touches
To make bunny ears, cut twenty-four 1 1/2-inch by 1-inch rectangles out of edible wafer paper. Cut each rectangle into a long football shape, flat at one end. Cut a 1/2-inch slit at the flat end. With a small paint brush, dab a bit of piping gel on one side of the slit. Overlap the cut ends of the slit and press together with your fingers. Let dry. Brush pink luster dust into the center of the ears. Skip this step if you are using floral wafer paper. Cut small slits into the bunny cakes and insert the ears.
To make sleepy eyes, roll out a bit of black fondant to 1/16-inch thickness. Cut circles using the small end of a #12 piping tip. Cut thin crescent shapes from the circles using the small end of the piping tip. For easier handling, let eyes dry for a few minutes. If the coconut on your bunny cakes is still moist and tacky, the eyes will stick. If not, brush them with a small bit of water or piping gel.
To make noses, use the candy of your choice, such as candy pearls or candy hearts. I used white candy pearls, brushed with edible pink luster dust.
To make tails, you can use cotton candy or mini marshmallows attached with a bit of buttercream. If using cotton candy, keep in mind that it melts when exposed to air, so it's best applied right before serving.
Recipe Notes
*Do not substitute all-purpose flour. For best results, weigh your dry ingredients.
**For best results, use natural coconut extract. Imitation coconut flavorings may give your baked goods an unpleasant flavor.
***If your coconut milk is separated when you open the can, simply place it in a blender to emulsify it before using.
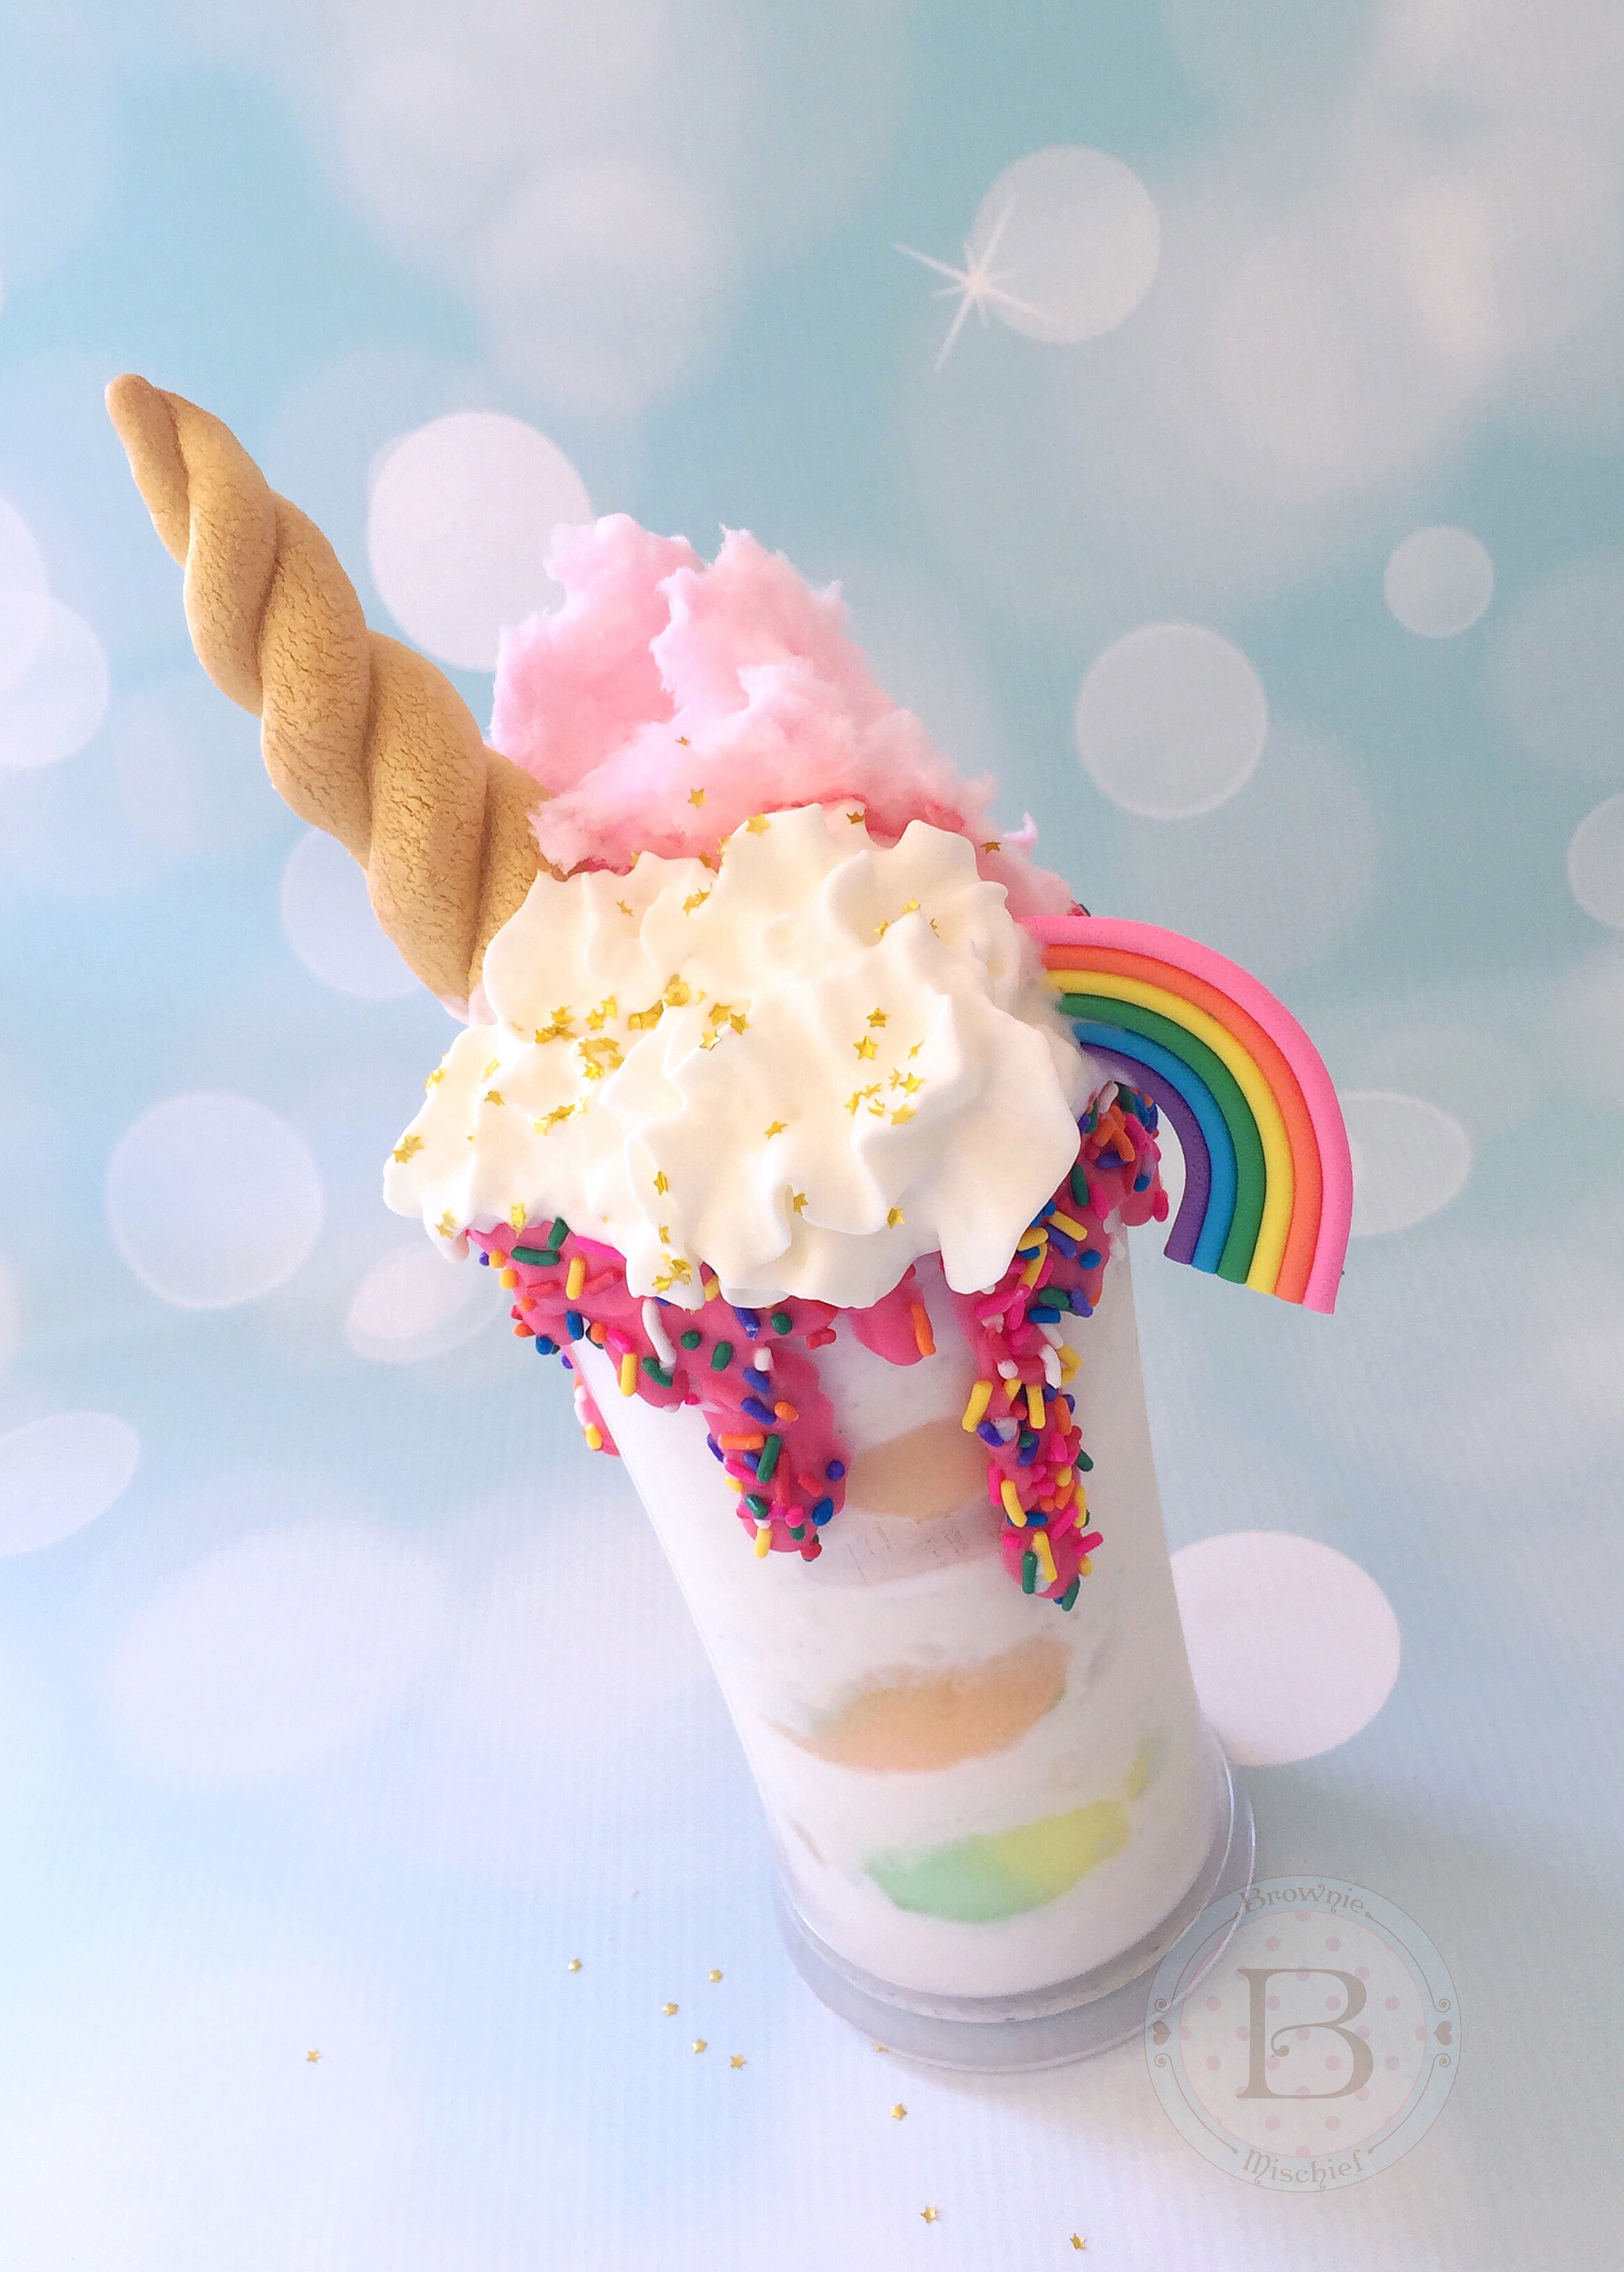
I’ve been dying to try one of those over-the-top milkshakes that have been catching my eye on social media for some time now. Also known as freakshakes, some magnificently indulgent ones can be found in Australia, the UK and New York City. It’s certainly on my bucket list to go meet up with one of those glorious creations in person and dig in! In the meantime, I decided to concoct my humble version here at home, in honor of National Unicorn Day. Yup, unicorns have their own day! Whoever invented celebrating national days, I thank you. It gives me a great excuse to indulge in a delicious treat…not that I need an excuse.
There are so many versions of unicorn milkshakes out there and I love every one of them! In fact, anything that’s unicorn related sets my heart aflutter. The current unicorn craze won’t seem to go away and, as you can imagine, that is just fine by me! One of the cutest unicorn things I’ve seen is my adorable cousin Nicole, scooting around in her fluffy unicorn slippers. Unicorn slippers are a must while drinking a Unicorn Rainbow Milkshake!
To make the Unicorn Rainbow Milkshake, you’ll need:
Place candy melts in a microwave safe container. Heat in the microwave for 1 minute at 50% power. Stir. Heat in the microwave for 10 second intervals until melted and smooth. If your melted candy melts are too thick, stir in melted shortening a teaspoon at a time until desired consistency is reached. Transfer the melted candy melts to a disposable piping bag or a squeeze bottle. (Alternately, you can use a plastic zip bag.) Place your glass on a rimmed plate or baking sheet. Snip off the tip of the piping bag and drizzle the melted candy along the rim of the glass. Immediately sprinkle on the rainbow sprinkles, before the melted candy sets.
Combine vanilla ice cream and milk in a blender and blend until smooth. Place 3 scoops of rainbow sherbet into your glass. Pour vanilla milkshake over the sherbet scoops in your glass. Top with cotton candy, whipped cream, a Unicorn Horn Cookie, a Fondant Rainbow Topper and a sprinkle of edible gold star glitter. Put on your unicorn slippers and enjoy your unicorn milkshake!
In a medium bowl, sift together flour, baking powder and salt. Set aside.
In a large bowl, cream butter and sugar with an electric mixer at medium speed until light and fluffy, about 2-3 minutes.
Add the egg yolk and extracts. Beat at medium speed until combined.
Gradually add the flour mixture, beating at low speed just until combined. Do not over mix.
Cover dough with plastic wrap and chill in the refrigerator for 30 minutes.
Line 2 large cookie sheets with parchment paper.
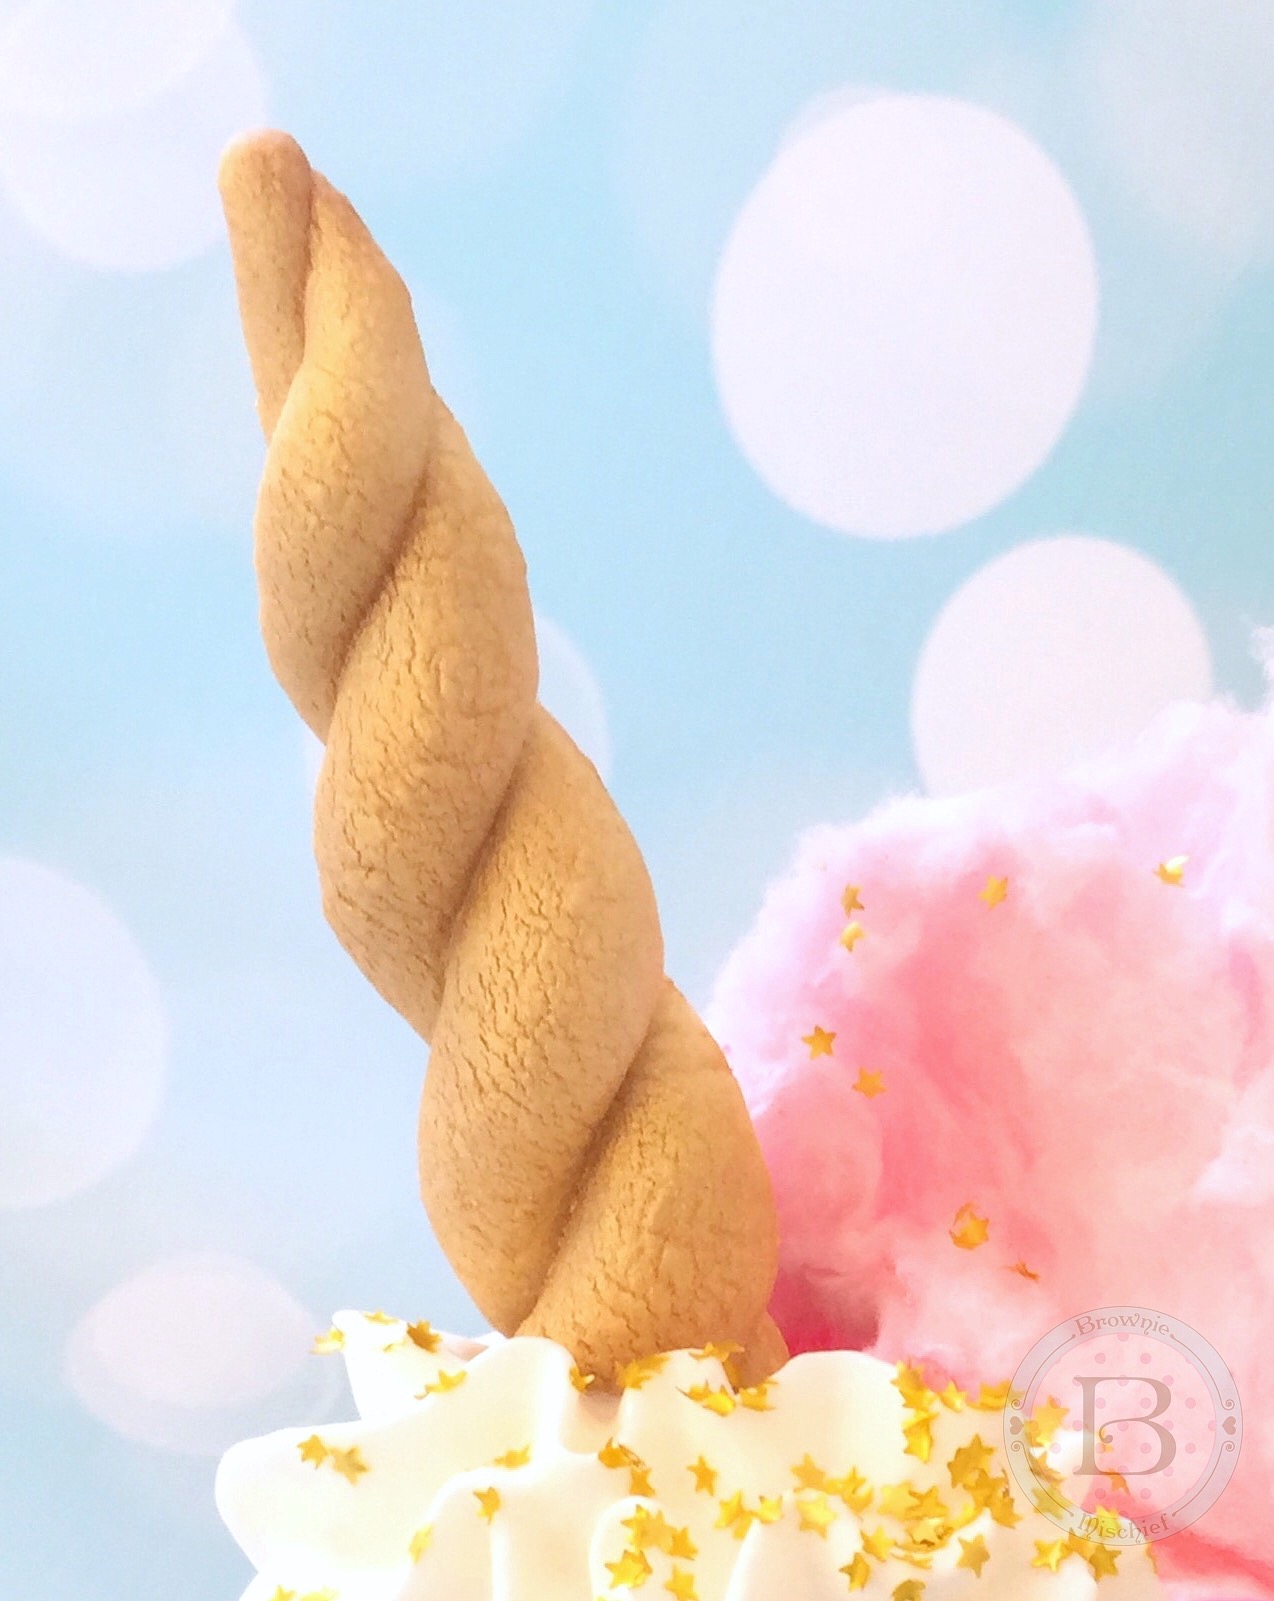
Form dough into tablespoon size balls. (I used a tablespoon cookie scoop to make them uniform in size.) Form each ball of dough into a log, tapering at one end.
Twist two logs together to form a horn shape. Repeat with remaining logs. Insert skewers or lollipop sticks, if using. Place about 2 inches apart on prepared cookie sheets.
Cover with plastic wrap and chill in the refrigerator for 30 minutes.
Preheat oven to 350ºF. Bake until golden brown, about 13-15 minutes. Transfer cookies to wire rack to cool.
When cookies have cooled completely, place them on a parchment paper lined work surface. (You can use the same pieces of parchment paper that you baked them on.) If you are using lollipop sticks, you may want to cover the sticks with plastic wrap to keep them clean. Spray with edible gold spray. Let dry. Apply an additional coat of edible gold spray, if desired.
Recipe Notes
*This recipe makes about 14 unicorn horn cookies, but if you only need a few, you can roll out the remaining dough and use your favorite cookie cutter to make cookies. The baking time will be a bit less. You can also make as many unicorn horns as you need and freeze the remaining dough for later use.
**To make toppers as shown, use wooden skewers. To make cookie pops, use lollipop sticks.
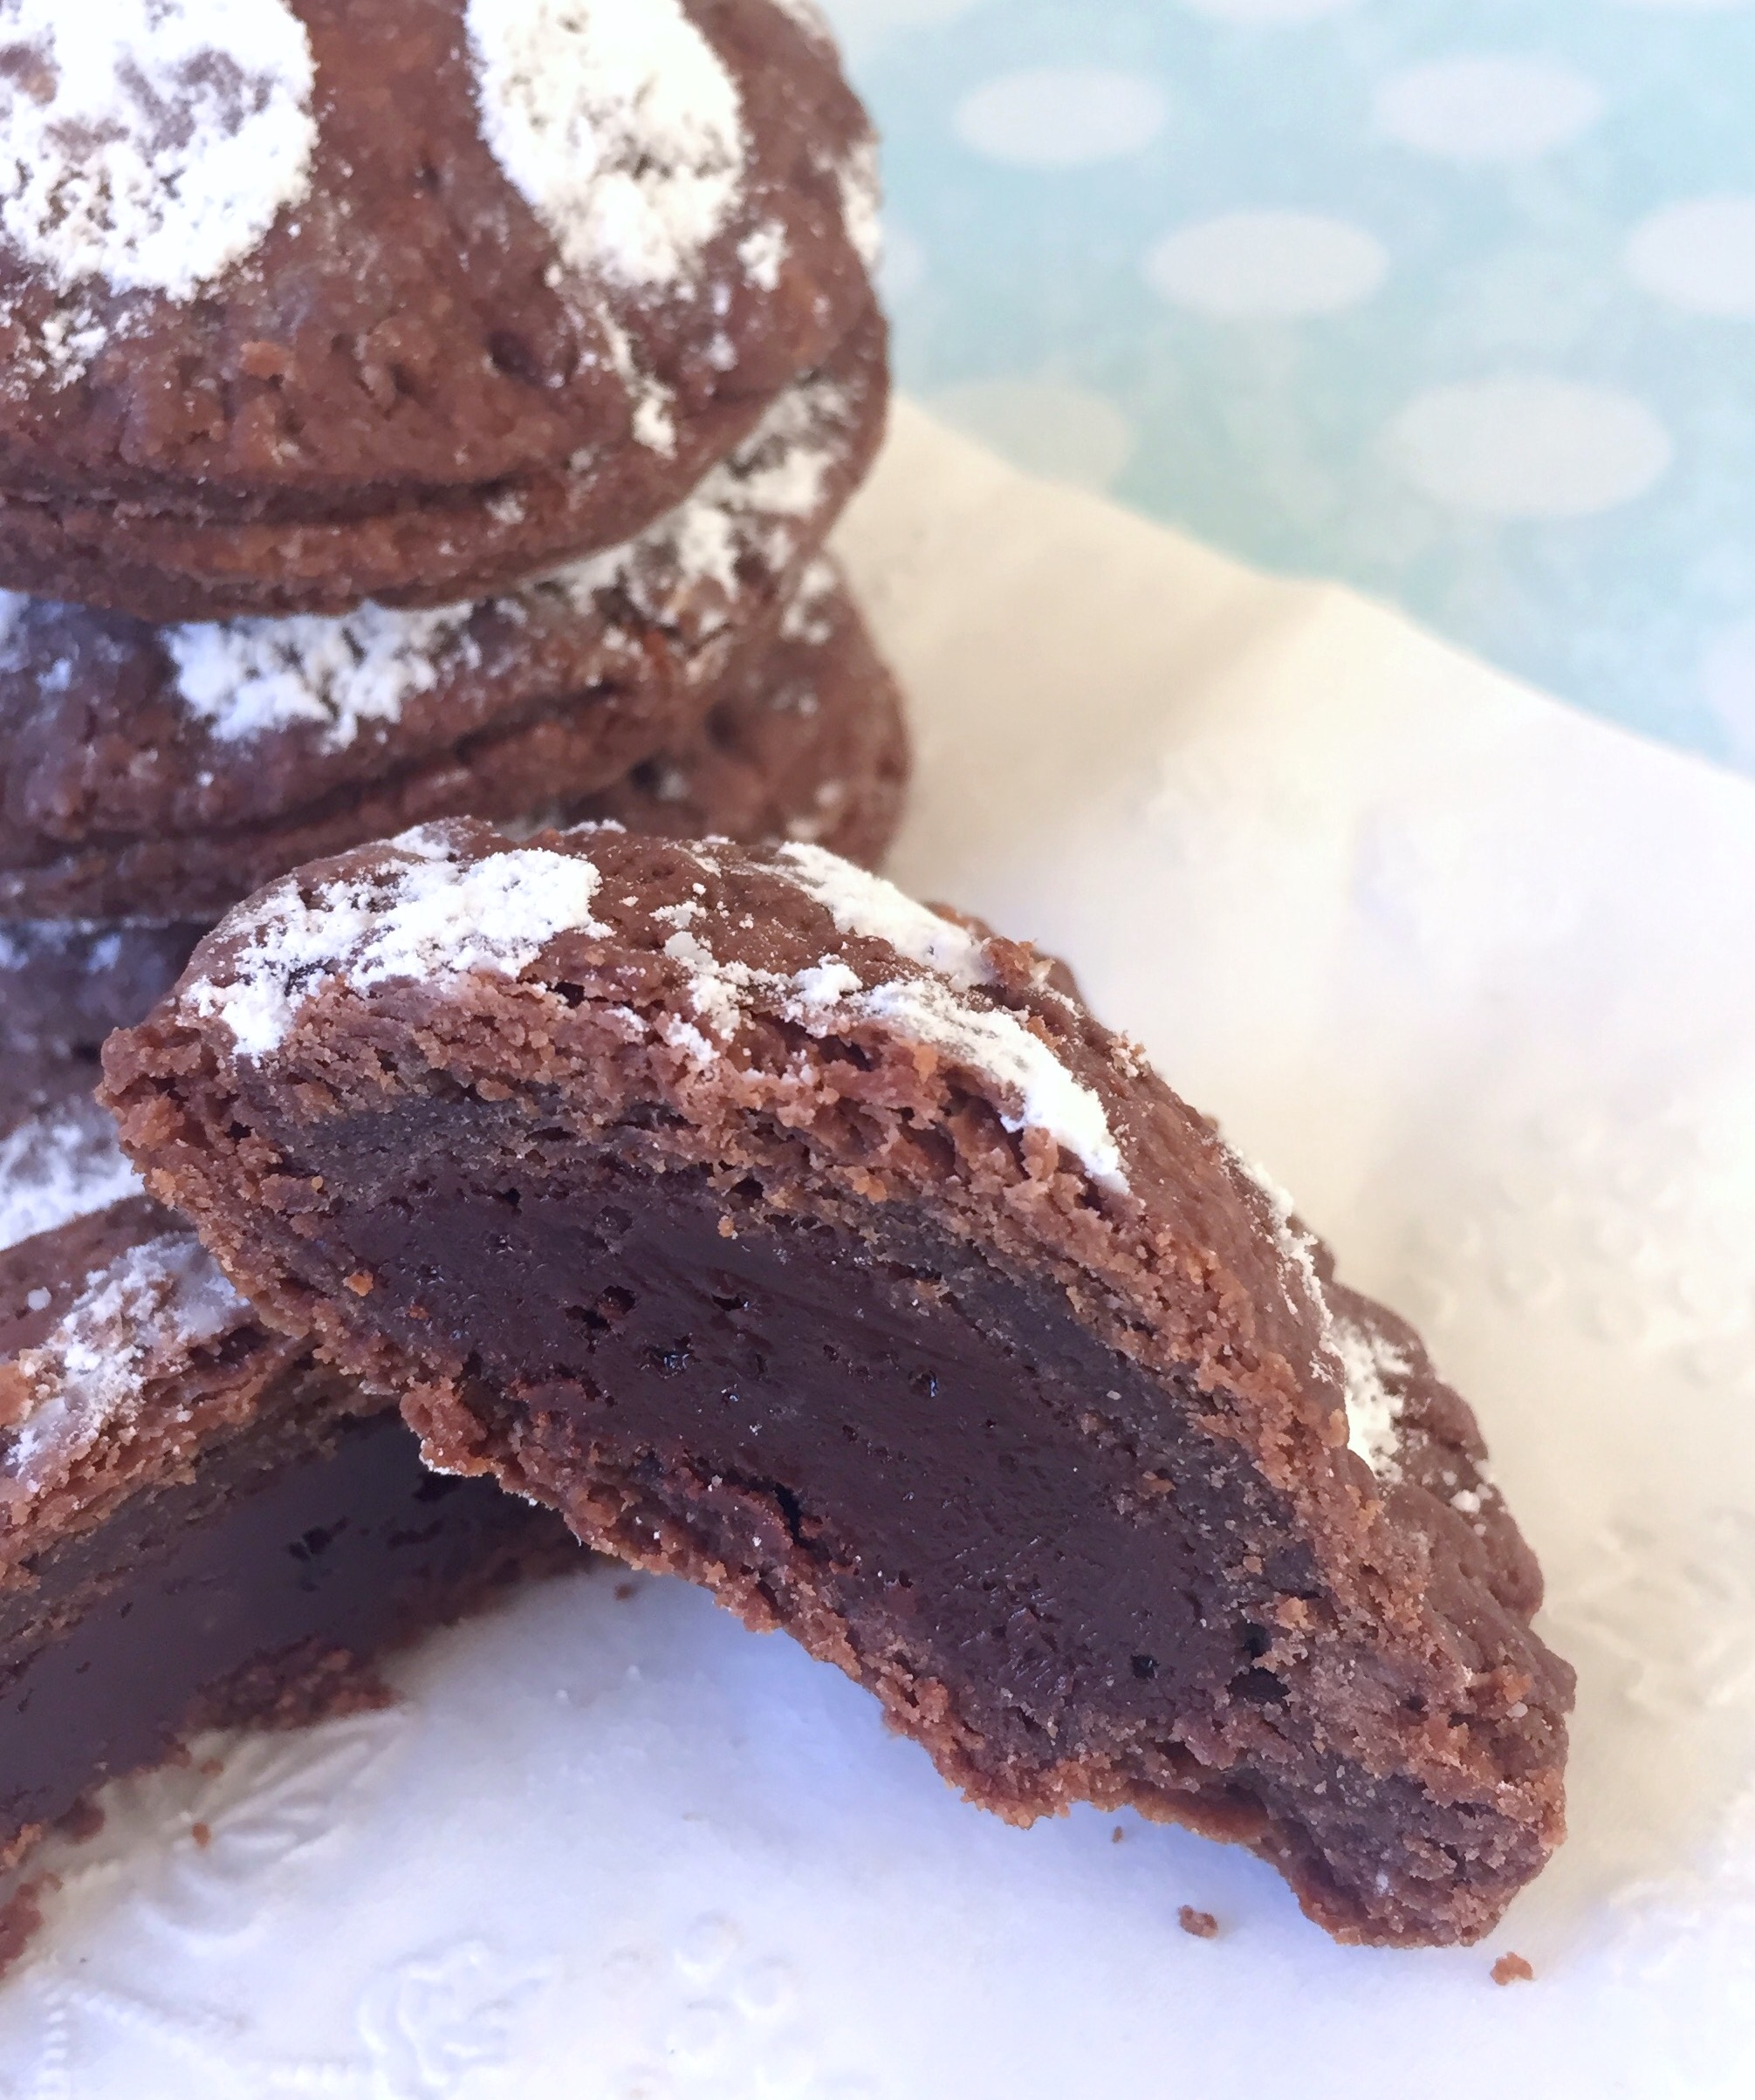
Pi Day is a day to celebrate mathematics, or more specifically, the ratio of a circle’s circumference to it’s diameter. While I do appreciate math for it’s precision, I also feel a bit peeved at math for making my brain hurt! Ok, I’m sorry math. I forgive you. I do need you! How would I bake without you? So today I will celebrate math (and also my love for puns) with these tender, fudgy mini hand pies!
Since pi is all about circles, I used a 2 3/4-inch circle cutter to make round pies, but you can cut them into any shape you like. You could cut larger circles, fold them in half and call them empanadas. Rectangles are very popular with Pop Tart fans and you don’t need a special cutter, but a ruler would be helpful. I think squares would be cute, too! Whatever your shape of choice, my buddy math can hook you up!
I used a stencil to add some powdered sugar polka dots to my mini pies. I may have gone a little overboard with my circles, but who’s going to stop me? I think they look pretty cute, but If you don’t have a stencil, a sprinkle or two of powdered sugar will do just fine! Alternately, you could drizzle them with some melted white chocolate. I had a bit of white chocolate on hand, so I can confidently say, that version is yummy too!
Print Recipe
Mini Chocolate Hand Pies
Mini chocolate pies with fudgy filling and a tender chocolate crust.
In a large bowl, sift together the flour, cocoa powder, sugar, salt and baking powder.
Use a pastry cutter or your fingers to work the butter and cream cheese into the flour mixture until it resembles pea-sized crumbs.
Add 2 tablespoons of the cold water to the mixture. Stir gently just until the dough comes together.
Turn the dough out onto a lightly floured surface. Fold the dough over onto itself a couple of times. Form the dough into a disk. Cover with plastic wrap and chill for at least 1 hour.
Filling
In a small microwavable bowl, melt the chocolate chips and sweetened condensed milk in the microwave. Heat for 10 second intervals, stirring until smooth.
Set aside to cool to room temperature.
Assembly
Preheat the oven to 375ºF. Line a large baking sheet with parchment paper.
In a small bowl, whisk together the egg and remaining 1 tablespoon water.
On lightly floured surface, roll the dough to 1/8-inch thickness.
Cut out 20 rounds with a 2 3/4-inch circle cutter (or cut into desired shapes of your choice).
Place 10 dough rounds about 1 inch apart onto prepared baking sheet. Top each with 1 tablespoon of filling.
With a small pastry brush or your finger, brush egg mixture around the perimeter of each of the filled dough circles.
Top each with the 10 remaining dough circles. Crimp the edges together with a fork. Brush the pies with the remaining egg mixture.
Bake until the crust is crisp and browned, about 15-20 minutes.
Transfer to a cooling rack. Sprinkle the cooled pies with powdered sugar or drizzle with melted white chocolate.
Recipe Notes
*The chocolate chips you use depends on personal preference. Bittersweet chocolate chips give a more intense chocolate flavor, while semi-sweet chocolate chips yield a slightly sweeter finished product.
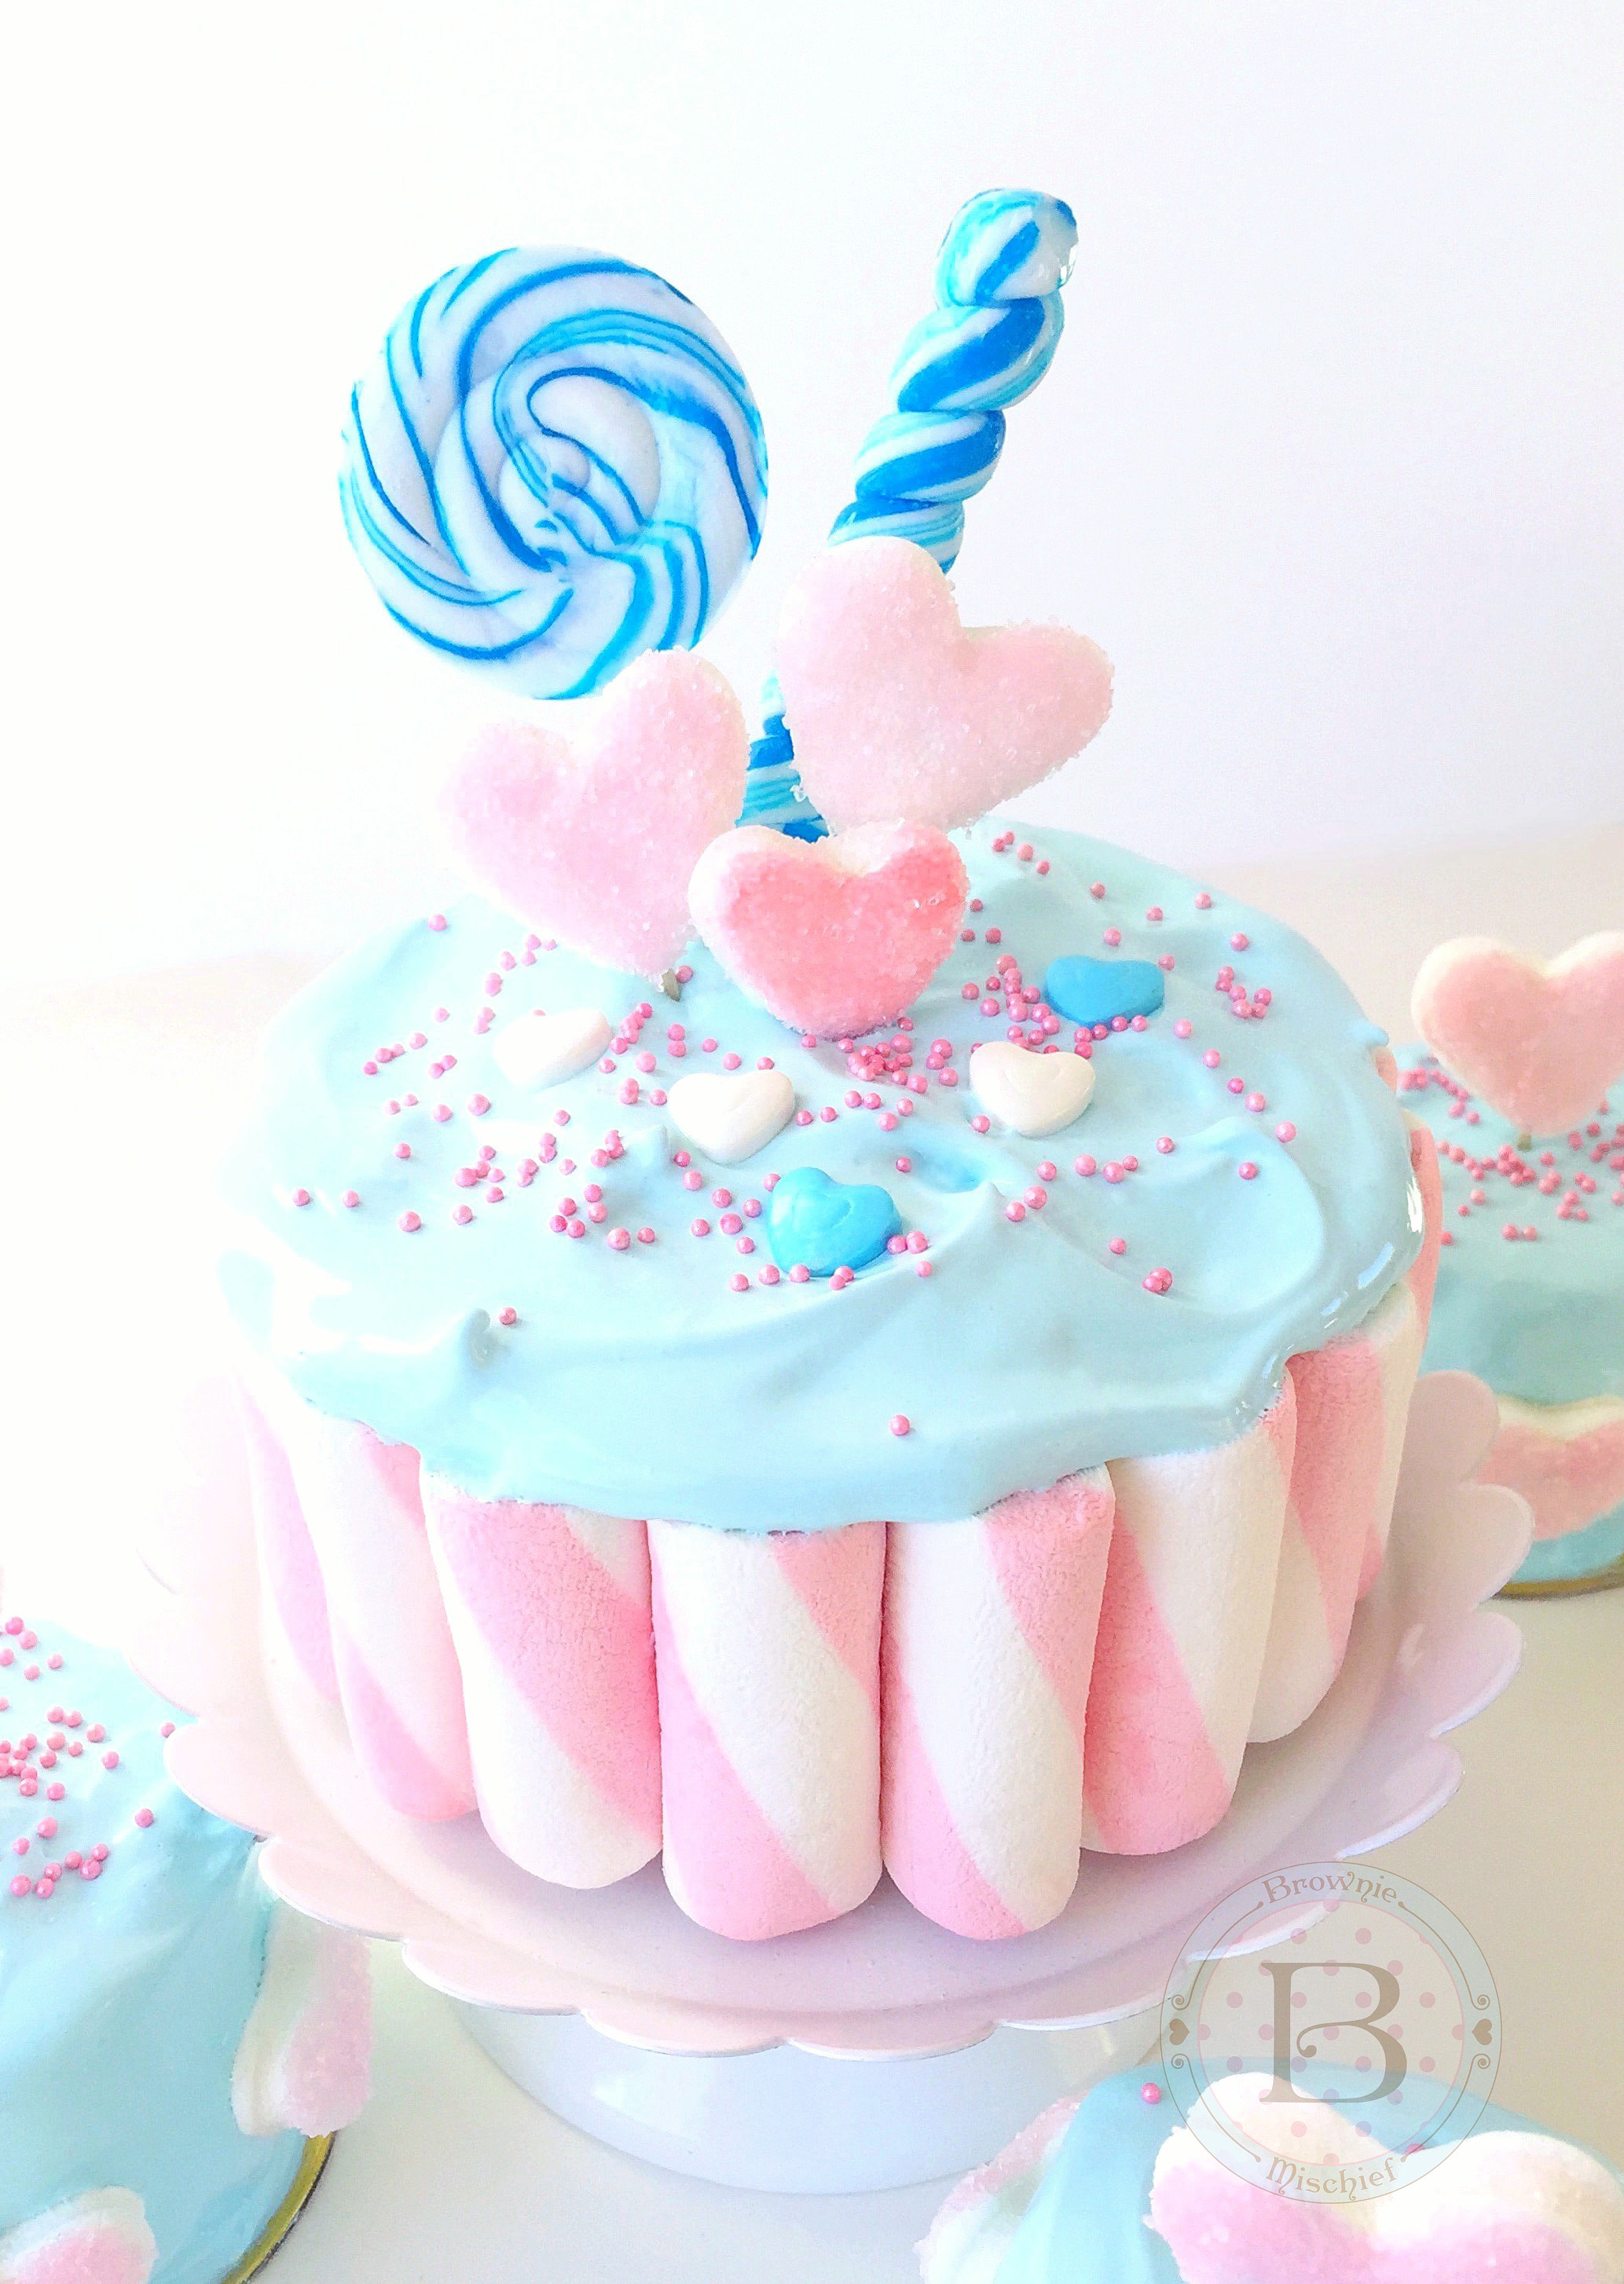
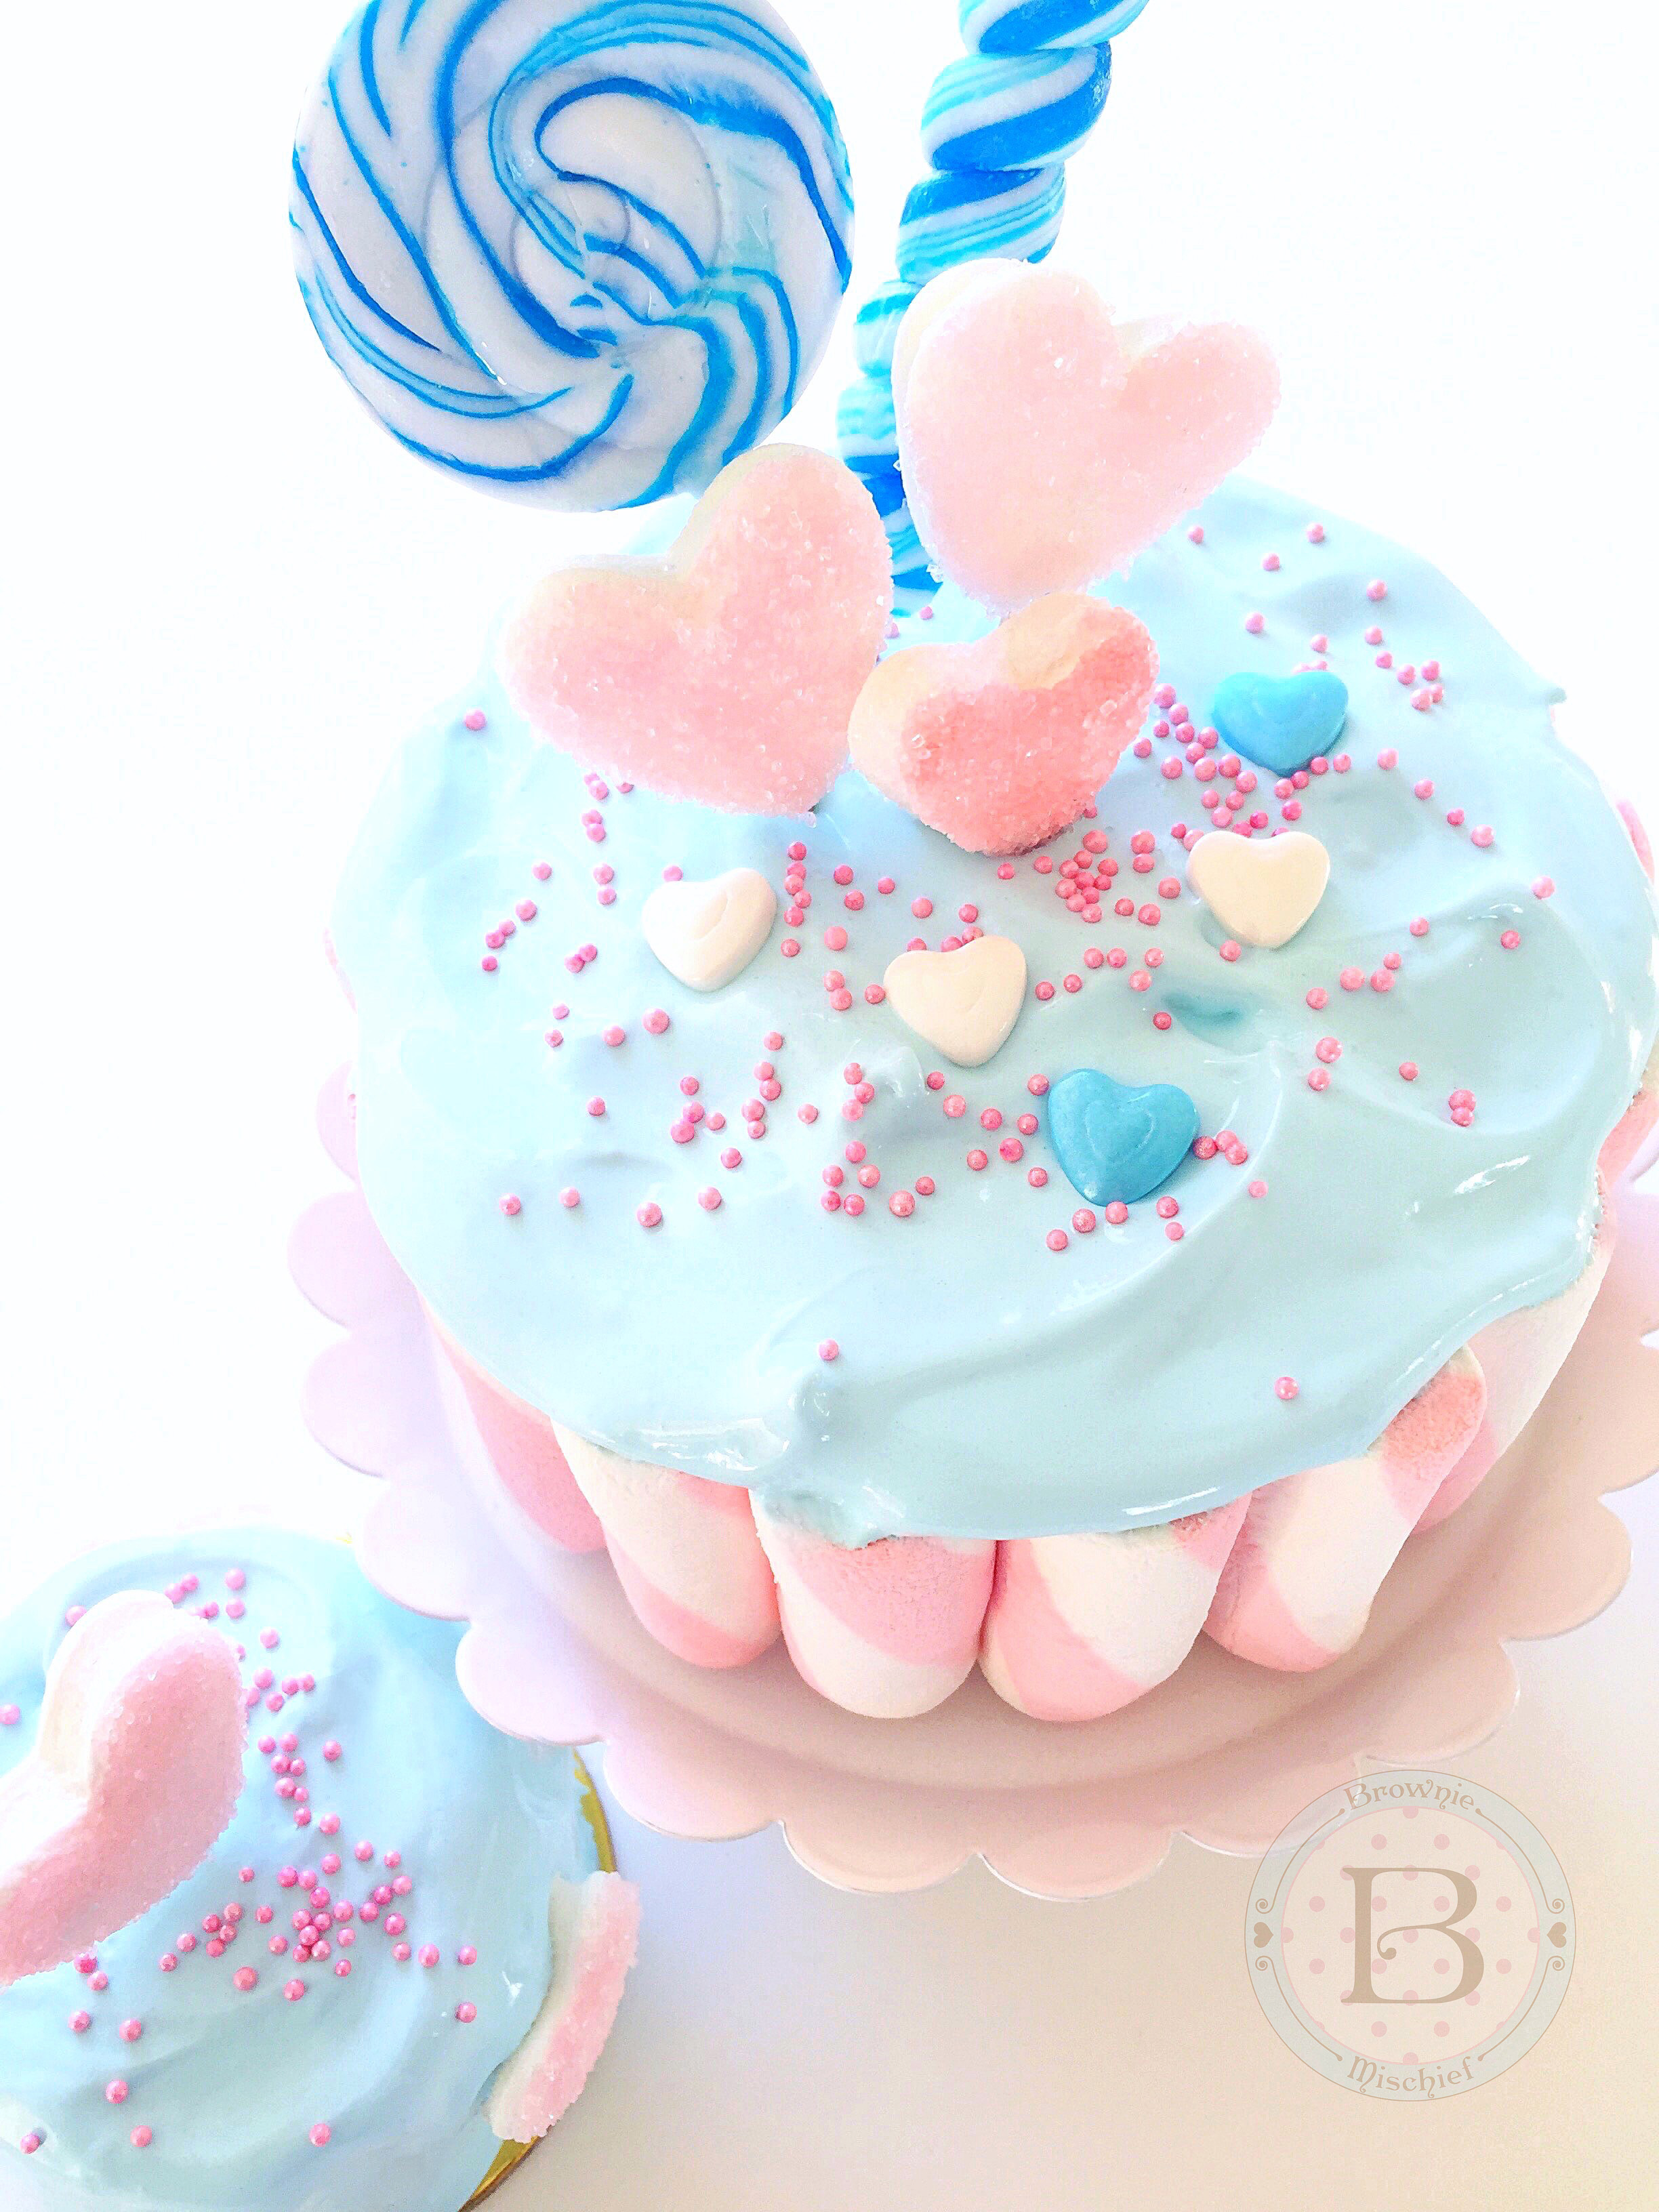
Dear marshmallows, why are you so sweet and fluffy? I shall call you squishy and you shall be mine! Yes, it’s true, I’m a bit crazy about marshmallows. This post is nothing short of a marshmallow fest! First, my daughter and I made some Sparkly Marshmallow Hearts that are super fun and easy to make. I literally want to put them on everything! How cute do they look on this mini cake? They also make adorable cupcake toppers! To view the Sparkly Marshmallow Hearts tutorial click here.
We also had some fun with Puffy Poles. In case you’re not marshmallow savvy, Puffy Poles are marshmallows that look like chubby barber poles. They’re very popular on dessert tables and candy buffets. We used pink ones, which have a subtle strawberry flavor. We applied them to the pictured 4-inch diameter by 2 1/4 inch tall strawberry cake, which was crumb coated with a thin layer of vanilla buttercream. We used buttercream to adhere them to the sides of the cake. To find Puffy Poles click here.
Next, I made some Billowy Sky Blue Marshmallow Frosting to share with you. One of the things you’re going to love about this frosting, besides being yummy, is it’s natural beauty. You can simply spoon it on, no piping or fancy tricks necessary. Everything it touches becomes an ethereal cloud of deliciousness! The recipe is below.
In a large heatproof bowl, whisk together sugar, egg whites, water and cream of tartar until frothy.
Place bowl over a pan of gently simmering water, making sure the water isn't touching the bottom of the bowl. Whisk mixture until temperature reaches 160° and sugar is completely dissolved.
Remove bowl from heat. Add extracts. Beat mixture with the whisk attachment of an electric mixer on high speed until stiff and glossy.
Add a small amount of food color with a toothpick and mix on low speed. Continue adding food color, a little at a time, until desired shade is reached. Use a clean toothpick for each addition.
Recipe Notes
*It's important to dissolve all of the sugar when making this frosting. Ultra fine sugar dissolves easier, but if you are unable to find it, you can use regular granulated sugar.
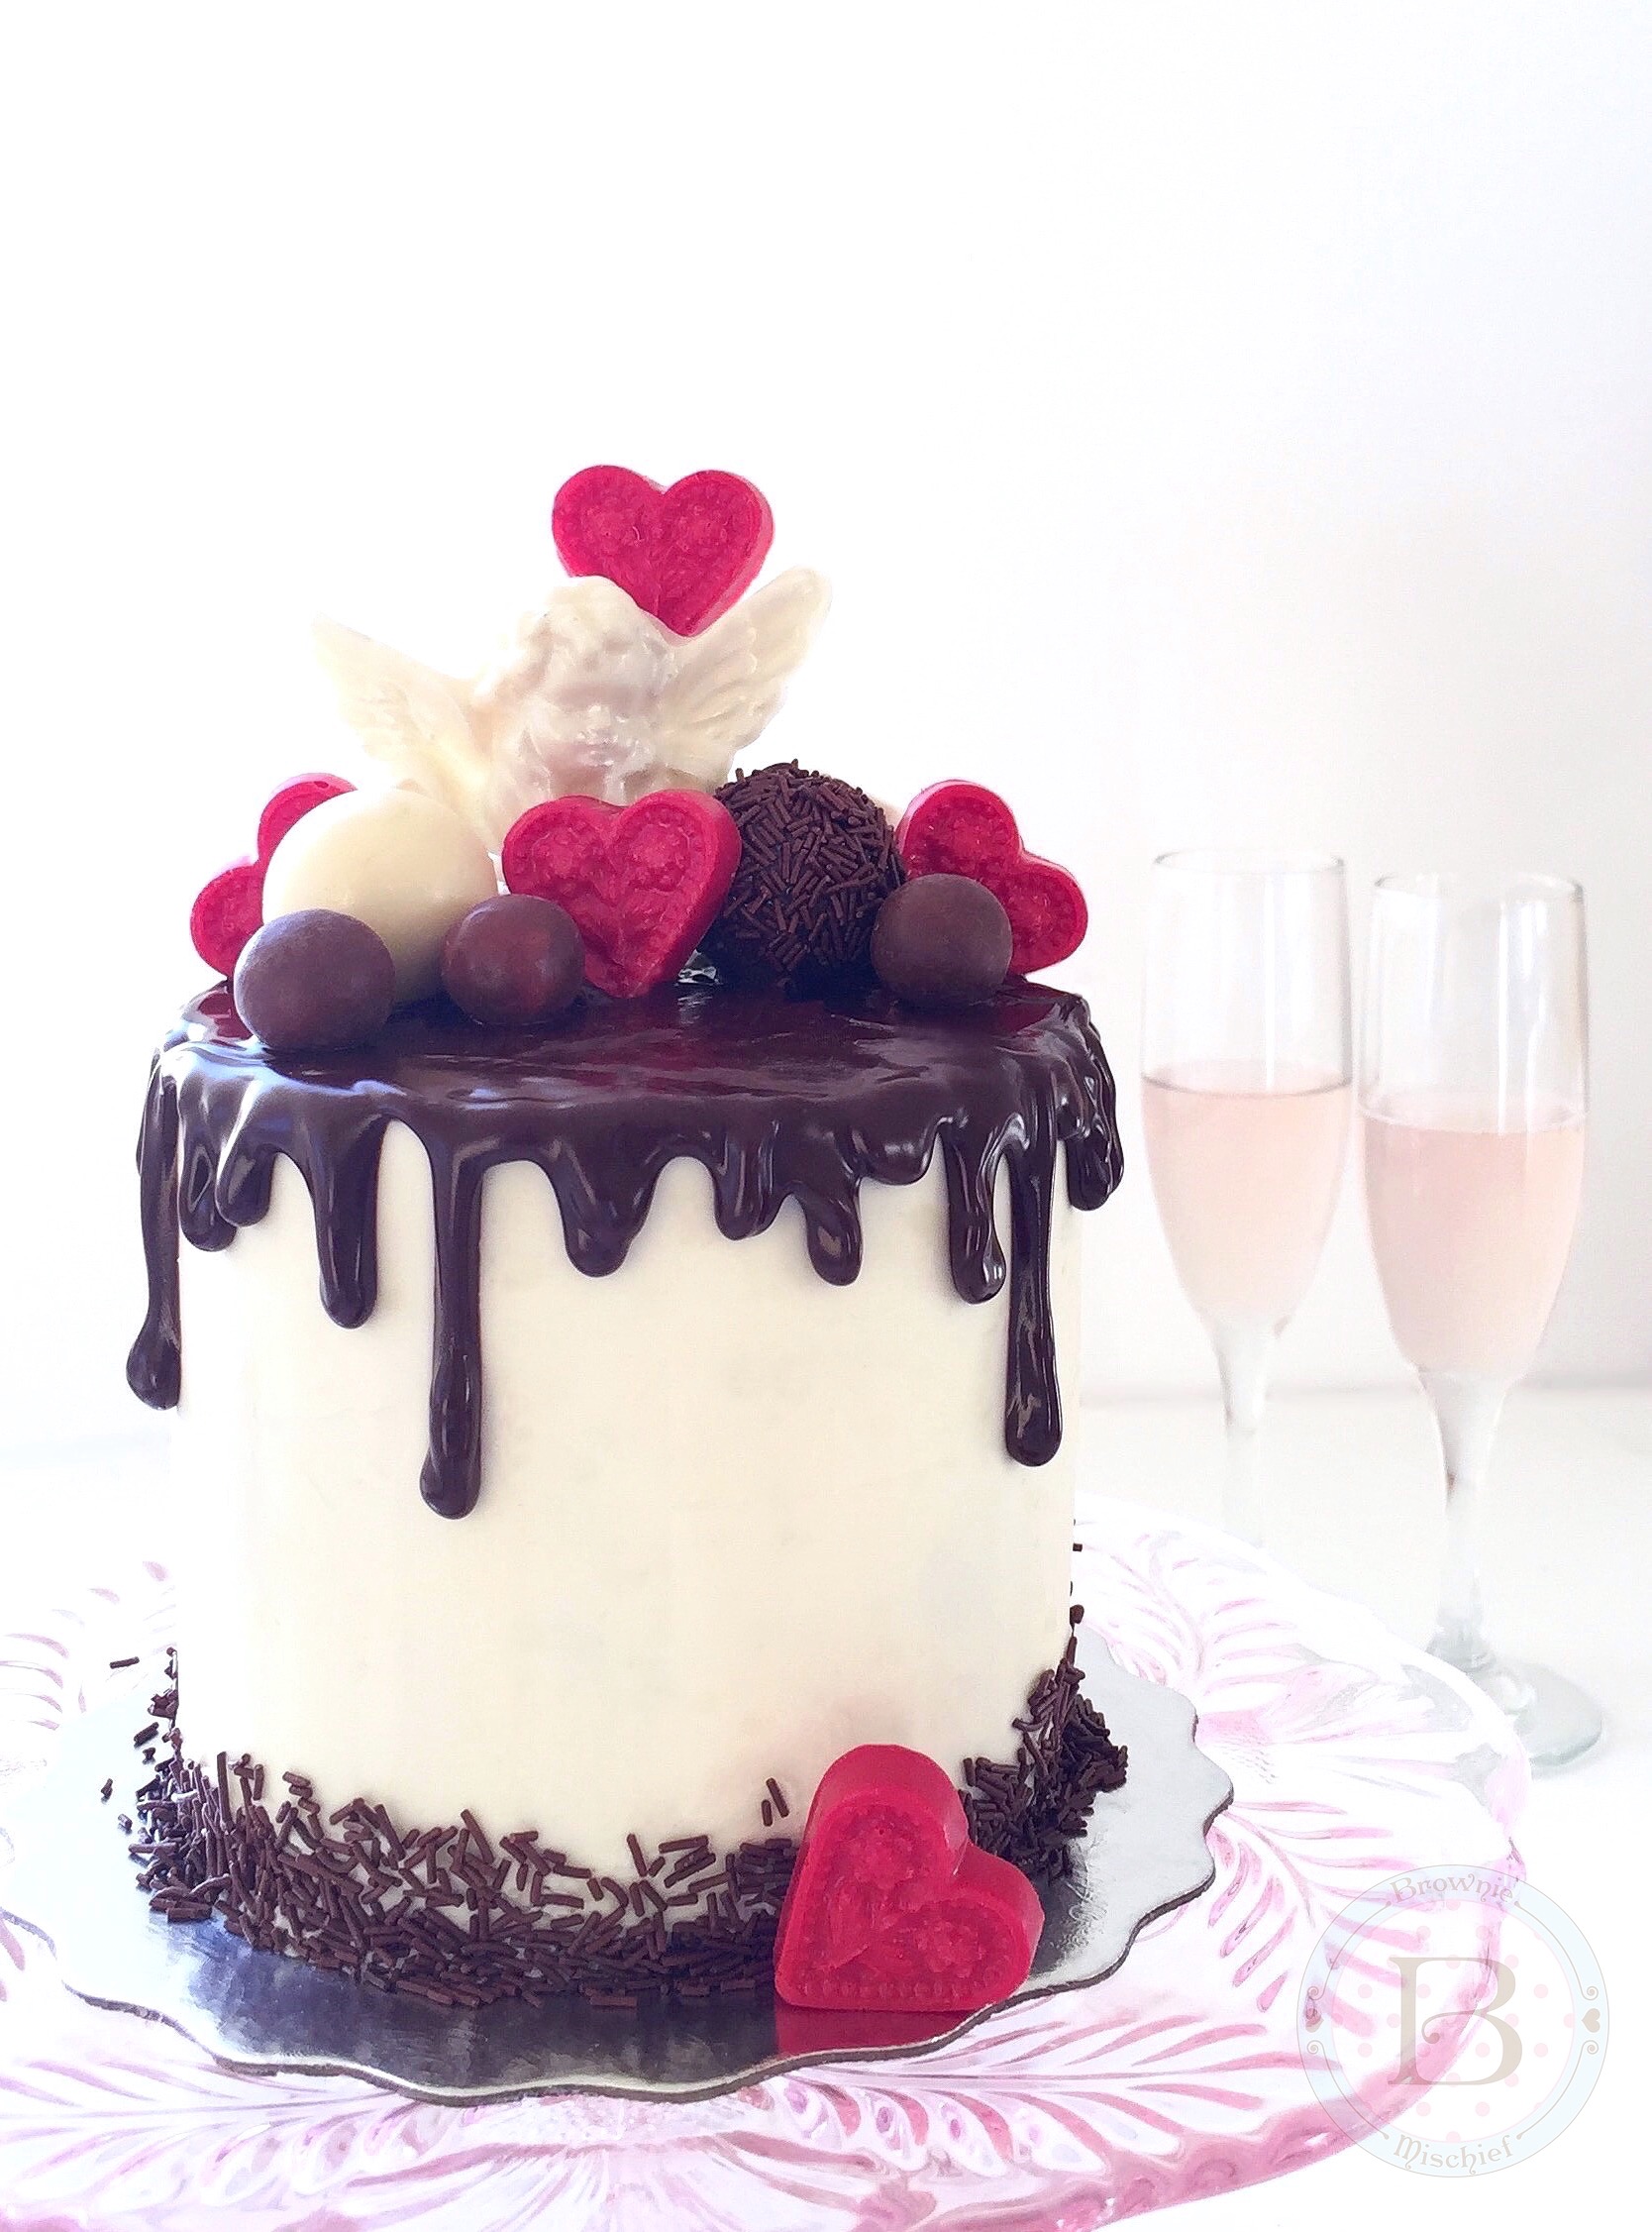
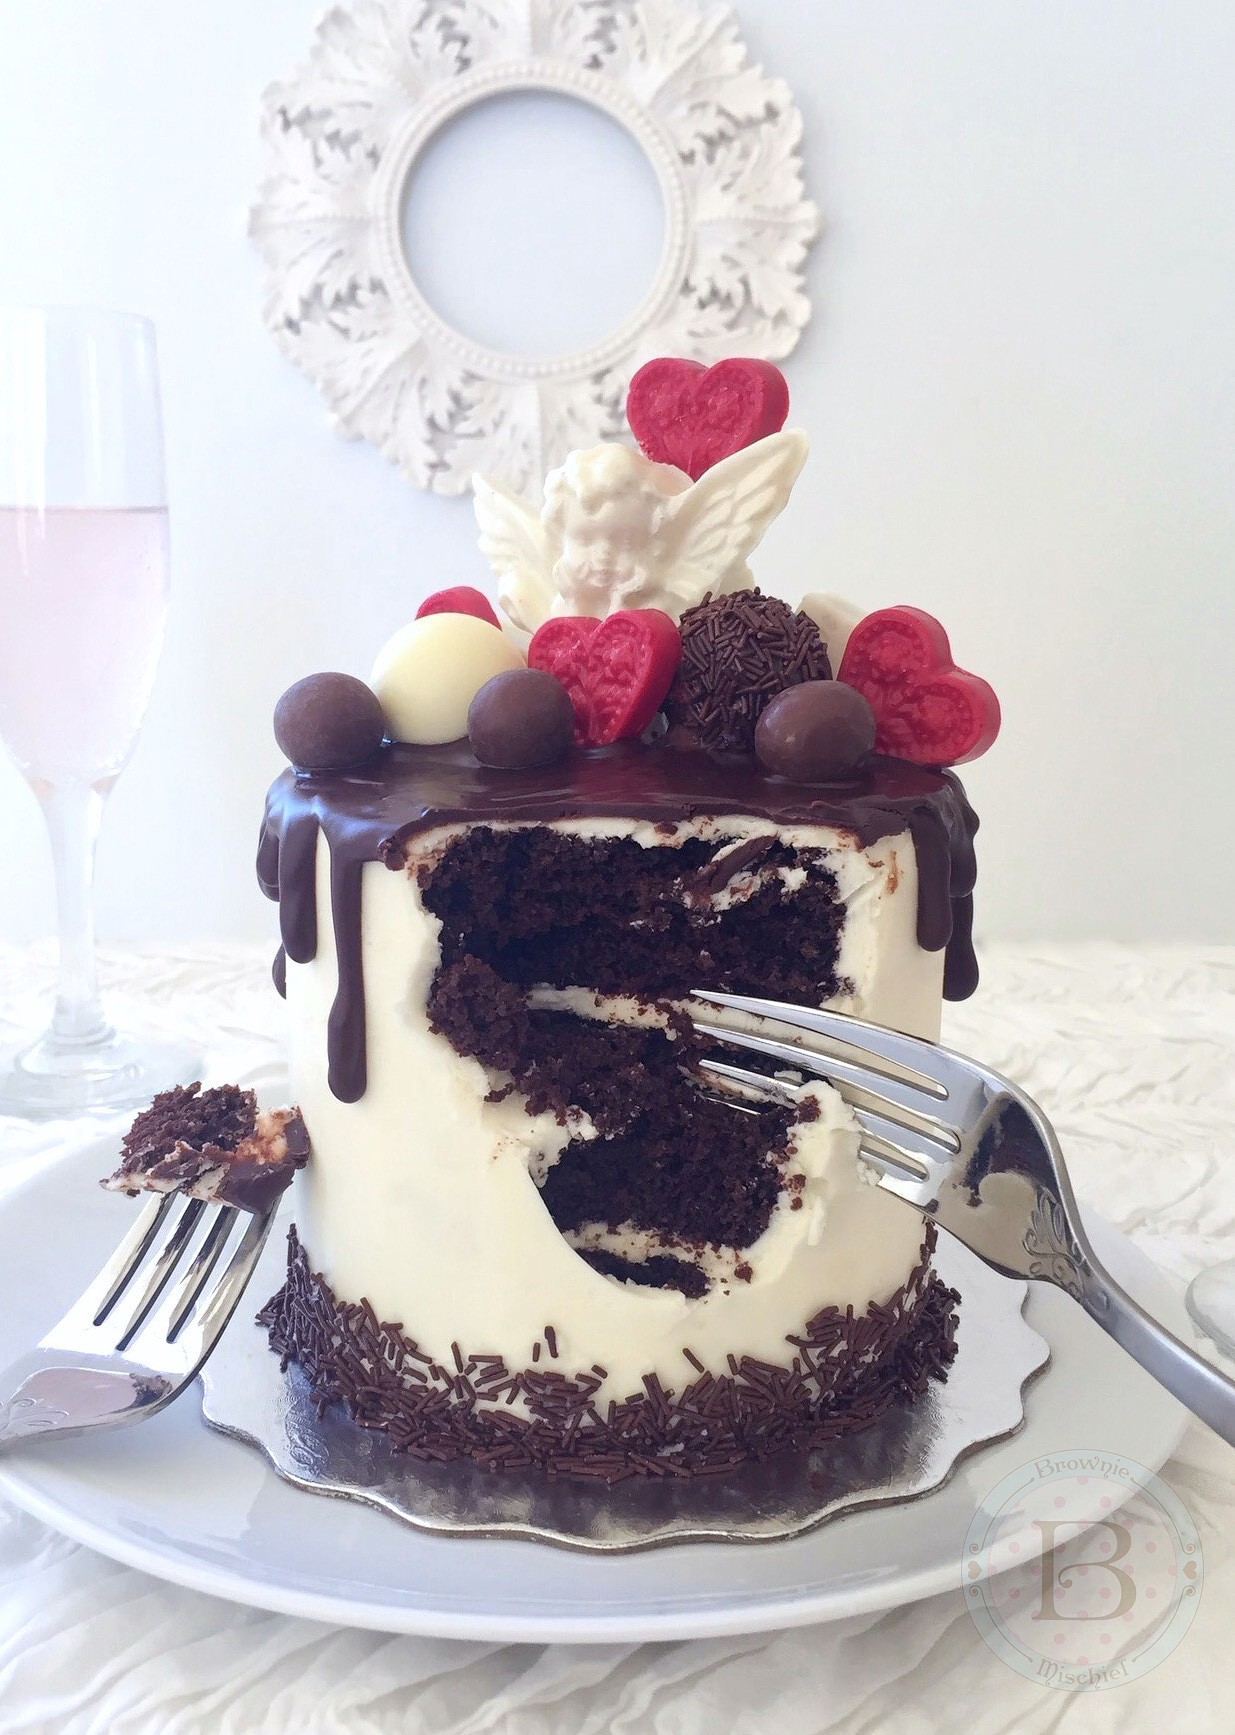
My relationship with Valentine’s Day has transformed over the years. When I was a child, I joyfully skipped home from school with my bounty of tiny Valentine cards, candy hearts and a cupcake someone’s mother baked. As I grew older, I was hot and cold towards Valentine’s Day, depending on the state of my love life at the time. After having kids, Valentine’s Day became about red construction paper, doily hearts and glue sticks. I happily cleaned up sprinkles and kissed chubby, frosting-stained cheeks. Now I think of Valentine’s Day as simply a day to celebrate love. I embrace Valentine’s Day and all the hearts, roses and chocolates that go with it! Show your loved ones that you love them on Valentine’s Day, but more importantly, show them throughout the year, by loving, respecting and accepting them for who they are every day.
If your heart beats for a chocolate lover, then this Valentine cake for two will have them swooning. It’s small in size, but grand in chocolate indulgence. It has three layers of moist chocolate cake, rich, white chocolate buttercream and a silky chocolate glaze. As if that isn’t enough, I loaded the top with chocolate candy! Some of the candy is store bought and some I made with candy melts and chocolate molds. Click here to find the cherub mold.Click here to find the heart mold.
I hope you share this Valentine cake with someone you love! However you celebrate the day and whoever you love, have a happy one!
Print Recipe
Chocolate Lovers' Valentine Cake for Two
A mini chocolate cake with white chocolate buttercream, topped with chocolate glaze and chocolate Valentine candy. Perfect for sharing!
Preheat oven to 350°F. Grease & flour three 4-inch cake pans. *See note below.
Sift flour, cocoa powder, baking powder, baking soda and salt together in a medium bowl. Add sugar and stir to combine.
Combine egg, buttermilk, vegetable oil and vanilla extract in a small bowl. Whisk lightly to combine.
Add egg mixture to dry ingredients and mix on low speed with a handheld electric mixer, until combined. Stop mixer. Scrape sides of bowl with spatula. Turn mixer up to medium speed and beat for 1 minute.
Add hot coffee and stir until incorporated.
Pour batter into prepared cake pans, dividing batter evenly between the pans. Bake for 20-25 minutes or until a toothpick inserted into the center of the cake comes out clean.
Cool cakes in pans 10 minutes, then invert onto a wire rack to cool.
White Chocolate Buttercream
Melt white chocolate in a double boiler over gently simmering water. (Alternately, you can melt the white chocolate in the microwave. In a small microwaveable bowl, heat the white chocolate for 30 seconds, then stir. Heat again for 10 second intervals, stirring until melted, being very careful not to overheat it.)
Set white chocolate aside to cool until lukewarm and still soft.
In a medium bowl, beat butter with an electric mixer at medium speed until pale and creamy.
Add vanilla extract, salt and melted white chocolate. Beat at low speed until combined. Stop mixer. Scrape sides of bowl with spatula.
Add powdered sugar. Beat at low speed, until powdered sugar is combined. Beat at medium speed until buttercream is smooth, stopping to scrape the bowl occasionally. Keep covered at room temperature until ready to use.
Cake Assembly
When cakes have cooled completely, trim the cake layers to 1-inch tall.
Attach one of the layers to a cake board with some of the white chocolate buttercream. Apply 1/4-inch thick layer of buttercream to the top of the cake layer, followed by the second cake layer, another 1/4-inch thick layer of buttercream, then the final cake layer.
Apply a crumb coat (thin layer) of buttercream to the cake. Chill the cake in the refrigerator for 20 minutes.
Frost the cake with the remaining buttercream. Apply chocolate sprinkles to the bottom edge of the cake.
Melt chocolate drip glaze ingredients together in a double boiler over gently simmering water. Let cool slightly.
Spoon chocolate glaze into a piping bag. Snip off the end of the bag with kitchen scissors. Drizzle chocolate glaze along the edges of the perimeter of the cake, then fill in the middle. Smooth top with a small offset spatula.
Top cake with assorted chocolate candy. If desired, you can stack some of the candy and adhere them with melted chocolate to give some variation in height.