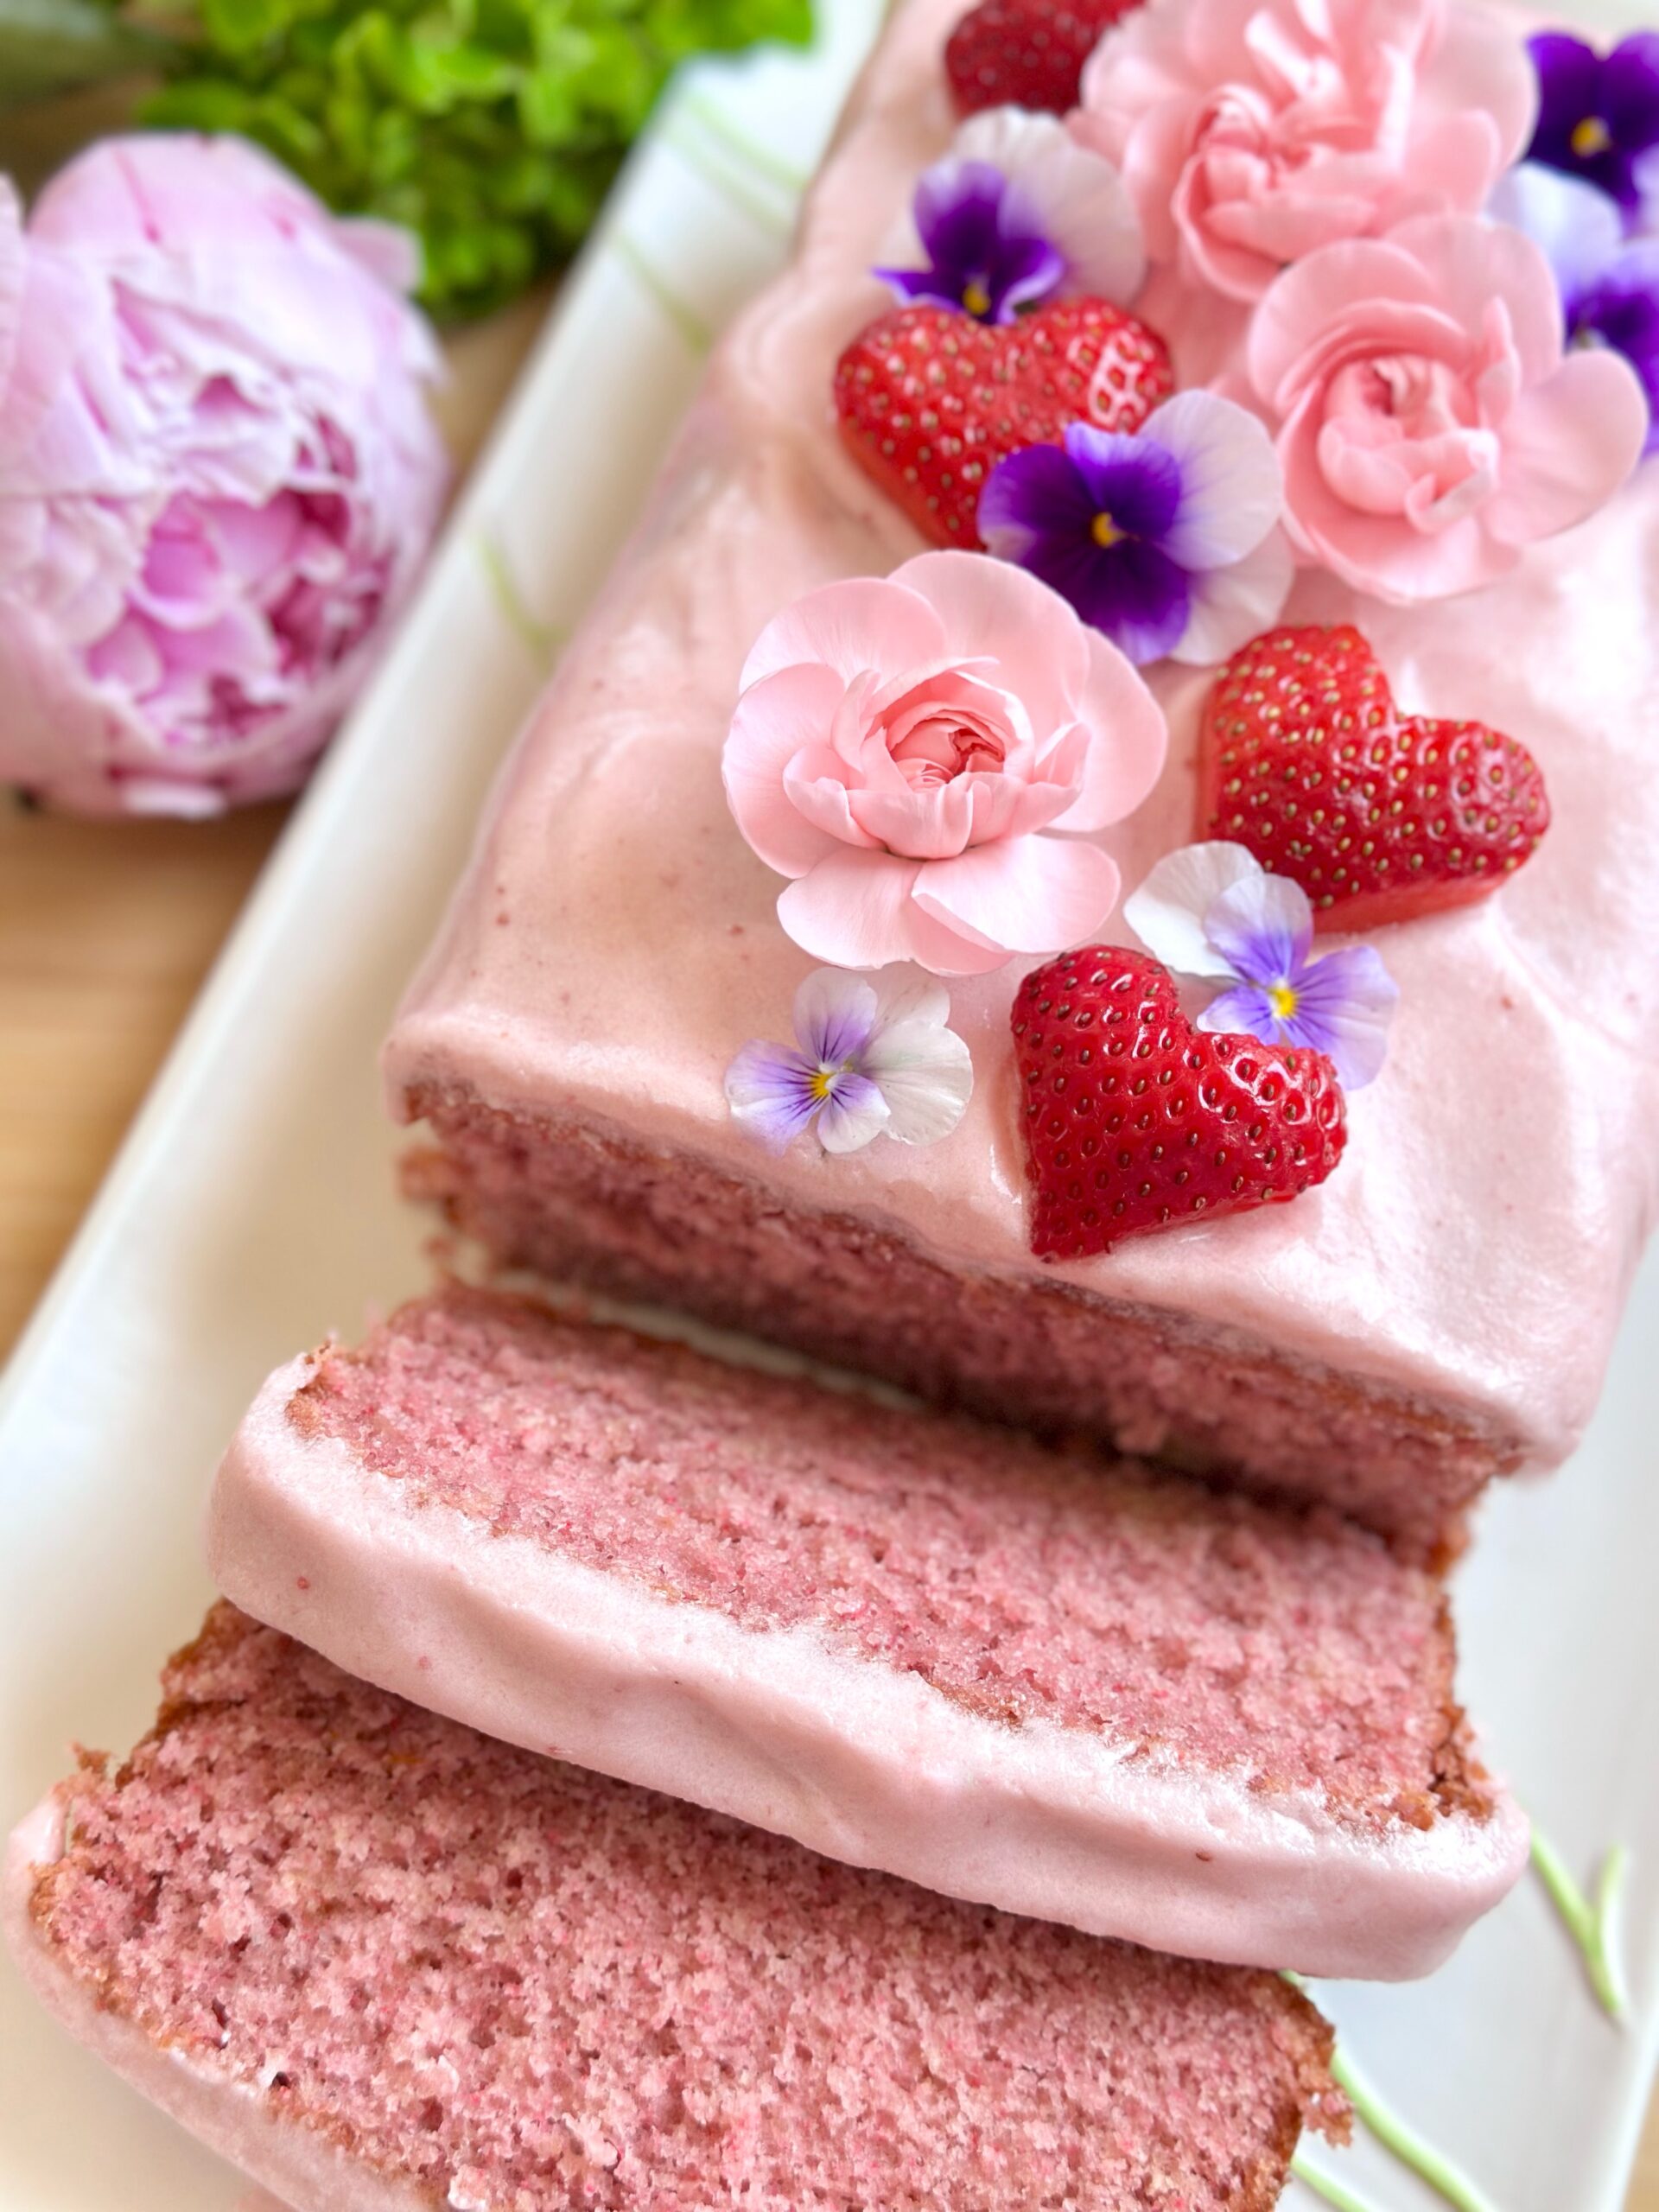
Totoro Inspired Blueberry Tarts

Totoro Inspired Blueberry Tarts

If you’re a fan of the movie, My Neighbor Totoro, you’ll love these cute little tarts with bellies full of blueberry filling. I watched this movie multiple times over my break from Christmas to New Year’s Day. 2024 was such a roller coaster, that I needed something that brings happiness and comfort. I hope these yummy little cuties will bring you happiness too!

I shared my flaky pie crust recipe below along with the filling. If you want to streamline the process, you can certainly use store bought pie crust. But I must say that that I’ve made them both ways and the homemade crust tastes so much better! You can use a 4 1/2-inch Totoro cookie cutter* to make the pies or you can use the free printable pattern** I provided below. For best results, make sure your dough is nice and cold when cutting it out. You can also use any leftover pie scraps to make tiny Chibi Totoros if you like. Brush them with egg wash and sprinkle with coarse sugar. Bake for a few minutes until light golden brown.

Print Recipe
Totoro Inspired Blueberry Tarts
Totoro-shaped blueberry tarts with vanilla icing
Course Dessert
Servings
tarts
Ingredients
Crust
Filling
Icing
Course Dessert
Servings
tarts
Ingredients
Crust
Filling
Icing
Instructions
Crust
  1. In a large bowl, whisk together the flour, sugar and salt. Work the shortening into the flour mixture with your fingertips until it's evenly distributed. Work in the butter until flat, dime-size pieces are formed.
  2. In a glass measuring cup, stir the ice water and the vinegar together. Sprinkle it over the flour mixture a little at a time, stirring the dough until it comes together. You may not need all of the liquid, depending on your climate.
  3. Turn the dough out onto a lightly floured surface. Fold the dough over onto itself a few times. Do not over work the dough. Divide the dough into 2 equal portions. Use a kitchen scale for accuracy. Form the portions into disks, wrap them in plastic wrap and refrigerate until firm, at least 2 hours or up to overnight.
Filling & Assembly
  1. Set aside 1/2 cup of blueberries. In a medium-size saucepan, over medium heat, stir together 2 cups of blueberries and the lemon juice. Add the sugar, cornstarch and salt. Stir gently until the sugar melts and the mixture starts to bubble. Let the mixture simmer gently until thickened, about 3-5 minutes. Transfer the mixture to a shallow bowl. Stir in the reserved 1/2 cup of blueberries and the vanilla extract. Let cool to room temperature.
  2. Preheat the oven to 375ºF (190ºCº). Line two baking sheets with parchment paper.
  3. On a lightly floured surface, roll the dough to 1/8-inch thickness. Cut out 9-10 Totoro shapes out of each dough portion using a 4 1/2-inch Totoro cookie cutter* or cut with a paring knife using the provided pattern.** You should get 20 Totoro cut-outs out of the homemade dough, only re-rolling the dough scraps once. Store bought dough will yield about 18 cut-outs, re-rolling the scraps once. (Let the re-rolled dough scraps rest in the refrigerator until firm before cutting.) Place half of the Totoro cut-outs, about 2 inches apart, onto the baking sheets.
  4. Brush the edges of the Totoro cut-outs with egg wash, using your finger or a small pastry brush. Place about 2 tablespoons of the filling in the center of each one. Place a second cut-out over each one. Press the edges together with your fingers, beginning at the bottom and working your way up the sides. Wipe up any excess blueberry drips with a paper towel. Crimp the edges with a small fork. Brush the pies with egg wash. Cut a small ventilation slit into the center of each tart. Bake until the crust is golden brown and the filling starts to bubble, about 23-28 minutes. (If the ears start to brown too fast, you can cover them with small pieces of aluminum foil during the last few minutes of baking.) Transfer the tarts to a cooling rack.
Icing & Decor
  1. In a medium bowl, whisk together the powdered sugar, butter, 1 tablespoon of milk, the vanilla and salt until well combined. Add additional milk as needed to achieve the desired consistency. Whisk until smooth. Spread the icing onto the bellies of the cooled Totoro tarts. Pipe dots for the eyes. When the icing has dried, you can use melted chocolate to make the eyeballs, noses and decorate the bellies.
Recipe Notes

*To find a Totoro cookie cutter, click here.

**To get the free printable Totoro pattern, click here.

Fluffy Homemade Marshmallows


Print Recipe


Fluffy Homemade Marshmallows

Thick, soft and fluffy homemade marshmallows

Keyword candy, marshmallows

Servings
marshmallows


Ingredients

Keyword candy, marshmallows

Servings
marshmallows


Ingredients


Instructions
  1. Spray an 8-inch square pan lightly with nonstick spray. Wipe out any excess spray with a paper towel. Combine the gelatin powder with 1/2 cup (118ml) of water in the bowl of a stand mixer fitted with a whisk attachment.

  2. Place the granulated sugar, corn syrup, salt and the remaining 1/2 cup (118ml) of water in a medium-size saucepan. Stir gently to combine. Place the saucepan on the stovetop over medium heat. Cook, without stirring, until the temperature reaches 230ºF (110ºC) on a candy thermometer. Gently swirl the pan occasionally to help prevent hot spots.

  3. Turn the mixer on to low speed. Slowly and carefully pour the hot syrup mixture inside the mixer bowl along the side, away from the whisk. Keep beating until the gelatin is dissolved. Add the vanilla. Gradually turn the mixer up to high speed and continue whipping the mixture until it's glossy, thick and fluffy, about 10 minutes.

  4. Transfer the mixture to the pan, spreading it with an offset spatula. Let it sit uncovered at room temperate until it firms up, about 4 hrs.

  5. In a small bowl, whisk together the powdered sugar and cornstarch. Sprinkle about 2/3 of the mixture over your work surface. Loosen the edges of marshmallow slab with a small offset spatula. Turn it out onto your work surface. Sprinkle it with the powdered sugar mixture. Cut it into 2-inch squares (or any size you want). Clean your knife after each cut. Toss the marshmallows in the powdered sugar mixture. Store in a covered container for up to 3 days.

Evangeline Butterscotch Star Cookies

Evangeline Butterscotch Star Cookies

These star-shaped sugar cookies with pretty butterscotch windows are often called stained glass cookies. The center of the cookie is cut out and filled with crushed hard candy. It melts in the oven, creating a beautiful glass-like effect. They’re perfect for the holiday season.

I named my star cookies after Evangeline from the Disney movie, The Princess and the Frog. When my mom passed away, my dad used to say that he dreamed of her as a beautiful lady in the stars. Recently, I lost my dad too. I like to think that my mom and dad are reunited up there somewhere. The story of Ray the firefly and Evangeline the star from The Princess and the Frog reminds me of them. I made these cookies as a small holiday tribute to my cherished parents.

Print Recipe
Evangeline Butterscotch Star Cookies
Vanilla sugar cookies with butterscotch candy windows
Servings
4-inch cookies
Ingredients
Servings
4-inch cookies
Ingredients
Instructions
  1. In a large bowl, beat the butter, sugar and salt until smooth and well combined. Beat in the egg and vanilla until incorporated. Mix in the flour until combined.
  2. Form the dough into a disk and wrap it with plastic wrap. Chill it in the refrigerator until firm, at least 2 hours or overnight.
  3. Preheat the oven tp 350ºF (180ºC). Line 2 large cookie sheets with parchment paper.
  4. On a lightly floured surface (or between parchment sheets), roll the dough to 1/4-inch thickness. Cut out 18-20 star shapes using a 4-inch cookie cutter.* Place the stars about 2 inches apart onto the cookie sheets. Cut the center out of each star using a 2-inch cookie cutter.* Place the small star cut outs on a separate cookie sheet. Sprinkle with sanding sugar. Fill the cut out section of the large stars with the crushed butterscotch candy. I recommend chilling the cut cookies in the refrigerator for 15-20 minutes to prevent excess spreading.
  5. Bake until the candy melts and the edges of the cookies start to turn light golden brown, about 8-10 minutes. Let the cookies cool on the cookie sheet. Bake the small stars for 6-8 minutes. Transfer them to a cooling rack.
Recipe Notes

*To find 4-inch and 2-inch star-shaped cookie cutters, click here.

Fudgy Chocolate Crumb Cake

Fudgy Chocolate Crumb Cake

This moist, fudgy chocolate cake with a generous amount of melt-in-your-mouth chocolate crumb topping and powdered sugar snow is perfect for frosty mornings with a cup of hot coffee or tea. It’s also perfect for a holiday breakfast or brunch served with fresh raspberries and/or raspberry sauce.*

Print Recipe
Fudgy Chocolate Crumb Cake
Rich, moist, fudgy chocolate cake with melt-in-your mouth crumb topping and sprinkled with powdered sugar.
Cuisine American
Keyword cake, chocolate, crumb
Servings
servings
Ingredients
Crumb Topping
Cake
Cuisine American
Keyword cake, chocolate, crumb
Servings
servings
Ingredients
Crumb Topping
Cake
Instructions
Crumb Topping
  1. In a medium-size bowl, whisk together the flour, granulated sugar, brown sugar, cocoa powder and salt until well combined. Work the butter into the flour mixture with your fingertips until it looks like dirt, with no large pieces of butter remaining. Press the mixture together to form chunks. Set aside in the refrigerator until ready to use.
Cake
  1. Preheat the oven to 350ºF (180ºC). Line an 8-inch square cake pan** with parchment paper, leaving a couple of inches of overhang to serve as handles to lift the cake out of the pan. If you want to serve the cake directly from the pan, you can skip the parchment paper and simply spray the pan with nonstick spray.
  2. In a medium-size bowl, whisk the flour, cocoa powder, baking powder, baking soda and salt together until well combined.
  3. In a large bowl, beat the butter, granulated sugar and brown sugar together, with an electric mixer at medium speed, until light and fluffy. Beat in the oil until combined. Beat in the egg, egg yolk, and vanilla in 3 separate additions, making sure each one is incorporated before adding the next.
  4. On low speed, beat the flour mixture into the batter in 2 additions, alternating with half of the sour cream after each addition. Beat just until combined. Gradually beat in the hot coffee just until smooth and well combined. Fold in the mini chocolate chips.
  5. Transfer the batter to the prepared cake pan. Top the batter evenly with the crumb topping. Bake until a toothpick inserted into the center of the cake comes with a few moist crumbs attached (not wet batter), about 28-37 minutes.
  6. Cool the cake in the pan for 15 minutes, then remove the cake from the pan and continue cooling on a cooling rack. Sprinkle powdered sugar over the cooled cake.
Recipe Notes

*To find my raspberry sauce recipe, click here.

**To find my favorite 8-inch square cake pan, click here.


Gingerbread Friends Cookies

Gingerbread Friends Cookies

I got a set of the teeny tiniest cookie cutters last year. Ever since, I’ve been coming up with cute ways to use them. Since Christmas is coming, I made the littlest and cutest gingerbread people. They look so cute adorning my full size gingerbread cookies. Working with such small cookies can be challenging but I have a few tips to make it easier. The dough has to be rolled very thin, so I found it easier to manage by rolling it between sheets of parchment paper. Since the dough is so thin and fragile, it has to be kept very cold during the entire process , so pop it into the fridge if it becomes too warm. A toothpick dipped in melted white chocolate was the easiest way for me to draw on their little faces, but a black edible marker would work too. You can also use royal icing if you’re comfortable working with it.

Print Recipe
Gingerbread Friends Cookies
Gingerbread cookies topped with white chocolate, mini gingerbread cookies and sprinkles
Course Dessert
Keyword cookies, gingerbread
Servings
cookies
Ingredients
Course Dessert
Keyword cookies, gingerbread
Servings
cookies
Ingredients
Instructions
  1. In a large bowl, whisk the flour, cornstarch, salt, baking powder, baking soda, ginger, cinnamon, nutmeg, and cloves together until well blended.
  2. In a separate large bowl, beat the butter, shortening and brown sugar together, with an electric mixer on medium speed, until light and fluffy. Beat in the egg until incorporated. Beat in the vanilla, then the molasses until well combined.
  3. On low speed, beat in the flour mixture in two additions. Beat just until combined. Set aside about 1/4 of the dough for the mini cookies. Form it into a disk. Divide the remaining dough into 2 portions and form them into disks. Wrap all of the dough disks in plastic wrap and chill them in the refrigerator until firm, at least 2 hours or overnight.
  4. Place the small portion of dough between 2 sheets of parchment paper. Roll to 1/16-inch thickness. Cut out 40-50 mini cookies using a 1-inch gingerbread man cookie cutter. Place the cut outs on a parchment paper lined tray. Freeze for 20-30 minutes. this will help the cookies keep their shape when baking.
  5. Preheat the oven to 350ºF (180ºC). Line 2 large cookie sheets with parchment paper. On a lightly floured surface, roll the remaining dough to 1/4-inch thickness. Using a 2 3/4-inch or a 3-inch round cookie cutter, cut out 18 cookies. Re-roll the scraps as needed. place the cookies at least 1-inch apart onto the cookie sheets. Bake until the cookies are set and slightly puffed, about 8-10 minutes. Transfer the cookies to a cooling rack.
  6. Place the mini cookies, about 1/2-inch apart onto a parchment lined cookie sheet. Bake until the cookies are set and slightly puffed, about 5-6 minutes. Let the cookies cool on the baking sheet. Decorate the cooled mini cookies with melted white chocolate, using a toothpick to make the eyes, smiles, etc.
  7. Spread melted white chocolate onto one side of each round cookie. Top with the mini gingerbread cookies and the sprinkles of your choice.
Recipe Notes

*To find the mini gingerbread man cookie cutter I used, click here.

To find round cookie cutters, click here.

Mini Banana Bread Puddings

These delightful Mini Banana Bread Puddings are a great way to use up leftover banana bread. At my house, we rarely have any leftover banana bread so I like to bake a special loaf of banana bread just for this recipe, a couple of days before I want to serve the bread puddings. If you need a banana bread recipe, try My Favorite Banana Bread, click here for the recipe. These personal bread puddings make an equally delicious brunch or dessert. You can top them with whipped cream or vanilla ice cream which makes them even more delicious.

Print Recipe
Mini Banana Bread Puddings
Individual banana bread puddings with caramel sauce
Cuisine American
Servings
servings
Ingredients
Cuisine American
Servings
servings
Ingredients
Instructions
  1. Preheat the oven to 300ºF (150ºC). Line a baking sheet with parchment paper. Place the banana bread cubes on the baking sheet. Bake until dry and slightly crisp, about 10-15 minutes, turning every 5 minutes. Set aside to cool.
  2. In a small bowl, whisk the sugar and cinnamon together until well combined.
  3. In a large bowl, whisk the eggs, milk, heavy cream, vanilla extract, salt and the cinnamon-sugar mixture together until well combined. Add the cooled banana bread cubes to the egg mixture and gently toss to coat. Let sit until all of the liquid is absorbed, about 15-20 minutes.
  4. Preheat the oven to 350ºF (180º). Generously butter six 7 or 8-ounce ramekins or a 6-serving jumbo muffin pan. (You can also line the bottoms of the ramekins or the muffin pan with parchment paper rounds to make them easier to release. The parchment isn't necessary if you want to serve the bread puddings in ramekins.) Place the ramekins on a baking sheet.
  5. Spoon the banana bread cubes into the ramekins or the muffin pan. Drizzle with melted butter. Top each one with a few pecans.
  6. Bake until the bread puddings are golden brown and the center is set, about 25-33 minutes. Let the puddings cool for about 5 minutes, then turn them out if you're using a muffin pan. Drizzle the warm bread puddings with caramel sauce and top with whipped cream if desired.
Recipe Notes

To find 7-ounce ramekins, click here.

To find 8-ounce ramekins, click here.

To find a jumbo muffin pan, click here.

Sweet Potato Cake with Marshmallow Cream Cheese Frosting and Salted Caramel

This incredibly easy-to-make cake is like a sleeper that takes you by surprise. The two-ingredient frosting is an unlikely winner, but will end up pleasantly surprising you, especially when the salted caramel is added as a finishing touch. The combination of sweet potatoes and marshmallows is a classic pairing that will remind you of a sweet potato casserole in cake form. My family adores it and I think you will too. If you’re not a fan of marshmallows you can frost this cake with my silky cream cheese frosting instead. Click here for the recipe.

Print Recipe
Sweet Potato Cake with Marshmallow Cream Cheese Frosting and Salted Caramel
Soft moist, single layer sweet potato cake topped with a luscious 2-ingredient frosting and drizzled with salted caramel
Course Dessert
Keyword cake, sweet potato
Servings
servings
Ingredients
Sweet Potato Cake
Marshmallow Cream Cheese Frosting
Course Dessert
Keyword cake, sweet potato
Servings
servings
Ingredients
Sweet Potato Cake
Marshmallow Cream Cheese Frosting
Instructions
Sweet Potato Cake
  1. Preheat the oven to 350ºF (180ºC). Line the bottom of an 8-inch square cake pan with parchment paper. Grease and flour the insides.
  2. In a medium bowl, whisk together the flour, cinnamon, baking powder, baking soda, salt, ginger and nutmeg until well combined.
  3. In a large bowl, beat the granulated sugar, brown sugar, oil, eggs and vanilla, with an electric mixer or whisk by hand until smooth and well combined. Stir in the sweet potatoes until incorporated. Mix in the flour mixture just until combined.
  4. Transfer the batter to the prepared cake pan. Bake until a toothpick inserted into the center of the cake comes out clean, about 23-28 minutes. Let the cake cool in the pan for 10 minutes then remove the cake from the pan and transfer it to a cooling rack.
Marshmallow Cream Cheese Frosting
  1. In a large bowl, stir the cream cheese with a spatula until smooth. Add the Marshmallow Fluff and beat with an electric mixer just until smooth and well combined. Don't over beat. Over beating can cause the cream cheese to curdle.
  2. Spread the frosting over the cooled cake. Drizzle the caramel over the top of the cake or top each piece of cake with a spoonful of caramel.
Recipe Notes

*It's okay to use canned sweet potatoes if you don't have fresh ones. Make sure to rinse them before using.

Cranberry Orange Crumb Cake Cookies

Cranberry Orange Crumb Cake Cookies

When you combine cranberry orange crumb cake with white chocolate chip cookies, you get these delicious, unique cookies that are perfect for the holiday season. They make a festive addition to your holiday cookie platter. I came up with these delightful cookies when I was looking for a way to use up leftover cranberry sauce. If your family is like mine, it’s rare for us to have leftover cranberry sauce because we love it so much. Click here to view my Cranberry Sauce recipe. Don’t worry, you can certainly use store bought whole berry cranberry sauce for this recipe and the cookies will be just as delicious.

Print Recipe
Cranberry Orange Crumb Cake Cookies
Orange scented vanilla cookies with white chocolate chips, topped with cranberry sauce, crumb topping and orange icing
Course Dessert
Servings
cookies
Ingredients
Crumb Topping
Icing
Course Dessert
Servings
cookies
Ingredients
Crumb Topping
Icing
Instructions
Crumb Topping
  1. In a medium-size bowl, whisk together the flour, brown sugar, granulated sugar and salt until well combined. Work the butter into the flour mixture with your fingertips until it looks like wet sand with no large chunks of butter. Press the mixture together to form chunks. Set aside in the refrigerator while you make the cookie dough.
Cookies
  1. Preheat the oven to 350ºF (180ºC). Line 2 large cookies sheets with parchment paper.
  2. In a medium-size bowl, whisk together the flour, baking powder and salt until well combined.
  3. In a large bowl, beat the butter, brown sugar, granulated sugar and orange zest, with an electric mixer at medium speed, until light and fluffy. Beat in the egg and egg yolk in two separate additions, making sure each one is incorporated before adding the next. Beat in the vanilla extract. On low speed, beat in the flour mixture into the batter, just until combined. Stir in the white chocolate chips.
  4. Form the cookie dough into sixteen 2-tablespoon size balls. Place them about 3 inches apart onto the cookie sheets. Press a 1-inch wide indentation into each cookie using your thumb or a pastry tamper. Fill each indentation with a generous teaspoon of cranberry sauce. Top each one generously with the crumb topping. Gently press the topping into the cookies.
  5. Bake until the topping and the edges start to turn light golden, about 11-13 minutes. (Be careful not to over bake to avoid drying out your cookies.) Let the cookies cool on the baking sheet for 1 minute, then transfer them to a cooling rack.
Icing
  1. In a small bowl, whisk together the powdered sugar, salt, lemon juice and 1 tablespoon of orange juice until well combined. Add additional orange juice as needed to achieve your desired consistency. Whisk until smooth. Drizzle the icing over the cooled cookies.

Melt-in-Your-Mouth Pecan Pie Cookies

Pecan Pie Cookies

My Peach Crumble Pie Cookies were so popular that I decided to make a Pecan Pie version. These buttery little tarts have a sweet, gooey pecan filling that’s the perfect contrast to the tender shortbread crusts. They taste like autumn and Thanksgiving in a cute little pie. They also make a delightful addition to your Christmas cookie platter. Make sure to use good quality butter, so your shortbread crusts will be melt-in-your-mouth delicious.

Print Recipe
Melt-in-Your-Mouth Pecan Pie Cookies
Tender, buttery shortbread crusts topped with rich, gooey pecan pie filling in a cute mini size
Course Dessert
Servings
cookie tarts
Ingredients
Shortbread Crusts
Pecan Filling
Course Dessert
Servings
cookie tarts
Ingredients
Shortbread Crusts
Pecan Filling
Instructions
Shortbread Crusts
  1. Lightly spray a 12-serving muffin pan* with nonstick spray. (If you're concerned about the cookies sticking to the pan, see notes below.**)
  2. In a medium-size bowl, whisk together the flour, baking powder and salt.
  3. In a large bowl, beat the butter and powdered sugar with an electric mixer until light and fluffy. Mix in the flour mixture on low speed or by hand, just until combined.
  4. Press generous tablespoon size (about 20g each) portions of dough into the bottoms and 1/4-inch up the insides of the muffin pan cups with a pastry tamper dipped in flour. You can also use the bottom of a flat shot glass. Set aside in the refrigerator while you prepare the pecan filling.
Pecan Filling
  1. Preheat the oven to 350ºF (180ºC). In a medium-size saucepan, combine the pecans, butter, brown sugar and maple syrup over medium heat. Bring to a simmer and let the mixture bubble gently for 2 minutes. Remove the pan from the heat and stir in the heavy cream, cinnamon and salt. Return the pan to the heat and let the mixture bubble gently on low heat for 2 more minutes. Stir in the vanilla and let the mixture cool to lukewarm.
  2. Top the cookie crusts evenly with the pecan filling mixture. Bake until the cookies are set and the topping is golden brown and bubbly, about 14-16 minutes. Cool the cookies completely in the pan. Once cool, remove the cookies from the pan by running a small offset spatula or paring knife around the inside perimeter of the muffin cups to loosen them.
Recipe Notes

*To find the12-serving  muffin pan I used, click here.

** You can line the bottoms of the muffin cups with 2-inch parchment circles to make sure your cookies release. I don't recommend cupcake liners because the cookies stick to the ridges of the liners. You can, however, cut the circles from the bottom of the cupcake liners if you don't have parchment paper.

Double Chocolate Marble Cookies

Double Chocolate Marble Cookies

If you like marble cookies, you’ll love my amazing deluxe version. They have crisp edges with soft, chewy centers and plenty of chocolate which makes them the best marble cookies ever! I used a combination of dark chocolate pieces and milk chocolate chips for the perfect balance. Set aside some of the dark chocolate pieces for the tops for the most beautiful, decadent pools of melted chocolate.

Print Recipe
Double Chocolate Marble Cookies
Double chocolate marble cookies with crisp edges and soft, chewy centers. Chocolate dough with dark chocolate pieces is swirled together with vanilla dough with milk chocolate chips.
Instructions
  1. Line 2 large cookie sheets with parchment paper. In a medium-size bowl, whisk together the flour, baking powder, baking soda, and salt until well combined.
  2. In a large bowl, beat the butter, brown sugar and granulated sugar, with an electric mixer at medium speed, until light and fluffy. Beat in the egg, egg yolk and 1 teaspoon of vanilla extract in 3 separate additions, making sure each one is incorporated before adding the next. Add the flour mixture and mix just until combined.
  3. Divide the cookie dough in half, using a kitchen scale for accuracy. Place half of the dough in a separate bowl. Add the cocoa powder into half of the dough, mixing just until combined. Set aside several pieces of dark chocolate for the tops of the cookies, then fold the remaining dark chocolate pieces into the chocolate dough.
  4. Add the cornstarch and the remaining 1/2 teaspoon of vanilla extract to the other half of the cookie dough, mixing just until combined. Fold the milk chocolate chips into the vanilla dough.
  5. Divide each type of dough into 28 portions, approximately 1 tablespoon each. Roll them into balls. Take two balls of each type of dough (4 total) and arrange them in a checkerboard pattern then roll them together to form a large ball. Repeat this process to make 14 large dough balls. Cover the dough balls and chill them in the refrigerator for 1 hour.
  6. Preheat the oven to 350ºF (180ºC). Place the dough balls 3 inches apart onto the cookie sheets. Top each one with 1 or 2 pieces of the reserved dark chocolate. Bake until the edges are golden brown and the centers are set, but still soft, about 10-14 minutes. Do not over bake. The cookies will spread a bit. Remove the cookies from the oven and immediately use a large round cookie cutter to shape the hot cookies. Place the cookie cutter onto the cookie sheet over each cookie and slide it around each one a couple of times to achieve perfectly round cookies. Work quickly before the cookies set. Let the cookies cool on the cookie sheet for 5 minutes, then transfer them to a cooling rack.
Recipe Notes

To find dark Dutch process cocoa powder, click here.

Soot Sprite Treats

Spirited Away Soot Sprite Treats

If you’re a fan of Ghibli movies, you may remember the cute Susuwatari or Soot Sprites from Spirited Away and My Neighbor Totoro. These easy-to-make chocolate covered treats are also known as haystacks or tumbleweeds. They’re often made with shredded coconut or chow main noodles. I love using potato stick snacks for a delicious, crunchy salty-sweet snack.

In Spirited Away, the cute sprites are fed handfuls of Japanese konpietō candy. If you aren’t able to find it, candy star sprinkles are a nice substitute for decorating your Soot Sprites. (See the links below.)

Print Recipe
Soot Sprite Treats
Chocolate covered potato stick snacks shaped like the beloved Spirited Away Soot Sprites
Instructions
  1. Line 2 large baking sheets with parchment paper or wax paper. In an extra-large bowl, combine the potato sticks and nuts.
  2. In a medium microwave-safe bowl, combine the chocolate chips, butterscotch chips and the oil. Heat in the microwave for 20 second bursts, stirring gently between each burst, until melted and smooth. Stir in the food coloring if using.
  3. Pour the melted chocolate mixture over the potato stick mixture. Stir gently with a spatula until the mix is completely coated with the melted chocolate.
  4. Scoop or spoon rounded 2-tbs-size portions of the mixture onto the baking sheets. Add candy eyes and stars. Refrigerate until set, about 20 minutes.
Recipe Notes

*To find black oil based food coloring, click here.

**To find candy eyes, click here.

***To find Konpieto candy, click here.

****To find pastel star candy sprinkles, click here.


Orange Chocolate Chip Scones

Orange Chocolate Chip Scones

These Orange Chocolate Chip scones have everything I love in a scone. They have buttery, crisp edges and soft, tender centers. Plenty of mini chocolate chips are enhanced with the vibrant flavor of fresh orange zest. These melt-in-your-mouth scones are perfectly delicious on their own, but I went ahead and added some tangy orange icing which took them over the top. They’re so good you won’t be able to eat just one!

Print Recipe
Orange Chocolate Chip Scones
Tender orange-scented scones studded with mini chocolate chips and topped with a tangy orange icing
Servings
scones
Ingredients
Scones
Icing
Servings
scones
Ingredients
Scones
Icing
Instructions
Scones
  1. Preheat the oven to 375ºF (190ºC). Line a large baking sheet with parchment paper.
  2. In a large bowl, whisk together the flour, sugar, baking powder and salt until well combined. Work the butter and the orange zest into the flour mixture with your fingertips or with a pastry blender until pea sized pieces are formed. Stir in the mini chocolate chips.
  3. In a small bowl, whisk together the sour cream, heavy cream, orange juice and vanilla extract.
  4. Stir the sour cream mixture into the flour mixture just until a shaggy dough is formed and there are no dry bits of flour left. Do not over mix.
  5. Scoop** 1/4 cup size rounded portions of dough and place them about 2 inches apart onto the prepared baking sheet. (If your dough has become a bit warm, refrigerate the dough portions for 15 minutes, then proceed with the recipe. This will prevent excess spreading.) Brush the tops of the scones with heavy cream. Bake until golden brown, about 20-25 minutes. Transfer the scones to a cooling rack.
Icing
  1. In a medium-size bowl, whisk together the powdered sugar, melted butter, salt, lemon juice, and 1 tablespoon of orange juice until well combined. Add additional orange juice as needed to achieve your desired consistency. Whisk until smooth.
  2. Brush the icing onto the cooled scones with a small pastry brush or drizzle the icing onto the scones if you prefer. Serve the scones warm or at room temperature.
Recipe Notes

* If you want your scones to be more golden brown, you can brush them with egg wash instead of heavy cream before baking. To make egg wash, whisk together 1 egg with 1 tablespoon of water.

**To find the portion scoop I used, click here.