Vanilla Bean Glazed Peach Turnovers

Vanilla Bean Glazed Peach Turnovers

These pretty, portable pastries are made with fresh, juicy peaches wrapped in golden pie crust, coated with sweet vanilla bean glaze. They’re so perfect for summer picnics. This treasured recipe is one of my personal favorites from my cookbook, “Enchanted Baking.” This charming book is coming out on August 6, 2024. To preorder it here, click here.

The pie crust, which is exceptionally tender and flaky, is made with a combination of butter, for flavor and vegetable shortening, for flakiness. Make sure to use fresh, ripe peaches for the most delicious results. I added meringue powder to the glaze to give it that crisp finish we love in glazed donuts. As an extra special touch, I garnished the turnovers with pressed edible flowers. A sprinkle of dried rose petals would also be pretty.

Print Recipe
Vanilla Bean Glazed Peach Turnovers
Fresh, juicy peaches wrapped in tender, flaky crust, coated with sweet vanilla bean glaze
Servings
6-inch turnovers
Ingredients
Peach Turnovers
Vanilla Bean Glaze
Servings
6-inch turnovers
Ingredients
Peach Turnovers
Vanilla Bean Glaze
Instructions
  1. In a large bowl, whisk together the flour, granulated sugar and salt. Work in the shortening with your fingertips until it's evenly dispersed. Work in the butter until flat dime-sized pieces are formed.
  2. In a small bowl, combine 1/4 cup (59ml) of ice water and the vinegar. Sprinkle the ice water mixture over the flour mixture a little at a time and stir just until the dough comes together. You may not need all of the liquid, depending on your climate. Turn the dough out onto a lightly floured surface. Fold the dough over onto itself a couple of times. Divide the dough into 4 equal portions and form the portions into disks. Cover the dough disks with plastic wrap and refrigerate for at least 2 hours or up to overnight.
  3. In a medium-size bowl, gently toss the peaches with the lemon juice. Add 1 tablespoon (13g) of brown sugar and stir to combine. Let the peaches sit for 30 minutes. Drain the excess juices from the peaches, then toss with the vanilla bean paste. Sprinkle on the cornstarch, cinnamon and the remaining 1 tablespoon (12g of brown sugar and stir gently to coat the peaches.
  4. Meanwhile, preheat the oven to 375ºF (190ºC). Line a large baking sheet with parchment paper.
  5. On a lightly floured surface, roll out the 4 disks to about 1/8-inch (.3cm) thickness. Cut each one into a 6 1/4-inch round. Transfer the dough rounds to the prepared baking sheet. Spoon the peaches onto one side of the dough rounds to within 1/2-inch (1.3cm) from the edges. It's helpful to arrange the peach slices by hand. Brush the perimeter edges with egg wash using a small pastry brush or your fingertip. Fold the dough over and press the edges to seal. Crimp the edges with a fork. Brush the turnovers with egg wash. Cut two 1/2-inch (1.3cm) ventilation slits in each turnover.
  6. Bake for 25-30 minutes, or until the turnovers are golden brown and the filling starts to bubble. Transfer the turnovers to a cooling rack to cool completely. While the turnovers cool, make the vanilla bean glaze.
  7. In a small bowl, whisk together the powdered sugar, melted butter, vanilla bean paste, the meringue powder (if using), salt and 1 tablespoon (15ml) of milk. Add additional milk if needed to reach the desired consistency.
  8. Using a small pastry brush, brush the icing onto the cooled turnovers. When the icing is almost set, apply pressed blossoms to the tops of the pies if desired.
Recipe Notes

To find my favorite vanilla bean paste, click here.

Easy Apricot Pastries

Easy Apricot Pastries

These cheerful apricot pastries are guaranteed to bring you some sunshine. They’re so cute and easy to make! They remind me of sunny-side-up-eggs. They’re perfect for a summer breakfast or brunch.

Print Recipe
Easy Apricot Pastries
Instructions
Apricot Pastries
  1. In a medium bowl, beat the cream cheese, sugar, egg yolk, heavy cream and vanilla together until smooth.
  2. Line 2 baking sheets with parchment paper. Place a puff pastry sheet on a lightly floured surface. Cut out for 4 1/2-inch rounds using a cookie cutter or trace a bowl using a paring knife. Score a border about 1/2 inch from the edge, making sure not to cut all the way through. I used a 3 1/2 inch cookie cutter for the border. Transfer the cut pastry to the baking sheets. Repeat with the 2nd pastry sheet. Refrigerate the dough rounds for 15 minutes. Meanwhile, preheat the oven to 400ºF (200ºC).
  3. Spoon or pipe the cream cheese filling within the border of each pastry round. Top each one with an apricot half. Brush the borders with egg wash. Bake until puffed and golden brown, about 17-20 minutes. Transfer to a cooling rack.
  4. In a small bowl, whisk the apricot preserves with 1 tablespoon (15ml) of water Brush this mixture over the warm pastries. Once the pastries are cool, drizzle them with icing.
Icing
  1. In a small bowl, whisk together the powdered sugar, heavy cream and 1 tablespoon (15ml) of milk until smooth. Add additional milk as needed to achieve your desired consistency. Add the almond extract and whisk until smooth.

Deluxe Cinnamon Swirl Bread

This dreamy Cinnamon Swirl Bread is a perfectly soft, tender loaf with two layers of brown sugar cinnamon. It was already delicious on its own, but I’m sure Grandma wouldn’t mind that I upgraded it with a generous amount of crumb topping and a drizzle of cream cheese icing. This versatile loaf is enjoyable year round. During spring, it’s delightful served with a cup of blueberry tea. On summer mornings, it’s perfect with a glass of peach iced tea. And of course, during fall and winter, this comforting loaf is cozy served with a mug of hot coffee or cocoa.

To watch the Instagram video, click here.

Print Recipe
Deluxe Cinnamon Swirl Bread
Soft, tender vanilla loaf cake with two layers of brown sugar-cinnamon swirl, topped with crumb topping and cream cheese icing
Course Breakfast, Brunch
Keyword cinnamon swirl, loaf
Servings
loaf
Ingredients
Crumb Topping
Cinnamon Swirl Bread
Cream Cheese Icing
Course Breakfast, Brunch
Keyword cinnamon swirl, loaf
Servings
loaf
Ingredients
Crumb Topping
Cinnamon Swirl Bread
Cream Cheese Icing
Instructions
Crumb Topping
  1. In a medium bowl, stir together the flour, brown sugar, sugar, cinnamon and salt until well combined. With your fingertips, work the butter into the flour mixture until it looks like wet sand with no large pieces of butter. Press the mixture together to form chunks. Set aside in the refrigerator until ready to use.
Cinnamon Swirl Bread
  1. Preheat the oven to 350ºF (180ºC). Line a 9 x 5-inch loaf pan with parchment paper.
  2. In medium bowl, stir together 1/2 cup (100g) of brown sugar and the cinnamon until well combined. Set aside.
  3. In a separate medium bowl, whisk together the flour, baking powder, baking soda and salt until well combined.
  4. In a large bowl, beat the butter, granulated sugar and the remaining 1/4 cup (50g) of brown sugar, with an electric mixer at medium speed, until light and fluffy. Beat in the eggs one at a time, making sure each one is fully incorporated. Beat in the vanilla extract.
  5. In a small bowl or a glass measuring cup, whisk the milk and sour cream together. On low speed, beat the flour mixture into the batter in two additions, followed by half of the milk mixture after each addition. Mix just until combined.
  6. Transfer half of the batter to the prepared loaf pan. Sprinkle half of the brown sugar-cinnamon mixture over the batter. Swirl with a skewer. Add the remaining batter and repeat with the remaining brown sugar-cinnamon mixture. Sprinkle the crumb topping on evenly.
  7. Bake until a toothpick inserted into the center of the loaf comes out clean, about 50-60 minutes. (The toothpick may have some brown sugar or crumb topping on it, but not wet batter.) Let the loaf cool in the pan for 10 minutes, then transfer it to a cooling rack.
Cream Cheese Icing
  1. In a small bowl, whisk together the cream cheese, butter, powdered sugar, vanilla extract, salt and 1 tablespoon (30ml) of milk until smooth. Whisk in additional milk if needed to achieve your desired consistency. Drizzle the icing over the cooled loaf.
Recipe Notes

*To find my favorite cinnamon, click here.

Chocolate Olive Oil Cakes

Chocolate Olive Oil Cakes

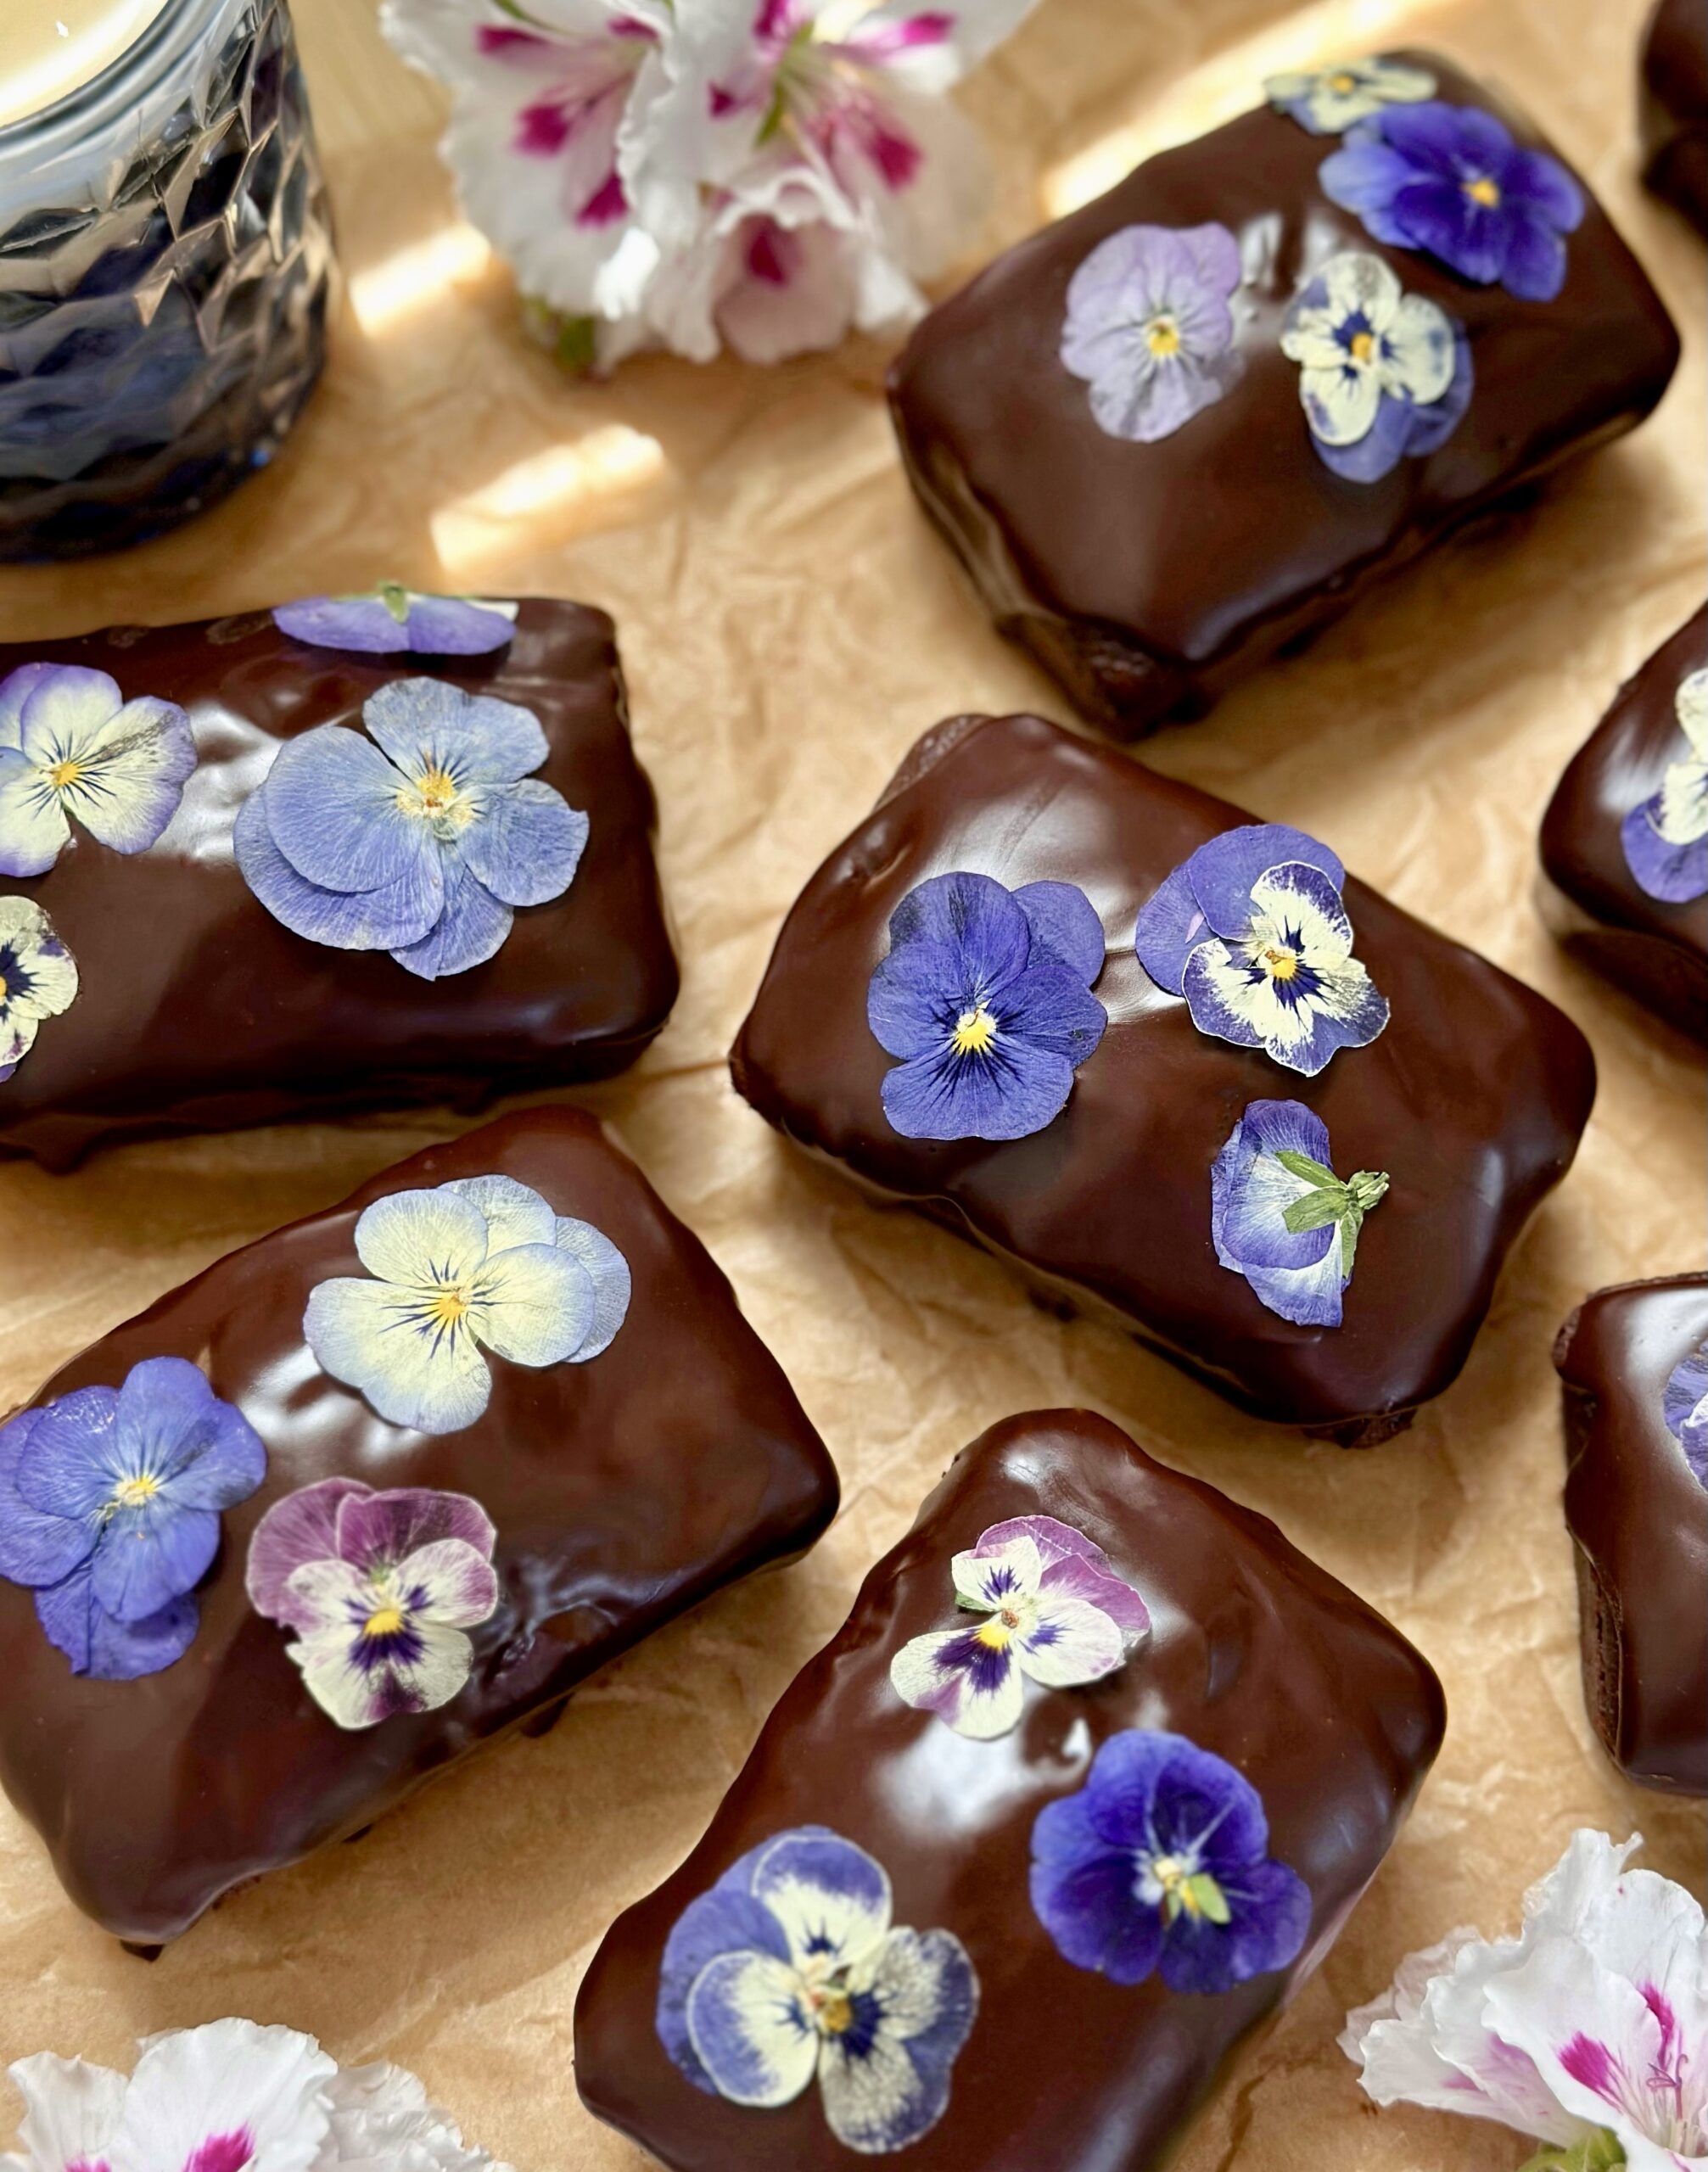
These soft, plush mini chocolate loaf cakes with a silky chocolate glaze are perfect for fairy picnics. They also make adorable Mother’s Day treats for moms who love chocolate. They’re easy to make and don’t require a mixer. I garnished them with edible pressed flowers for a magical finishing touch.

Print Recipe
Chocolate Olive Oil Cakes
Chocolate olive oil mini loaf cakes with silky chocolate icing
Course Dessert
Servings
mini loaf cakes
Ingredients
Chocolate Olive Oil Cakes
Chocolate Glaze
Course Dessert
Servings
mini loaf cakes
Ingredients
Chocolate Olive Oil Cakes
Chocolate Glaze
Instructions
Chocolate Olive Oil Cakes
  1. Preheat the oven to 350ºF (180ºC). Grease and flour the cavities of an 8-serving mini loaf pan,** I use a mixture of equal parts flour and cocoa powder to flour them. It's also helpful to line the bottoms of the cavities with parchment paper. I used a pan with eight 2 1/4-inch by 3 1/2-inch cavities.
  2. In a medium bowl, whisk together the flour, cocoa powder, almond flour, baking powder, baking soda and salt until well combined.
  3. In a large bowl, whisk together the sugar, brown sugar, oil, eggs and vanilla extract until smooth and well combined.
  4. In a small bowl, whisk together the milk and sour cream.
  5. Stir the flour mixture into the batter in two additions, followed by half of the milk mixture after each addition. Beat just until combined.
  6. Transfer the batter to the prepared pan, filling the cavities half full. Bake until a toothpick inserted into the center of the cakes comes out clean or with a few moist crumbs attached, about 13-17 minutes. Be diligent and avoid over baking the cakes.
  7. Cool the cakes in the pan for 7 minutes, then transfer to a cooling rack to cool.
Chocolate Glaze
  1. Melt the butter, chocolate and corn syrup together in a large heatproof bowl set over a pan of barely simmering water, making sure the water doesn't touch the bottom of the bowl. Stir occasionally until smooth. Remove from heat and let cool slightly.
  2. Spoon the glaze over the cooled cakes. When the glaze is almost set, garnish with edible pressed flowers if desired.
Recipe Notes

*  I use a microwave flower press to make edible pressed flowers quickly. To find it, click here.

**To find a mini loaf pan, click here.

Confetti Crumb Cake Cookies

Just when you thought confetti cookies couldn’t get any more fun and cute, Confetti Crumb Cake Cookies have arrived! I took confetti cookies, also known as birthday cake cookies, over the top by adding confetti crumb topping and a drizzle of pale pink icing. For top level fun, I finished them with edible glitter.

Print Recipe
Confetti Crumb Cake Cookies
Vanilla cookies with white chocolate chips, rainbow sprinkles, crumb topping and icing drizzle
Servings
cookies
Ingredients
Confetti Crumb Topping
Confetti Cookies
Icing
Servings
cookies
Ingredients
Confetti Crumb Topping
Confetti Cookies
Icing
Instructions
Confetti Crumb Topping
  1. In a medium bowl, whisk together the flour, sugar and salt. Work the butter into the flour mixture with your fingertips until it looks like sand with no large chunks of butter. Stir in the sprinkles. Press the mixture together to form chunks. Set aside in the refrigerator while you make the cookie dough.
Confetti Cookies
  1. Preheat the oven to 350ºF (180ºC). Line 2 large cookies sheets with parchment paper.
  2. In a medium bowl, whisk together the flour, baking powder and salt.
  3. In a large bowl, beat the butter, sugar and brown sugar, with an electric mixer at medium speed, until light and fluffy. Beat in the egg and egg yolk in two additions, making sure each one is incorporated before adding the next. Beat in the extracts.
  4. On low speed, beat in the flour mixture into the batter, just until combined. Stir in the white chocolate chips and the sprinkles.
  5. Form the cookie dough into 2-tablespoon size balls. Place them about 3 inches apart onto the cookie sheets. Flatten the dough balls slightly. Top each one generously with the crumb topping.
  6. Bake until the cookies are set and the edges start to turn light golden, about 11-13 minutes. (Be careful not to over bake to avoid drying out your cookies.) Let the cookies cool on the baking sheet for 1 minute, then transfer them to a cooling rack.
Icing
  1. In a small bowl, whisk together the powdered sugar, butter, vanilla and 1 tablespoon of milk. Add additional milk as needed to achieve your desired consistency. Using the tip of a toothpick, gradually add a tiny bit of food coloring and whisk until incorporated.
  2. Drizzle over the cooled cookies. Top with edible glitter if desired.
Recipe Notes

If your cookies spread too much, chill the dough for 20-30  minutes, then proceed with the recipe.

Lemon Bundt Cakes with Blueberry Cream Cheese Icing

Lemon Bundt Cakes with Blueberry Cream Cheese Icing

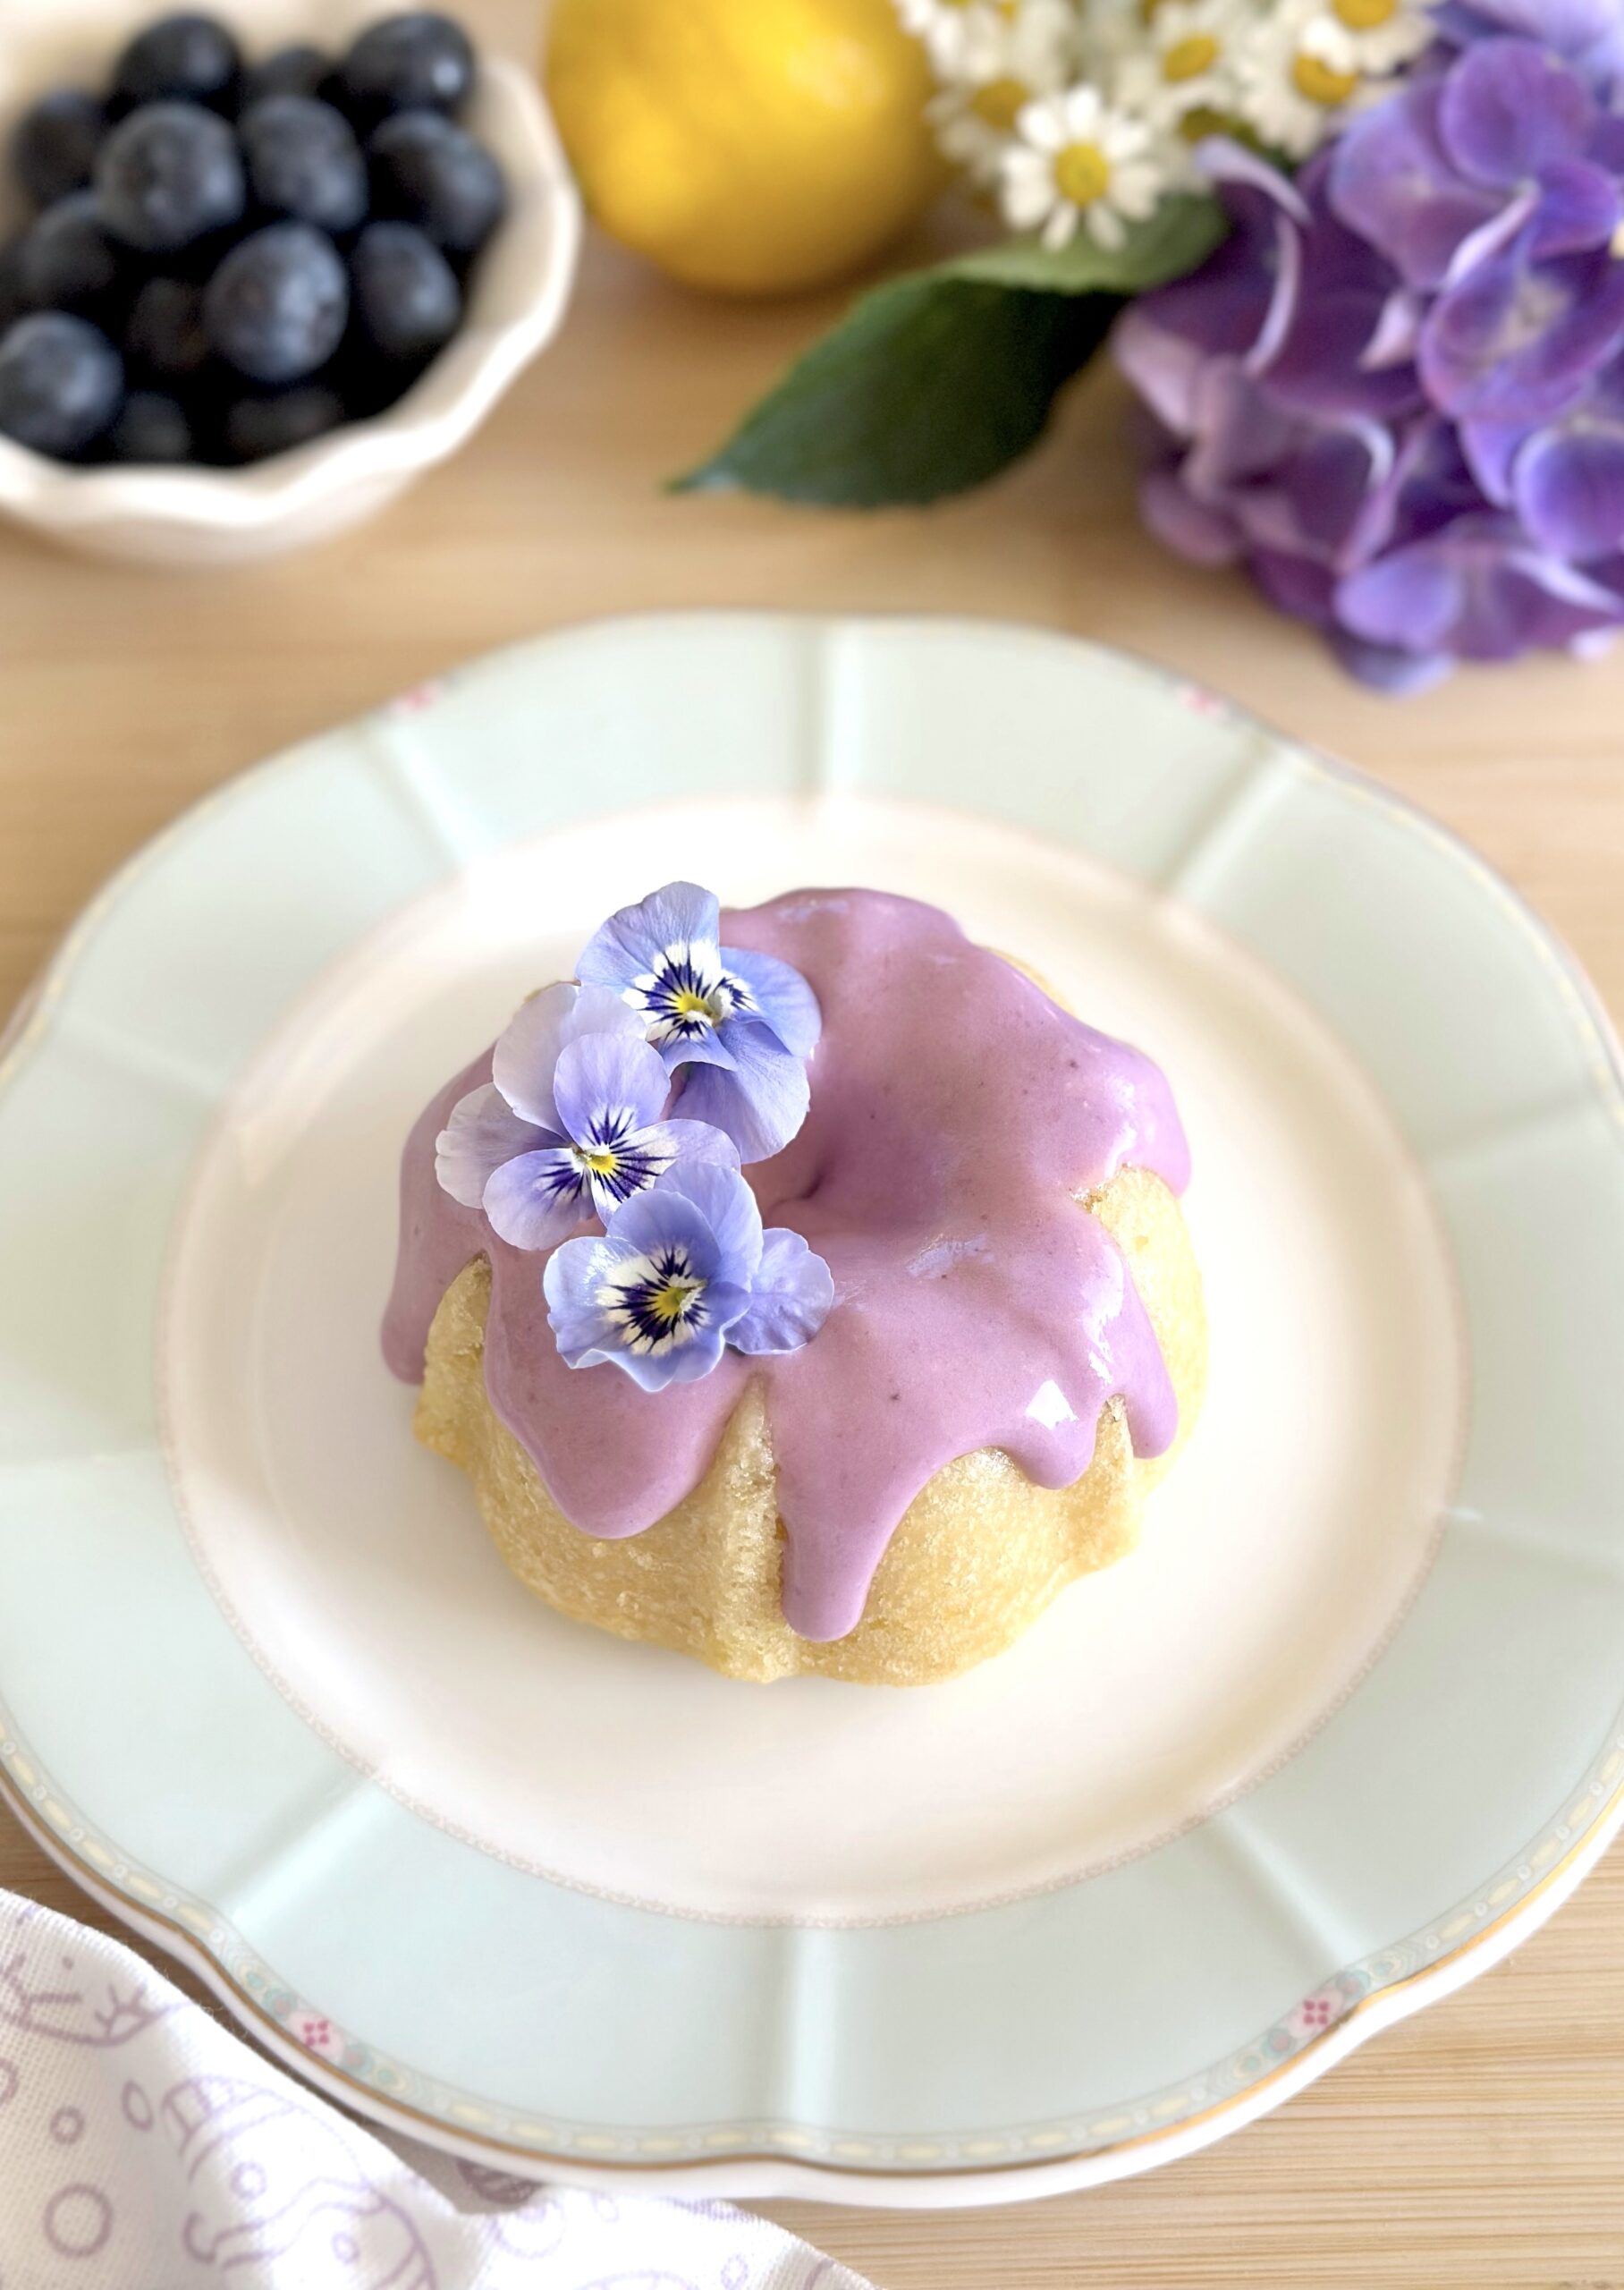
Say hello to springtime in cake form. These soft, fluffy, little lemon bundt cakes are bursting with lemon flavor and topped with a beautiful, delicious blueberry cream cheese icing. The icing gets it’s natural beauty from fresh blueberries. The colors and flavors of these cakes remind me of sunshine and spring blooms. I decorated my cakes with tiny blue violas from my garden. They would also look pretty topped with fresh chamomile flowers.

I used a bundtlette pan with six 1-cup servings. To find the pan I used, click here. This recipe also works as cupcakes using a standard muffin pan. The baking time will be a bit shorter. If you’re not a fan of blueberry icing, you can glaze the cakes with lemon icing instead. To find my lemon icing recipe, click here.

Print Recipe
Lemon Bundt Cakes with Blueberry Cream Cheese Icing
Soft, fluffy lemon bundtlette cakes topped with blueberry cream cheese icing
Course Dessert
Keyword cake, lemon bundts
Servings
Bundtlette cakes
Ingredients
Lemon Bundt Cakes
Blueberry Cream Cheese Frosting
Course Dessert
Keyword cake, lemon bundts
Servings
Bundtlette cakes
Ingredients
Lemon Bundt Cakes
Blueberry Cream Cheese Frosting
Instructions
Lemon Simple Syrup
  1. In a small saucepan, combine the sugar, lemon juice, and water over medium-low heat. Cook and stir gently just until the sugar is dissolved. Set aside to cool.
Lemon Bundt Cakes
  1. Preheat the oven to 350ºF (180ºC). Grease and flour a bundtlette pan with six 1-cup servings. Make sure to thoroughly grease and flour all of the crevices. (To find the pan I used, see note below.*)
  2. In a medium bowl, whisk together the flour, baking powder, baking soda and salt.
  3. In a large bowl whisk together the sugar and lemon zest until well combined. Add the oil, eggs, and vanilla extract and whisk until smooth and well combined.
  4. In a small bowl, whisk together the milk and sour cream. Stir the flour mixture into the batter in 2 additions, followed by half of the milk mixture after each addition. Stir just until combined.
  5. Fill the cake pan wells half full with the batter. (If using a standard muffin pan, fill the wells 2/3 full.) Bake until the tops are springy and a toothpick inserted in the centers of the cakes comes out clean or with a few crumbs attached, about 14-16 minutes. Check for doneness a couple of minutes early to avoid over baking. (Baking time is shorter for a standard muffin pan.) Cool the cakes in the pan for 8 minutes, then turn the cakes out onto a cooling rack. Brush the warm cakes generously with lemon simple syrup.
Blueberry Cream Cheese Icing
  1. In a small saucepan, combine the blueberries, sugar and lemon juice. Stir occasionally over medium heat, until the blueberries start to soften and the mixture starts to bubble. Smash the blueberries with a potato masher or the back of a spoon. Let the mixture simmer gently until thickened to a jam consistency, about 2-3 minutes. Strain the cooked blueberries through a mesh sieve for a smooth consistency. You can skip this step if you prefer a chunky consistency. Set aside to cool to room temperature.
  2. In a medium bowl, beat the cream cheese and butter together until smooth. Don't over beat. Cream cheese tends to curdle if beaten too much.
  3. Add the powdered sugar, vanilla and 2 tablespoons of milk and beat until smooth and well combined. Stir in the cooled blueberries until combined. Stir in more milk as needed to achieve your desired consistency. Spoon or drizzle the icing onto the cooled lemon cakes.
Recipe Notes

To find the bundt cake pan I used, click here.

Strawberry Crumb Cake


Print Recipe


Strawberry Crumb Cake

Tender vanilla crumb cake topped with fresh strawberries, plenty of crumb topping and fresh strawberry icing

Keyword cake, strawberry

Servings


Ingredients
Crumb Topping

Cake

Fresh Strawberry Icing

Keyword cake, strawberry

Servings


Ingredients
Crumb Topping

Cake

Fresh Strawberry Icing


Instructions
Crumb Topping
  1. In a medium bowl, whisk the flour, sugar , brown sugar and salt together.

  2. Work in the butter with your fingertips until the mixture looks like wet sand. Press it together to form chunks. Set aside in the refrigerator until ready to use.

Cake
  1. Preheat the oven to 350ºF (180ºC). Line the bottom of an 8-inch cake pan with a removable bottom or an 8-inch springform pan, with parchment paper. Grease and flour the insides or line with a strip of parchment paper.

  2. In a medium bowl, whisk together the flour, baking powder and salt. Set aside.

  3. In a large bowl, cream the butter and sugar with an electric mixer on medium speed, until light and fluffy.

  4. Beat the egg, egg yolk and vanilla into the butter mixture in 3 separate additions, making sure each addition is incorporated before adding the next.

  5. In a small bowl, whisk the milk and sour cream together. On low speed, mix the flour mixture into the batter in two additions alternating with half of the milk mixture. Beat just until combined.

  6. Transfer the batter to the prepared pan. Smooth the batter with a spatula. Place the strawberries evenly on top of the batter. Sprinkle the crumb topping over the top.

  7. Bake until the topping is golden brown and a toothpick inserted into the center of the cake comes out clean, about 48-55 minutes. Do not over bake. Let the cake cool in the pan for 10 minutes, then remove it from the pan and transfer it to a cooling rack.

Fresh Strawberry Icing
  1. In a medium bowl, whisk together the powdered sugar and puréed strawberries. Add the half & half a little at a time until your desired consistency is achieved. Whisk until smooth. Drizzle over the cooled cake.


Recipe Notes

To find the cake pan I used, click here.

White Velvet Snowflake Cakes

Print Recipe
White Velvet Snowflake Cakes
Soft, plush vanilla mini cakes with vanilla icing
Course Dessert
Keyword cake, white velvet
Servings
cakes
Ingredients
Snowflake Cakes
Vanilla Icing
Course Dessert
Keyword cake, white velvet
Servings
cakes
Ingredients
Snowflake Cakes
Vanilla Icing
Instructions
Snowflake Cakes
  1. Preheat the oven to 350ºF (177ºC). Spray a 6-serving silicone snowflake mini cake mold* with nonstick spray. Use a small pastry brush to brush the spray into all of the crevices. Tap out any excess spray. Place the mold on a baking sheet.
  1. In a large bowl, whisk together the cake flour, baking powder and salt. Add the sugar and whisk to combine. Add the butter and beat, with an electric mixer on low speed, until the butter is evenly distributed and the mixture looks like crumbs with no large chunks.
  2. In a medium bowl, whisk together the milk, egg whites, oil and vanilla. Slowly add the milk mixture to the flour mixture and continue beating on low until smooth, about 1-2 minutes.
  3. Transfer the batter to the prepared pan, evenly distributing the batter and filling the cavities a little more than half full. Bake until the tops of the cakes are light golden and a toothpick inserted into the centers of the cakes comes out clean, about 18-22 minutes. Be careful not to over bake. Let the cakes cool in the pan for about 7 minutes then turn the cakes out onto a cooling rack to cool completely.
  4. Brush one or two coats of vanilla icing on the tops and sides of the cakes. Decorate as desired. I used fine opal sanding sugar, candy snowflakes and candy pearls.
Vanilla Icing
  1. In a medium bowl, whisk together the powdered sugar, butter, vanilla, salt and 1 tablespoon of milk until smooth. Add additional milk as need to achieve your desired consistency.
Recipe Notes

I used a 6-serving silicone mold with 3-inch diameter, 1-inch deep cavities.


Double Chocolate Oreo Muffins

Double Chocolate Oreo Muffins

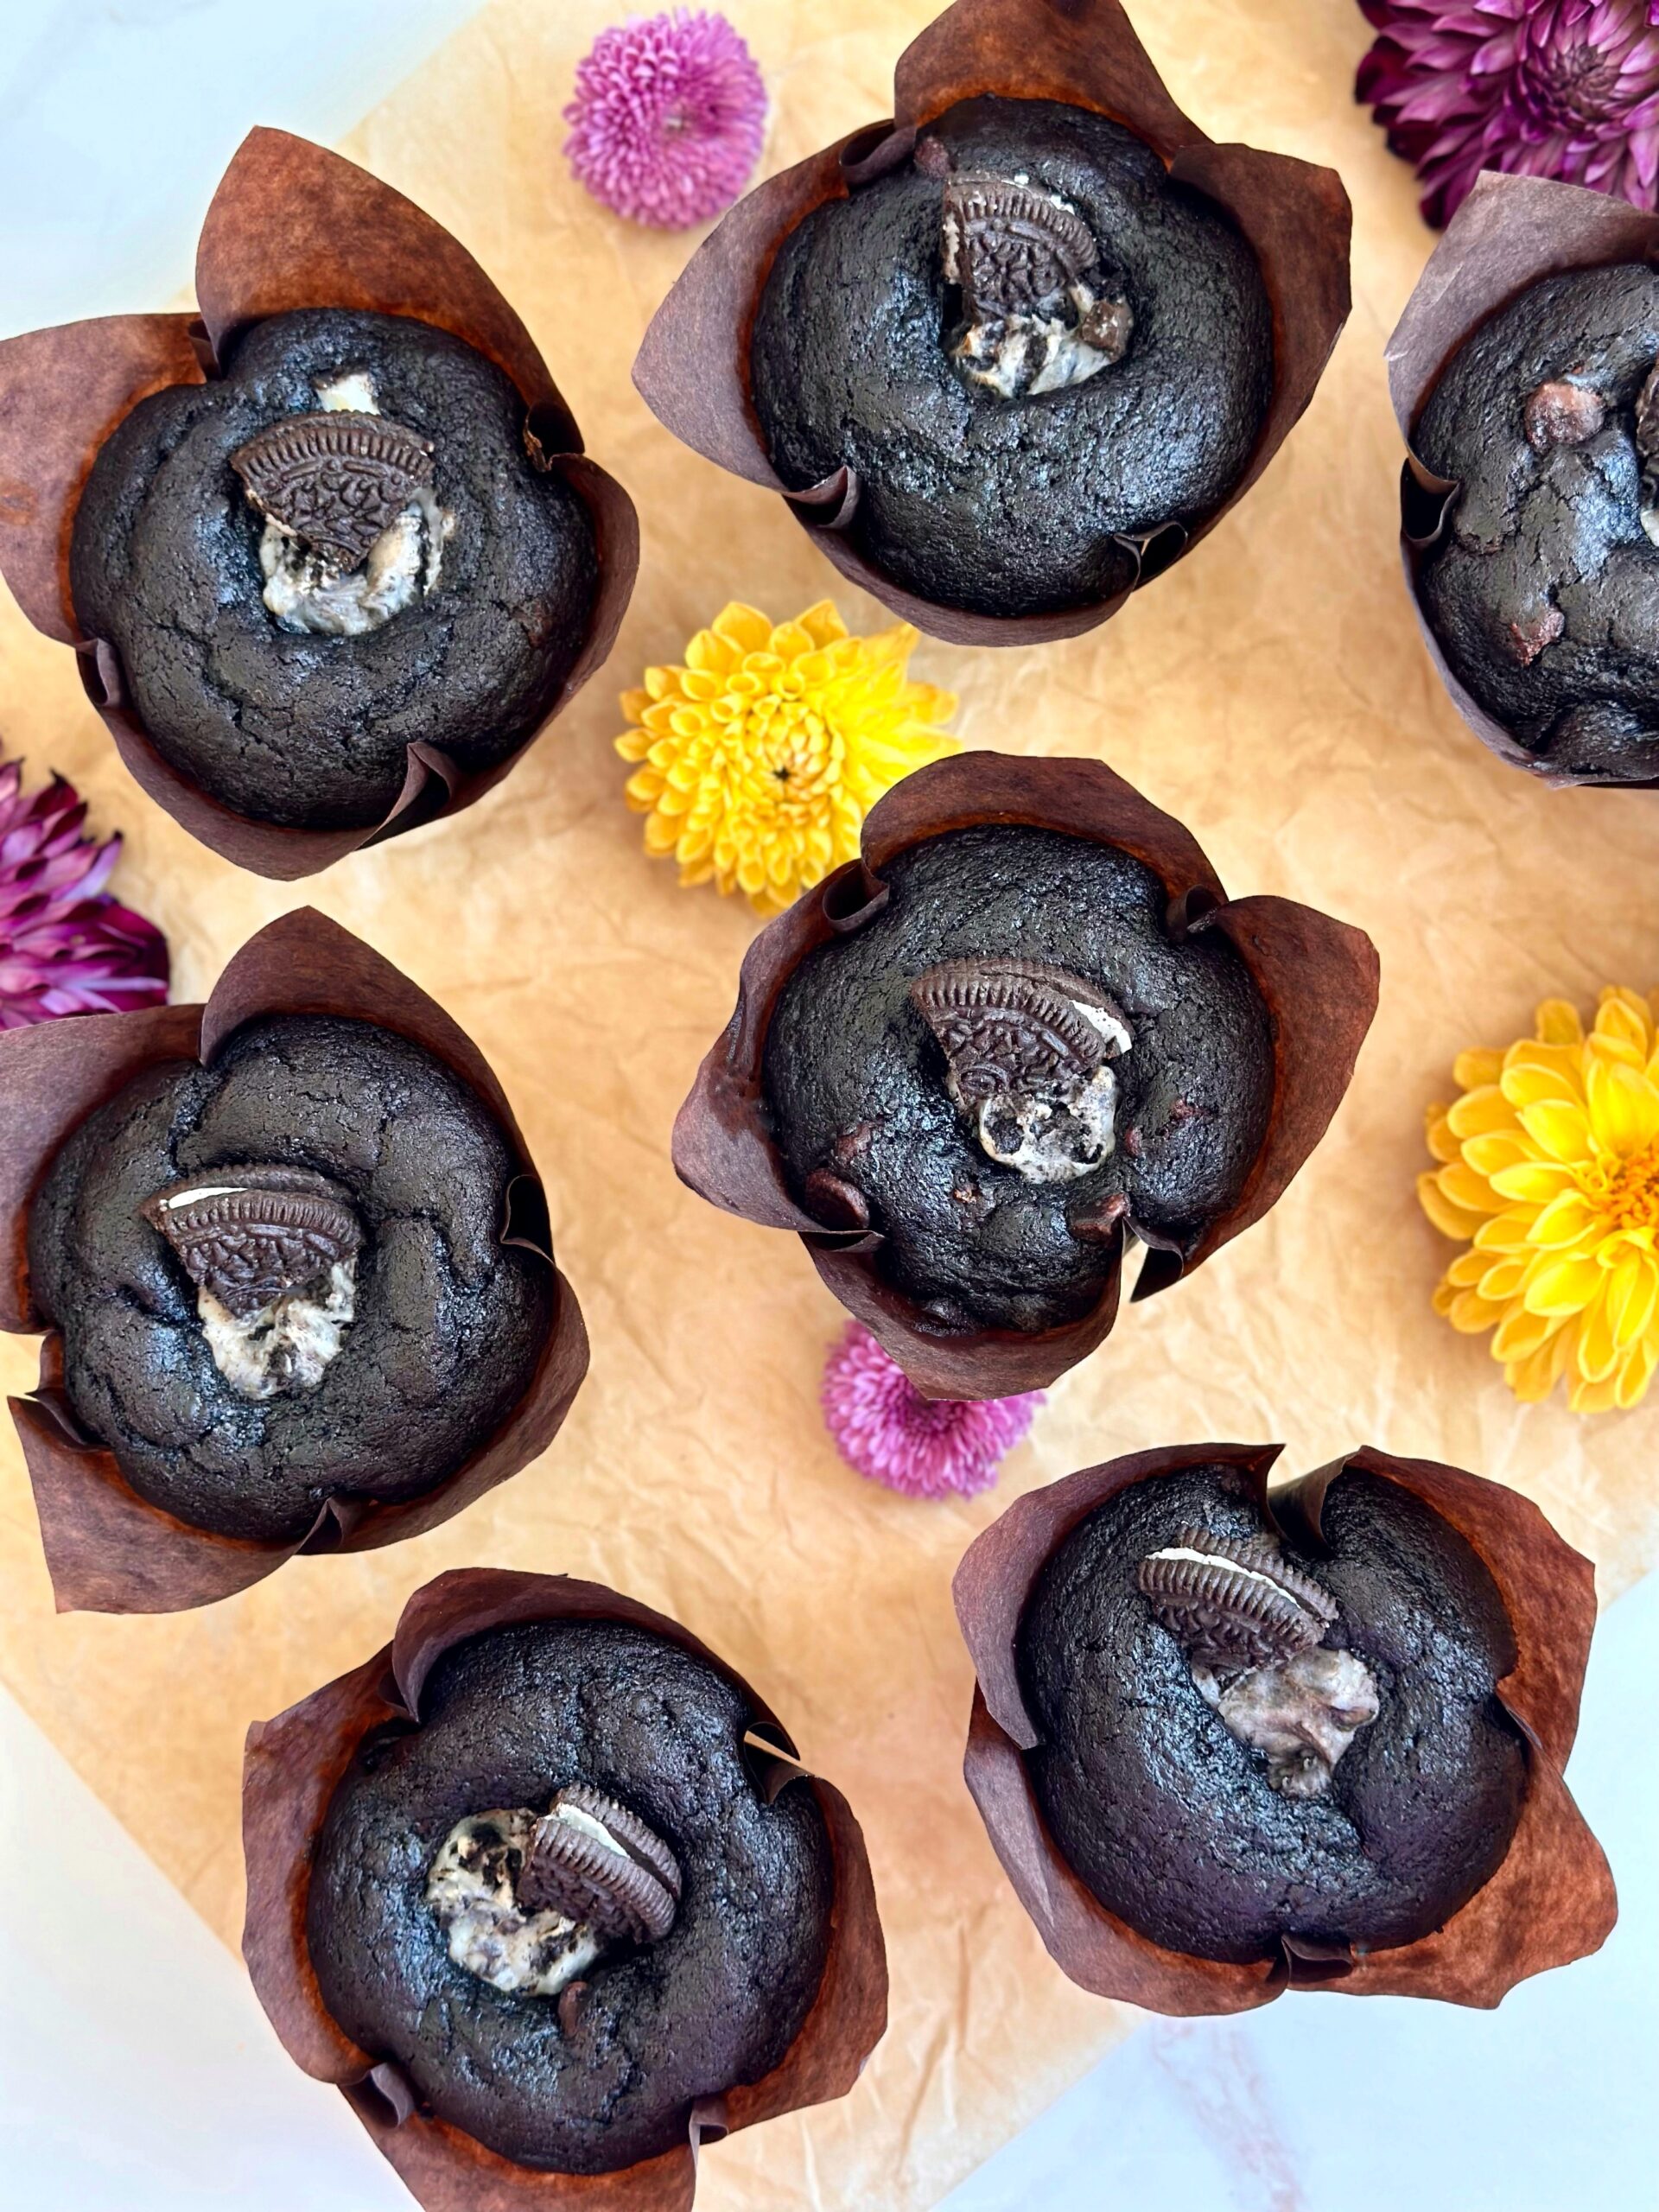
If you’re craving something sweet, decadent and intensely chocolate, these Double Chocolate Oreo Muffins might be just what you need. They were born when I had a craving for Double Chocolate Muffins, but I didn’t feel like driving all the way to my favorite cafe. I noticed the internet had an overwhelming number of chocolate muffin recipes, each one claiming to be the best. I said goodbye to the sea of chocolate muffin recipes and went to work on a muffin recipe that fulfilled my dream muffin wish. I used black cocoa powder to capture the Oreo essence, semisweet chocolate chips, for those little pools of melted chocolate throughout and a cookies and cream filling. I used tulip muffin liners* because they hold more batter so you end up with more generous sized muffins. They’re high recommended if you want to make the muffins exactly the way I made them.

The most challenging part of this recipe is testing for doneness, because you don’t want to over bake these. Insert a toothpick or a cake tester into the cake part of the muffins. If there are a few moist crumbs on it, that’s what you’re looking for. If there’s melted chocolate on it, you’ve likely hit a chocolate chip, so test again with a clean toothpick. If you see cake batter on the toothpick, the muffins need more time in the oven.

To watch the Instagram video of Double Chocolate Oreo Muffins being made, click here.

Print Recipe
Double Chocolate Oreo Muffins
Dark chocolate muffins with semisweet chocolate chips and cookies and cream filling
Servings
muffins
Ingredients
Cookies & Cream Filling
Double Chocolate Muffins
Servings
muffins
Ingredients
Cookies & Cream Filling
Double Chocolate Muffins
Instructions
Cookies & Cream Filling
  1. In a medium bowl, mix together the cream cheese, sugar and vanilla. Gently fold in the Oreos.
Double Chocolate Muffins
  1. Preheat the oven to 400ºF (200ºC). Line a 12-serving muffin pan with tulip liners*
  2. In a large bowl, whisk together the flour, cocoa powder, baking powder, baking soda and salt.
  3. In a separate large bowl, whisk together the sugar, brown sugar, oil, eggs, vanilla extract, sour cream and milk until well combined. Stir the wet ingredients into the dry ingredients just until combined. Do not over mix. Fold in the chocolate chips.
  4. Scoop the batter evenly into the muffin cups, about 3 1/2 ounces ( in each one. Scoop or spoon a scant tablespoon size dollop of the filling into the center of each muffin.
  5. Bake for 5 minutes, then turn the oven temperature down to 350ºF (180ºC). Continue baking until a toothpick inserted into the cake part of the muffins comes out with a few moist crumbs on it, about 7-10 more minutes. If the toothpick hits a melted chocolate chip, reinsert a clean toothpick and test again. Cool in the pan for 5 minutes, then transfer to a cooling rack. Top each muffin with a quarter piece of Oreo cookie.
Recipe Notes

*Tulip muffin liners are preferred. To find tulip muffin liners, click here. You can also make your own by pressing  6-inch squares of parchment paper into the muffin pan cups. If you want to use standard muffin liners, fill them 3/4 full and use less filling. Standard muffin liners hold less batter so you'll end up with a a couple of extra muffins.  Keep in mind, the baking time will be shorter.

Mini Pumpkin Bear Muffins

Mini Pumpkin Bear Muffins

These cute little bear-shaped pumpkin muffins are almost too cute to eat. But if you try one, it’ll be gobbled up without hesitation because they’re so moist, fluffy and delicious! The cinnamon sugar coating gives them the perfect fall flavor and a subtle crunch. I used cream cheese icing to form the snouts and melted chocolate for the eyes and noses. You can also use melted chocolate chips or candy melts to decorate their faces if you prefer. I used a bear-shaped mini muffin pan, which is also called a Madeleine pan or a financier pan. To find a bear mini muffin pan, click here. A standard mini muffin pan will also work, but the muffins won’t be bear-shaped. If you end up using a standard mini muffin pan, you can add round, flat candies to form the ears.

To watch the TikTok video of Mini Pumpkin Bear Muffins being made, click here.

To watch the Instagram video of Mini Pumpkin Bear Muffins being made, click here.

Print Recipe
Mini Pumpkin Bear Muffins
Moist, fluffy bear-shaped pumpkin mini muffins with cream cheese icing snouts
Course Breakfast, Brunch
Keyword muffins, pumpkin
Servings
mini muffins
Ingredients
Mini Pumpkin Bear Muffins
Cinnamon Sugar
Bear Faces
Course Breakfast, Brunch
Keyword muffins, pumpkin
Servings
mini muffins
Ingredients
Mini Pumpkin Bear Muffins
Cinnamon Sugar
Bear Faces
Instructions
Mini Pumpkin Bear Muffins
  1. Preheat the oven to 325ºF (165ºC). Grease and flour a bear-shaped mini muffin pan. (This recipe also works in a mini muffin pan but the muffins won't be bear shaped.)
  2. In a medium bowl, whisk together the flour, baking powder, baking soda, salt, cinnamon, ginger and nutmeg.
  3. In a large bowl, whisk together the brown sugar, oil and egg until smooth and well combined. Mix in the pumpkin purée until incorporated. Stir in the flour mixture just until combined.
  4. Scoop or pipe the batter into the muffin pan, filling the cups 2/3 full (about 3/4 oz or 21g in each). Use a small offset spatula to smooth the top of the batter, making sure to get batter into the ears.
  5. Bake until a toothpick inserted into the center of the muffins comes out clean, about 9-11 minutes. Let the muffins cool in the pan for 5 minutes then remove them from the pan and transfer to a cooling rack.
  6. Clean the pan and repeat with the remaining batter.
Cinnamon Sugar
  1. In a small bowl, whisk together the sugar and cinnamon until well combined. Brush the warm muffins with with melted butter using a small pastry brush. Coat them with the cinnamon sugar mixture.
Bear Faces
  1. In a small bowl, beat the butter, cream cheese, powdered sugar and 1/2 teaspoon of milk until smooth. Add more milk as needed.
  2. Transfer the icing to a piping bag fitted with a medium round tip or snip off the end of the piping bag making a 1/4-inch wide opening. Pipe a small blob of icing onto each bear's face to form the snouts.
  3. Transfer the melted chocolate to a piping bag fitted with a small round tip or snip off the end of the piping bag making a 1/16-inch wide opening. Pipe dots of chocolate onto the snouts to make the noses. Pipe dots or curved lines to make the eyes. Alternately you can apply the melted chocolate dots with the tip of a toothpick
Recipe Notes

*To find a bear-shaped mini muffin pan, click here.

Pumpkin Cinnamon Roll Cakes

Summer was such a happy season for me as a child that I didn’t want it to end. I still love summer, but now that I’m an adult, I begin to anticipate fall right around the time when I’m tired of harsh, hot temperatures, rumbling air conditioners and flies buzzing around at cookouts. Now is that time for me. It’s so hot where I live right now, that I’m welcoming the cool, crisp fall weather and all it brings.

The beautiful warm flavors of fall are perfectly captured in these Pumpkin Cinnamon Roll Cakes. The moist, perfectly spiced cakes are topped with a cinnamon swirl which is basically cinnamon roll filling. I topped them with Vanilla Bean Icing, but you can also make it cream cheese icing by swapping out 1 tablespoon of the melted butter for 1 tablespoon of softened cream cheese, if you prefer. The optional addition of meringue powder helps the icing set up and gives it that crunch we love on glazed donuts. To find meringue powder, click here.

I used a shallow jumbo muffin pan to make these cakes. The muffin cups are 4 inches wide and 1 inch deep. A hamburger bun pan for 4-inch buns or six 4-inch cake pans will also work. To find the pan I used, click here.

To watch the Instagram video of the finished Pumpkin Cinnamon Roll Cakes, click here.

Print Recipe
Pumpkin Cinnamon Roll Cakes
Moist pumpkin cakes with cinnamon swirls and vanilla bean icing
Servings
4-inch cakes
Ingredients
Pumpkin Cakes
Cinnamon Swirl
Vanilla Bean Icing
Servings
4-inch cakes
Ingredients
Pumpkin Cakes
Cinnamon Swirl
Vanilla Bean Icing
Instructions
Pumpkin Cakes
  1. Preheat the oven to 350ºF (180ºC). Line a 6-serving shallow jumbo muffin pan with jumbo muffin liners.* (The jumbo muffin liners will fit by pressing them in around the inside bottom edges.) The muffin pan I used has cups that are 4-inches across by 1-inch deep. A hamburger bun pan for 4-inch buns or six 4-inch cake pans will also work.
  2. In a medium bowl, whisk together the flour, baking powder, baking soda, salt, cinnamon, ginger and nutmeg.
  3. In a large bowl, whisk together the sugar, oil, eggs and vanilla until smooth and well combined. Mix in the pumpkin purée. Stir in the flour in two additions, just until combined.
  4. Transfer the batter to the muffin cups, evenly dividing the batter among the cups. Pipe the cinnamon swirl mixture in a spiral on the top of the batter of each one.
  5. Bake until a toothpick inserted into the center of the cake part comes out clean, about 23-27 minutes. Let the cakes cool in the pan for 5 minutes, then transfer to a cooling rack.
Cinnamon Swirl
  1. In a small bowl, whisk together the brown sugar, flour, cinnamon and salt. Add the melted butter and whisk until well combined.
  2. Transfer the mixture to a piping bag fitted with a 1/4-inch wide round tip.
Vanilla Bean Icing
  1. In a small bowl, whisk together the butter, vanilla bean paste, powdered sugar, meringue powder, salt and 1 tablespoon of milk until well combined. Whisk in more milk as needed to reach your desired consistency.
  2. Brush the icing on the cooled cakes with a small pastry brush or make the icing a little thinner and drizzle the icing on if you prefer.
Recipe Notes

*To find jumbo muffin liners, click here.

To find the baking pan I used, click here.

To find 4-inch cake pans, click here.

To find meringue powder click here.

Chocolate Chip Cookie Bread

Chocolate Chip Cookie Bread

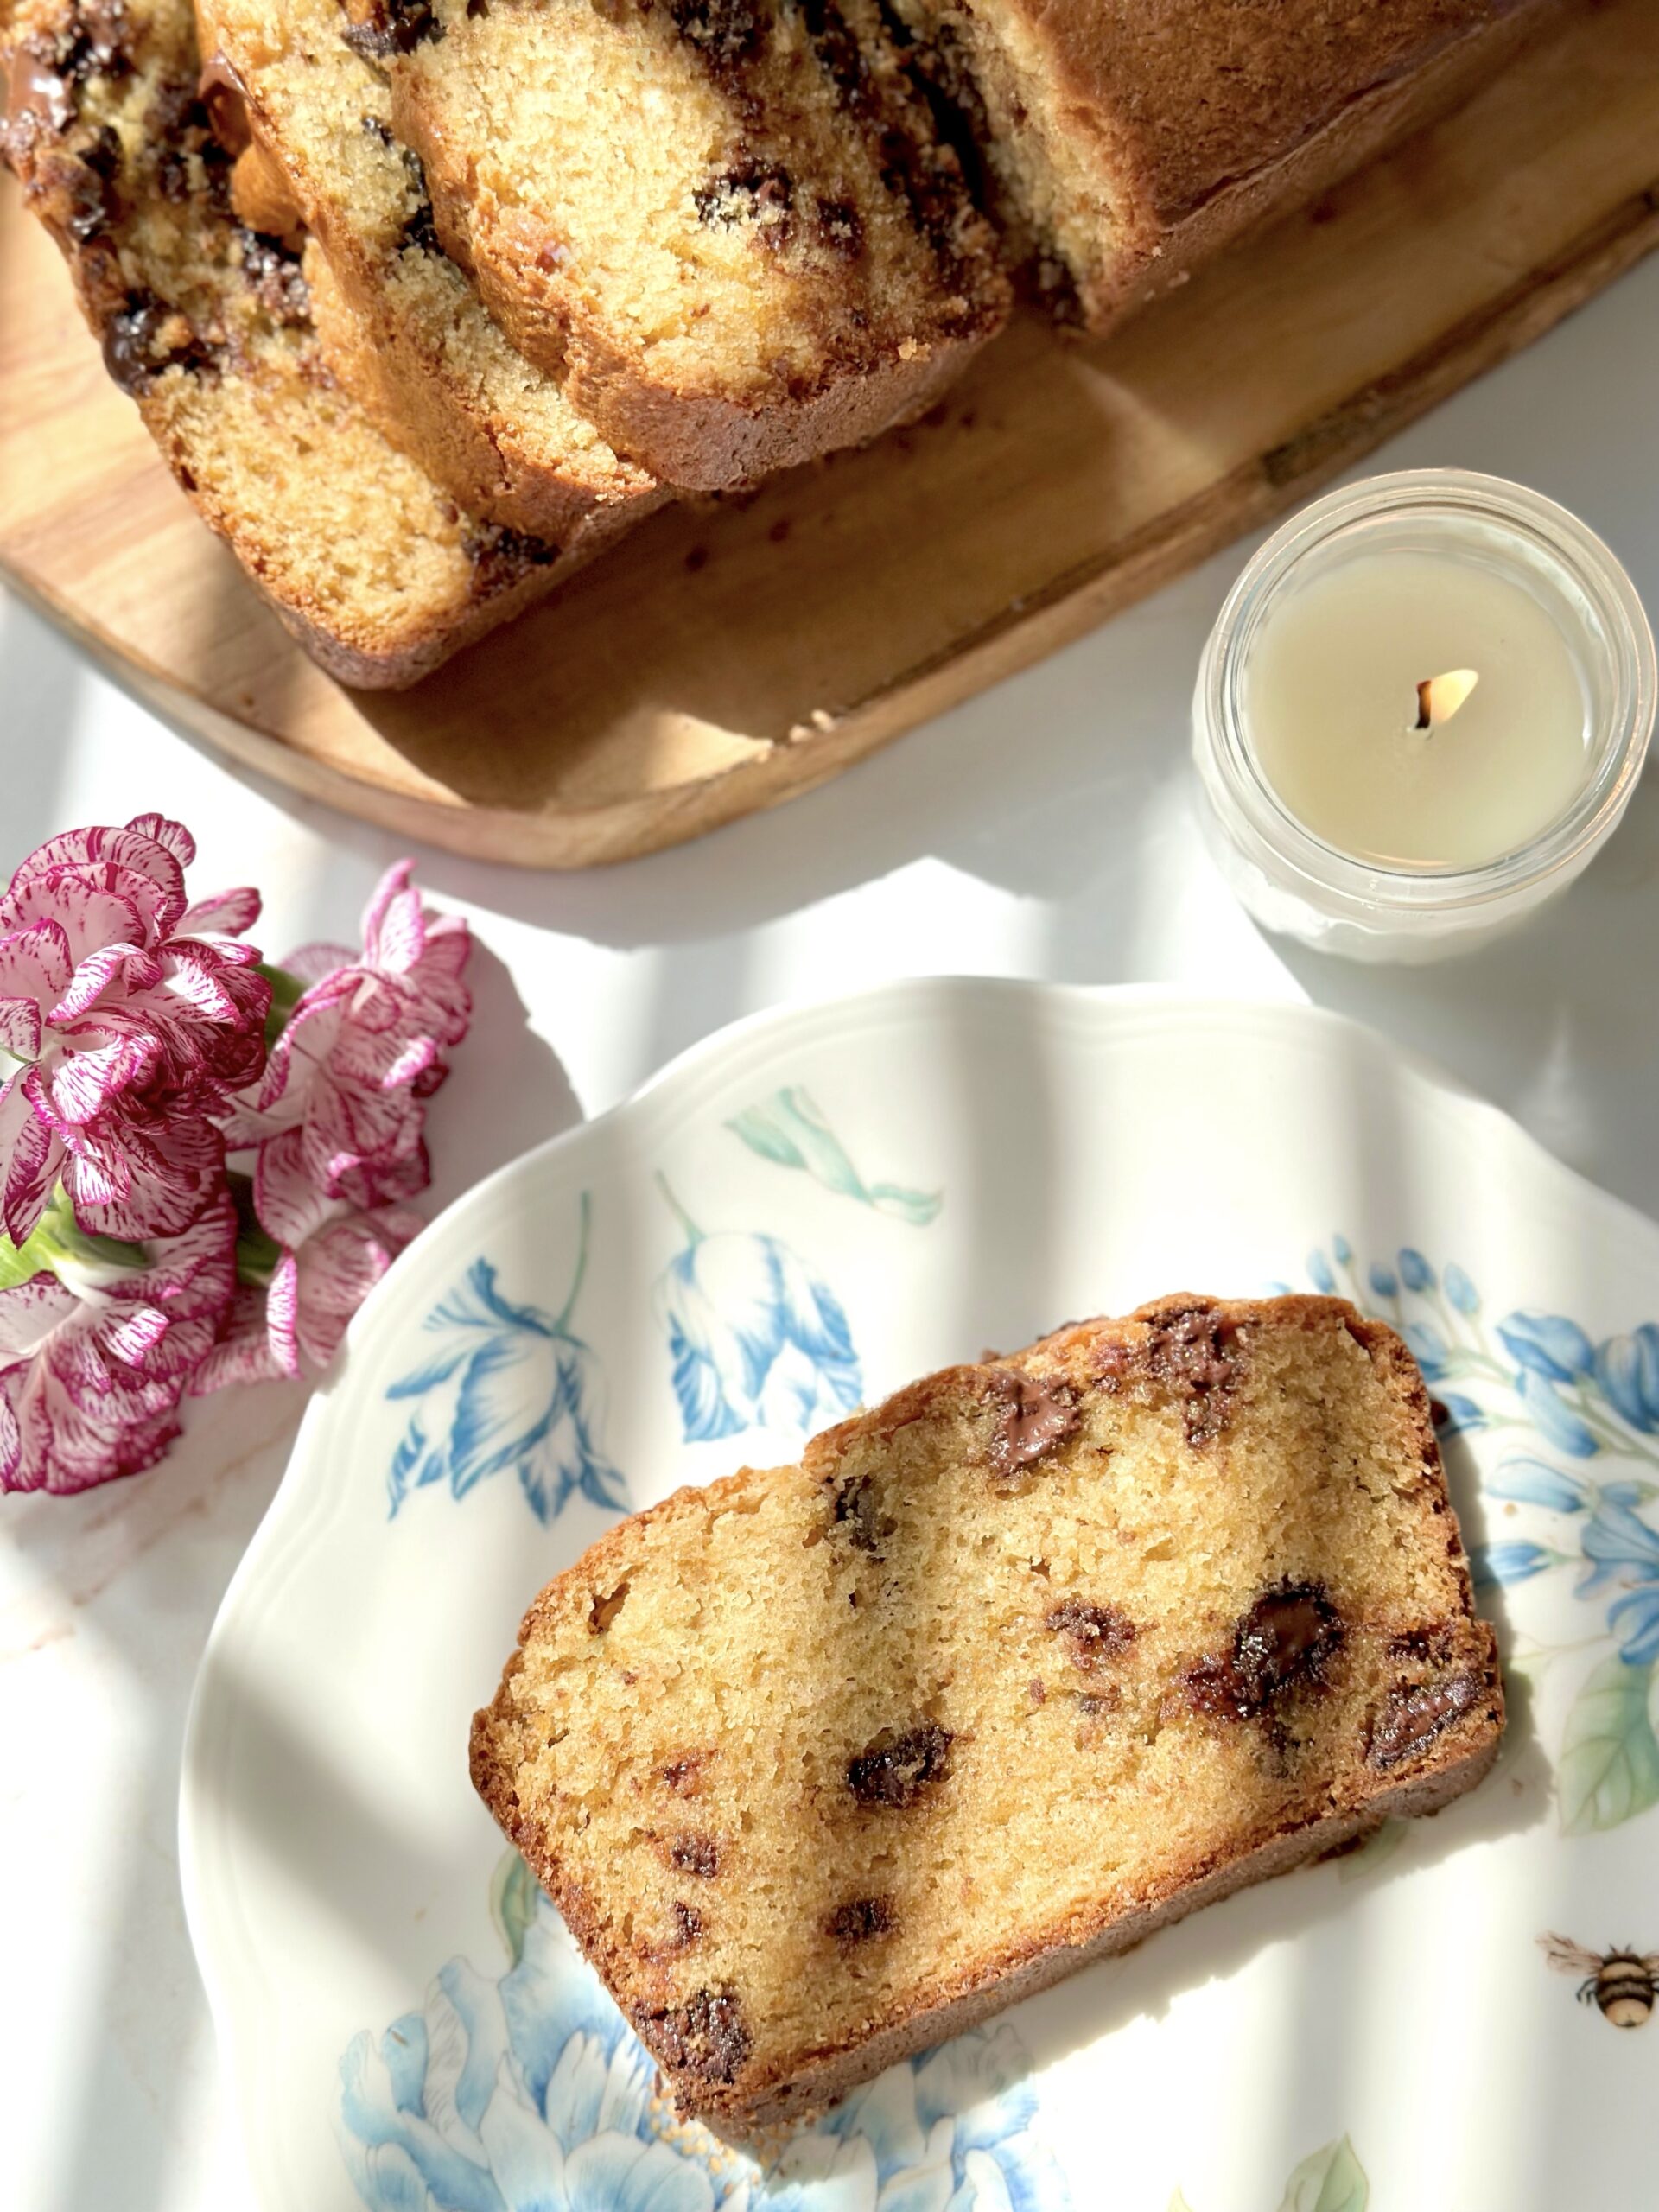
This is the ultimate chocolate chip bread! There are no cookies in this recipe, but it tastes so much like freshly baked chocolate chip cookies that Chocolate Chip Cookie Bread is the perfect name for it. Brown sugar, vanilla and jumbo chocolate chips really help to mimic that beloved chocolate chip cookie flavor. I love the big pockets of chocolate that come from using jumbo chocolate chips, but of course you can use regular or mini chocolate chips if you prefer.

I typically wait until a loaf is cooled off before slicing it, but in this case, I wanted to capture the melted pools of chocolate for the video. The fresh baked chocolate chip aroma was so heavenly, that it took all of my willpower not to immediately devour the entire loaf! It’s easier to slice a fresh baked loaf when it’s cooled off. But if you want to experience the melty chocolate chips, warm your slice in the microwave for 10 seconds.

To watch the TikTok video, click here.

Print Recipe
Chocolate Chip Cookie Bread
A moist, tender loaf cake with brown sugar and chocolate chips that tastes just like chocolate chip cookies
Servings
loaf
Ingredients
Servings
loaf
Ingredients
Instructions
  1. Preheat oven to 375ºF (190ºC). Line the bottom of a 9 x 5-inch loaf pan with parchment paper. Grease and flour the insides.
  2. In a medium bowl, whisk together the 1 3/4 cups flour, baking powder, baking soda and salt.
  3. In a large bowl, cream the butter and brown sugar until fluffy and well combined.
  4. Beat in the egg, egg yolk and vanilla in 3 separate additions, making sure each one is fully incorporated before adding the next.
  5. In a small bowl, whisk the milk and sour cream together.
  6. Add the flour mixture to the batter in two additions, alternating with half of the milk mixture after each addition. Beat just until combined. Do not over mix.
  7. Set aside a handful of chocolate chips for the top of the loaf. In a small bowl, toss the remaining chips with 1 teaspoon flour, making sure to coat them all, then fold them into the batter. This will help to prevent them from sinking.
  8. Transfer the batter to the prepared loaf pan. Top with the reserved chocolate chips.
  9. Bake for 10 minutes. Turn the oven temperature down to 325ºF (165ºC) and continue baking until the loaf is golden brown and a toothpick inserted in center comes out clean, about 45-50 more minutes.
  10. Cool the loaf in pan for 10 minutes then turn the loaf out onto a cooling rack.
Recipe Notes

*If you want to use mini chocolate chips, use one cup (6 oz or 170g)