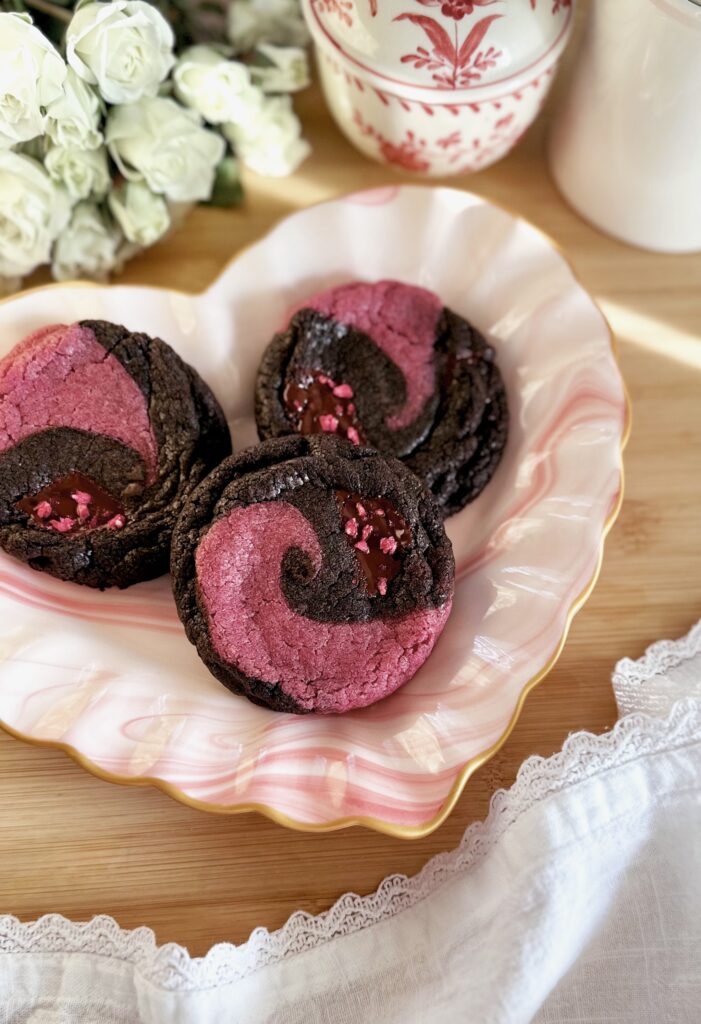
Banana Cake with Cream Cheese Frosting & Salted Caramel

Banana Cake with Cream Cheese Frosting & Salted Caramel

Banana bread is typically everyone’s go-to when we have overripe bananas on our countertops. There’s something so wholesome and comforting about a slice of homemade banana bread. This Banana Cake recipe gives you all of those heart-warming feelings, but it’s a little more flavorful, rich and satisfying. The cake is moist, soft and fluffy. The silky Cream Cheese Frosting pairs beautifully with the spices in the cake. A swirl of salted caramel adds the perfect, decadently delicious finishing touch.

Print Recipe
Banana Cake with Cream Cheese Frosting & Salted Caramel
Moist, flavorful banana sheet cake topped with silky cream cheese icing and salted caramel sauce.
Course Dessert
Keyword banana, cake
Servings
servings
Ingredients
Banana Cake
Cream Cheese Frosting & Salted Caramel
Course Dessert
Keyword banana, cake
Servings
servings
Ingredients
Banana Cake
Cream Cheese Frosting & Salted Caramel
Instructions
Banana Cake
  1. Preheat the oven to 350ºF (180ºC). Line the bottom of an 8-inch square cake pan with parchment paper. Grease and flour the insides.
  2. In a medium-size bowl, whisk together the flour, cinnamon, baking soda, salt and nutmeg until well combined.
  3. In a large bowl, beat the butter, with an electric mixer on medium speed, until light and creamy, Add the brown sugar and oil. Continue beating until creamy and well incorporated, about 2-3 minutes. Beat in the eggs and vanilla extract in 3 separate additions, making sure each one is incorporated before adding the next. Stir in the mashed bananas. Add the flour mixture in two additions, followed by half of the sour cream after each addition. Mix just until combined.
  4. Transfer the batter to the prepared cake pan. Bake until a toothpick inserted into the center of the cake comes out clean, about 25-30 minutes. Let the cake cool in the pan for 10 minutes, then remove it from the pan and place it on a cooling rack.
Cream Cheese Frosting & Salted Caramel
  1. In a medium-size bowl, stir the cream cheese with a spatula until smooth. Beat in the butter, with an electric mixer on low speed, until smooth and well combined.
  2. Beat in the powdered sugar, vanilla, salt and heavy cream, on medium speed, until smooth and well combined. Stir slowly with a spatula to smooth the frosting and remove bubbles.
  3. Spread the cream cheese frosting on the cooled cake. Drizzle with a couple of tablespoons of salted caramel sauce and swirl it into the frosting with a spoon, adding more if desired.
Recipe Notes

*For my homemade caramel sauce recipe, click here.

For my easy caramel sauce recipe, click here.

To find premade salted caramel sauce, click here.

Sunshine Picnic Cake

Out here in Southern California we have picnic weather in the middle of winter. Even if you don’t have picnic weather yet, you might be craving something deliciously bright, like this Sunshine Picnic Cake made with fresh orange juice and orange zest. The soft, moist cake is topped with a subtly tart citrus icing. It’s perfect for a spring or summer picnic, a tea party, weekend brunch or even an anytime snack. This recipe is so versatile that you can easily switch it up to make it a lemon cake if you wish.*

Print Recipe
Sunshine Picnic Cake
Soft, plush, moist orange scented cake with citrus icing
Course Brunch, Dessert
Keyword cake, orange
Servings
Ingredients
Cake
Icing
Course Brunch, Dessert
Keyword cake, orange
Servings
Ingredients
Cake
Icing
Instructions
Cake
  1. Preheat the oven to 350ºF (180ºC). Line the bottom of an 8-inch square baking pan with parchment paper. Grease and flour the insides.
  2. In a medium-size bowl, whisk together the flour, baking powder, baking soda, and salt until well combined.
  3. In a large bowl, beat the sugar, orange zest, and oil, with an electric mixer at medium speed, until smooth and well combined. Add the orange juice and the extracts and beat until combined. With the mixer on low speed or by hand, beat in the flour mixture in two additions followed by half of the sour cream after each addition. Mix just until smooth and combined.
  4. Transfer the batter to the baking pan. Bake until the top looks golden and a toothpick inserted into the center of the cake comes out clean, about 20-25 minutes. Do not over bake. Let the cake cool in the pan for 10 minutes, then remove it from the pan and transfer it to a cooling rack. Alternately, if you want to transport the cake in the pan, you can let it cool in the pan.
Icing
  1. In a small bowl, whisk together the powdered sugar, butter, lemon juice, 1 tablespoon (15ml) of orange juice and the salt until well combined. Add additional orange juice as needed to achieve the desired consistency. Whisk until smooth. Spread the icing on the cooled cake, letting it drip down the sides.
Recipe Notes

*To make a lemon version of this cake, replace the orange juice with lemon juice. Replace the orange zest with the lemon zest of two medium lemons. Replace the orange extract with pure lemon extract. Reduce the vanilla extract to 1/2 teaspoon.

**To find pure orange extract, click here.

Little Chocolate Donuts

Little Chocolate Donuts with pink icing

Little chocolate donuts are a fun, nostalgic treat from my childhood. I’m talking about the ones at the local market that come in a plastic sleeve. I remember sharing the waxy little donuts with a friend, and at the time we thought they were delicious. Now that I’m an adult, I realize that homemade ones taste soo much better and they’re surprisingly quick and easy to make. They’re delicious with either naturally pink strawberry icing or chocolate glaze. I shared the recipe for both options below.

For Valentine’s Day, I used a heart-shaped mini donut pan for the donuts shown in the photo, but a standard round mini donut pan works too. A sprinkle of pink sparkling sugar makes them extra special, especially for Galentine’s Day.

Print Recipe
Little Chocolate Donuts
Servings
mini donuts
Ingredients
Little Chocolate Donuts
Pink Strawberry Icing
Chocolate Glaze
Servings
mini donuts
Ingredients
Little Chocolate Donuts
Pink Strawberry Icing
Chocolate Glaze
Instructions
Little Chocolate Donuts
  1. Preheat the oven to 350ºF (180ºC). Spray a mini donut pan with nonstick spray. (I used a heart-shaped mini donut pan** but a standard round mini donut pan***works too.)
  2. In a medium-size bowl, whisk together the flour, cocoa powder, salt, baking powder and baking soda until well combined.
  3. In a large bowl, whisk together the brown sugar, oil, egg, buttermilk and vanilla until smooth. Add the flour mixture and stir just until combined.
  4. Transfer the batter to the donut pan, using a piping bag or a plastic food storage bag with the corner cut off. Bake until a toothpick inserted into the centers of the donuts comes out clean, about 6-8 minutes. Do not over bake or the donuts will dry out. Transfer the donuts to a cooling rack. Clean the pan and repeat with the remaining batter.
Strawberry Icing
  1. In a medium-size bowl, whisk together the powdered sugar, pureéd strawberries, melted butter, salt and 1 tablespoon (15ml) of milk until well combined. Add additional milk as needed to reach your desired consistency. Whisk until smooth. Dunk the top surface of the cooled donuts into the icing.
Chocolate Glaze
  1. In a heat safe bowl set over a pan of barely simmering water, melt the butter, chocolate and corn syrup together, stirring occasionally, until smooth. Remove from heat and set aside to cool slightly. Dunk the top surface of the cooled donuts into the glaze or spoon it over the tops.
Recipe Notes

*To find pink sparkling sugar, click here.

**To find the heart-shaped mini donut pan I used, click here.

***To find a standard mini donut pan, click here.


Fudgy Chocolate Crumb Cake

Fudgy Chocolate Crumb Cake

This moist, fudgy chocolate cake with a generous amount of melt-in-your-mouth chocolate crumb topping and powdered sugar snow is perfect for frosty mornings with a cup of hot coffee or tea. It’s also perfect for a holiday breakfast or brunch served with fresh raspberries and/or raspberry sauce.*

Print Recipe
Fudgy Chocolate Crumb Cake
Rich, moist, fudgy chocolate cake with melt-in-your mouth crumb topping and sprinkled with powdered sugar.
Cuisine American
Keyword cake, chocolate, crumb
Servings
servings
Ingredients
Crumb Topping
Cake
Cuisine American
Keyword cake, chocolate, crumb
Servings
servings
Ingredients
Crumb Topping
Cake
Instructions
Crumb Topping
  1. In a medium-size bowl, whisk together the flour, granulated sugar, brown sugar, cocoa powder and salt until well combined. Work the butter into the flour mixture with your fingertips until it looks like dirt, with no large pieces of butter remaining. Press the mixture together to form chunks. Set aside in the refrigerator until ready to use.
Cake
  1. Preheat the oven to 350ºF (180ºC). Line an 8-inch square cake pan** with parchment paper, leaving a couple of inches of overhang to serve as handles to lift the cake out of the pan. If you want to serve the cake directly from the pan, you can skip the parchment paper and simply spray the pan with nonstick spray.
  2. In a medium-size bowl, whisk the flour, cocoa powder, baking powder, baking soda and salt together until well combined.
  3. In a large bowl, beat the butter, granulated sugar and brown sugar together, with an electric mixer at medium speed, until light and fluffy. Beat in the oil until combined. Beat in the egg, egg yolk, and vanilla in 3 separate additions, making sure each one is incorporated before adding the next.
  4. On low speed, beat the flour mixture into the batter in 2 additions, alternating with half of the sour cream after each addition. Beat just until combined. Gradually beat in the hot coffee just until smooth and well combined. Fold in the mini chocolate chips.
  5. Transfer the batter to the prepared cake pan. Top the batter evenly with the crumb topping. Bake until a toothpick inserted into the center of the cake comes with a few moist crumbs attached (not wet batter), about 28-37 minutes.
  6. Cool the cake in the pan for 15 minutes, then remove the cake from the pan and continue cooling on a cooling rack. Sprinkle powdered sugar over the cooled cake.
Recipe Notes

*To find my raspberry sauce recipe, click here.

**To find my favorite 8-inch square cake pan, click here.


Gingerbread Friends Cookies

Gingerbread Friends Cookies

I got a set of the teeny tiniest cookie cutters last year. Ever since, I’ve been coming up with cute ways to use them. Since Christmas is coming, I made the littlest and cutest gingerbread people. They look so cute adorning my full size gingerbread cookies. Working with such small cookies can be challenging but I have a few tips to make it easier. The dough has to be rolled very thin, so I found it easier to manage by rolling it between sheets of parchment paper. Since the dough is so thin and fragile, it has to be kept very cold during the entire process , so pop it into the fridge if it becomes too warm. A toothpick dipped in melted white chocolate was the easiest way for me to draw on their little faces, but a black edible marker would work too. You can also use royal icing if you’re comfortable working with it.

Print Recipe
Gingerbread Friends Cookies
Gingerbread cookies topped with white chocolate, mini gingerbread cookies and sprinkles
Course Dessert
Keyword cookies, gingerbread
Servings
cookies
Ingredients
Course Dessert
Keyword cookies, gingerbread
Servings
cookies
Ingredients
Instructions
  1. In a large bowl, whisk the flour, cornstarch, salt, baking powder, baking soda, ginger, cinnamon, nutmeg, and cloves together until well blended.
  2. In a separate large bowl, beat the butter, shortening and brown sugar together, with an electric mixer on medium speed, until light and fluffy. Beat in the egg until incorporated. Beat in the vanilla, then the molasses until well combined.
  3. On low speed, beat in the flour mixture in two additions. Beat just until combined. Set aside about 1/4 of the dough for the mini cookies. Form it into a disk. Divide the remaining dough into 2 portions and form them into disks. Wrap all of the dough disks in plastic wrap and chill them in the refrigerator until firm, at least 2 hours or overnight.
  4. Place the small portion of dough between 2 sheets of parchment paper. Roll to 1/16-inch thickness. Cut out 40-50 mini cookies using a 1-inch gingerbread man cookie cutter. Place the cut outs on a parchment paper lined tray. Freeze for 20-30 minutes. this will help the cookies keep their shape when baking.
  5. Preheat the oven to 350ºF (180ºC). Line 2 large cookie sheets with parchment paper. On a lightly floured surface, roll the remaining dough to 1/4-inch thickness. Using a 2 3/4-inch or a 3-inch round cookie cutter, cut out 18 cookies. Re-roll the scraps as needed. place the cookies at least 1-inch apart onto the cookie sheets. Bake until the cookies are set and slightly puffed, about 8-10 minutes. Transfer the cookies to a cooling rack.
  6. Place the mini cookies, about 1/2-inch apart onto a parchment lined cookie sheet. Bake until the cookies are set and slightly puffed, about 5-6 minutes. Let the cookies cool on the baking sheet. Decorate the cooled mini cookies with melted white chocolate, using a toothpick to make the eyes, smiles, etc.
  7. Spread melted white chocolate onto one side of each round cookie. Top with the mini gingerbread cookies and the sprinkles of your choice.
Recipe Notes

*To find the mini gingerbread man cookie cutter I used, click here.

To find round cookie cutters, click here.

Sweet Potato Cake with Marshmallow Cream Cheese Frosting and Salted Caramel

This incredibly easy-to-make cake is like a sleeper that takes you by surprise. The two-ingredient frosting is an unlikely winner, but will end up pleasantly surprising you, especially when the salted caramel is added as a finishing touch. The combination of sweet potatoes and marshmallows is a classic pairing that will remind you of a sweet potato casserole in cake form. My family adores it and I think you will too. If you’re not a fan of marshmallows you can frost this cake with my silky cream cheese frosting instead. Click here for the recipe.

Print Recipe
Sweet Potato Cake with Marshmallow Cream Cheese Frosting and Salted Caramel
Soft moist, single layer sweet potato cake topped with a luscious 2-ingredient frosting and drizzled with salted caramel
Course Dessert
Keyword cake, sweet potato
Servings
servings
Ingredients
Sweet Potato Cake
Marshmallow Cream Cheese Frosting
Course Dessert
Keyword cake, sweet potato
Servings
servings
Ingredients
Sweet Potato Cake
Marshmallow Cream Cheese Frosting
Instructions
Sweet Potato Cake
  1. Preheat the oven to 350ºF (180ºC). Line the bottom of an 8-inch square cake pan with parchment paper. Grease and flour the insides.
  2. In a medium bowl, whisk together the flour, cinnamon, baking powder, baking soda, salt, ginger and nutmeg until well combined.
  3. In a large bowl, beat the granulated sugar, brown sugar, oil, eggs and vanilla, with an electric mixer or whisk by hand until smooth and well combined. Stir in the sweet potatoes until incorporated. Mix in the flour mixture just until combined.
  4. Transfer the batter to the prepared cake pan. Bake until a toothpick inserted into the center of the cake comes out clean, about 23-28 minutes. Let the cake cool in the pan for 10 minutes then remove the cake from the pan and transfer it to a cooling rack.
Marshmallow Cream Cheese Frosting
  1. In a large bowl, stir the cream cheese with a spatula until smooth. Add the Marshmallow Fluff and beat with an electric mixer just until smooth and well combined. Don't over beat. Over beating can cause the cream cheese to curdle.
  2. Spread the frosting over the cooled cake. Drizzle the caramel over the top of the cake or top each piece of cake with a spoonful of caramel.
Recipe Notes

*It's okay to use canned sweet potatoes if you don't have fresh ones. Make sure to rinse them before using.

Double Chocolate Marble Cookies

Double Chocolate Marble Cookies

If you like marble cookies, you’ll love my amazing deluxe version. They have crisp edges with soft, chewy centers and plenty of chocolate which makes them the best marble cookies ever! I used a combination of dark chocolate pieces and milk chocolate chips for the perfect balance. Set aside some of the dark chocolate pieces for the tops for the most beautiful, decadent pools of melted chocolate.

Print Recipe
Double Chocolate Marble Cookies
Double chocolate marble cookies with crisp edges and soft, chewy centers. Chocolate dough with dark chocolate pieces is swirled together with vanilla dough with milk chocolate chips.
Instructions
  1. Line 2 large cookie sheets with parchment paper. In a medium-size bowl, whisk together the flour, baking powder, baking soda, and salt until well combined.
  2. In a large bowl, beat the butter, brown sugar and granulated sugar, with an electric mixer at medium speed, until light and fluffy. Beat in the egg, egg yolk and 1 teaspoon of vanilla extract in 3 separate additions, making sure each one is incorporated before adding the next. Add the flour mixture and mix just until combined.
  3. Divide the cookie dough in half, using a kitchen scale for accuracy. Place half of the dough in a separate bowl. Add the cocoa powder into half of the dough, mixing just until combined. Set aside several pieces of dark chocolate for the tops of the cookies, then fold the remaining dark chocolate pieces into the chocolate dough.
  4. Add the cornstarch and the remaining 1/2 teaspoon of vanilla extract to the other half of the cookie dough, mixing just until combined. Fold the milk chocolate chips into the vanilla dough.
  5. Divide each type of dough into 28 portions, approximately 1 tablespoon each. Roll them into balls. Take two balls of each type of dough (4 total) and arrange them in a checkerboard pattern then roll them together to form a large ball. Repeat this process to make 14 large dough balls. Cover the dough balls and chill them in the refrigerator for 1 hour.
  6. Preheat the oven to 350ºF (180ºC). Place the dough balls 3 inches apart onto the cookie sheets. Top each one with 1 or 2 pieces of the reserved dark chocolate. Bake until the edges are golden brown and the centers are set, but still soft, about 10-14 minutes. Do not over bake. The cookies will spread a bit. Remove the cookies from the oven and immediately use a large round cookie cutter to shape the hot cookies. Place the cookie cutter onto the cookie sheet over each cookie and slide it around each one a couple of times to achieve perfectly round cookies. Work quickly before the cookies set. Let the cookies cool on the cookie sheet for 5 minutes, then transfer them to a cooling rack.
Recipe Notes

To find dark Dutch process cocoa powder, click here.

Honey Caramel Popcorn

Honey Caramel Popcorn

Autumn is my favorite time of year to make caramel popcorn. That’s when the weather start to get cooler and we love curling up in a blanket with some snacks to watch a movies. Honey Caramel Popcorn has a buttery, sweet, earthy flavor that brings back memories of past fall seasons. It’s easy to make and fun to share. I added roasted almonds to mine but you can use your favorite nuts or leave them out if you wish.

If you want to share your Honey Caramel Popcorn, place it in food safe treat bags. I created some free printable labels that you can add to your treat bags. To get the free printables, click here.

Print Recipe
Honey Caramel Popcorn
Honey caramel coated popcorn with roasted almonds
Course Dessert
Cuisine American
Servings
servings
Ingredients
Course Dessert
Cuisine American
Servings
servings
Ingredients
Instructions
  1. Preheat the oven to 200ºF (95Cº). Line a large baking sheet with nonstick parchment paper or a silicone mat, such as a silpat.* Place the popcorn in an extra-large lightly greased bowl. Wipe out any excess oil or grease with a paper towel.
  2. In a medium-size, heavy bottom saucepan over medium heat, melt the butter, brown sugar, honey, corn syrup and salt together, stirring gently. When the mixture comes to a boil, stop stirring and let the mixture bubble for 5 minutes. Stir in the vanilla and baking soda. The mixture will foam up. Remove from heat.
  3. Carefully pour half of the caramel mixture over the popcorn. Stir gently, then pour the remaining caramel over the popcorn. Stir again. Add the almonds, then stir once more. Transfer the caramel popcorn to the baking sheet, arranging it in an even layer. Bake for about 1 hour, stirring gently every 15 minutes. Remove from the oven and let cool completely. Sprinkle with sea salt to taste if desired.
Recipe Notes

To find my favorite large baking sheets, click here. 

To find a silicone mat, click here.  

Morning Glory Cake

You may have tasted Morning Glory Muffins at your local bakery or coffee shop. They date back to the 1970’s and originated at Nantucket’s Morning Glory Cafe. The original muffins contained carrots, apples, coconut, raisins and nuts. Over the years I’ve tasted many versions of the hearty breakfast muffins with countless variations of nutritious add-ins. I was inspired to make a cake version using fall harvest ingredients. I replaced the coconut with zucchini and omitted the nuts. But you can certainly add in your favorite toasted chopped nuts, such as pecans or walnuts. Whether or not you like raisins, you’ll love the golden raisins I used in this recipe. They’re soaked in juice prior to baking and they taste like juicy little jewels, nothing like traditional raisins. I also added a brown sugar glaze, but the cake is equally delicious without the glaze.

Print Recipe
Morning Glory Cake
Moist tender single layer spice cake with carrots, apples, zucchini and golden raisins topped with brown sugar glaze
Cuisine American
Keyword apple, cake, carrot, zucchini
Servings
servings
Ingredients
Morning Glory Cake
Brown Sugar Glaze
Cuisine American
Keyword apple, cake, carrot, zucchini
Servings
servings
Ingredients
Morning Glory Cake
Brown Sugar Glaze
Instructions
Morning Glory Cake
  1. Preheat the oven to 350ºF (180ºC). Line the bottom of an 8-inch round cake pan** with parchment paper. Grease and flour the insides.
  2. In a small heat proof bowl, combine the raisins and apple juice, making sure the raisins are submerged. Heat in the microwave for 10-15 seconds until the raisins are plump and hydrated. Set aside to cool to room temperature, then drain the raisins.
  3. In a medium-size bowl, whisk together the flour, baking powder, baking soda, salt, cinnamon, ginger and nutmeg until well combined.
  4. In a large bowl, whisk together the brown sugar, granulated sugar, orange zest, oil, eggs and vanilla until smooth and well combined. Stir in the flour mixture just until combined. Fold in the carrots, apples, zucchini and the drained raisins.
  5. Transfer the batter to the prepared cake pan. Bake until the top is deep golden brown and a toothpick inserted into the center of the cake comes out clean, about 28-35 minutes. Cool the cake in the pan for 10 minutes then turn the cake out and transfer it to a cooling rack.
Brown Sugar Glaze
  1. In a small saucepan over medium-low heat, melt the butter and brown sugar together, stirring until the sugar dissolves and the mixture starts to bubble. Let it bubble gently for 30 seconds, then remove it from the heat. Stir in the heavy cream and salt until smooth. Whisk in the powdered sugar until smooth and well combined. Spread the glaze over the cooled cake.
Recipe Notes

*Wrap the shredded zucchini  in a clean kitchen towel or a sturdy paper towel and squeeze out the excess liquid.

**To find my favorite 8-inch cake pans, click here.

To find parchment cake rounds, click here.

Mocha Pumpkin Spice Bread

Mocha Pumpkin Spice Bread

It wouldn’t be fall without PSL’s and pumpkin bread. This ultra moist, deluxe version of pumpkin bread has mocha batter swirled though it and a rich chocolate glaze that takes it over the top. It’s dangerously delicious and nearly impossible to eat just one slice. I think this will become your new favorite fall baking recipe.

Print Recipe
Mocha Pumpkin Spice Bread
Soft, ultra moist pumpkin spice bread, swirled with mocha and topped with a shiny chocolate glaze
Servings
loaf
Ingredients
Mocha Pumpkin Spice Bread
Chocolate Glaze
Servings
loaf
Ingredients
Mocha Pumpkin Spice Bread
Chocolate Glaze
Instructions
  1. Preheat the oven to 350ºF (180ºC). Line the bottom of a 9 x 5-inch loaf pan with parchment paper. Grease and flour the insides with a mixture of equal parts unsweetened cocoa powder and flour.
  2. In a medium-size bowl, whisk together the flour, pumpkin pie spice, baking powder, baking soda and salt until well combined.
  3. Set aside one tablespoon (15ml) of the oil. In a large bowl, beat the remaining oil, the sugar, brown sugar, eggs, evaporated milk and vanilla extract until smooth and well combined. Beat in the pumpkin purée until incorporated. Stir in the flour mixture just until combined.
  4. Place one cup (237g) of the batter in a separate medium-size bowl. Add the cocoa powder, espresso powder and the reserved one tablespoon of oil. Mix until incorporated.
  5. Place half of the pumpkin batter into the baking pan. Scoop the mocha batter into the pan, alternating with scoops of the remaining pumpkin batter. Swirl the batter with a skewer. Bake until a toothpick inserted into the center comes out clean or with a few moist crumbs attached (not wet batter), about 35-45 minutes. Let the loaf cool in the pan for 10 minutes, then turn the loaf out and continue cooling on a cooling rack.
Chocolate Glaze
  1. Melt the butter, chocolate, and corn syrup together in a medium-size heatproof bowl set over a pan of barely simmering water, making sure the water doesn't touch the bottom of the bowl. Stir gently until smooth. Set aside to cool slightly then spoon the glaze over the cooled loaf and let it drip down the sides.
Recipe Notes

To find the 9 x 5 inch loaf pan I used, click here.

Brown Butter Chocolate Oatmeal Cookies

Brown Butter Chocolate Oatmeal Cookies

Oatmeal cookies are the most nostalgic and comforting cookies. A warm, freshly baked oatmeal cookie is like a hug from your grandmother. For this recipe, I kept the cozy, nostalgic flavor we all love about oatmeal cookies, but enhanced them with toasty, brown butter. I also added dark chocolate, which gives them a bit of decadence and modern sophistication. If you prefer a sweeter cookie, you can use semisweet chocolate instead.

Print Recipe
Brown Butter Chocolate Oatmeal Cookies
Oatmeal cookies made with toasty, fragrant brown butter and cinnamon and studded with dark chocolate pieces
Course Dessert
Cuisine American
Servings
cookies
Ingredients
Course Dessert
Cuisine American
Servings
cookies
Ingredients
Instructions
  1. In a small light-colored saucepan over medium heat, melt the butter and cook until it's deep golden and fragrant. When brown specks start to appear, remove it from the heat and immediately transfer the butter with the brown specks to a large bowl. Set aside to cool to room temperature.
  2. Preheat the oven to 350ºF (180ºC). Line two cookie sheets with parchment paper.
  3. In a medium-size bowl, whisk together the flour, baking soda, salt, cinnamon and pumpkin pie spice until well combined.
  4. Add the granulated sugar and brown sugar to the cooled brown butter and mix until combined. Beat in the egg and vanilla extract until smooth and well combined. Mix in the flour mixture, just until combined. Stir in the oats.
  5. Set aside a few chocolate pieces for the tops. Stir the remaining chocolate pieces and the pecans (if using) into the dough. Form the dough into 12 portions, about 3 tablespoons each. Roll into balls and place about 2 inches apart onto the baking sheets. Top the dough balls with the reserved chocolate pieces. Bake until the centers puff up and the edges start to turn light golden brown, about 9-11 minutes.
  6. Cool the cookies on the cookie sheet for 1 minute, then transfer to a cooling rack. (If your cookies spread too much** you can immediately use a large round cookie cutter or a small bowl to shape the hot cookies. Place the cookie cutter onto the cookie sheet over each cookie and slide it around each one a couple of times to achieve perfectly round cookies. Work quickly before the cookies set. Let the cookies cool on the baking sheet for 1 minutes, then transfer them to a cooling rack.)
Recipe Notes

*If you want a sweeter cookie, you can use a semisweet chocolate bar instead.

**You can also try chilling your dough balls for 20 minutes to prevent excess spreading. Bake a test cookie before baking the entire batch when trying a new recipe.

Apple Fritter Cake with Brown Butter Icing

If you love apple fritters, you’ll adore this moist, tender cake that’s loaded with fresh apples and topped with rich brown butter icing. This is the best Apple Fritter Cake recipe I’ve ever tasted! A couple of simple steps give it the most flavor and the best texture. The apples are cooked briefly on the stovetop before being added to the batter. This gives the apples a better flavor and texture and prevents soggy spots in your cake. The juices that the apples release during this step are saved to add to the icing. The browned butter in the icing adds a rich, nutty flavor that takes this cake over the top.

Print Recipe
Apple Fritter Cake with Brown Butter Icing
A moist, tender, subtly spiced cake loaded with fresh apples and topped with rich brown butter icing
Course Brunch, Dessert
Keyword apple, cake
Servings
servings
Ingredients
Apples
Cake
Icing
Course Brunch, Dessert
Keyword apple, cake
Servings
servings
Ingredients
Apples
Cake
Icing
Instructions
Apples
  1. Melt the butter in a large skillet over medium heat. When the butter starts to bubble, add the apples. Sprinkle the sugar and cinnamon over the apples and cook, stirring occasionally until the apples release their juices and start to become tender, about 5-7 minutes. Remove from heat and set aside to cool to room temperature.
  2. Drain the cooled apples, reserving the juice for the icing.
Cake
  1. Preheat the oven to 350ºF (180ºC). Grease an 8-inch square baking dish. (I used a ceramic baking dish.*)
  2. In a medium-size bowl, whisk together the flour, cinnamon, baking soda, salt and nutmeg until well combined.
  3. In large bowl, beat the butter, granulated sugar and brown sugar together until light and fluffy. Beat in the egg until incorporated, then beat in the vanilla extract.
  4. Stir in the flour mixture in 2 additions, followed by half of the sour cream after each addition. Mix just until combined. Do not over mix. Fold in the cooled, drained apples.
  5. Transfer the batter to the baking dish. Smooth the top with a spatula. Bake until the cake is golden brown and springs back when lightly touched. A toothpick inserted into the center of the cake will be clean or have a few moist crumbs attached, about 23-28 minutes. Do not over bake.
Icing
  1. In a small light-colored saucepan over medium heat, melt the butter and cook until it's deep golden and fragrant. When brown specks start to appear, remove it from the heat and immediately transfer it to a small bowl. Set aside to cool to room temperature.
  2. In a medium bowl, mix the cooled brown butter with the powdered sugar, reserved apple juice, 1 tablespoon (15ml) of milk and the salt until well combined. Add additional milk as needed to achieve the desired consistency. Whisk until smooth. Spread the icing over the cooled cake.
Recipe Notes

*To find an 8-inch ceramic baking dish, click here.