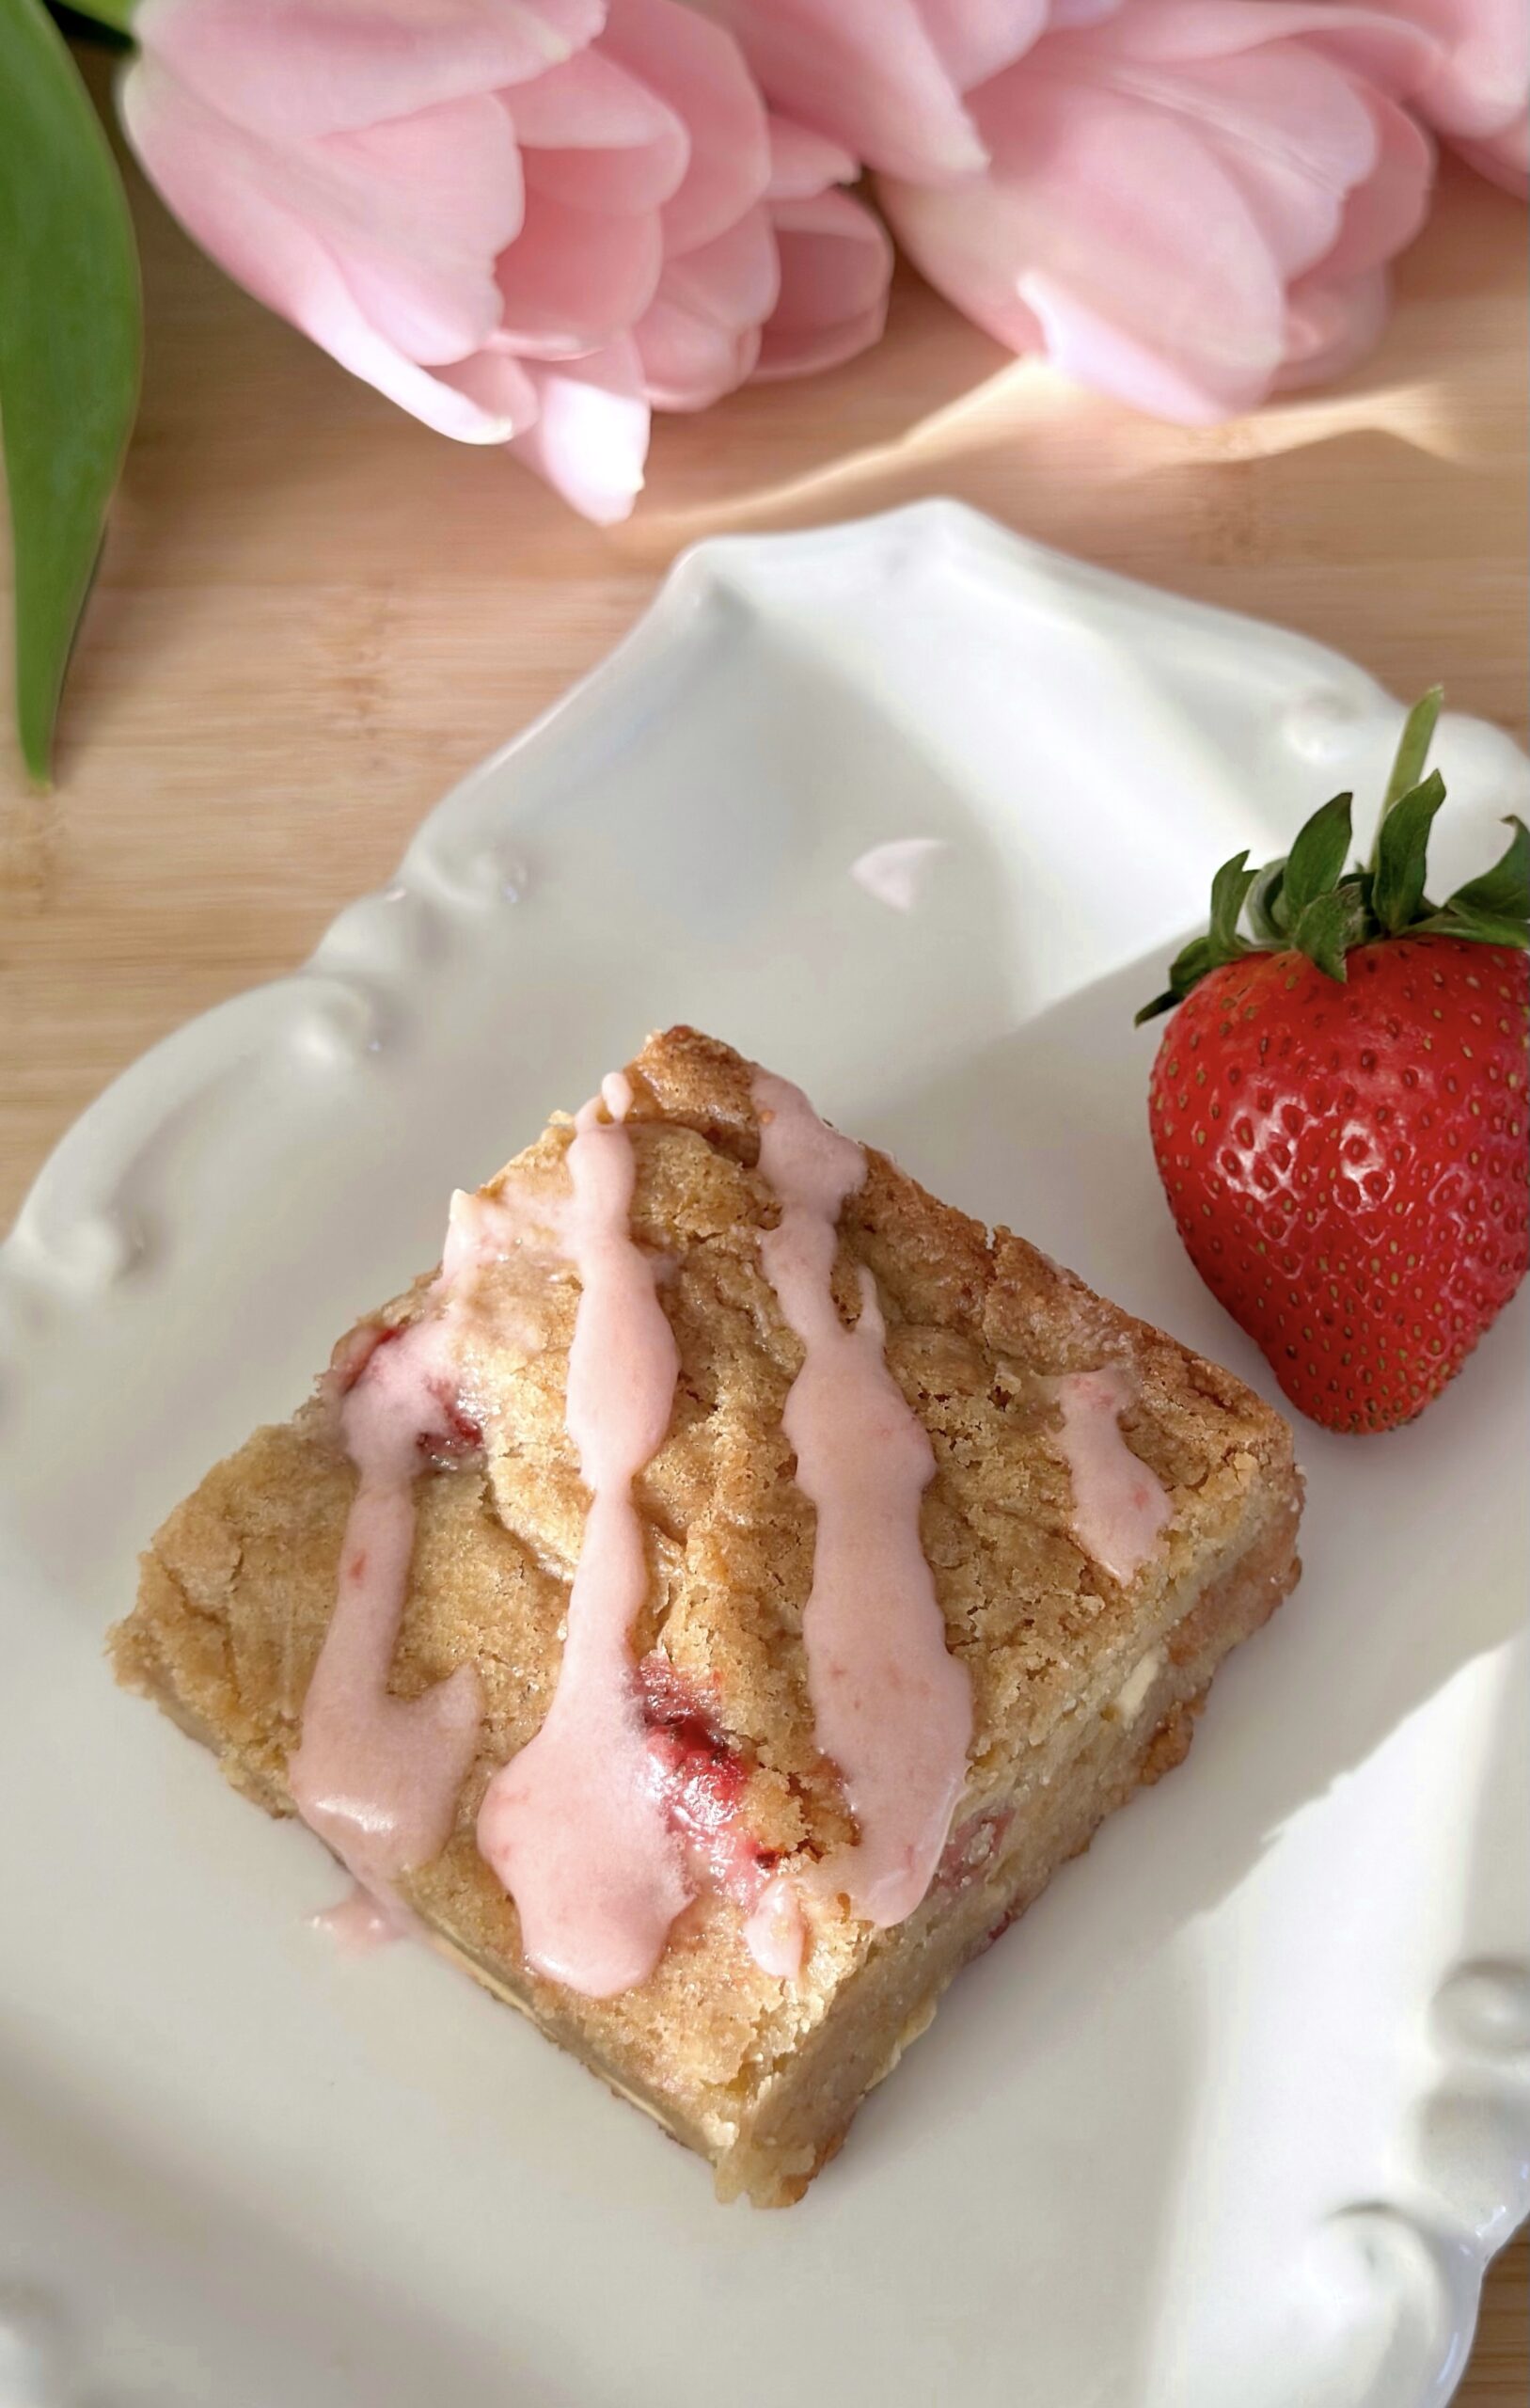
White Velvet Snowflake Cakes

Print Recipe
White Velvet Snowflake Cakes
Soft, plush vanilla mini cakes with vanilla icing
Course Dessert
Keyword cake, white velvet
Servings
cakes
Ingredients
Snowflake Cakes
Vanilla Icing
Course Dessert
Keyword cake, white velvet
Servings
cakes
Ingredients
Snowflake Cakes
Vanilla Icing
Instructions
Snowflake Cakes
  1. Preheat the oven to 350ºF (177ºC). Spray a 6-serving silicone snowflake mini cake mold* with nonstick spray. Use a small pastry brush to brush the spray into all of the crevices. Tap out any excess spray. Place the mold on a baking sheet.
  1. In a large bowl, whisk together the cake flour, baking powder and salt. Add the sugar and whisk to combine. Add the butter and beat, with an electric mixer on low speed, until the butter is evenly distributed and the mixture looks like crumbs with no large chunks.
  2. In a medium bowl, whisk together the milk, egg whites, oil and vanilla. Slowly add the milk mixture to the flour mixture and continue beating on low until smooth, about 1-2 minutes.
  3. Transfer the batter to the prepared pan, evenly distributing the batter and filling the cavities a little more than half full. Bake until the tops of the cakes are light golden and a toothpick inserted into the centers of the cakes comes out clean, about 18-22 minutes. Be careful not to over bake. Let the cakes cool in the pan for about 7 minutes then turn the cakes out onto a cooling rack to cool completely.
  4. Brush one or two coats of vanilla icing on the tops and sides of the cakes. Decorate as desired. I used fine opal sanding sugar, candy snowflakes and candy pearls.
Vanilla Icing
  1. In a medium bowl, whisk together the powdered sugar, butter, vanilla, salt and 1 tablespoon of milk until smooth. Add additional milk as need to achieve your desired consistency.
Recipe Notes

I used a 6-serving silicone mold with 3-inch diameter, 1-inch deep cavities.


Heavenly Glazed Vanilla Bean Scones

I’ve often been asked to create a vanilla scone recipe. At first I thought vanilla scones seemed a bit uninteresting, but the perfectly tender texture combined with the fragrant addition of vanilla bean and luscious vanilla icing, changed my mind completely. They’re truly delicious and much better than any vanilla scones I’ve tasted in any coffee shop or bakery. The classic vanilla flavor pairs perfectly with all of the warm, cozy drinks of the season.

Print Recipe
Heavenly Glazed Vanilla Bean Scones
Tender vanilla bean scones with luscious vanilla bean icing
Course Breakfast, Brunch
Keyword scones, vanilla bean
Servings
scones
Ingredients
Vanilla Bean Scones
Course Breakfast, Brunch
Keyword scones, vanilla bean
Servings
scones
Ingredients
Vanilla Bean Scones
Instructions
Vanilla Bean Scones
  1. Line a large baking sheet with parchment paper.
  2. In a large bowl, whisk together the flour, sugar, baking powder and salt. Work the butter into the flour mixture with your fingertips or with a pastry blender until pea size pieces form.
  3. In a small bowl, whisk together the heavy cream, sour cream and vanilla. Stir the cream mixture into the flour mixture until a shaggy dough is formed.
  4. Turn the dough out onto a lightly floured surface. Fold the dough over onto itself a couple of times. Don't overwork the dough. Pat the dough into a 6 1/2-inch diameter, 3/4-inch thick round. Cut the dough into 8 wedges.
  5. Place the scones 2 inches apart onto the prepared baking sheet. Chill the scones in the refrigerator for 15-20 minutes.
  6. Preheat the oven to 375ºF (190ºC). Brush the tops of the scones with egg wash. Bake until the scones are golden brown, about 16-20 minutes. Transfer the scones to a cooling rack. Brush the tops of the cooled scones with vanilla bean icing.
Vanilla Bean Icing
  1. In a medium bowl, whisk together the powdered sugar, butter, vanilla, 1 tablespoon of milk and the salt. Add additional milk as needed to reach your desired consistency.

Pumpkin Cinnamon Roll Cakes

Summer was such a happy season for me as a child that I didn’t want it to end. I still love summer, but now that I’m an adult, I begin to anticipate fall right around the time when I’m tired of harsh, hot temperatures, rumbling air conditioners and flies buzzing around at cookouts. Now is that time for me. It’s so hot where I live right now, that I’m welcoming the cool, crisp fall weather and all it brings.

The beautiful warm flavors of fall are perfectly captured in these Pumpkin Cinnamon Roll Cakes. The moist, perfectly spiced cakes are topped with a cinnamon swirl which is basically cinnamon roll filling. I topped them with Vanilla Bean Icing, but you can also make it cream cheese icing by swapping out 1 tablespoon of the melted butter for 1 tablespoon of softened cream cheese, if you prefer. The optional addition of meringue powder helps the icing set up and gives it that crunch we love on glazed donuts. To find meringue powder, click here.

I used a shallow jumbo muffin pan to make these cakes. The muffin cups are 4 inches wide and 1 inch deep. A hamburger bun pan for 4-inch buns or six 4-inch cake pans will also work. To find the pan I used, click here.

To watch the Instagram video of the finished Pumpkin Cinnamon Roll Cakes, click here.

Print Recipe
Pumpkin Cinnamon Roll Cakes
Moist pumpkin cakes with cinnamon swirls and vanilla bean icing
Servings
4-inch cakes
Ingredients
Pumpkin Cakes
Cinnamon Swirl
Vanilla Bean Icing
Servings
4-inch cakes
Ingredients
Pumpkin Cakes
Cinnamon Swirl
Vanilla Bean Icing
Instructions
Pumpkin Cakes
  1. Preheat the oven to 350ºF (180ºC). Line a 6-serving shallow jumbo muffin pan with jumbo muffin liners.* (The jumbo muffin liners will fit by pressing them in around the inside bottom edges.) The muffin pan I used has cups that are 4-inches across by 1-inch deep. A hamburger bun pan for 4-inch buns or six 4-inch cake pans will also work.
  2. In a medium bowl, whisk together the flour, baking powder, baking soda, salt, cinnamon, ginger and nutmeg.
  3. In a large bowl, whisk together the sugar, oil, eggs and vanilla until smooth and well combined. Mix in the pumpkin purée. Stir in the flour in two additions, just until combined.
  4. Transfer the batter to the muffin cups, evenly dividing the batter among the cups. Pipe the cinnamon swirl mixture in a spiral on the top of the batter of each one.
  5. Bake until a toothpick inserted into the center of the cake part comes out clean, about 23-27 minutes. Let the cakes cool in the pan for 5 minutes, then transfer to a cooling rack.
Cinnamon Swirl
  1. In a small bowl, whisk together the brown sugar, flour, cinnamon and salt. Add the melted butter and whisk until well combined.
  2. Transfer the mixture to a piping bag fitted with a 1/4-inch wide round tip.
Vanilla Bean Icing
  1. In a small bowl, whisk together the butter, vanilla bean paste, powdered sugar, meringue powder, salt and 1 tablespoon of milk until well combined. Whisk in more milk as needed to reach your desired consistency.
  2. Brush the icing on the cooled cakes with a small pastry brush or make the icing a little thinner and drizzle the icing on if you prefer.
Recipe Notes

*To find jumbo muffin liners, click here.

To find the baking pan I used, click here.

To find 4-inch cake pans, click here.

To find meringue powder click here.

Blueberry Lemon Crumb Cakes

Blueberry Lemon Crumb Cakes

Do you ever feel like a three year old child who doesn’t want to share? That’s how I feel about this crumb cake. I didn’t want to share so I made six 4-inch personal crumb cakes. You’ll understand once you taste the soft, fluffy lemon scented cake with juicy blueberries, a ton of sweet crumb topping and a lemony cream cheese icing. You’ll want every bite for yourself! I was also hesitant to share the recipe. But I was taught to share recipes by my two grandmothers who were amazing cooks and bakers. They shared their knowledge and recipes with anyone who asked. Recipes are a legacy that should be passed on to family and friends. If you’re reading this, I consider you a friend. So enjoy this recipe that’s especially dear to me because it’s based on my Grandma’s Apple Crumb Cake recipe.

I used a six serving shallow jumbo muffin pan to bake the cakes. The muffin cups are 4 inches across by 1 inch deep. To find the pan, click here. A hamburger bun pan for 4-inch buns will work too. If you happen to have six 4-inch cake pans, those work nicely. I used jumbo muffin liners to line the muffin cups, which fit perfectly by pressing them in around the inside bottom edges.

Print Recipe
Blueberry Lemon Crumb Cakes
Fluffy, soft lemon cakes with blueberries, crumb topping and lemon cream cheese icing
Servings
4-inch crumb cakes
Ingredients
Crumb Topping
Crumb Cakes
Cream Cheese Icing
Servings
4-inch crumb cakes
Ingredients
Crumb Topping
Crumb Cakes
Cream Cheese Icing
Instructions
Crumb Topping
  1. In a medium bowl, whisk flour, sugar, brown sugar and salt together.
  2. Work in butter with your fingertips until the mixture looks like the consistency of wet sand. Press together to make chunks. Set aside in the refrigerator until ready to use.
Crumb Cakes
  1. Preheat oven to 350ºF (180ºC). Line a 6-serving shallow jumbo muffin pan* with jumbo muffin liners.** Jumbo muffin liners will fit by pressing them around the inside bottom edges.
  2. In a medium bowl, whisk together the flour, baking powder and salt.
  3. In a large bowl, cream the butter, sugar and lemon zest with an electric mixer on medium speed, until light and fluffy.
  4. Beat the egg, egg yolk and extracts into the butter mixture in 3 separate additions, making sure each addition is incorporated before adding the next.
  5. In a small bowl, whisk the milk and sour cream together.
  6. On low speed, mix the flour mixture into the batter in two additions alternating with half of the milk mixture after each addition. Beat just until combined.
  7. Transfer batter to the prepared baking pan, evenly distributing the batter and filling the cups about half full.
  8. In a medium bowl, toss the blueberries with 1 teaspoon of flour and place them into the cups on top of the batter, about 1 ounce (28g) in each. Top each one with crumb topping.
  9. Bake until a toothpick inserted into the center of the cakes comes out clean, about 25-30 minutes. Let cakes cool in the pan for 5 minutes, then transfer to a cooling rack to cool completely.
Cream Cheese Icing
  1. In a medium bowl, whisk together the cream cheese, melted butter, powdered sugar, salt and 1 tablespoon of lemon juice. Add additional lemon juice, a little at a time until the desired consistency is reached. Drizzle over the cooled cakes.
Recipe Notes

*To find the muffin pan I used, click here.

**To find jumbo muffin liners, click here. To find 4-inch cake pans, click here.

Pineapple Coconut Cake Bars

Pineapple Coconut Cake

If you like tropical flavors, you’ll love this spring dessert from my childhood. We used to call it Pineapple Coconut Snack Cake, but I would consider it more of a bar, so I changed the name to Pineapple Coconut Cake Bars. We would enjoy it on Easter or Mother’s Day because it was my mom’s favorite. It’s buttery, moist and rich. It’s also kind of addicting, because everyone always asks for seconds. You can double the recipe if you need to.

Print Recipe
Pineapple Coconut Cake Bars
Course Dessert
Servings
Ingredients
Cake
Topping
Course Dessert
Servings
Ingredients
Cake
Topping
Instructions
Cake
  1. Preheat oven to 350ºF. Grease an 8-inch square baking pan.
  2. In a medium bowl, whisk together flour, baking powder and salt.
  3. In a large bowl, whisk melted butter, sugar, egg, egg yolk and vanilla until smooth.
  4. Stir in pineapple until well combined. Stir in flour mixture just until combined.
  5. Transfer batter to prepared baking pan. Bake until top is golden brown and toothpick inserted into center of cake comes out clean, about 20-25 minutes.
Topping
  1. In a medium saucepan over medium heat, melt butter with sugar, brown sugar and salt. Whisk in heavy cream.
  2. When mixture starts to bubble, turn heat down to low and simmer until thickened, about 3 minutes.
  3. Remove from heat and stir in coconut, pecans and vanilla. Spread over warm cake. Let cool at least 15 minutes before cutting cake.

Strawberry Sweetheart Brownies

Strawberry Sweetheart Brownies

At the Brownie Mischief website, all types of brownies are welcome. We all know and love chocolate brownies. But there are other less common brownies in the universe, that deserve to shine too. Let me introduce you to Strawberry Sweetheart Brownies. These lovely pink creations aren’t strawberry cake or strawberry blondies. They contain white chocolate and they’re made with the same baking method as brownies. When you bake chocolate brownies, you want to be careful not to over bake them, to achieve the rich, fudgy texture. The same is true for these strawberry brownies. When you test for doneness, the toothpick should have a few moist crumbs attached to it. If the toothpick is clean, the brownies have baked too long and will likely be a little dry and cakey, although still edible. So make sure to test for doneness well before the end of the baking time!

The baking temperature for this recipe is 325ºF. I noticed that when baking in a heart shaped cake pan, things tend to bake unevenly because of the shape. So I used a lower temperature to help with even baking. If you don’t have an 8-inch heart shaped cake pan, you can also use an 8-inch round cake pan. To find the cake pan I used, click here.

Strawberry Sweetheart Brownies

To watch the Strawberry Sweetheart Brownies Instagram video, click here.

Print Recipe
Strawberry Sweetheart Brownies
A heart shaped strawberry brownie made with fresh strawberries topped with strawberry icing.
Course Dessert
Keyword brownies, strawberry
Servings
Ingredients
Strawberry Brownies
Strawberry Icing
Course Dessert
Keyword brownies, strawberry
Servings
Ingredients
Strawberry Brownies
Strawberry Icing
Instructions
Strawberry Brownies
  1. Preheat oven to 325ºF. Line the bottom of an 8-inch heart shaped cake pan*** with parchment paper. Spray the insides with nonstick spray.
  2. In a large heat safe bowl, melt butter and white chocolate together on the stovetop over a pan of barely simmering water or in the microwave for 20 seconds at time, stirring at each interval. White chocolate overheats easily, so be vigilant.
  3. Add the sugar and salt to the butter mixture and mix until well combined.
  4. Add egg and egg yolks. Whisk until smooth.
  5. Pass strawberry purée through a sieve to remove seeds. Set aside 2 tablespoons of strawberry purée for icing. Add remaining purée to batter. Mix until well combined.
  6. Add extracts and food color. Mix until combined.
  7. Stir in flour until combined, scraping bowl as needed.
  8. Transfer batter to prepared pan. Bake until toothpick inserted in center has a few moist crumbs on it, (not batter), about 25-30 minutes. Do not over bake. Let cool in pan. Remove from pan and top with strawberry icing.
Strawberry Icing
  1. Whisk all icing ingredients together until smooth and well combined.
Recipe Notes

*To make strawberry purée:   Purée clean, hulled and quartered strawberries in a blender or food processor. **To find the food color I used, click here. **To find the heart cake pan I used, click here.

This recipe was updated on January 24th, 2023

Cinnamon Crumble Scones

The weeks following the winter holidays always feel peaceful to me. The rush is over and it’s time to catch my breath and rest. When it’s chilly and raining outside, I love spending time at home curled up in my coziest fluffy pajama bottoms and fuzzy socks. Give me a blanket, 75 pillows, a warm cup of tea and these Cinnamon Crumble Scones for ultimate coziness!

The crumb topping on these scones will remind you of a cinnamon crumb cake, which makes them extra nostalgic and comforting. The technique of folding the dough over itself gives them a flaky layered texture. For the tenderest scones, make sure not to over work your dough.

To watch Instagram reel, click here. To watch extended TikTok video showing baking process, click here.

Print Recipe
Cinnamon Crumble Scones
Course Breakfast, Brunch
Keyword cinnamon, scones
Servings
scones
Ingredients
Crumb Topping
Cinnamon Filling
Scones
Icing
Course Breakfast, Brunch
Keyword cinnamon, scones
Servings
scones
Ingredients
Crumb Topping
Cinnamon Filling
Scones
Icing
Instructions
Crumb Topping
  1. In a medium bowl, combine flour, brown sugar, sugar cinnamon and salt.
  2. Work in butter with your fingertips until it looks like wet sand. Press together to make dime size chunks.
  3. Set aside in refrigerator until ready to use.
Cinnamon Filling
  1. In a small bowl, mix filling ingredients together until well combined.
Scones
  1. Preheat oven to 375ºF. Line a large baking sheet with parchment paper.
  2. In a large bowl, whisk together flour, baking powder and salt.
  3. Work butter into flour mixture with your fingertips or with a pastry blender until pea sized pieces are formed.
  4. In a small bowl, whisk together heavy cream, sour cream and vanilla extract.
  5. Stir cream mixture into flour mixture a little at a time until dough comes together. If your dough is too dry add 1-2 more teaspoons of heavy cream.
  6. Turn dough out onto a lightly floured surface. Fold dough over onto itself a couple of times.
  7. Pat dough into an approximately 9 x 5-inch oval. Spread cinnamon filling on half of the dough to within 1/2-inch from the edges. Fold dough in half bringing short ends together. Press edges to seal.
  8. Shape dough into a 7-inch round, about 3/4-inch thickness. Cut into 8 wedges. (Or 6 wedges if you prefer larger scones.)
  9. Pinch the pointed tip of the wedges and tuck under to seal. This helps to prevent the top layer from sliding off while baking. Place wedges about 2-inches apart onto prepared baking sheet.
  10. Brush tops of scones with heavy cream. Top with crumb topping. Bake until light golden brown, about 18-22 minutes.
  11. Transfer scones to a cooling rack to cool. Drizzle with icing.
Icing
  1. In a small bowl, whisk together powdered sugar, butter, 1 tablespoon of milk and vanilla. Add additional milk until desired consistency is reached.

Grandma’s Apple Crumb Cake

Grandma's Apple Crumb Cake

I remember my grandma making coffee cakes and sweet muffins for breakfast, along with eggs, sausages, hot coffee and a big pitcher of milk on the table. The older generation really loved their coffee cakes. I’ve noticed that many Millennials and Gen Z’s think coffee cake contains coffee. Maybe some coffee cake does contain coffee, but in general, coffee cake is called that because it’s typically eaten with coffee. A classic coffee cake is usually a subtly sweet cake with cinnamon, crumb topping and maybe some icing. The Apple Crumb Cake recipe I’m sharing with you has the elements of a classic coffee cake, but so much better! The cake is fluffy and soft, the crumb topping is chunky and plentiful, and the apples are perfectly tender. And don’t get me started about the icing!

Why do most of our grandmothers cook and bake so well? Because they’ve had decades of trial and error to perfect their recipes, tweaking them here and there until they’re approved and loved by their families, neighbors and friends. This cake has had its share of trial and error. She has earned her place as a well-loved, delicious, beautiful queen of coffee cakes.

Print Recipe
Grandma's Apple Crumb Cake
Keyword apple, cake
Servings
servings
Ingredients
Apples
Crumb Topping
Cake
Keyword apple, cake
Servings
servings
Ingredients
Apples
Crumb Topping
Cake
Instructions
Apples
  1. In a large skillet, melt the butter over medium heat. Add the apples, sugar and cinnamon.
  2. Cook, stirring occasionally, until the apples are tender, about 10 minutes. Transfer the apples to a bowl and let cool to room temperature.
Crumb Topping
  1. In a medium bowl, mix the flour, brown sugar, sugar, cinnamon and salt.
  2. Work in the butter with your fingertips until the mixture looks like wet sand. Press together to make 1/2-inch chunks.
Cake
  1. Preheat the oven to 325ºF. Line a 9-inch cake pan with a removable bottom*, or a 9-inch springform pan, with parchment paper. Wrap the bottom of the cake pan with aluminum foil and place pan on a baking sheet.
  2. In a medium bowl, whisk together the flour, baking powder and salt.
  3. In a large bowl, cream the butter and sugar, with an electric mixer on medium speed, until light and fluffy.
  4. Beat the eggs and vanilla into the butter mixture in three separate addition, making sure each addition is incorporated before adding the next.
  5. In a small bowl, whisk the milk and sour cream together.
  6. On low speed, beat the flour mixture into batter in three separate additions, alternating with milk mixture. Mix just until combined.
  7. Transfer the batter to the prepared baking pan. Smooth the top with a spatula.
  8. Drain any excess liquid from the apples. Top the cake batter evenly with apples, then the topping mixture.
  9. Bake until a toothpick inserted into the center of the cake comes out clean, about 50-60 minutes. Cool the cake in pan for 10 minutes. Remove the cake from pan and transfer it to a cooling rack to cool completely.
Icing
  1. In a medium bowl, whisk together the powdered sugar, melted butter, vanilla, salt and 2 tablespoons of cream. Add additional cream until desired consistency is reached. Drizzle over the cooled cake.
Recipe Notes

*To find the cake pan I used, click here.

Caramel Apple Blossoms

Caramel Apple Blossoms by Brownie Mischief

Whether you call them apple blossoms, apple dumplings or apple fussbudgets, (which are named after your great grandfather’s second wife’s cousin), these are cute little apple pastries. I made them because I was craving apple pie, but I didn’t have enough apples to bake one. I didn’t invent them, and I don’t know who did, but I’ve had frozen ones and I’ve seen them on restaurant menus. I thought it would be fun to make them, and it was! I could’ve just put some pie dough in muffin cups and made quick little pies, but flower shaped things automatically get extra points for cuteness. And if you know me, you know I love my cute bakes!

Print Recipe
Caramel Apple Blossoms
Course Dessert
Keyword pastry
Servings
blossoms
Ingredients
Topping
Course Dessert
Keyword pastry
Servings
blossoms
Ingredients
Topping
Instructions
  1. In a large bowl, toss apples with lemon juice until combined.
  2. Add brown sugar, sugar, melted butter, flour, cinnamon and salt to apples. Stir until combined.
  3. In a medium bowl, mix together all topping ingredients. Set aside.
  4. Line a large baking sheet with parchment paper.
  5. On a lightly floured surface, roll pie dough to 1/8-inch thickness.
  6. Cut out 12 5-inch blossom shapes, re-rolling dough as necessary.*
  7. Lightly mark a 2-inch circle in the center of each blossom. Make cuts between the petals to separate them, just up to the edge of the center circle.
  8. Top each blossom with about 2 generous tablespoons of apples.
  9. Brush dough petals with egg wash. Form blossoms by lifting and overlapping each petal 1/2-inch in a spiral pattern similar to a rose. Tuck the last petal under. Press petals together to seal so filling won't leak out.
  10. Top each with a spoonful of topping. Place in refrigerator to chill for 30 minutes. Don't skip this step. This will help blossoms keep their shape.
  11. Preheat oven to 375ºF. Brush blossom dough all over with egg wash. Wipe any drips off of parchment paper. Bake until crust is golden brown and filling is starting to bubble, about 23-28 minutes.
  12. Drizzle blossoms with caramel sauce.
Recipe Notes

*When re-rolling pie dough, cover and let rest for several minutes to help avoid shrinkage.

Maple Brown Sugar Madeleines

Maple Brown Sugar Madeleines

I had tea with with a well mannered hedgehog once on a crisp fall day. He brought me a tiny bouquet of flowers, which I placed in a small jam jar filled with water. He said the delightful maple scent of these Madeleines reminded him of his time in the woods, as a young hoglet. When he had his fill of the delicate little cakes, I wrapped some in a tea towel for his journey home.

As cooler weather approaches, I’m always looking for a little something to enjoy with a warm drink and a good book. Although traditional Madeleines typically remind me of spring, these Maple Brown Sugar Madeleines have a cozy fall feeling. They go well with coffee, tea or hot cocoa. If you want to make them for a friend, make the batter and keep it in the refrigerator. Bake the Madeleines right before your friend arrives.

I used a spherical Madeleine pan to make these maple scented little cakes. The Madeleines made in this pan are a little thicker and fluffier than those made in a traditional oval pan. To find the Madeleine pan I used, click here. You can certainly use a traditional pan if you prefer. Keep in mind that the baking time will be shorter and you will end up with about twice as many.

Print Recipe
Maple Brown Sugar Madeleines
Course Dessert
Cuisine French
Keyword madeleines, maple
Servings
Ingredients
Maple Brown Sugar Madeleines
Maple Icing
Course Dessert
Cuisine French
Keyword madeleines, maple
Servings
Ingredients
Maple Brown Sugar Madeleines
Maple Icing
Instructions
Maple Brown Sugar Madeleines
  1. In a medium bowl, sift together the flour, baking powder and salt.
  2. In a large bowl, beat the eggs, brown sugar and maple extract, on medium-high speed with an electric mixer, until the batter is voluminous, light in color and holds its shape when you lift the beater, about 8-10 minutes.
  3. Combine the melted butter and maple syrup.
  4. Gently fold the the flour mixture into the egg mixture in three additions, alternating with the melted butter. Fold just until combined, being careful not to deflate the batter. Make sure to scrape the bottom of the bowl to ensure that all of the flour is combined.
  5. Cover and refrigerate for 30-45 minutes.
  6. Preheat the oven to 350ºF (177ºC). Grease a spherical Madeleine pan* with nonstick spray or melted butter. Dust the pan with a light coating of flour. Tap out the excess flour.
  7. Fill the wells of the Madeleine pan with batter 3/4 full, about 2 tablespoons each, using a scoop**or a spoon. (If you're using a traditional oval Madeleine pan, fill 3/4 full, about a generous tablespoon of batter in each.)
  8. Bake until golden brown around the edges and puffed in the center, about 10-12 minutes. (Baking time for oval Madeleine pan will be about 7-8 minutes.) Do not over bake.
  9. Cool in the pan for one minute then turn Madeleines out onto a cooling rack to cool completely.
Maple Icing
  1. In a small bowl, whisk together the powdered sugar, melted butter, maple extract and one tablespoon of milk. Add additional milk as needed until your desired consistency is reached, Stir in a pinch of salt to taste.
  2. Brush icing onto the Madeleines with a pastry brush. Apply nuts to the edges of Madeleines. Serve immediately. Madeleines are best served the day they're baked.
Recipe Notes

*To find the Madeleine pan I used, click here.

**To find the scoop I used, click here.

Blueberry Donut Holes with Homemade Blueberry Sugar

Blueberry Donut Holes with Homemade Blueberry Sugar

If you landed here from one of my social media accounts, welcome! I’m really glad you’re here. I love to create fun, pretty and sweet treats like these delicious blueberry donut holes! The thing that really makes these special is the homemade blueberry sugar, which adds a burst of blueberry flavor. Freeze dried blueberries are combined with sugar to create a beautiful, flavorful sugar that you can use for many other things. It can also be used in tea, lattes, lemonade, cocktails or sprinkled on cookies or scones. Keep in mind that freeze dried blueberries are not the same as dried blueberries. Dried blueberries still contain some moisture, so they won’t work for this purpose.

The donut hole batter comes together quickly and easily. The most challenging part for me is frying them. I found that using a thermometer and testing one donut hole first, helps you determine the perfect oil temperature. Using a small portion scoop helps you get uniform donut holes. Make sure the outside of the scoop is clean between each donut to help them keep the round shape and avoid pointy tails.

Print Recipe
Blueberry Donut Holes with Homemade Blueberry Sugar
Course Breakfast, Dessert
Servings
donut holes
Ingredients
Blueberry Sugar
Blueberry Donut Holes
Course Breakfast, Dessert
Servings
donut holes
Ingredients
Blueberry Sugar
Blueberry Donut Holes
Instructions
Blueberry Sugar
  1. Process freeze dried blueberries and sugar in a food processor or a clean spice grinder until finely ground. Be careful not to over process or you may end up with powdered sugar.
Blueberry Donut Holes
  1. In a medium bowl, whisk together flour, baking powder, nutmeg and salt. Set aside.
  2. In a large bowl, beat sugar, eggs, melted butter, milk and vanilla extract until well combined.
  3. Add flour mixture and mix just until combined. Do not over mix. A few lumps are okay.
  4. Fold in chopped blueberries.
  5. In a heavy saucepan, heat 1 1/2 inches of oil to 340ºF.
  6. Drop tablespoon size portions of batter into hot oil. I used a #60 portion scoop.** Don't overcrowd the pan.
  7. Cook donut holes until golden brown on all sides, about 2-4 minutes, flipping halfway through. If donut holes cook too quickly on the outside, turn heat down.
  8. Briefly drain donut holes on paper towels, then toss warm donut holes in blueberry sugar. Serve immediately.
Recipe Notes

Success tips: Use a small ice cream scoop sprayed with nonstick spray to drop donut holes into oil. Make sure the outside of scoop is clean between each donut hole to keep the round shape and avoid tails on your donut holes.

*To find freeze dried blueberries, click here.

**To find the portion scoop I used, click here.

Blueberry Skillet Cornbread

This is a sweet, fluffy blueberry cornbread that my family loves. It’s heavenly served with honey and butter. I love baking it in a cast iron skillet because of the delicious crust that forms from the steady high heat conducted with cast iron. If you don’t have a cast iron skillet, you can use an 8-inch round cake pan instead. To find the 8-inch cast iron skillet I used, click here.

The texture of this cornbread is more like a quick bread than a cake and my family has always called it cornbread. When I posted this recipe previously, I called it a skillet cornmeal cake because I was trying to shy away from the cornbread police who inevitably show up when I post sweet cornbread recipes. These enforcers of non existent cornbread laws no longer intimidate me because I’ve done my cornbread research. There are different regions who make cornbread in many different ways. Various groups of people in the United States argue over whether or not cornbread should contain sugar. Historically, some people had to add sugar to cornbread because of the lower quality cornmeal they had access to. But the first cornbread was made long before that in ancient Mexico. People then and now use the ingredients available to them to create food that tastes good to them. So by any name, it’s all good.

Print Recipe
Blueberry Skillet Cornbread
Sweet cornbread with blueberries baked in a cast iron skillet.
Keyword blueberry, cornbread
Servings
Ingredients
Keyword blueberry, cornbread
Servings
Ingredients
Instructions
  1. Preheat oven to 350ºF (177ºC). Grease an 8-inch cast iron skillet.*
  2. Set aside 1/4 cup of blueberries. In a small bowl, toss the remaining 1 cup of blueberries with 1 teaspoon of flour.
  3. In a large bowl, whisk together flour, sugar, cornmeal, baking powder and salt.
  4. In a medium bowl, whisk together eggs, sour cream, oil and melted butter until well combined.
  5. Add egg mixture to flour mixture and stir just until combined. A few small lumps are okay.
  6. Gently fold one cup of blueberries into the batter.
  7. Transfer batter to prepared pan. Top with reserved 1/4 cup of blueberries.
  8. Bake until top looks golden brown and a toothpick inserted in center comes out clean, about 35-45 minutes. Let cool in pan 10 minutes.
Recipe Notes

*To find the skillet I used, click here.

If you don't have a cast iron skillet, you can use and 8-inch round cake pan.