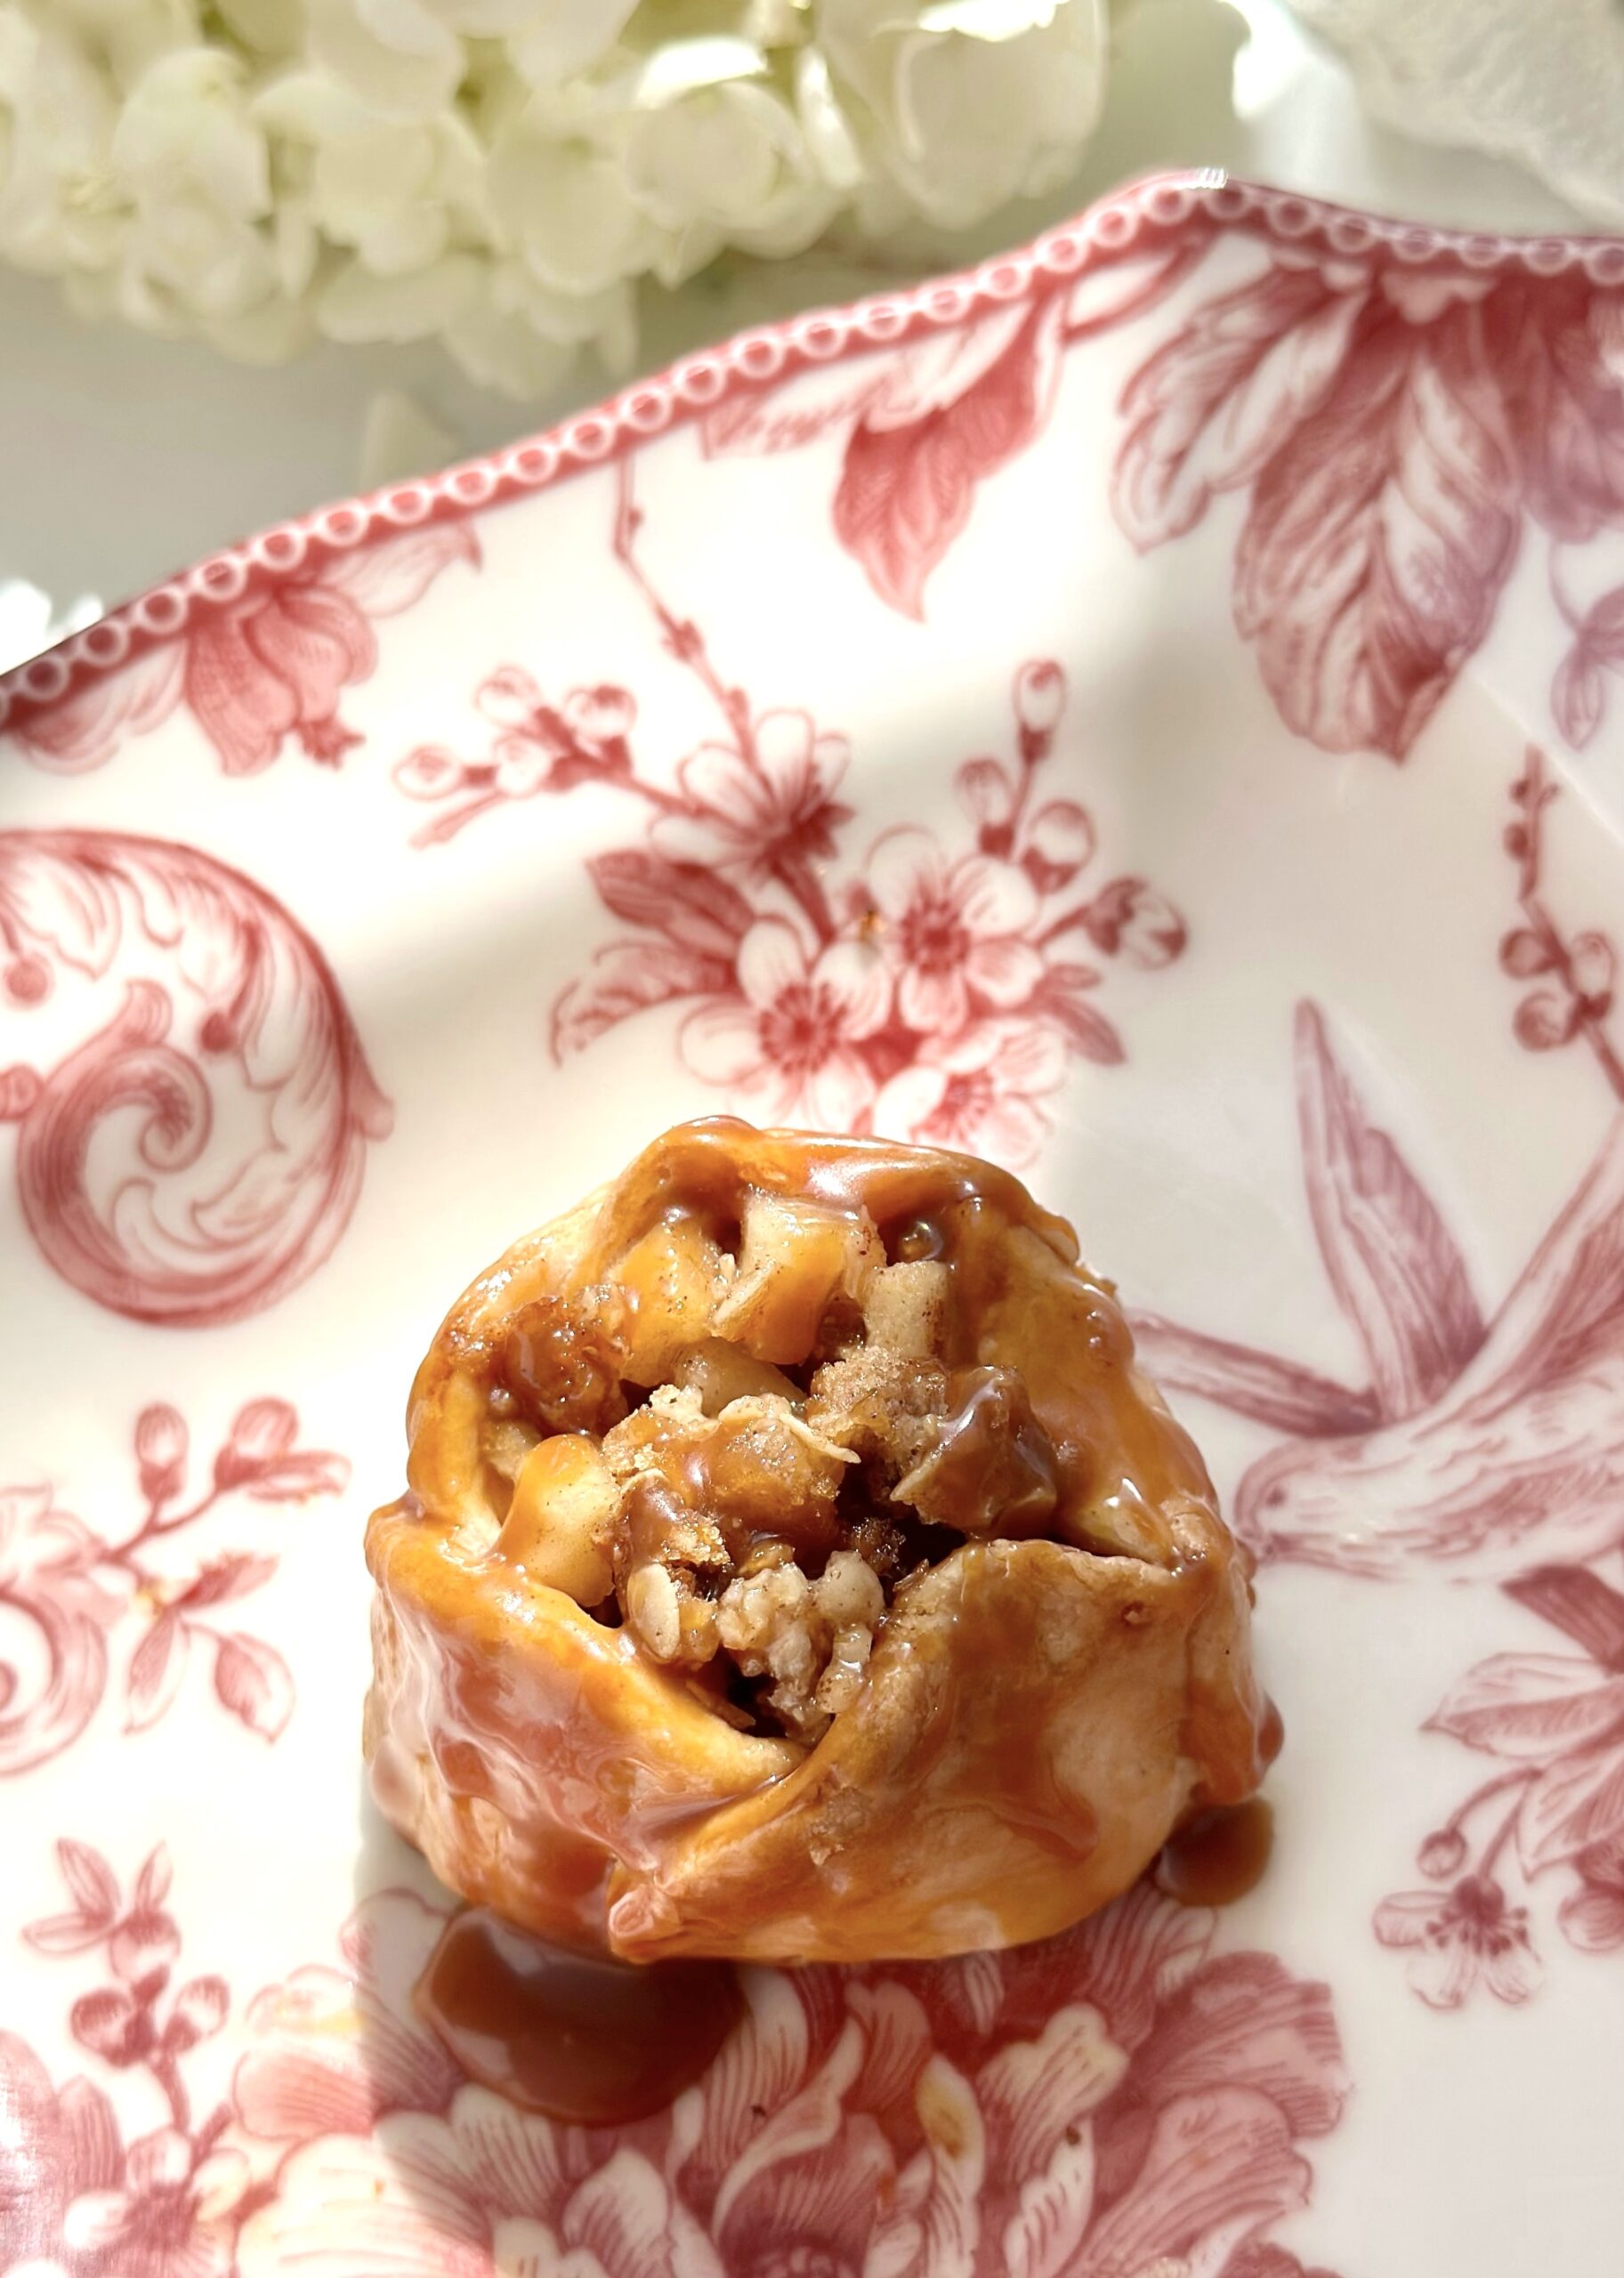
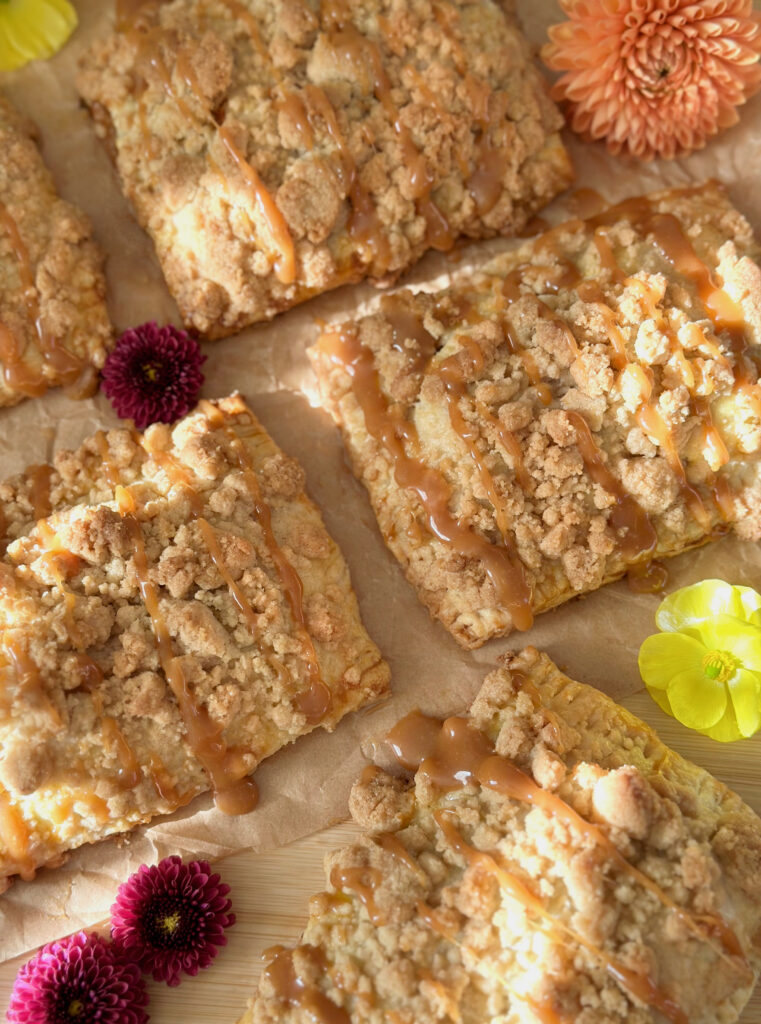
Caramel Apple Blossoms

Caramel Apple Blossoms by Brownie Mischief

Whether you call them apple blossoms, apple dumplings or apple fussbudgets, (which are named after your great grandfather’s second wife’s cousin), these are cute little apple pastries. I made them because I was craving apple pie, but I didn’t have enough apples to bake one. I didn’t invent them, and I don’t know who did, but I’ve had frozen ones and I’ve seen them on restaurant menus. I thought it would be fun to make them, and it was! I could’ve just put some pie dough in muffin cups and made quick little pies, but flower shaped things automatically get extra points for cuteness. And if you know me, you know I love my cute bakes!

Print Recipe
Caramel Apple Blossoms
Course Dessert
Keyword pastry
Servings
blossoms
Ingredients
Topping
Course Dessert
Keyword pastry
Servings
blossoms
Ingredients
Topping
Instructions
  1. In a large bowl, toss apples with lemon juice until combined.
  2. Add brown sugar, sugar, melted butter, flour, cinnamon and salt to apples. Stir until combined.
  3. In a medium bowl, mix together all topping ingredients. Set aside.
  4. Line a large baking sheet with parchment paper.
  5. On a lightly floured surface, roll pie dough to 1/8-inch thickness.
  6. Cut out 12 5-inch blossom shapes, re-rolling dough as necessary.*
  7. Lightly mark a 2-inch circle in the center of each blossom. Make cuts between the petals to separate them, just up to the edge of the center circle.
  8. Top each blossom with about 2 generous tablespoons of apples.
  9. Brush dough petals with egg wash. Form blossoms by lifting and overlapping each petal 1/2-inch in a spiral pattern similar to a rose. Tuck the last petal under. Press petals together to seal so filling won't leak out.
  10. Top each with a spoonful of topping. Place in refrigerator to chill for 30 minutes. Don't skip this step. This will help blossoms keep their shape.
  11. Preheat oven to 375ºF. Brush blossom dough all over with egg wash. Wipe any drips off of parchment paper. Bake until crust is golden brown and filling is starting to bubble, about 23-28 minutes.
  12. Drizzle blossoms with caramel sauce.
Recipe Notes

*When re-rolling pie dough, cover and let rest for several minutes to help avoid shrinkage.

Harry Potter Inspired Pumpkin Pasties

Pumpkin Pasties

Even though the weather is warm where I live at the moment, I’m dreaming about all the delicious fall treats I’ll be baking this year. Let’s look forward to cool, crisp weather, the smell of pumpkin or apples baking, and sipping a warm mug of something spicy while we wait for our bakes to come out of the oven.

Inevitably, every fall, the Harry Potter movies come on at my house and it’s nice to have some popcorn and sweet treats to enjoy while watching the movies. And these Harry Potter Inspired Pumpkin Pasties are perfect for that! If you’ve read the Harry Potter books, you may remember the Pumpkin Pasties being mentioned. There are many interpretations out there, but I imagined them to be crispy and flaky on the outside with a sweet pumpkin filling. I included a delicious flaky pie crust recipe here, but feel free to use store bought pie dough if you want to streamline the process. I sprinkled mine with raw turbinado sugar before baking which provides a sweet delicious crunch. You can also use maple sugar or sparkling sugar. To find the sugar I used, click here. And as a magical touch, I added some edible gold star glitter. To find the edible gold stars, click here.

Print Recipe
Pumpkin Pasties
Harry Potter inspired sweet pumpkin filled hand pies
Course Dessert
Keyword pastry
Servings
hand pies
Ingredients
Pie Crust
Pumpkin Filling
Assembly
Course Dessert
Keyword pastry
Servings
hand pies
Ingredients
Pie Crust
Pumpkin Filling
Assembly
Instructions
Pie Crust
  1. In a large bowl, whisk together the flour, sugar and salt. Work the shortening into the flour mixture with your fingertips until evenly dispersed throughout.
  2. Work the butter into the flour mixture with your fingertips, creating flat dime size pieces.
  3. Mix the ice water and vinegar together. Sprinkle over the flour mixture a little at a time, stirring until dough comes together. You may not need all of the water depending on your climate.
  4. Turn the dough out onto a lightly floured surface. Fold the dough over onto itself a few times. Do not overwork the dough! Form the dough into two disks. Cover with plastic wrap and refrigerate at least one hour or up to overnight.
Pumpkin Filling
  1. In a medium bowl, mix together the pumpkin purée, sugar, egg, heavy cream, cinnamon, ginger and nutmeg until well combined.
Assembly
  1. Preheat oven to 400ºF. (200ºC). Line two baking sheets with parchment paper.
  2. On a lightly floured surface, roll dough to 1/8-inch thickness. Cut dough into 12 5-inch rounds, re-rolling scraps as needed. Place dough rounds on prepared baking sheets.
  3. Place 2 tablespoons of filling on each round, leaving a half-inch border. Apply egg wash to edges of rounds.
  4. Fold the dough over and press the edges together. Crimp the edges with a fork. If any filling oozes out, wipe it up with a paper towel or it will burn.
  5. Brush the pasties with egg wash. Cut a half-inch slit into the top of each pastie. Sprinkle with coarse sugar.
  6. Bake until golden brown, about 18-20 minutes. Transfer to a cooling rack.

Skillet Chicken Pot Pie with Herb Crust

Pot pies belong to everyone. They date back to ancient times and many cultures worldwide have various versions of savory pies. It’s a very popular comfort food dish here in the U.S. and many people already have a favorite recipe. The recipe I’m sharing here isn’t the only way to make a pot pie, but it’s one way to do it that happens to be delicious! I usually bake pot pies in a casserole dish, and you can certainly bake this one in a casserole dish if you want to. But I thought it would be nice to save a step and try baking one in a skillet. I love baking other things, such as cornbread, in a skillet so I had a feeling it would be good. I used an 8-inch cast iron skillet. Click here to find the skillet I used.

I had a ton of fresh herbs on hand, so they ended up in my pie crust on a whim. I was very pleased with the results. Feel free to switch up the herbs and use your favorites. Typically when you bake or roast something with fresh herbs, they tend to turn black and crispy. But don’t worry, they’ll be safely nestled inside the crust. And speaking of the crust, this one is tender and flaky due to my grandmother’s method of working the fat into the dough with your fingertips. You want to end up with flat dime size pieces throughout. A little vegetable shortening helps to add structure and flakiness and the butter makes it taste good. A touch of vinegar helps to inhibit gluten formation, so you’ll have a tender, flaky crust rather than a chewy one. And if you’re one of those people who tends to over work your dough, the vinegar can help with that. But please do yourself a favor and don’t over work your dough!!

Now I’m going to give you the best piece of cooking advice my grandmother ever gave me: Taste as you go! Taste everything as you are preparing it, not just when it’s done. So when you’re making your filling for this pot pie, add the herbs, salt, pepper and sage a little bit at a time until it tastes good to you.

Print Recipe
Skillet Chicken Pot Pie with Herb Crust
Skillet chicken pot pie with fresh herbs baked into the crust
Course Main Dish
Servings
Ingredients
Herb Crust
Filling
Course Main Dish
Servings
Ingredients
Herb Crust
Filling
Instructions
Herb Crust
  1. In a large bowl, whisk together flour, sugar and salt. Work shortening into the flour mixture with your fingertips until evenly dispersed throughout.
  2. Work butter and herbs into the flour mixture with your fingertips, creating flat dime size pieces.
  3. Mix ice water and vinegar together. Sprinkle over flour mixture a little at a time, stirring until dough comes together. You may not need all of the water depending on your climate.
  4. Turn dough out onto a lightly floured surface. Knead dough briefly by folding dough over onto itself a few times. Do not over work dough! Form dough into a disk. Cover with plastic wrap and refrigerate at least one hour or up to overnight.
Filling
  1. In an 8-inch cast iron skillet, heat butter over medium heat. Sauté onions, celery and carrots until onions are translucent, stirring occasionally. Sprinkle with flour and cook one to two more minutes, stirring frequently.
  2. Stir in chicken broth slowly. If your sauce seems lumpy, use a whisk and vigorously whisk until smooth. Simmer on low until thickened. Stir in heavy cream. Add herbs and seasonings to taste. Add a splash of chicken broth if your sauce seems too thick.
  3. Mix in chicken and peas. Remove form heat. Set aside until skillet is cool enough to handle.
Assembly
  1. Preheat oven to 400ºF.
  2. On a lightly floured surface, roll dough out to a 10-inch round. Place dough over filling, tucking ends under and crimping with your fingers or with a fork. Brush pie with egg wash. Cut a 1-inch X in the center of pie to allow steam to escape.
  3. Bake until golden brown, about 40 minutes. Cover edges of crust with strips of foil if they start to brown too fast.

Italian Easter Pocket Pies

Italian Easter Pocket Pies

Italian Easter Pie, also known as Pizza Rustica is a rich, delicious, savory pie, similar to a quiche. When I was growing up, my family enjoyed this pie at Easter time, but it’s delicious and comforting any time of the year. Easter Pie typically contains meats and cheeses. We made ours with sausage, cheese and spinach. I started making these small, handheld versions years ago for my kids. They love dipping them in pizza sauce. I included the recipe for the homemade pie crust below, but you can streamline the recipe by making the pie dough the night before or using store bought 2-crust pie dough if you wish.

Print Recipe
Italian Easter Pocket Pies
Golden handheld pies filled with Italian sausage, spinach, ricotta and mozzarella cheese
Cuisine Italian
Keyword pastry, pie
Servings
pocket pies
Ingredients
Pie Crust
Filling
Cuisine Italian
Keyword pastry, pie
Servings
pocket pies
Ingredients
Pie Crust
Filling
Instructions
Pie Crust
  1. Whisk together the flour, sugar, and salt in a large bowl. Work the shortening into the flour mixture with your fingertips until evenly distributed. Work the butter into the flour mixture until flat, dime size pieces are formed.
  2. In a small bowl combine the ice water and vinegar. Sprinkle the ice water mixture over the flour mixture a little at a time and mix just until the dough comes together. You may not need all of the water, depending on your climate. On a lightly floured surface, fold the dough over onto itself a couple of times. Form the dough into two disks. Wrap the disks in plastic wrap. Refrigerate at least two hours or up to overnight.
Filling and Assembly
  1. Preheat the oven to 375ºF (190ºC). Line a large baking sheet with parchment paper.
  2. Combine the sausage, spinach, cheeses and seasonings in a medium bowl and mix well.
  3. Roll out the pie dough to 1/8-inch thickness. Cut into ten 5-inch rounds. Place the rounds on the prepared baking sheet.
  4. Brush the edges of the rounds with egg wash. Place about 3 tablespoons of filling into the center of each round. Fold the dough over and press the edges to seal. Crimp the edges with a fork. Brush the pies with egg wash. Cut a 3/4-inch ventilation slit on the top of each pie.
  5. Bake until golden brown, about 25-30 minutes. Serve with pizza sauce or marinara if desired.

Little Spring Vegetable Pot Pies

These little veggie pot pies are so cute and comforting. The crust is incredibly flaky and the filling is so versatile. I used asparagus, carrots and peas for the filling, but feel free to use your favorite vegetables. The possibilities are endless! The small size bakes up quickly and is perfect for lunch or a light dinner. I typically serve these with some fresh fruit or salad greens on the side.

I used vegetable shortening for the crust because it makes the flakiest crust ever and also because the pies can easily be a vegetarian dish. If you’re trying to avoid trans fats, then choose a brand of vegetable shortening that doesn’t contain trans fat or replace some of the vegetable shortening with butter.* Keep in mind that if you replace all of the vegetable shortening with butter, your crust won’t be nearly as flaky.

Print Recipe
Little Spring Vegetable Pot Pies
Servings
Mini pot pies
Ingredients
Pie Crust
Servings
Mini pot pies
Ingredients
Pie Crust
Instructions
Pie Crust
  1. In a large bowl, whisk together the flour, baking powder and salt. Work the shortening into the flower with your fingertips until flat dime size pieces are formed.
  2. In a small bowl, combine the ice water and vinegar. Sprinkle over the flour mixture a little at a time, mixing just until the dough comes together. You may not need all of the liquid, depending on your climate.
  3. Turn the dough out onto a lightly floured surface. Fold the dough over onto itself a few times. Do not over work the dough. Form the dough into a disc. Wrap in plastic wrap and refrigerate for 1-2 hours or up to overnight.
Filling
  1. Preheat the oven to 400ºF. (200ºC). Grease four 6-oz ramekins.*** Place the ramekins on a baking sheet.
  2. In a medium saucepan, melt the butter over medium heat. Sauté the onions, carrots and asparagus for a few minutes until the onions are translucent.
  3. Sprinkle the vegetables with flour. Cook 1-2 minutes. Stir in the broth and simmer until thickened. Add the milk, parsley and seasonings. Make sure to taste your sauce to adjust the seasonings to your preference. Stir in the peas. Transfer the filling to the greased ramekins.
  4. On a lightly floured surface, roll the pie dough to 1/4-inch thickness. Cut out 4 rounds of dough about an inch larger than the tops of your ramekins. Brush the top edges of the ramekins with a bit of egg wash. Place the rounds of dough on the ramekins, overlapping a bit. Crimp the edges of the dough with your fingers or with a fork. Brush the pies with egg wash. Cut a 3/4-inch ventilation slit in the top of each pie. Bake until golden brown, about 30-35 minutes.
Recipe Notes

*To replace part of the shortening with butter, use 1/4 cup (48g) shortening and 1/4 cup (57g) butter.

**For a vegetarian version, you can substitute the egg wash by brushing the tops of the pies lightly with olive oil.

***To find the ramekins I used, click here.