Heavenly Glazed Vanilla Bean Scones

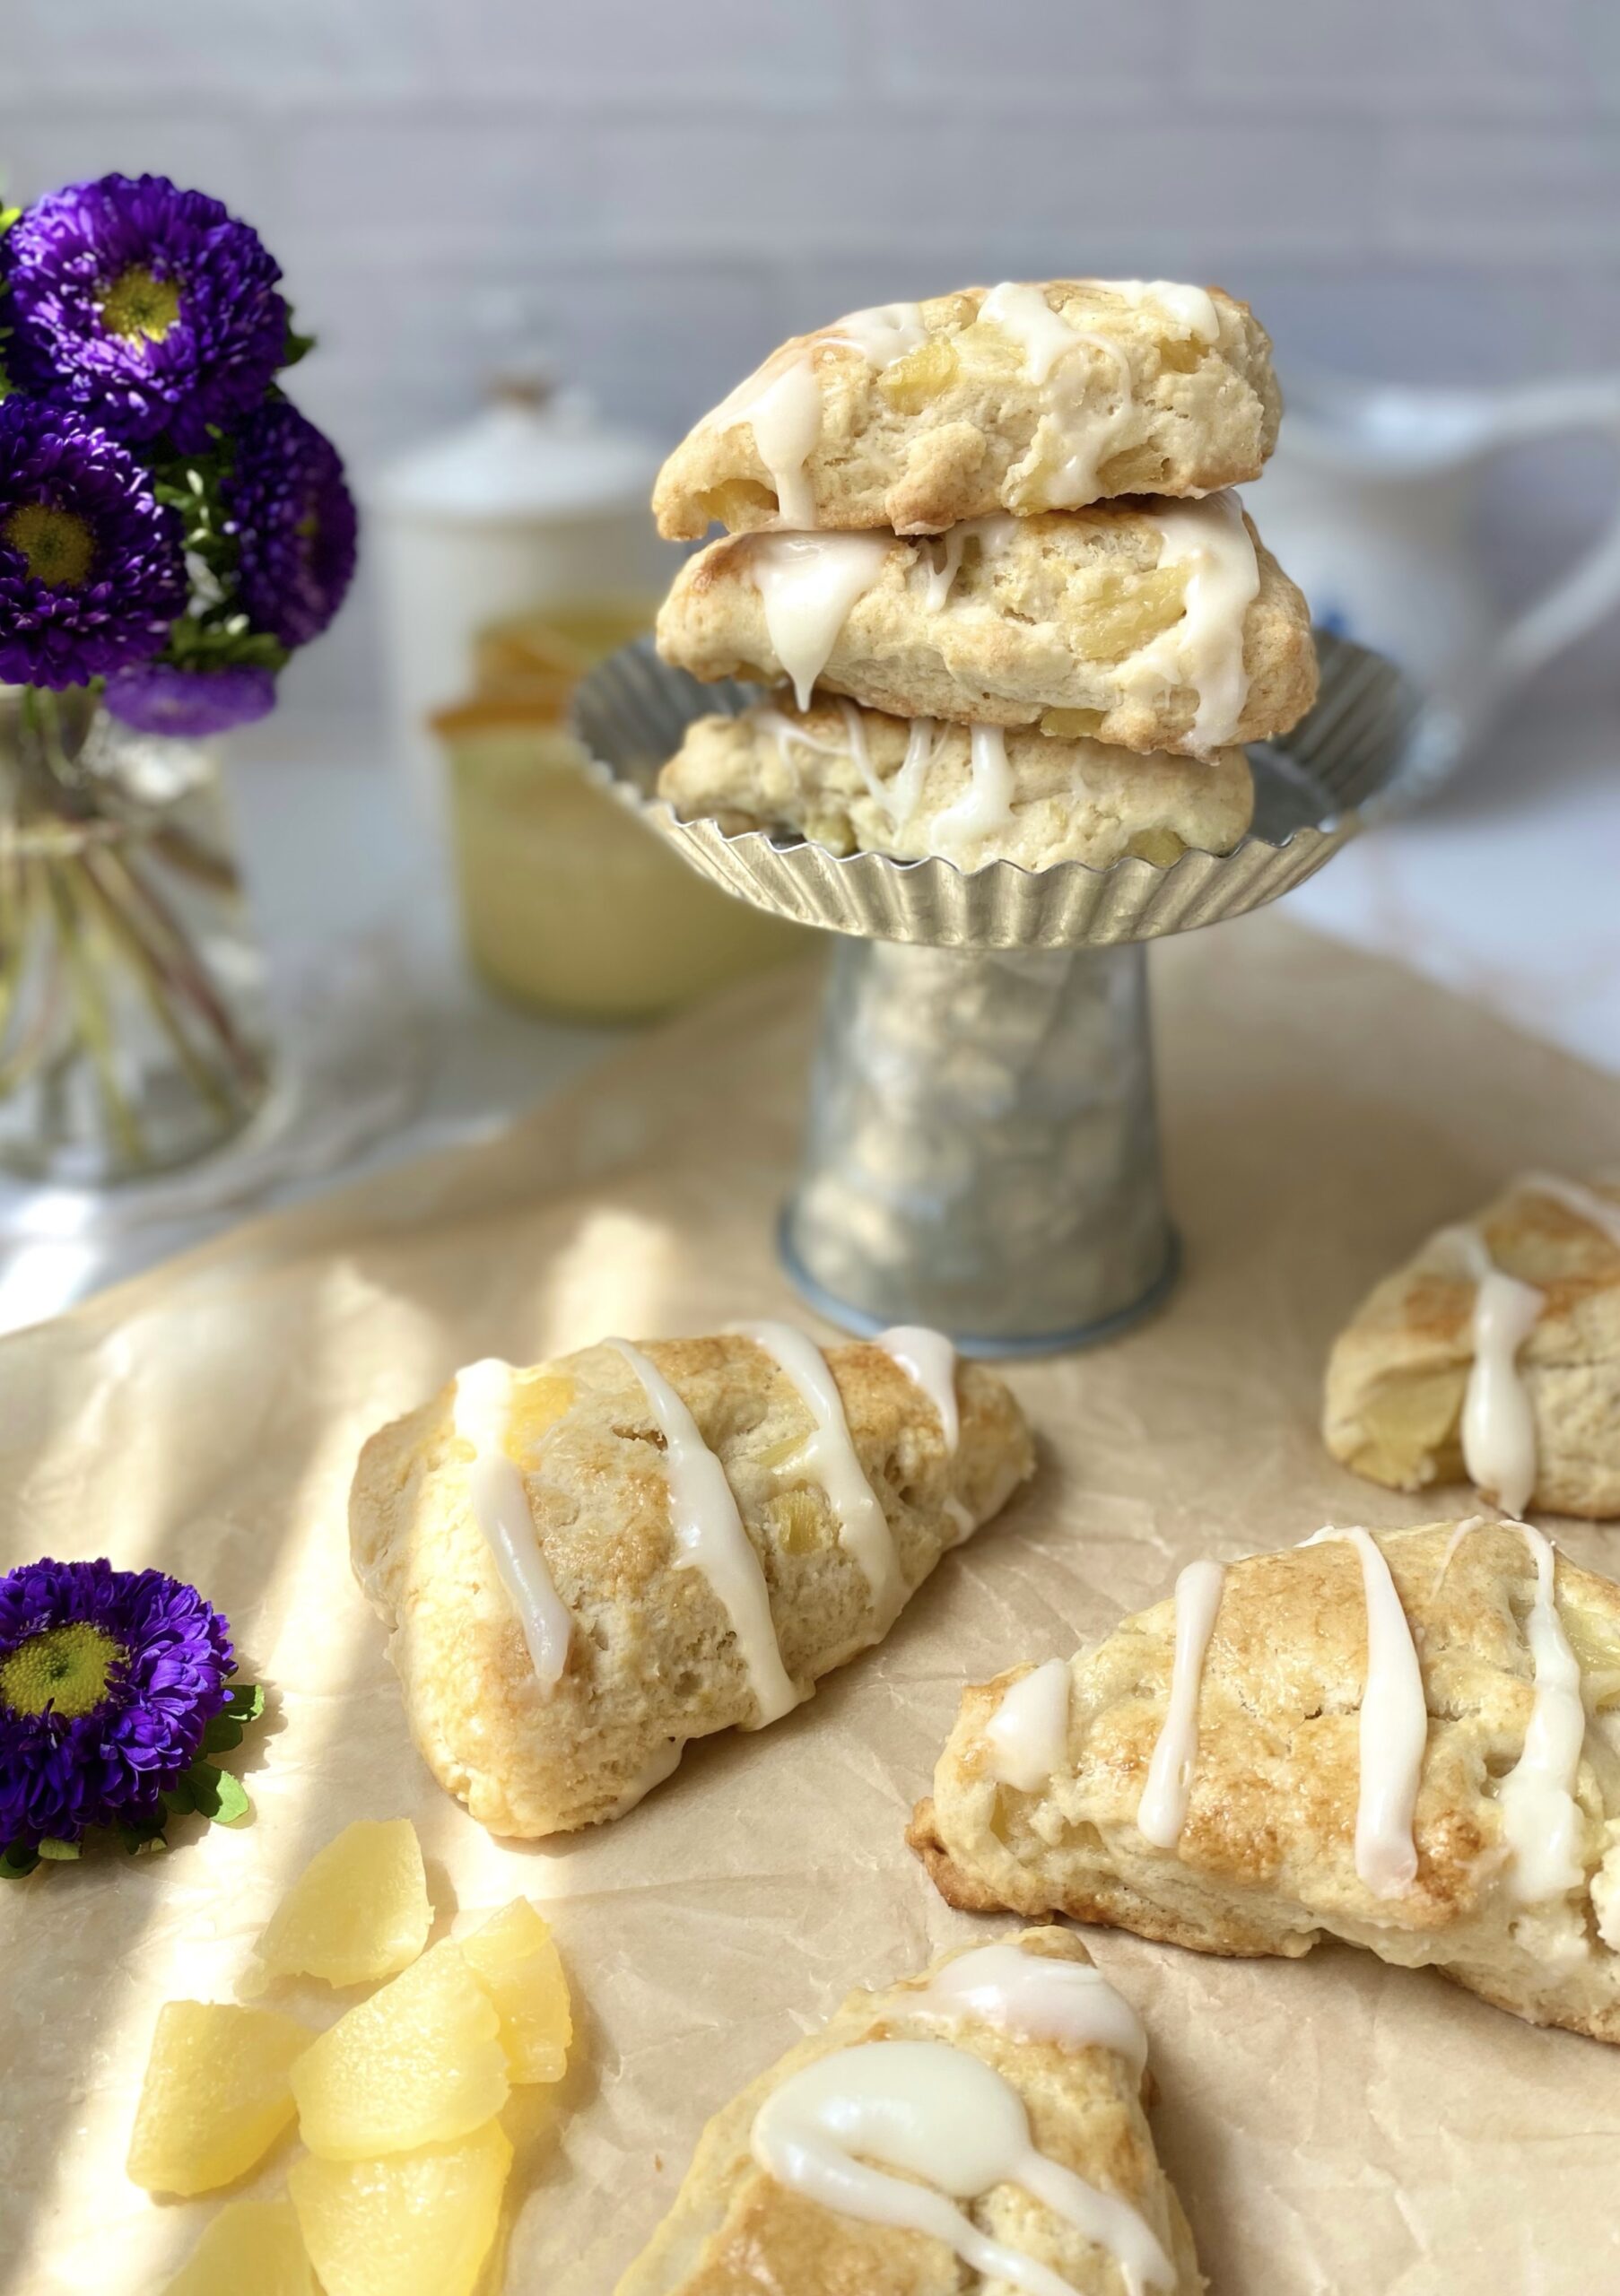
I’ve often been asked to create a vanilla scone recipe. At first I thought vanilla scones seemed a bit uninteresting, but the perfectly tender texture combined with the fragrant addition of vanilla bean and luscious vanilla icing, changed my mind completely. They’re truly delicious and much better than any vanilla scones I’ve tasted in any coffee shop or bakery. The classic vanilla flavor pairs perfectly with all of the warm, cozy drinks of the season.

Print Recipe
Heavenly Glazed Vanilla Bean Scones
Tender vanilla bean scones with luscious vanilla bean icing
Course Breakfast, Brunch
Keyword scones, vanilla bean
Servings
scones
Ingredients
Vanilla Bean Scones
Course Breakfast, Brunch
Keyword scones, vanilla bean
Servings
scones
Ingredients
Vanilla Bean Scones
Instructions
Vanilla Bean Scones
  1. Line a large baking sheet with parchment paper.
  2. In a large bowl, whisk together the flour, sugar, baking powder and salt. Work the butter into the flour mixture with your fingertips or with a pastry blender until pea size pieces form.
  3. In a small bowl, whisk together the heavy cream, sour cream and vanilla. Stir the cream mixture into the flour mixture until a shaggy dough is formed.
  4. Turn the dough out onto a lightly floured surface. Fold the dough over onto itself a couple of times. Don't overwork the dough. Pat the dough into a 6 1/2-inch diameter, 3/4-inch thick round. Cut the dough into 8 wedges.
  5. Place the scones 2 inches apart onto the prepared baking sheet. Chill the scones in the refrigerator for 15-20 minutes.
  6. Preheat the oven to 375ºF (190ºC). Brush the tops of the scones with egg wash. Bake until the scones are golden brown, about 16-20 minutes. Transfer the scones to a cooling rack. Brush the tops of the cooled scones with vanilla bean icing.
Vanilla Bean Icing
  1. In a medium bowl, whisk together the powdered sugar, butter, vanilla, 1 tablespoon of milk and the salt. Add additional milk as needed to reach your desired consistency.

Caramel Apple Blossoms

Caramel Apple Blossoms by Brownie Mischief

Whether you call them apple blossoms, apple dumplings or apple fussbudgets, (which are named after your great grandfather’s second wife’s cousin), these are cute little apple pastries. I made them because I was craving apple pie, but I didn’t have enough apples to bake one. I didn’t invent them, and I don’t know who did, but I’ve had frozen ones and I’ve seen them on restaurant menus. I thought it would be fun to make them, and it was! I could’ve just put some pie dough in muffin cups and made quick little pies, but flower shaped things automatically get extra points for cuteness. And if you know me, you know I love my cute bakes!

Print Recipe
Caramel Apple Blossoms
Course Dessert
Keyword pastry
Servings
blossoms
Ingredients
Topping
Course Dessert
Keyword pastry
Servings
blossoms
Ingredients
Topping
Instructions
  1. In a large bowl, toss apples with lemon juice until combined.
  2. Add brown sugar, sugar, melted butter, flour, cinnamon and salt to apples. Stir until combined.
  3. In a medium bowl, mix together all topping ingredients. Set aside.
  4. Line a large baking sheet with parchment paper.
  5. On a lightly floured surface, roll pie dough to 1/8-inch thickness.
  6. Cut out 12 5-inch blossom shapes, re-rolling dough as necessary.*
  7. Lightly mark a 2-inch circle in the center of each blossom. Make cuts between the petals to separate them, just up to the edge of the center circle.
  8. Top each blossom with about 2 generous tablespoons of apples.
  9. Brush dough petals with egg wash. Form blossoms by lifting and overlapping each petal 1/2-inch in a spiral pattern similar to a rose. Tuck the last petal under. Press petals together to seal so filling won't leak out.
  10. Top each with a spoonful of topping. Place in refrigerator to chill for 30 minutes. Don't skip this step. This will help blossoms keep their shape.
  11. Preheat oven to 375ºF. Brush blossom dough all over with egg wash. Wipe any drips off of parchment paper. Bake until crust is golden brown and filling is starting to bubble, about 23-28 minutes.
  12. Drizzle blossoms with caramel sauce.
Recipe Notes

*When re-rolling pie dough, cover and let rest for several minutes to help avoid shrinkage.

Harry Potter Inspired Pumpkin Pasties

Pumpkin Pasties

Even though the weather is warm where I live at the moment, I’m dreaming about all the delicious fall treats I’ll be baking this year. Let’s look forward to cool, crisp weather, the smell of pumpkin or apples baking, and sipping a warm mug of something spicy while we wait for our bakes to come out of the oven.

Inevitably, every fall, the Harry Potter movies come on at my house and it’s nice to have some popcorn and sweet treats to enjoy while watching the movies. And these Harry Potter Inspired Pumpkin Pasties are perfect for that! If you’ve read the Harry Potter books, you may remember the Pumpkin Pasties being mentioned. There are many interpretations out there, but I imagined them to be crispy and flaky on the outside with a sweet pumpkin filling. I included a delicious flaky pie crust recipe here, but feel free to use store bought pie dough if you want to streamline the process. I sprinkled mine with raw turbinado sugar before baking which provides a sweet delicious crunch. You can also use maple sugar or sparkling sugar. To find the sugar I used, click here. And as a magical touch, I added some edible gold star glitter. To find the edible gold stars, click here.

Print Recipe
Pumpkin Pasties
Harry Potter inspired sweet pumpkin filled hand pies
Course Dessert
Keyword pastry
Servings
hand pies
Ingredients
Pie Crust
Pumpkin Filling
Assembly
Course Dessert
Keyword pastry
Servings
hand pies
Ingredients
Pie Crust
Pumpkin Filling
Assembly
Instructions
Pie Crust
  1. In a large bowl, whisk together the flour, sugar and salt. Work the shortening into the flour mixture with your fingertips until evenly dispersed throughout.
  2. Work the butter into the flour mixture with your fingertips, creating flat dime size pieces.
  3. Mix the ice water and vinegar together. Sprinkle over the flour mixture a little at a time, stirring until dough comes together. You may not need all of the water depending on your climate.
  4. Turn the dough out onto a lightly floured surface. Fold the dough over onto itself a few times. Do not overwork the dough! Form the dough into two disks. Cover with plastic wrap and refrigerate at least one hour or up to overnight.
Pumpkin Filling
  1. In a medium bowl, mix together the pumpkin purée, sugar, egg, heavy cream, cinnamon, ginger and nutmeg until well combined.
Assembly
  1. Preheat oven to 400ºF. (200ºC). Line two baking sheets with parchment paper.
  2. On a lightly floured surface, roll dough to 1/8-inch thickness. Cut dough into 12 5-inch rounds, re-rolling scraps as needed. Place dough rounds on prepared baking sheets.
  3. Place 2 tablespoons of filling on each round, leaving a half-inch border. Apply egg wash to edges of rounds.
  4. Fold the dough over and press the edges together. Crimp the edges with a fork. If any filling oozes out, wipe it up with a paper towel or it will burn.
  5. Brush the pasties with egg wash. Cut a half-inch slit into the top of each pastie. Sprinkle with coarse sugar.
  6. Bake until golden brown, about 18-20 minutes. Transfer to a cooling rack.

Skillet Chicken Pot Pie with Herb Crust

Pot pies belong to everyone. They date back to ancient times and many cultures worldwide have various versions of savory pies. It’s a very popular comfort food dish here in the U.S. and many people already have a favorite recipe. The recipe I’m sharing here isn’t the only way to make a pot pie, but it’s one way to do it that happens to be delicious! I usually bake pot pies in a casserole dish, and you can certainly bake this one in a casserole dish if you want to. But I thought it would be nice to save a step and try baking one in a skillet. I love baking other things, such as cornbread, in a skillet so I had a feeling it would be good. I used an 8-inch cast iron skillet. Click here to find the skillet I used.

I had a ton of fresh herbs on hand, so they ended up in my pie crust on a whim. I was very pleased with the results. Feel free to switch up the herbs and use your favorites. Typically when you bake or roast something with fresh herbs, they tend to turn black and crispy. But don’t worry, they’ll be safely nestled inside the crust. And speaking of the crust, this one is tender and flaky due to my grandmother’s method of working the fat into the dough with your fingertips. You want to end up with flat dime size pieces throughout. A little vegetable shortening helps to add structure and flakiness and the butter makes it taste good. A touch of vinegar helps to inhibit gluten formation, so you’ll have a tender, flaky crust rather than a chewy one. And if you’re one of those people who tends to over work your dough, the vinegar can help with that. But please do yourself a favor and don’t over work your dough!!

Now I’m going to give you the best piece of cooking advice my grandmother ever gave me: Taste as you go! Taste everything as you are preparing it, not just when it’s done. So when you’re making your filling for this pot pie, add the herbs, salt, pepper and sage a little bit at a time until it tastes good to you.

Print Recipe
Skillet Chicken Pot Pie with Herb Crust
Skillet chicken pot pie with fresh herbs baked into the crust
Course Main Dish
Servings
Ingredients
Herb Crust
Filling
Course Main Dish
Servings
Ingredients
Herb Crust
Filling
Instructions
Herb Crust
  1. In a large bowl, whisk together flour, sugar and salt. Work shortening into the flour mixture with your fingertips until evenly dispersed throughout.
  2. Work butter and herbs into the flour mixture with your fingertips, creating flat dime size pieces.
  3. Mix ice water and vinegar together. Sprinkle over flour mixture a little at a time, stirring until dough comes together. You may not need all of the water depending on your climate.
  4. Turn dough out onto a lightly floured surface. Knead dough briefly by folding dough over onto itself a few times. Do not over work dough! Form dough into a disk. Cover with plastic wrap and refrigerate at least one hour or up to overnight.
Filling
  1. In an 8-inch cast iron skillet, heat butter over medium heat. Sauté onions, celery and carrots until onions are translucent, stirring occasionally. Sprinkle with flour and cook one to two more minutes, stirring frequently.
  2. Stir in chicken broth slowly. If your sauce seems lumpy, use a whisk and vigorously whisk until smooth. Simmer on low until thickened. Stir in heavy cream. Add herbs and seasonings to taste. Add a splash of chicken broth if your sauce seems too thick.
  3. Mix in chicken and peas. Remove form heat. Set aside until skillet is cool enough to handle.
Assembly
  1. Preheat oven to 400ºF.
  2. On a lightly floured surface, roll dough out to a 10-inch round. Place dough over filling, tucking ends under and crimping with your fingers or with a fork. Brush pie with egg wash. Cut a 1-inch X in the center of pie to allow steam to escape.
  3. Bake until golden brown, about 40 minutes. Cover edges of crust with strips of foil if they start to brown too fast.

Pineapple Scones with Cream Cheese Icing

Pineapple Scones with Cream Cheese Icing

I had pineapple smoothies two days in a row. There’s something so vibrant and refreshing about pineapple. It feels sunny and tropical. Should scones ever feel sunny and tropical? I’m going to say yes! Scones deserve a summer vacation too. They can take a break from tea parties and coffee shops and enjoy a little sunshine.

You’ll be pleasantly surprised when you experience your first bite of a scone with a burst of pineapple flavor. I immediately thought, “Why isn’t this a thing?” There are probably other pineapple scones out there in the universe, but they’re definitely not well known, like the very popular blueberry scone for example. I’m going to go so far as to say, pineapple scones are better than blueberry scones. There, I said it. (And this is coming from a person who loves blueberries.)

Print Recipe
Pineapple Scones with Cream Cheese Icing
Servings
scones
Ingredients
Pineapple Scones
Cream Cheese Icing
Servings
scones
Ingredients
Pineapple Scones
Cream Cheese Icing
Instructions
Pineapple Scones
  1. Preheat oven to 375ºF. Line a baking sheet with parchment paper.
  2. In a large bowl, whisk together flour, sugar, baking powder and salt.
  3. Work butter into the flour mixture with your fingers or with a pastry blender until pea size chunks form.
  4. In a small bowl, whisk together heavy cream, pineapple juice and vanilla.
  5. Stir heavy cream mixture into flour and butter mixture until a shaggy dough is formed.
  6. Fold in pineapple.
  7. Turn dough out onto a lightly floured surface. Knead briefly, by folding dough over onto itself a few times. Do not overwork dough.
  8. Pat or roll dough into a 7-inch round. Cut dough into 8 wedges.
  9. Place scones about 2 inches apart onto prepared baking sheet. Brush scones with egg wash.
  10. Bake until golden brown, about 18-22 minutes.
  11. Transfer scones to a cooling rack to cool completely. Drizzle with icing.
Cream Cheese Icing
  1. In a medium bowl, beat cream cheese and butter together until smooth.
  2. Add powdered sugar and pineapple juice. Whisk until smooth.

Italian Easter Pocket Pies

Italian Easter Pocket Pies

Italian Easter Pie, also known as Pizza Rustica is a rich, delicious, savory pie, similar to a quiche. When I was growing up, my family enjoyed this pie at Easter time, but it’s delicious and comforting any time of the year. Easter Pie typically contains meats and cheeses. We made ours with sausage, cheese and spinach. I started making these small, handheld versions years ago for my kids. They love dipping them in pizza sauce. I included the recipe for the homemade pie crust below, but you can streamline the recipe by making the pie dough the night before or using store bought 2-crust pie dough if you wish.

Print Recipe
Italian Easter Pocket Pies
Golden handheld pies filled with Italian sausage, spinach, ricotta and mozzarella cheese
Cuisine Italian
Keyword pastry, pie
Servings
pocket pies
Ingredients
Pie Crust
Filling
Cuisine Italian
Keyword pastry, pie
Servings
pocket pies
Ingredients
Pie Crust
Filling
Instructions
Pie Crust
  1. Whisk together the flour, sugar, and salt in a large bowl. Work the shortening into the flour mixture with your fingertips until evenly distributed. Work the butter into the flour mixture until flat, dime size pieces are formed.
  2. In a small bowl combine the ice water and vinegar. Sprinkle the ice water mixture over the flour mixture a little at a time and mix just until the dough comes together. You may not need all of the water, depending on your climate. On a lightly floured surface, fold the dough over onto itself a couple of times. Form the dough into two disks. Wrap the disks in plastic wrap. Refrigerate at least two hours or up to overnight.
Filling and Assembly
  1. Preheat the oven to 375ºF (190ºC). Line a large baking sheet with parchment paper.
  2. Combine the sausage, spinach, cheeses and seasonings in a medium bowl and mix well.
  3. Roll out the pie dough to 1/8-inch thickness. Cut into ten 5-inch rounds. Place the rounds on the prepared baking sheet.
  4. Brush the edges of the rounds with egg wash. Place about 3 tablespoons of filling into the center of each round. Fold the dough over and press the edges to seal. Crimp the edges with a fork. Brush the pies with egg wash. Cut a 3/4-inch ventilation slit on the top of each pie.
  5. Bake until golden brown, about 25-30 minutes. Serve with pizza sauce or marinara if desired.