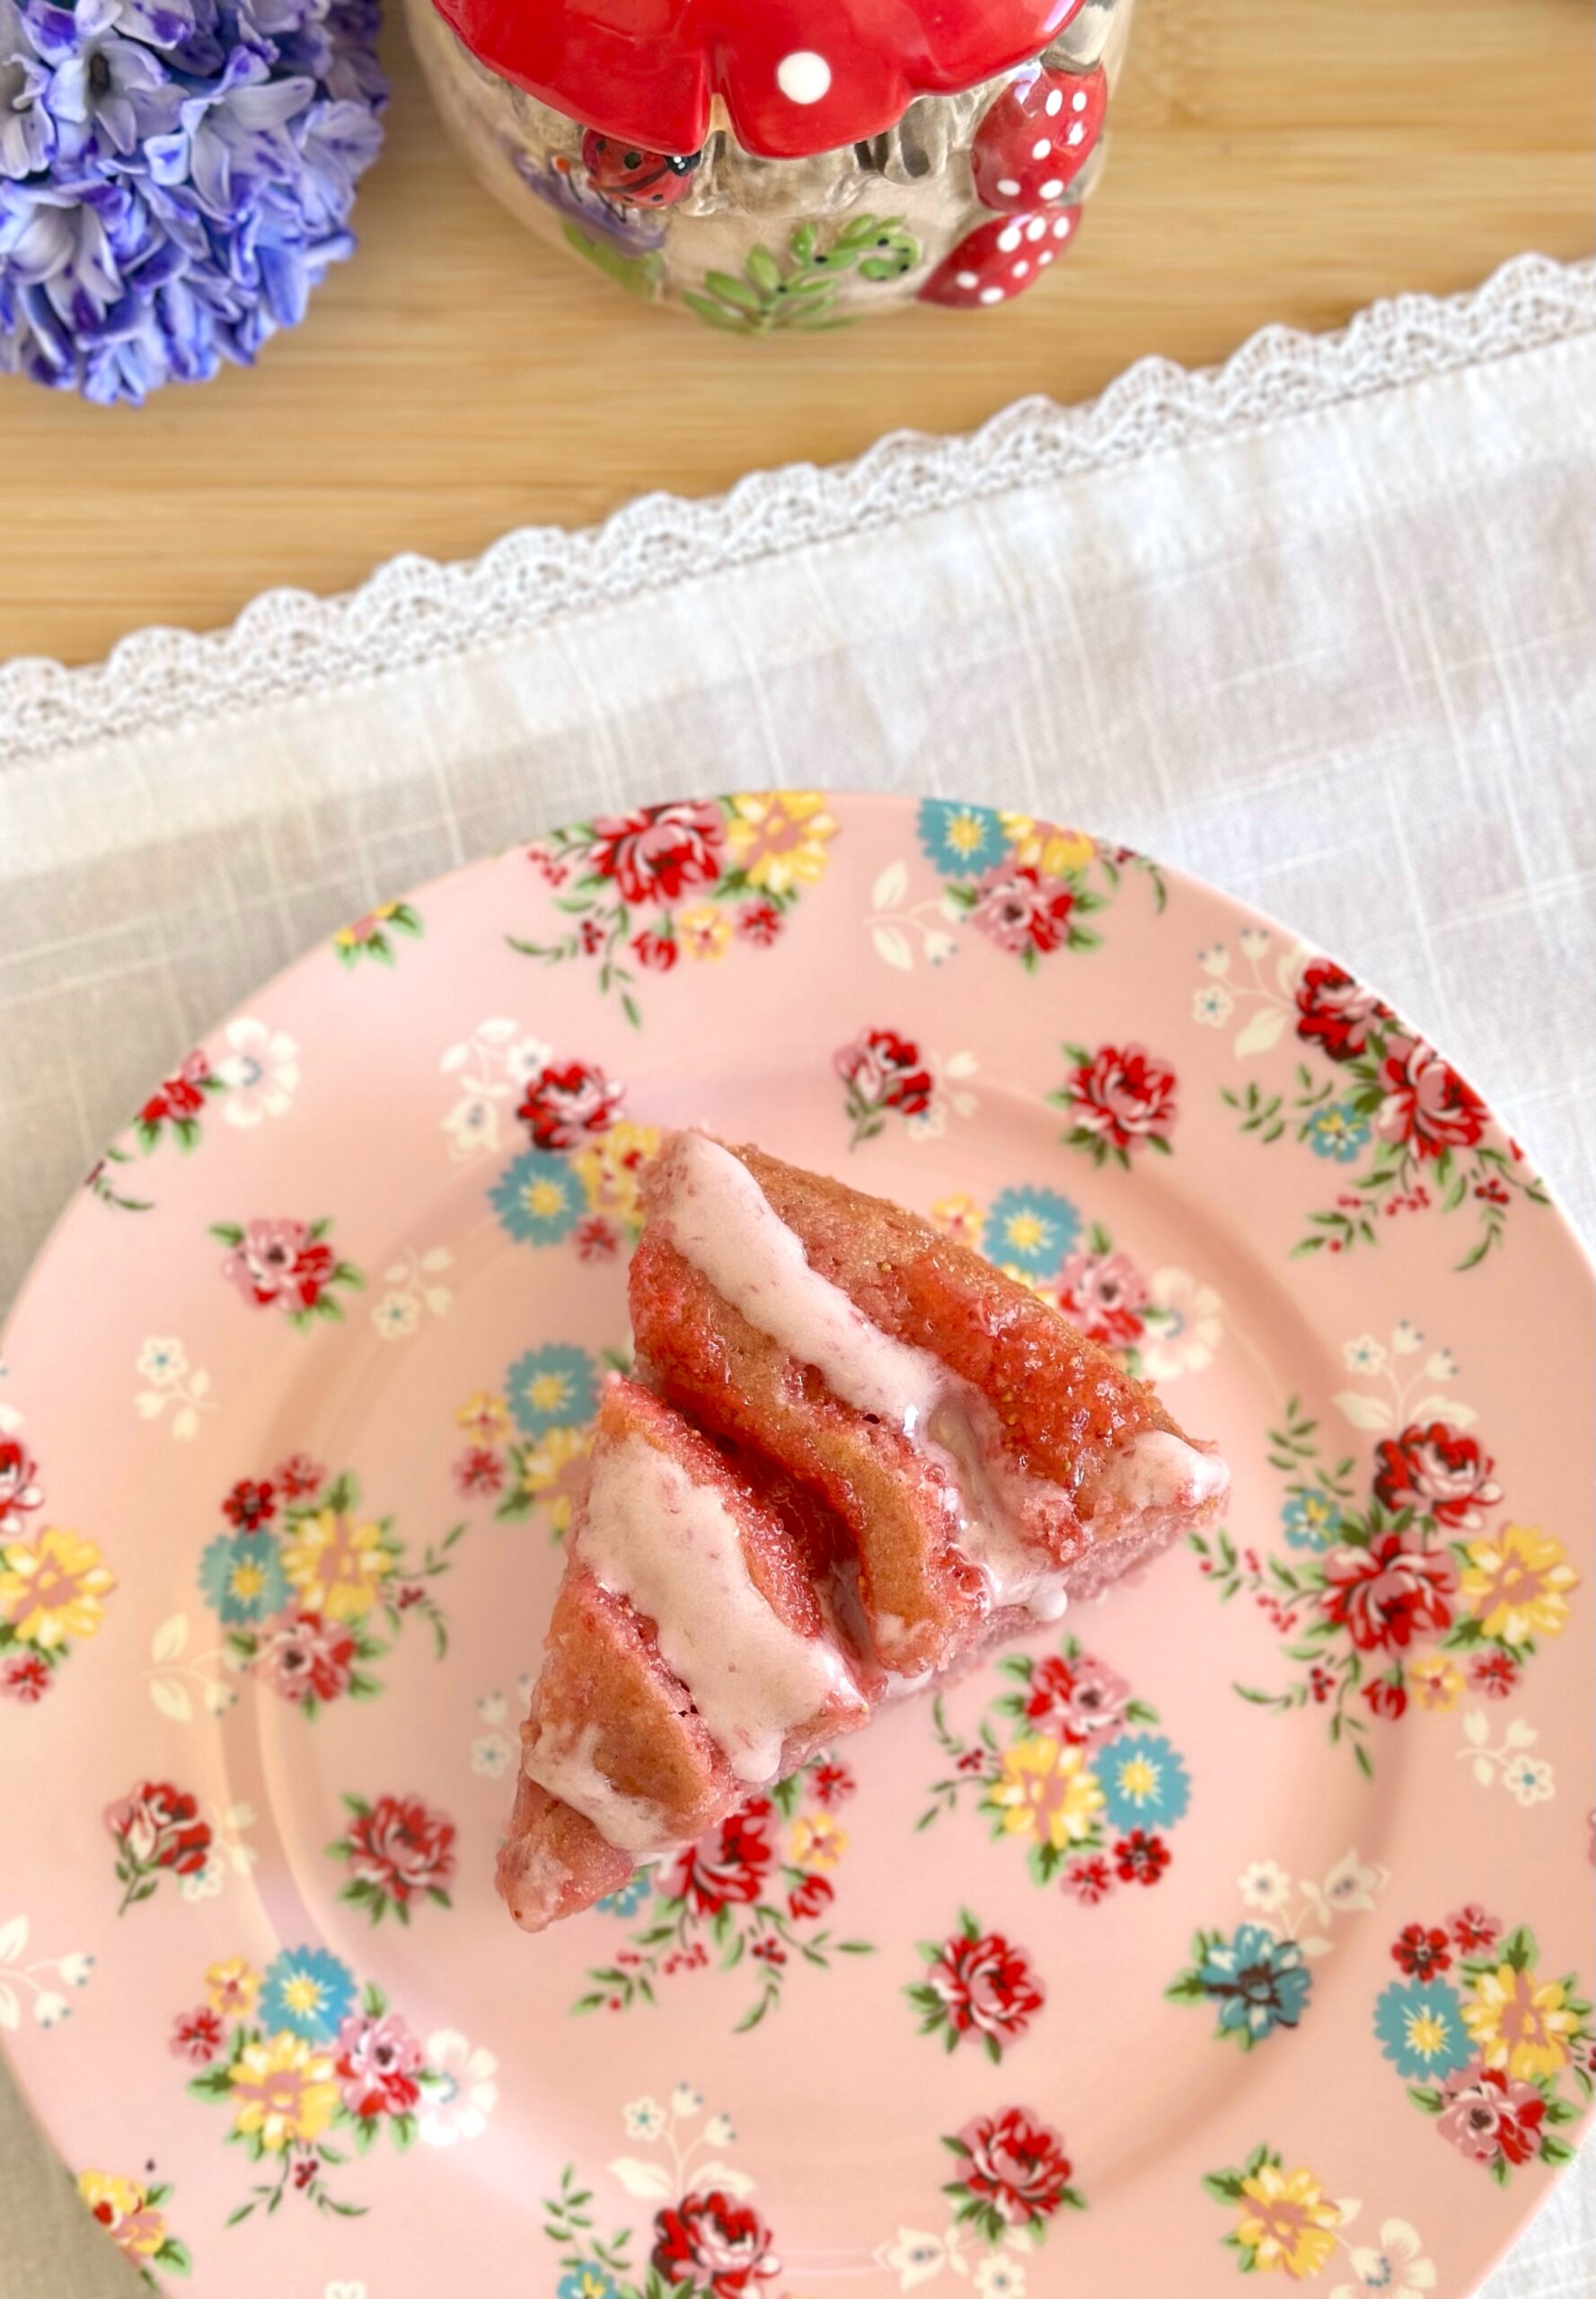
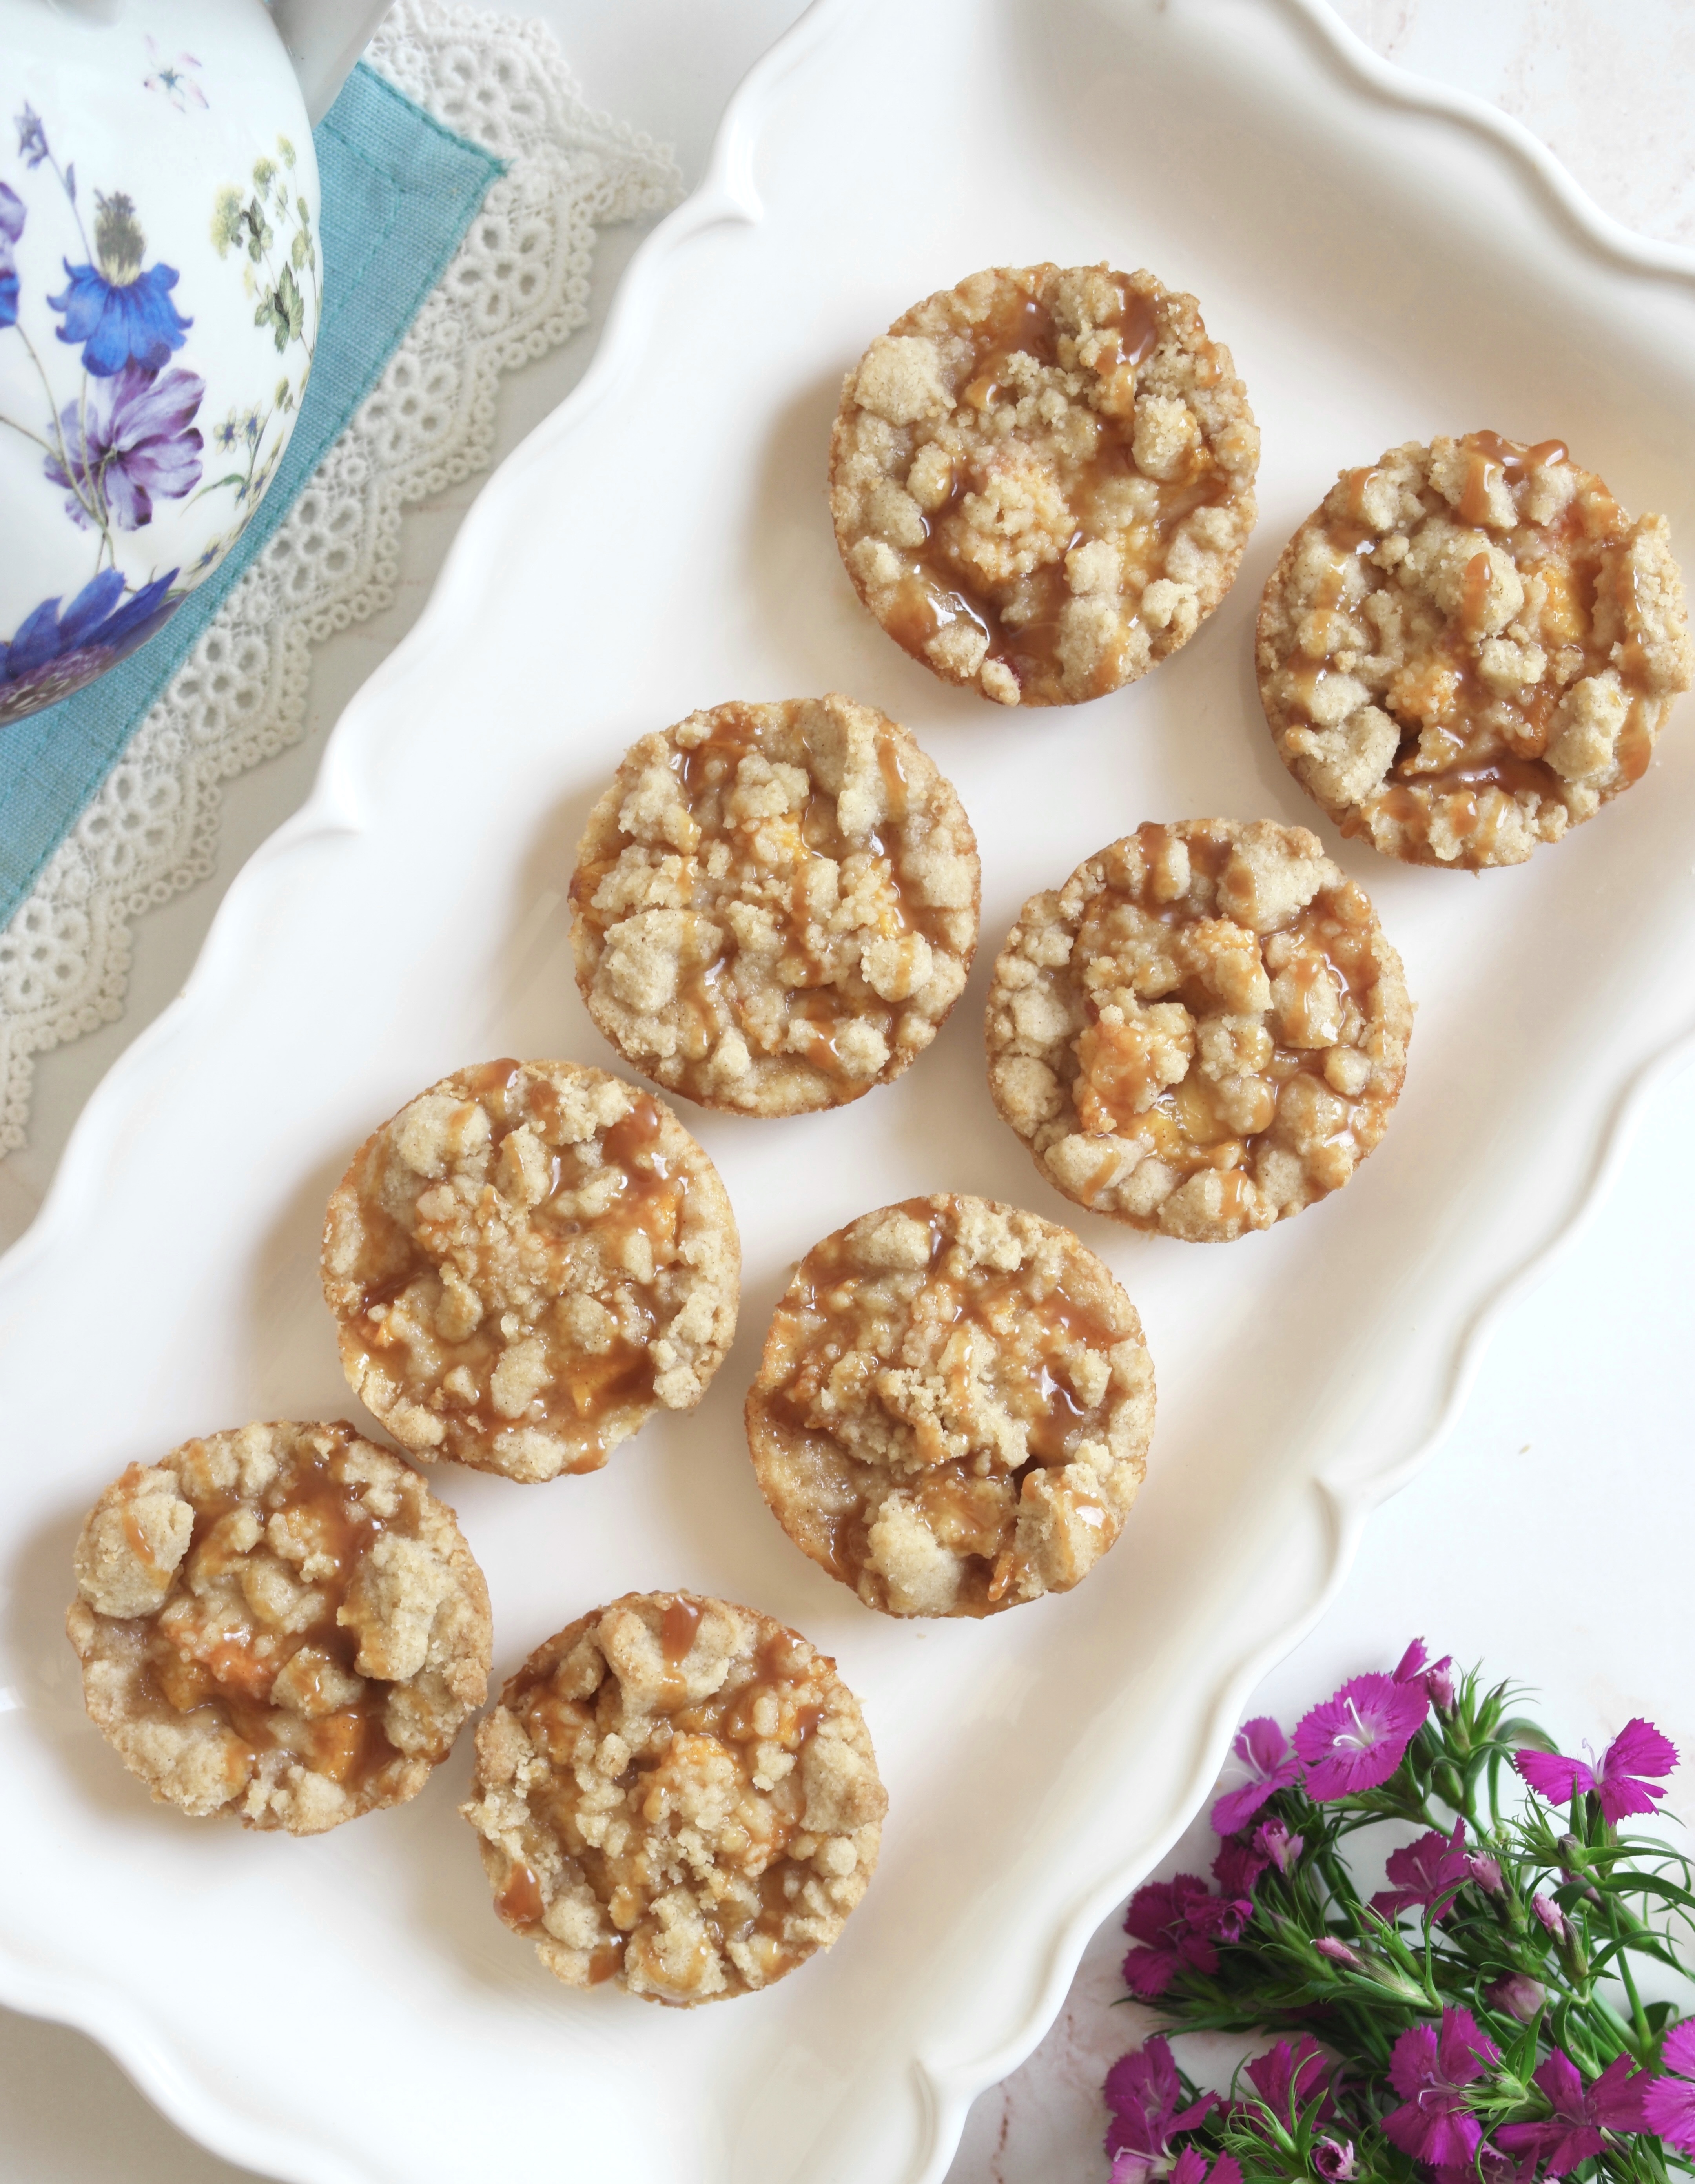
Caramel Apple Crumble Bars

Although we have access to apples year around, apple season is my favorite time to bake with apples. I love the opportunity to go apple picking or choosing fresh apples from the abundance of apples available at farmers markets. Baking with apples makes your home smell cozy and delightful, especially when paired with cinnamon. These Caramel Apple Crumble Bars have the autumn flavors you’re craving. They’re the apple version of my popular Blueberry Crumble Bars and they’re equally delicious.

This recipe requires multiple steps, but the steps are all very easy. The apples are cooked briefly on the stovetop to achieve the perfect texture. The crust is blind baked to keep it crisp. The caramel is drizzled over the apples which helps keep them juicy and we all know what a perfect match apples and caramel are! Adding the caramel to the apples, rather than drizzling it over the top of the crumble topping also keeps the topping crisp.

I like using green apples for this recipe, such as Granny Smith or Golden Delicious, or a combination of green and red apples, but you can use any baking apples that you prefer. The caramel sauce recipe is one that I would consider a shortcut. I used caramel candies melted together with heavy cream.

Print Recipe
Caramel Apple Crumble Bars
Fresh apple cinnamon filling on a crisp, buttery shortbread base with a generous crumble topping
Course Dessert
Keyword bars, caramel apple
Servings
2-inch bars
Ingredients
Apples
Crumble Topping
Caramel Sauce
Crust
Course Dessert
Keyword bars, caramel apple
Servings
2-inch bars
Ingredients
Apples
Crumble Topping
Caramel Sauce
Crust
Instructions
Apples
  1. In a large bowl, toss the apples with the lemon juice.
  2. In a large skillet, melt the butter over medium heat. Add the apples, sugar, cinnamon and salt. Cook, stirring occasionally until the apples are tender, about 10-12 minutes. Set aside to cool.
Crumble Topping
  1. In a medium bowl, whisk together the flour, brown sugar, sugar, cinnamon and salt. Work the cold butter into the flour mixture with a pastry blender or with your fingertips until it looks like wet sand. Press together to form 1/2-inch chunks. Set aside in the refrigerator until ready to use.
Caramel Sauce
  1. In a small saucepan over medium heat, melt the caramel candies and heavy cream together, stirring until smooth.
Crust
  1. Preheat the oven to 350ºF. (180ºC). Line an 8-inch square baking pan* with parchment paper.
  2. In a medium bowl, whisk together the flour, powdered sugar, baking powder and salt.
  3. In a large bowl, beat the butter, with an electric mixer at medium speed, until smooth. Add the flour mixture and beat just until the dough comes together.
  4. Press the dough into the prepared baking pan. Bake until the surface looks evenly light golden brown, about 20-22 minutes. Remove from the oven. Top with the cooked apples. Drizzle with caramel sauce. Top with the crumble topping. Return the pan to the oven and continue baking until the topping looks golden brown and the filling starts to bubble, about 25-28 minutes.
  5. Let cool completely in the pan. Sprinkle with powdered sugar.
Recipe Notes

To find the baking pan I used, click here.

Blueberry Pecan Banana Bread

This banana bread was a happy accident. One morning, I started to make banana bread. My recipe called for three over-ripe bananas, but I realized that I only had two. So I changed my recipe, and then I added blueberries, toasted pecans, a pecan crumb topping and a brown sugar cinnamon glaze. The results were so tender, moist and delicious that I can confidently say this is the best banana bread I’ve ever tasted. And I’ve tasted a lot of banana bread. I’ve tried many different recipes and tasted loaves baked by other people. I also like picking up a slice of banana bread at bakeries and coffee shops sometimes, alongside my coffee or tea.

The three biggest problems I typically see with banana bread are rubbery texture, dry texture or bland flavor. Over mixing can cause a rubbery loaf, so when you add your dry ingredients to the batter, mix it just until the flour is incorporated, to avoid excess gluten formation. To avoid a dry loaf, make sure not to over bake it. Test it before you think it might be done. When measuring your dry ingredients, weigh them for the best results. Sometimes people inadvertently add too much or too little flour when using measuring cups.

For the best flavor and sweetness, make sure to use very ripe bananas when making banana bread. I like to use bananas that are soft and covered with brown spots. I avoid the black, oozing bananas, even though you may see people on social media recommending them for use. These are technically rotten bananas and can give your banana bread an unpleasant fermented flavor. The toasted pecans in this recipe add texture and a rustic nutty flavor. Even people who don’t like nuts tend to appreciate them in this banana bread. But if you have a nut allergy you can certainly leave them out. The addition of cinnamon, nutmeg and vanilla also add lovely flavor to this loaf. This banana bread is quite delicious on its own, but the crumb topping and brown sugar glaze take it over the top!

To watch the Blueberry Pecan Banana Bread Instagram video, click here.

Print Recipe
Blueberry Pecan Banana Bread
Moist tender banana bread with blueberries and toasted pecans, topped with pecan crumb topping and brown sugar cinnamon glaze.
Servings
loaf
Ingredients
Crumb Topping
Blueberry Pecan Banana Bread
Brown Sugar Cinnamon Glaze
Servings
loaf
Ingredients
Crumb Topping
Blueberry Pecan Banana Bread
Brown Sugar Cinnamon Glaze
Instructions
Crumble Topping
  1. In a medium bowl, combine the flour, brown sugar, cinnamon and salt. Work in the butter with your fingertips until the mixture looks like wet sand. Mix in the pecans. Press the mixture to together to form chunks. Set aside in the refrigerator until ready to use.
Blueberry Pecan Banana Bread
  1. Preheat the oven to 325ºF (165ºC). Line the bottom a 9 x 5-inch loaf pan* with parchment paper. Grease and flour the insides.
  2. In a medium bowl, whisk together the flour, baking powder, baking soda, salt, cinnamon and nutmeg.
  3. In a large bowl, whisk together the brown sugar, oil, eggs, sour cream and vanilla until smooth and well combined. Stir in the bananas until incorporated. Mix in the flour mixture just until combined. Do not over mix. Stir in the pecans.
  4. In a small bowl, gently toss the blueberries with the lemon juice, then toss them with 2 teaspoons of flour. Fold 3/4 of the blueberries into the batter. Transfer the batter to the prepared loaf pan. Top with the remaining blueberries, then the crumb topping.
  5. Bake until a toothpick inserted into the center of the loaf comes out clean, about 55-60 minutes. Cool in the pan for 10 minutes, then remove the loaf from the pan and transfer to a cooling rack to cool completely.
Brown Sugar Cinnamon Glaze
  1. In a small saucepan, whisk the brown sugar, butter, cinnamon and salt together over medium heat until the sugar dissolves and the edges start to bubble. Remove from heat and whisk in the heavy cream, vanilla and powdered sugar until smooth. Set aside to cool slightly. Drizzle over the cooled banana bread.
Recipe Notes

*To find the loaf pan I used, click here.

Peach Crumble Pie Cookies

Peach Crumble Pie Cookies

I couldn’t decide whether to call these cookies or pies, so I made a compromise. They’re about the size of cookies, but they taste like little peach crumble pies. The base is tender like shortbread or pie crust and the filling is made with fresh peaches. I’ve seen people make something similar with jam and call them cookies, but since I used fresh fruit for these, they deserve to be elevated to pie status.

The peaches are macerated to draw out the excess juices, to help avoid making your cookies soggy. If you’re impatient, don’t be tempted to skip this step. It’ll go by fast as you prep the crumb topping and the remaining ingredients.

When I first made these, I used cupcake liners because I was worried that they might stick to the pan. It turns out that they stick to the cupcake liners more than the pan. So the next time I made them, I opted to lightly spray the pan with nonstick spray instead of using liners. I ran a small thin offset spatula around the perimeter of the cookies to loosen them from the pan and they popped out nicely.

I love topping these little peach delights with caramel sauce. Salted caramel is also a delicious addition. Or you can simply sprinkle them with powdered sugar if you prefer.

Print Recipe
Peach Crumble Pie Cookies
Tender, peach-filled cookies with crumble topping and caramel drizzle
Keyword cookies, peach
Servings
Ingredients
Macerated Peaches
Crumble Topping
Cookies
Topping
Keyword cookies, peach
Servings
Ingredients
Macerated Peaches
Crumble Topping
Cookies
Topping
Instructions
Macerated Peaches
  1. In a medium bowl, toss peaches with lemon juice. Add the brown sugar and cinnamon. Stir gently to combine. Let stand 30 minutes.
  2. Drain the peaches, reserving 1 tablespoon of the juices. In a small bowl, whisk together the reserved 1 tablespoon of peach juice with the corn starch. Mix with the drained peaches.
Crumble Topping
  1. In a medium bowl, whisk together the flour, sugar, brown sugar, cinnamon and salt.
  2. With a pastry blender or with your fingertips, work the butter into the flour mixture until it looks like wet sand. Press the mixture together to form chunks.
Cookies
  1. Preheat the oven to 350ºF (180ºC). Lightly spray a 12-serving muffin pan with nonstick spray.
  2. In a medium bowl, whisk together the flour, baking powder and salt.
  3. In a large bowl, beat the butter and powdered sugar with an electric mixer until light and fluffy.
  4. Mix in the flour mixture on low speed or by hand, just until combined.
  5. Press generous tablespoon size (5/8 oz or 20g each) portions of dough into the bottoms of the muffin pan cups with a pastry tamper dipped in flour. You can also use the bottom of a flat shot glass.
  6. Top with the peaches, then the crumble topping mixture. Bake until the cookies are set and the topping is golden brown, about 15-17 minutes.
  7. Cool the cookies completely in the pan. Once cool, remove the cookies from the pan by running a small offset spatula or paring knife around the inside perimeter of the muffin cups to loosen them. Drizzle with caramel sauce.

White Chocolate Peach Muffins

I have strong opinions about muffins. Maybe a little controversial too. When baked correctly, muffins should be soft, fluffy and tender. I get a little sad and disappointed when I buy a big, domed bakery muffin and the inside is rubbery. Many of the pretty muffins I see on social media are painfully rubbery too, as the creators break open a muffin in a dramatic moment of triumph. The muffin recipe I’m sharing here is tender and delicious if baked correctly.

One of the most important ways to achieve tender muffins is by not over mixing your batter once the flour is added. Muffins are technically cake, not bread, so we don’t want gluten formation. Another way to get tender muffins is to use an acidic ingredient such as sour cream, yogurt or buttermilk. Lastly, and very importantly, don’t over bake or under bake your muffins. Baking times in recipes are a guide and not necessarily exact because everyone’s ovens and baking pans are different. Keep an eye on your muffins and test them for doneness with a cake tester or a toothpick. My grandma used to say that when you start to smell them, they’re probably done or close to being done.

Soggy muffins also make me run the other way. Muffins loaded with too much fruit or fruit that hasn’t been macerated can make your muffins soggy or dense. In this recipe, I macerated the peaches to draw out some of the moisture, so it helps to avoid creating soggy spots in your muffins. The waiting time goes by fast as you prep the rest of your ingredients.

Print Recipe
White Chocolate Peach Muffins
Tender muffins with white chocolate chips and chunks of fresh peaches.
Servings
muffins
Ingredients
Macerated Peaches
Crumb Topping
Muffins
Servings
muffins
Ingredients
Macerated Peaches
Crumb Topping
Muffins
Instructions
Macerated Peaches
  1. In a medium bowl, toss the peaches with lemon juice. Add the brown sugar and cinnamon and stir to combine. Let stand 30 minutes.
  2. Drain the peaches well and toss with flour. Reserve 1/4 cup of peaches for the muffin tops.
Crumb Topping
  1. In a medium bowl, whisk together the flour, sugar, brown sugar, cinnamon and salt.
  2. With a pastry blender, or with your fingertips, work the butter into the flour mixture until it looks like wet sand. Press together to form chunks. Set aside in the refrigerator until ready to use.
Muffins
  1. Preheat the oven to 375ºF (190ºC). Line a 12-serving muffin pan with tulip muffin liners.* (Tulip muffin liners are preferable because they hold more batter, but you can also use standard muffin liners.)
  2. In a medium bowl, whisk together the flour, baking powder, baking soda, salt, cinnamon and nutmeg.
  3. In a large bowl, beat the butter and sugar together until light and fluffy. Beat in the eggs and extracts in 3 separate additions, making sure each one is incorporated before adding the next.
  4. Mix in the flour mixture with a wooden spoon or spatula, in two additions, followed by half of the sour cream after each addition. Mix just until combined. The batter will be thick.
  5. Toss the white chocolate chips with flour, then fold them into the batter. Gently fold in the drained peaches.
  6. Transfer batter to the prepared muffin pan, equally dividing the batter among the muffin cups. (If you're using standard muffin liners, fill them 2/3 full.) Top with the reserved peaches and the crumb topping. Optional: Top each muffin with a piece of white chocolate.
  7. Bake muffins for 5 minutes. Turn down the oven heat to 350ºF (180ºC). Continue baking until the muffins are light golden brown and a toothpick inserted into the centers of the muffins comes out clean, about 15-20 more minutes. Cool in the pan for 5 minutes, then remove the muffins from the pan and continue cooling on a cooling rack.
Recipe Notes

*To find tulip muffin liners, click here.


Blueberry Lavender Cookies

Blueberry Lavender Cookies

Blueberry cookies remind me of a time when I was little. Every year my family would take a road trip up to Northern California. My parents loved stopping at roadside stands to buy fresh produce on the way back. One year my dad bought an enormous box of blueberries. When we got home, for the next couple of weeks, we ate far too many blueberry pancakes. My dad also used the blueberries in his famous cobbler, which was delightful. Then he made biscuits which turned out like rocks and we all laughed. My favorite blueberry creations that year were the blueberry shortcake and blueberry cookies. I’m sharing my version of the blueberry cookies, with the addition of lavender to make them a little more special.

My Blueberry Lavender Cookies start with butter and homemade lavender sugar. The original cookies had fresh blueberries plopped into the dough, which is perfectly fine if you’re making muffins. To reduce the soggy spots that form as the fruit releases its juices while baking, I typically macerate or cook fruit before it’s added to many of my recipes. The extra step makes a big difference. A quick, cooked blueberry compote is folded into the batter of these cookies, making pretty blueberry swirls. I finished these cookies with a sprinkle of sparkly sanding sugar in a lilac shade. This is optional, but very pretty. You can also make extra lavender sugar to use for sprinkling on your cookies. Sprinkle the sugar on before baking or after the cookies bake, while they’re still warm.

Print Recipe
Blueberry Lavender Cookies
Chewy lavender scented sugar cookies with crisp exteriors and swirls of blueberry compote.
Servings
cookies
Ingredients
Blueberry Compote
Lavender Sugar
Blueberry Lavender Cookies
Servings
cookies
Ingredients
Blueberry Compote
Lavender Sugar
Blueberry Lavender Cookies
Instructions
Blueberry Compote
  1. In a small bowl, whisk together the cornstarch with 1 tablespoon of water.
  2. In a small saucepan over medium heat, combine the blueberries, lemon juice and remaining 1 tablespoon of water, stirring until the blueberries soften and start to release their juices. Smash the blueberries slightly with the back of the spoon. Stir in cornstarch mixture. Turn the heat down to low. Simmer until thickened to a jam consistency, about 1-2 minutes.
  3. Transfer the blueberry compote to a small bowl and set aside to cool to room temperature.
Lavender Sugar
  1. In a small food processor or a clean spice grinder, combine 1/4 cup of the sugar with the lavender. Pulse a few times to chop the lavender into smaller bits. Add the remaining sugar and pulse a few more times to combine.
Blueberry Lavender Cookies
  1. Preheat your oven to 350ºF (180ºC) Line two large baking sheets with parchment paper.
  2. In a medium bowl, whisk together the flour, cornstarch, baking powder and salt.
  3. In a large bowl, beat the butter and lavender sugar with an electric mixer, until light and fluffy.
  4. Add the the egg white and vanilla and beat until well combined.
  5. On low speed, add the flour mixture in two additions and mix just until combined.
  6. Add dollops of the blueberry compote to the batter. Fold in gently, but don't completely combine it. You want to see swirls of blueberry.
  7. Place 2-tablespoon size portions of dough about 2 inches apart onto prepared baking sheets. I used a #30 portion scoop.*** Sprinkle with decorative sugar if desired.
  8. Bake until tops of cookies are set and bottom edges turn light golden brown, about 10-14 minutes. Transfer the cookies to a cooling rack. Do not over bake. Test one cookie before baking the entire batch if you are unsure about how to determine the doneness of cookies.
Recipe Notes

*To find culinary lavender, click here.

**To find the decorative sanding sugar I used, click here.

***To find the scoop I used, click here.

Blueberry Ripple Scones

Blueberry Ripple Scones

Once there was a blueberry scone. She was good and reliable. One day she felt bored and tired of her soggy blueberries. She thought about her friend, the other blueberry scone. The one with the dried blueberries. The shriveled up blueberries reminded her of raisin bran. “It’s time for a change,” she thought. So she grabbed her friend, and they headed over to Brownie Mischief for a makeover.

That’s how Blueberry Ripple Scones were born, at least in my imagination. These scones are the new and improved, elevated version of blueberry scones. They have a ribbon of sweet blueberry compote swirling through the tender vanilla dough, making them look beautiful and taste delicious. Although the blueberry compote is quick to make, it requires a little more effort than simply folding blueberries into the dough. But it’s definitely worth it. I like to make my compote the night before, then it’s ready to go when I make my scones in the morning.

Print Recipe
Blueberry Ripple Scones
Vanilla scones with ribbons of sweet blueberry compote and crunchy sugar topping
Course Breakfast, Brunch
Keyword blueberry, scones
Servings
scones
Ingredients
Scones
Blueberry Compote
Course Breakfast, Brunch
Keyword blueberry, scones
Servings
scones
Ingredients
Scones
Blueberry Compote
Instructions
Scones
  1. Line a large baking sheet with parchment paper.
  2. In a large bowl, whisk together the flour, sugar, baking powder and salt.
  3. Work the butter into the flour with your fingertips or with a pastry blender, until pea size pieces form.
  4. In a small bowl whisk together the heavy cream, sour cream and vanilla.
  5. Stir the cream mixture into flour mixture until a shaggy dough is formed.
  6. Turn the dough out onto a lightly floured surface. Pat the dough into an oval. Spoon dollops of blueberry compote onto the dough. Fold the dough over onto itself 3 times.
  7. Form the dough into a 1-inch thick round, about 6 1/2-inches in diameter. Cut the dough into 8 wedges.
  8. Place the scones 2 inches apart on the prepared baking sheet. Chill the scones in refrigerator for 20 minutes.
  9. Heat your oven to 375ºF. Brush the tops of scones with heavy cream. Sprinkle with coarse sugar.
  10. Bake until the edges look golden brown, about 18-22 minutes.
Blueberry Compote
  1. In a small saucepan over medium heat, cook the blueberries, sugar, cornstarch and lemon juice, stirring until the sugar is dissolved and the blueberries start to release their juices.
  2. Turn the heat down to low and simmer, stirring occasionally, until thick and jammy, about 3-4 minutes. Remove from heat and let cool completely. Cover and store in refrigerator until ready to use.
Recipe Notes

*To find coarse sugar, click here.

To find purple coarse sugar, click here.

Flourless Chocolate Cake with Raspberry Sauce

Flourless Chocolate Cake with Raspberry Sauce

This cake story has a happy ending. Once, many years ago, someone gave my grandparents’ neighbor a flourless chocolate cake. The neighbor had a slice and couldn’t finish it because it was too rich. She brought the cake over to my grandparents and they each had a slice and couldn’t finish them, because they were too rich. I had a slice and I couldn’t finish mine either and, well…you can guess why. So my grandparents, not wanting to be wasteful, put the cake in the freezer and forgot about it for a very long time. Whenever I opened the freezer and saw it, I wondered why none of us could eat more than a few bites of that rich cake. Although I don’t know for sure, it was probably because the ratio of chocolate to butter was off. But I do know that serving it with something acidic, like berries or raspberry sauce, would have helped immensely.

The happy ending to this story is that this flourless chocolate cake was created to be enjoyed to the last bite. It’s decadent, but not overly rich. It has a good balance, not too sweet or too bitter. The raspberry sauce and fresh raspberries compliment it perfectly. This luscious cake is also delicious with strawberries or any combination of berries you like. It’s also delicious served with salted caramel sauce. I wish my grandparents were still around to give my version of a flourless chocolate cake a try. I think they would have loved this cake and finished every last bite!

Print Recipe
Flourless Chocolate Cake with Raspberry Sauce
Keyword cake, chocolate
Servings
Ingredients
Raspberry Sauce
Keyword cake, chocolate
Servings
Ingredients
Raspberry Sauce
Instructions
Flourless Chocolate Cake
  1. Preheat oven to 325ºF. Line a 6-inch springform pan** with parchment paper. Spray the parchment paper with nonstick spray. Wrap the bottom two inches of the pan tightly with aluminum foil. Set pan in a baking pan.
  2. Combine chocolate and butter in a large stainless steel bowl set over a pot of barely simmering water. Stir until melted and smooth. Remove bowl from heat.
  3. In a large bowl, beat eggs with an electric mixer until doubled in size, about 5 minutes. Beat in vanilla extract and salt.
  4. With a large spatula, gently fold beaten eggs into chocolate mixture in three additions until no streaks of egg remain. Transfer batter to prepared pan. Smooth top of batter with a small offset spatula.
  5. Pour 1 1/2 inches of boiling water into baking pan. Bake until top is set and internal temperature*** reaches 140ºF, about 28-37 minutes.
  6. Remove cake pan from water bath. Cool to room temperature then cover and refrigerate for at least 4 hours (or up to overnight, but cake is best served the day it's made).
  7. Remove cake from pan when chilled and set. Top with powdered sugar and fresh raspberries.
  8. To serve, remove cake from refrigerator at least 30 minutes before serving and serve at room temperature for best texture. Serve with raspberry sauce.
Raspberry Sauce
  1. Purée raspberries in blender or food processor. Pass purée through a fine mesh sieve**** to remove seeds.
  2. In a small bowl, whisk together water and cornstarch.*****
  3. In a small saucepan, heat raspberry purée with sugar and cornstarch slurry to a boil over medium heat. Turn heat down to low and simmer until slightly thickened, about 2-3 minutes.
Recipe Notes

*Chalazae are the opaque chords of egg white. Removing them is optional, but they do show up as white spots in the cake after baking.

**To find the 6-inch springform pan I used, click here.

***To find an instant read thermometer, click here.

****To find a fine mesh sieve, click here.

*****To find a mini whisk for whisking small amounts, click here.

Caramel Apple Blossoms

Caramel Apple Blossoms by Brownie Mischief

Whether you call them apple blossoms, apple dumplings or apple fussbudgets, (which are named after your great grandfather’s second wife’s cousin), these are cute little apple pastries. I made them because I was craving apple pie, but I didn’t have enough apples to bake one. I didn’t invent them, and I don’t know who did, but I’ve had frozen ones and I’ve seen them on restaurant menus. I thought it would be fun to make them, and it was! I could’ve just put some pie dough in muffin cups and made quick little pies, but flower shaped things automatically get extra points for cuteness. And if you know me, you know I love my cute bakes!

Print Recipe
Caramel Apple Blossoms
Course Dessert
Keyword pastry
Servings
blossoms
Ingredients
Topping
Course Dessert
Keyword pastry
Servings
blossoms
Ingredients
Topping
Instructions
  1. In a large bowl, toss apples with lemon juice until combined.
  2. Add brown sugar, sugar, melted butter, flour, cinnamon and salt to apples. Stir until combined.
  3. In a medium bowl, mix together all topping ingredients. Set aside.
  4. Line a large baking sheet with parchment paper.
  5. On a lightly floured surface, roll pie dough to 1/8-inch thickness.
  6. Cut out 12 5-inch blossom shapes, re-rolling dough as necessary.*
  7. Lightly mark a 2-inch circle in the center of each blossom. Make cuts between the petals to separate them, just up to the edge of the center circle.
  8. Top each blossom with about 2 generous tablespoons of apples.
  9. Brush dough petals with egg wash. Form blossoms by lifting and overlapping each petal 1/2-inch in a spiral pattern similar to a rose. Tuck the last petal under. Press petals together to seal so filling won't leak out.
  10. Top each with a spoonful of topping. Place in refrigerator to chill for 30 minutes. Don't skip this step. This will help blossoms keep their shape.
  11. Preheat oven to 375ºF. Brush blossom dough all over with egg wash. Wipe any drips off of parchment paper. Bake until crust is golden brown and filling is starting to bubble, about 23-28 minutes.
  12. Drizzle blossoms with caramel sauce.
Recipe Notes

*When re-rolling pie dough, cover and let rest for several minutes to help avoid shrinkage.

Blueberry Nectarine Cobbler


Print Recipe


Blueberry Nectarine Cobbler

Servings


Ingredients

Servings


Ingredients


Instructions
  1. Preheat oven to 400ºF (200ºC). Grease a 2 quart baking dish.

  2. In a large bowl, toss the nectarines with the lemon juice. Add the vanilla, brown sugar, cornstarch and cinnamon and stir gently to combine. Fold in the blueberries.

  3. Transfer fruit mixture to the prepared baking dish. Bake for 10 minutes.

  4. In a medium bowl, whisk together the flour, baking powder and salt. Work the butter into the flour mixture with your fingertips or with a pastry blender until pea size pieces from.

  5. Stir in the sour cream and milk just until a shaggy dough forms.

  6. Remove the baking dish from the oven. Top the fruit with 2-tablespoon size portions of dough. Sprinkle the dough with coarse sugar.

  7. Return the baking dish to the oven and continue baking until the topping is deep golden brown, about 25 minutes. Let cool at least 15 minutes before serving, to allow the sauce to thicken.

Lemon Scones

Lemon Scones

Yellow is the color of happiness and sunshine. These adorable Lemon Scones will bring you a burst of lemony brightness even on the grayest day. The pretty, vibrant yellow sparkling sugar adds a pleasant crunch to the tops. It’s a nice contrast to the soft, tender interior of the scones. These little gems would shine on any breakfast or brunch table. I served them with blueberry jam and green tea, which was so delightful, I’m still smiling.

Print Recipe
Lemon Scones
Course Breakfast, Brunch
Keyword lemon, scones
Servings
scones
Ingredients
Lemon Scones
Icing
Course Breakfast, Brunch
Keyword lemon, scones
Servings
scones
Ingredients
Lemon Scones
Icing
Instructions
Lemon Scones
  1. Preheat the oven to 375ºF (190ºC). Line a baking sheet with parchment paper.
  2. In a large bowl, whisk together the flour, baking powder, salt and sugar.
  3. Work the butter and lemon zest into the flour mixture with your fingers or with a pastry blender until pea size chunks form.
  4. Stir in the heavy cream and lemon juice until a shaggy dough is formed. If your dough seems too dry, you can add 1-2 more teaspoons of heavy cream.
  5. Turn the dough out onto a lightly floured surface. Knead briefly, by folding dough over onto itself a few times. Do not overwork the dough.
  6. Pat or roll the dough into an 8-inch round, about 3/4-inch thick. Cut out rounds using a 2" or 2 1/4" inch round cutter.**
  7. Place scones about 2 inches apart on prepared baking sheet. Brush scones with heavy cream. Sprinkle generously with sparkling sugar.
  8. Bake until edges are golden brown, about 16-19 minutes.
  9. Cool completely on a wire rack. Decorate with icing.
Icing
  1. In a small bowl, whisk together the powdered sugar, heavy cream and enough lemon juice to form a stiff icing.
  2. Transfer icing to a piping bag or a plastic zip bag. Snip off the tip of the bag. Pipe lines in a spoke pattern onto the scones.
Recipe Notes

*To find the sparkling sugar I used, click here.

**To find the cutter I used, click here.

Pink Lemonade Cake

This cheerful little loaf cake feels like a spring or summer picnic with lemonade and sunshine. It’s similar to a pink lemonade cake that my elderly neighbor used to make when I was growing up. She made it for all the neighborhood kids and we always gobbled it up. When I was about eight years old she taught my friend and me how to make it. She used a yellow cake mix in a large baking pan and poked holes all over the cake, then drenched it in a pink, sugary lemon icing. I transformed that happy pink lemonade memory into a delightful loaf cake made from scratch.

To watch the TikTok video, click here.

Print Recipe
Pink Lemonade Cake
A tender, moist loaf cake that tastes just like pink lemonade
Course Brunch, Dessert
Keyword cake, pink lemonade
Servings
8 x 4-inch loaf
Ingredients
Pink Lemonade Cake
Lemon Syrup
Icing
Course Brunch, Dessert
Keyword cake, pink lemonade
Servings
8 x 4-inch loaf
Ingredients
Pink Lemonade Cake
Lemon Syrup
Icing
Instructions
Pink Lemonade Cake
  1. Preheat oven to 325ºF (163ºC). Line the bottom of an 8 X 4-inch loaf pan with parchment paper. Grease and flour the sides.
  2. In a medium bowl, whisk together the flour, baking powder, salt and baking soda.
  3. In a small bowl, whisk together the milk and sour cream.
  4. In a large bowl, beat the sugar, oil, eggs, lemon zest and strawberry extract until smooth.
  5. Stir in the flour mixture in two additions, alternating with the milk mixture. Stir just until combined. Stir in food color a little at time until your desired shade is achieved.
  6. Transfer the batter to the prepared baking pan. Bake until a toothpick inserted into center of the loaf comes out clean, about 45-50 minutes. Meanwhile, prepare lemon syrup.
  7. Let the cake cool in the pan for 10 minutes, then remove from pan and transfer to a cooling rack. Poke holes all over the top of cake with a skewer.
  8. Brush the warm cake generously with the lemon syrup. Let the cake cool completely, then top with icing.
Lemon Syrup
  1. In a small saucepan, combine the juice of one lemon with enough water to equal 1/4 cup. Add sugar and stir over medium-low heat until sugar is dissolved. Remove from heat.
Icing
  1. In a medium bowl, beat the butter, powdered sugar, 1 tablespoon lemon juice, the strawberry extract and a pinch of salt, until smooth. Add more lemon juice until your desired consistency is reached. Mix in gel food color.
Recipe Notes

*To find the gel food color I used, click here.

Strawberries and Cream Profiteroles

Strawberries & Cream Profiteroles

Imagine you’re in a beautiful room, reclining on a plush velvet chaise lounge. There’s a dainty table nearby. On the table is a cake pedestal with a little pyramid of small, perfectly plump, pink pastries. They’re filled with sweet, luscious strawberry cream. And they’re all yours. This Strawberries & Cream Profiteroles recipe can make that dream come true. Maybe not the velvet chaise lounge, but really any comfortable chair will do while you indulge in these delicious little gems. Profiteroles have a way of making you feel regal and majestic. I think princesses and princes snack on them. Most of us don’t have a personal pastry chef or the budget to order from a French bakery every day, but we can certainly follow a recipe and make one of the easiest pastry doughs there is. Choux pastry or pate à choux is used to make profiteroles, cream puffs, eclairs, churros and other pastries. Once you get the hang of it, the possibilities are endless.

This recipe features fresh strawberries, but frozen strawberries will work too. You can also substitute raspberries or peaches. To find the recipe for Peaches & Cream Profiteroles, click here. The strawberry purée can be made a day or two ahead and stored in the refrigerator. To make it easy on myself, I like to make the strawberry purée on day one, the pastry cream on day two, then make the profiteroles and strawberry icing and assemble on day three. It’s also helpful to practice the French culinary style of prep, mise en place, which means to have all of your ingredients and equipment in place before you begin. Everything will go much smoother and prevent you from feeling overwhelmed.

Print Recipe
Strawberries and Cream Profiteroles
Bite sized choux pastry puffs filled with fresh strawberries and cream filling and topped with fresh strawberry icing
Course Dessert
Cuisine French
Servings
profiteroles
Ingredients
Strawberry Pureé
Strawberries and Cream Filling
Profiteroles
Strawberry Icing
Course Dessert
Cuisine French
Servings
profiteroles
Ingredients
Strawberry Pureé
Strawberries and Cream Filling
Profiteroles
Strawberry Icing
Instructions
Strawberry Purée
  1. Purée strawberries in a blender or food processor. Strain puréed strawberries through a sieve.
  2. Transfer strawberry purée to a small saucepan. Stir in lemon juice.
  3. Bring to a boil over medium heat. Reduce heat and simmer until strawberry purée is reduced by half.
  4. Remove from heat. Stir in strawberry extract. Set aside to cool completey.
Strawberries and Cream Filling
  1. Bring milk to a boil in a small saucepan over medium heat.
  2. Meanwhile, whisk sugar, cornstarch and salt together in a medium bowl. Add the egg and whisk until smooth.
  3. When milk starts to boil, remove from heat and pour 1/3 of the hot milk into the egg mixture and whisk to combine.
  4. Pour the egg mixture back into the remaining hot milk and cook over medium heat, whisking continuously, until the mixture comes to a boil and thickens.
  5. Remove from heat. Stir in butter and vanilla extract.
  6. Pour mixture through a sieve placed over a bowl. Cover the surface with plastic wrap and let cool completely.
  7. Set aside 2 tablespoons of strawberry purée. Add remaining strawberry purée to cooled pastry cream and stir to combine. Cover strawberry pastry cream and chill in refrigerator.
  8. In a medium bowl, whip heavy cream to stiff peaks with an electric mixer at high speed. Fold whipped cream into cooled strawberry pastry cream. Set aside in refrigerator.
Profiteroles
  1. Preheat oven to 400ºF. Line 2 large baking sheets with parchment paper,
  2. Combine water, butter and salt in a medium saucepan. Bring to a boil over medium heat.
  3. Reduce heat. Add flour and stir vigorously with a wooden spoon until mixture pulls away from sides of pan and forms a ball.
  4. Transfer mixture to the bowl of a stand mixer. Mix on low speed until steam dissipates and mixture cools to lukewarm.
  5. Add eggs one at a time and beat on medium speed until smooth, stopping to scrape down bowl.
  6. Transfer mixture to a piping bag fitted with a large round tip. (I used *Ateco tip 808)
  7. Pipe 1 1/4-inch mounds, about 2 inches apart, on prepared baking sheets. Smooth tops with a wet finger.
  8. Bake 15 minutes, then turn down the oven heat to 350ºF and continue baking until golden brown, about 8-10 more minutes. Using a toothpick or skewer, prick a small hole in each profiterole to allow steam to escape. Place on a wire rack to cool completely.
  9. Use the tip of a paring knife to make a pilot hole in the bottom of each profiterole.
  10. Place strawberries and cream filling into a piping bag fitted with a medium round piping tip. (I used **Wilton tip 12)
  11. Place tip into the pilot holes and fill each profiterole with filling.
Strawberry Icing
  1. In a medium bowl, whisk all icing ingredients together until smooth. Spoon over filled profiteroles. Refrigerate profiteroles until ready to serve.
Recipe Notes

*To find Ateco tip 808 click here.

**To find Wilton tip 12 click here.