Flourless Chocolate Cake with Raspberry Sauce

Flourless Chocolate Cake with Raspberry Sauce

This cake story has a happy ending. Once, many years ago, someone gave my grandparents’ neighbor a flourless chocolate cake. The neighbor had a slice and couldn’t finish it because it was too rich. She brought the cake over to my grandparents and they each had a slice and couldn’t finish them, because they were too rich. I had a slice and I couldn’t finish mine either and, well…you can guess why. So my grandparents, not wanting to be wasteful, put the cake in the freezer and forgot about it for a very long time. Whenever I opened the freezer and saw it, I wondered why none of us could eat more than a few bites of that rich cake. Although I don’t know for sure, it was probably because the ratio of chocolate to butter was off. But I do know that serving it with something acidic, like berries or raspberry sauce, would have helped immensely.

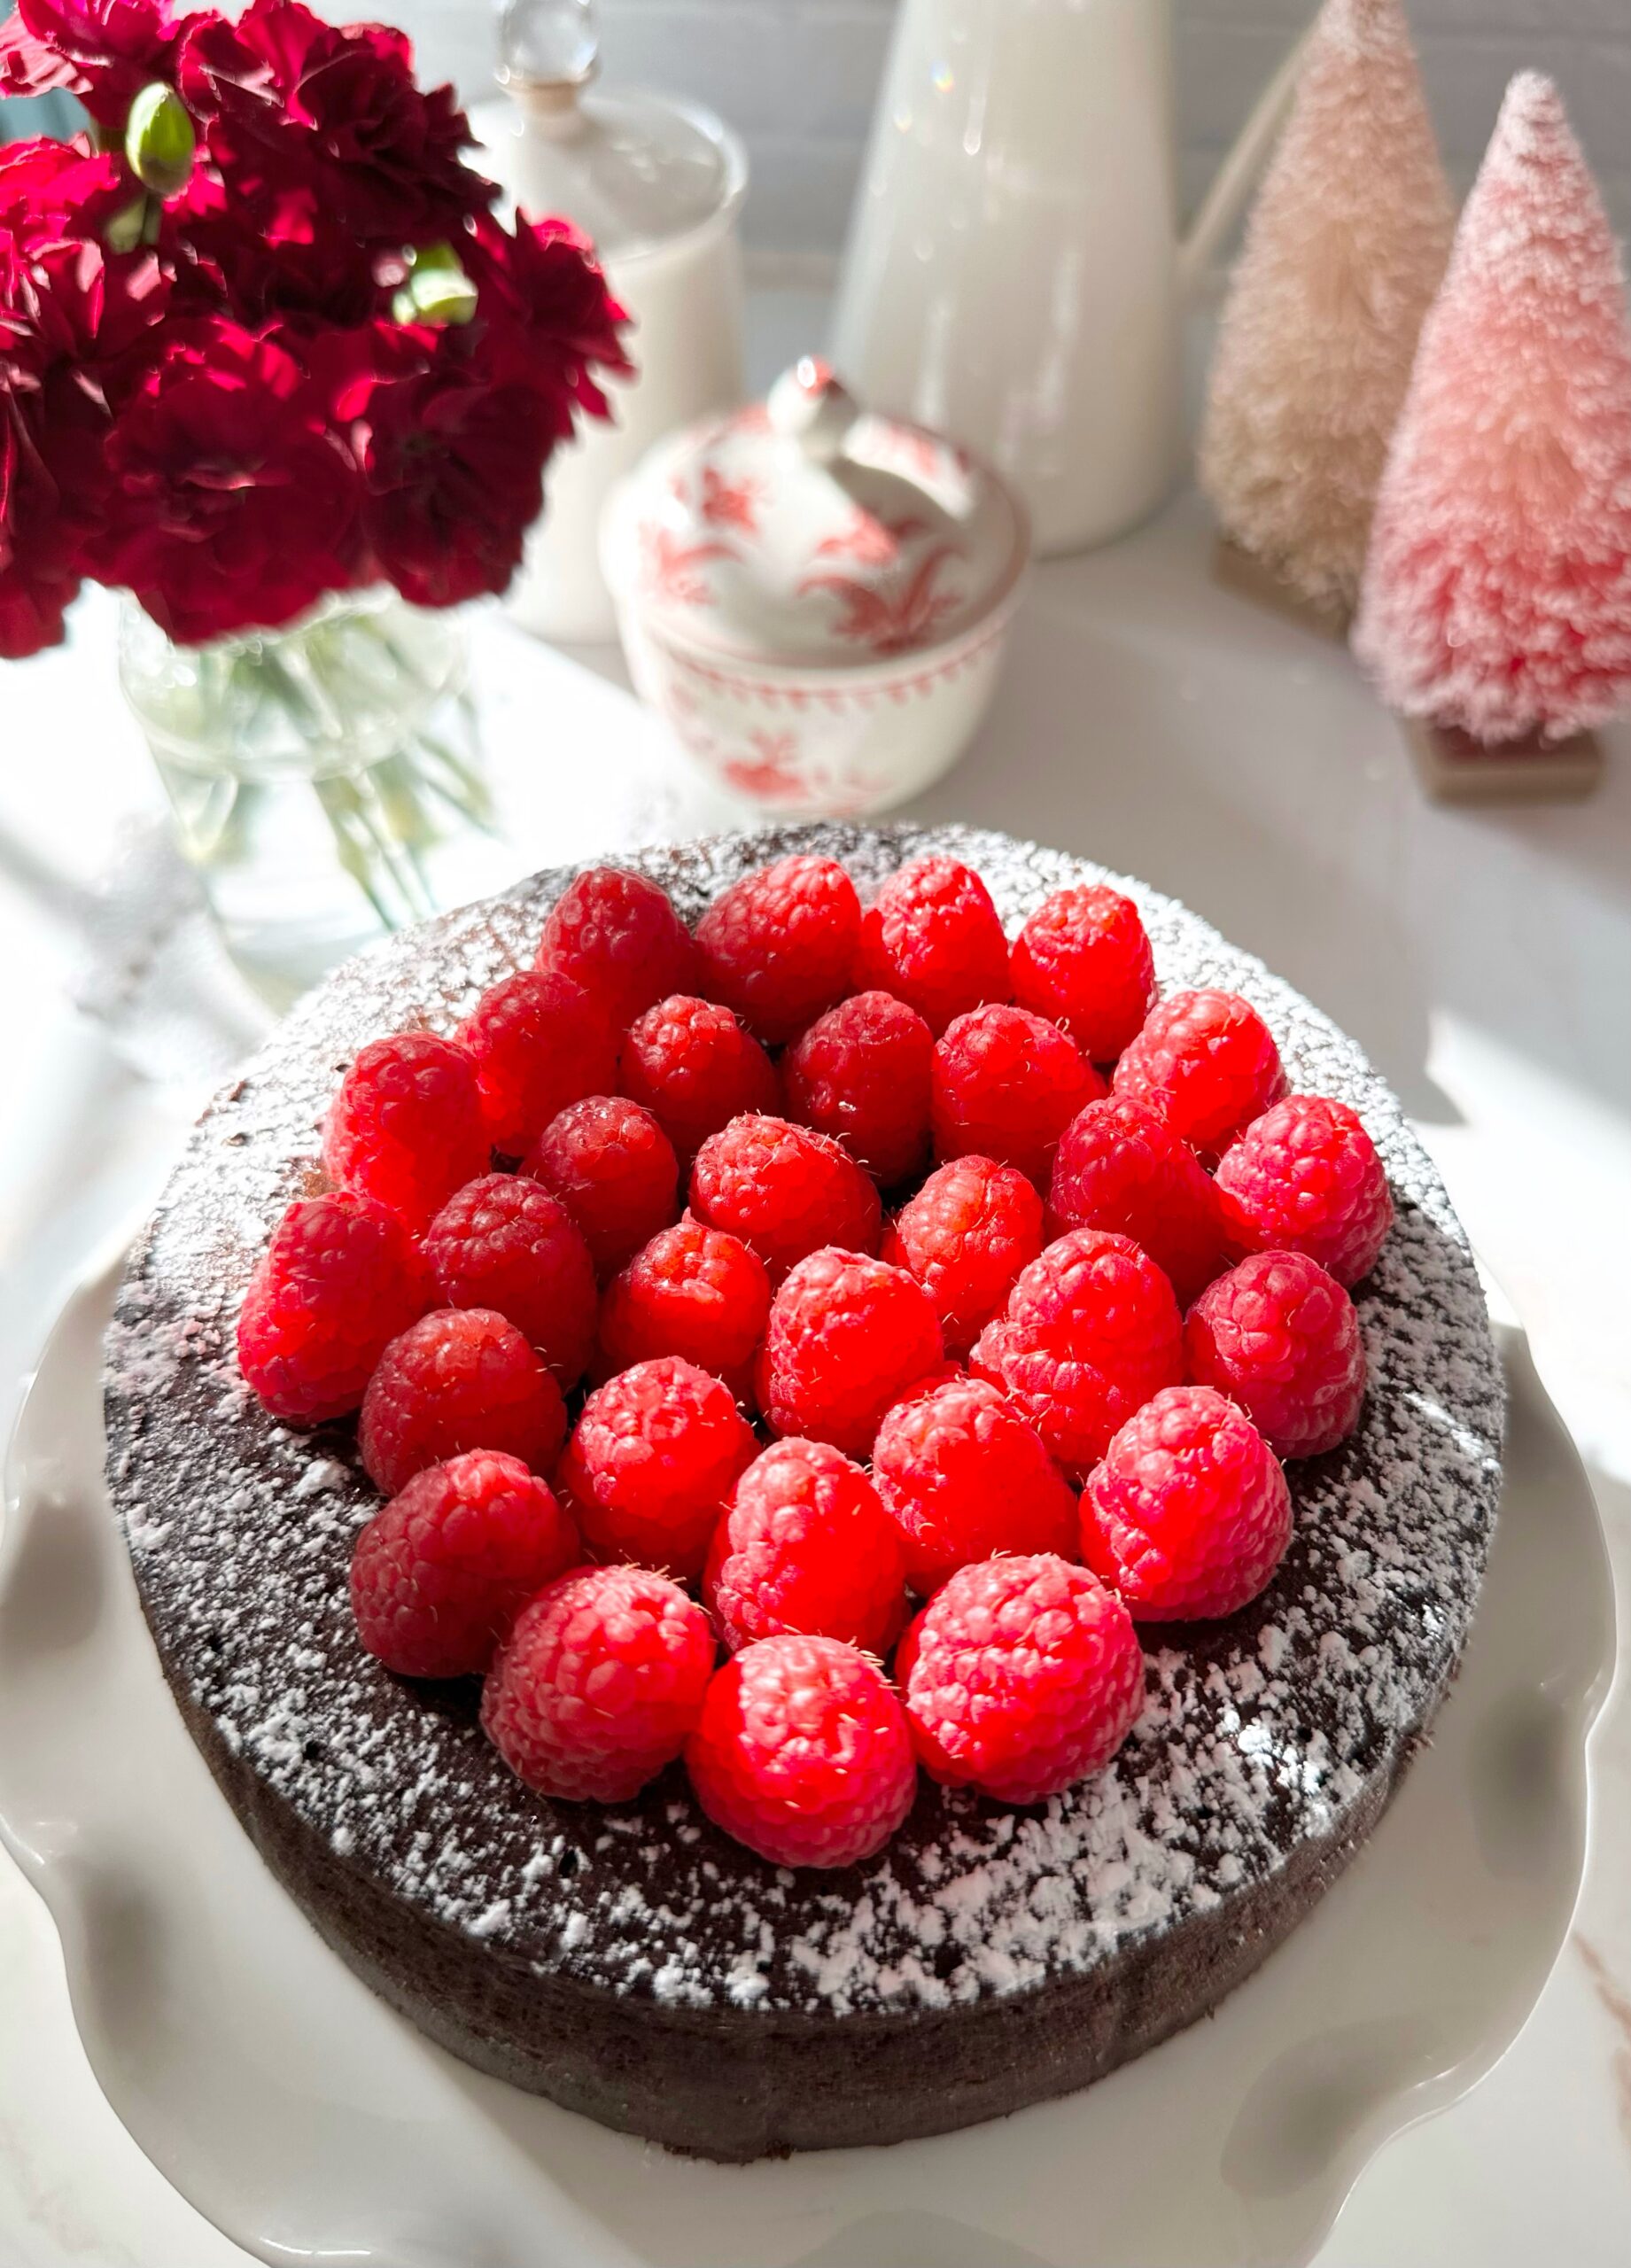
The happy ending to this story is that this flourless chocolate cake was created to be enjoyed to the last bite. It’s decadent, but not overly rich. It has a good balance, not too sweet or too bitter. The raspberry sauce and fresh raspberries compliment it perfectly. This luscious cake is also delicious with strawberries or any combination of berries you like. It’s also delicious served with salted caramel sauce. I wish my grandparents were still around to give my version of a flourless chocolate cake a try. I think they would have loved this cake and finished every last bite!

Print Recipe
Flourless Chocolate Cake with Raspberry Sauce
Keyword cake, chocolate
Servings
Ingredients
Raspberry Sauce
Keyword cake, chocolate
Servings
Ingredients
Raspberry Sauce
Instructions
Flourless Chocolate Cake
  1. Preheat oven to 325ºF. Line a 6-inch springform pan** with parchment paper. Spray the parchment paper with nonstick spray. Wrap the bottom two inches of the pan tightly with aluminum foil. Set pan in a baking pan.
  2. Combine chocolate and butter in a large stainless steel bowl set over a pot of barely simmering water. Stir until melted and smooth. Remove bowl from heat.
  3. In a large bowl, beat eggs with an electric mixer until doubled in size, about 5 minutes. Beat in vanilla extract and salt.
  4. With a large spatula, gently fold beaten eggs into chocolate mixture in three additions until no streaks of egg remain. Transfer batter to prepared pan. Smooth top of batter with a small offset spatula.
  5. Pour 1 1/2 inches of boiling water into baking pan. Bake until top is set and internal temperature*** reaches 140ºF, about 28-37 minutes.
  6. Remove cake pan from water bath. Cool to room temperature then cover and refrigerate for at least 4 hours (or up to overnight, but cake is best served the day it's made).
  7. Remove cake from pan when chilled and set. Top with powdered sugar and fresh raspberries.
  8. To serve, remove cake from refrigerator at least 30 minutes before serving and serve at room temperature for best texture. Serve with raspberry sauce.
Raspberry Sauce
  1. Purée raspberries in blender or food processor. Pass purée through a fine mesh sieve**** to remove seeds.
  2. In a small bowl, whisk together water and cornstarch.*****
  3. In a small saucepan, heat raspberry purée with sugar and cornstarch slurry to a boil over medium heat. Turn heat down to low and simmer until slightly thickened, about 2-3 minutes.
Recipe Notes

*Chalazae are the opaque chords of egg white. Removing them is optional, but they do show up as white spots in the cake after baking.

**To find the 6-inch springform pan I used, click here.

***To find an instant read thermometer, click here.

****To find a fine mesh sieve, click here.

*****To find a mini whisk for whisking small amounts, click here.

Caramel Apple Blossoms

Caramel Apple Blossoms by Brownie Mischief

Whether you call them apple blossoms, apple dumplings or apple fussbudgets, (which are named after your great grandfather’s second wife’s cousin), these are cute little apple pastries. I made them because I was craving apple pie, but I didn’t have enough apples to bake one. I didn’t invent them, and I don’t know who did, but I’ve had frozen ones and I’ve seen them on restaurant menus. I thought it would be fun to make them, and it was! I could’ve just put some pie dough in muffin cups and made quick little pies, but flower shaped things automatically get extra points for cuteness. And if you know me, you know I love my cute bakes!

Print Recipe
Caramel Apple Blossoms
Course Dessert
Keyword pastry
Servings
blossoms
Ingredients
Topping
Course Dessert
Keyword pastry
Servings
blossoms
Ingredients
Topping
Instructions
  1. In a large bowl, toss apples with lemon juice until combined.
  2. Add brown sugar, sugar, melted butter, flour, cinnamon and salt to apples. Stir until combined.
  3. In a medium bowl, mix together all topping ingredients. Set aside.
  4. Line a large baking sheet with parchment paper.
  5. On a lightly floured surface, roll pie dough to 1/8-inch thickness.
  6. Cut out 12 5-inch blossom shapes, re-rolling dough as necessary.*
  7. Lightly mark a 2-inch circle in the center of each blossom. Make cuts between the petals to separate them, just up to the edge of the center circle.
  8. Top each blossom with about 2 generous tablespoons of apples.
  9. Brush dough petals with egg wash. Form blossoms by lifting and overlapping each petal 1/2-inch in a spiral pattern similar to a rose. Tuck the last petal under. Press petals together to seal so filling won't leak out.
  10. Top each with a spoonful of topping. Place in refrigerator to chill for 30 minutes. Don't skip this step. This will help blossoms keep their shape.
  11. Preheat oven to 375ºF. Brush blossom dough all over with egg wash. Wipe any drips off of parchment paper. Bake until crust is golden brown and filling is starting to bubble, about 23-28 minutes.
  12. Drizzle blossoms with caramel sauce.
Recipe Notes

*When re-rolling pie dough, cover and let rest for several minutes to help avoid shrinkage.

Blueberry Nectarine Cobbler

Many families have an old favorite recipe for cobbler. I’m sharing my dad’s recipe with you and it’s definitely comfort food. It took awhile to get the ingredient amounts right because he never measured them. He used whichever fruit was available and plopped the dough on top haphazardly with a big spoon. But it was always delicious and came from the heart and that’s what mattered.

This recipe is so easy and versatile. Feel free to use peaches instead or use the berries of your choice. Make sure to enjoy it warm with a scoop of vanilla ice cream.

Print Recipe
Blueberry Nectarine Cobbler
Vintage fruit cobbler
Servings
Ingredients
Servings
Ingredients
Instructions
  1. Preheat the oven to 400ºF (200ºC). Grease a 2 quart baking dish.
  2. In a large bowl, toss the nectarines with the lemon juice. Add the vanilla, brown sugar, cornstarch and cinnamon. Stir gently to combine. Fold in the blueberries.
  3. Transfer the fruit mixture to the prepared baking dish. Bake for 10 minutes.
  4. Meanwhile, in a medium bowl, whisk together the flour, granulated sugar, baking powder and salt. Work the butter into the flour mixture with your fingertips or with a pastry blender until pea size pieces from. Stir in the sour cream and milk just until a shaggy dough forms.
  5. Remove the baking dish from the oven. Top the fruit with 2-tablespoon size portions of dough. Sprinkle the dough with coarse sugar.
  6. Return the baking dish to the oven and continue baking until the topping is deep golden brown, about 25 minutes. Let cool at least 15 minutes before serving, to allow the sauce to thicken.

Lemon Scones

Lemon Scones

Yellow is the color of happiness and sunshine. These adorable Lemon Scones will bring you a burst of lemony brightness even on the grayest day. The pretty, vibrant yellow sparkling sugar adds a pleasant crunch to the tops. It’s a nice contrast to the soft, tender interior of the scones. These little gems would shine on any breakfast or brunch table. I served them with blueberry jam and green tea, which was so delightful, I’m still smiling.

Print Recipe
Lemon Scones
Course Breakfast, Brunch
Keyword lemon, scones
Servings
scones
Ingredients
Lemon Scones
Icing
Course Breakfast, Brunch
Keyword lemon, scones
Servings
scones
Ingredients
Lemon Scones
Icing
Instructions
Lemon Scones
  1. Preheat the oven to 375ºF (190ºC). Line a baking sheet with parchment paper.
  2. In a large bowl, whisk together the flour, baking powder, salt and sugar.
  3. Work the butter and lemon zest into the flour mixture with your fingers or with a pastry blender until pea size chunks form.
  4. Stir in the heavy cream and lemon juice until a shaggy dough is formed. If your dough seems too dry, you can add 1-2 more teaspoons of heavy cream.
  5. Turn the dough out onto a lightly floured surface. Knead briefly, by folding dough over onto itself a few times. Do not overwork the dough.
  6. Pat or roll the dough into an 8-inch round, about 3/4-inch thick. Cut out rounds using a 2" or 2 1/4" inch round cutter.**
  7. Place scones about 2 inches apart on prepared baking sheet. Brush scones with heavy cream. Sprinkle generously with sparkling sugar.
  8. Bake until edges are golden brown, about 16-19 minutes.
  9. Cool completely on a wire rack. Decorate with icing.
Icing
  1. In a small bowl, whisk together the powdered sugar, heavy cream and enough lemon juice to form a stiff icing.
  2. Transfer icing to a piping bag or a plastic zip bag. Snip off the tip of the bag. Pipe lines in a spoke pattern onto the scones.
Recipe Notes

*To find the sparkling sugar I used, click here.

**To find the cutter I used, click here.

Pink Lemonade Cake

This cheerful little loaf cake feels like a spring or summer picnic with lemonade and sunshine. It’s similar to a pink lemonade cake that my elderly neighbor used to make when I was growing up. She made it for all the neighborhood kids and we always gobbled it up. When I was about ten years old she taught my friend and me how to make it. She used a yellow cake mix in a large baking pan and poked holes all over the cake, then drenched it in a pink, sugary lemon icing. I transformed that happy pink lemonade memory into a delightful loaf cake made from scratch.

To watch the TikTok video, click here.

Print Recipe
Pink Lemonade Cake
A tender, moist loaf cake that tastes just like pink lemonade
Course Brunch, Dessert
Keyword cake, pink lemonade
Servings
8 x 4-inch loaf
Ingredients
Pink Lemonade Cake
Lemon Syrup
Icing
Course Brunch, Dessert
Keyword cake, pink lemonade
Servings
8 x 4-inch loaf
Ingredients
Pink Lemonade Cake
Lemon Syrup
Icing
Instructions
Pink Lemonade Cake
  1. Preheat oven to 325ºF (163ºC). Line the bottom of an 8 X 4-inch loaf pan with parchment paper. Grease and flour the sides.
  2. In a medium bowl, whisk together the flour, baking powder, salt and baking soda.
  3. In a small bowl, whisk together the milk and sour cream.
  4. In a large bowl, beat the sugar, oil, eggs, lemon zest and strawberry extract until smooth.
  5. Stir in the flour mixture in two additions, alternating with the milk mixture. Stir just until combined. Stir in food color a little at time until your desired shade is achieved.
  6. Transfer the batter to the prepared baking pan. Bake until a toothpick inserted into center of the loaf comes out clean, about 45-50 minutes. Meanwhile, prepare lemon syrup.
  7. Let the cake cool in the pan for 10 minutes, then remove from pan and transfer to a cooling rack. Poke holes all over the top of cake with a skewer.
  8. Brush the warm cake generously with the lemon syrup. Let the cake cool completely, then top with icing.
Lemon Syrup
  1. In a small saucepan, combine the juice of one lemon with enough water to equal 1/4 cup. Add sugar and stir over medium-low heat until sugar is dissolved. Remove from heat.
Icing
  1. In a medium bowl, beat the butter, powdered sugar, 1 tablespoon lemon juice, the strawberry extract and a pinch of salt, until smooth. Add more lemon juice until your desired consistency is reached. Mix in gel food color.
Recipe Notes

*To find the gel food color I used, click here.

Strawberries and Cream Profiteroles

Strawberries & Cream Profiteroles

Imagine you’re in a beautiful room, reclining on a plush velvet chaise lounge. There’s a dainty table nearby. On the table is a cake pedestal with a little pyramid of small, perfectly plump, pink pastries. They’re filled with sweet, luscious strawberry cream. And they’re all yours. This Strawberries & Cream Profiteroles recipe can make that dream come true. Maybe not the velvet chaise lounge, but really any comfortable chair will do while you indulge in these delicious little gems. Profiteroles have a way of making you feel regal and majestic. I think princesses and princes snack on them. Most of us don’t have a personal pastry chef or the budget to order from a French bakery every day, but we can certainly follow a recipe and make one of the easiest pastry doughs there is. Choux pastry or pate à choux is used to make profiteroles, cream puffs, eclairs, churros and other pastries. Once you get the hang of it, the possibilities are endless.

This recipe features fresh strawberries, but frozen strawberries will work too. You can also substitute raspberries or peaches. To find the recipe for Peaches & Cream Profiteroles, click here. The strawberry purée can be made a day or two ahead and stored in the refrigerator. To make it easy on myself, I like to make the strawberry purée on day one, the pastry cream on day two, then make the profiteroles and strawberry icing and assemble on day three. It’s also helpful to practice the French culinary style of prep, mise en place, which means to have all of your ingredients and equipment in place before you begin. Everything will go much smoother and prevent you from feeling overwhelmed.

Print Recipe
Strawberries and Cream Profiteroles
Bite sized choux pastry puffs filled with fresh strawberries and cream filling and topped with fresh strawberry icing
Course Dessert
Cuisine French
Servings
profiteroles
Ingredients
Strawberry Pureé
Strawberries and Cream Filling
Profiteroles
Strawberry Icing
Course Dessert
Cuisine French
Servings
profiteroles
Ingredients
Strawberry Pureé
Strawberries and Cream Filling
Profiteroles
Strawberry Icing
Instructions
Strawberry Purée
  1. Purée strawberries in a blender or food processor. Strain puréed strawberries through a sieve.
  2. Transfer strawberry purée to a small saucepan. Stir in lemon juice.
  3. Bring to a boil over medium heat. Reduce heat and simmer until strawberry purée is reduced by half.
  4. Remove from heat. Stir in strawberry extract. Set aside to cool completey.
Strawberries and Cream Filling
  1. Bring milk to a boil in a small saucepan over medium heat.
  2. Meanwhile, whisk sugar, cornstarch and salt together in a medium bowl. Add the egg and whisk until smooth.
  3. When milk starts to boil, remove from heat and pour 1/3 of the hot milk into the egg mixture and whisk to combine.
  4. Pour the egg mixture back into the remaining hot milk and cook over medium heat, whisking continuously, until the mixture comes to a boil and thickens.
  5. Remove from heat. Stir in butter and vanilla extract.
  6. Pour mixture through a sieve placed over a bowl. Cover the surface with plastic wrap and let cool completely.
  7. Set aside 2 tablespoons of strawberry purée. Add remaining strawberry purée to cooled pastry cream and stir to combine. Cover strawberry pastry cream and chill in refrigerator.
  8. In a medium bowl, whip heavy cream to stiff peaks with an electric mixer at high speed. Fold whipped cream into cooled strawberry pastry cream. Set aside in refrigerator.
Profiteroles
  1. Preheat oven to 400ºF. Line 2 large baking sheets with parchment paper,
  2. Combine water, butter and salt in a medium saucepan. Bring to a boil over medium heat.
  3. Reduce heat. Add flour and stir vigorously with a wooden spoon until mixture pulls away from sides of pan and forms a ball.
  4. Transfer mixture to the bowl of a stand mixer. Mix on low speed until steam dissipates and mixture cools to lukewarm.
  5. Add eggs one at a time and beat on medium speed until smooth, stopping to scrape down bowl.
  6. Transfer mixture to a piping bag fitted with a large round tip. (I used *Ateco tip 808)
  7. Pipe 1 1/4-inch mounds, about 2 inches apart, on prepared baking sheets. Smooth tops with a wet finger.
  8. Bake 15 minutes, then turn down the oven heat to 350ºF and continue baking until golden brown, about 8-10 more minutes. Using a toothpick or skewer, prick a small hole in each profiterole to allow steam to escape. Place on a wire rack to cool completely.
  9. Use the tip of a paring knife to make a pilot hole in the bottom of each profiterole.
  10. Place strawberries and cream filling into a piping bag fitted with a medium round piping tip. (I used **Wilton tip 12)
  11. Place tip into the pilot holes and fill each profiterole with filling.
Strawberry Icing
  1. In a medium bowl, whisk all icing ingredients together until smooth. Spoon over filled profiteroles. Refrigerate profiteroles until ready to serve.
Recipe Notes

*To find Ateco tip 808 click here.

**To find Wilton tip 12 click here.

Blueberry Earl Grey Tarts

Blueberry Earl Grey Tarts

These Blueberry Earl Grey Tarts have three individual components, which, when combined together, are absolutely delicious. I experimented with each separate component of this recipe until I perfected them individually. The tart crust is flaky and tender, yet sturdy enough to hold the filling. The filling is just sweet enough for my sweet tooth and the whipped cream has just enough Earl Grey flavor.

This recipe makes enough whipped cream to cover the entire tops of the tarts or you can be like me and try to be artistic and avant-garde with your whipped cream. To make the Earl Grey infused whipped cream, use your favorite Earl Grey tea, whether it’s loose leaf tea or a teabag. We don’t discriminate here. All forms of tea are welcome! I do have a favorite Earl Grey tea. If you want to check it out, click here. The tea will make your whipped cream a dull pale yellow. This issue is purely aesthetic. I added a tiny bit of violet gel food color which brightens the whipped cream. You can add more if you want a lavender shade.

Print Recipe
Blueberry Earl Grey Tarts
Course Dessert
Keyword blueberries, tarts
Servings
4-inch tarts
Ingredients
Tart Crust
Blueberry Filling
Earl Grey Whipped Cream
Course Dessert
Keyword blueberries, tarts
Servings
4-inch tarts
Ingredients
Tart Crust
Blueberry Filling
Earl Grey Whipped Cream
Instructions
Tart Crust
  1. In a large bowl, whisk together flour, powdered sugar and salt.
  2. Work in butter and egg yolk, with a pastry blender or with your fingers, until pea sized pieces are formed.
  3. Add ice water one tablespoon at a time until dough comes together.
  4. Form dough into a disk. Wrap in plastic wrap and chill in refrigerate for at least one hour or up to overnight.
  5. On a lightly floured surface, roll dough to scant 1/4-inch thickness.
  6. Cut dough into six 5-inch rounds. Press rounds into six 4-inch or 4 1/4-inch tart pans
  7. Dock the bottoms of tart crusts with a fork. Freeze for 30 minutes.
  8. Heat oven to 375ºF. Place tart pans on a large baking sheet.
  9. Line tart shells with 6-inch parchment rounds. Fill with pie weights. (You can use dried beans or rice if you don't have pie weights)
  10. Bake tart shells for 12 minutes. Remove parchment paper and pie weights. Continue baking until tart shells are light golden brown, about 4-6 more minutes.
Blueberry Filling
  1. Set aside 1 cup blueberries. Combine the remaining 3 cups blueberries, sugar, corn starch and lemon juice in a medium saucepan.
  2. Simmer over low heat, stirring occasionally, until blueberries are softened and sauce is thickened, about 5 minutes.
  3. Stir in the reserved 1 cup of blueberries during the last minute of cooking.
  4. Remove from heat and let cool completely.
Earl Grey Whipped Cream
  1. Combine heavy cream and tea leaves or tea bag in a small saucepan.
  2. Heat just until bubbles form around the edges.
  3. Transfer to a small bowl, cover with plastic wrap and let cool.
  4. Pass through a sieve to strain out tea leaves or remove tea bag.
  5. Cover surface with plastic wrap and place in refrigerator to chill.
  6. Transfer chilled cream to a large bowl. Whip with an electric mixer until thickened.
  7. Add powdered sugar and food color in separate additions and continue whipping at high speed just until stiff peaks form.

Mini Orange Olive Oil Cakes

mini orange olive oil cakes

Ever since a certain celebrity cut a hole from the middle of her favorite olive oil cake back in 2020, the internet has been obsessed with olive oil cakes. I must confess that I was a fan of olive oil cakes long before that. I first tasted one at a restaurant years ago and fell in love. The flavor and texture was so delightful, that all it needed was a dusting of powdered sugar on top. Now that the dust has settled, I’m sharing my favorite orange olive oil cake recipe. Not because it’s trendy, but because it’s a really delicious recipe that tastes like spring.

I made cute little orange scented, personal cakes that are really just elegant cupcakes. The recipe is easily adapted to your tastes. You can switch up the orange flavor and substitute with lemon or any citrus of your choice. Even if you don’t like olive oil, you’ll still like these little cakes. I used light olive oil, rather than extra virgin olive oil, for a more subtle olive oil flavor. It’s also able to withstand higher temperatures. Feel free to use your favorite olive oil or replace it with the oil you prefer. Grape seed, avocado, canola and vegetable oil are some examples of oils you can use as a replacement.

This recipe contains almond flour. It helps with texture and flavor, so it’s a necessary ingredient. Almond flour can be pricey, but it’s good to have on hand. Adding it to your baked goods will make them more moist and tender. To find almond flour click here,

Print Recipe
Mini Orange Olive Oil Cakes
Course Dessert
Keyword cake, olive oil, orange
Servings
mini cakes
Ingredients
Mini Orange Olive Oil Cakes
Orange Simple Syrup
Course Dessert
Keyword cake, olive oil, orange
Servings
mini cakes
Ingredients
Mini Orange Olive Oil Cakes
Orange Simple Syrup
Instructions
Mini Orange Olive Oil Cakes
  1. Heat the oven to 350ºF (180ºC). Grease and flour a 12 serving muffin pan.
  2. In a medium bowl, whisk together the cake flour, almond flour, baking powder, baking soda and salt. Set aside.
  3. In a large bowl, beat the sugar, eggs, orange zest and vanilla extract together until smooth.
  4. Gradually mix in the olive oil and beat until well combined.
  5. Stir in the dry ingredients in two additions, alternating with the milk and orange juice. Stir just until combined. Do not over mix.
  6. Fill the prepared muffin pan cups 2/3 full with batter. Do not overfill or cakes will be more difficult to remove.
  7. Bake for 10-12 minutes or until the tops look light golden, but still moist and a toothpick inserted comes out clean. They bake very quickly, so check them a few minutes early to avoid over baking.
  8. Cool the cakes in pan for 5 minutes. Remove them from pan and transfer to a cooling rack.
  9. Brush the warm cakes with orange simple syrup and allow to cool completely.
  10. When the cakes have cooled, dust with powdered sugar.
Orange Simple Syrup
  1. In a small saucepan, stir together the sugar, orange juice, lemon juice, and orange zest.
  2. Cook over low heat, stirring occasionally, just until the sugar is dissolved.
  3. Remove from heat and set aside to cool.

Raspberry Sauce


Print Recipe


Raspberry Sauce

Course Dessert
Keyword raspberry, sauce

Servings
cup


Ingredients

Course Dessert
Keyword raspberry, sauce

Servings
cup


Ingredients


Instructions
  1. Purée raspberries with lemon juice in a blender or food processor. Pass purée through a fine mesh sieve* to remove seeds.

  2. In a small bowl, whisk together water and cornstarch.**

  3. In a small saucepan, heat raspberry purée with sugar and cornstarch slurry to a boil over medium heat. Turn heat down to low and simmer until slightly thickened, about 2-3 minutes.


Recipe Notes

*To find a fine mesh sieve, click here.

**To find a mini whisk for whisking small amounts, click here.