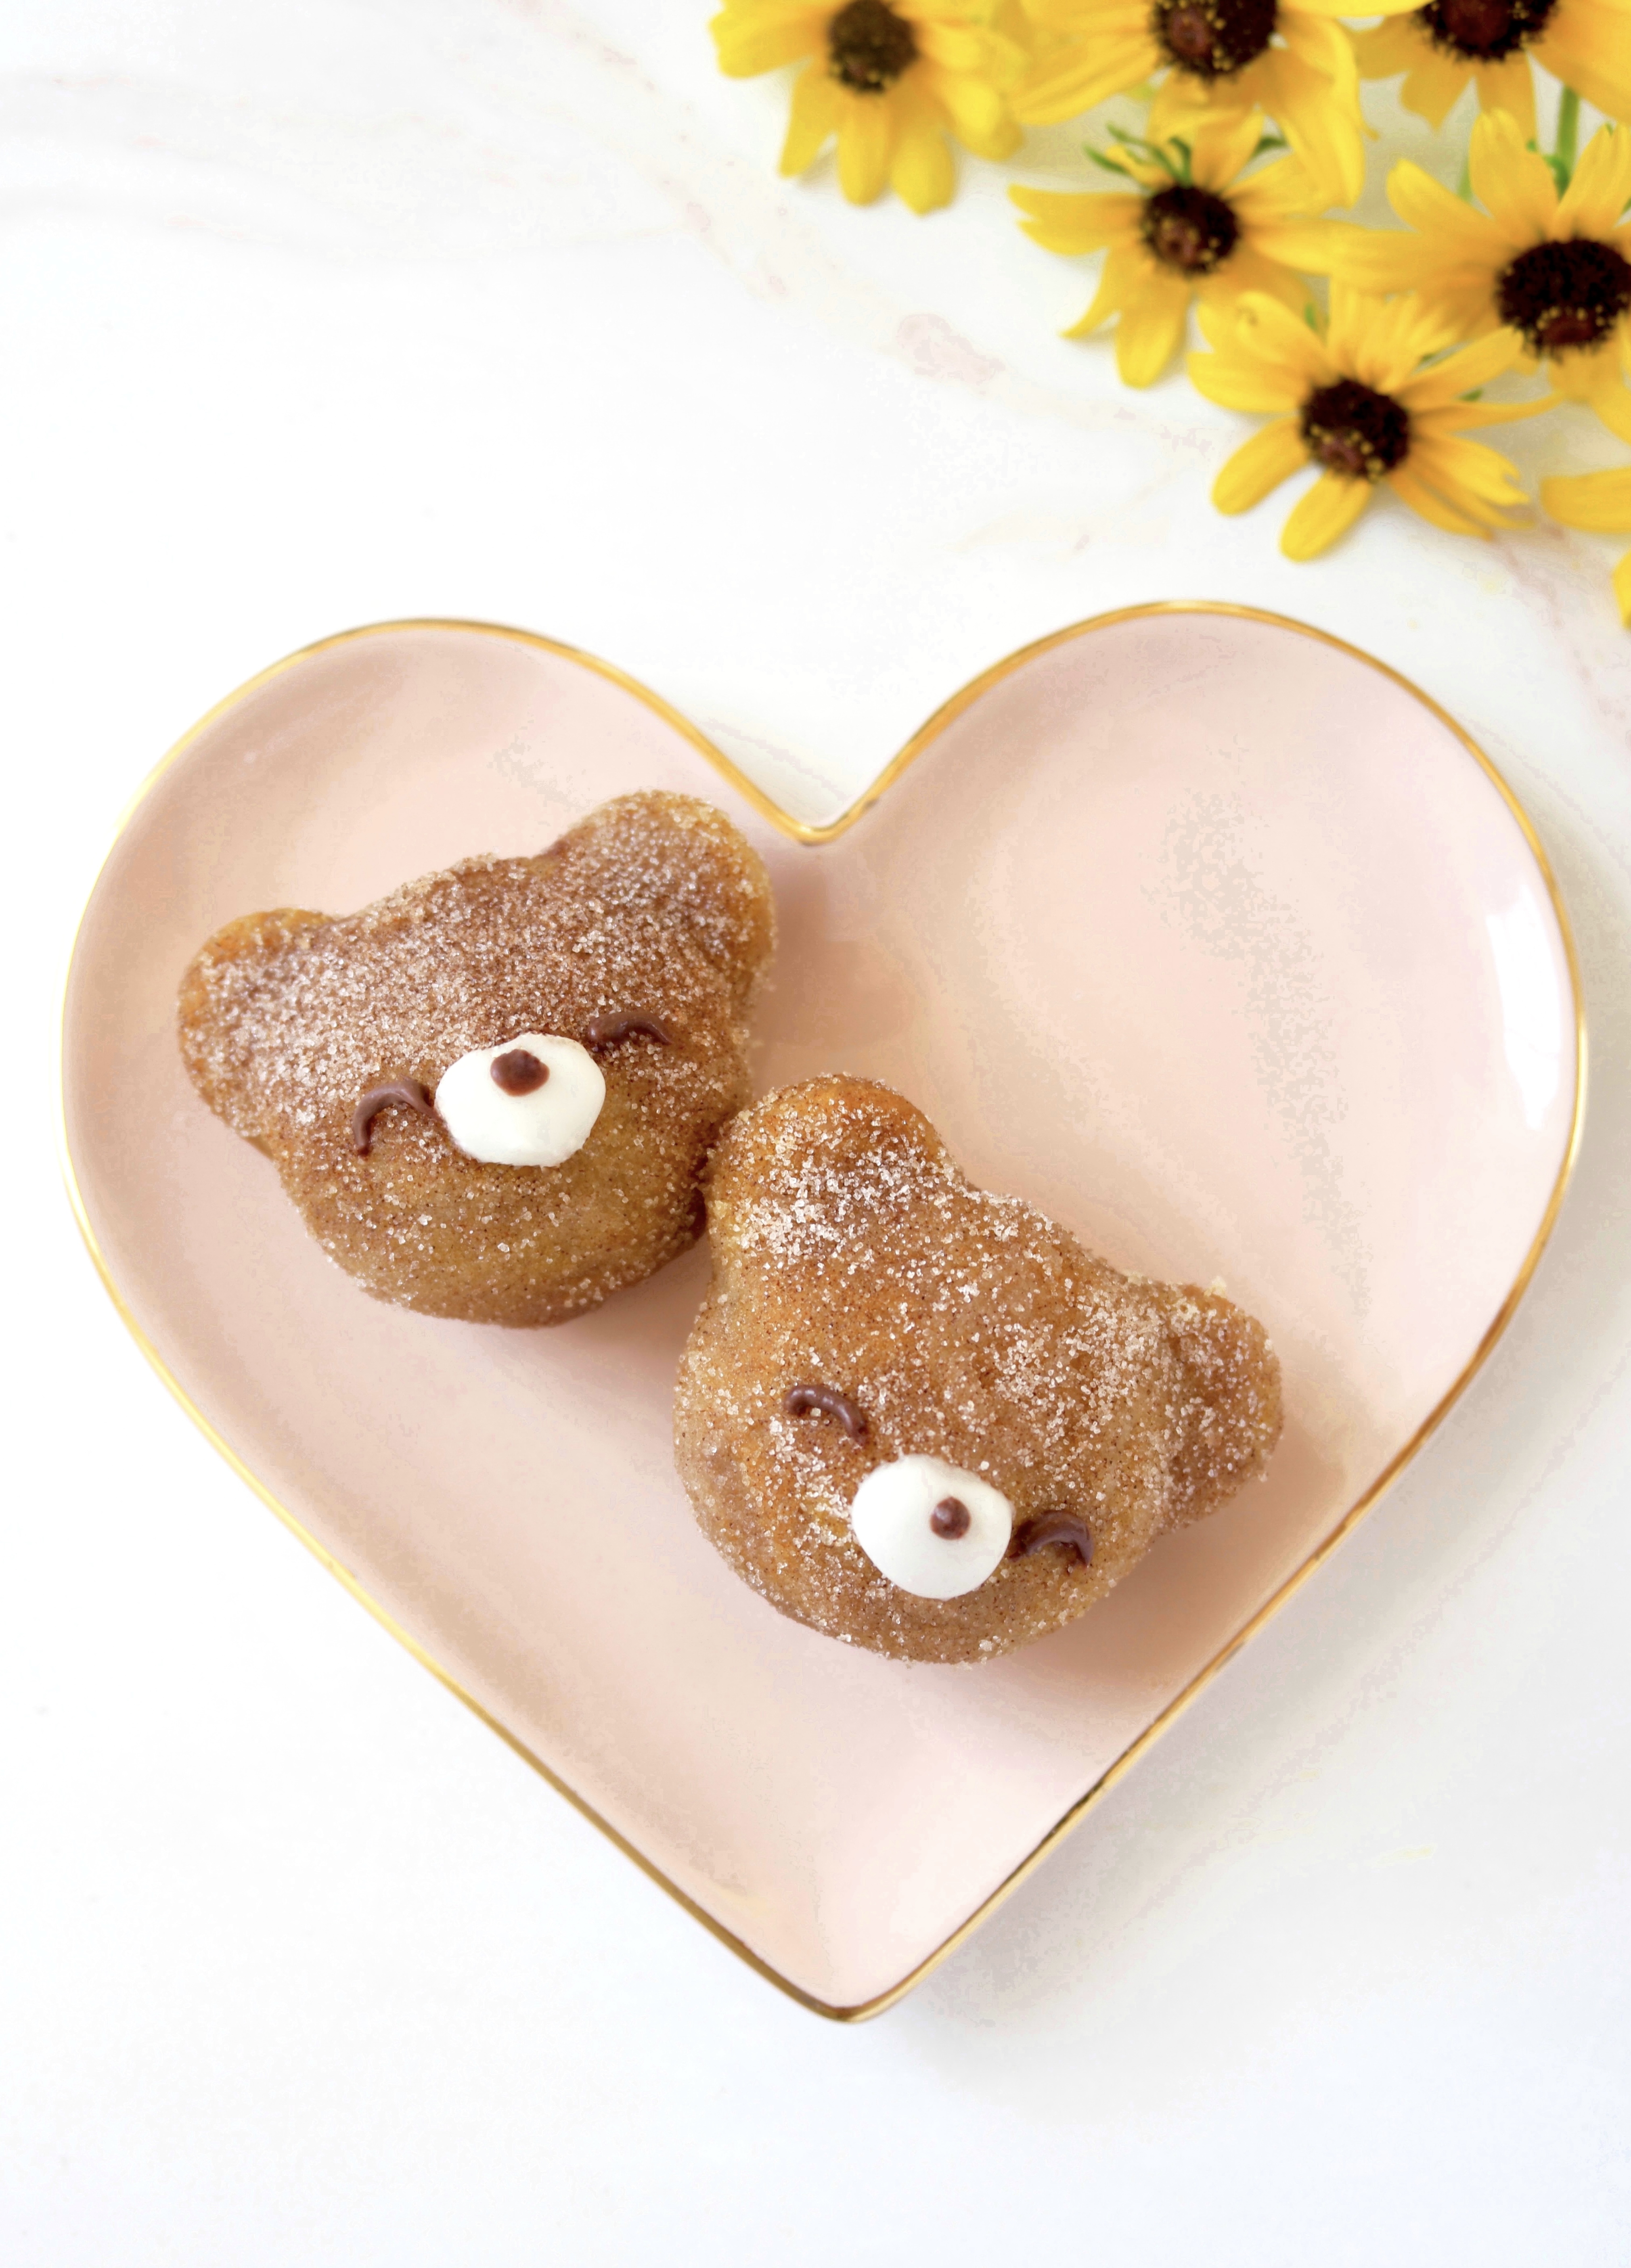
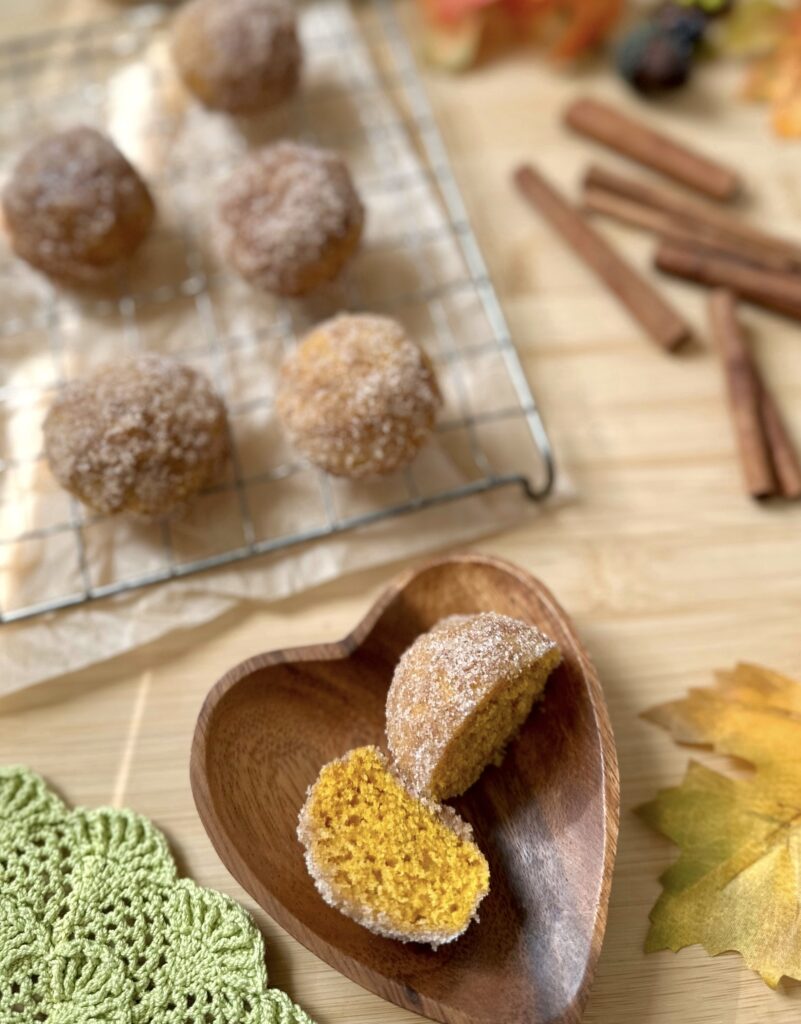
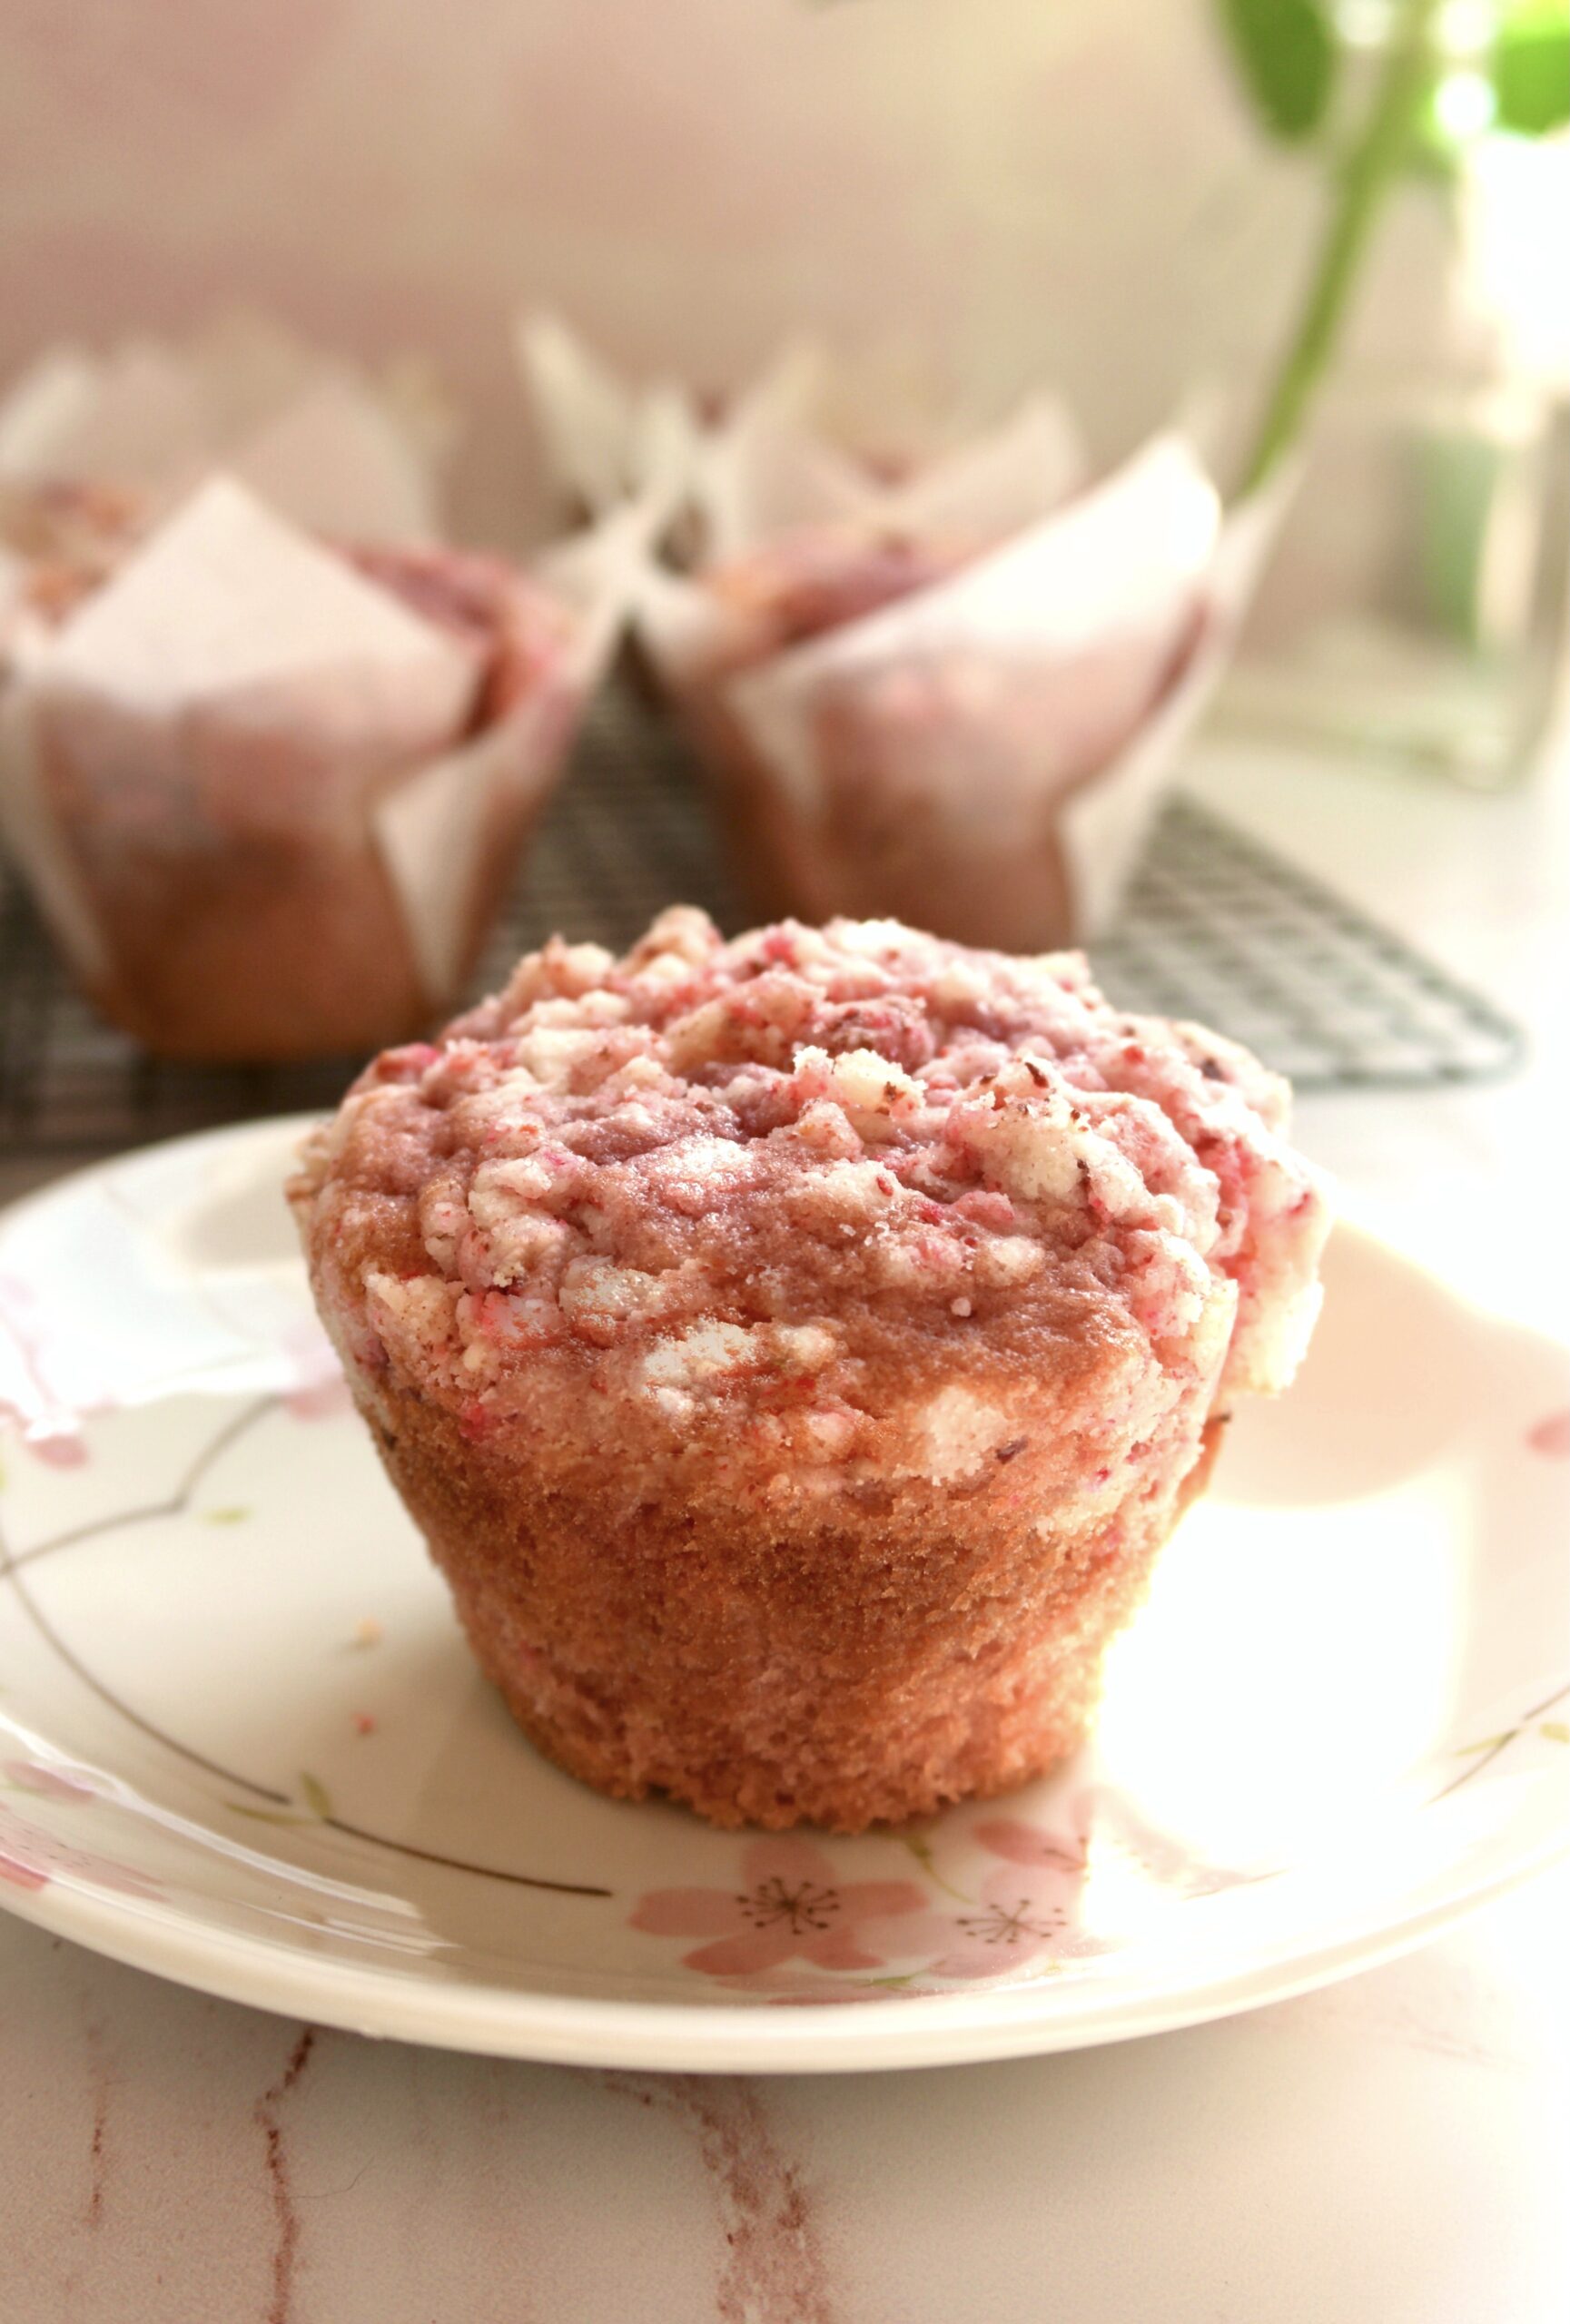
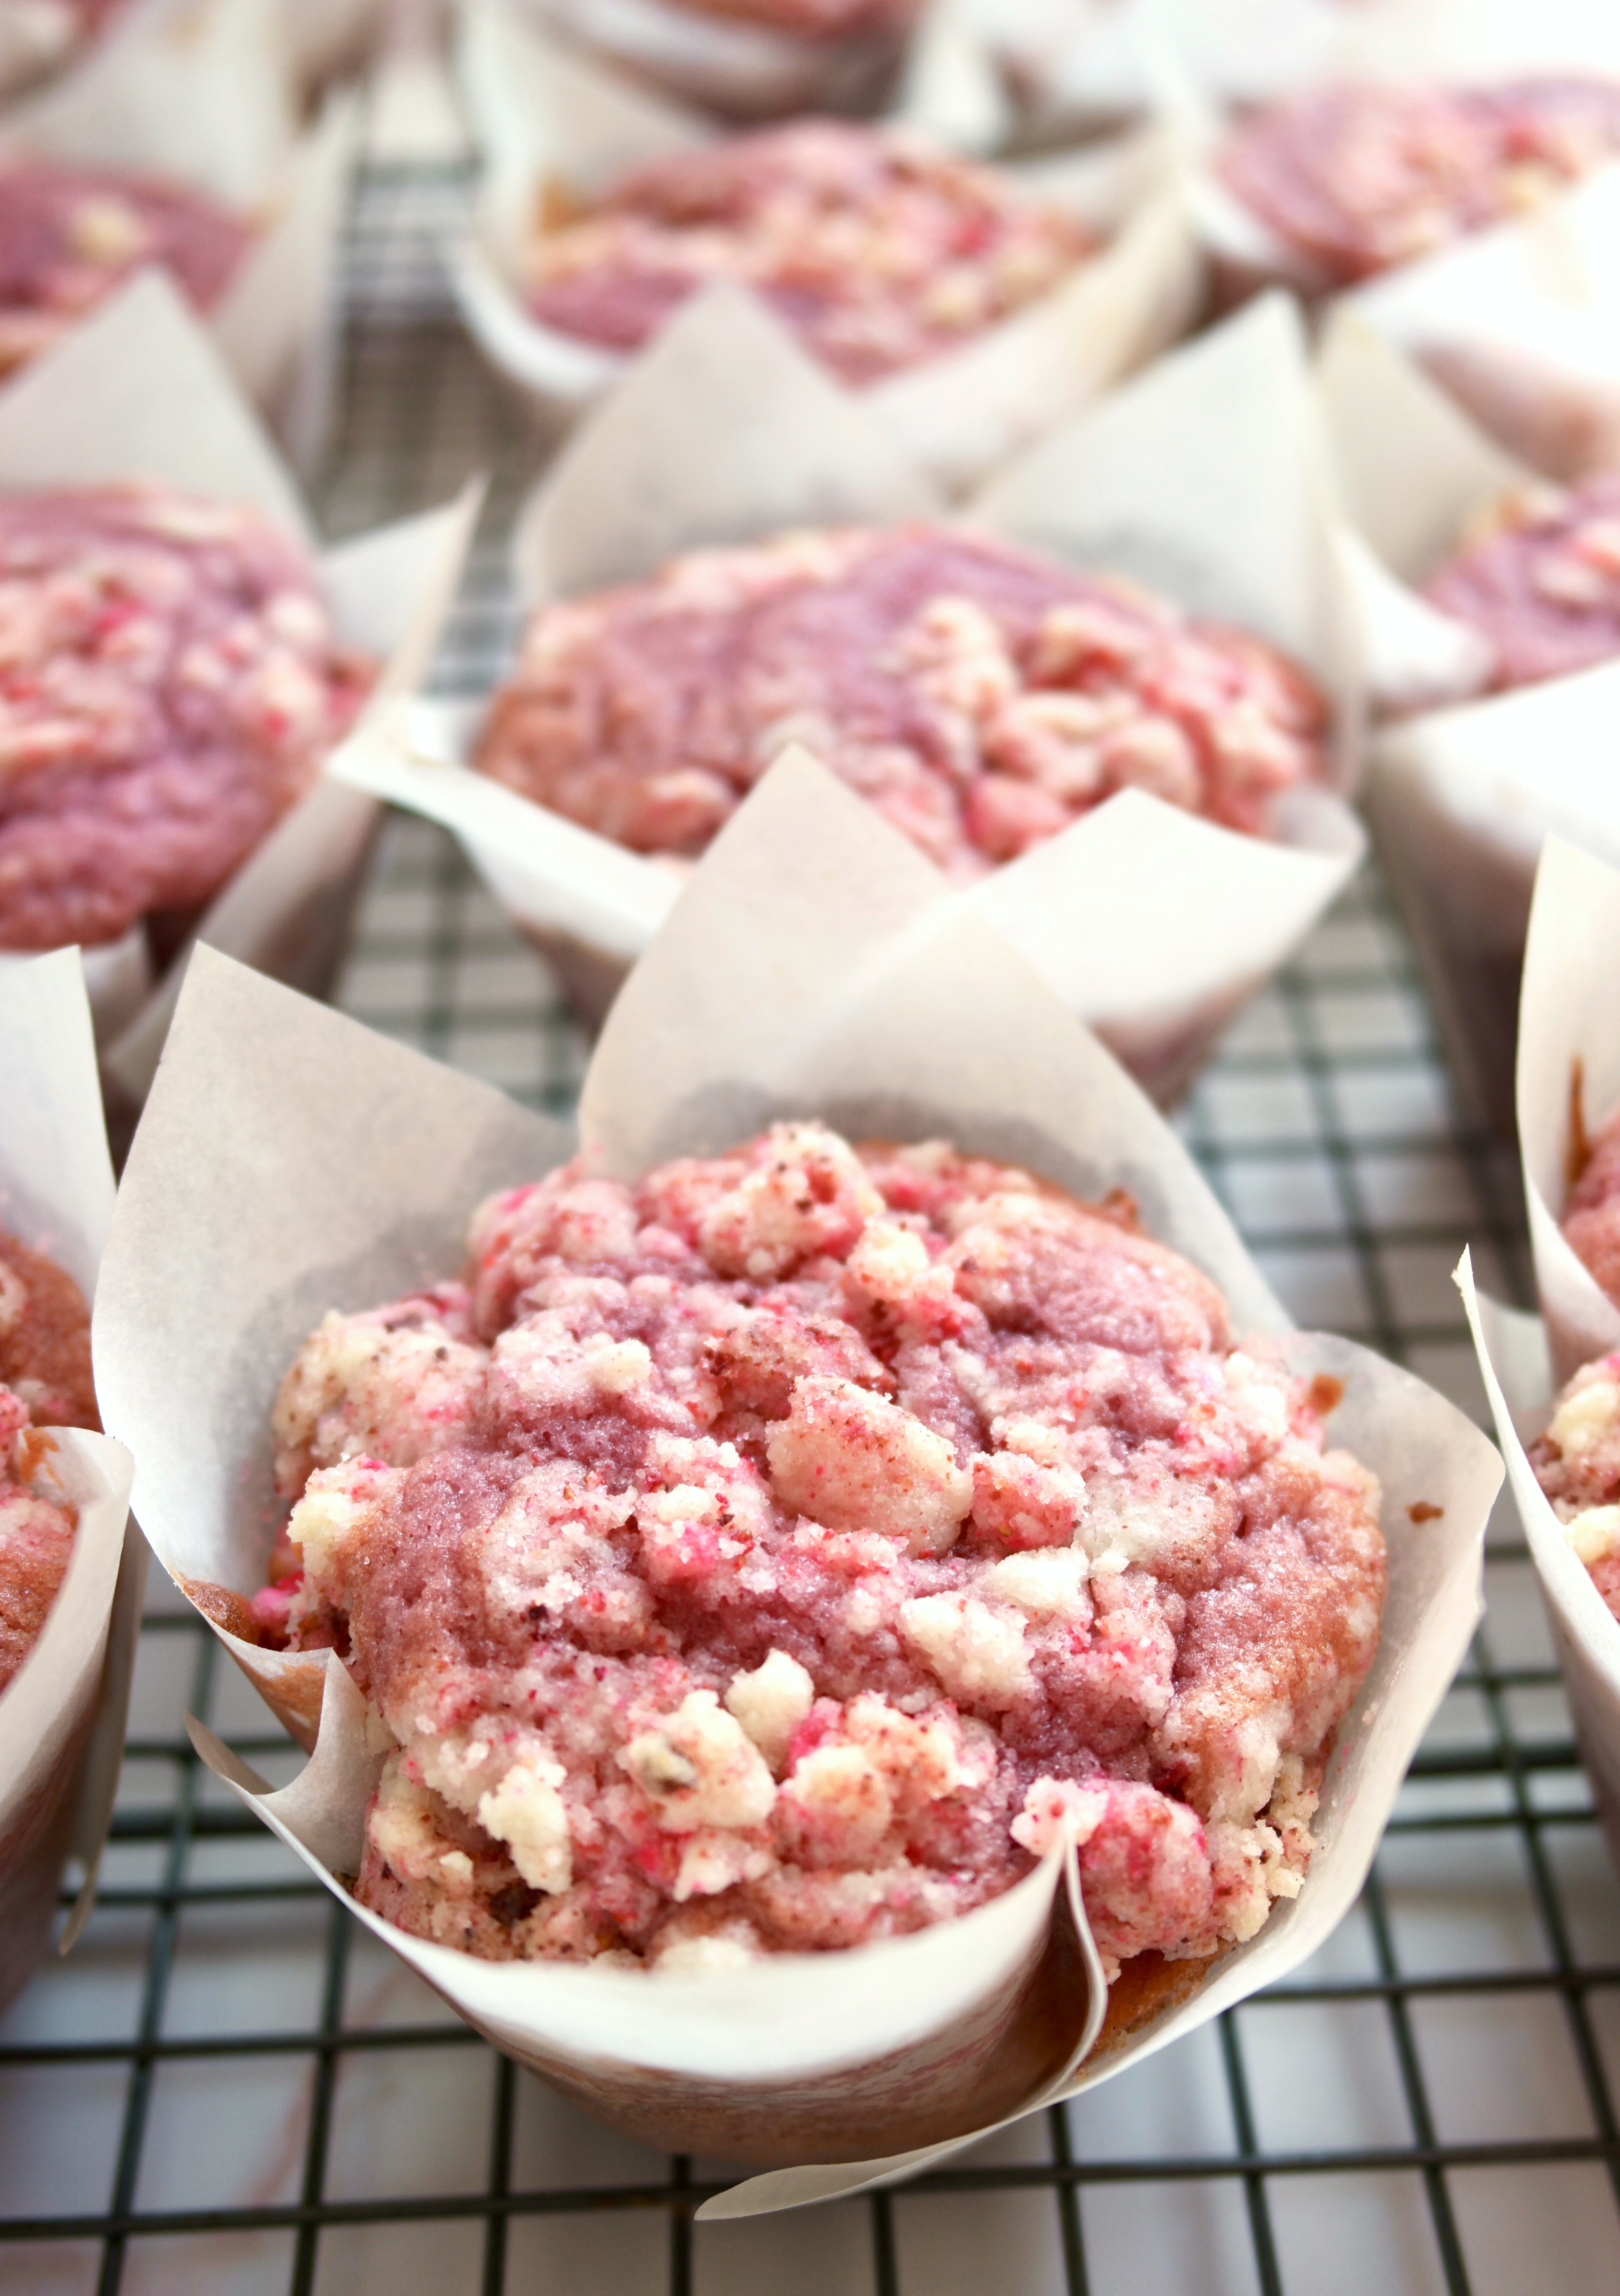
Double Chocolate Oreo Muffins

Double Chocolate Oreo Muffins

If you’re craving something sweet, decadent and intensely chocolate, these Double Chocolate Oreo Muffins might be just what you need. They were born when I had a craving for Double Chocolate Muffins, but I didn’t feel like driving all the way to my favorite cafe. I noticed the internet had an overwhelming number of chocolate muffin recipes, each one claiming to be the best. I said goodbye to the sea of chocolate muffin recipes and went to work on a muffin recipe that fulfilled my dream muffin wish. I used black cocoa powder to capture the Oreo essence, semisweet chocolate chips, for those little pools of melted chocolate throughout and a cookies and cream filling. I used tulip muffin liners* because they hold more batter so you end up with more generous sized muffins. They’re high recommended if you want to make the muffins exactly the way I made them.

The most challenging part of this recipe is testing for doneness, because you don’t want to over bake these. Insert a toothpick or a cake tester into the cake part of the muffins. If there are a few moist crumbs on it, that’s what you’re looking for. If there’s melted chocolate on it, you’ve likely hit a chocolate chip, so test again with a clean toothpick. If you see cake batter on the toothpick, the muffins need more time in the oven.

To watch the Instagram video of Double Chocolate Oreo Muffins being made, click here.

Print Recipe
Double Chocolate Oreo Muffins
Dark chocolate muffins with semisweet chocolate chips and cookies and cream filling
Servings
muffins
Ingredients
Cookies & Cream Filling
Double Chocolate Muffins
Servings
muffins
Ingredients
Cookies & Cream Filling
Double Chocolate Muffins
Instructions
Cookies & Cream Filling
  1. In a medium bowl, mix together the cream cheese, sugar and vanilla. Gently fold in the Oreos.
Double Chocolate Muffins
  1. Preheat the oven to 400ºF (200ºC). Line a 12-serving muffin pan with tulip liners*
  2. In a large bowl, whisk together the flour, cocoa powder, baking powder, baking soda and salt.
  3. In a separate large bowl, whisk together the sugar, brown sugar, oil, eggs, vanilla extract, sour cream and milk until well combined. Stir the wet ingredients into the dry ingredients just until combined. Do not over mix. Fold in the chocolate chips.
  4. Scoop the batter evenly into the muffin cups, about 3 1/2 ounces ( in each one. Scoop or spoon a scant tablespoon size dollop of the filling into the center of each muffin.
  5. Bake for 5 minutes, then turn the oven temperature down to 350ºF (180ºC). Continue baking until a toothpick inserted into the cake part of the muffins comes out with a few moist crumbs on it, about 7-10 more minutes. If the toothpick hits a melted chocolate chip, reinsert a clean toothpick and test again. Cool in the pan for 5 minutes, then transfer to a cooling rack. Top each muffin with a quarter piece of Oreo cookie.
Recipe Notes

*Tulip muffin liners are preferred. To find tulip muffin liners, click here. You can also make your own by pressing  6-inch squares of parchment paper into the muffin pan cups. If you want to use standard muffin liners, fill them 3/4 full and use less filling. Standard muffin liners hold less batter so you'll end up with a a couple of extra muffins.  Keep in mind, the baking time will be shorter.

Mini Pumpkin Bear Muffins

Mini Pumpkin Bear Muffins

These cute little bear-shaped pumpkin muffins are almost too cute to eat. But if you try one, it’ll be gobbled up without hesitation because they’re so moist, fluffy and delicious! The cinnamon sugar coating gives them the perfect fall flavor and a subtle crunch. I used cream cheese icing to form the snouts and melted chocolate for the eyes and noses. You can also use melted chocolate chips or candy melts to decorate their faces if you prefer. I used a bear-shaped mini muffin pan, which is also called a Madeleine pan or a financier pan. To find a bear mini muffin pan, click here. A standard mini muffin pan will also work, but the muffins won’t be bear-shaped. If you end up using a standard mini muffin pan, you can add round, flat candies to form the ears.

To watch the TikTok video of Mini Pumpkin Bear Muffins being made, click here.

To watch the Instagram video of Mini Pumpkin Bear Muffins being made, click here.

Print Recipe
Mini Pumpkin Bear Muffins
Moist, fluffy bear-shaped pumpkin mini muffins with cream cheese icing snouts
Course Breakfast, Brunch
Keyword muffins, pumpkin
Servings
mini muffins
Ingredients
Mini Pumpkin Bear Muffins
Cinnamon Sugar
Bear Faces
Course Breakfast, Brunch
Keyword muffins, pumpkin
Servings
mini muffins
Ingredients
Mini Pumpkin Bear Muffins
Cinnamon Sugar
Bear Faces
Instructions
Mini Pumpkin Bear Muffins
  1. Preheat the oven to 325ºF (165ºC). Grease and flour a bear-shaped mini muffin pan. (This recipe also works in a mini muffin pan but the muffins won't be bear shaped.)
  2. In a medium bowl, whisk together the flour, baking powder, baking soda, salt, cinnamon, ginger and nutmeg.
  3. In a large bowl, whisk together the brown sugar, oil and egg until smooth and well combined. Mix in the pumpkin purée until incorporated. Stir in the flour mixture just until combined.
  4. Scoop or pipe the batter into the muffin pan, filling the cups 2/3 full (about 3/4 oz or 21g in each). Use a small offset spatula to smooth the top of the batter, making sure to get batter into the ears.
  5. Bake until a toothpick inserted into the center of the muffins comes out clean, about 9-11 minutes. Let the muffins cool in the pan for 5 minutes then remove them from the pan and transfer to a cooling rack.
  6. Clean the pan and repeat with the remaining batter.
Cinnamon Sugar
  1. In a small bowl, whisk together the sugar and cinnamon until well combined. Brush the warm muffins with with melted butter using a small pastry brush. Coat them with the cinnamon sugar mixture.
Bear Faces
  1. In a small bowl, beat the butter, cream cheese, powdered sugar and 1/2 teaspoon of milk until smooth. Add more milk as needed.
  2. Transfer the icing to a piping bag fitted with a medium round tip or snip off the end of the piping bag making a 1/4-inch wide opening. Pipe a small blob of icing onto each bear's face to form the snouts.
  3. Transfer the melted chocolate to a piping bag fitted with a small round tip or snip off the end of the piping bag making a 1/16-inch wide opening. Pipe dots of chocolate onto the snouts to make the noses. Pipe dots or curved lines to make the eyes. Alternately you can apply the melted chocolate dots with the tip of a toothpick
Recipe Notes

*To find a bear-shaped mini muffin pan, click here.

White Chocolate Peach Muffins

I have strong opinions about muffins. Maybe a little controversial too. When baked correctly, muffins should be soft, fluffy and tender. I get a little sad and disappointed when I buy a big, domed bakery muffin and the inside is rubbery. Many of the pretty muffins I see on social media are painfully rubbery too, as the creators break open a muffin in a dramatic moment of triumph. The muffin recipe I’m sharing here is tender and delicious if baked correctly.

One of the most important ways to achieve tender muffins is by not over mixing your batter once the flour is added. Muffins are technically cake, not bread, so we don’t want gluten formation. Another way to get tender muffins is to use an acidic ingredient such as sour cream, yogurt or buttermilk. Lastly, and very importantly, don’t over bake or under bake your muffins. Baking times in recipes are a guide and not necessarily exact because everyone’s ovens and baking pans are different. Keep an eye on your muffins and test them for doneness with a cake tester or a toothpick. My grandma used to say that when you start to smell them, they’re probably done or close to being done.

Soggy muffins also make me run the other way. Muffins loaded with too much fruit or fruit that hasn’t been macerated can make your muffins soggy or dense. In this recipe, I macerated the peaches to draw out some of the moisture, so it helps to avoid creating soggy spots in your muffins. The waiting time goes by fast as you prep the rest of your ingredients.

Print Recipe
White Chocolate Peach Muffins
Tender muffins with white chocolate chips and chunks of fresh peaches.
Servings
muffins
Ingredients
Macerated Peaches
Crumb Topping
Muffins
Servings
muffins
Ingredients
Macerated Peaches
Crumb Topping
Muffins
Instructions
Macerated Peaches
  1. In a medium bowl, toss the peaches with lemon juice. Add the brown sugar and cinnamon and stir to combine. Let stand 30 minutes.
  2. Drain the peaches well and toss with flour. Reserve 1/4 cup of peaches for the muffin tops.
Crumb Topping
  1. In a medium bowl, whisk together the flour, sugar, brown sugar, cinnamon and salt.
  2. With a pastry blender, or with your fingertips, work the butter into the flour mixture until it looks like wet sand. Press together to form chunks. Set aside in the refrigerator until ready to use.
Muffins
  1. Preheat the oven to 375ºF (190ºC). Line a 12-serving muffin pan with tulip muffin liners.* (Tulip muffin liners are preferable because they hold more batter, but you can also use standard muffin liners.)
  2. In a medium bowl, whisk together the flour, baking powder, baking soda, salt, cinnamon and nutmeg.
  3. In a large bowl, beat the butter and sugar together until light and fluffy. Beat in the eggs and extracts in 3 separate additions, making sure each one is incorporated before adding the next.
  4. Mix in the flour mixture with a wooden spoon or spatula, in two additions, followed by half of the sour cream after each addition. Mix just until combined. The batter will be thick.
  5. Toss the white chocolate chips with flour, then fold them into the batter. Gently fold in the drained peaches.
  6. Transfer batter to the prepared muffin pan, equally dividing the batter among the muffin cups. (If you're using standard muffin liners, fill them 2/3 full.) Top with the reserved peaches and the crumb topping. Optional: Top each muffin with a piece of white chocolate.
  7. Bake muffins for 5 minutes. Turn down the oven heat to 350ºF (180ºC). Continue baking until the muffins are light golden brown and a toothpick inserted into the centers of the muffins comes out clean, about 15-20 more minutes. Cool in the pan for 5 minutes, then remove the muffins from the pan and continue cooling on a cooling rack.
Recipe Notes

*To find tulip muffin liners, click here.


Double Strawberry Mini Muffins

Double Strawberry Mini Muffins

These cute little pink muffins are the strawberriest muffins ever. I had to use a word that’s not even in the dictionary to describe them because these little gems are bursting with strawberry flavor. They’re made with fresh strawberry purée and finished with homemade strawberry sugar. The strawberry purée helps to make the muffins soft and moist on the inside and the strawberry sugar gives a nice crunchy texture and a bright strawberry flavor on the outside.

The strawberry sugar is made by pulverizing freeze dried strawberries together with sugar. Freeze dried strawberries are not the same as dried strawberries. You can find freeze dried strawberries at grocery markets, gourmet stores and online. They’re typically located near the nuts and dried fruit in most markets.

To watch the TikTok video of Double Strawberry Mini Muffins click here.

Print Recipe
Double Strawberry Mini Muffins
Strawberry Mini Muffins Coated in Homemade Strawberry Sugar
Keyword muffins, strawberry
Servings
mini muffins
Ingredients
Keyword muffins, strawberry
Servings
mini muffins
Ingredients
Instructions
  1. Combine the freeze dried strawberries and 2 tablespoons (7/8 oz or 25g) of sugar in a small food processor or a clean spice grinder. Process until finely ground. Add 1/2 cup (3 1/2 oz or 100g) of sugar and pulse a few times until well combined. Place the strawberry sugar in a shallow bowl and set aside.
  2. Preheat the oven to 350ºF (180ºC). Grease and flour a 24-serving mini muffin pan.** Do not skip this step and do not use liners. The muffins need to form a crust on the outside so they don't soak up too much butter in the final step.
  3. In a medium bowl, whisk together the flour, baking powder and salt
  4. In a large bowl, whisk together the remaining 1/2 cup (3 1/2 oz or 100g) of sugar with the oil, egg and extracts until smooth. Whisk in the strawberry purée until well combined.
  5. Stir in the flour mixture with a rubber spatula, just until combined. The batter will be thick.
  6. Transfer the batter evenly into the prepared muffin pan cups.
  7. Bake until a toothpick inserted into the center of the muffins comes out clean, about 10-12 minutes. Do not over bake! Be diligent, since over baking can happen very quickly with mini muffins.
  8. Let the muffins cool in the pan for 5 minutes. Turn the muffins out onto a cooling rack. Place the melted butter in a small bowl. Dunk the warm muffins briefly in the melted butter, then roll them in the strawberry sugar.
Recipe Notes

To find the gel food color I used, click here.

To find the mini muffin pan I used, click here.

Glazed Lemon Muffins

Glazed Lemon Muffins

However your day is going today, it’s about to get better. I can confidently say these lemon muffins are some of the best you will ever taste. Follow the recipe exactly, weigh your ingredients and you’ll be enjoying these soft, tender muffins in no time.

These delightful muffins are perfect for breakfast, brunch or an anytime snack. I love enjoying one with a cup of strawberry or chamomile tea.

Print Recipe
Glazed Lemon Muffins
Soft, tender lemon muffins glazed with lemon icing
Course Breakfast, Brunch
Keyword lemon, muffins
Servings
muffins
Ingredients
Muffins
Icing
Course Breakfast, Brunch
Keyword lemon, muffins
Servings
muffins
Ingredients
Muffins
Icing
Instructions
Muffins
  1. Preheat the oven to 375ºF. Line a 12-serving muffin pan with tulip baking liners.* (You can also use standard muffin liners. They hold less batter so you may end up with a couple of extra muffins.)
  2. In a medium bowl, whisk together the flour, baking powder, baking soda and salt.
  3. In a large bowl, cream the butter, sugar and lemon zest, with an electric mixer, until light and fluffy.
  4. Add the eggs one at a time and beat until well combined.
  5. Add extracts and beat until combined.
  6. On low speed, mix in flour mixture in two additions, alternating with half of sour cream after each addition. Mix just until combined. Batter will be thick.
  7. Divide batter evenly into muffin liners. (If using standard muffin liners, fill 3/4 full.)
  8. Bake at 375ºF for 5 minutes. Turn the oven heat down to 350ºF and continue baking the muffins until a toothpick inserted into the centers comes out clean, about 12-16 more minutes. Do not over bake.
  9. Transfer muffins to a cooling rack to cool completely. Brush icing onto muffin tops with a small pastry brush.
Icing
  1. Whisk the powdered sugar, melted butter, and 1 tablespoon of lemon juice together until smooth. Add additional lemon juice until your desired consistency is reached.
Recipe Notes

*To find  tulip muffin liners, click here.

To find floral tulip muffin liners, click here.

Sweet Cornbread Muffins

These soft, tender, fluffy, sweet cornbread muffins are my favorite version of cornbread ever! No hate to the crumbly, savory cornbread that some people prefer. I like that too! Coincidentally, the latter has fans who leave the most heated comments on my cornbread posts. Maybe their cornbread is making them cranky. This cornbread recipe is delightful and would cheer up anyone, especially when it’s served warm and slathered with butter and honey. Positively divine.

I used a square muffin pan because it makes the muffins look absolutely adorable. The pan is also known as a brownie pan. The pan details are in the recipe notes. Feel fee to use a standard round muffin pan instead.

Print Recipe
Sweet Cornbread Muffins
Soft, tender, fluffy, sweet cornbread muffins
Keyword cornbread, muffins
Servings
square muffins
Ingredients
Keyword cornbread, muffins
Servings
square muffins
Ingredients
Instructions
  1. Preheat oven to 350ºF. Grease and flour a 12-serving square muffin pan, also known as a brownie pan.* (You can also use a traditional round muffin pan. The baking time may be a little shorter.)
  2. In a large bowl, whisk together flour, sugar, cornmeal, baking powder and salt.
  3. In a separate bowl, whisk eggs, sour cream, oil and butter until smooth.
  4. Add egg mixture into the flour mixture and mix just until combined. A few lumps are okay.
  5. Transfer batter to prepared pan, filling wells halfway full. (Fill 2/3 full if using a round muffin pan.)
  6. Bake until edges turn golden brown and a toothpick inserted into center comes out clean, about 17-20 minutes. Do not over bake.
  7. Let cool in pan for 5 minutes them transfer muffins to a cooling rack. Serve warm or room temperature.
Recipe Notes

*I used a Fat Daddio's square muffin pan. It's available at kitchen stores and online.  If you can't find that one, Chefmade also makes a good one. The cavities on that one are a little smaller, so the baking time may be shorter. To find it, click here.

If you're using a dark colored pan, reduce your oven temperature to 325ºF

Pumpkin Cinnamon Mini Muffins

My mom had a cupboard in the kitchen containing a few old cookbooks that she rarely used. As a child, I used to enjoy perusing them and looking at the baked treats. Some of the cookbooks were so old, they had black and white photos or even just drawings of the food. The ones with drawings interested me because they depicted smiling children enjoying the treats.

When I started learning to bake, I found a recipe for French Breakfast Puffs in one of those old books. The title sounded so fancy, but they were really just simple muffins dunked in butter and rolled in cinnamon sugar. I have no idea what the name of the cookbook was or what happened to it, but the delicious muffin recipe stuck around for a while. I’ve tweaked the recipe so many times over the years, and most recently, I added pumpkin to it. These Pumpkin Cinnamon Mini Muffins are one of the best versions I’ve created. The inside texture of the muffins is soft and moist and it contrasts nicely with the slight crunch you get from the cinnamon sugar on the outside. They look so cute too, like little pumpkins, and they definitely make children smile!

To watch the TikTok video of these mini muffins being made, click here.

Print Recipe
Pumpkin Cinnamon Mini Muffins
Servings
mini muffins
Ingredients
Muffins
Topping
Servings
mini muffins
Ingredients
Muffins
Topping
Instructions
Muffins
  1. Preheat oven to 350ºF. Grease and flour a 24-serving *mini muffin pan.
  2. In a medium bowl, whisk together flour, baking powder, salt, cinnamon, ginger and nutmeg.
  3. In a large bowl, beat sugar, oil, egg and pumpkin purée until smooth.
  4. Stir in flour mixture just until combined. A few lumps are okay. Batter will be thick.
  5. Transfer batter to prepared pan, about a scant 2 tablespoons of batter in each muffin cup.
  6. Bake until toothpick inserted into muffins comes out clean, about 11-13 minutes. Do not over bake! Be diligent, since over baking can happen very quickly with mini muffins.
  7. Let muffins cool in pan for 5 minutes. Turn muffins out onto a cooling rack.
Topping
  1. Combine sugar and cinnamon in a shallow bowl.
  2. Dunk warm muffins in melted butter, then roll in cinnamon sugar.
Recipe Notes

To find the mini muffin pan I used, click here.

Pumpkin Spice Mini Loaves with Caramel Filling

pumpkin spices mini loaves with caramel filling

In early September, I saw someone announce the fall season on social media. In addition to people pointing out that it was too early for the announcement, the word police corrected the person with the word autumn. Since both terms are correct, we can call the season whatever we prefer. I think autumn is a pretty sounding word, so I’ll use it for the rest of this post. Whatever you call it, these Pumpkin Spice Mini Loaves are a perfect little celebration of the season. They have just the right amount of pumpkin spices, making them so fragrant that your kitchen will smell like cozy autumn heaven.

pumpkin spices mini loaves with caramel filling

I call them loaves because I originally made them in mini loaf pans. They’re so cute and delicious that I often give them as holiday gifts. This year I decided to try them in ramekins and I loved the results! I used 6-ounce ramekins, but you can use 8-ounce ramekins, any size mini loaf pans, a muffin pan or even an 8 or 9-inch loaf pan. Keep in mind that baking times will differ. To find the ramekins I used, click here.

Print Recipe
Pumpkin Spice Mini Loaves with Caramel Filling
Mini loaves of tender pumpkin bread with caramel filling and luscious cream cheese frosting
Servings
mini loaves
Ingredients
Pumpkin Spice Mini Loaves
Cream Cheese Frosting
Servings
mini loaves
Ingredients
Pumpkin Spice Mini Loaves
Cream Cheese Frosting
Instructions
Pumpkin Spice Mini Loaves
  1. Preheat oven to 350ºF. Grease and flour seven 6-ounce ramekins or six 8-ounce ramekins or any loaf pans of your choice.
  2. In a large bowl, sift together flour, cinnamon, baking powder, baking soda, salt, ginger, nutmeg and cloves. Set aside.
  3. In a separate large bowl, cream butter and brown sugar together with an electric mixer until light and fluffy.
  4. Beat in eggs, one at a time, until well combined.
  5. Beat in pumpkin and vanilla until combined.
  6. Stir in flour mixture just until combined.
  7. Divide batter evenly into prepared ramekins. Bake for 20-25 minutes or until golden brown and toothpick inserted in center comes out clean. Do not overbake. (Mini loaves or muffins bake for 15-25 minutes, depending on size. 8 or 9-inch loaf bakes for 40-50 minutes)
  8. Cool completely if serving in ramekins or remove from pans after cooling for 10 minutes. Continue to cool on wire rack.
  9. Make 3/4-inch well in the center of each loaf. Fill with caramel sauce. (For an 8 or 9-inch loaf, poke multiple holes with a skewer. Fill with caramel sauce.)
  10. Top with cream cheese frosting and pumpkin seeds
Cream Cheese Frosting
  1. In a large bowl, beat cream cheese and butter together with an electric mixer until smooth.
  2. Add vanilla extract and salt and beat until combined.
  3. Gradually add powdered sugar and beat at medium speed until combined.
  4. Add heavy cream and beat at low speed until combined.

Fairy Puffs

Fairy Puffs sugared mini muffins wtih edible flowers

My dad used to take me on walks in the woods to look for fairy rings when I was a child. I wanted to see a real fairy so badly! I read a book about fairies, hoping to learn more about them. Fairies love little cakes, milk, honey and butter so I’m sure these Fairy Puffs would be fairy approved.

My Fairy Puffs recipe is loosely based on an old favorite mini muffin recipe. I tweaked it quite a bit, including the addition of pink dragonfruit powder. Dragonfruit has a subtle flavor, so the bright fuchsia powder is mostly for color. But oh what a beautiful color it is! You can find dragonfruit powder in healthy food stores or online. To find the dragonfruit powder, also known as pink pitaya powder, I used, click here.

fairy puff muffins

Decorating these little cuties was so entertaining! After sampling multiple variations of sparkling sugar and cinnamon sugar, I decided that dipping the bottoms of the muffins in butter and cinnamon sugar, then dipping the tops in butter and sparkling sugar gave them the perfect balance of sugar and spice. I had purchased some edible flowers a couple of days prior, and they added a pretty, magical touch. The flowers I used are called bachelor’s buttons and I got them at a local gourmet flower seller.

sugared mini muffins with edible flowers

Print Recipe
Fairy Puffs
Course Breakfast, Brunch
Keyword cake, muffins
Servings
mini muffins
Ingredients
Fairy Puffs
Topping
Course Breakfast, Brunch
Keyword cake, muffins
Servings
mini muffins
Ingredients
Fairy Puffs
Topping
Instructions
Fairy Puffs
  1. Preheat oven to 350ºF. Grease and flour a 24 serving mini muffin pan.
  2. In a medium bowl, whisk together flour, dragonfruit powder, baking powder, salt and nutmeg. Set aside.
  3. In a large bowl, cream butter and sugar with an electric mixer until light and fluffy.
  4. Add egg and beat until smooth.
  5. Add flour mixture and milk alternately in two additions and mix just until combined.
  6. Transfer batter to prepared muffin pan, filling muffin cups about 3/4 full.
  7. Bake until toothpick inserted in center of muffins comes out clean, about 12-14 minutes. (Be careful not to over bake. Check a few minutes early. Small muffins can dry out easily.)
  8. Let cool in pan for 5 minutes. Remove puffs from pan and transfer to cooling rack. (Loosen puffs with a small offset spatula or butter knife if necessary.)
Topping
  1. Combine granulated sugar and cinnamon in a shallow bowl.
  2. Place colored sparkling sugar crystals in another shallow bowl.
  3. Dip the bottoms of each puff in melted butter, then into cinnamon sugar mixture.
  4. Dip the tops of each puff in melted butter, then into sparkling sugar.
  5. Decorate with edible flowers if desired.
Recipe Notes

*To purchase dragonfruit powder, click here.

 **To purchase pink sparkling sugar crystals, click here.


Strawberry Shortcake Crumble Muffins

strawberrry shortcake crumble muffins

Have you noticed the strawberry shortcake crumble topping trend? I noticed many people sharing various versions of the crumble recipe all over Tiktok. I’ve seen the topping on cake, cupcakes and countless other desserts. Most people seem to make it using strawberry gelatin mix and vanilla pudding mix. The version I’m sharing here uses freeze dried strawberries instead. I’m not opposed to using gelatin mix, I just seriously love the tart, natural flavor of freeze dried strawberries.

This topping is irresistible on these tender strawberry muffins. I wanted to pile on as much crumble topping as possible so I used tulip baking cups. They’re made of grease-proof parchment paper squares. You can buy them online or make them yourself with squares of parchment. You can use the link provided at the end of the recipe to find the ones I used. Keep in mind, if you use standard muffin liners, you’ll use less batter and topping for each muffin, so you’ll end up with a few more muffins.

I used fresh strawberries for the puree in the muffins, but feel free to use frozen, defrosted strawberries if you cant get fresh ones.

Strawberry shortcake crumble muffins

Print Recipe
Strawberry Shortcake Crumble Muffins
Strawberry muffins topped with strawberry shortcake crumble
Servings
muffins
Ingredients
Strawberry Shortcake Crumble Topping
Strawberry Muffins
Servings
muffins
Ingredients
Strawberry Shortcake Crumble Topping
Strawberry Muffins
Instructions
Strawberry Shortcake Crumble Topping
  1. In a medium bowl, combine flour, sugar and salt.
  2. Cut cubed butter into the flour mixture with a pastry blender or with your fingers until it forms pea size pieces.
  3. Place half of crumble mixture into another medium bowl and combine with freeze dried strawberries. Mix well and press together with your fingers to form pea sized pieces.
  4. Gently combine the two bowls of crumble together. Set aside in refrigerator while preparing muffin batter.
Strawberry Muffins
  1. Preheat oven to 375ºF. Line a 12 serving muffin tin with tulip baking liners or parchment squares.
  2. In a medium bowl, combine flour, baking powder, baking soda and salt. Set aside.
  3. In a large bowl, beat butter with an electric mixer on medium speed until smooth. Add sugar and beat until light and fluffy.
  4. Add eggs and extract. Beat until well combined.
  5. Add dry ingredients and beat on low speed, just until combined.
  6. Add buttermilk, strawberry puree and food color. Beat on low speed, just until combined.
  7. Divide batter evenly into muffin liners.
  8. Sprinkle crumble topping evenly over batter.
  9. Bake at 375ºF for 5 minutes, then turn oven temperature down to 350ºF and continue baking until topping is golden and a toothpick inserted in center is clean, about 13-17 more minutes.
Recipe Notes

To find tulip baking cups, click here

To find floral tulip baking cups, as seen on TikTok, click here