If you’re a fan of Ghibli movies, you may remember the cute Susuwatari or Soot Sprites from Spirited Away and My Neighbor Totoro. These easy-to-make chocolate covered treats are also known as haystacks or tumbleweeds. They’re often made with shredded coconut or chow main noodles. I love using potato stick snacks for a delicious, crunchy salty-sweet snack.
In Spirited Away, the cute sprites are fed handfuls of Japanese konpietō candy. If you aren’t able to find it, candy star sprinkles are a nice substitute for decorating your Soot Sprites. (See the links below.)
Soot Sprite Treats
by Mari Vasseur
Chocolate covered potato stick snacks shaped like the beloved Spirited Away Soot Sprites
⅔cup (65g)chopped toasted salted cashews or peanuts (optional but recommended)
2cups (340g)semisweet chocolate chips
1cup (170g)butterscotch chips
1tablespoon (15ml)vegetable oil or neutral oil of your choice
A few dropsblack oil based food coloring (optional)
48Candy eyes
Konpeitō candy or pastel star candy sprinkles
Instructions
Line 2 large baking sheets with parchment paper or wax paper. In an extra-large bowl, combine the potato sticks and nuts.
In a medium-sized microwave-safe bowl, combine the chocolate chips, butterscotch chips and the oil. Heat in the microwave for 20 second bursts, stirring gently between each burst, until melted and smooth. Stir in the food coloring if using.
Pour the melted chocolate mixture over the potato stick mixture. Stir gently with a spatula until the mix is completely coated with the melted chocolate.
Scoop or spoon rounded 2-tbs-size portions of the mixture onto the baking sheets. Add candy eyes and stars. Refrigerate until set, about 20 minutes.
Do you ever feel like someone is watching you? These spooky Cyclops S’mores Bites can’t help but stare at you. They’re a fun, easy-to-make Halloween treat. Mini graham cracker crusts are filled with a sweet, silky chocolate filling and topped with monster eyeball marshmallows.
Cyclops S'mores Bites
Silky chocolate filling in a graham cracker crust, topped with spooky monster eyeball marshmallows
Preheat the oven to 350ºF (180ºC). Line a 24-serving muffin pan** with mini cupcake liners.***
In a medium-size bowl, whisk together the graham cracker crumbs, brown sugar and flour until well combined. Stir in the melted butter until the crumbs are evenly coated and the mixture looks like wet sand.
Evenly distribute the crumb mixture into the muffin cups. Press the crumbs firmly into the bottoms and up the sides of the muffin cups, using a pastry tamper, the flat bottom of a small shot glass or a 1/8 cup measuring cup. Bake for 5 minutes. Set aside to cool.
In a medium-size microwavable bowl, heat the sweetened condensed milk and the chocolate chips together in the microwave for 20 second burst, stirring in between each burst, until melted and smooth. (Alternately, you can melt the mixture in a medium-size saucepan over low heat.)
Working quickly, fill the graham cracker crusts almost to the top with the melted chocolate mixture using a small scoop or a piping bag. Carefully remove the chocolate-filled crusts from the muffin pan and top each one with a monster eyeball marshmallow. Enjoy as is or place a few at a time on a microwave safe plate and heat them in the microwave for 7-10 seconds for a gooey eyeball treat.
Notes
*Marshmallow eyeballs are sold at Walmart and World Market.**To find the muffin pan I used, click here.***To find mini muffin liners, click here.
What’s your self care indulgence? Mine is chocolate. These Triple Chocolate Brownie Cookies are the ultimate brownie cookies with the perfect combination of chocolate to satisfy any craving. They taste just like brownies with rich, fudgy centers and crisp edges. A sprinkle of sea salt flakes gives them the perfect balance.
I was inspired to create these cookies after I paid $5 for one disappointing chocolate cookie at a posh bakery. That impressive looking cookie promised gooey decadence, but it was dry and crumbly. I set out to create a cookie that does not disappoint. To achieve the perfect fudgy texture, it’s important not to over bake your cookies. To avoid over baking, I suggest baking one cookie as a test to determine your optimal baking time.
2tablespoons (12g)unsweetened Dutch process cocoa powder
1 teaspoonbaking powder
¾teaspoonfine sea salt
½cup (100g)packed brown sugar
6tablespoons (75g)granulated sugar
2largeeggs
1 ½teaspoonspure vanilla extract
½cup (85g)semisweet chocolate chips
½cup (85g)milk chocolate chips
sea salt flakes**for sprinkling
Instructions
Melt the chopped semisweet chocolate, the bittersweet chocolate and the butter together in large heatproof bowl set over a pan of barely simmering water, making sure the water doesn't touch the bottom of the bowl. Stir occasionally until smooth. Remove from heat and cool slightly. (Alternately you can melt the chocolate and butter in the microwave in short bursts, stirring after each one.)
In a medium bowl, whisk together the flour, cocoa powder, baking powder and salt until well combined.
In a large bowl, whisk together the brown sugar, sugar, eggs and vanilla extract until smooth and well combined, about 2-3 minutes. With a rubber spatula, stir in the melted chocolate mixture until combined.
Stir in the flour mixture just until combined. Fold in the chocolate chips. Refrigerate the cookie dough for about 5-10 minutes, just long enough to make the dough easier to work with.
Meanwhile, preheat the oven to 350ºF (180ºC). Line 2 large cookie sheets with parchment paper.
Roll 2-tablespoon (40g) size portions of cookie dough into balls. I used a #30 portion scoop.*** Place the dough balls on the cookie sheet, about 3 inches apart. Bake until the tops of the cookies are set and beginning to crack, about 9-11 minutes, being careful not to over bake. Cool the cookies on the cookie sheet for 1 minute, then transfer to a cooling rack. Sprinkle the warm cookies with sea salt flakes.
Spring is finally here and Easter is around the corner, so I couldn’t resist making these cute, melt-in-your-mouth Miffy inspired bunny cookies. They’re made of tender coconut shortbread topped with icing and sprinkled with coconut flakes. Coconut bunnies make perfect Easter treats. I happened to have a Miffy cookie cutter, but any 3-inch (7.6cm) bunny cookie cutter works too.* You can also use a pattern to cut out the cookies with a small paring knife. Click here for a Miffy-inspired cookie pattern. Coconut bunnies make perfect Easter treats. This shortbread recipe also works beautifully as vanilla flavor. If you prefer vanilla, refer to the notes below.**
Miffy Inspired Coconut Cookies
by Mari Vasseur
Tender, melt-in-your-mouth bunny shaped coconut shortbread cookies with icing and coconut flakes
In a large bowl, beat the butter, powdered sugar, and salt with an electric mixer on medium speed, until smooth and pale. Beat in the extracts and coconut flakes until well blended. On low speed beat in the flour, just until combined.
Form the dough into 2 disks. Wrap with plastic wrap and refrigerate for 2 hours or up to overnight.
Line 2 large baking sheets with parchment paper. On a lightly floured surface, roll the dough to a scant 1/4-inch (.6cm) thick. Cut out the cookies using a 3-inch (7.6cm) bunny cookie cutter. If you don't have a cookie cutter you can use the provided pattern and cut the cookies out with a small paring knife. Place the cut cookies about 2 inches (5cm) apart onto the prepared baking sheets. Freeze the cookies for 10 minutes.
Meanwhile, preheat the oven to 350ºF (180ºC). Bake the cookies until set and light golden, about 9-11 minutes. Let the cookies cool on the baking sheet for 2 minutes, then transfer them to a cooling rack to cool completely.
Coconut Icing
In a medium-sized bowl, whisk together the powdered sugar, 2 tablespoons of half & half, the coconut extract and salt until smooth. Whisk in additional half & half as needed to achieve the desired consistency.
Apply the icing to the cookies by dipping the tops of the cookies in the icing or by spreading the icing on with a small offset spatula. Sprinkle with coconut flakes.
To make the Miffy or bunny faces, melt the chocolate ships in a small heat safe bowl, in the microwave. Transfer the melted chocolate to a piping bag fitted with a narrow round tip. For the Miffy faces, pipe an x for the mouth and dots for the eyes. For Easter bunnies, pipe eyes, noses and mouths. You can also use small candies for the noses.
Notes
*To find bunny cookie cutters, click here.**To make vanilla shortbread cookies, omit the vanilla extract, coconut flavoring and the coconut flakes. Replace with 1 1/2 teaspoons vanilla bean paste. To make vanilla icing, replace the coconut flavoring with pure vanilla extract***To find the coconut flavoring I used, click here.
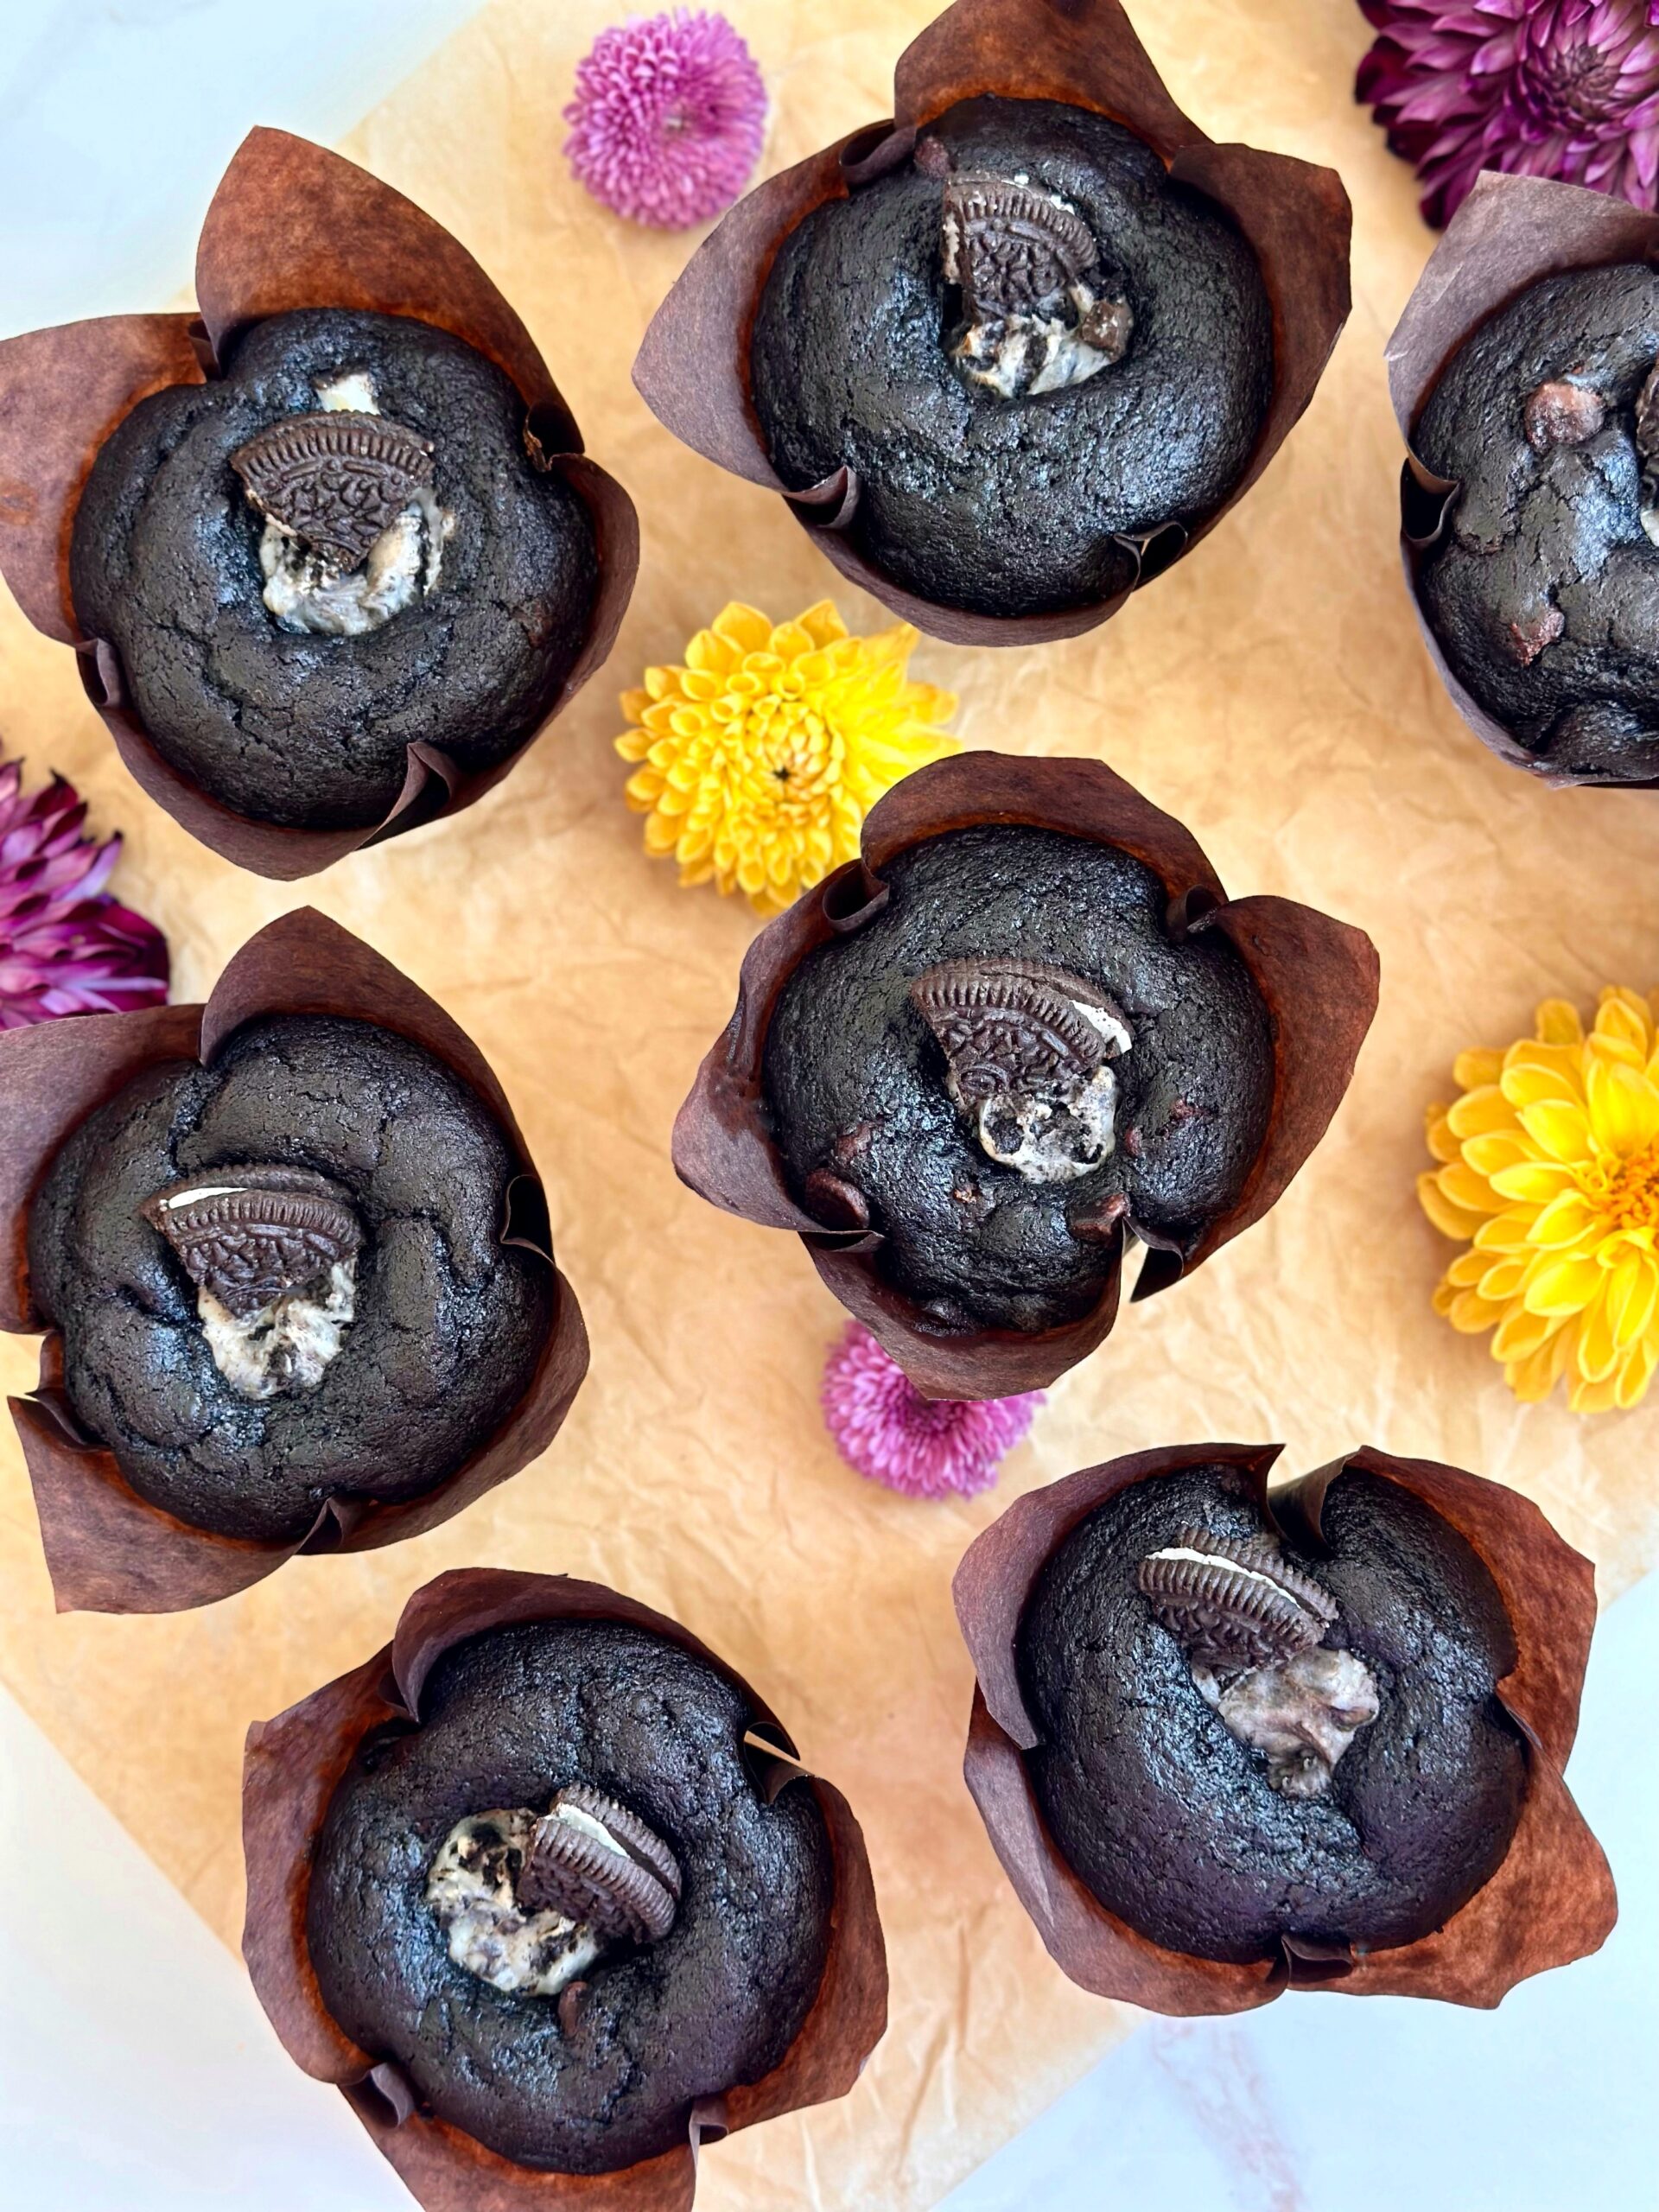
If you’re craving something sweet, decadent and intensely chocolate, these Double Chocolate Oreo Muffins might be just what you need. They were born when I had a craving for Double Chocolate Muffins, but I didn’t feel like driving all the way to my favorite cafe. I noticed the internet had an overwhelming number of chocolate muffin recipes, each one claiming to be the best. I said goodbye to the sea of chocolate muffin recipes and went to work on a muffin recipe that fulfilled my dream muffin wish. I used black cocoa powder to capture the Oreo essence, semisweet chocolate chips, for those little pools of melted chocolate throughout and a cookies and cream filling. I used tulip muffin liners* because they hold more batter so you end up with more generous sized muffins. They’re high recommended if you want to make the muffins exactly the way I made them.
The most challenging part of this recipe is testing for doneness, because you don’t want to over bake these. Insert a toothpick or a cake tester into the cake part of the muffins. If there are a few moist crumbs on it, that’s what you’re looking for. If there’s melted chocolate on it, you’ve likely hit a chocolate chip, so test again with a clean toothpick. If you see cake batter on the toothpick, the muffins need more time in the oven.
Double Chocolate Oreo Muffins
Dark chocolate muffins with semisweet chocolate chips and cookies and cream filling
½ cup (56g)black or dark unsweetened cocoa powder, sifted
2teaspoonsbaking powder
½teaspoonbaking soda
1teaspoonfine sea salt
1cup (200g)granulated sugar
¼cup (50g)packed brown sugar
⅔cup (152ml)vegetable oil or neutral oil of your choice
2largeeggs, room temperature
1teaspoon pure vanilla extract
1cup (227g)sour cream, room temperature
⅓cup (78ml)whole milk, room temperature
1 ⅓cups (227g)semisweet chocolate chips
3 Oreo chocolate sandwich cookies, quartered
Instructions
Cookies & Cream Filling
In a medium bowl, mix together the cream cheese, sugar and vanilla. Gently fold in the Oreos.
Double Chocolate Muffins
Preheat the oven to 400ºF (200ºC). Line a 12-serving muffin pan with tulip liners*
In a large bowl, whisk together the flour, cocoa powder, baking powder, baking soda and salt.
In a separate large bowl, whisk together the granulated sugar, brown sugar, oil, eggs, vanilla extract, sour cream and milk until well combined. Stir the wet ingredients into the dry ingredients just until combined. Do not over mix. Fold in the chocolate chips.
Scoop the batter evenly into the muffin cups, about 3 1/2 oz (99g) in each one. Scoop or spoon a scant tablespoon-size dollop of the filling into the center of each muffin.
Bake for 5 minutes, then turn the oven temperature down to 350ºF (180ºC). Continue baking until a toothpick inserted into the cake part of the muffins comes out with a few moist crumbs on it, about 7-10 more minutes. If the toothpick hits a melted chocolate chip, reinsert a clean toothpick and test again. Cool in the pan for 5 minutes, then transfer to a cooling rack. Top each muffin with a quarter piece of Oreo cookie.
Notes
*Tulip muffin liners are preferred. To find tulip muffin liners, click here. You can also make your own by pressing 6-inch squares of parchment paper into the muffin pan cups. If you want to use standard muffin liners, fill them 3/4 full and use less filling. Standard muffin liners hold less batter so you'll end up with a a couple of extra muffins. Keep in mind that the baking time will be shorter.
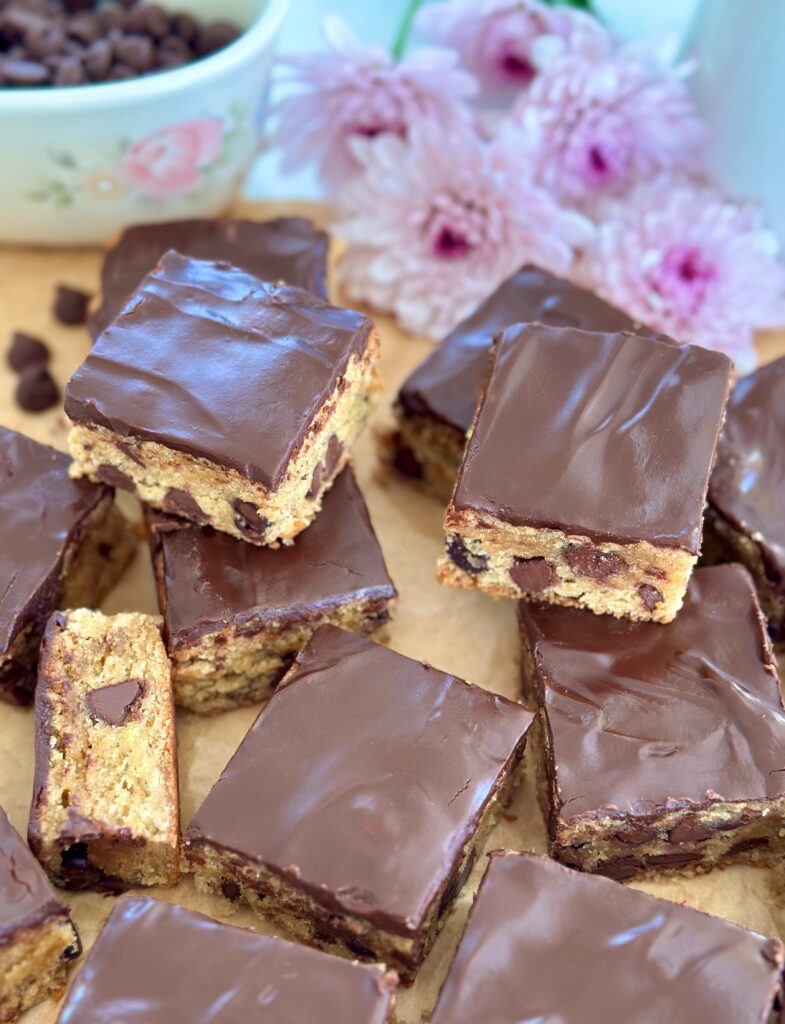
The combination of peanut butter and chocolate feels so nostalgic to me. This is a beloved recipe from my childhood with those comforting flavors. We used to make these delicious Peanut Butter Chocolate Chip Bars with melted chocolate chips on top, but I upgraded them with a silky chocolate glaze. My family always devours these easy-to-make, customizable bars. Feel free to add chopped peanuts, peanut butter chips or even a sprinkle of sea salt on top.
1cup (128g)all purpose flour, siftedplus 1 teaspoon for the chocolate chips
2tablespoons (18g)cornstarch
1 teaspoonbaking powder
¼teaspoonfine sea salt
¼cup (57g)unsalted butter, room temperature
½cup (128g)creamy peanut butter
¾cup (150g)packed brown sugar
¼cup (50g)granulated sugar
2largeeggs, room temperature
1 ½teaspoonspure vanilla extract
1cup (170g)semisweet chocolate chips
Glaze
½cup (71g)semisweet chocolate, chopped
2tablespoons (28g)unsalted butter
1teaspoonlight corn syrup
Instructions
Bars
Preheat the oven to 350ºF (180ºC). Line the bottom of an 8-inch square baking pan with parchment paper. Grease and flour the insides.
In a medium-sized bowl, whisk together the flour, cornstarch, baking powder, and salt until well combined.
In a large bowl, beat the butter and peanut butter together, with an electric mixer, until smooth and well blended. Add the brown sugar and granulated sugar. Beat until light and fluffy. Beat in the eggs and vanilla extract in 3 separate additions, making sure each one is incorporated before adding the next. Stir in the flour mixture just until combined.
In a small bowl, toss the chocolate chips with 1 teaspoon of flour then stir them into the batter. Transfer the batter to the baking pan. Smooth the top with a spatula. Bake until the top is golden brown and a toothpick inserted into the center of the bars comes out with a few moist crumbs on it, about 20-25 minutes. Do not over bake. Let cool in the pan. Spread the chocolate glaze over the cooled bars.
Glaze
Combine the glaze ingredients in a heat-safe bowl set over a pan of gently simmering water, making sure the water doesn't touch the bottom of the bowl. Stir occasionally until melted and smooth.
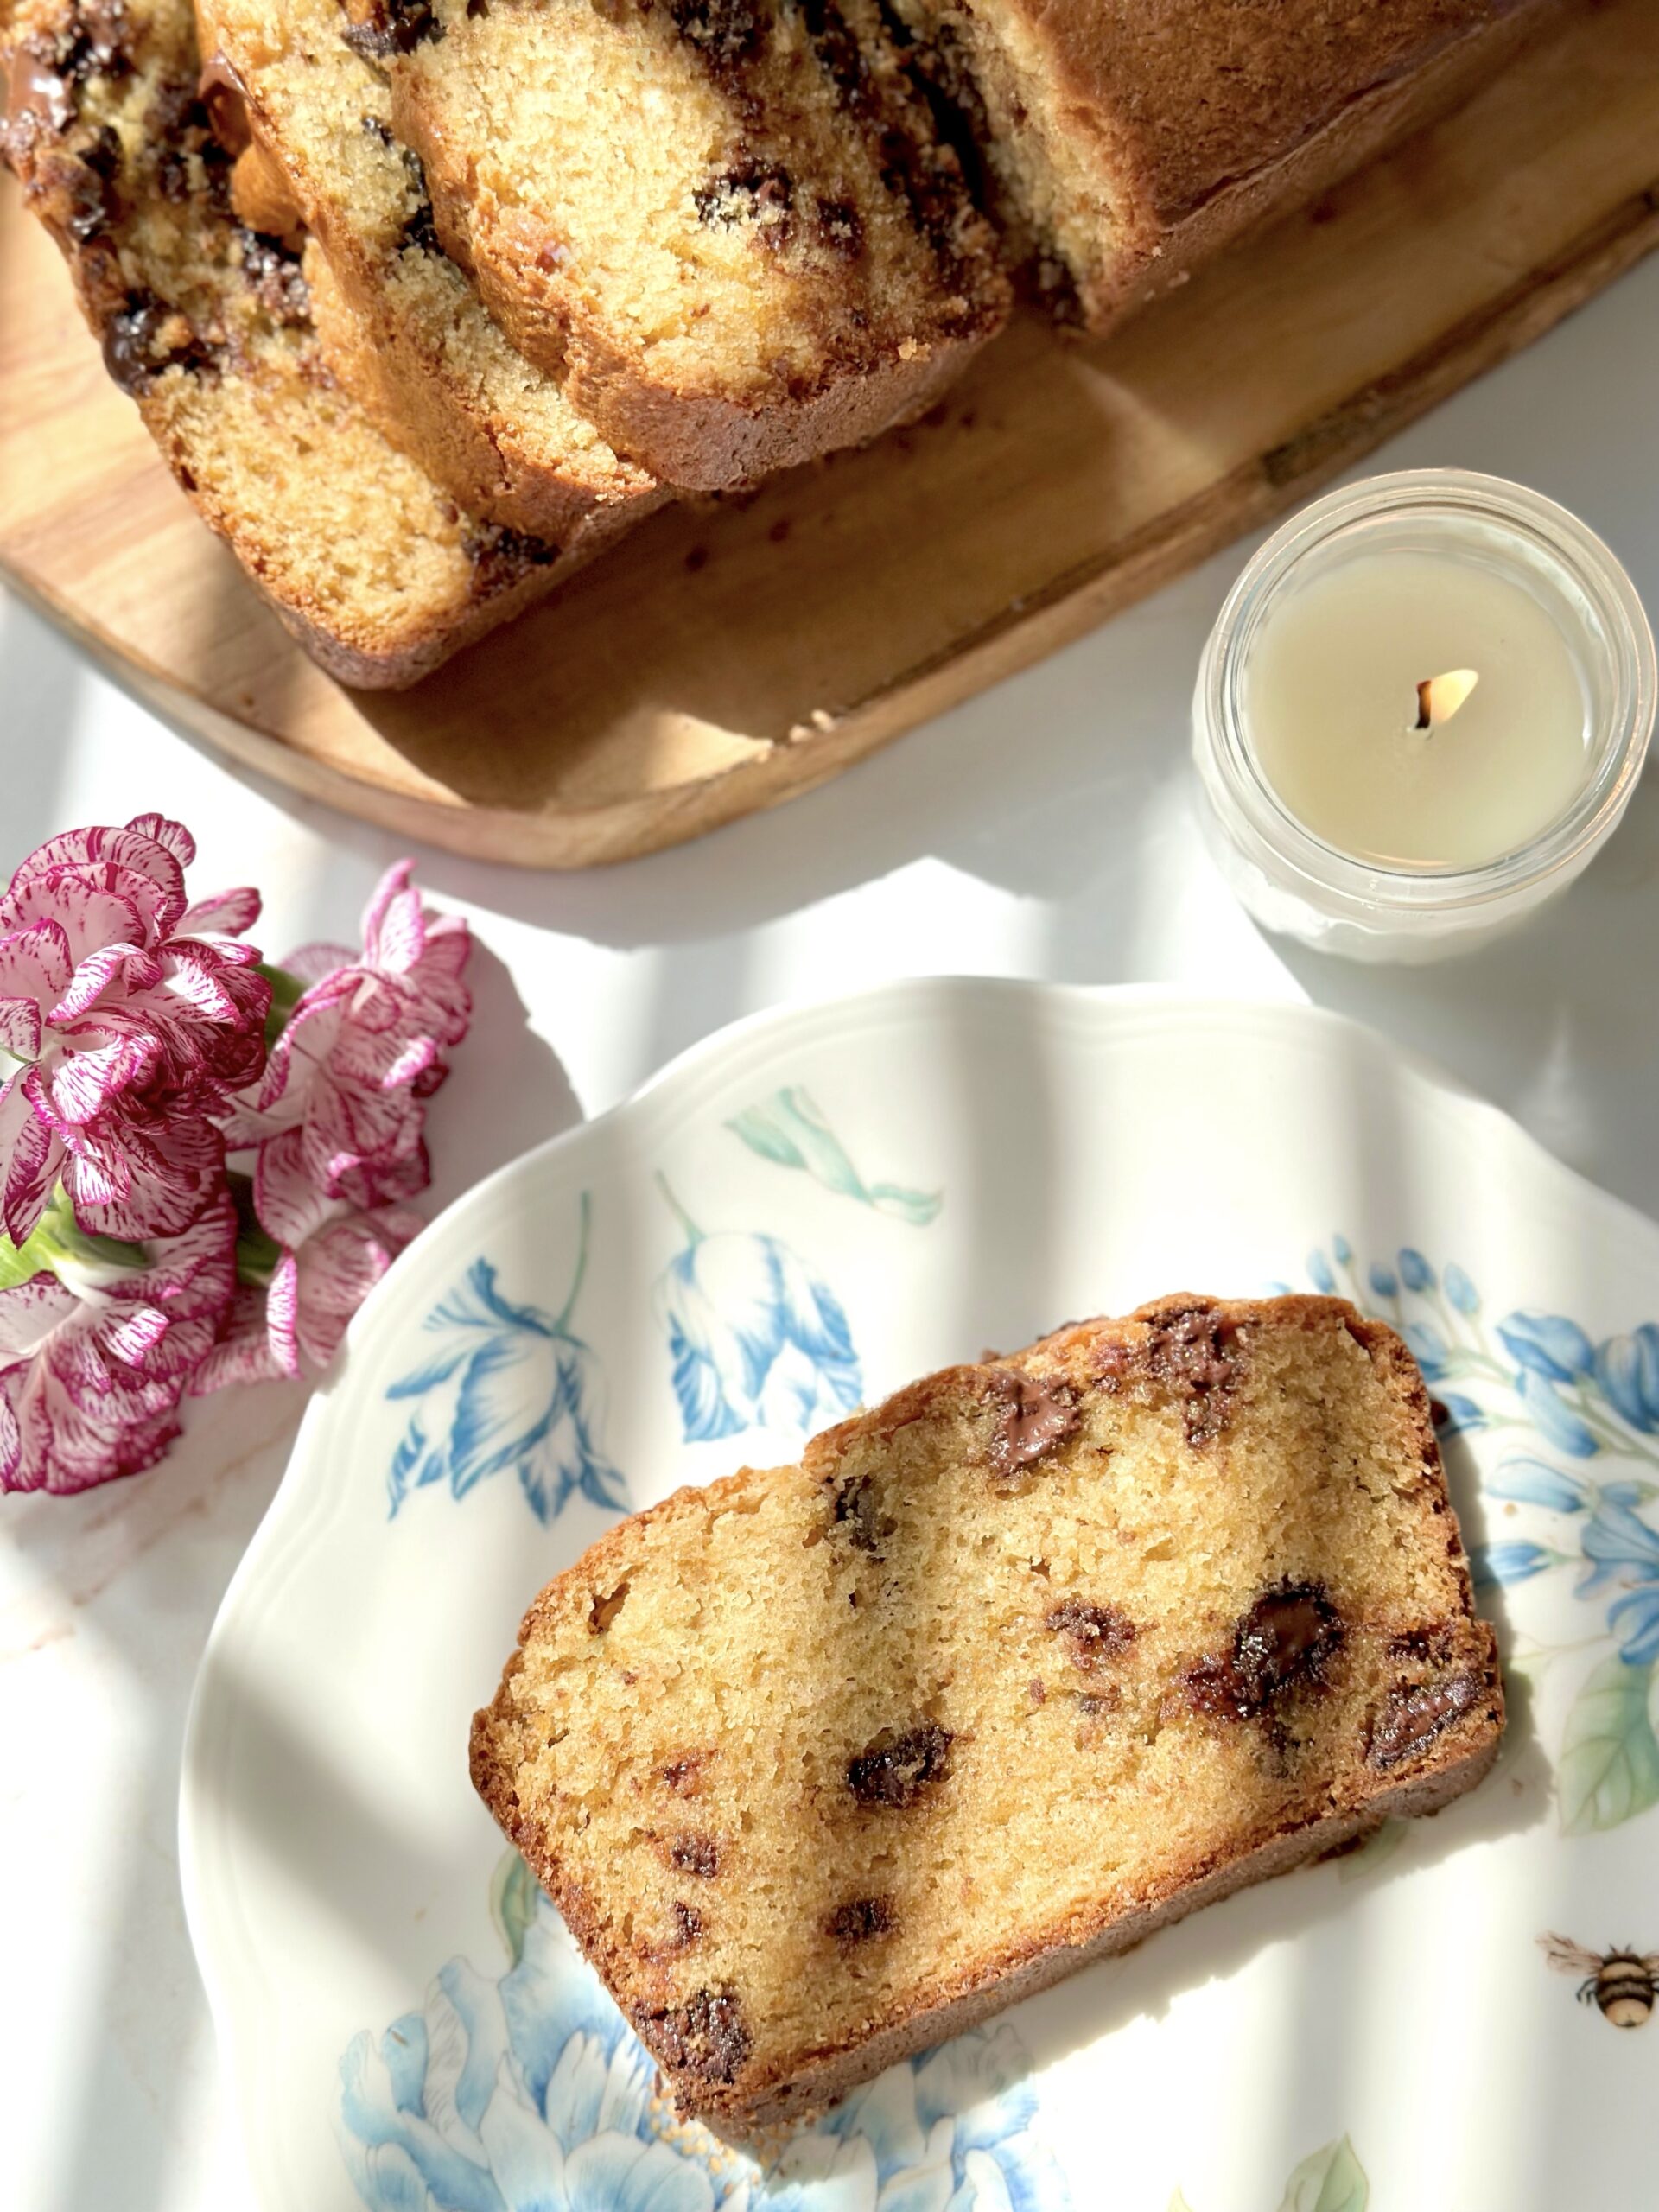
This is the ultimate chocolate chip bread! There are no cookies in this recipe, but it tastes so much like freshly baked chocolate chip cookies that Chocolate Chip Cookie Bread is the perfect name for it. Brown sugar, vanilla and semisweet chocolate chips really help to mimic that beloved chocolate chip cookie flavor. I love the big pockets of chocolate that come from using jumbo chocolate chips, but of course you can use regular or mini chocolate chips if you prefer.
I typically wait until a loaf is cooled off before slicing it, but in this case, I wanted to capture the melted pools of chocolate for the video. The fresh baked chocolate chip aroma was so heavenly, that it took all of my willpower not to immediately devour the entire loaf! It’s easier to slice a fresh baked loaf when it’s cooled off. But if you want to experience the melty chocolate chips, warm your slice in the microwave for 8-10 seconds.
Chocolate Chip Cookie Bread
A moist, tender loaf cake with brown sugar and chocolate chips that tastes just like chocolate chip cookies
Preheat oven to 375ºF (190ºC). Line the bottom of a 9 x 5-inch loaf pan with parchment paper. Grease and flour the insides.
In a medium-size bowl, whisk together the 1 3/4 cups (223g) flour, baking powder, baking soda and salt.
In a large bowl, cream the butter and brown sugar until light and fluffy. Beat in the egg, egg yolk and vanilla in 3 separate additions, making sure each one is fully incorporated before adding the next.
In a small bowl, whisk the milk and sour cream together.
Add the flour mixture to the batter in two additions, alternating with half of the milk mixture after each addition. Beat just until combined. Do not over mix.
Set aside a handful of chocolate chips for the top of the loaf. In a small bowl, toss the remaining chips with 1 teaspoon flour, making sure to coat them all, then fold them into the batter. This will help to prevent them from sinking. Transfer the batter to the prepared loaf pan. Top with the reserved chocolate chips.
Bake for 10 minutes. Turn the oven temperature down to 325ºF (165ºC) and continue baking until the loaf is golden brown and a toothpick inserted in center comes out clean, about 45-50 more minutes. Cool the loaf in pan for 10 minutes then turn the loaf out onto a cooling rack.
Notes
*If you want to use mini chocolate chips, use one cup (6 oz or 170g)
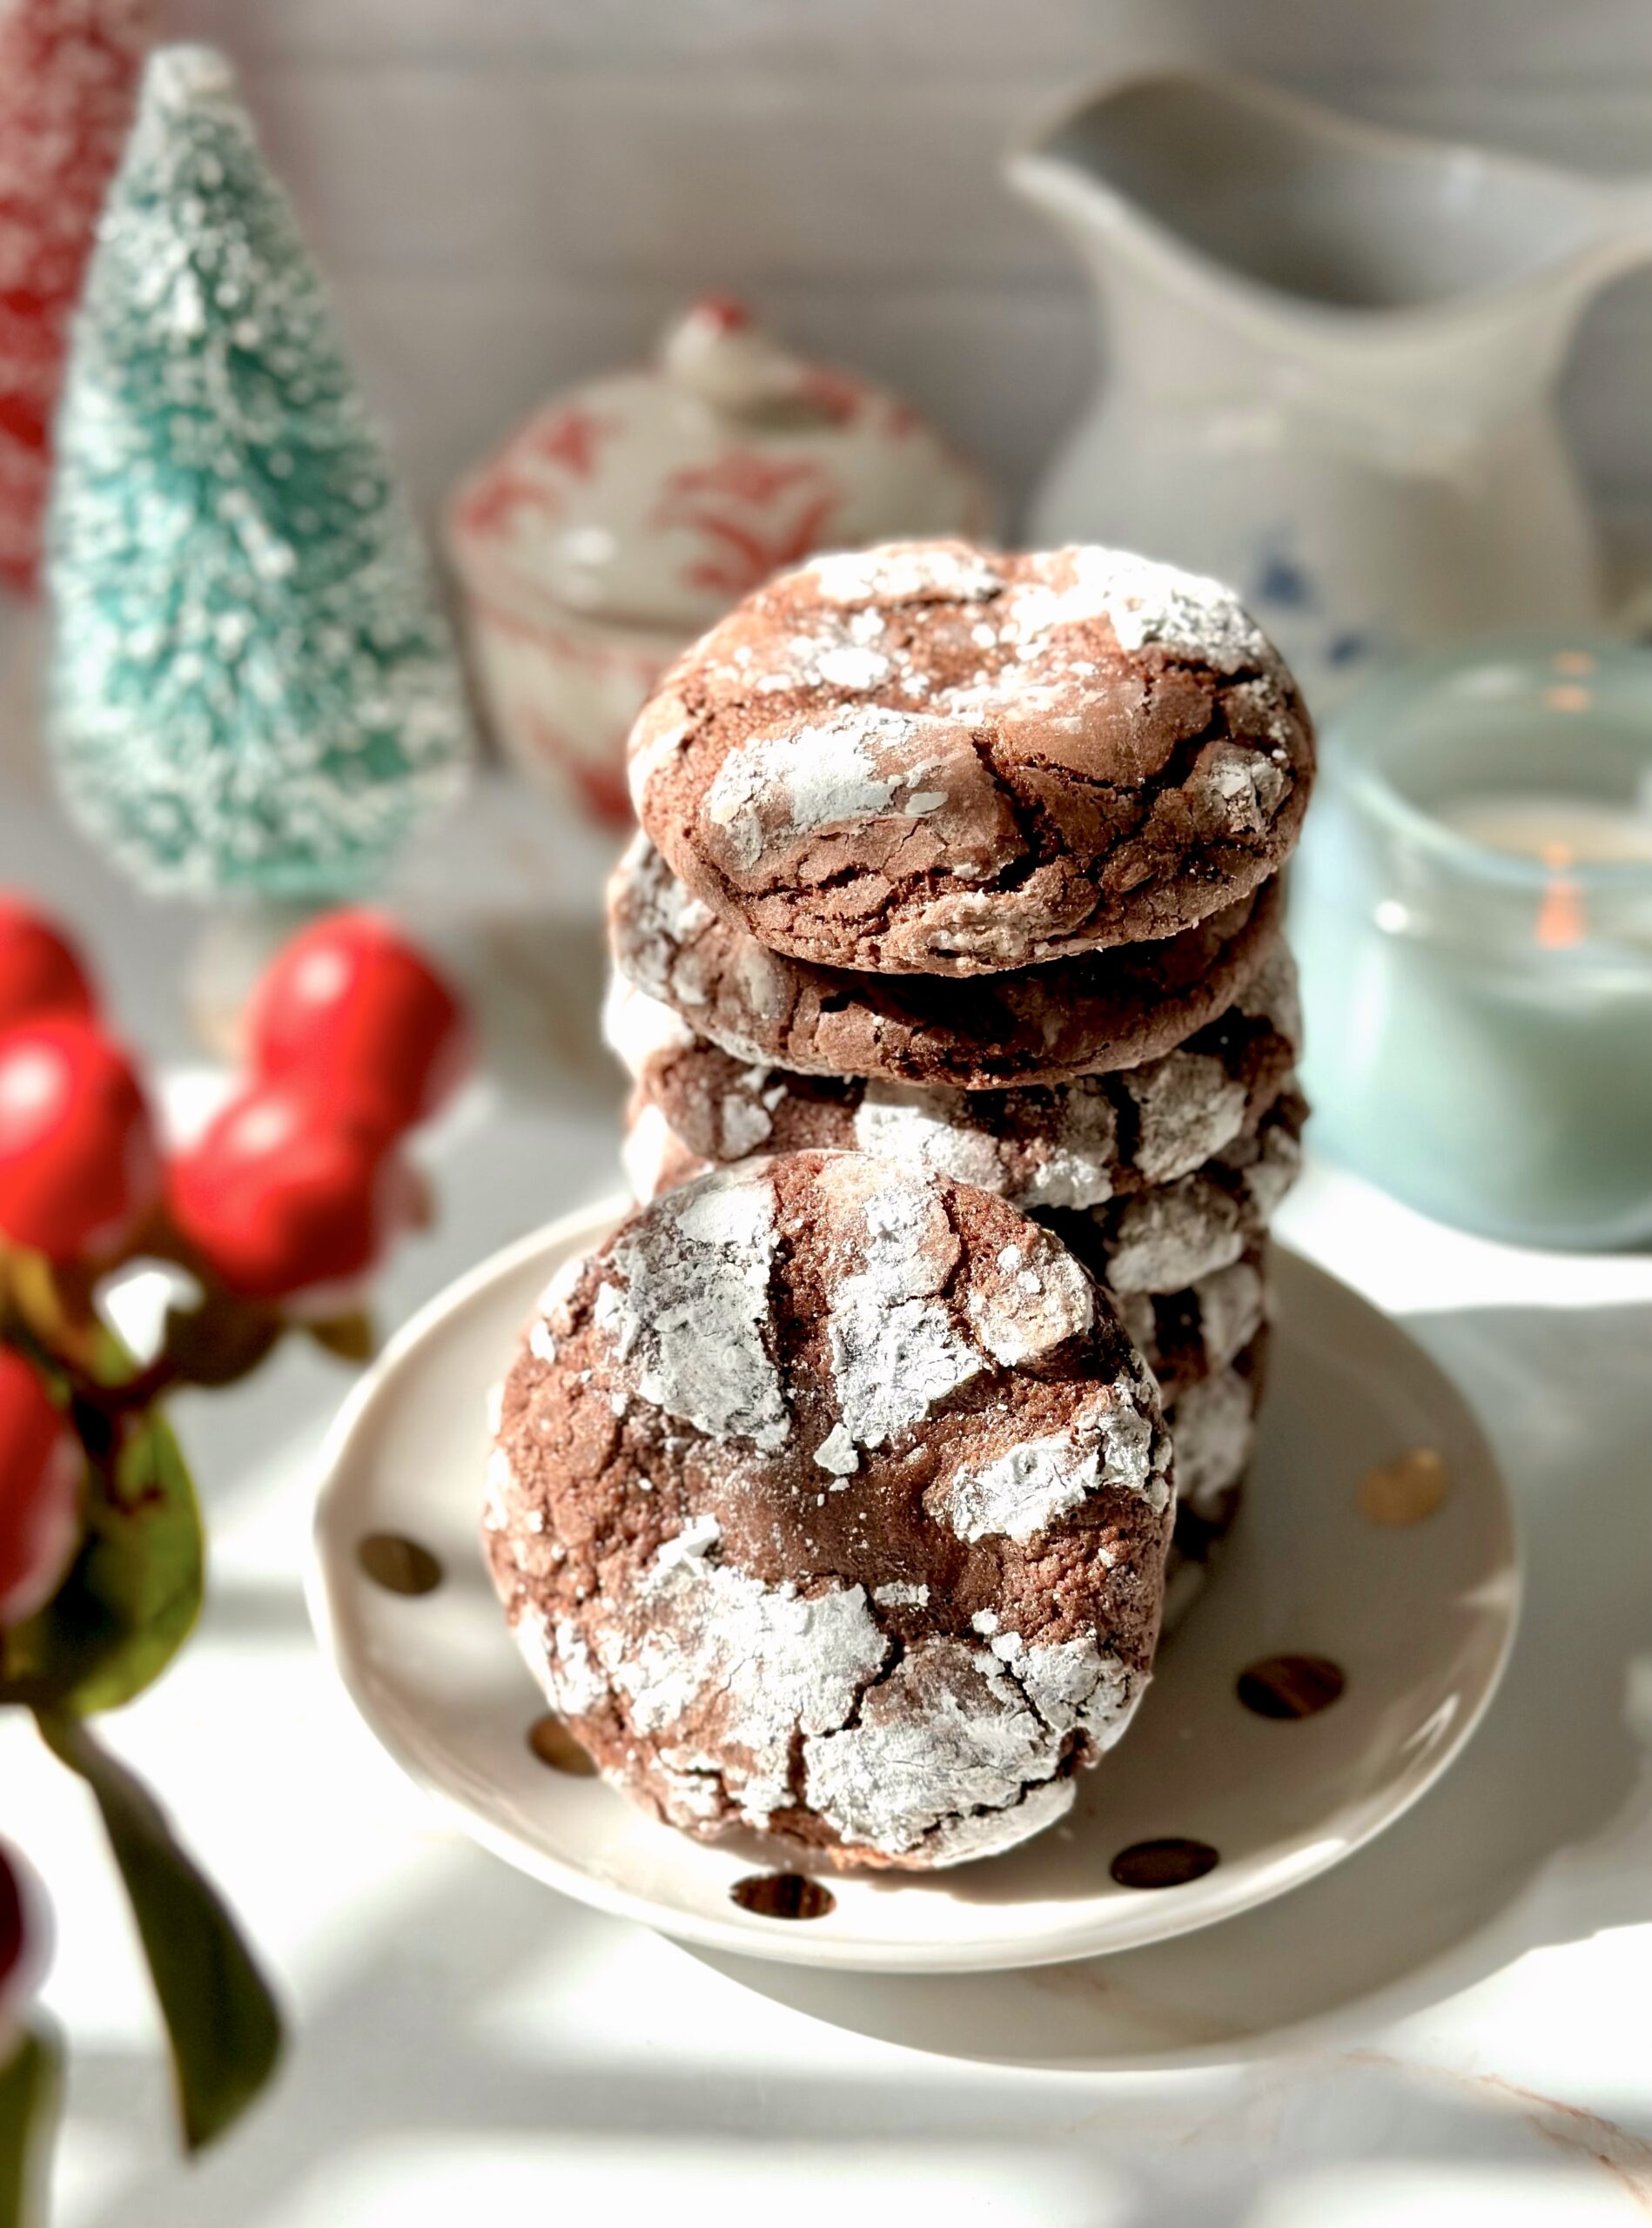
Chocolate Crinkle Cookies are traditional holiday cookies, probably because of the pretty, crackly powdered sugar covered exterior that reminds us of snow. They always seem to show up on cookie trays at Christmas time and I’ve loved them since I was a child. I decided to take my old favorites to another level by adding a surprise inside! Two years ago, I made some cookies with fudge filling that my family and friends raved over. They’re my Marshmallow Mudslide Cookies. To view the recipe, click here. I used the same concept for these Chocolate Crinkle Cookies. I filled them with a simple, smooth fudge filling that stays soft at room temperature. The results were absolutely delicious!
Fudge Filled Chocolate Crinkle Cookies
Chocolate crinkle cookies with a smooth fudge filling that stays soft at room temperature
2tablespoonsunsweetened cocoa powder, preferably Dutch process
1 ½teaspoonsbaking powder
½teaspoonfine sea salt
⅓cup (2 5/8 ounces)unsalted butter, softened
2 ½cups (9 5/8 ounces)powdered sugar, sifted and divided
2largeeggs
1 teaspoonpure vanilla extract
2ounces unsweetened chocolate, melted and cooled to room temperature
Instructions
Fudge Filling
In a double boiler or in the microwave*, melt chocolate chips and sweetened condensed milk together until smooth. Set aside to cool while preparing cookie dough.
Cover and refrigerate for two hours. Roll filling into 1-inch balls.
Chocolate Crinkle Cookies
In a medium bowl, whisk together flour, cocoa powder, baking powder and salt.
In a large bowl, beat butter with an electric mixer until light and fluffy.
Gradually beat in 2 cups (7 3/4 ounces) of powdered sugar until well combined. Set aside remaining 1/2 cup powdered sugar in a shallow dish.
Beat in eggs and vanilla in three separate additions, until smooth. Stop to scrape bowl as needed.
Beat in melted chocolate until combined. Beat in flour mixture just until combined.
Cover and refrigerate dough for 2 hours. Don't skip this step.
Preheat oven to 350ºF. Line two large baking sheets with parchment paper.
Roll dough into 15 2-inch balls, 1 1/4 ounce each. Flatten each ball into a 3-inch disk. Place a fudge ball in the center of each disk and wrap dough around it, pinching edges together to seal. Roll dough balls generously in remaining powdered sugar.
Place dough balls three inches apart on prepared baking sheets. Bake until cookies puff up and tops are set, about 11-13 minutes. Transfer cookies to a cooling rack.
Notes
*To melt fudge filling in microwave, heat for 30 seconds. Stir, then microwave for 10 second intervals, stirring until melted.MAKE AHEAD INSTRUCTIONS: To make cookie dough one day ahead, prepare cookie dough. Cover the surface with plastic wrap and refrigerate in a covered container up to 24 hours. To make fudge filling one day ahead, prepare filling and chill for 1 1/2 to 2 hours. Roll filling into 1-inch balls and place on a parchment lined tray. Cover tightly with plastic wrap and refrigerate up to 24 hours.
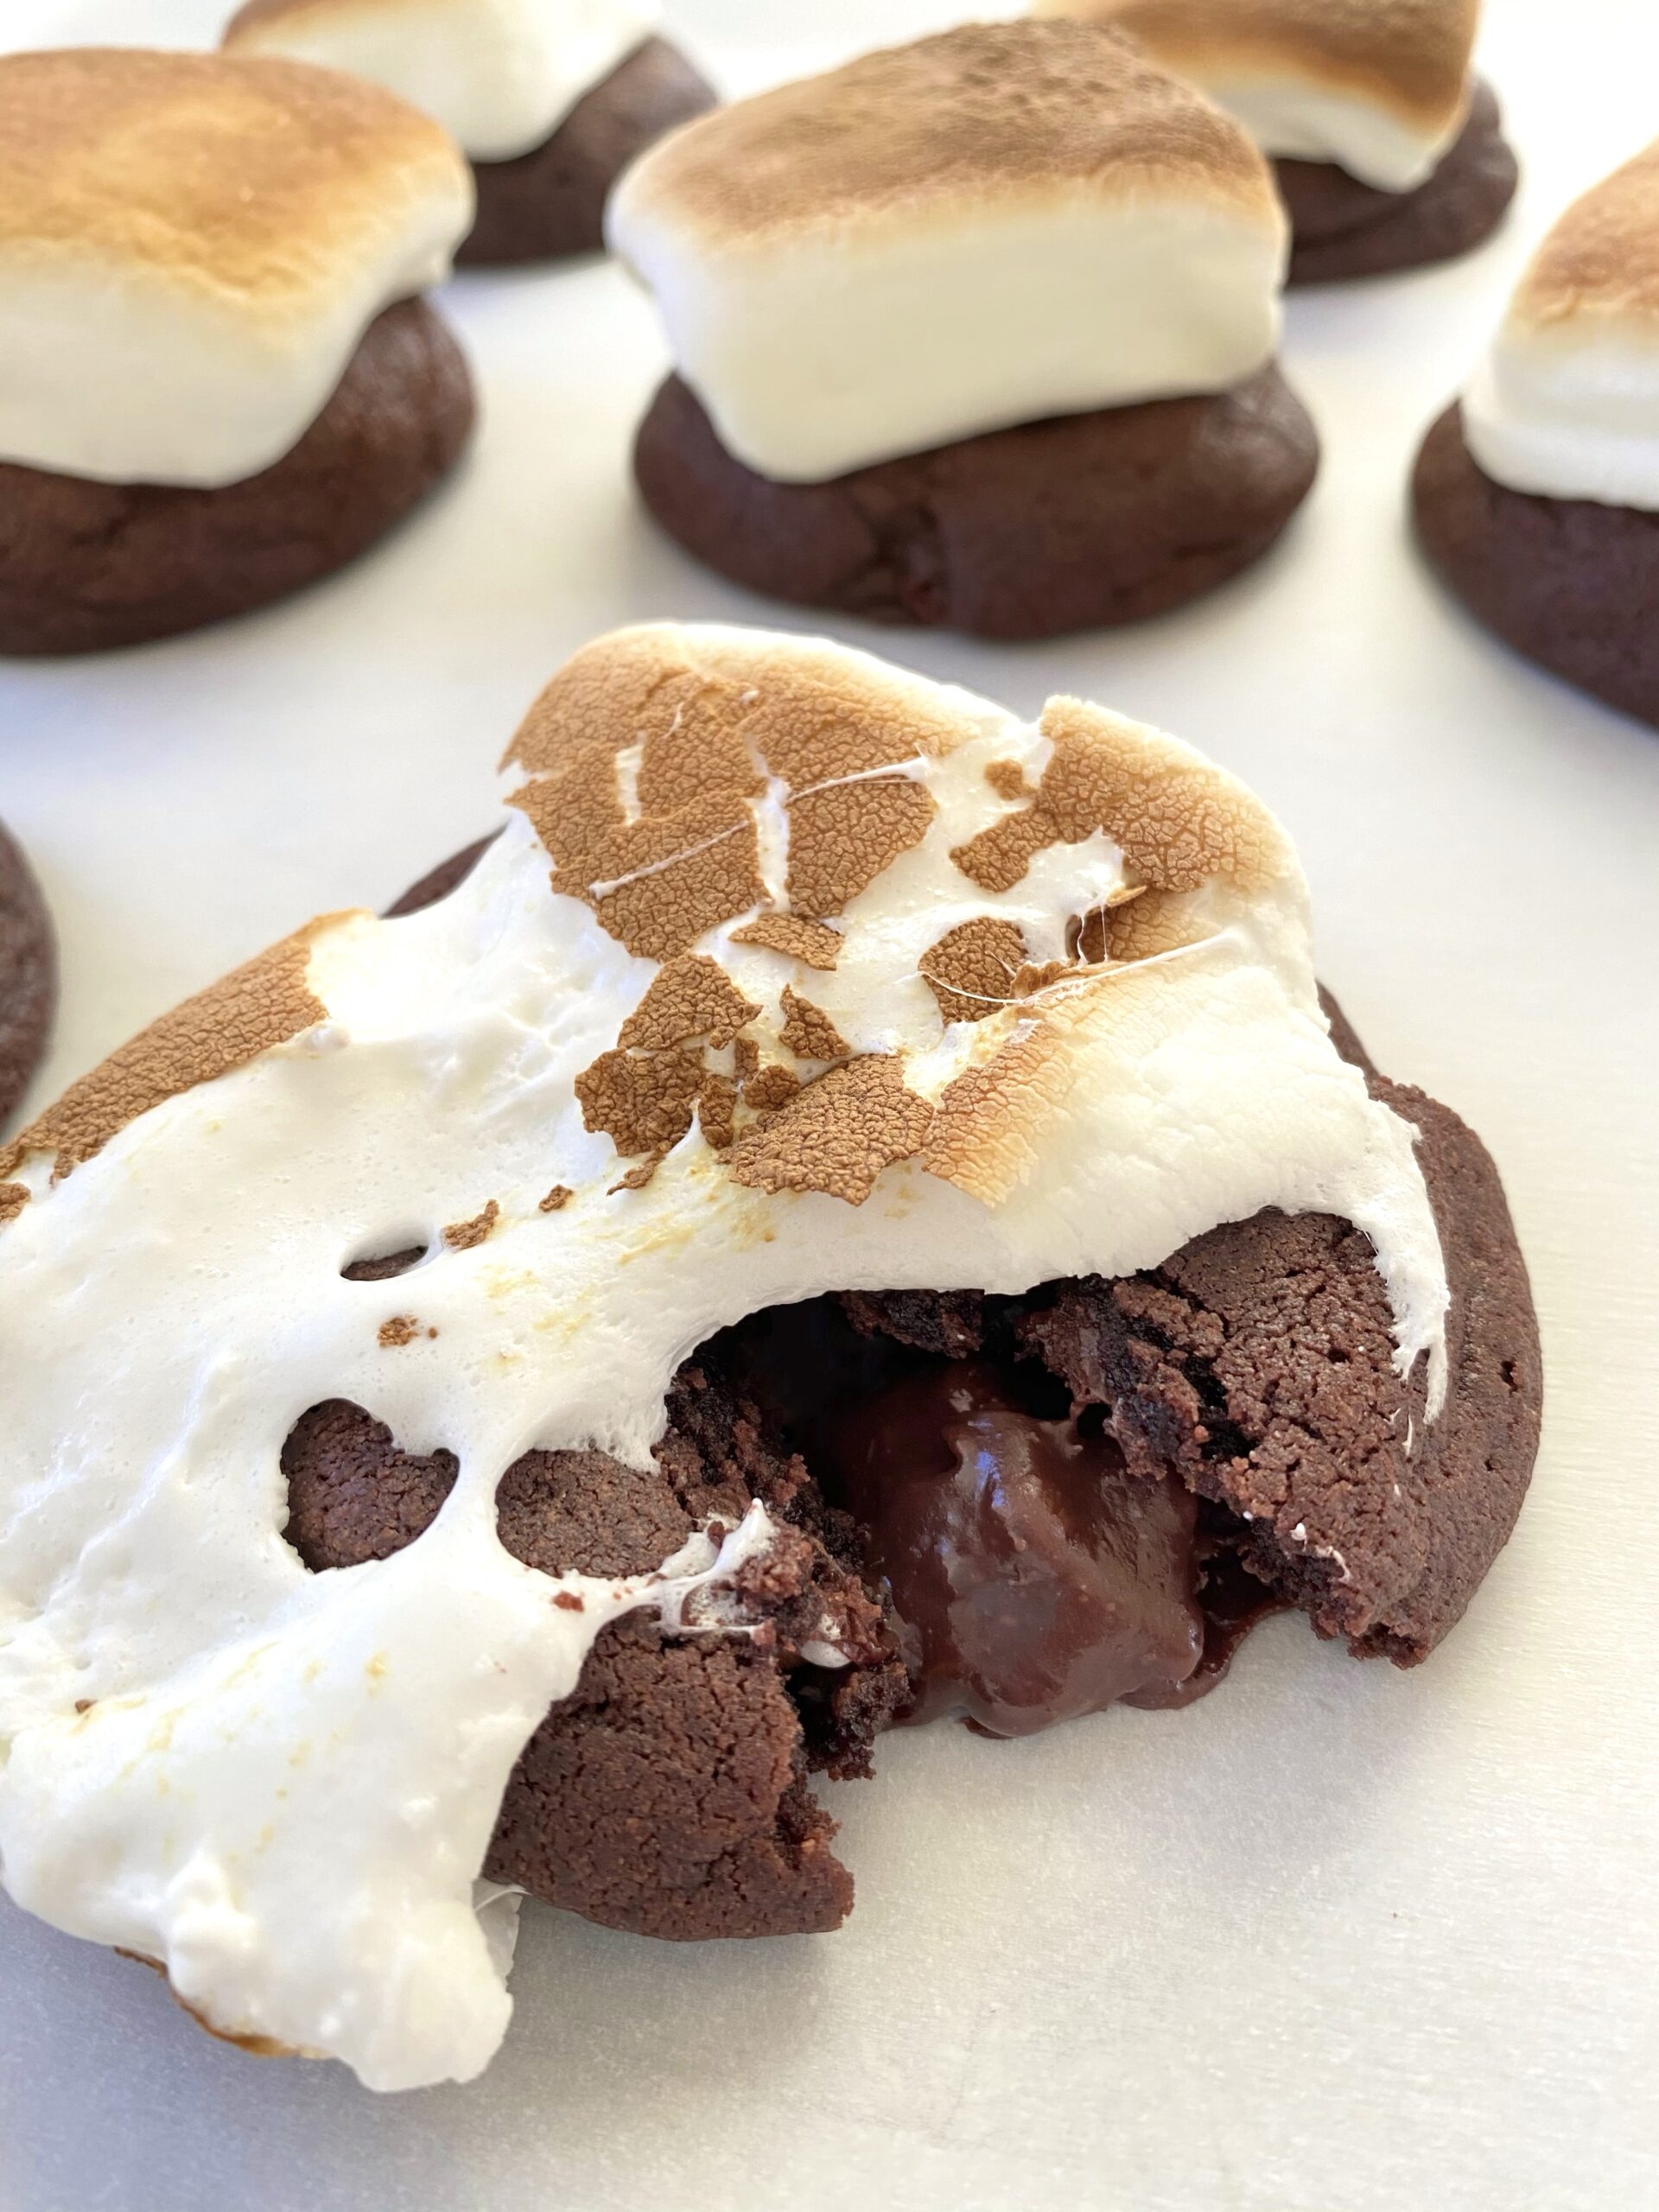
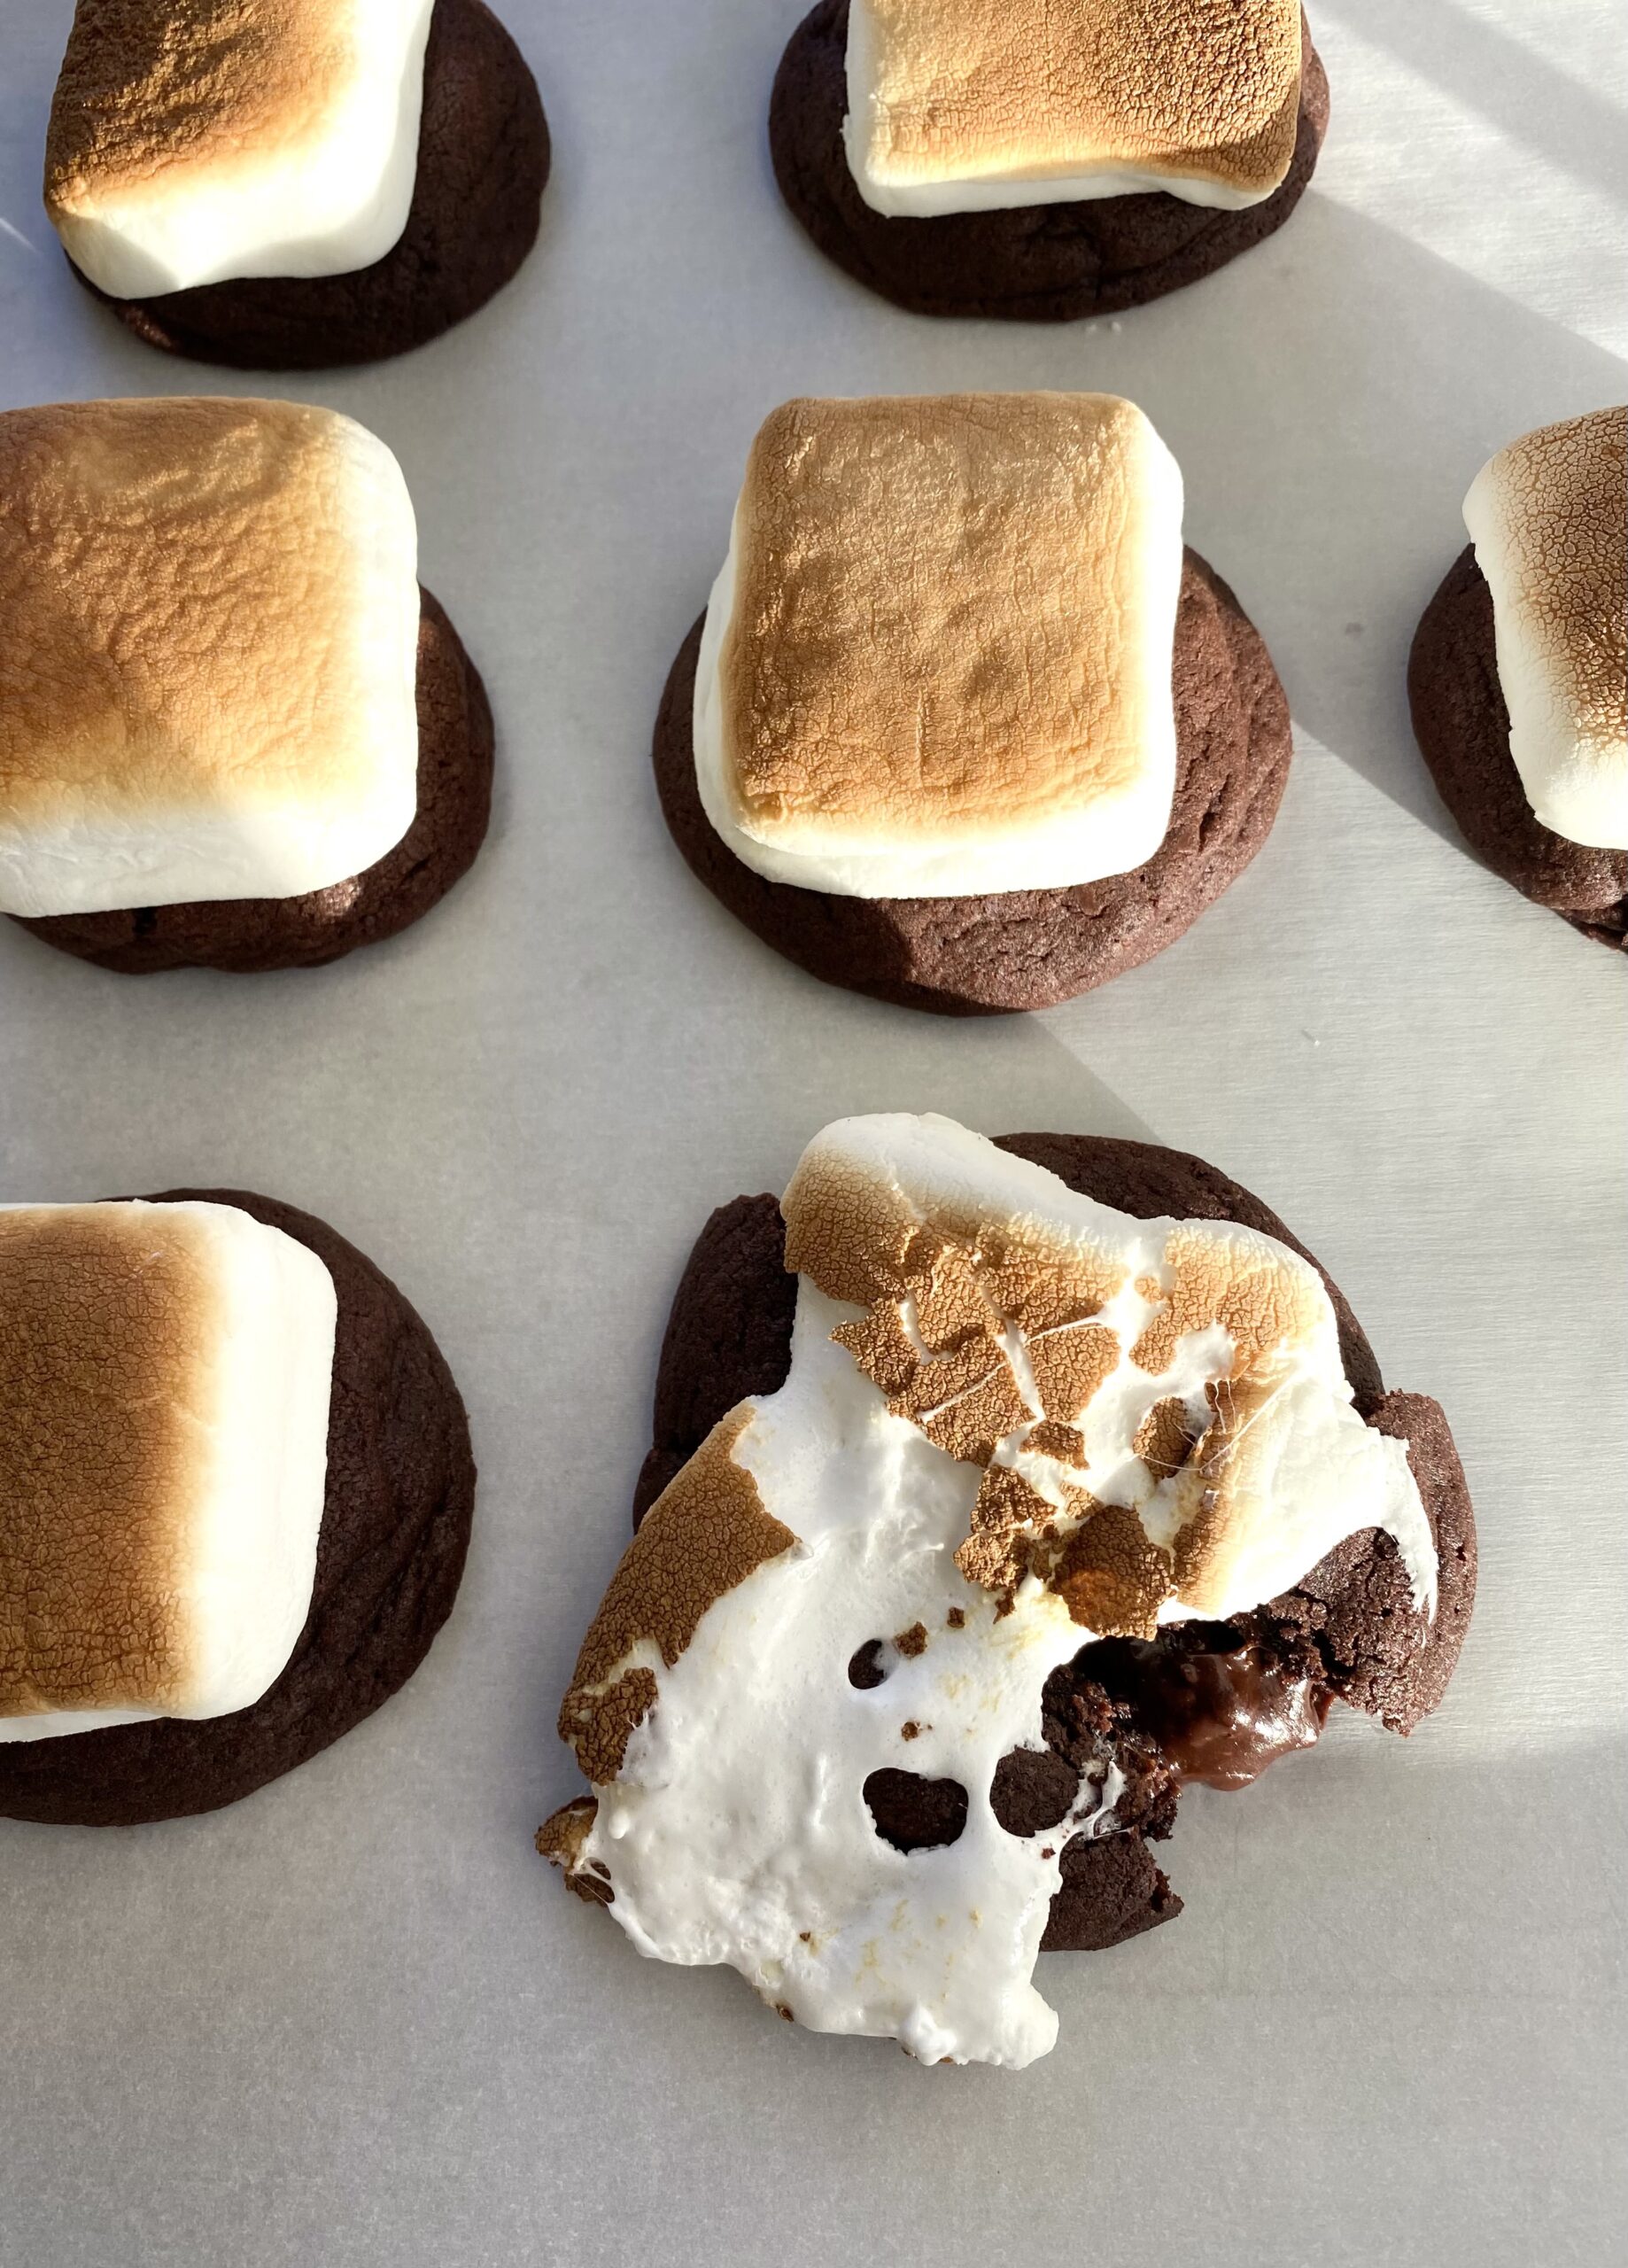
Have you ever had mudslide cake? It’s a deliciously messy chocolate cake with chocolate frosting and marshmallows, also known as Mississippi mud cake. I saw one covered in a layer of marshmallow fluff and it made its way into my dreams. I woke up with the inspiration to make a cookie version of the gooey mudslide cake.
I saw a few mudslide cookie recipes out there that used standard size marshmallows and chocolate chips mixed into the cookie dough. If you’ve ever baked with marshmallows, you know that they nearly disappear during the baking process. Chocolate chips melt beautifully into little pools of chocolate, but then harden once cooled to room temperature. I happily volunteered to address these challenges! After some trial and error, I created a satisfying cookie with plenty of gooey marshmallow goodness and a rich fudge filling that stays soft at room temperature. Dreams do come true!
Marshmallow Mudslide Cookies
by Mari Vasseur
Chocolate fudge-filled cookies topped with toasted marshmallows
⅔cup (74g)chopped toasted pecans or walnutsoptional
Cookies
2 ¼cups (287g)all purpose flour, sifted
½cup (45g)unsweetened Dutch Process cocoa powder, siftedpreferably dark
½teaspoonbaking powder
½teaspoonbaking soda
¼teaspoonfine sea salt
1cup (227g)unsalted butter, softened
2largeeggs
1teaspoonpure vanilla extract
1cup (200g)granulated sugar
¼cup (50g)packed brown sugar
22-24S'mores marshmallows or jumbo marshmallows*I used Kraft Jet-Puffed S'moreMallows
Instructions
Fudge filling
Melt the chocolate chips and sweetened condensed milk together in a double boiler or in the microwave in a medium-sized microwave safe bowl.** Stir gently until smooth.
Stir in the chopped nuts if using. Set aside to cool to room temperature.
Cookies
Preheat the oven to 350º (180ºC). Line 2 large cookie sheets with parchment paper.
In a medium-sized bowl, sift together the flour, cocoa powder, baking powder, baking soda, and salt until well blended.
In a large bowl, beat the butter, granulated sugar and brown sugar with an electric mixer at medium speed, until pale and fluffy. Mix in the eggs and the vanilla in 3 separate additions, making sure each addition is incorporated before adding the next. On low speed, mix in the flour mixture in 2 additions, just until combined.
Roll the fudge filling into 1-tablespoon-sized balls. Roll the cookie dough into 2-tablespoon-sized balls then flatten them into disks. Place a ball of fudge filling in the middle of each disk. Wrap the cookie dough around the ball of filling, sealing it completely.
Place the cookies about 2 inches apart onto the prepared cookie sheets. Bake until the tops of the cookies are set, about 9-11 minutes. Remove from oven.
Place a marshmallow on top of each cookie. Use a kitchen torch to toast the marshmallows or toast them in the broiler: Turn on the broiler. Transfer the cookies to an aluminum foil-lined cookie sheet. Broil the cookies until the marshmallows are toasted. This takes about 1 minute. WARNING: Use extreme caution and watch the cookies carefully when broiling. They can go from done to burnt in the blink of an eye!
Notes
*I used Kraft Jet-Puffed S'moreMallows, but if you're unable to find them, use jumbo marshmallows. Cut them in half with kitchen shears. Place them on the cookies cut side down.**To melt the fudge filling in microwave, heat for 20 seconds. Stir, then microwave for 10 second bursts, stirring until melted and smooth.