Blog

Lemon Scones

Lemon Scones

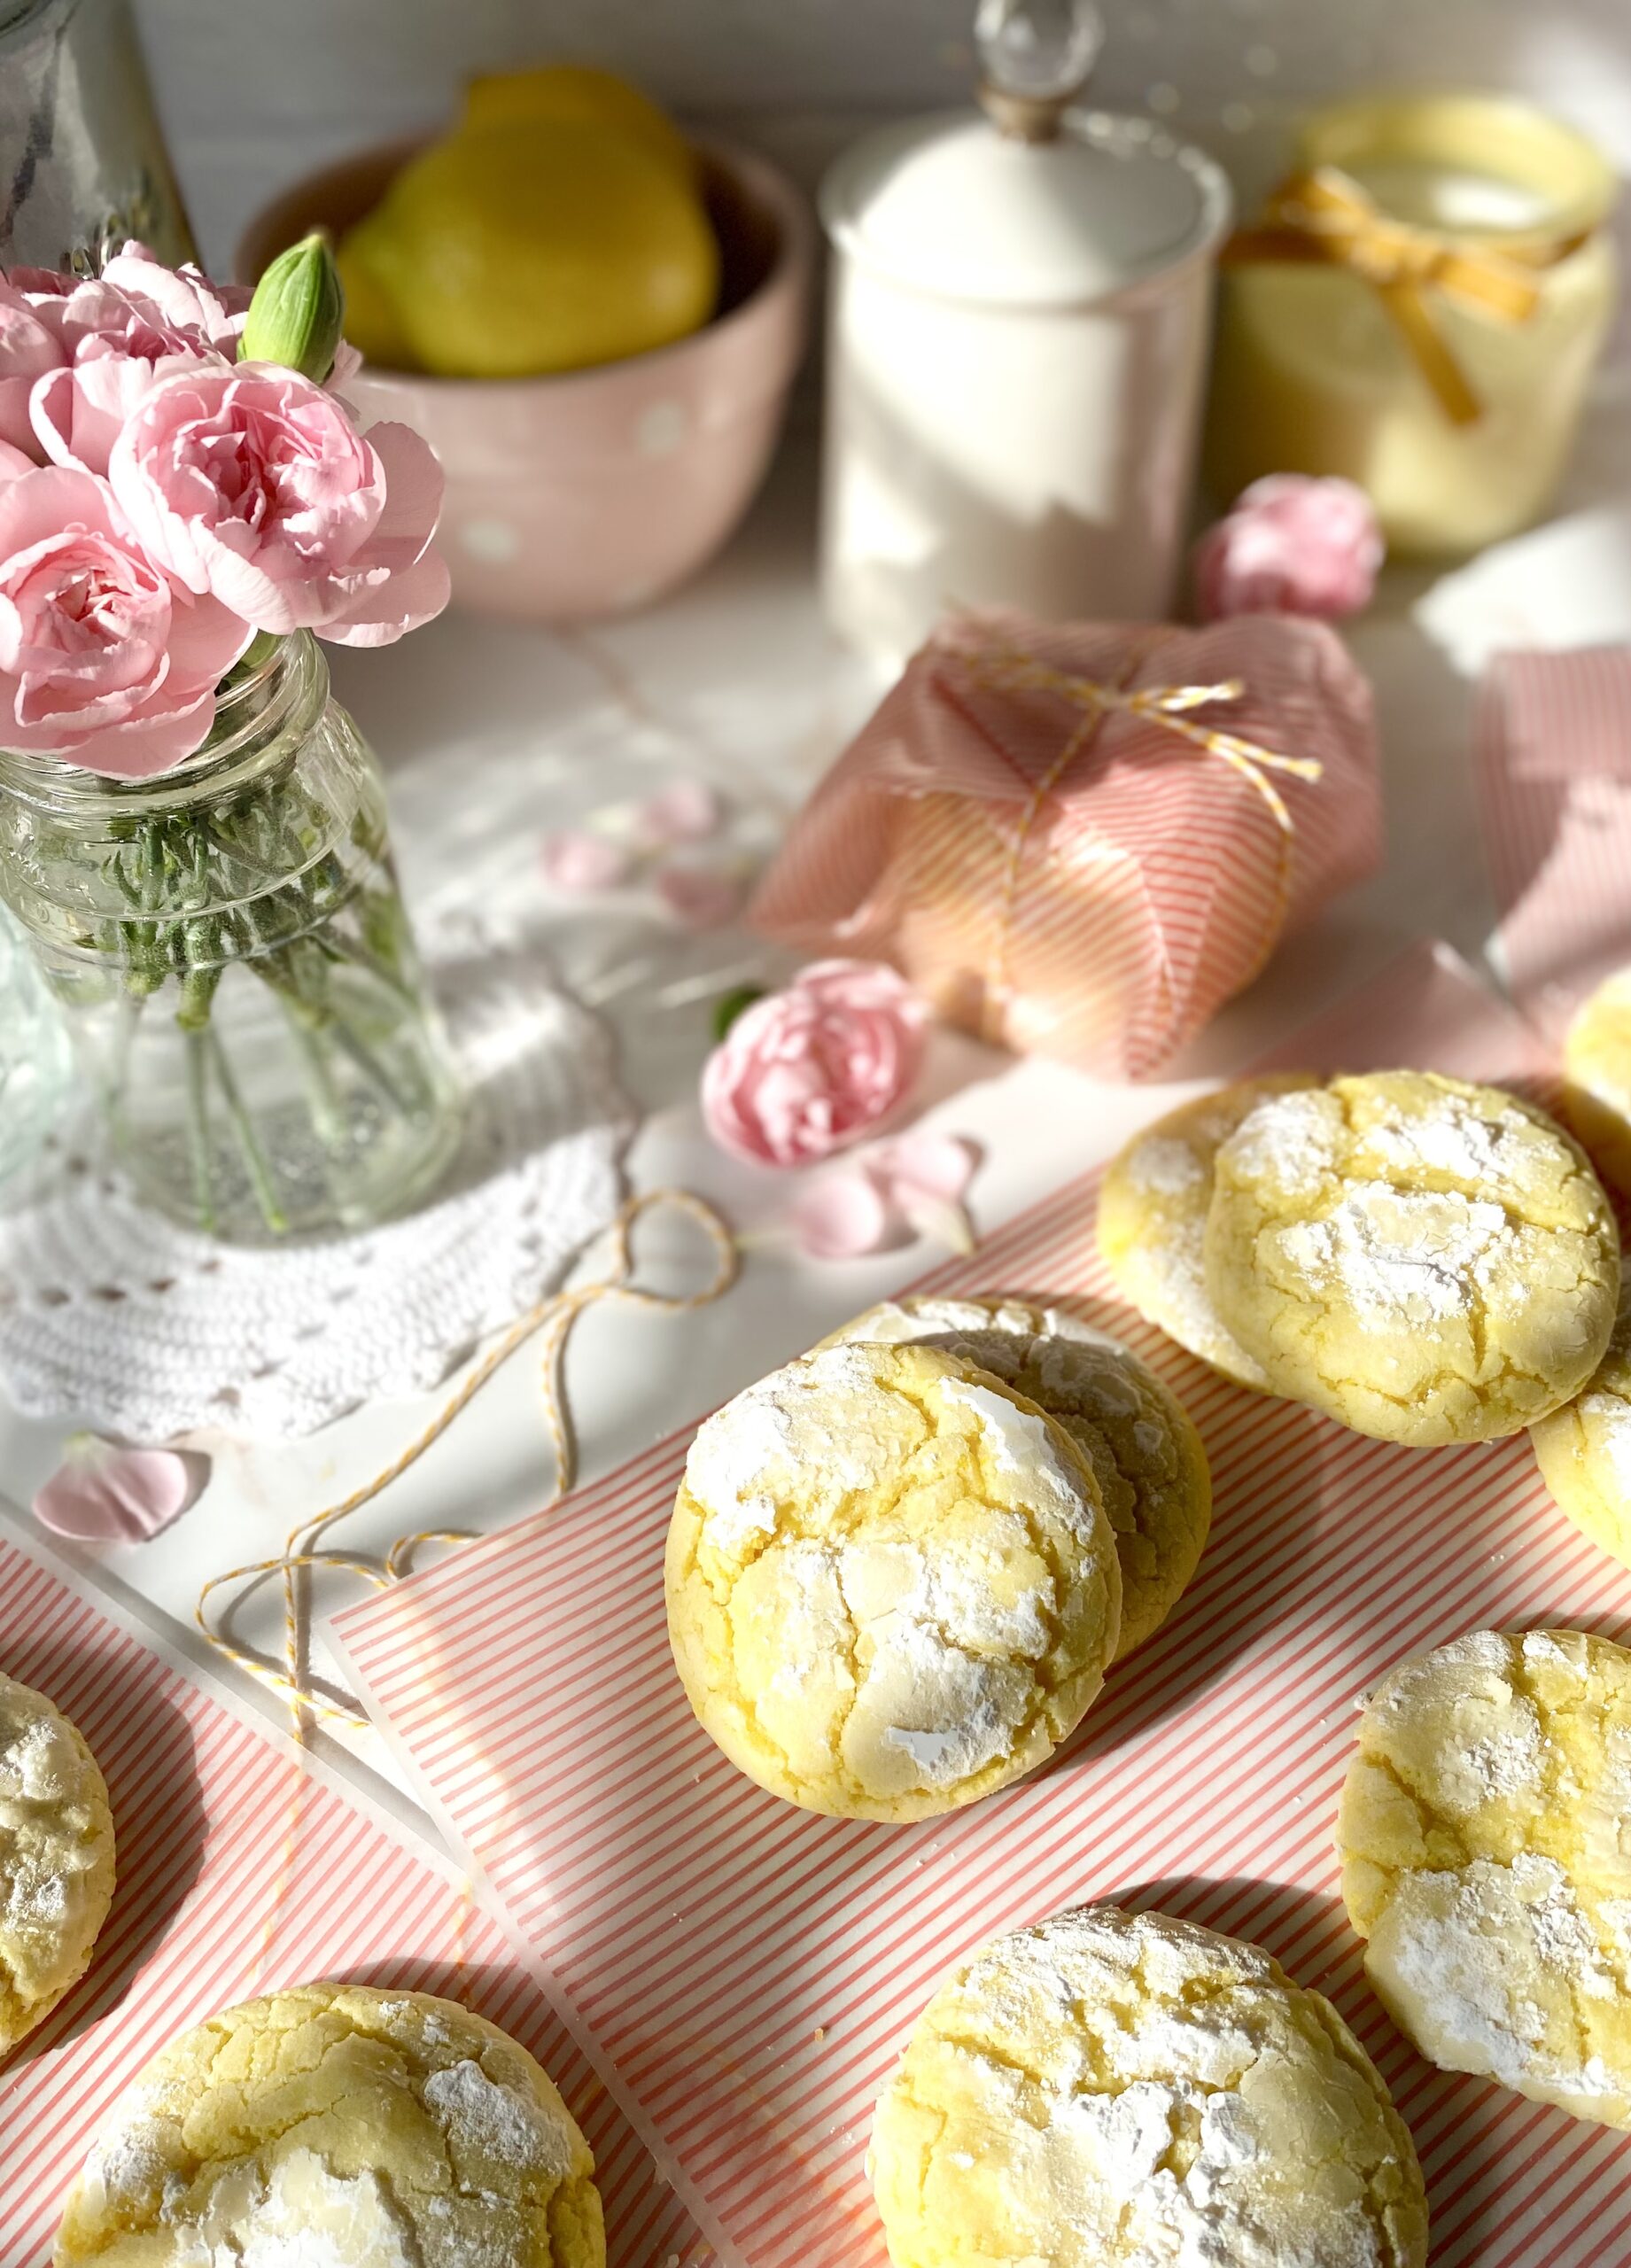
Yellow is the color of happiness and sunshine. These adorable Lemon Scones will bring you a burst of lemony brightness even on the grayest day. The pretty, vibrant yellow sparkling sugar adds a pleasant crunch to the tops. It’s a nice contrast to the soft, tender interior of the scones. These little gems would shine on any breakfast or brunch table. I served them with blueberry jam and green tea, which was so delightful, I’m still smiling.

Print Recipe
Lemon Scones
Course Breakfast, Brunch
Keyword lemon, scones
Servings
scones
Ingredients
Lemon Scones
Icing
Course Breakfast, Brunch
Keyword lemon, scones
Servings
scones
Ingredients
Lemon Scones
Icing
Instructions
Lemon Scones
  1. Preheat the oven to 375ºF (190ºC). Line a baking sheet with parchment paper.
  2. In a large bowl, whisk together the flour, baking powder, salt and sugar.
  3. Work the butter and lemon zest into the flour mixture with your fingers or with a pastry blender until pea size chunks form.
  4. Stir in the heavy cream and lemon juice until a shaggy dough is formed. If your dough seems too dry, you can add 1-2 more teaspoons of heavy cream.
  5. Turn the dough out onto a lightly floured surface. Knead briefly, by folding dough over onto itself a few times. Do not overwork the dough.
  6. Pat or roll the dough into an 8-inch round, about 3/4-inch thick. Cut out rounds using a 2" or 2 1/4" inch round cutter.**
  7. Place scones about 2 inches apart on prepared baking sheet. Brush scones with heavy cream. Sprinkle generously with sparkling sugar.
  8. Bake until edges are golden brown, about 16-19 minutes.
  9. Cool completely on a wire rack. Decorate with icing.
Icing
  1. In a small bowl, whisk together the powdered sugar, heavy cream and enough lemon juice to form a stiff icing.
  2. Transfer icing to a piping bag or a plastic zip bag. Snip off the tip of the bag. Pipe lines in a spoke pattern onto the scones.
Recipe Notes

*To find the sparkling sugar I used, click here.

**To find the cutter I used, click here.

French Toast Cubes

French toast in all forms is welcome here! Everything from classic French toast to stuffed, sticks, bricks, casseroles and even cubes. I came up with this recipe for French Toast Cubes after I had a French toast brick at a restaurant. I like the idea of tall, thick pieces of French toast, but the cubes are a bit more manageable. This is a fun to make, well-loved recipe. I love to serve the cubes with warm maple syrup and fresh whipped cream.

Print Recipe
French Toast Cubes
Course Breakfast, Brunch
Servings
cubes
Ingredients
Course Breakfast, Brunch
Servings
cubes
Ingredients
Instructions
  1. Preheat the oven to 325ºF. With a serrated knife, cut the bread into eight 2-inch cubes.
  2. In an 11 x 7-inch baking dish, whisk tougher the eggs, milk, vanilla extract, cinnamon and salt.
  3. Coat all sides of the the bread cubes with the egg mixture. Let the cubes soak up all of the liquid.
  4. Fry the cubes on a hot buttered griddle until all sides are golden brown.
  5. Transfer the cubes to a baking sheet with a wire rack. Bake until the cubes are puffy, about 20 minutes.

Lavender Shortbread Sandwich Cookies with Honey Buttercream

Lavender Shortbread Sandwich Cookies with Honey Buttercream

Lavender and honey go so well together. Bees know it, fairies know it, princesses know it. The flavor combination is so delightful in these cookies, that I decided to share them with you. In addition to delicious, compatible flavors, these cookies have a divine texture combination. The shortbread cookies have a tender, melt-in-your-mouth texture. Together with the silky, smooth honey buttercream, they’ll make you feel fancy and regal. You’ll hold your head up higher, ring for your tea and declare that you do indeed deserve fine things!

Some people are nervous about baking with lavender because they don’t want their baked goods to taste like soap or perfume. That can be a concern if the lavender flavor is too pronounced. However, if you don’t use enough you won’t be able to taste it at all. There’s a fine balance. If you use the right amount, it will taste pleasant and have sweet undertones. I used two teaspoons of culinary lavender in these cookies, but you can adjust the amount to your tastes. You can start out with one teaspoon, bake a small sample of dough and taste it, to customize the flavor.

Speaking of tasting, my grandmother always said, “taste as you go.” This is also helpful when making the honey buttercream. Typically, when making other flavors of buttercream, you add more powdered sugar if your buttercream is too thin. In this case, adding more powdered sugar can make the buttercream too sweet. Once you have added the amount of honey that tastes good to you, you can add a little cornstarch if you need to stiffen it up a bit.

Print Recipe
Lavender Shortbread Sandwich Cookies with Honey Buttercream
Tender lavender scented cookies with silky honey buttercream filling
Keyword cookies
Servings
Ingredients
Lavender Shortbread Cookies
Honey Buttercream
Keyword cookies
Servings
Ingredients
Lavender Shortbread Cookies
Honey Buttercream
Instructions
Honey Buttercream
  1. In a medium bowl, beat butter and sugar together until smooth. Add honey, one tablespoon at a time until desired sweetness and consistency is reached.
  2. Mix in a pinch of salt to taste.
  3. Mix in cornstarch, if necessary, to firm up buttercream. *See notes below.
Recipe Notes

*The addition of cornstarch helps to firm up buttercream without adding additional sweetness.

To find culinary lavender, click here.

Lemon Blueberry Cloud Cookies

Once, some time ago, I made some soft, melt-in-your mouth cookies and posted them on the internet. A viewer got triggered and insisted that cookies must be crunchy. I have to disagree! Cookies can be crunchy, crisp, soft, chewy, sandy or anything your heart desires. These soft, pillowy cookies are light and airy like little clouds. They could almost be called little cakes. The texture is similar to whoopee pies, but not as sticky. They’re delightfully delicious and have been well-loved by my family for two generations. They’re perfect for a spring teatime treat or alongside a glass of lemonade at a picnic.

Print Recipe
Lemon Blueberry Cloud Cookies
Soft, pillowy cookies made with ricotta cheese and fresh blueberries, topped with a tangy lemon icing
Course Dessert
Servings
cookies
Ingredients
Cookies
Icing
Course Dessert
Servings
cookies
Ingredients
Cookies
Icing
Instructions
Cookies
  1. Preheat the oven to 350ºF (180ºC). Line two cookie sheets with parchment paper.
  2. In a medium-size bowl, whisk together the flour, baking powder and salt until well combined.
  3. In a large bowl, beat the butter, with an electric mixer on medium speed, until smooth Add the ricotta cheese, sugar and lemon zest. Beat until well combined. Beat in the egg and vanilla until incorporated. On low speed, gradually mix in the flour mixture, just until combined. Fold in the blueberries.
  4. Place rounded tablespoon-size portions of dough about 2 inches apart onto the cookie sheets. Top the cookies with additional blueberries. (If your cookie dough is sticky and hard to work with, refrigerate it just until it's easier to work with, about 30 minutes to 1 hour.)
  5. Bake until the bottom edges of the cookies are lightly browned, about 11-13 minutes. Transfer the cookies to a cooling rack. Top the cooled cookies with icing. Best eaten the day they're made.
Icing
  1. In a medium-size bowl, whisk together the powdered sugar, melted butter, salt and 1 tablespoon (15ml) of lemon juice until well combined. Add additional lemon juice as needed to achieve the desired consistency. Whisk until smooth.

Strawberry Rose Pancakes


Print Recipe


Strawberry Rose Pancakes

Pink pancakes made with strawberry purée and rose petals, topped with strawberry syrup and pink whipped cream

Course Breakfast, Brunch
Keyword pancakes, strawberry

Servings


Ingredients
Strawberry Syrup

Pink Whipped Cream

Strawberry Rose Pancakes

Course Breakfast, Brunch
Keyword pancakes, strawberry

Servings


Ingredients
Strawberry Syrup

Pink Whipped Cream

Strawberry Rose Pancakes


Instructions
Strawberry Syrup
  1. Purée the strawberries in a blender or small food processor. Pass the purée through a mesh sieve into a small saucepan. Stir in the sugar and 1/2 cup (118ml) of water. Bring the mixture to a boil over medium heat. Turn the heat down to low and simmer until the sugar has dissolved and the syrup thickens, about 10 minutes. Set aside to cool. Serve warm or at room temperature.

Pink Whipped Cream
  1. In a large bowl, beat the whipped cream to soft peaks with an electric mixer at high speed. Add the powdered sugar, strawberry extract and food coloring in 3 separate additions. Continue beating just until stiff peaks are formed. Set aside in the refrigerator until ready to use.

Strawberry Rose Pancakes
  1. In a large bowl, whisk the flour, sugar, baking powder and salt together until well combined. Set aside.

  2. Purée the strawberries in a blender or small food processor. Pass the purée through a mesh sieve into a medium bowl. Add the egg, milk, melted butter, vanilla extract and food coloring (if using) and whisk until well combined. Stir this mixture into the flour mixture just until combined. A few lumps are okay. Stir in the rose petals.

  3. For each pancake, scoop 3-4 tablespoons of batter onto a hot oiled griddle. Flip the pancakes when bubbles form on the surface. Continue cooking until the pancakes puff and are lightly browned.


Recipe Notes

*To find the gel food coloring I used, click here.

**To find culinary dried rose petals, click here.


Blackberry Oatmeal Cookies

Blackberry Oatmeal Cookies by Brownie Mischief

We’ve all heard our parents telling their childhood stories of walking miles to school and suffering worse hardships than we ever had to. My mom used to tell me stories like that, but she had a sense of humor, so her stories were always fun to listen to. She used to tell me about her friend’s mother, who would make big, delicious oatmeal cookies. My mom would trade her baloney sandwich nearly every day to get one of those cookies from her friend. She reminisced about those cookies so much, that I set out to make her some when I learned to bake. She and my grandmother would taste test batch after batch of my cookies over the years. I have probably baked enough oatmeal cookies to circle the earth. Okay that’s an exaggeration, but seriously I have baked quite a few. Of all the oatmeal cookies I’ve baked, these are one of my favorites!

Most of the time when you see fruit added to an oatmeal cookie, it’s dried fruit, like raisins or cranberries. That’s mostly because if you just dump fruit into your cookie dough, the fruit releases water, leaving soggy spots in your cookies. To solve that issue, for this recipe, I macerate the blackberries before baking. The purple blackberry juice that’s released from the berries is used to make a beautiful lilac icing to drizzle over the cookies.

Print Recipe
Blackberry Oatmeal Cookies
Course Dessert
Keyword blackberry, cookies
Servings
cookies
Ingredients
Brown Butter
Macerated Berries
Oatmeal Cookies
Icing
Course Dessert
Keyword blackberry, cookies
Servings
cookies
Ingredients
Brown Butter
Macerated Berries
Oatmeal Cookies
Icing
Instructions
  1. In a small, light colored saucepan, melt 1/2 cup (4 oz or 113g) of butter over medium heat, stirring occasionally, until deep golden and fragrant. Keep a close eye on it. It can go from toasted to burned very quickly. When you see brown particles form, remove from heat and immediately transfer the butter, including the particles, to a small bowl. Refrigerate until solid, about one hour.
  2. Place the blackberries in a medium-size bowl. Sprinkle with granulated sugar and toss to coat. Let sit for 30 minutes until the berries release their juices.
  3. Drain the blackberries and reserve the juices.
  4. Preheat oven to 350ºF (180ºC). Line two large cookie sheets with parchment paper.
  5. In a separate medium-size bowl, whisk together the flour, baking soda, salt and cinnamon. Set aside.
  6. In a large bowl, beat the brown butter, softened butter and brown sugar until light and fluffy.
  7. Add the eggs and vanilla extract in three separate additions and beat until well combined.
  8. Stir in the flour mixture just until combined. Stir in the oats just until combined. Gently fold in the blackberries.
  9. Scoop 1/4 cup sized portions of dough, about 2 inches apart, onto the prepared cookie sheets. *I used a #16 2-ounce scoop.
  10. Bake until the cookie tops are set and the edges are golden brown, about 13-15 minutes. Transfer the cookies to a cooling rack to cool completely.
  11. Pass reserved blackberry juice through a sieve to remove the seeds.
  12. In a small bowl, whisk together the powdered sugar, heavy cream and one tablespoon of the reserved blackberry juice until smooth. Add more blackberry juice, a little at a time, until the desired consistency is reached. Drizzle the icing over the cooled cookies.
Recipe Notes

*To find the portion scoop I used, click here.

Pink Lemonade Cake

This cheerful little loaf cake feels like a spring or summer picnic with lemonade and sunshine. It’s similar to a pink lemonade cake that my elderly neighbor used to make when I was growing up. She made it for all the neighborhood kids and we always gobbled it up. When I was about ten years old she taught my friend and me how to make it. She used a yellow cake mix in a large baking pan and poked holes all over the cake, then drenched it in a pink, sugary lemon icing. I transformed that happy pink lemonade memory into a delightful loaf cake made from scratch.

To watch the TikTok video, click here.

Print Recipe
Pink Lemonade Cake
A tender, moist loaf cake that tastes just like pink lemonade
Course Brunch, Dessert
Keyword cake, pink lemonade
Servings
8 x 4-inch loaf
Ingredients
Pink Lemonade Cake
Lemon Syrup
Icing
Course Brunch, Dessert
Keyword cake, pink lemonade
Servings
8 x 4-inch loaf
Ingredients
Pink Lemonade Cake
Lemon Syrup
Icing
Instructions
Pink Lemonade Cake
  1. Preheat oven to 325ºF (163ºC). Line the bottom of an 8 X 4-inch loaf pan with parchment paper. Grease and flour the sides.
  2. In a medium bowl, whisk together the flour, baking powder, salt and baking soda.
  3. In a small bowl, whisk together the milk and sour cream.
  4. In a large bowl, beat the sugar, oil, eggs, lemon zest and strawberry extract until smooth.
  5. Stir in the flour mixture in two additions, alternating with the milk mixture. Stir just until combined. Stir in food color a little at time until your desired shade is achieved.
  6. Transfer the batter to the prepared baking pan. Bake until a toothpick inserted into center of the loaf comes out clean, about 45-50 minutes. Meanwhile, prepare lemon syrup.
  7. Let the cake cool in the pan for 10 minutes, then remove from pan and transfer to a cooling rack. Poke holes all over the top of cake with a skewer.
  8. Brush the warm cake generously with the lemon syrup. Let the cake cool completely, then top with icing.
Lemon Syrup
  1. In a small saucepan, combine the juice of one lemon with enough water to equal 1/4 cup. Add sugar and stir over medium-low heat until sugar is dissolved. Remove from heat.
Icing
  1. In a medium bowl, beat the butter, powdered sugar, 1 tablespoon lemon juice, the strawberry extract and a pinch of salt, until smooth. Add more lemon juice until your desired consistency is reached. Mix in gel food color.
Recipe Notes

*To find the gel food color I used, click here.

Italian Easter Pocket Pies

Italian Easter Pocket Pies

Italian Easter Pie, also known as Pizza Rustica is a rich, delicious, savory pie, similar to a quiche. When I was growing up, my family enjoyed this pie at Easter time, but it’s delicious and comforting any time of the year. Easter Pie typically contains meats and cheeses. We made ours with sausage, cheese and spinach. I started making these small, handheld versions years ago for my kids. They love dipping them in pizza sauce. I included the recipe for the homemade pie crust below, but you can streamline the recipe by making the pie dough the night before or using store bought 2-crust pie dough if you wish.

Print Recipe
Italian Easter Pocket Pies
Golden handheld pies filled with Italian sausage, spinach, ricotta and mozzarella cheese
Cuisine Italian
Keyword pastry, pie
Servings
pocket pies
Ingredients
Pie Crust
Filling
Cuisine Italian
Keyword pastry, pie
Servings
pocket pies
Ingredients
Pie Crust
Filling
Instructions
Pie Crust
  1. Whisk together the flour, sugar, and salt in a large bowl. Work the shortening into the flour mixture with your fingertips until evenly distributed. Work the butter into the flour mixture until flat, dime size pieces are formed.
  2. In a small bowl combine the ice water and vinegar. Sprinkle the ice water mixture over the flour mixture a little at a time and mix just until the dough comes together. You may not need all of the water, depending on your climate. On a lightly floured surface, fold the dough over onto itself a couple of times. Form the dough into two disks. Wrap the disks in plastic wrap. Refrigerate at least two hours or up to overnight.
Filling and Assembly
  1. Preheat the oven to 375ºF (190ºC). Line a large baking sheet with parchment paper.
  2. Combine the sausage, spinach, cheeses and seasonings in a medium bowl and mix well.
  3. Roll out the pie dough to 1/8-inch thickness. Cut into ten 5-inch rounds. Place the rounds on the prepared baking sheet.
  4. Brush the edges of the rounds with egg wash. Place about 3 tablespoons of filling into the center of each round. Fold the dough over and press the edges to seal. Crimp the edges with a fork. Brush the pies with egg wash. Cut a 3/4-inch ventilation slit on the top of each pie.
  5. Bake until golden brown, about 25-30 minutes. Serve with pizza sauce or marinara if desired.

Blueberry Donut Holes with Homemade Blueberry Sugar

Blueberry Donut Holes with Homemade Blueberry Sugar

If you landed here from one of my social media accounts, welcome! I’m really glad you’re here. I love to create fun, pretty and sweet treats like these delicious blueberry donut holes! The thing that really makes these special is the homemade blueberry sugar, which adds a burst of blueberry flavor. Freeze dried blueberries are combined with sugar to create a beautiful, flavorful sugar that you can use for many other things. It can also be used in tea, lattes, lemonade, cocktails or sprinkled on cookies or scones. Keep in mind that freeze dried blueberries are not the same as dried blueberries. Dried blueberries still contain some moisture, so they won’t work for this purpose.

The donut hole batter comes together quickly and easily. The most challenging part for me is frying them. I found that using a thermometer and testing one donut hole first, helps you determine the perfect oil temperature. Using a small portion scoop helps you get uniform donut holes. Make sure the outside of the scoop is clean between each donut to help them keep the round shape and avoid pointy tails.

Print Recipe
Blueberry Donut Holes with Homemade Blueberry Sugar
Course Breakfast, Dessert
Servings
donut holes
Ingredients
Blueberry Sugar
Blueberry Donut Holes
Course Breakfast, Dessert
Servings
donut holes
Ingredients
Blueberry Sugar
Blueberry Donut Holes
Instructions
Blueberry Sugar
  1. Process freeze dried blueberries and sugar in a food processor or a clean spice grinder until finely ground. Be careful not to over process or you may end up with powdered sugar.
Blueberry Donut Holes
  1. In a medium bowl, whisk together flour, baking powder, nutmeg and salt. Set aside.
  2. In a large bowl, beat sugar, eggs, melted butter, milk and vanilla extract until well combined.
  3. Add flour mixture and mix just until combined. Do not over mix. A few lumps are okay.
  4. Fold in chopped blueberries.
  5. In a heavy saucepan, heat 1 1/2 inches of oil to 340ºF.
  6. Drop tablespoon size portions of batter into hot oil. I used a #60 portion scoop.** Don't overcrowd the pan.
  7. Cook donut holes until golden brown on all sides, about 2-4 minutes, flipping halfway through. If donut holes cook too quickly on the outside, turn heat down.
  8. Briefly drain donut holes on paper towels, then toss warm donut holes in blueberry sugar. Serve immediately.
Recipe Notes

Success tips: Use a small ice cream scoop sprayed with nonstick spray to drop donut holes into oil. Make sure the outside of scoop is clean between each donut hole to keep the round shape and avoid tails on your donut holes.

*To find freeze dried blueberries, click here.

**To find the portion scoop I used, click here.

Little Spring Vegetable Pot Pies

These little veggie pot pies are so cute and comforting. The crust is incredibly flaky and the filling is so versatile. I used asparagus, carrots and peas for the filling, but feel free to use your favorite vegetables. The possibilities are endless! The small size bakes up quickly and is perfect for lunch or a light dinner. I typically serve these with some fresh fruit or salad greens on the side.

I used vegetable shortening for the crust because it makes the flakiest crust ever and also because the pies can easily be a vegetarian dish. If you’re trying to avoid trans fats, then choose a brand of vegetable shortening that doesn’t contain trans fat or replace some of the vegetable shortening with butter.* Keep in mind that if you replace all of the vegetable shortening with butter, your crust won’t be nearly as flaky.

Print Recipe
Little Spring Vegetable Pot Pies
Servings
Mini pot pies
Ingredients
Pie Crust
Servings
Mini pot pies
Ingredients
Pie Crust
Instructions
Pie Crust
  1. In a large bowl, whisk together the flour, baking powder and salt. Work the shortening into the flower with your fingertips until flat dime size pieces are formed.
  2. In a small bowl, combine the ice water and vinegar. Sprinkle over the flour mixture a little at a time, mixing just until the dough comes together. You may not need all of the liquid, depending on your climate.
  3. Turn the dough out onto a lightly floured surface. Fold the dough over onto itself a few times. Do not over work the dough. Form the dough into a disc. Wrap in plastic wrap and refrigerate for 1-2 hours or up to overnight.
Filling
  1. Preheat the oven to 400ºF. (200ºC). Grease four 6-oz ramekins.*** Place the ramekins on a baking sheet.
  2. In a medium saucepan, melt the butter over medium heat. Sauté the onions, carrots and asparagus for a few minutes until the onions are translucent.
  3. Sprinkle the vegetables with flour. Cook 1-2 minutes. Stir in the broth and simmer until thickened. Add the milk, parsley and seasonings. Make sure to taste your sauce to adjust the seasonings to your preference. Stir in the peas. Transfer the filling to the greased ramekins.
  4. On a lightly floured surface, roll the pie dough to 1/4-inch thickness. Cut out 4 rounds of dough about an inch larger than the tops of your ramekins. Brush the top edges of the ramekins with a bit of egg wash. Place the rounds of dough on the ramekins, overlapping a bit. Crimp the edges of the dough with your fingers or with a fork. Brush the pies with egg wash. Cut a 3/4-inch ventilation slit in the top of each pie. Bake until golden brown, about 30-35 minutes.
Recipe Notes

*To replace part of the shortening with butter, use 1/4 cup (48g) shortening and 1/4 cup (57g) butter.

**For a vegetarian version, you can substitute the egg wash by brushing the tops of the pies lightly with olive oil.

***To find the ramekins I used, click here.

Lemon Crinkle Cookies

Lemon Crinkle Cookies by Brownie Mischief
Click here to watch the video

Crinkle cookies, also known as crackle cookies, have been around for a very long time. The pretty, crispy, cracked exterior and the soft, moist interior are what we love about them! There’s definitely no shortage of recipes for crinkles out there, everything from chocolate to red velvet. I even saw an audacious cookie company selling lemon crinkles for twelve dollars each, more money than it will cost for this entire batch! So many of the recipes I tried were disappointing, especially the ones made with cake mix. So I created my own version and I’m sharing it with you. Here’s to making sure delicious lemon crinkle cookies are available for all to enjoy, not just a select few.

This recipe requires a bit of chilling, which I know many people don’t like because they’re impatient. I happen to be one of those people. Old fashioned crinkle cookies require about 3 hours of chilling. My recipe has the addition of cornstarch, which helps prevent spreading and allows for a shorter chilling time. As an added bonus, cornstarch makes the cookies more tender. Win win!

Fresh lemon zest and lemon juice in these cookies is crucial to the best lemon flavor. A bit of pure lemon extract is added to enhance that flavor. Don’t be tempted to use imitation extracts. The flavor will disappoint you. I added two drops of lemon yellow food color, which made them so pretty they look like pure sunshine!

Print Recipe
Lemon Crinkle Cookies
Lemon cookies with a crackled, crispy exterior and a soft, tender interior
Course Dessert
Servings
cookies
Ingredients
Course Dessert
Servings
cookies
Ingredients
Instructions
  1. In a medium bowl, whisk together the flour, cornstarch, baking powder, salt and baking soda.
  2. In a large bowl, cream the butter, sugar and lemon zest together until light and fluffy.
  3. Beat in the egg until well combined.
  4. Mix in the lemon juice, extracts and food coloring until well combined.
  5. Add the flour mixture and mix just until combined.
  6. Refrigerate the cookie dough for 30 minutes to one hour.
  7. Preheat the oven to 350ºF (180ºC). Line two large cookie sheets with parchment paper.
  8. Roll the dough into balls, about 2 tablespoons each. **I used a #30 portion scoop.
  9. Roll the dough balls generously in powdered sugar.
  10. Place two inches apart onto the prepared baking sheets.
  11. Bake for 10-12 minutes. Let cool on the cookie sheet for one minute then transfer to a cooling rack.
Recipe Notes

*To find Americolor lemon yellow gel food color, click here.

**To find a #30 cookie scoop, click here.

To find the striped wax paper pictured above, click here.


Lilac Vanilla Mini Cakes

Lilac Vanilla Mini Cakes

Once upon a time, there was a little black bear who woke up from a long nap. As she stretched, she felt her tummy growl. She ventured into the morning sunshine and smelled something sweet. She sniffed the air, following the sweet fragrance until she came upon a beautiful purple tree. She climbed up to a comfy branch and ate the tender, purple blossoms to her heart’s content.

Bears, butterflies and bees know something good when they see it. We humans can also enjoy lilacs. I knew lilacs were edible, but I hadn’t tasted them until recently. The flavor reminds me of beets, slightly sweet with a vegetable aftertaste. I really wanted to try lilac syrup after seeing so many photos of pretty purple syrup online. I discovered that lilac syrup is not purple. It’s more of a dull, brownish blue-green. Many people use food coloring or blueberries to color their syrup. I also discovered that lilac syrup will turn a pretty shade of mauve by adding a small amount of lemon juice to the finished syrup. Since I would be using my lilac syrup inside of cake layers, I let it remain its natural color. I made a simple syrup with lilac blossoms and let them steep for a couple of hours. It was just long enough to give a subtle lilac flavor without being too floral. If you want a stronger lilac flavor, I suggest using more lilac blossoms rather than steeping longer to avoid bitterness.

I paired the lilac syrup with this soft, fluffy vanilla cake and silky Swiss meringue buttercream. If you aren’t a fan of lilac syrup, feel free to use vanilla simple syrup instead and just use the lilac blossoms to decorate your cakes. They look stunning on any cake or cupcakes.

Print Recipe
Lilac Vanilla Mini Cakes
Soft, fluffy mini white vanilla cakes with lilac syrup and vanilla Swiss meringue buttercream, topped with lilac blossoms
Course Dessert
Servings
mini cakes
Ingredients
Lilac Syrup
White Vanilla Cake
Swiss Meringue Buttercream
Course Dessert
Servings
mini cakes
Ingredients
Lilac Syrup
White Vanilla Cake
Swiss Meringue Buttercream
Instructions
Lilac Syrup
  1. In a small saucepan combine the sugar and water. Bring to a boil over medium heat, stirring gently to dissolve the sugar. Add the the lilac blossoms and stir gently.
  2. Turn the heat down and simmer for 5 minutes.
  3. Remove from heat and allow the lilac blossoms to steep for 2 hours. Pass the lilac syrup through a mesh sieve.
White Vanilla Cake
  1. Preheat the oven to 350ºF (180ºC). Grease and flour two 9-inch round cake pans and line the bottoms with parchment paper.
  2. In a medium-size bowl, whisk together the cake flour, baking powder and salt until well combined. Set aside.
  3. In a large bowl, beat the butter, sugar, oil and vanilla bean paste with an electric mixer at medium speed, until light and fluffy, about 3 minutes.
  4. On medium speed, beat in the egg whites in two additions, then beat in the egg until well combined.
  5. On low speed, beat in one third of the flour mixture, then beat in the sour cream just until combined.
  6. Beat in the remaining flour in two additions, alternating with milk. Beat just until combined.
  7. Transfer the batter to prepared cake pans. Bake for 28-33 minutes, or until the tops of the cakes are light golden brown and a toothpick inserted in center comes out clean. Do not over bake.
  8. Allow the cakes to cool in the pans for 10 minutes, then remove from the pans and continue cooling on a wire rack.
  9. Cut each cake into four 2 3/4-inch rounds using a cookie or biscuit cutter.
  10. Using a pastry brush, brush the mini cakes generously with lilac syrup or vanilla simple syrup.
Swiss Meringue Buttercream
  1. Combine the egg whites and sugar in a large heatproof bowl. Set over a pan of gently simmering water, making sure the water doesn't touch the bottom of the bowl.
  2. Whisk constantly until the sugar is dissolved and a temperature of 160ºF (71ºC) is reached.
  3. Transfer the mixture to the bowl of a stand mixer with a whisk attachment. Whisk on low speed, gradually increasing to medium-high speed. Whisk until glossy, stiff peaks form and the mixture reaches room temperature.
  4. Turn the mixer to medium-low speed. Add the butter, a few pieces at a time, allowing it to fully incorporate before adding more. If the mixture looks curdled, keep mixing and it will correct itself.
  5. Switch to a paddle attachment. On low speed, mix in the vanilla bean paste and salt. Continue mixing on low speed for a few minutes until smooth.
  6. Remove about 3/4 cup of frosting and transfer it to a small bowl. Using a toothpick, place two tiny drops of lilac gel food color and one tiny drop of violet gel food color into the bowl. Mix with a spatula until well combined.
Assembly
  1. Smear a bit of frosting on each mini cake board. Top each one with a cake round, a layer of frosting, then a second cake round. Frost with a crumb coat if desired. Refrigerate of 15 minutes. Frost the mini cakes with white Swiss meringue buttercream, then smear small amounts of lilac Swiss meringue buttercream around the sides and top. Smooth frosting with a bench scraper and smooth the tops with a small offset spatula. Decorate with lilac blossoms.
Vanilla Simple Syrup (optional)
  1. Combine 1/2 cup sugar and 1/2 cup water in a small saucepan. Bring to a boil over medium heat, stirring gently to dissolve the sugar. When the sugar has dissolved, remove from heat and stir in 1 teaspoon vanilla bean paste or pure vanilla extract.
Recipe Notes

*If you can't find ultra fine granulated sugar, it's okay to substitute with regular granulated sugar.

**To find the lilac gel food color I used, click here.

***To find the violet gel food color I used, click here.

****To find 3-inch mini cake boards, click here.