Pumpkin Cinnamon Roll Cakes

Summer was such a happy season for me as a child that I didn’t want it to end. I still love summer, but now that I’m an adult, I begin to anticipate fall right around the time when I’m tired of harsh, hot temperatures, rumbling air conditioners and flies buzzing around at cookouts. Now is that time for me. It’s so hot where I live right now, that I’m welcoming the cool, crisp fall weather and all it brings.

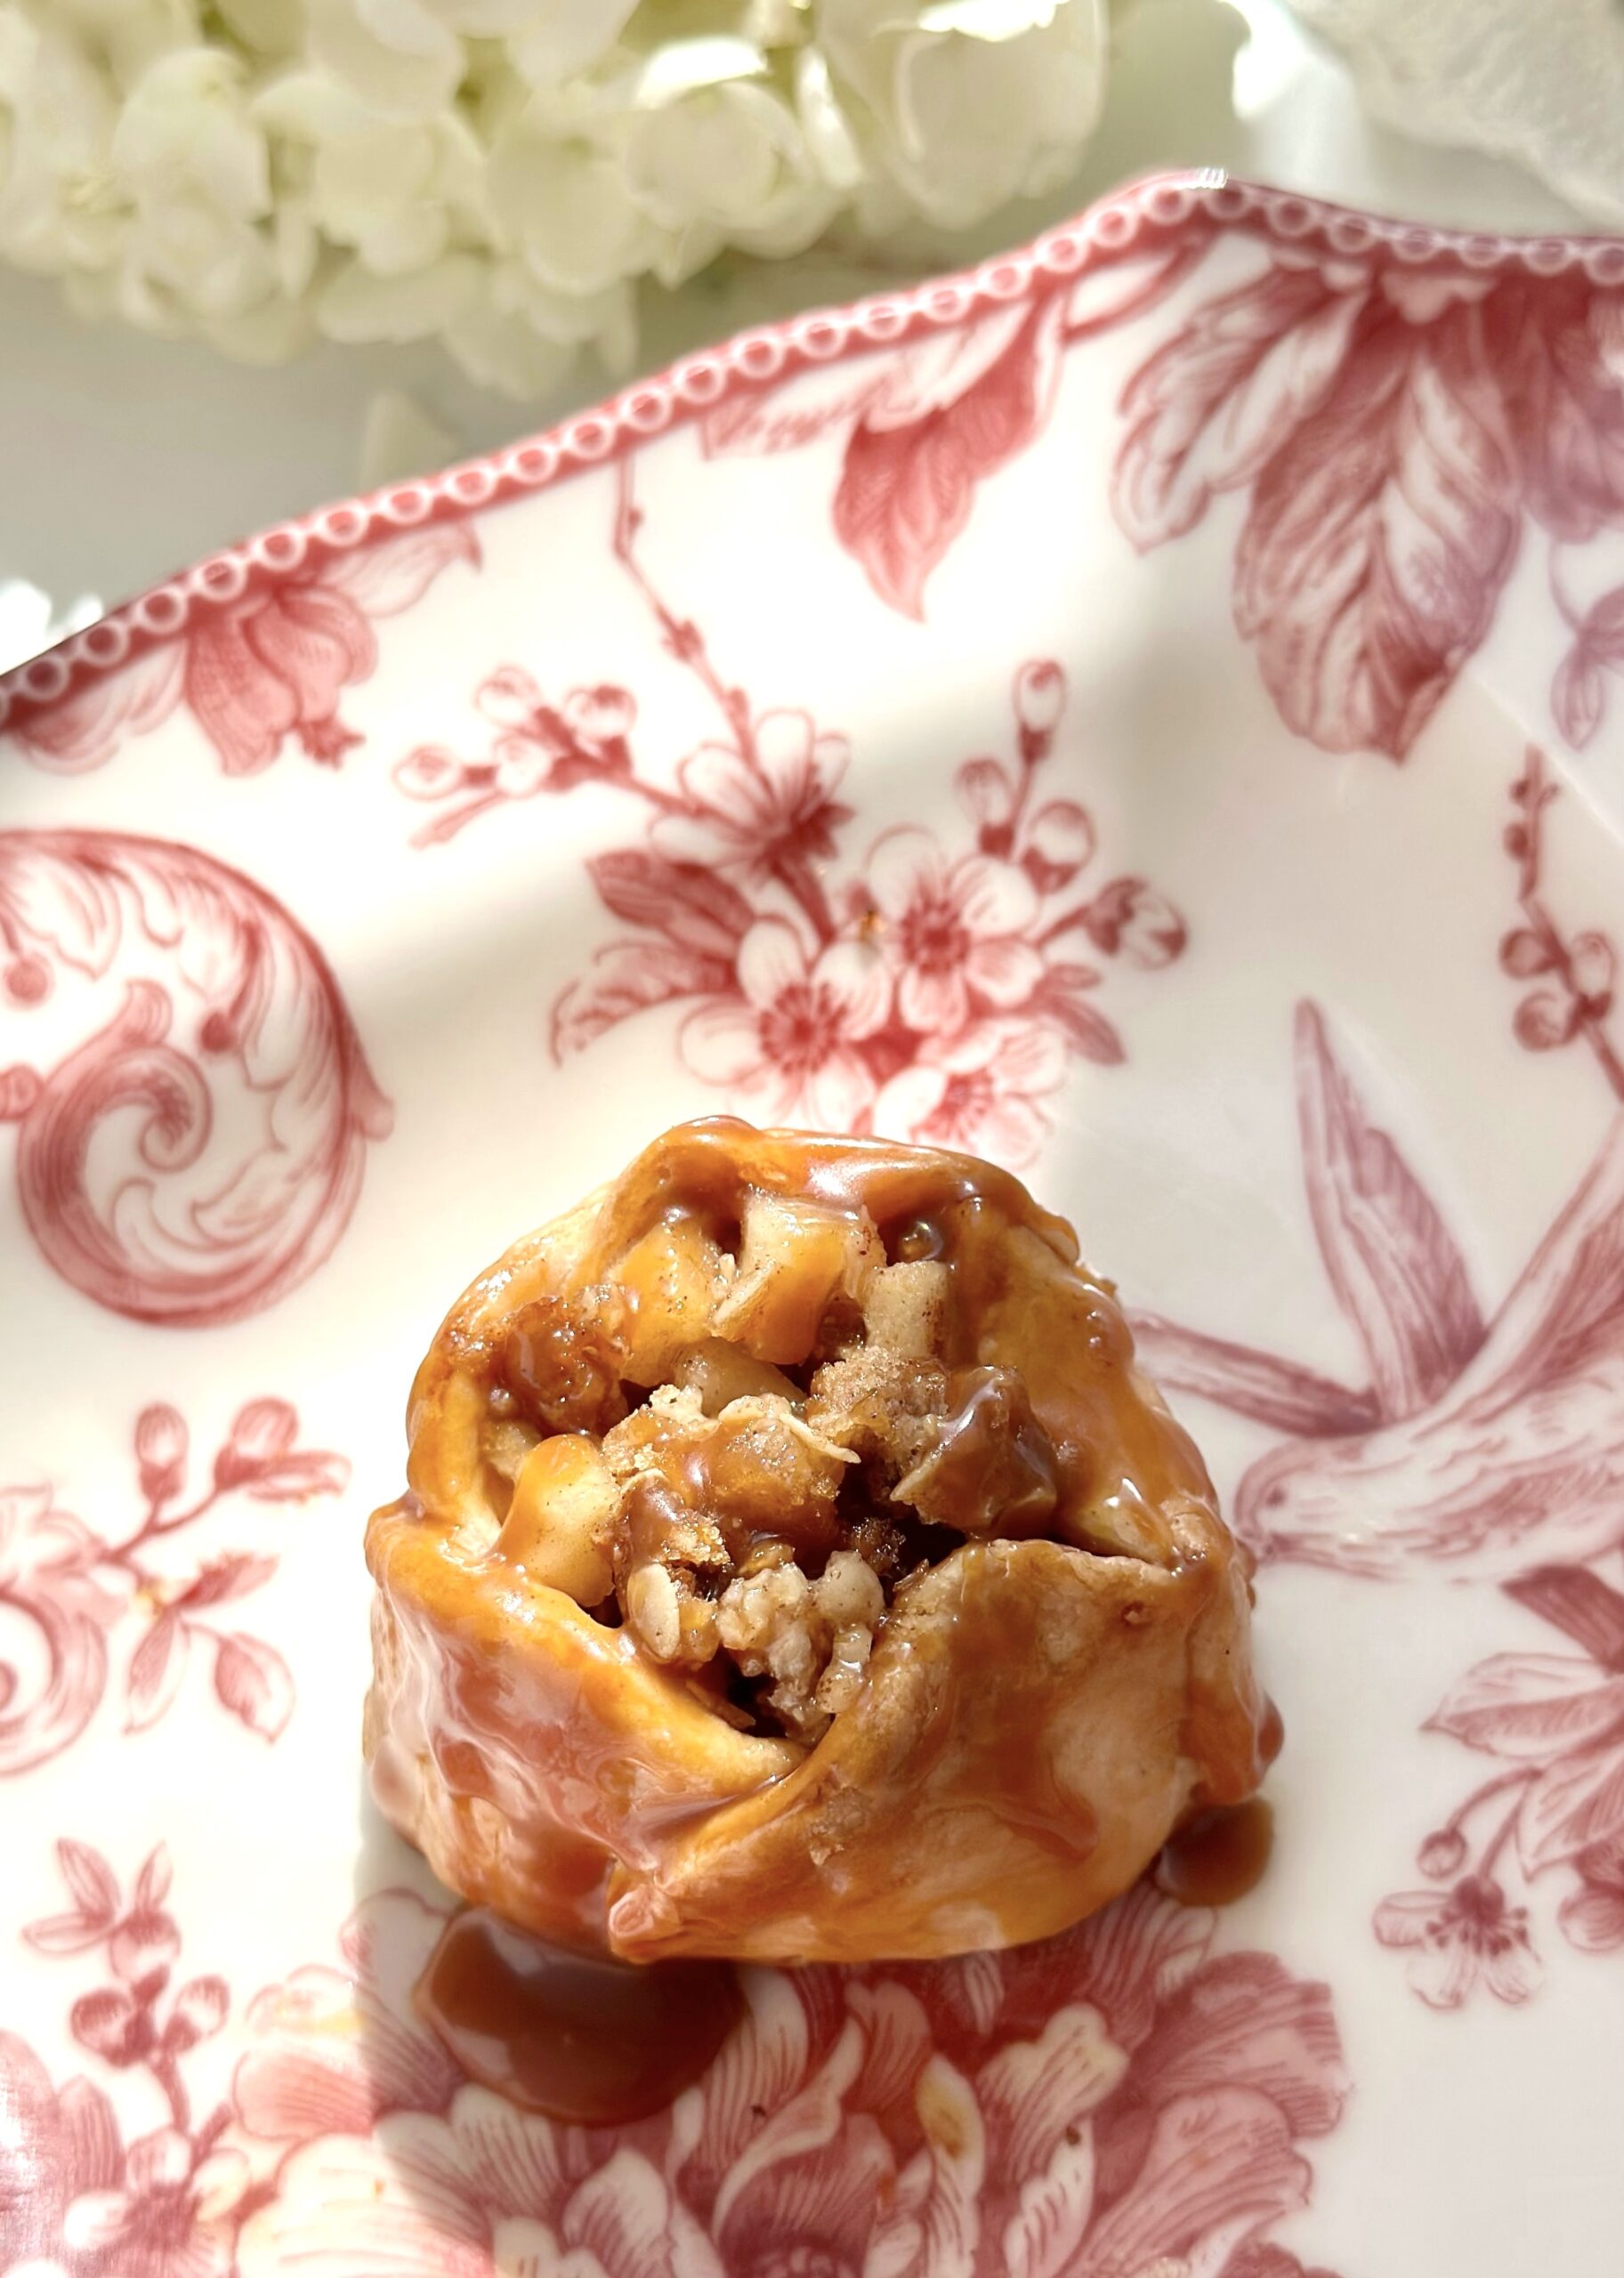
The beautiful warm flavors of fall are perfectly captured in these Pumpkin Cinnamon Roll Cakes. The moist, perfectly spiced cakes are topped with a cinnamon swirl which is basically cinnamon roll filling. I topped them with Vanilla Bean Icing, but you can also make it cream cheese icing by swapping out 1 tablespoon of the melted butter for 1 tablespoon of softened cream cheese, if you prefer. The optional addition of meringue powder helps the icing set up and gives it that crunch we love on glazed donuts. To find meringue powder, click here.

I used a shallow jumbo muffin pan to make these cakes. The muffin cups are 4 inches wide and 1 inch deep. A hamburger bun pan for 4-inch buns or six 4-inch cake pans will also work. To find the pan I used, click here.

Print Recipe
Pumpkin Cinnamon Roll Cakes
Moist pumpkin cakes with cinnamon swirls and vanilla bean icing
Servings
4-inch cakes
Ingredients
Pumpkin Cakes
Cinnamon Swirl
Vanilla Bean Icing
Servings
4-inch cakes
Ingredients
Pumpkin Cakes
Cinnamon Swirl
Vanilla Bean Icing
Instructions
Pumpkin Cakes
  1. Preheat the oven to 350ºF (180ºC). Line a 6-serving shallow jumbo muffin pan with jumbo muffin liners.* (The liners will fit by pressing them in around the inside bottom edges.) The muffin pan I used has cups that are 4-inches across by 1-inch deep. A hamburger bun pan for 4-inch buns or six 4-inch cake pans will also work.
  2. In a medium-size bowl, whisk together the flour, baking powder, baking soda, salt, cinnamon, ginger and nutmeg until well combined.
  3. In a large bowl, whisk together the sugar, oil, eggs and vanilla until smooth and well combined. Mix in the pumpkin purée. Stir in the flour in two additions, just until combined.
  4. Transfer the batter to the muffin cups, evenly dividing the batter among the cups. Pipe the cinnamon swirl mixture in a spiral on the top of the batter of each one.
  5. Bake until a toothpick inserted into the center of the cake part comes out clean, about 23-27 minutes. Let the cakes cool in the pan for 5 minutes, then transfer to a cooling rack.
Cinnamon Swirl
  1. In a small bowl, whisk together the brown sugar, flour, cinnamon and salt. Add the melted butter and whisk until well combined.
  2. Transfer the mixture to a piping bag fitted with a 1/4-inch wide round tip.
Vanilla Bean Icing
  1. In a small bowl, whisk together the butter, vanilla bean paste, powdered sugar, meringue powder, salt and 1 tablespoon (15ml) of milk until well combined. Whisk in more milk as needed to reach your desired consistency.
  2. Brush the icing on the cooled cakes with a small pastry brush or make the icing a little thinner and drizzle the icing on if you prefer.
Recipe Notes

*To find jumbo muffin liners, click here.

To find the baking pan I used, click here.

To find 4-inch cake pans, click here.

To find meringue powder click here.

Peanut Butter Chocolate Chip Bars


Print Recipe


Peanut Butter Chocolate Chip Bars

Servings
2-inch bars


Ingredients
Bars

Glaze

Servings
2-inch bars


Ingredients
Bars

Glaze


Instructions
Bars
  1. Preheat the oven to 350ºF (180ºC). Line the bottom of an 8-inch square baking pan with parchment paper. Grease and flour the insides.

  2. In a medium-size bowl, whisk together the flour, cornstarch, baking powder, and salt until well combined.

  3. In a large bowl, beat the butter and peanut butter together, with an electric mixer, until smooth and well blended. Add the brown sugar and granulated sugar. Beat until combined. Beat in the eggs and vanilla extract in 3 separate additions, making sure each one is incorporated before adding the next. Stir in the flour mixture just until combined.

  4. In a small bowl, toss the chocolate chips with 1 teaspoon of flour then fold them into the batter. Transfer the batter to the baking pan. Smooth the top with a spatula. Bake until the top is golden brown and a toothpick inserted into the center of the bars comes out with a few moist crumbs on it, about 20-25 minutes. Let cool in the pan. Spread the chocolate glaze over the cooled bars.

Glaze
  1. Combine the glaze ingredients in a heat-safe bowl set over a pan of gently simmering water, making sure the water doesn't touch the bottom of the bowl. Stir occasionally until melted and smooth.

Peach Crumble Pie Cookies

Peach Crumble Pie Cookies

I couldn’t decide whether to call these cookies or pies, so I made a compromise. They’re about the size of cookies, but they taste like little peach crumble pies. The base is tender like shortbread or pie crust and the filling is made with fresh peaches. I’ve seen people make something similar with jam and call them cookies, but since I used fresh fruit for these, they deserve to be elevated to pie status.

The peaches are macerated to draw out the excess juices, to help avoid making your cookies soggy. If you’re impatient, don’t be tempted to skip this step. It’ll go by fast as you prep the crumb topping and the remaining ingredients.

When I first made these, I used cupcake liners because I was worried that they might stick to the pan. It turns out that they stick to the cupcake liners more than the pan. So the next time I made them, I opted to lightly spray the pan with nonstick spray instead of using liners. I ran a small thin offset spatula around the perimeter of the cookies to loosen them from the pan and they popped out nicely.

I love topping these little peach delights with caramel sauce. Salted caramel is also a delicious addition. Or you can simply sprinkle them with powdered sugar if you prefer.

Print Recipe
Peach Crumble Pie Cookies
Tender, peach-filled cookies with crumble topping and caramel drizzle
Keyword cookies, peach
Servings
cookie tarts
Ingredients
Macerated Peaches
Crumble Topping
Cookies
Topping
Keyword cookies, peach
Servings
cookie tarts
Ingredients
Macerated Peaches
Crumble Topping
Cookies
Topping
Instructions
Macerated Peaches
  1. In a medium bowl, toss the peaches with lemon juice. Add the brown sugar and cinnamon. Stir gently to combine. Let stand 30 minutes.
  2. Drain the peaches, reserving 1 tablespoon of the juices. In a small bowl, whisk together the reserved peach juice with the corn starch. Mix with the drained peaches.
Crumble Topping
  1. In a medium bowl, whisk together the flour, sugar, brown sugar, cinnamon and salt.
  2. With your fingertips, work the butter into the flour mixture until it looks like wet sand. Press the mixture together to form chunks.
Cookies
  1. Preheat the oven to 350ºF (180ºC). Lightly spray a 12-serving muffin pan with nonstick spray. (If you're concerned about the cookies sticking to the pan, see notes below.*)
  2. In a medium bowl, whisk together the flour, baking powder and salt.
  3. In a large bowl, beat the butter and powdered sugar with an electric mixer until light and fluffy.
  4. Mix in the flour mixture on low speed or by hand, just until combined.
  5. Press generous tablespoon size (about 20g each) portions of dough into the bottoms of the muffin pan cups with a pastry tamper dipped in flour. You can also use the bottom of a flat shot glass.
  6. Top with the peaches, then the crumble topping mixture. Bake until the cookies are set and the topping is golden brown, about 15-17 minutes.
  7. Cool the cookies completely in the pan. Once cool, remove the cookies from the pan by running a small offset spatula or paring knife around the inside perimeter of the muffin cups to loosen them. Drizzle with caramel sauce.
Recipe Notes

*You can line the bottoms of the muffin cups with 2-inch parchment circles to make sure your cookies release. I don't recommend cupcake liners because the cookies stick to the ridges of the liners. You can, however, cut the circles from the bottom of the cupcake liners if you don't have parchment paper.

White Chocolate Peach Muffins

I have strong opinions about muffins. Maybe a little controversial too. When baked correctly, muffins should be soft, fluffy and tender. I get a little sad and disappointed when I buy a big, domed bakery muffin and the inside is rubbery. Many of the pretty muffins I see on social media are painfully rubbery too, as the creators break open a muffin in a dramatic moment of triumph. The muffin recipe I’m sharing here is tender and delicious if baked correctly.

One of the most important ways to achieve tender muffins is by not over mixing your batter once the flour is added. Muffins are technically cake, not bread, so we don’t want gluten formation. Another way to get tender muffins is to use an acidic ingredient such as sour cream, yogurt or buttermilk. Lastly, and very importantly, don’t over bake or under bake your muffins. Baking times in recipes are a guide and not necessarily exact because everyone’s ovens and baking pans are different. Keep an eye on your muffins and test them for doneness with a cake tester or a toothpick. My grandma used to say that when you start to smell them, they’re probably done or close to being done.

Soggy muffins also make me run the other way. Muffins loaded with too much fruit or fruit that hasn’t been macerated can make your muffins soggy or dense. In this recipe, I macerated the peaches to draw out some of the moisture, so it helps to avoid creating soggy spots in your muffins. The waiting time goes by fast as you prep the rest of your ingredients.

Print Recipe
White Chocolate Peach Muffins
Tender muffins with white chocolate chips and chunks of fresh peaches.
Servings
muffins
Ingredients
Macerated Peaches
Crumb Topping
Muffins
Servings
muffins
Ingredients
Macerated Peaches
Crumb Topping
Muffins
Instructions
Macerated Peaches
  1. In a medium bowl, toss the peaches with lemon juice. Add the brown sugar and cinnamon and stir to combine. Let stand 30 minutes.
  2. Drain the peaches well and toss with flour. Reserve 1/4 cup of peaches for the muffin tops.
Crumb Topping
  1. In a medium bowl, whisk together the flour, sugar, brown sugar, cinnamon and salt.
  2. With a pastry blender, or with your fingertips, work the butter into the flour mixture until it looks like wet sand. Press together to form chunks. Set aside in the refrigerator until ready to use.
Muffins
  1. Preheat the oven to 375ºF (190ºC). Line a 12-serving muffin pan with tulip muffin liners.* (Tulip muffin liners are preferable because they hold more batter, but you can also use standard muffin liners.)
  2. In a medium bowl, whisk together the flour, baking powder, baking soda, salt, cinnamon and nutmeg.
  3. In a large bowl, beat the butter and sugar together until light and fluffy. Beat in the eggs and extracts in 3 separate additions, making sure each one is incorporated before adding the next.
  4. Mix in the flour mixture with a wooden spoon or spatula, in two additions, followed by half of the sour cream after each addition. Mix just until combined. The batter will be thick.
  5. Toss the white chocolate chips with flour, then fold them into the batter. Gently fold in the drained peaches.
  6. Transfer batter to the prepared muffin pan, equally dividing the batter among the muffin cups. (If you're using standard muffin liners, fill them 2/3 full.) Top with the reserved peaches and the crumb topping. Optional: Top each muffin with a piece of white chocolate.
  7. Bake muffins for 5 minutes. Turn down the oven heat to 350ºF (180ºC). Continue baking until the muffins are light golden brown and a toothpick inserted into the centers of the muffins comes out clean, about 15-20 more minutes. Cool in the pan for 5 minutes, then remove the muffins from the pan and continue cooling on a cooling rack.
Recipe Notes

*To find tulip muffin liners, click here.


Blueberry Lemon Crumb Cakes

Blueberry Lemon Crumb Cakes

The texture and flavor of these cute Blueberry Lemon Crumb Cakes is immaculate. You’ll love them so much, you won’t want to share, but this recipe makes six 4-inch personal crumb cakes, so you’ll have one all to yourself. You’ll understand once you taste the soft, fluffy lemon scented cake with juicy blueberries, a generous amount of sweet crumb topping and a lemony cream cheese icing. I was a bit hesitant to share this recipe. But I was taught to share recipes by my two grandmothers who were amazing cooks and bakers. They shared their knowledge and recipes with anyone who asked. Recipes are a legacy that should be passed on to family and friends. If you’re reading this, I consider you a friend. So enjoy this recipe that’s especially dear to me, because it’s based on my Grandma’s Apple Crumb Cake recipe.

I used a six serving shallow jumbo muffin pan to bake the cakes. The muffin cups are 4 inches across by 1 inch deep. To find the pan, click here. A hamburger bun pan for 4-inch buns will work too. If you happen to have six 4-inch cake pans, those work nicely. I used jumbo muffin liners to line the muffin cups, which fit perfectly by pressing them in around the inside bottom edges.

Print Recipe
Blueberry Lemon Crumb Cakes
Fluffy, soft lemon cakes with blueberries, crumb topping and lemon cream cheese icing
Servings
4-inch crumb cakes
Ingredients
Crumb Topping
Crumb Cakes
Cream Cheese Icing
Servings
4-inch crumb cakes
Ingredients
Crumb Topping
Crumb Cakes
Cream Cheese Icing
Instructions
Crumb Topping
  1. In a medium bowl, whisk the flour, sugar, brown sugar and salt together.
  2. Work in the butter with your fingertips until the mixture looks like the consistency of wet sand. Press the mixture together to make chunks. Set aside in the refrigerator until ready to use.
Crumb Cakes
  1. Preheat the oven to 350ºF (180ºC). Line a 6-serving shallow jumbo muffin pan* with jumbo muffin liners.** Jumbo muffin liners will fit by pressing them around the inside bottom edges.
  2. In a medium bowl, whisk together the flour, baking powder and salt.
  3. In a large bowl, cream the butter, sugar and lemon zest with an electric mixer on medium speed, until light and fluffy.
  4. Beat the egg and egg yolk into the butter mixture in 2 separate additions, making sure each addition is incorporated before adding the next. Beat in the extracts until combined.
  5. In a small bowl, whisk the milk and sour cream together.
  6. On low speed, mix the flour mixture into the batter in 2 additions alternating with half of the milk mixture after each addition. Beat just until combined.
  7. Transfer the batter to the prepared baking pan, evenly distributing the batter and filling the cups about half full.
  8. In a medium bowl, toss the blueberries with 1 teaspoon of flour and place them into the cups on top of the batter, about 1 ounce (28g) in each. Top each one with crumb topping.
  9. Bake until a toothpick inserted into the center of the cakes comes out clean, about 25-30 minutes. Let the cakes cool in the pan for 5 minutes, then transfer them to a cooling rack to cool completely.
Cream Cheese Icing
  1. In a medium bowl, whisk together the cream cheese, melted butter, powdered sugar, salt and 1 tablespoon (30ml) of lemon juice. Add additional lemon juice, a little at a time until your desired consistency is reached. Drizzle over the cooled cakes.
Recipe Notes

*To find the muffin pan I used, click here.

**To find jumbo muffin liners, click here. To find 4-inch cake pans, click here.

Pineapple Coconut Cake Bars

Pineapple Coconut Cake

If you like tropical flavors, you’ll love this spring dessert from my childhood. We used to call it Pineapple Coconut Snack Cake, but I would consider it more of a bar, so I changed the name to Pineapple Coconut Cake Bars. We would enjoy it on Easter or Mother’s Day because it was my mom’s favorite. It’s buttery, moist and rich. It’s also kind of addicting, because everyone always asks for seconds. You can double the recipe if you need to.

Print Recipe
Pineapple Coconut Cake Bars
Course Dessert
Servings
Ingredients
Cake
Topping
Course Dessert
Servings
Ingredients
Cake
Topping
Instructions
Cake
  1. Preheat oven to 350ºF. Grease an 8-inch square baking pan.
  2. In a medium bowl, whisk together flour, baking powder and salt.
  3. In a large bowl, whisk melted butter, sugar, egg, egg yolk and vanilla until smooth.
  4. Stir in pineapple until well combined. Stir in flour mixture just until combined.
  5. Transfer batter to prepared baking pan. Bake until top is golden brown and toothpick inserted into center of cake comes out clean, about 20-25 minutes.
Topping
  1. In a medium saucepan over medium heat, melt butter with sugar, brown sugar and salt. Whisk in heavy cream.
  2. When mixture starts to bubble, turn heat down to low and simmer until thickened, about 3 minutes.
  3. Remove from heat and stir in coconut, pecans and vanilla. Spread over warm cake. Let cool at least 15 minutes before cutting cake.

Chocolate Chip Cookie Bread

Chocolate Chip Cookie Bread

This is the ultimate chocolate chip bread! There are no cookies in this recipe, but it tastes so much like freshly baked chocolate chip cookies that Chocolate Chip Cookie Bread is the perfect name for it. Brown sugar, vanilla and semisweet chocolate chips really help to mimic that beloved chocolate chip cookie flavor. I love the big pockets of chocolate that come from using jumbo chocolate chips, but of course you can use regular or mini chocolate chips if you prefer.

I typically wait until a loaf is cooled off before slicing it, but in this case, I wanted to capture the melted pools of chocolate for the video. The fresh baked chocolate chip aroma was so heavenly, that it took all of my willpower not to immediately devour the entire loaf! It’s easier to slice a fresh baked loaf when it’s cooled off. But if you want to experience the melty chocolate chips, warm your slice in the microwave for 8-10 seconds.

Print Recipe
Chocolate Chip Cookie Bread
A moist, tender loaf cake with brown sugar and chocolate chips that tastes just like chocolate chip cookies
Servings
loaf
Ingredients
Servings
loaf
Ingredients
Instructions
  1. Preheat oven to 375ºF (190ºC). Line the bottom of a 9 x 5-inch loaf pan with parchment paper. Grease and flour the insides.
  2. In a medium-size bowl, whisk together the 1 3/4 cups (223g) flour, baking powder, baking soda and salt.
  3. In a large bowl, cream the butter and brown sugar until light and fluffy. Beat in the egg, egg yolk and vanilla in 3 separate additions, making sure each one is fully incorporated before adding the next.
  4. In a small bowl, whisk the milk and sour cream together.
  5. Add the flour mixture to the batter in two additions, alternating with half of the milk mixture after each addition. Beat just until combined. Do not over mix.
  6. Set aside a handful of chocolate chips for the top of the loaf. In a small bowl, toss the remaining chips with 1 teaspoon flour, making sure to coat them all, then fold them into the batter. This will help to prevent them from sinking. Transfer the batter to the prepared loaf pan. Top with the reserved chocolate chips.
  7. Bake for 10 minutes. Turn the oven temperature down to 325ºF (165ºC) and continue baking until the loaf is golden brown and a toothpick inserted in center comes out clean, about 45-50 more minutes. Cool the loaf in pan for 10 minutes then turn the loaf out onto a cooling rack.
Recipe Notes

*If you want to use mini chocolate chips, use one cup (6 oz or 170g)

Pink m&m’s Chocolate Cookies


Print Recipe


Pink m&m's Chocolate Cookies

Chocolate cookies with pink m&m's candies

Course Dessert
Keyword chocolate, cookies

Servings
cookies


Ingredients

Course Dessert
Keyword chocolate, cookies

Servings
cookies


Ingredients


Instructions
  1. Preheat oven to 350ºF. Line two cookie sheets with parchment paper.

  2. In a medium bowl, whisk together flour, cocoa powder, baking soda and salt.

  3. In a large bowl, cream butter with sugar and brown sugar until light and fluffy.

  4. Add egg and vanilla in separate additions and beat until well incorporated.

  5. Add flour mixture and beat just until combined.

  6. Gently fold in m&m's.

  7. Place 2-tablespoon size portions, about 2 inches apart, onto prepared cookie sheets. I used a #30 portion scoop.**

  8. Add a few more m&m's to the top of each cookie.

  9. Bake until edges are set and tops puff slightly, about 8-10 minutes. Let cookies cool on cookie sheet for 1 minute, then transfer to cooling rack.


Recipe Notes

*To find pink m&m's, click here.

**To find the portion scoop I used, click here.

Melt-in-Your-Mouth Peanut Butter Cookie Sandwiches

Soft Peanut Butter Sandwich Cookies

I never imagined that I’d ever be posting a peanut butter cookie recipe. There are already crunchy peanut butter cookies, soft ones, chewy ones, and those peanut shaped store bought ones out there. I mean, do we even need another peanut butter cookie recipe? After I tasted this one, it’s a resounding YES! These soft, tender cookies combined with a silky, smooth filling are a new peanut butter experience that I had to share.

The key to getting the soft texture in the cookie, without being dry, is cake flour. So don’t substitute it, because it’s vital to achieve the correct texture. Make sure to weigh your flour for the most accurate results. The second important ingredient is heavy whipping cream. Just a little added to the filling gives it a luxurious, silky texture.

This recipe makes sixteen medium size peanut butter cookies, which will give you eight sandwiches. If you want more, you can double the recipe or make the cookies smaller. Smaller cookies will have a shorter baking time.

Print Recipe
Melt-in-Your-Mouth Peanut Butter Cookie Sandwiches
Course Dessert
Servings
cookie sandwiches
Ingredients
Peanut Butter Cookies
Peanut Butter Filling
Course Dessert
Servings
cookie sandwiches
Ingredients
Peanut Butter Cookies
Peanut Butter Filling
Instructions
Peanut Butter Cookies
  1. Preheat oven to 350ºF (180ºC). Line two large baking sheets with parchment paper.
  2. In a medium bowl, whisk together the all purpose flour, cake flour, baking soda and salt. Set aside.
  3. In a large bowl, beat the peanut butter, butter and shortening until smooth.
  4. Beat in the egg and vanilla until well combined.
  5. Set aside 1/4 cup (50g) of the granulated sugar. Beat the peanut butter mixture with brown sugar and remaining granulated sugar, with an electric mixer at medium speed, until light and fluffy.
  6. Add the flour mixture and beat just until combined.
  7. Roll the dough into 1 1/2-inch (3.8cm) diameter balls (about 1 1/4 oz or 35g each). Roll the dough balls in the reserved granulated sugar.
  8. Place the dough balls 3 inches apart onto the prepared baking sheets. Flatten with a fork, making a criss cross pattern.
  9. Bake until the cookies are puffy and start to crack around the edges, about 9-11 minutes.
  10. Let the cookies cool on baking sheet for 1 minute, then carefully transfer them to a cooling rack. The cookies will be fragile, but they will firm up as they cool.
  11. Place a spoonful of filling on the bottoms of half of the cooled cookies. Top with remaining the remaining cookies.
Peanut Butter Filling
  1. In medium bowl, beat the peanut butter and butter together until smooth.
  2. Beat in the powdered sugar, heavy cream, vanilla and salt until smooth.
Recipe Notes

To find my favorite cookie sheet, click here.

Butterscotch Bread

What’s better than the smell of chocolate chip cookies baking or of fresh coffee brewing? The aroma of this warm, sweet buttery loaf of Butterscotch Bread is so heavenly that I’m convinced angel grandmothers bake this on a regular basis in heaven. The rich scent is accompanied by a soft, tender bread topped with a silky butterscotch glaze.

It all starts with browning your butter first. It adds a nutty, deep butter flavor. When browning your butter, use a light colored saucepan so you can see the visual clues. You’ll see it start to foam and brown specks will collect on the bottom of the pan. It will smell nutty and fragrant. Keep a close eye on it. It can go from brown to burnt in a quick second. When your brown butter has cooled to room temperature, the rest of the recipe comes together quickly. You can also brown your butter a day ahead and keep it in the refrigerator. Bring it to room temperate before using.

This delightful bread goes well with coffee or tea and is just as delicious the next day. Store covered at room temperature.

Print Recipe
Butterscotch Bread
Servings
loaf
Ingredients
Butterscotch Bread
Butterscotch Glaze
Servings
loaf
Ingredients
Butterscotch Bread
Butterscotch Glaze
Instructions
Butterscotch Bread
  1. In a small saucepan, cook the butter over medium heat until brown and fragrant. When brown specks (not black!) collect at the bottom of the pan, immediately transfer the butter to a small bowl. Let cool to room temperature.
  2. Preheat the oven to 350ºF. Line the bottom of an 8 x 4-inch baking pan with parchment paper. Grease and flour the insides.
  3. In a medium bowl, beat the brown butter, brown sugar, eggs, vanilla and buttermilk until smooth.
  4. Stir in the flour mixture in two additions. Mix just until combined. A few lumps are okay.
  5. Transfer the batter to prepared baking pan. Bake until the top is deep golden brown and q toothpick inserted into center comes out clean, about 38-43 minutes.
  6. Let the bread cool in pan for 10 minutes, them turn it out onto a cooling rack to cool completely. Top with two coats of butterscotch glaze.
Butterscotch Glaze
  1. Melt the butter in a small saucepan over medium heat. Stir in the brown sugar and salt.
  2. Continue stirring over medium heat until the mixture comes to a boil. Boil for two minutes.
  3. Turn the heat down and slowly stir in the heavy cream. Keep stirring until mixture is smooth. Remove from heat and stir in the vanilla extract.
  4. Transfer the butterscotch glaze to a small bowl and let cool until thickened.

Blueberry Crumble Bars

Crumb bars with fruit are classic, rustic bars that are easy to make and so delicious. These Blueberry Crumble Bars happen to be the best I’ve ever tasted! With a tender, almost addicting shortbread crust, the filling is perfectly sweet and blanketed with plenty of crisp crumb topping. They’re perfect to pack in a lunch, take on a family picnic or as an addition to a backyard cookout. Everyone who tries these comes back for seconds!

Print Recipe
Blueberry Crumble Bars
The best Blueberry Crumble Bars ever! Tender shortbread crust topped with sweet blueberry filling and generous crumb topping by Brownie Mischief
Course Dessert
Cuisine American
Servings
Ingredients
Crumb Topping
Crust
Blueberry Filling
Course Dessert
Cuisine American
Servings
Ingredients
Crumb Topping
Crust
Blueberry Filling
Instructions
Crumb Topping
  1. In a medium bowl, whisk together the flour, brown sugar, granulated sugar, cinnamon and salt until well combined. Work the butter into the flour mixture with your fingertips, until it looks like sand, with no large pieces of butter. Press the mixture together to form chunks. Set aside in the refrigerator until ready to use.
Crust
  1. Preheat the oven to 350ºF (180ºC). Line an 8-inch square baking pan with parchment paper, overlapping the ends a couple of inches. These will be handles to lift the bars out of the pan.
  2. In a medium bowl, whisk together the flour, powdered sugar, baking powder and salt until well combined. In a large bowl, beat the butter until smooth. Add the flour mixture and beat just until combined.
  3. Press the dough evenly into the baking pan. Bake until the surface looks light golden brown, about 15-20 more minutes. Meanwhile, prepare the filling.
Blueberry Filling
  1. In a large bowl, toss the blueberries with the lemon juice. Mix in the sugar and cornstarch. Pour the blueberry mixture over the warm crust. Top evenly with the crumb topping. Return the pan to the oven and continue baking until the topping is golden brown and the filling starts to bubble, about 28-33 minutes. Let cool completely before removing the bars from the pan. Sprinkle with powdered sugar.

Caramel Apple Blossoms

Caramel Apple Blossoms by Brownie Mischief

Whether you call them apple blossoms, apple dumplings, apple roses or mini apple pies, these are cute, delicious little apple pastries. I made them because I was craving apple pie, but I didn’t have enough apples to bake one. I didn’t invent them, and I don’t know who did, but I’ve had frozen ones and I’ve seen them on restaurant menus. I thought it would be fun to make them, and it was! I could’ve just put some pie dough in muffin cups and made quick little pies, but flower shaped things automatically get extra points for cuteness. And if you know me, you know I love my cute bakes!

Print Recipe
Caramel Apple Blossoms
Course Dessert
Keyword pastry
Servings
blossoms
Ingredients
Topping
Blossoms
Course Dessert
Keyword pastry
Servings
blossoms
Ingredients
Topping
Blossoms
Instructions
  1. In a medium-size bowl, mix together all of the topping ingredients. Set aside in the refrigerator until ready to use.
  2. In a large bowl, toss the apples with lemon juice. Add the brown sugar, granulated sugar, melted butter, flour, cinnamon and salt to the apples. Stir until well combined.
  3. Line a large baking sheet with parchment paper.
  4. On a lightly floured surface, roll the pie dough to 1/8-inch thickness. Cut out twelve 5-inch blossom shapes*, re-rolling the dough scraps as needed.** Lightly mark a 2-inch circle in the center of each blossom. Make cuts between the petals to separate them, just up to the edge of the center circle. Top each blossom with about 2 generous tablespoons of apples.
  5. Brush the dough petals with egg wash. Form blossoms by lifting and overlapping each petal 1/2-inch in a spiral pattern similar to a rose. Tuck the last petal under. Press the petals together to seal so the filling won't leak.
  6. Top each blossom with a spoonful of topping. Place in the refrigerator to chill for 30 minutes to 1 hour. Don't skip this step. This will help the blossoms keep their shape.
  7. Preheat oven to 375ºF (190ºC). Brush the blossom dough all over with egg wash. Wipe any drips off of the parchment paper. Bake until the crust is golden brown and filling is starting to bubble, about 23-28 minutes. Transfer the blossoms to a cooling rack to cool for a few minutes before serving warm or serve at room temperature. Drizzle the blossoms with caramel sauce.
Recipe Notes

*I used a 5-inch blossom cutter. To find a blossom cutter, click here.

**If you need to  re-roll your  pie dough scraps, press the scraps together, cover and let rest in the refrigerator for several minutes to help avoid shrinkage.