Morning Glory Cake

You may have tasted Morning Glory Muffins at your local bakery or coffee shop. They date back to the 1970’s and originated at Nantucket’s Morning Glory Cafe. The original muffins contained carrots, apples, coconut, raisins and nuts. Over the years I’ve tasted many versions of the hearty breakfast muffins with countless variations of nutritious add-ins. I was inspired to make a cake version using fall harvest ingredients. I replaced the coconut with zucchini and omitted the nuts. But you can certainly add in your favorite toasted chopped nuts, such as pecans or walnuts. Whether or not you like raisins, you’ll love the golden raisins I used in this recipe. They’re soaked in juice prior to baking and they taste like juicy little jewels, nothing like traditional raisins. I also added a brown sugar glaze, but the cake is equally delicious without the glaze.

Print Recipe
Morning Glory Cake
Moist tender single layer spice cake with carrots, apples, zucchini and golden raisins topped with brown sugar glaze
Cuisine American
Keyword apple, cake, carrot, zucchini
Servings
servings
Ingredients
Morning Glory Cake
Brown Sugar Glaze
Cuisine American
Keyword apple, cake, carrot, zucchini
Servings
servings
Ingredients
Morning Glory Cake
Brown Sugar Glaze
Instructions
Morning Glory Cake
  1. Preheat the oven to 350ºF (180ºC). Line the bottom of an 8-inch round cake pan** with parchment paper. Grease and flour the insides.
  2. In a small heat proof bowl, combine the raisins and apple juice, making sure the raisins are submerged. Heat in the microwave for 10-15 seconds until the raisins are plump and hydrated. Set aside to cool to room temperature, then drain the raisins.
  3. In a medium-size bowl, whisk together the flour, baking powder, baking soda, salt, cinnamon, ginger and nutmeg until well combined.
  4. In a large bowl, whisk together the brown sugar, granulated sugar, orange zest, oil, eggs and vanilla until smooth and well combined. Stir in the flour mixture just until combined. Fold in the carrots, apples, zucchini and the drained raisins.
  5. Transfer the batter to the prepared cake pan. Bake until the top is deep golden brown and a toothpick inserted into the center of the cake comes out clean, about 28-35 minutes. Cool the cake in the pan for 10 minutes then turn the cake out and transfer it to a cooling rack.
Brown Sugar Glaze
  1. In a small saucepan over medium-low heat, melt the butter and brown sugar together, stirring until the sugar dissolves and the mixture starts to bubble. Let it bubble gently for 30 seconds, then remove it from the heat. Stir in the heavy cream and salt until smooth. Whisk in the powdered sugar until smooth and well combined. Spread the glaze over the cooled cake.
Recipe Notes

*Wrap the shredded zucchini  in a clean kitchen towel or a sturdy paper towel and squeeze out the excess liquid.

**To find my favorite 8-inch cake pans, click here.

To find parchment cake rounds, click here.

Mocha Pumpkin Spice Bread

Mocha Pumpkin Spice Bread

It wouldn’t be fall without PSL’s and pumpkin bread. This ultra moist, plush version of pumpkin bread has mocha batter swirled through it and a rich chocolate glaze that takes it over the top. It’s dangerously delicious and nearly impossible to eat just one slice. I think this will become your new favorite fall baking recipe.

Print Recipe
Mocha Pumpkin Spice Bread
Soft, ultra moist pumpkin spice bread, swirled with mocha and topped with a shiny chocolate glaze
Servings
loaf
Ingredients
Mocha Pumpkin Spice Bread
Chocolate Glaze
Servings
loaf
Ingredients
Mocha Pumpkin Spice Bread
Chocolate Glaze
Instructions
  1. Preheat the oven to 350ºF (180ºC). Line the bottom of a 9 x 5-inch loaf pan with parchment paper. Grease and flour the insides with a mixture of equal parts unsweetened cocoa powder and flour.
  2. In a medium-size bowl, whisk together the flour, pumpkin pie spice, baking powder, baking soda and salt until well combined.
  3. Set aside one tablespoon (15ml) of the oil. In a large bowl, beat the remaining oil, the sugar, brown sugar, eggs, evaporated milk and vanilla extract until smooth and well combined. Beat in the pumpkin purée until incorporated. Stir in the flour mixture just until combined.
  4. Place one cup (237g) of the batter in a separate medium-size bowl. Add the cocoa powder, espresso powder and the reserved one tablespoon of oil. Mix until incorporated.
  5. Place half of the pumpkin batter into the baking pan. Scoop the mocha batter into the pan, alternating with scoops of the remaining pumpkin batter. Swirl the batter with a skewer. Bake until a toothpick inserted into the center comes out clean or with a few moist crumbs attached (not wet batter), about 35-45 minutes. Let the loaf cool in the pan for 10 minutes, then turn the loaf out and continue cooling on a cooling rack.
Chocolate Glaze
  1. Melt the butter, chocolate, and corn syrup together in a medium-size heatproof bowl set over a pan of barely simmering water, making sure the water doesn't touch the bottom of the bowl. Stir gently until smooth. Set aside to cool slightly then spoon the glaze over the cooled loaf and let it drip down the sides.
Recipe Notes

To find the 9 x 5 inch loaf pan I used, click here.

Brown Butter Chocolate Oatmeal Cookies

Brown Butter Chocolate Oatmeal Cookies

Oatmeal cookies are the most nostalgic and comforting cookies. A warm, freshly baked oatmeal cookie is like a hug from your grandmother. For this recipe, I kept the cozy, nostalgic flavor we all love about oatmeal cookies, but enhanced them with toasty, brown butter. I also added dark chocolate, which gives them a bit of decadence and modern sophistication. If you prefer a sweeter cookie, you can use semisweet chocolate instead.

Print Recipe
Brown Butter Chocolate Oatmeal Cookies
Oatmeal cookies made with toasty, fragrant brown butter and cinnamon and studded with dark chocolate pieces
Course Dessert
Cuisine American
Servings
cookies
Ingredients
Course Dessert
Cuisine American
Servings
cookies
Ingredients
Instructions
  1. In a small light-colored saucepan over medium heat, melt the butter and cook until it's deep golden and fragrant. When brown specks start to appear, remove it from the heat and immediately transfer the butter with the brown specks to a large bowl. Set aside to cool to room temperature.
  2. Preheat the oven to 350ºF (180ºC). Line two cookie sheets with parchment paper.
  3. In a medium-size bowl, whisk together the flour, baking soda, salt, cinnamon and pumpkin pie spice until well combined.
  4. Add the granulated sugar and brown sugar to the cooled brown butter and mix until combined. Beat in the egg and vanilla extract until smooth and well combined. Mix in the flour mixture, just until combined. Stir in the oats.
  5. Set aside a few chocolate pieces for the tops. Stir the remaining chocolate pieces and the pecans (if using) into the dough. Form the dough into 12 portions, about 3 tablespoons each. Roll into balls and place about 2 inches apart onto the baking sheets. Top the dough balls with the reserved chocolate pieces. Bake until the centers puff up and the edges start to turn light golden brown, about 9-11 minutes.
  6. Cool the cookies on the cookie sheet for 1 minute, then transfer to a cooling rack. (If your cookies spread too much** you can immediately use a large round cookie cutter or a small bowl to shape the hot cookies. Place the cookie cutter onto the cookie sheet over each cookie and slide it around each one a couple of times to achieve perfectly round cookies. Work quickly before the cookies set. Let the cookies cool on the baking sheet for 1 minutes, then transfer them to a cooling rack.)
Recipe Notes

*If you want a sweeter cookie, you can use a semisweet chocolate bar instead.

**You can also try chilling your dough balls for 20 minutes to prevent excess spreading. Bake a test cookie before baking the entire batch when trying a new recipe.

Blueberry Crumble Bars

Crumb bars with fruit are classic, rustic bars that are easy to make and so delicious. These Blueberry Crumble Bars happen to be the best I’ve ever tasted! With a tender, almost addicting shortbread crust, the filling is perfectly sweet and blanketed with plenty of crisp crumb topping. They’re perfect to pack in a lunch, take on a family picnic or as an addition to a backyard cookout. Everyone who tries these comes back for seconds!

Print Recipe
Blueberry Crumble Bars
The best Blueberry Crumble Bars ever! Tender shortbread crust topped with sweet blueberry filling and generous crumb topping by Brownie Mischief
Course Dessert
Cuisine American
Servings
Ingredients
Crumb Topping
Crust
Blueberry Filling
Course Dessert
Cuisine American
Servings
Ingredients
Crumb Topping
Crust
Blueberry Filling
Instructions
Crumb Topping
  1. In a medium bowl, whisk together the flour, brown sugar, granulated sugar, cinnamon and salt until well combined. Work the butter into the flour mixture with your fingertips, until it looks like sand, with no large pieces of butter. Press the mixture together to form chunks. Set aside in the refrigerator until ready to use.
Crust
  1. Preheat the oven to 350ºF (180ºC). Line an 8-inch square baking pan with parchment paper, overlapping the ends a couple of inches. These will be handles to lift the bars out of the pan.
  2. In a medium bowl, whisk together the flour, powdered sugar, baking powder and salt until well combined. In a large bowl, beat the butter until smooth. Add the flour mixture and beat just until combined.
  3. Press the dough evenly into the baking pan. Bake until the surface looks light golden brown, about 15-20 more minutes. Meanwhile, prepare the filling.
Blueberry Filling
  1. In a large bowl, toss the blueberries with the lemon juice. Mix in the sugar and cornstarch. Pour the blueberry mixture over the warm crust. Top evenly with the crumb topping. Return the pan to the oven and continue baking until the topping is golden brown and the filling starts to bubble, about 28-33 minutes. Let cool completely before removing the bars from the pan. Sprinkle with powdered sugar.

Blackberry Cornbread

This sweet Blackberry Cornbread is super easy to make. It makes a delicious breakfast, brunch or side dish. It’s so good served with Blackberry Honey Butter. I love baking my cornbread in a cast iron skillet. It gives the cornbread a crisp, rustic crust. You can also use a cake pan if you prefer. (The baking time may vary.) Make sure not to over bake your cornbread since overtaking will dry it out. Use fresh, ripe blackberries when they’re in season. You can also use frozen blackberries or fresh or frozen blueberries. Skip the macerating step if you’re using blueberries or frozen berries.

Print Recipe
Blackberry Cornbread
Sweet cornbread studded with ripe blackberries
Cuisine American
Servings
Ingredients
Cuisine American
Servings
Ingredients
Instructions
  1. Preheat the oven to 350°F (180°C). Grease an 8” cast iron skillet* or an 8” round cake pan.
  2. In a large bowl, whisk together the flour, sugar, cornmeal, baking powder and salt.
  3. In a separate bowl, whisk together the eggs, sour cream, oil and melted butter until smooth. Add the egg mixture to the flour mixture. Mix just until combined. A few lumps are okay. In a small bowl, gently toss one 1 cup (136g) of the blackberries with 1 tsp of flour. Gently fold the berries into the batter.
  4. Transfer the batter to the skillet. Top with the remaining blackberries. Bake until the top is golden brown and toothpick inserted into the center comes out clean, about 35-43 min. Let cool in the pan 10 min. Serve with Blackberry Honey Butter** or honey if desired
Recipe Notes

*To find an 8-inch cast iron skillet, click here.  

**To find the Blackberry Honey Butter Recipe, click here.


Cherry Cutie Pies

Cherry Cutie Pies

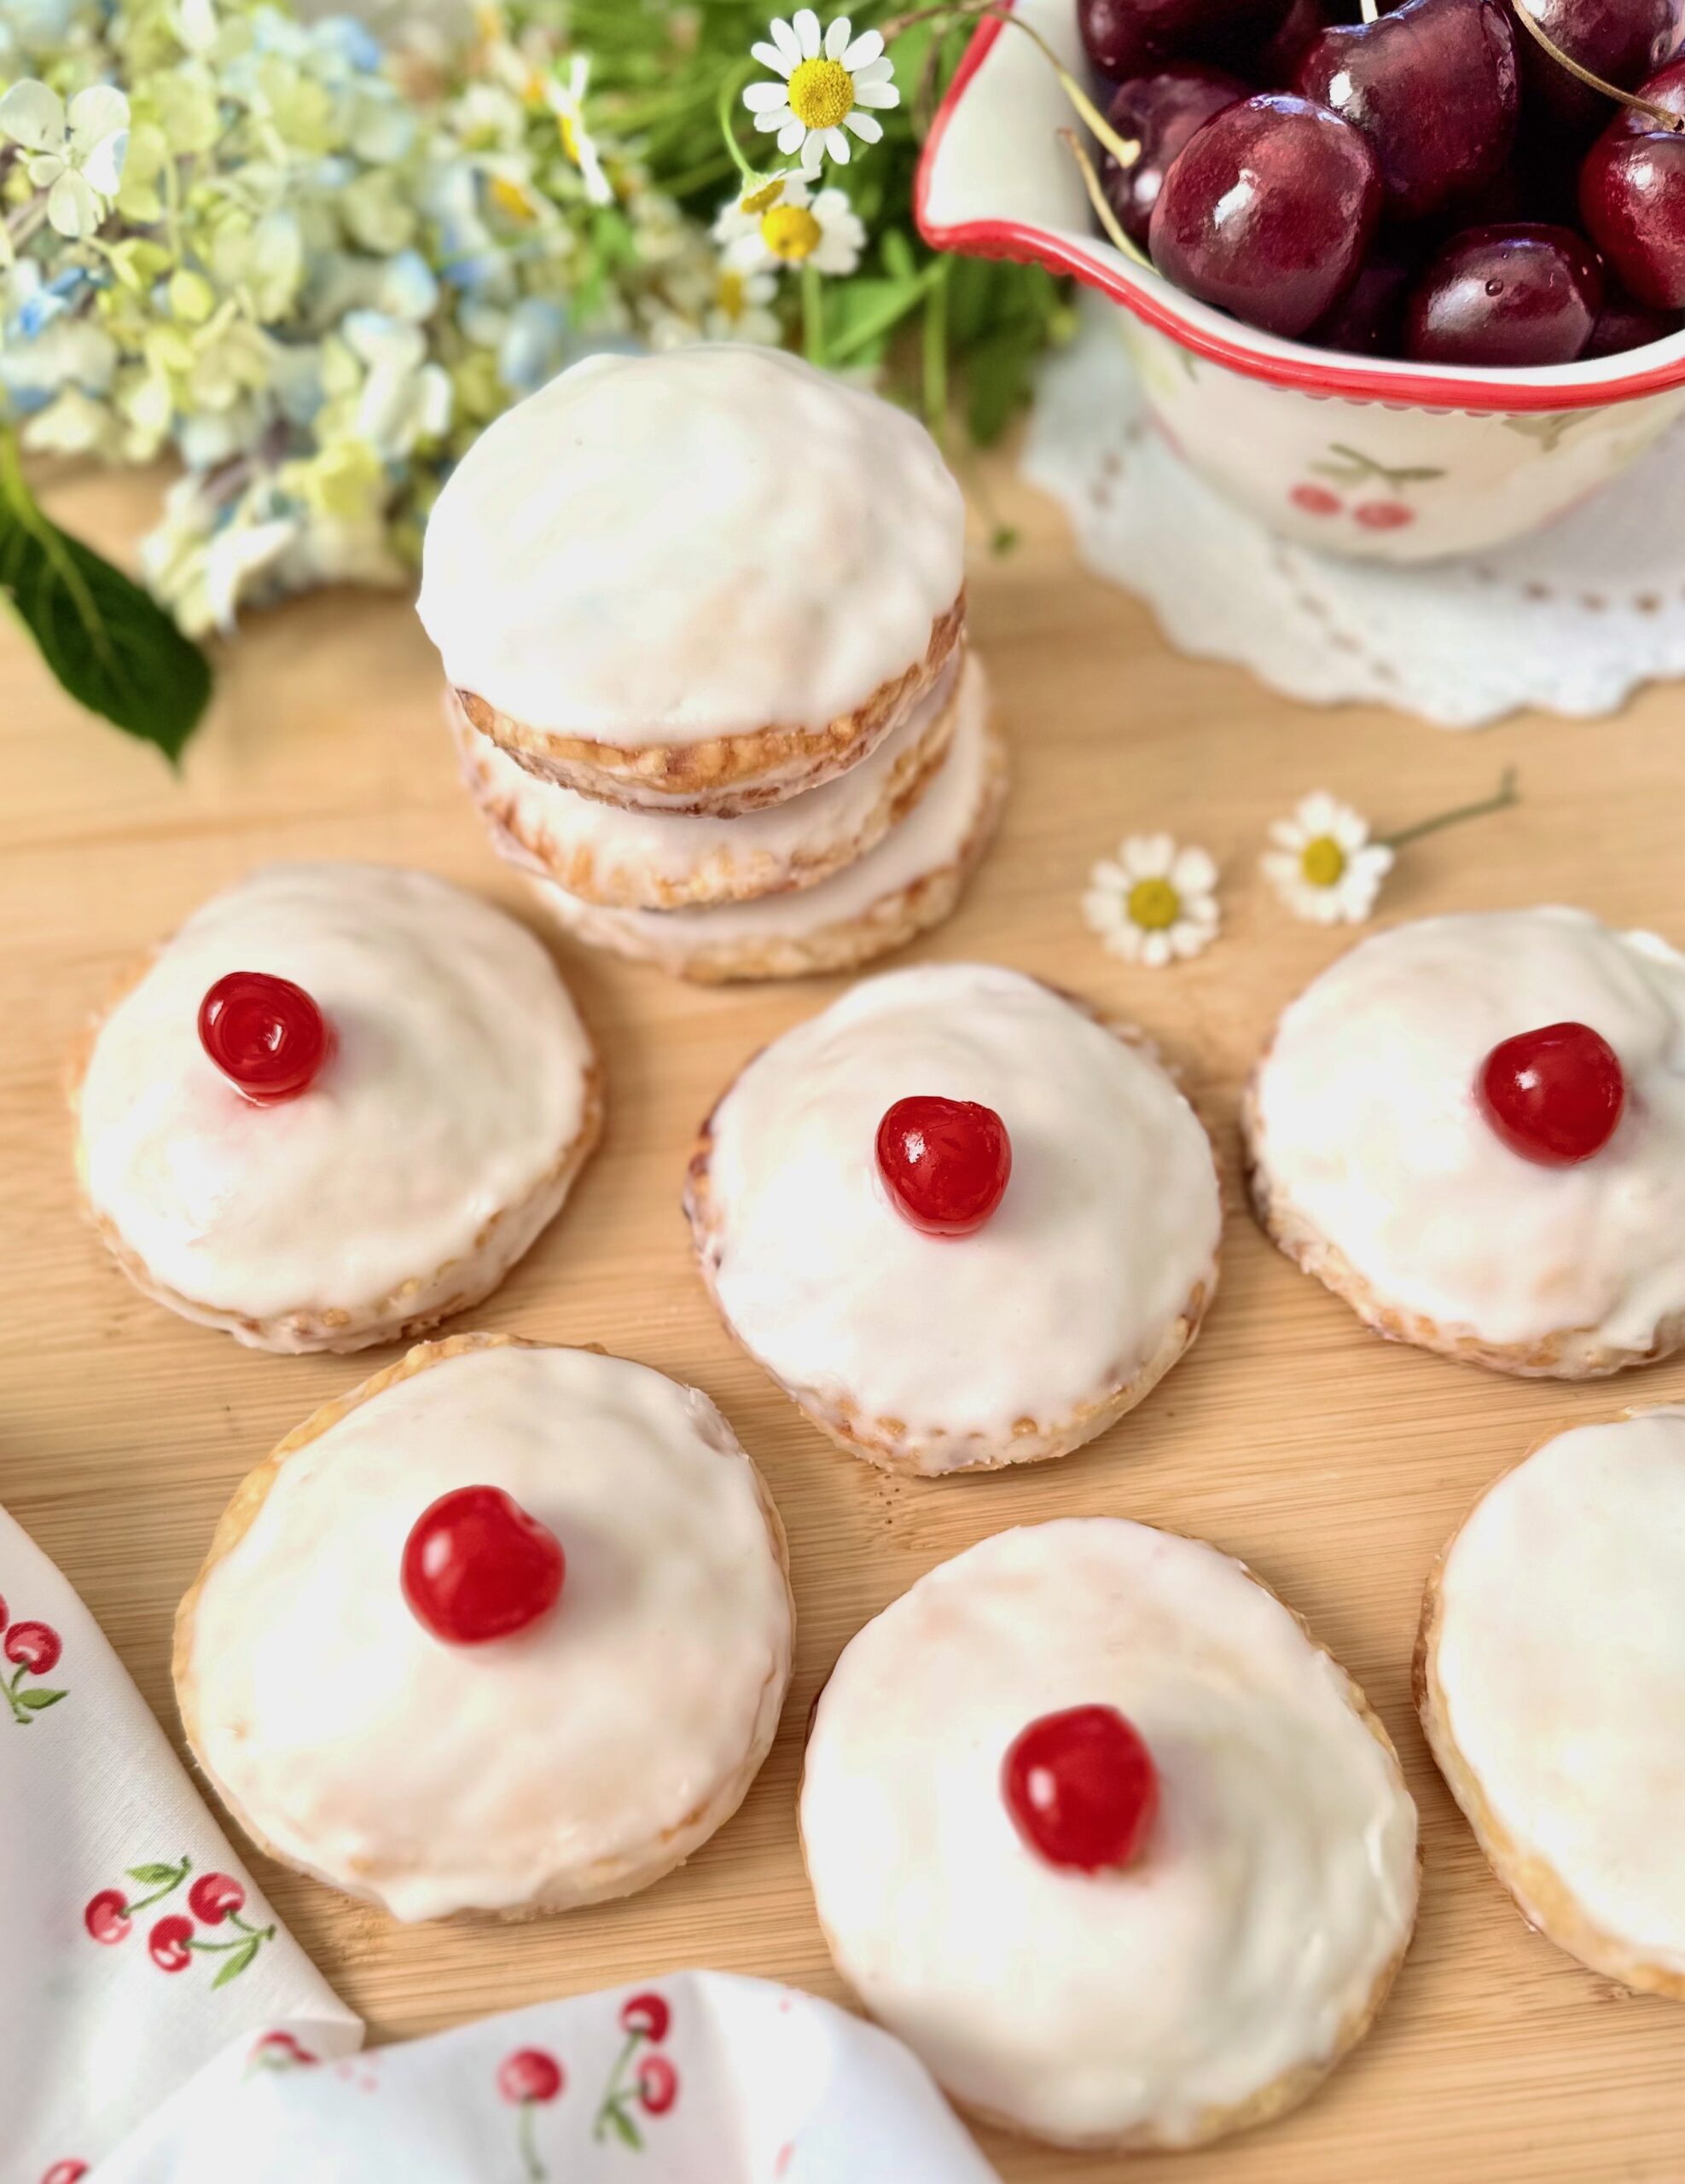
Cherry season is highly anticipated at my house. We love enjoying a bowl of fresh cherries during the summer. We also love fresh cherry desserts. These cute little hand pies are a family favorite. They have the most delicious fresh cherry filling, surrounded with buttery, flaky crust and topped with vanilla icing. The small size makes them perfect for sharing or taking them along in a picnic lunch. I like to make the crust and the filling the day before, which makes them come together quicker on baking day. I decorated mine with bright red maraschino cherries for the photo, but my favorite cherries to top them with are Italian-style maraschino cherries.

Print Recipe
Cherry Cutie Pies
3-inch cherry hand pies with flaky crust, topped with vanilla icing
Course Dessert
Cuisine American
Keyword cherry, pastry, pie
Servings
hand pies
Ingredients
Pie Crust
Cherry Filling
Icing
Course Dessert
Cuisine American
Keyword cherry, pastry, pie
Servings
hand pies
Ingredients
Pie Crust
Cherry Filling
Icing
Instructions
Pie Crust
  1. In a large bowl, whisk together the flour, sugar and salt. Work the shortening into the flour with your fingertips until it's evenly dispersed throughout. Work the butter into the flour mixture, creating flat dime size pieces.
  2. In a glass measuring cup, mix the ice water and vinegar together. Sprinkle the liquid over the flour mixture a little at a time, stirring until the dough comes together. You may not need all of the liquid depending on your climate.
  3. Turn the dough out onto a lightly floured surface. Fold the dough over onto itself a couple of times. Do not overwork the dough. Divide the dough into 2 equal portions and form into disks. Wrap them in plastic wrap and refrigerate until firm, at least 2 hours or up to overnight.
Cherry Filling
  1. In a medium-size saucepan, combine the cherries, sugar and cornstarch. Simmer over low heat, stirring occasionally, until the cherries start to soften and the juices are thickened, about 5 minutes. Transfer the cherries to a bowl. Stir in the almond extract. Set aside to cool completely.
Icing
  1. In a medium-size bowl, whisk together the powdered sugar, meringue powder, 1 1/2 tablespoons (22ml) of milk, the salt and the vanilla extract. Add additional milk as needed to achieve the desired consistency. (If you decide to omit the meringue powder, you'll need less milk.)
Assembly
  1. Preheat oven to 375°F (190°). Line a large baking sheet with parchment paper.
  2. On a lightly floured surface, roll dough to about 1/8-inch (.3cm) thickness. Cut out 20-22 3-inch (7.6cm) rounds. Transfer half of the rounds to a baking sheet, placing them about 2 inches (5cm) apart. Using a slotted spoon, place the filling onto rounds to within 1/2-inch (1.3cm) of the edges. Using a small pastry brush or your finger, apply egg wash to the edges. Top with the remaining rounds. Press the edges to seal & crimp with a fork. Brush the pies with egg wash. Cut a small x in the top of each pie.
  3. Bake until golden, about 18-24 min. Transfer the pies to a cooling rack to cool completely. Brush icing on the cooled pies with a pastry brush. When the icing is almost set, top the pies with pitted cherries if desired.

Little Spring Vegetable Pot Pies

These little veggie pot pies are so cute and comforting. The crust is incredibly flaky and the filling is so versatile. I used asparagus, carrots and peas for the filling, but feel free to use your favorite vegetables. The possibilities are endless! The small size bakes up quickly and is perfect for lunch or a light dinner. I typically serve these with some fresh fruit or salad greens on the side.

I used vegetable shortening for the crust because it makes the flakiest crust ever and also because the pies can easily be a vegetarian dish. If you’re trying to avoid trans fats, then choose a brand of vegetable shortening that doesn’t contain trans fat or replace some of the vegetable shortening with butter.* Keep in mind that if you replace all of the vegetable shortening with butter, your crust won’t be nearly as flaky.

Print Recipe
Little Spring Vegetable Pot Pies
Servings
Mini pot pies
Ingredients
Pie Crust
Servings
Mini pot pies
Ingredients
Pie Crust
Instructions
Pie Crust
  1. In a large bowl, whisk together the flour, baking powder and salt. Work the shortening into the flower with your fingertips until flat dime size pieces are formed.
  2. In a small bowl, combine the ice water and vinegar. Sprinkle over the flour mixture a little at a time, mixing just until the dough comes together. You may not need all of the liquid, depending on your climate.
  3. Turn the dough out onto a lightly floured surface. Fold the dough over onto itself a few times. Do not over work the dough. Form the dough into a disc. Wrap in plastic wrap and refrigerate for 1-2 hours or up to overnight.
Filling
  1. Preheat the oven to 400ºF. (200ºC). Grease four 6-oz ramekins.*** Place the ramekins on a baking sheet.
  2. In a medium saucepan, melt the butter over medium heat. Sauté the onions, carrots and asparagus for a few minutes until the onions are translucent.
  3. Sprinkle the vegetables with flour. Cook 1-2 minutes. Stir in the broth and simmer until thickened. Add the milk, parsley and seasonings. Make sure to taste your sauce to adjust the seasonings to your preference. Stir in the peas. Transfer the filling to the greased ramekins.
  4. On a lightly floured surface, roll the pie dough to 1/4-inch thickness. Cut out 4 rounds of dough about an inch larger than the tops of your ramekins. Brush the top edges of the ramekins with a bit of egg wash. Place the rounds of dough on the ramekins, overlapping a bit. Crimp the edges of the dough with your fingers or with a fork. Brush the pies with egg wash. Cut a 3/4-inch ventilation slit in the top of each pie. Bake until golden brown, about 30-35 minutes.
Recipe Notes

*To replace part of the shortening with butter, use 1/4 cup (48g) shortening and 1/4 cup (57g) butter.

**For a vegetarian version, you can substitute the egg wash by brushing the tops of the pies lightly with olive oil.

***To find the ramekins I used, click here.

My Favorite Banana Bread

This moist, flavorful banana bread is my favorite banana bread recipe to date. I like to add toasted pecans or chocolate chips to make it extra delicious.

Print Recipe
My Favorite Banana Bread
Moist, flavorful banana bread
Cuisine American
Keyword banana, loaf
Servings
loaf
Ingredients
Cuisine American
Keyword banana, loaf
Servings
loaf
Ingredients
Instructions
  1. Preheat the oven to 350ºF (165ºC). Line the bottom an 8 x 4-inch or a 9 x 5-inch loaf pan with parchment paper. Grease and flour the insides.
  2. In a medium-size bowl, whisk together the flour, baking powder, baking soda, salt, cinnamon and nutmeg.
  3. In a large bowl, whisk together the brown sugar, oil, eggs, sour cream and vanilla until smooth and well combined. Stir in the bananas until incorporated. Mix in the flour mixture just until combined. Do not over mix. Stir in the 1/2 cup of pecans if using. If using chocolate chips, set aside 1/4 cup (43g) for the top and stir in the remaining 1 cup (170g) of chocolate chips.
  4. Transfer the batter to the prepared loaf pan. Sprinkle the loaf with the chopped pecans or 1/4 cup (43g)of chocolate chips. Bake until a toothpick inserted into the center of the loaf comes out clean, about 40-50 minutes. Cool in the pan for 10 minutes, then remove the loaf from the pan and transfer it to a cooling rack to cool completely.

Cranberry Sauce

Homemade cranberry sauce is easier to make than you might think, and it takes your turkey dinner to another level. And don’t get me started on how delicious it is on Thanksgiving leftover sandwiches (which I happen to love more than the dinner itself.) This cranberry sauce is also delicious used in dessert recipes, like bars and cookies, such as my Cranberry Orange Crumb Cake Cookies.

Print Recipe
Cranberry Sauce
Servings
servings
Ingredients
Servings
servings
Ingredients
Instructions
  1. In a medium saucepan, combine the cranberries, granulated sugar, brown sugar, orange juice, water, orange zest and cinnamon. Bring to a boil over medium heat. Turn the heat down to medium-low and simmer until the cranberries soften and the mixture thickens to a jam consistency, about 18-25 minutes. Stir in the honey and salt. Transfer the mixture to a bowl and set aside to cool to room temperature. The sauce will thicken a bit as it cools.