Strawberries & Cream Tarts

Strawberries & Cream Tarts

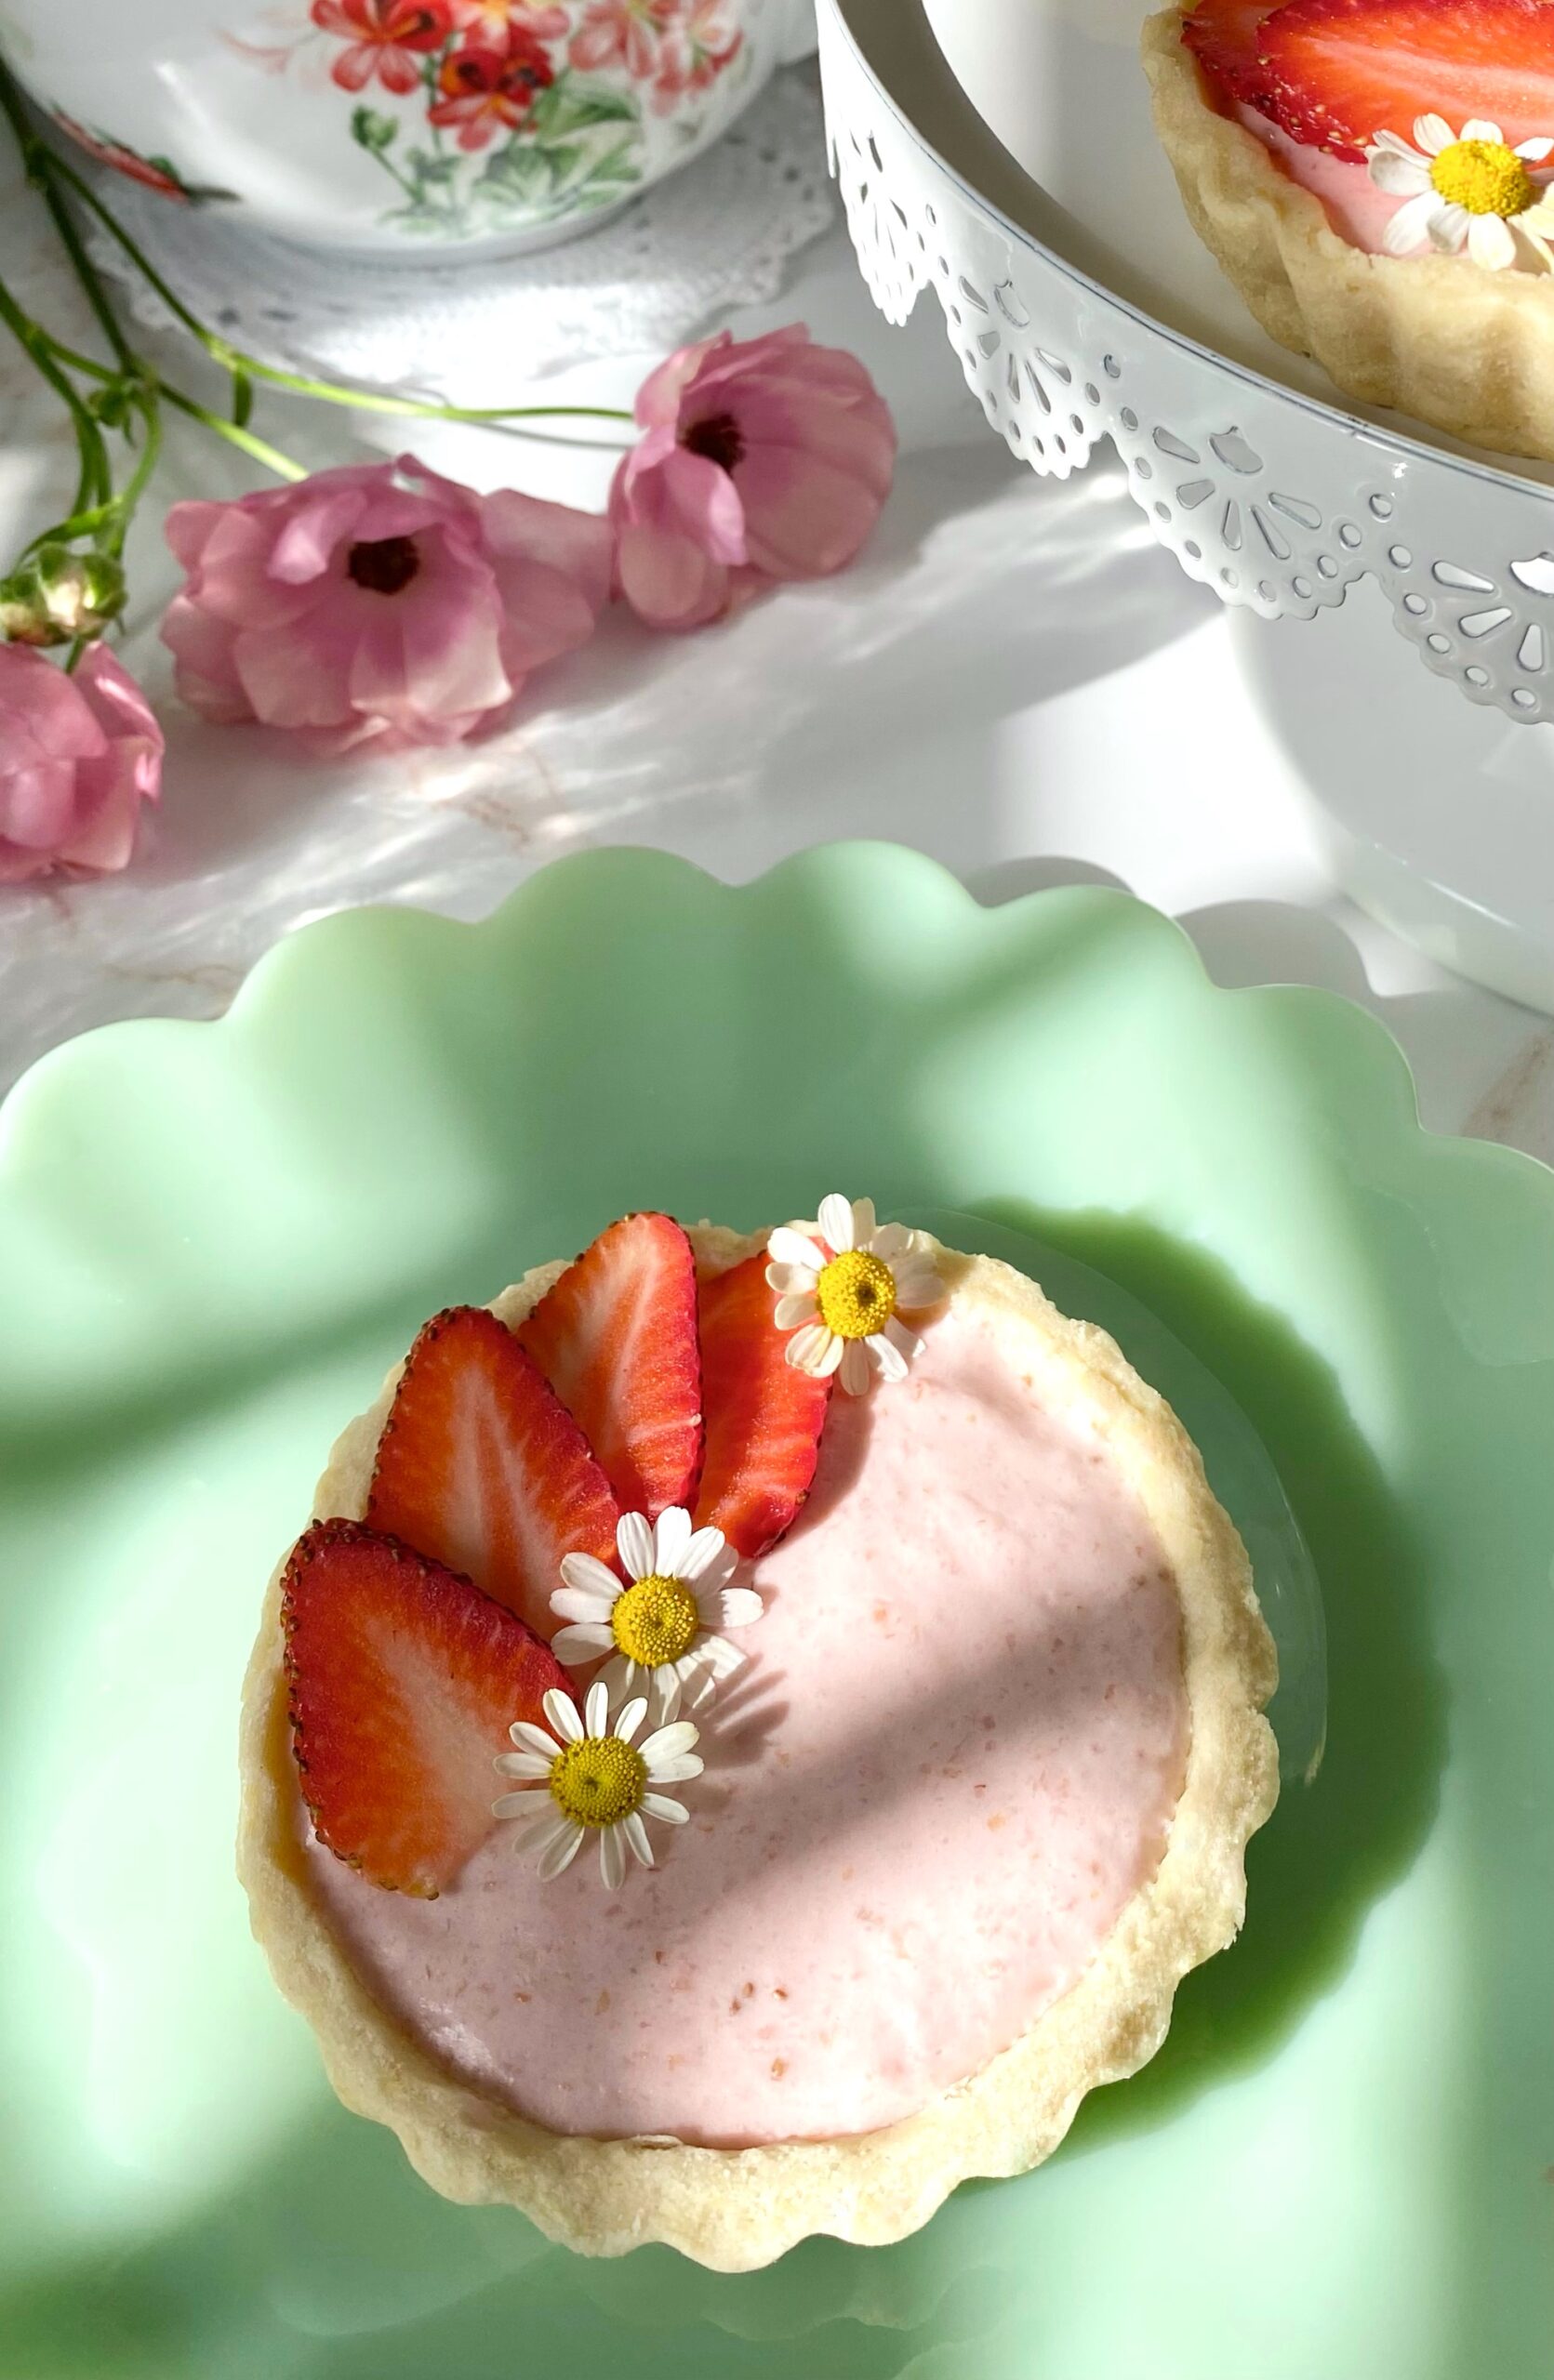
May is when I get to pull out all of my summery recipes. These pretty little Strawberries & Cream Tarts remind me of a summer day. The kind of day when you’re outside enjoying the sunshine and you’re craving a cool, refreshing dessert. This strawberry cream filling alone is so delicious that I could just eat the entire bowl with a spoon. But since I’m extra, I had to create an aesthetic dessert with it.

I used my favorite tart shells for this recipe, but this would also be delicious with those little pre-made graham cracker pie crusts if you want to take a shortcut. The reason I love this tart crust recipe so much though, is that it actually tastes delicious. Once, a few years ago, I purchased a beautiful, small fruit tart from a famous bakery. The fruit was vibrant and glistening and the pastry cream filling was sweet and silky. Now we need the sound of a mic drop, because the tart crust was hard and flavorless, like cardboard! Ever since then, I knew I would settle for nothing less than a delicious tart crust.

Print Recipe
Strawberries & Cream Tarts
Course Dessert
Keyword strawberry, tarts
Servings
4-inch tarts
Ingredients
Tart Crust
Strawberry Cream Filling
Course Dessert
Keyword strawberry, tarts
Servings
4-inch tarts
Ingredients
Tart Crust
Strawberry Cream Filling
Instructions
Tart Crust
  1. In a bowl, whisk together flour, powdered sugar and salt. Set aside.
  2. Work in butter and egg yolk with a pastry blender or with your fingers, until pea size pieces are formed.
  3. Add ice water, one tablespoon at a time, until dough comes together.
  4. Form dough into a disc. Wrap in plastic and refrigerate for one hour.
  5. On a lightly floured surface, roll dough to a scant 1/4-inch thickness
  6. Cut dough into six 5-inch rounds. Press rounds into six 4-inch or 4 1/4-inch tart pans.*
  7. Dock the bottoms of pie crusts with a fork. Freeze for 30 minutes.
  8. Heat oven to 375ºF. Place tart pans on a large baking sheet.
  9. Line tart shells with six 6-inch parchment rounds. Fill with pie weights. (You can use dried beans or rice if you don't have pie weights.)
  10. Bake tart shells for 12 minutes. Remove parchment paper and pie weights. Continue baking until tart shells are light golden brown, about 4-6 more minutes.
  11. Transfer to cooling rack to cool completely.
Strawberry Cream Filling
  1. Pass the strawberry purée through a mesh sieve to remove large seeds.
  2. In a medium saucepan, simmer the strawberry purée until it's reduced by half. Stir in the sugar and continue cooking over medium heat, until the sugar is dissolved. Transfer to a medium bowl.
  3. Meanwhile, place 3 tablespoons of water into a small bowl. Sprinkle gelatin powder over the top of water. Let sit until water is absorbed, about 5 minutes.
  4. Pour the gelatin mixture into the warm strawberry reduction mixture and stir until fully incorporated.
  5. In a large bowl, beat cream cheese on low speed with an electric mixer until smooth.
  6. Add extracts and beat until combined.
  7. Add the strawberry reduction mixture to the cream cheese a little at time. Beat until well combined.
  8. In a medium bowl, beat heavy whipping cream with an electric mixer at high speed until stiff peaks form.
  9. Fold whipped cream into strawberry mixture.
  10. Spoon into cooled tart shells. Smooth tops with a small offset spatula. Refrigerate for two hours. Garnish with sliced, fresh strawberries.
Recipe Notes

*To find the tart pans I used, click here.

Marshmallow Mudslide Cookies

marshmallow mudslide cookies

Have you ever had mudslide cake? It’s a deliciously messy chocolate cake with chocolate frosting and marshmallows, also known as Mississippi mud cake. I saw one covered in a layer of marshmallow fluff and it made its way into my dreams. I woke up with the inspiration to make a cookie version of the gooey mudslide cake.

I saw a few mudslide cookie recipes out there that used standard size marshmallows and chocolate chips mixed into the cookie dough. If you’ve ever baked with marshmallows, you know that they nearly disappear during the baking process. Chocolate chips melt beautifully into little pools of chocolate, but then harden once cooled to room temperature. I happily volunteered to address these challenges! After some trial and error, I created a satisfying cookie with plenty of gooey marshmallow goodness and a rich fudge filling that stays soft at room temperature. Dreams do come true!

marshmallow mudslide cookies

Print Recipe
Marshmallow Mudslide Cookies
Chocolate fudge-filled cookies topped with toasted marshmallows
Course Dessert
Keyword chocolate, cookies
Servings
cookies
Ingredients
Fudge filling
Cookies
Course Dessert
Keyword chocolate, cookies
Servings
cookies
Ingredients
Fudge filling
Cookies
Instructions
Fudge filling
  1. Melt chocolate chips and sweetened condensed milk together in a double boiler or in the **microwave in a medium microwave safe bowl.
  2. Stir in chopped nuts. Set aside to cool to room temperature.
Cookies
  1. Heat oven to 350º.
  2. In a medium bowl, sift together flour, cocoa powder, baking powder, baking soda, and salt. Set aside.
  3. In a large bowl, cream butter with an electric mixer.
  4. Add granulated sugar and brown sugar and mix on medium speed until light and fluffy.
  5. Add eggs one at a time and mix until well combined.
  6. Add vanilla and mix until combined.
  7. Add dry ingredients in two increments, mixing just until combined.
  8. Roll fudge filling into tablespoon sized balls
  9. Roll cookie dough into 1/8 cup balls then flatten into a disc with your fingers and place a ball of fudge filling in the middle of each disc. Wrap the cookie dough around the ball of filling, sealing it completely.
  10. Place cookies about 2 inches apart on large baking sheets.
  11. Bake for 10 minutes. Remove from oven.
  12. Turn on broiler.
  13. Place a marshmallow on top of each cookie.
  14. Broil cookies until marshmallows are toasted. This takes about 1 minute. CAUTION Watch cookies carefully when broiling! They can go from done to burnt in the blink of an eye!
Recipe Notes

*I used Kraft Jet-Puffed S'moreMallows, but if you're unable to find them, use jumbo marshmallows. Cut them in half lengthwise with kitchen shears. Place on cookies cut side down.

**To melt fudge filling in microwave, heat for 30 seconds. Stir, then microwave for 10 second intervals, stirring until melted.

Pumpkin Cheesecake Crumble Brownies

pumpkin cheesecake crumble brownies

It’s Fall 2020. We need chocolate! We need pumpkin spice! And we need it drenched with caramel! These satisfying brownies check all of the boxes with multiple layers of comfort. A rich chocolate brownie is the base. The next layer is heavenly pumpkin cheesecake. The topping is a buttery crumble that rivals the best crumb cake. Finally, as if that isn’t enough, it’s drizzled with caramel sauce!

If it sounds complicated, don’t worry, it’s not. Each layer is super easy to make. You can use your favorite store bought caramel sauce to top it with. Vanilla ice cream and/or whipped cream are optional, but highly recommended toppings also. Just saying.

The layers go unexpectedly well together and make the perfect dessert for Halloween or Thanksgiving. I’m even going to add these beauties to my Christmas dessert table this year. Enjoy! You deserve it.

Print Recipe
Pumpkin Cheesecake Crumble Brownies
Chocolate brownies with pumpkin cheesecake and crumb topping, topped with caramel sauce.
Course Dessert
Servings
Ingredients
Crumb Topping
Pumpkin Cheesecake Layer
Brownie Layer
Course Dessert
Servings
Ingredients
Crumb Topping
Pumpkin Cheesecake Layer
Brownie Layer
Instructions
Crumb Topping
  1. In a medium bowl, combine flour, brown sugar, cinnamon and salt.
  2. Cut in butter using a pastry blender or your fingers until well-combined and crumbles are pea-sized. Press crumbles together to make large quarter-sized chunks.
  3. Set aside in refrigerator.
Pumpkin Cheesecake Layer
  1. Preheat oven to 350º. Line a 9-inch square baking pan with parchment paper.
  2. In a medium bowl, beat cream cheese with an electric mixer until smooth.
  3. Add pumpkin, eggs, sugar, cinnamon, ginger and nutmeg and beat until well combined. Set aside.
Brownie Layer
  1. Melt 1 stick of butter in a large microwaveable bowl.
  2. Stir in sugar until combined
  3. Stir in cocoa powder, vanilla, baking powder and salt.
  4. Add the eggs and beat until smooth
  5. Add the flour and mix until just combined.
  6. Spread brownie batter into prepared baking pan. Smooth with a spatula.
  7. Spread pumpkin cheesecake batter over the top of brownie batter. Smooth with a spatula.
  8. Sprinkle crumb topping evenly over the top of pumpkin cheesecake layer.
  9. Bake for 40-50 minutes until a toothpick inserted into pumpkin cheesecake layer comes out clean.
  10. Let cool completely. Cut into squares and serve with caramel sauce.

Honeydukes Inspired Pink Coconut Ice Cake

Honeydukes Inspired Pink Coconut Ice Cake by Brownie Mischief

I recently enjoyed a girls’ day out at Universal Studios Hollywood. My daughter is a Harry Potter fan, so of course we beelined straight to the Wizarding World of Harry Potter upon arrival at the theme park. We were spellbound by the ominous looking Hogwart’s Castle and the sparkling snow-topped shops of Hogsmeade. My daughter was in Harry Potter fan heaven, flitting around Hogsmeade, testing out her interactive wand and sipping some refreshing Butter Beer. It’s definitely a must-try

Our favorite shop was Honeydukes sweet shop, where anyone with a sweet tooth can get his or her candy wishes fulfilled. The candy selection was nothing short of magical. We picked up some Chocolate Flies, a Chocolate Frog and some Pink Coconut Ice candy.

Honeydukes Candy                   Pink Coconut Ice Candy

I was most excited to try the Pink Coconut Ice. I’ve been intrigued by the thought of this candy ever since it was mentioned in the book, Harry Potter and the Prisoner of Azkaban by J.K. Rowling. The Pink Coconut Ice candy is similar to a stiff fudge. It’s very sweet, so you can cut it into small squares and have plenty to share with friends.

Pink Coconut Ice Candy

I imagined the “shimmery pink squares” a little differently so, I decided to build on my imagined version of the coconut candy by making a shimmery pink coconut cake. I used my favorite coconut cake recipe and pink coconut buttercream. I tinted my buttercream with Americolor gel food color soft pink. I covered my cake in large flakes of unsweetened coconut. To find unsweetened coconut flakes, click here. I think the large flakes look more whimsical and add texture, but feel free to use whatever kind of coconut you prefer. I colored my coconut a shimmery, soft pink. Click here to see how I colored my coconut flakes.

Honeydukes Inspired Pink Coconut Ice Cake by Brownie Mischief

You don’t have to be a Harry Potter fan to appreciate this pink, fluffy, coconut-covered cake. I can imagine this pretty cake at any party or event with a pink theme. I hope you enjoy this perfectly Pink Coconut Ice Cake as much as we did!


Print Recipe


Pink Coconut Ice Cake

Moist, fluffy coconut cake with pink buttercream and coconut flakes

Course Dessert

Servings
6-inch cake (serves 6)


Ingredients
Coconut Cake

Pink Coconut Buttercream

Pink Coconut Flakes

Course Dessert

Servings
6-inch cake (serves 6)


Ingredients
Coconut Cake

Pink Coconut Buttercream

Pink Coconut Flakes


Instructions
Coconut Cake
  1. Preheat oven to 350º F. Grease three 6-inch cake pans.

  2. In a large bowl, sift together flour, baking powder and salt. Set aside.

  3. In a large bowl, beat butter, sugar and oil together with an electric mixer at medium speed, until light and fluffy, about 2-3 minutes.

  4. Beat in coconut extract. Gradually beat in egg whites until mixture is well combined, stopping to scrape the sides of the bowl.

  5. Beat in flour mixture in three additions, alternating with coconut milk, stopping to scrape the sides of the bowl.

  6. Pour batter into prepared pans, evenly distributing batter between the pans. Bake for 28-32 minutes, until a toothpick inserted into the center of pans comes out clean.

  7. Place pans on wire rack to cool for 10 minutes. Remove cakes from pans and place on rack to cool completely.

Pink Coconut Buttercream
  1. In a large bowl, beat butter with an electric mixer on medium speed, until light and fluffy.

  2. Add salt. Beat until combined.

  3. Turn off mixer. Add powdered sugar. Mix on low speed until sugar is moistened, then turn up to medium speed and beat until combined.

  4. Add coconut milk a little at a time, until desired consistency is reached. Add coconut extract and beat at medium speed until buttercream is smooth.

  5. Add gel food color with a toothpick, a little at a time, until desired consistency is reached. Beat at low speed until well blended.

  6. Fill and frost cake with Pink Coconut Buttercream.

Pink Coconut Flakes
  1. Place powdered sugar in a small bowl. Add a small amount of petal dust. Whisk together with a small whisk. Add additional petal dust until desired color is reached.

  2. Spread coconut flakes out onto a large shallow dish. Sprinkle powdered sugar mixture over coconut with a small sieve. Toss gently with gloved hands.

  3. Place cake on a baking sheet to catch excess coconut. Press colored coconut onto sides and top of cake.


Recipe Notes

*Do not substitute all-purpose flour. For best results weigh your dry ingredients. **For best results, use natural coconut extract. Imitation coconut flavorings may give your baked goods an unpleasant flavor. ***If your coconut milk is separated when you open the can, simply place it in a blender to emulsify before using. To find my favorite 6-inch cake pans, click here. To find the gel food color I used, click here. To find unsweetened coconut flakes, click here. To find the edible pearl dust I used, click here.

Peaches & Cream Profiteroles

Peaches & Cream Profiteroles by Brownie Mischief

Summer is nearly over, and after the recent heatwave here in Southern California, I’m more than ready to welcome fall weather. But before I put on my fluffy sweater and dive into pumpkin spice everything, I want to enjoy the tail end of peach season, don’t you? Farmer’s markets and stores near my home are still brimming over with fresh peaches, so I picked up some peaches and decided to give them a proper goodbye and send them off in style.

Peaches & Cream Profiteroles by Brownie Mischief

I created some luscious peaches and cream filled, bite-size puffs of choux pastry, called profiteroles. They’re like cream puffs, only smaller. The filling is creamy, but so light and airy that I’m convinced that these profiteroles have no calories! The recipe I’m sharing with you uses fresh peaches, but feel free to substitute frozen peaches if fresh peaches aren’t available. There are a lot of steps to this recipe, but the steps are done in stages and are very easy to do.

Peaches & Cream Profiteroles by Brownie Mischief

I decorated my profiteroles with fresh, pesticide-free miniature rosebuds, also known as spray roses. If you can’t find miniature rosebuds, pesticide-free rose petals would be a good substitute. You may not get a chance to embellish these little beauties. They have a way of popping into people’s mouths even before you can decorate them!

Print Recipe
Peaches & Cream Profiteroles
Bite-sized puffs of choux pastry filled with a creamy, fresh peach filling and topped with fresh peach icing.
Course Dessert
Cuisine French
Servings
Ingredients
Peach Purée
Peaches & Cream Filling
Profiteroles
Peach Icing
Course Dessert
Cuisine French
Servings
Ingredients
Peach Purée
Peaches & Cream Filling
Profiteroles
Peach Icing
Instructions
Peach Purée
  1. Purée peaches in a blender or food processor. Strain puréed peaches through a sieve. Stir in lemon juice.
  2. Place puréed peaches in a small saucepan. Bring to a boil over medium heat.
  3. Reduce heat and simmer until peach purée is reduced by half.
  4. Remove from heat. Stir in peach flavoring and set aside to cool completely.
Peaches and Cream Filling
  1. Bring milk to a boil in a small saucepan over medium heat.
  2. Meanwhile, whisk sugar, cornstarch and salt together in a medium bowl. Add the egg and whisk until smooth.
  3. When milk starts to boil, remove from heat and pour 1/3 of the hot milk into the egg mixture and whisk to combine.
  4. Pour the egg mixture into the remaining hot milk and cook over medium heat, stirring continuously, until the mixture comes to a boil and thickens.
  5. Remove from heat. Stir in butter and extracts.
  6. Pour mixture through a sieve placed over a bowl. Cover the surface of pastry cream with plastic wrap. Let cool.
  7. Set aside 2 tablespoons of cooled peach purée. Add remaining peach purée to cooled pastry cream and stir to combine. Chill in refrigerator.
  8. In a medium bowl, whip heavy cream to stiff peaks with an electric mixer at high speed. Fold whipped cream into peach pastry cream mixture. Set aside in refrigerator.
Profiteroles
  1. Preheat oven to 400ºF. Line two large baking sheets with parchment paper.
  2. Combine water, butter and salt in a medium saucepan and bring to a boil over medium heat.
  3. Reduce heat. Add flour and stir vigorously with a wooden spoon until mixture pulls away from sides of the pan and forms a ball.
  4. Transfer mixture to the bowl of a stand mixer. Mix on low speed until steam dissipates and mixture cools to lukewarm.
  5. Add eggs one at a time and beat with an electric mixer at medium speed, until smooth, stopping to scrape down bowl.
  6. Transfer mixture to a piping bag, fitted with a large round tip. (**I used Ateco tip 808.)
  7. Pipe 1 1/4 inch mounds, about 2 inches apart onto prepared baking sheets. Smooth tops with a wet finger.
  8. Bake for 15 minutes, then turn oven temperature down to 350ºF and continue baking until golden brown, about 8-10 more minutes. Using a toothpick or skewer poke a small hole in each profiterole to let steam escape. Place on a wire rack to cool completely.
  9. Using the tip of a paring knife, poke a pilot hole in the bottom of each profiterole.
  10. Place peaches and cream filling into a piping bag fitted with a medium round piping tip. (***I used Wilton tip 12.)
  11. Place piping tip into the pilot holes and fill each profiterole with filling.
Peach Icing
  1. In a small bowl, whisk all icing ingredients together and spoon over filled profiteroles. Refrigerate until ready to serve.
Recipe Notes

*To make peaches easy to peel, blanch them  in boiling water for about 30 seconds, then dunk  in ice water.

**To find Ateco tip 808, click here. ***To find Wilton tip 12, click here.

Fully Loaded Chocolate Snack Attack Cookies

Fully Loaded Chocolate Snack Attack Cookies by Brownie Mischief

I’ve seen some fully-loaded cookies out there, but these extreme cookies just earned the title! They’ve got enough chunky, chocolatey, sweet and salty glory to satisfy the most ravenous cookie craving!!! (Yes, all of those exclamation points are necessary.) But, before we even go one step further, I must mention a few disclaimers. I strongly urge you to make sure your fridge is stocked with milk. Please change into your comfiest pants before attempting this recipe. Canceling all plans for the rest of the day is recommended, as a nap may ensue immediately following consumption of these cookies. OK, now that we got that out of the way, let’s jump in with both feet!

Fully Loaded Chocolate Snack Attack Cookies by Brownie Mischief

Did you notice how serious the mood got? We need a moody photo that looks like it was taken in a rustic cabin to emphasize the seriousness of these chocolate cookies. It’s no coincidence that I’m sharing this recipe with you right before Father’s Day. Every Dad I know is an accomplished snacker. Dad will love these cookies for his personal snack stash! Package them up and deliver them to your Pop with a jug of milk or a thermos of coffee. You can probably skip the straw. We all know that Dad is going to chug his milk, but every respectable blog photo of milk must contain a pretty straw.

Fully Loaded Chocolate Snack Attack Cookie Ice Cream Sandwiches by Brownie Mischief

These cookies make amazing ice cream sandwiches, too. Press a scoop of softened vanilla ice cream between two cookies and pop it in the freezer. If you want to make these cookies picture perfect, use a scoop to portion out your dough. This will make them uniform in size and they’ll bake more evenly. Click here to find the scoop I used. For even more visual appeal, don’t crush the pretzels before adding to the cookie dough. Some of them will break when you are mixing them into the dough and this is fine, because the large pieces help make these cookies chunky. This recipe makes eighteen large cookies. That’s one dozen for Dad plus six for you to snack on, because when these babies come out of the oven with their melted chocolate chunks and little pools of caramel, resisting will be impossible! Now it’s cookie time…you’ve got this!

Print Recipe
Fully Loaded Chocolate Snack Attack Cookies
Large chunky, sweet and salty chocolate cookies loaded with chocolate chunks, pretzels, caramel, rice cereal and nuts.
Course Dessert
Prep Time 15 minutes
Cook Time 15 minutes
Servings
cookies
Ingredients
Course Dessert
Prep Time 15 minutes
Cook Time 15 minutes
Servings
cookies
Ingredients
Instructions
  1. Preheat oven to 350º F. Line 2 large baking sheets with parchment paper.
  2. In a medium bowl, sift together flour, cocoa powder, baking powder, baking soda and salt. Set aside
  3. In a large bowl, cream butter, granulated sugar, and brown sugar together with an electric mixer at medium speed until light and fluffy, about 2-3 minutes.
  4. Add eggs, one at a time, beating at medium speed until smooth. Add vanilla and beat just until combined.
  5. Add flour mixture and beat at low speed, just until combined.
  6. Stir in chocolate chunks, pretzels, caramel bits, chocolate rice cereal and peanuts.
  7. Scoop 1/4 cup portions of cookie dough and place 2 inches apart on prepared baking sheets. Bake for 13-15 minutes, until set. Cool on cookie sheets for 1 minute before transferring to wire rack to cool.

Mini Chocolate Hand Pies for Pi Day

Mini Chocolate Hand Pies by Brownie Mischief

Pi Day is a day to celebrate mathematics, or more specifically, the ratio of a circle’s circumference to it’s diameter. While I do appreciate math for it’s precision, I also feel a bit peeved at math for making my brain hurt! Ok, I’m sorry math. I forgive you. I do need you! How would I bake without you? So today I will celebrate math (and also my love for puns) with these tender, fudgy mini hand pies!

Mini Chocolate Hand Pies by Brownie Mischief

Since pi is all about circles, I used a 2 3/4-inch circle cutter to make round pies, but you can cut them into any shape you like. You could cut larger circles, fold them in half and call them empanadas. Rectangles are very popular with Pop Tart fans and you don’t need a special cutter, but a ruler would be helpful. I think squares would be cute, too! Whatever your shape of choice, my buddy math can hook you up!

I used a stencil to add some powdered sugar polka dots to my mini pies. I may have gone a little overboard with my circles, but who’s going to stop me? I think they look pretty cute, but If you don’t have a stencil, a sprinkle or two of powdered sugar will do just fine! Alternately, you could drizzle them with some melted white chocolate. I had a bit of white chocolate on hand, so I can confidently say, that version is yummy too!

Print Recipe
Mini Chocolate Hand Pies
Mini chocolate pies with fudgy filling and a tender chocolate crust.
Course Dessert
Prep Time 45 minutes
Cook Time 25 minutes
Passive Time 1 1/2 hours
Servings
Ingredients
Crust
Filling
Finishing Touches
Course Dessert
Prep Time 45 minutes
Cook Time 25 minutes
Passive Time 1 1/2 hours
Servings
Ingredients
Crust
Filling
Finishing Touches
Instructions
Crust
  1. In a large bowl, sift together the flour, cocoa powder, sugar, salt and baking powder.
  2. Use a pastry cutter or your fingers to work the butter and cream cheese into the flour mixture until it resembles pea-sized crumbs.
  3. Add 2 tablespoons of the cold water to the mixture. Stir gently just until the dough comes together.
  4. Turn the dough out onto a lightly floured surface. Fold the dough over onto itself a couple of times. Form the dough into a disk. Cover with plastic wrap and chill for at least 1 hour.
Filling
  1. In a small microwavable bowl, melt the chocolate chips and sweetened condensed milk in the microwave. Heat for 10 second intervals, stirring until smooth.
  2. Set aside to cool to room temperature.
Assembly
  1. Preheat the oven to 375ºF. Line a large baking sheet with parchment paper.
  2. In a small bowl, whisk together the egg and remaining 1 tablespoon water.
  3. On lightly floured surface, roll the dough to 1/8-inch thickness.
  4. Cut out 20 rounds with a 2 3/4-inch circle cutter (or cut into desired shapes of your choice).
  5. Place 10 dough rounds about 1 inch apart onto prepared baking sheet. Top each with 1 tablespoon of filling.
    Mini Chocolate Hand Pies
  6. With a small pastry brush or your finger, brush egg mixture around the perimeter of each of the filled dough circles.
  7. Top each with the 10 remaining dough circles. Crimp the edges together with a fork. Brush the pies with the remaining egg mixture.
    Mini Chocolate Hand Pies
  8. Bake until the crust is crisp and browned, about 15-20 minutes.
  9. Transfer to a cooling rack. Sprinkle the cooled pies with powdered sugar or drizzle with melted white chocolate.
    Mini Chocolate Hand Pies
Recipe Notes

*The chocolate chips you use depends on personal preference. Bittersweet chocolate chips give a more intense chocolate flavor, while semi-sweet chocolate chips yield a slightly sweeter finished product.

To find my favorite circle cutters click here.                                                                                  To find the polka-dot stencil click here.

Cocoa Meringue Brownies

One of my favorite things to top desserts with are meringue cookies. They’re as light as air and they look so pretty and whimsical! The color and flavor combinations are endless, so you can really have some fun getting creative. I decided to whip some up, especially for placing on top of my favorite brownies. They take even the most humble brownies to a new level. You can use your favorite brownie recipe or even a boxed brownie mix. I won’t judge! I like to make the meringues a day or two ahead since they take quite a while to bake in the oven. While they bake, a subtle chocolate scent will waft through your kitchen, reminding you of the smell of hot cocoa. They even taste like hot cocoa! You can make your brownies a few hours ahead or the night before. I cut mine into rounds with a 2 1/2-inch cutter. I cut 12 rounds of this size from a 13 x 9-inch batch of brownies. Right before serving, spoon some thick, glossy chocolate ganache on the brownies, then top them with your pretty meringues! To make these little bits of chocolate heaven, you’ll need:

  • 1 batch Cocoa Meringues (recipe below)
  • 1 batch of your favorite brownies
  • 1 batch chocolate ganache (see notes)

Print Recipe
Cocoa Meringues
Pretty, light and crispy treats that taste like hot cocoa!
Course Dessert
Prep Time 30 minutes
Cook Time 2 hours
Passive Time 2 hours
Servings
batch
Course Dessert
Prep Time 30 minutes
Cook Time 2 hours
Passive Time 2 hours
Servings
batch
Instructions
  1. Preheat oven to 200ºF. Line two baking sheets with parchment paper.
  2. Sift together powdered sugar and cocoa powder in a medium bowl. Set aside.
  3. Place egg whites in a large bowl. Whip egg whites with the whip attachment of an electric mixer, at medium speed, until foamy.
  4. Add cream of tartar and salt to the egg whites. Whip at medium-high speed until soft peaks form.
  5. Gradually add granulated sugar and continue whipping, at medium-high speed until stiff, glossy peaks form.
  6. Stop mixer. Sprinkle powdered sugar and cocoa mixture over egg whites and whip at low speed until until incorporated, about 10 seconds.
  7. *This step is optional. Place a large, disposable pastry bag, fitted with a round piping tip, into a tall drinking glass. (I used a Wilton tip #12.) Fold the top third of the bag over the glass, forming a cuff. Using a small, clean paintbrush, paint thin, vertical stripes of food coloring on the inside of the bag, from the piping tip to the edge of the fold.
  8. Spoon egg white mixture into the pastry bag. Pipe small kisses, 1 inch apart, onto the prepared baking sheets. (I made mine about 3/4-inch to 1-inch in diameter. If you'd like larger kisses, use a larger size piping tip.)
  9. Bake for 1 1/2 hours. Turn off oven and leave meringues in oven to cool and continue drying out for an additional 2 hours. Store tightly covered at room temperature for up to 3 days.
Recipe Notes

To make the chocolate ganache, I used a ratio of two parts semi-sweet chocolate to one part heavy cream. (Weighing the ingredients will give you the most accurate ratio.) Place 8 ounces of chopped semi-sweet chocolate into a medium bowl. Heat 4 ounces (1/2 cup) of heavy cream in a small saucepan over medium heat. Bring the cream just to a boil. Pour the hot cream over the chocolate, making sure to cover it completely. Let sit for 2 minutes, then stir gently until smooth.