Chocolate Turtle Drop Cookies

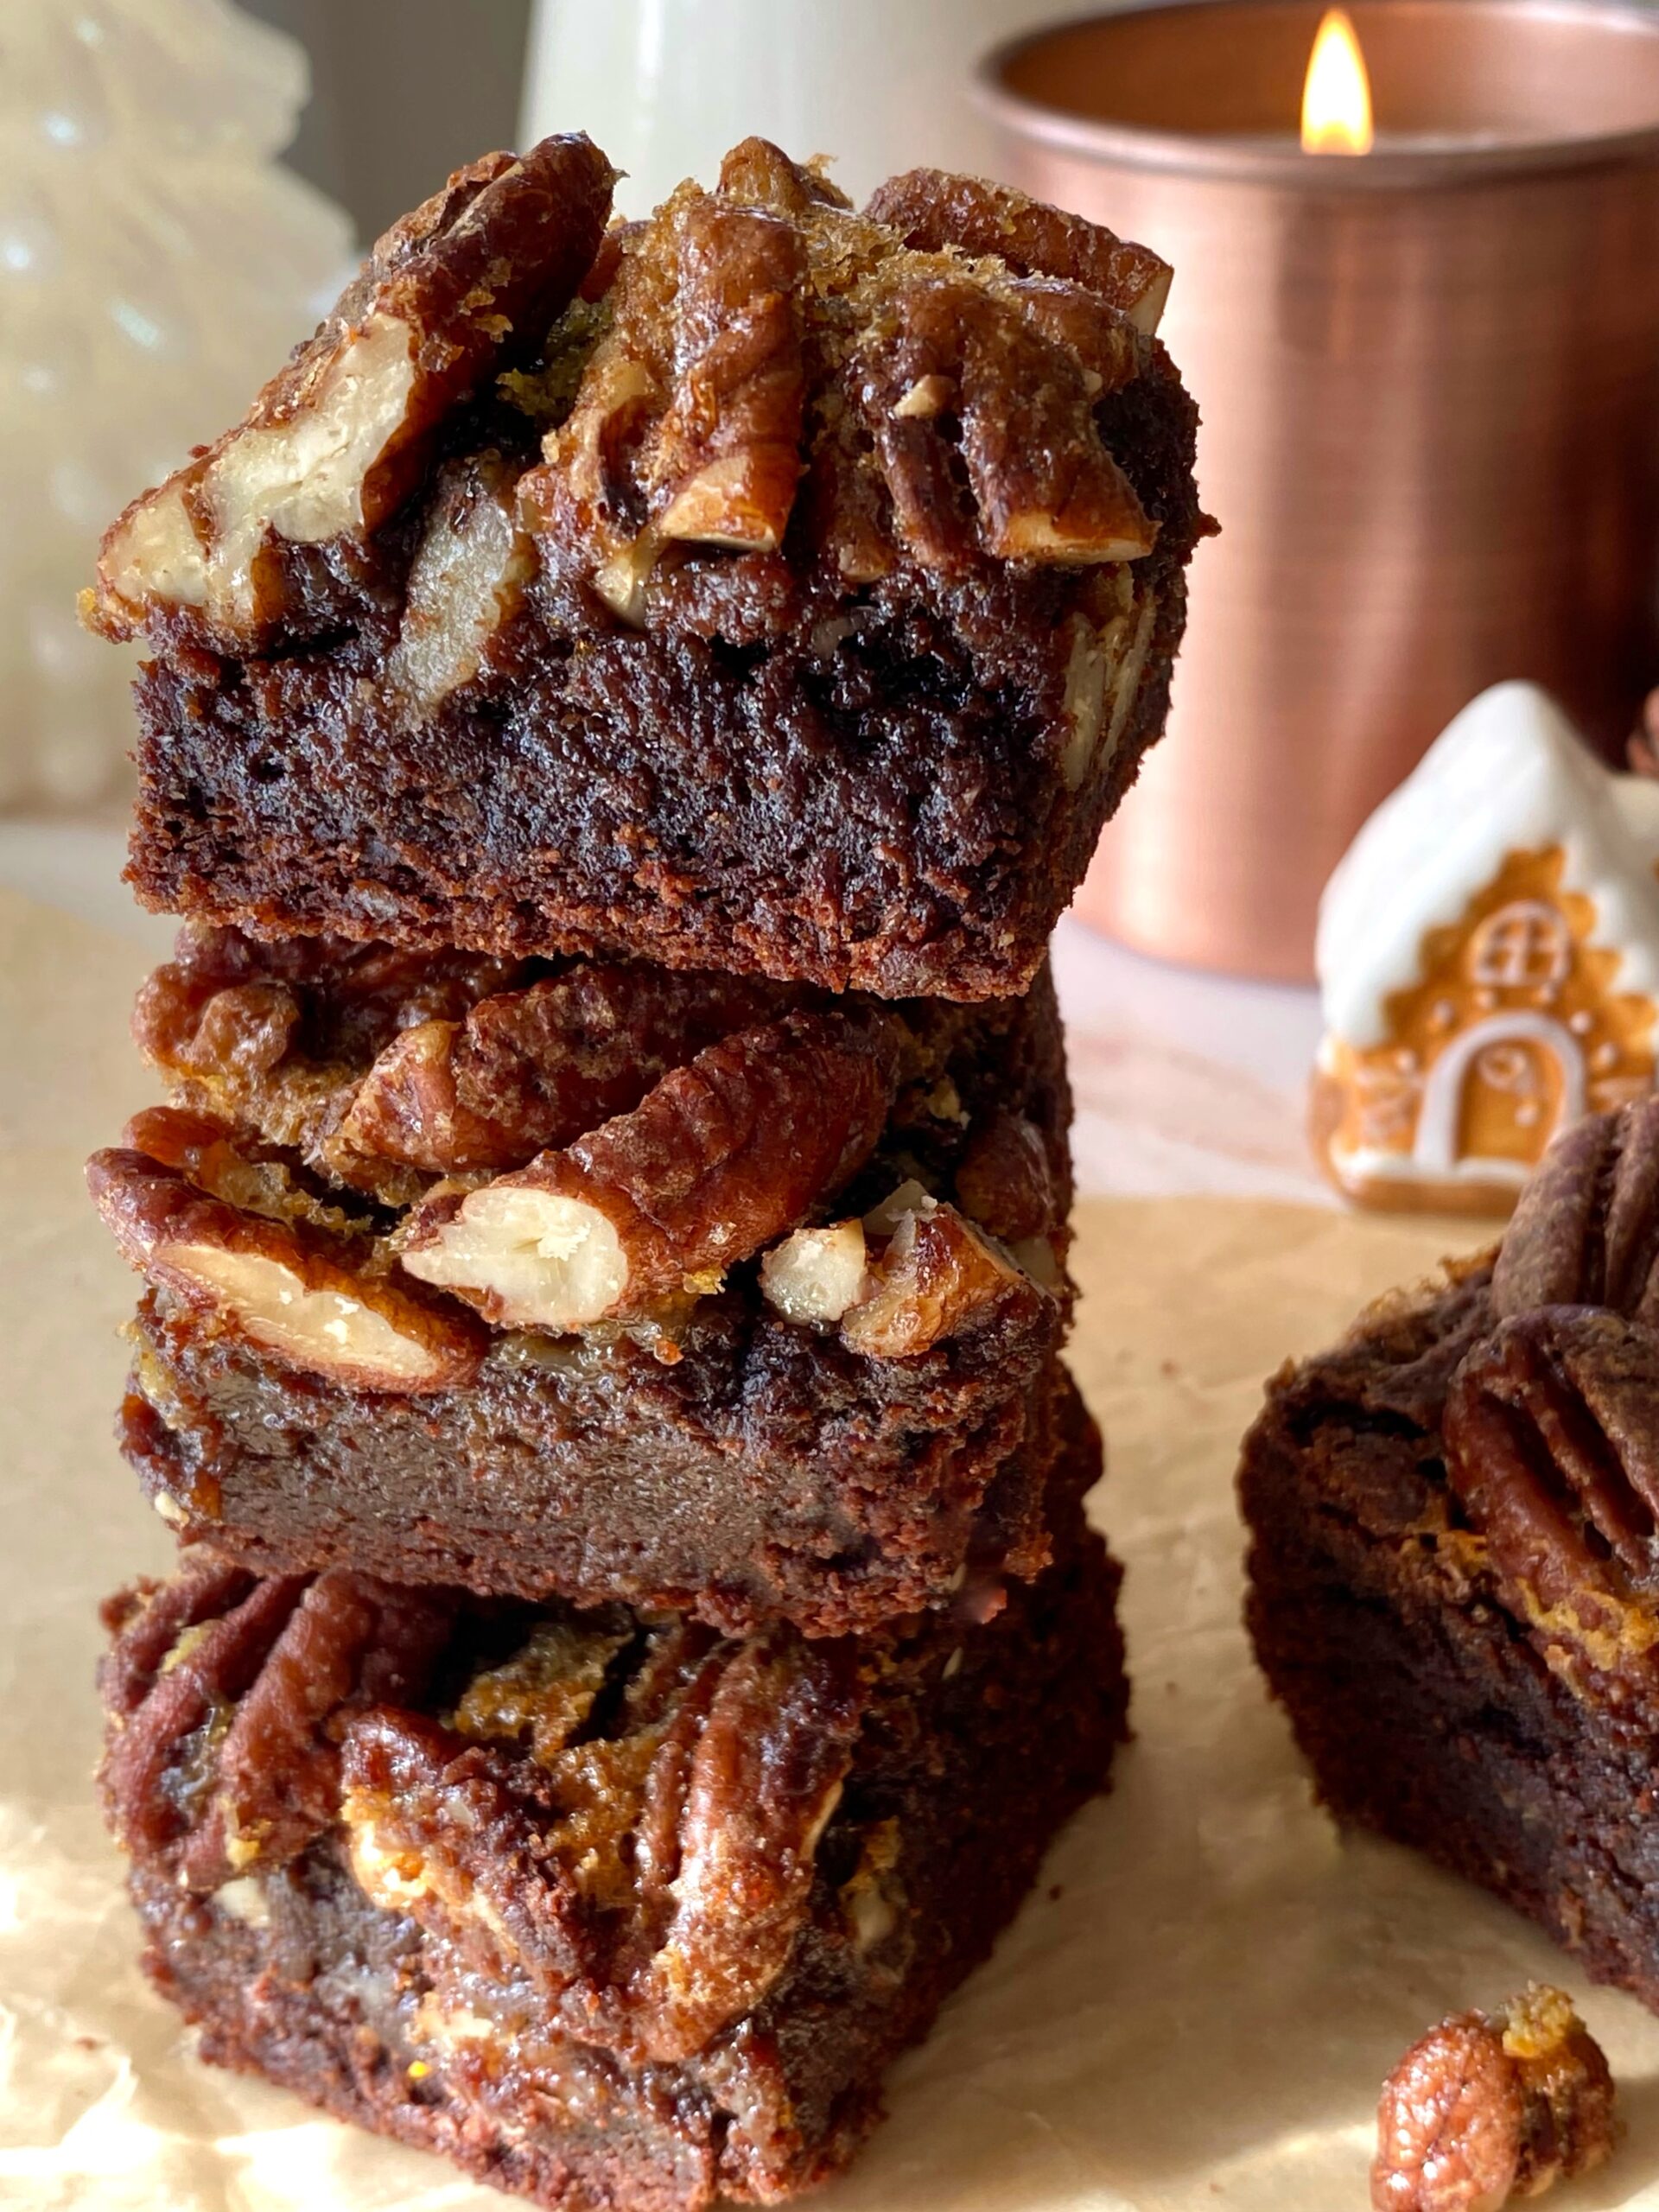
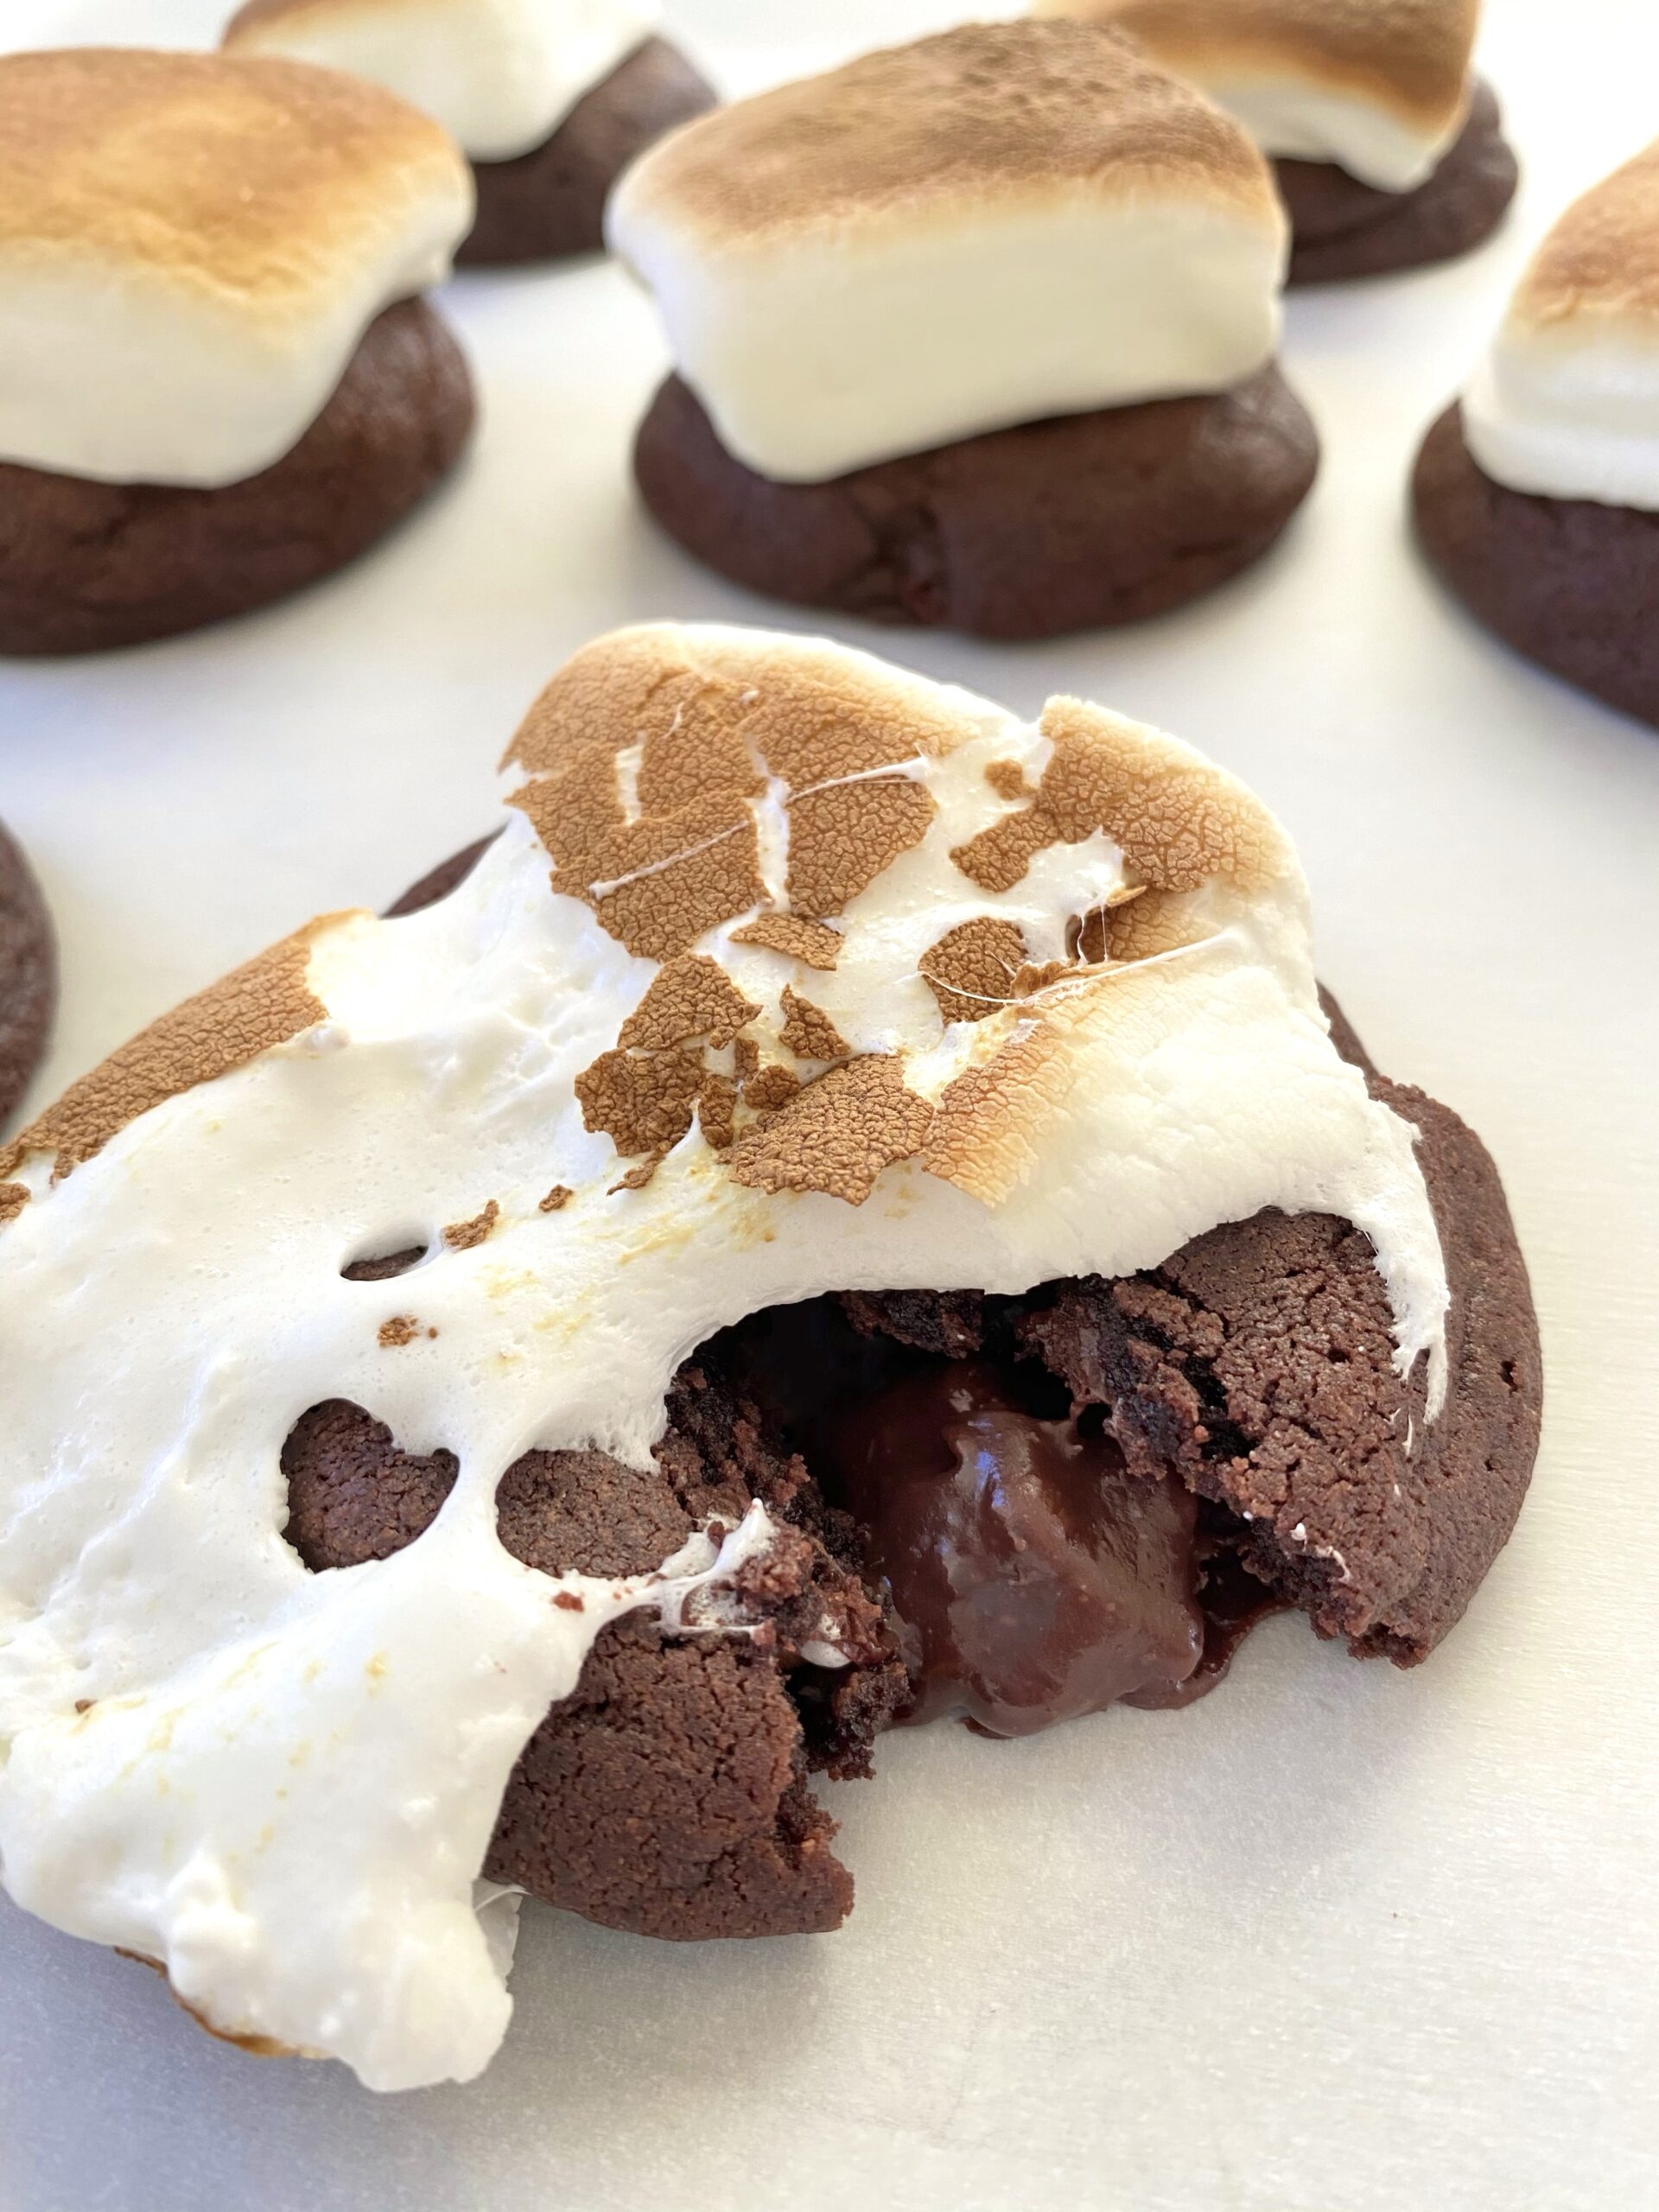
A chocolate turtle is a confection made with caramel and pecans. The shape resembles a turtle, which is how it got the name. This is my version of a turtle cookie, loaded with plenty of delicious add-ins.

Print Recipe
Chocolate Turtle Drop Cookies
Chocolate cookies loaded with chopped chocolate, caramel chips, and toffee bits, topped with pecans.
Course Dessert
Keyword chocolate, cookies
Servings
cookies
Ingredients
Course Dessert
Keyword chocolate, cookies
Servings
cookies
Ingredients
Instructions
  1. Preheat the oven to 350ºF (180ºC). Line two large cookie sheets with parchment paper.
  2. In a large bowl, whisk together the flour, cocoa powder, baking soda and salt.
  3. In a separate large bowl, cream the butter, granulated sugar and brown sugar together with an electric mixer at medium speed, until light and fluffy.
  4. Beat in the eggs and vanilla in three separate additions, making sure each addition is incorporated before adding the next. Beat in the flour mixture just until combined.
  5. Set aside 20 chunks of the chopped chocolate. Fold the remaining chopped chocolate, the caramel chips and the toffee bits into the dough.
  6. Place twenty 2-inch size portions of dough about 2-inches apart onto the prepared cookie sheets. (I used a #24 portion scoop*)
  7. Top each cookie with a chunk of the reserved chocolate and a pecan half. Bake until the surface of the cookies is set, about 10-11 minutes. Let cool on the baking sheet for 1 minute then transfer to a cooling rack.
Recipe Notes

To find the portion scoop I used, click here.

Peaches and Cream Loaf Cake

Every peach season, I get excited by the abundance of peaches at my local farmers market and I end up buying way too many. So if you’re like me and you have ripe peaches sitting on your counter, turn them into peach purée. I love adding peach purée to my iced tea or adding it to desserts like this moist, tender cake. This is one of my most popular cake recipes on social media, and for good reason. It does not disappoint! To watch the TikTok video, click here.

Print Recipe
Peaches and Cream Loaf Cake
Moist, tender peach cake with peach cream cheese icing
Keyword cake, peach
Servings
loaf
Ingredients
Cake
Icing
Keyword cake, peach
Servings
loaf
Ingredients
Cake
Icing
Instructions
Cake
  1. Preheat oven to 350ºF. Line the bottom of an 8 x 4-inch loaf pan with parchment paper. Grease and flour the sides.
  2. In a medium bowl, whisk together flour, baking powder, baking soda, salt, cinnamon and nutmeg.
  3. Set aside 2 tablespoons peach purée for icing.
  4. In a large bowl, beat sugar, oil, eggs, remaining peach purée and extracts until smooth.
  5. Add flour mixture and beat just until combined.
  6. Transfer batter to prepared baking pan. Bake until toothpick inserted into center comes out clean, about 38-45 minutes.
  7. Let cake cool in pan for 10 minutes, then turn out onto a cooling rack to cool completely. Spread icing on cooled cake.
Icing
  1. In a medium bowl, beat cream cheese and butter together until smooth.
  2. Add powdered sugar, salt, vanilla extract and 1 tablespoon of peach purée. Beat until smooth. Add additional peach purée, if needed, until desired consistency is reached. Fold in diced peaches.

Little Strawberry Charlotte

Little Strawberry Charlotte

Meet Little Strawberry Charlotte. She brings romance with her wherever she goes. Whether it’s a tea party, a birthday celebration or a romantic dinner, you’ll gaze at her beauty and sigh. This lovely Charlotte has luscious strawberry mascarpone cream filling layered with lady fingers and topped with fresh strawberries. I used store bought lady fingers to make life easier but you can certainly bake your own if you wish. I typically make this in spring or summer when the weather is warm and strawberries are plentiful. But since my local stores start carrying an abundance of strawberries around Valentine’s Day, I thought it would be a perfect time to make this pretty little Charlotte.

Print Recipe
Little Strawberry Charlotte
A pretty no-bake dessert layered with strawberry mascarpone cream filling and lady fingers and topped with fresh strawberries.
Course Dessert
Keyword cake, strawberry
Servings
Ingredients
Simple Syrup
Strawberry Charlottte
Course Dessert
Keyword cake, strawberry
Servings
Ingredients
Simple Syrup
Strawberry Charlottte
Instructions
Simple Syrup
  1. Combine sugar and water in a small saucepan over medium-low heat.
  2. Heat and stir until sugar is dissolved. Do not boil.
  3. Remove from heat and transfer to a small shallow bowl or dish wide enough to dip ladyfingers. Stir in extract.
Strawberry Charlotte
  1. In a blender or food processor, puree strawberries. Pass through a mesh sieve to strain out seeds.
  2. In a medium saucepan, combine strawberry puree and sugar. Cook over medium heat until sugar is dissolved, about 3-5 minutes. Remove from heat.
  3. Set aside two tablespoons of strawberry puree mixture. Cover and refrigerate until ready to use.
  4. Place water in a small bowl and sprinkle with gelatin powder. Whisk together and let sit until dissolved, about 5 minutes.
  5. Add gelatin mixture to warm strawberry puree and whisk until thoroughly combined. Set aside to cool.
  6. In a large bowl, beat mascarpone cheese with an electric mixer on medium speed, until smooth. Add strawberry puree and and extracts. Beat until well combined.
  7. In a separate large bowl, whip heavy cream with an electric mixer on medium-high speed until medium peaks form. Be careful not to over whip the cream or it will look curdled.
  8. Fold whipped cream into mascarpone mixture.
  9. Optional: Line the bottom of your springform pan with a cake board if you don't want to serve it on the pan base.
  10. Slice the round end off of 16 ladyfingers. Dunk them briefly in the simple syrup then line them up along the inner sides of a 7-inch by 3 inch deep *springform pan. (Typically you would line them smooth side in facing the filling, but I placed mine smooth side out because I wanted a smooth look on the outside and it makes removal from the pan easier.)
  11. Line the bottom snuggly with ladyfingers, cutting to fit where necessary.
  12. Top with half of the filling mixture, about 2 cups. Then top with a layer of ladyfingers, cutting to fit as with the bottom layer.
  13. Top with remaining filling. Smooth the top with a small offset spatula.
  14. Cove with plastic wrap and chill in refrigerator at least 4 hours.
  15. Carefully remove the springform pan ring from the base. Separate the base from the cake board, if using. Garnish with fresh strawberries. Brush strawberries with reserved strawberry puree mixture. Tie a clean ribbon around the finished Charlotte.
Recipe Notes

*To find a 7-inch springform pan, click here.

Blackberry Oatmeal Cookies

Blackberry Oatmeal Cookies by Brownie Mischief

We’ve all heard our parents telling their childhood stories of walking miles to school and suffering worse hardships than we ever had to. My mom used to tell me stories like that, but she had a sense of humor, so her stories were always fun to listen to. She used to tell me about her friend’s mother, who would make big, delicious oatmeal cookies. My mom would trade her baloney sandwich nearly every day to get one of those cookies from her friend. She reminisced about those cookies so much, that I set out to make her some when I learned to bake. She and my grandmother would taste test batch after batch of my cookies over the years. I have probably baked enough oatmeal cookies to circle the earth. Okay that’s an exaggeration, but seriously I have baked quite a few. Of all the oatmeal cookies I’ve baked, these are one of my favorites!

Most of the time when you see fruit added to an oatmeal cookie, it’s dried fruit, like raisins or cranberries. That’s mostly because if you just dump fruit into your cookie dough, the fruit releases water, leaving soggy spots in your cookies. To solve that issue, for this recipe, I macerate the blackberries before baking. The purple blackberry juice that’s released from the berries is used to make a beautiful lilac icing to drizzle over the cookies.

Print Recipe
Blackberry Oatmeal Cookies
Course Dessert
Keyword cookies
Servings
cookies
Ingredients
Brown Butter
Macerated Berries
Oatmeal Cookies
Icing
Course Dessert
Keyword cookies
Servings
cookies
Ingredients
Brown Butter
Macerated Berries
Oatmeal Cookies
Icing
Instructions
  1. In a small, light colored saucepan, melt 1/2 cup (4 oz or 113g) of butter over medium heat, stirring occasionally, until dark golden and fragrant. You will see brown particles sink to the bottom. Keep a close eye on it. It can go from toasted to burned very quickly.
  2. Remove from heat and immediately transfer the brown butter, including the brown particles, to a small bowl. Refrigerate until solid, about one hour.
  3. Place the blackberries in a medium bowl. Sprinkle with granulated sugar and toss to coat. Let sit for 30 minutes until the berries release their juices.
  4. Drain the blackberries and reserve the juice.
  5. Preheat oven to 350ºF (180ºC). Line two large cookie sheets with parchment paper.
  6. In a large bowl, whisk together the flour, baking soda, salt and cinnamon. Set aside.
  7. In a large bowl, beat brown butter, softened butter and brown sugar until light and fluffy.
  8. Add eggs and vanilla extract in three separate additions and beat until well combined.
  9. Stir in the flour mixture just until combined.
  10. Stir in the oats just until combined. Gently fold in the blackberries.
  11. Scoop 1/4 cup sized portions of dough, about 2 inches apart, onto the prepared cookie sheets. *I used a #16 2 ounce scoop.
  12. Bake until the cookie tops are set and the edges are golden brown, about 13-15 minutes. Transfer the cookies to a cooling rack to cool completely.
  13. Pass reserved blackberry juice through a sieve to remove the seeds.
  14. In a small bowl, whisk together the powdered sugar, heavy cream and one tablespoon of the reserved blackberry juice until smooth. Add more blackberry juice, a little at a time, until desired consistency is reached.
  15. Drizzle the icing over the cooled cookies.
Recipe Notes

*To find the portion scoop I used, click here.

Blueberry Donut Holes with Homemade Blueberry Sugar

Blueberry Donut Holes with Homemade Blueberry Sugar

If you landed here from one of my social media accounts, welcome! I’m really glad you’re here. I love to create fun, pretty and sweet treats like these delicious blueberry donut holes! The thing that really makes these special is the homemade blueberry sugar, which adds a burst of blueberry flavor. Freeze dried blueberries are combined with sugar to create a beautiful, flavorful sugar that you can use for many other things. It can also be used in tea, lattes, lemonade, cocktails or sprinkled on cookies or scones. Keep in mind that freeze dried blueberries are not the same as dried blueberries. Dried blueberries still contain some moisture, so they won’t work for this purpose.

The donut hole batter comes together quickly and easily. The most challenging part for me is frying them. I found that using a thermometer and testing one donut hole first, helps you determine the perfect oil temperature. Using a small portion scoop helps you get uniform donut holes. Make sure the outside of the scoop is clean between each donut to help them keep the round shape and avoid pointy tails.

Print Recipe
Blueberry Donut Holes with Homemade Blueberry Sugar
Course Breakfast, Dessert
Servings
donut holes
Ingredients
Blueberry Sugar
Blueberry Donut Holes
Course Breakfast, Dessert
Servings
donut holes
Ingredients
Blueberry Sugar
Blueberry Donut Holes
Instructions
Blueberry Sugar
  1. Process freeze dried blueberries and sugar in a food processor or a clean spice grinder until finely ground. Be careful not to over process or you may end up with powdered sugar.
Blueberry Donut Holes
  1. In a medium bowl, whisk together flour, baking powder, nutmeg and salt. Set aside.
  2. In a large bowl, beat sugar, eggs, melted butter, milk and vanilla extract until well combined.
  3. Add flour mixture and mix just until combined. Do not over mix. A few lumps are okay.
  4. Fold in chopped blueberries.
  5. In a heavy saucepan, heat 1 1/2 inches of oil to 340ºF.
  6. Drop tablespoon size portions of batter into hot oil. I used a #60 portion scoop.** Don't overcrowd the pan.
  7. Cook donut holes until golden brown on all sides, about 2-4 minutes, flipping halfway through. If donut holes cook too quickly on the outside, turn heat down.
  8. Briefly drain donut holes on paper towels, then toss warm donut holes in blueberry sugar. Serve immediately.
Recipe Notes

Success tips: Use a small ice cream scoop sprayed with nonstick spray to drop donut holes into oil. Make sure the outside of scoop is clean between each donut hole to keep the round shape and avoid tails on your donut holes.

*To find freeze dried blueberries, click here.

**To find the portion scoop I used, click here.

Strawberry Sugar Hearts

strawberry sugar hearts
To watch the Strawberry Sugar Hearts video, click here.

I’ve always been enamored by sugar cubes. You can’t help but feel fancy dropping a lump of sugar or two into your teacup. Flavored sugar formed into cute shapes is so fancy, I may faint. Someone please get the smelling salts! Pardon me while I google “what exactly are smelling salts?” In the mean time please enjoy these sweet, dainty, positively precious Strawberry Sugar Hearts. Pop them into tea, lattes, lemonade, cocktails or sparkling water.

These cuties are fragrant, delicious and easy to make. The most tedious part is filling the molds. Make sure to fill them completely and press firmly for the most defined shape. It’s also important to use enough water. Think of building a sand castle at the beach. You want enough water to dampen the sugar, but not turn it to slush. I live in a dry climate so I used 3 teaspoons, but you may need less depending on your climate.

Feel free to use the freeze dried fruit of your choice. Most grocery stores carry freeze dried fruit and you can always find it online. The most interesting one I saw was an apple-cherry combination. I might try that next!

Print Recipe
Strawberry Sugar Hearts
Servings
batch 1/2" sugar hearts
Servings
batch 1/2" sugar hearts
Instructions
  1. Process freeze-dried strawberries in a small food processor or a clean spice grinder until a powdered consistency is reached.
  2. Pass powdered strawberries through a sieve to strain out seeds.
  3. In a medium bowl, whisk together powdered strawberries and sugar.
  4. Add water, one teaspoon at a time, until the mixture is the consistency of wet sand. Climate will effect how much water is needed.
  5. Press mixture firmly into *silicone heart molds or any shape silicone molds of your choice. Brush off excess sugar.
  6. Let dry, uncovered, at least 24 hours.
  7. Remove sugar hearts from molds and store in a covered container
Recipe Notes

*To find the silicone heart molds I used, click here

Maple Pecan Brownies

maple pecan brownies

Pecan pie was my mom’s favorite, but she didn’t bake pies, so I always used to bake her one for Thanksgiving. One year, I made a chocolate version. It was delicious, but let’s just say it wasn’t user friendly. It was gooey and hard to serve. Over the years, it eventually morphed into these Maple Pecan Brownies. The brownie version is still delicious, rich and gooey with toasty pecans, but much more user friendly.

Enjoying Maple Pecan Brownies with a glass of milk or a cup of coffee is a must. Thinking of it brings back memories. I can practically smell my dad brewing the coffee to go with these brownies.

Print Recipe
Maple Pecan Brownies
Rich, gooey brownies topped with pecan pie filling
Servings
brownies
Ingredients
Brownies
Pecan Topping
Servings
brownies
Ingredients
Brownies
Pecan Topping
Instructions
Brownies
  1. Preheat oven to 350ºF. Line a 9-inch square baking pan with parchment paper, overlapping the sides an inch or two. Spray parchment paper with nonstick cooking spray.
  2. In a large bowl, stir together melted butter, granulated sugar and brown sugar until well combined.
  3. Mix in eggs and vanilla, one at a time, until well combined.
  4. Mix in cocoa powder, baking soda and salt until well combined.
  5. Stir in flour just until combined.
  6. Spread batter into prepared baking pan. Bake just until top is set, about 25 minutes.
  7. Meanwhile, prepare pecan topping.
  8. When brownie top is set, remove from oven. Gently pour pecan topping around the outer perimeter of brownies, to avoid making brownies sink in the middle. Evenly distribute the pecan topping over the top gently with a spoon.
  9. Return the brownies to the oven and continue baking until the topping is set, about 20-25 minutes. Brownies will stop jiggling and topping will look deep golden brown. Toothpick inserted inside will have a few moist crumbs on it. (If your topping starts to brown too much on the edges before the inside is done, apply aluminum foil around the edges as you would with a pie.)
  10. Remove from oven and cool completely before cutting, about 2- 2 1/2 hours.
  11. Cut into squares, wiping knife between cuts.
Pecan Topping
  1. In a medium bowl, stir together maple syrup, butter, brown sugar, egg, maple extract and salt until well combined.
  2. Stir in pecans until well coated with maple syrup mixture.
  3. Set aside until brownies are partially baked.

Fairy Puffs

Fairy Puffs sugared mini muffins wtih edible flowers

My dad used to take me on walks in the woods to look for fairy rings when I was a child. I wanted to see a real fairy so badly! I read a book about fairies, hoping to learn more about them. Fairies love little cakes, milk, honey and butter so I’m sure these Fairy Puffs would be fairy approved.

My Fairy Puffs recipe is loosely based on an old favorite mini muffin recipe. I tweaked it quite a bit, including the addition of pink dragonfruit powder. Dragonfruit has a subtle flavor, so the bright fuchsia powder is mostly for color. But oh what a beautiful color it is! You can find dragonfruit powder in healthy food stores or online. To find the dragonfruit powder, also known as pink pitaya powder, I used, click here.

fairy puff muffins

Decorating these little cuties was so entertaining! After sampling multiple variations of sparkling sugar and cinnamon sugar, I decided that dipping the bottoms of the muffins in butter and cinnamon sugar, then dipping the tops in butter and sparkling sugar gave them the perfect balance of sugar and spice. I had purchased some edible flowers a couple of days prior, and they added a pretty, magical touch. The flowers I used are called bachelor’s buttons and I got them at a local gourmet flower seller.

sugared mini muffins with edible flowers

Print Recipe
Fairy Puffs
Course Breakfast, Brunch
Keyword cake, muffins
Servings
mini muffins
Ingredients
Fairy Puffs
Topping
Course Breakfast, Brunch
Keyword cake, muffins
Servings
mini muffins
Ingredients
Fairy Puffs
Topping
Instructions
Fairy Puffs
  1. Preheat oven to 350ºF. Grease and flour a 24 serving mini muffin pan.
  2. In a medium bowl, whisk together flour, dragonfruit powder, baking powder, salt and nutmeg. Set aside.
  3. In a large bowl, cream butter and sugar with an electric mixer until light and fluffy.
  4. Add egg and beat until smooth.
  5. Add flour mixture and milk alternately in two additions and mix just until combined.
  6. Transfer batter to prepared muffin pan, filling muffin cups about 3/4 full.
  7. Bake until toothpick inserted in center of muffins comes out clean, about 12-14 minutes. (Be careful not to over bake. Check a few minutes early. Small muffins can dry out easily.)
  8. Let cool in pan for 5 minutes. Remove puffs from pan and transfer to cooling rack. (Loosen puffs with a small offset spatula or butter knife if necessary.)
Topping
  1. Combine granulated sugar and cinnamon in a shallow bowl.
  2. Place colored sparkling sugar crystals in another shallow bowl.
  3. Dip the bottoms of each puff in melted butter, then into cinnamon sugar mixture.
  4. Dip the tops of each puff in melted butter, then into sparkling sugar.
  5. Decorate with edible flowers if desired.
Recipe Notes

*To purchase dragonfruit powder, click here.

 **To purchase pink sparkling sugar crystals, click here.


Raspberry Lemonade Brownies

Raspberry Lemonade Brownies by Brownie Mischief

This is my new and improved Raspberry Lemonade Brownie recipe. The previous recipe was inspired by some lemon brownies I saw on Pinterest. I transformed them into Raspberry Lemonade Brownies and they were very good. But I knew I could improve them. I started over and after some experimentation, I came up with an even better version. I love the sweet-tart burst of flavor and color from the fresh raspberries. The icing contains no food coloring. Just three raspberries will give you that luscious shade of pink!

I want to clarify that lemon brownies are not lemon bars. We all know what a lemon bar is. The one we all know and love has a lemon curd filling on a shortbread crust, possibly drizzled with lemon icing or sprinkled with powdered sugar. The lemon brownie is a whole different animal. Don’t mistake lemon brownies for lemon cake either. Lemon brownies contain white chocolate which gives them a rich, fudgy texture like their chocolate cousins. We may be tempted to call them blondies, but blondies have a butterscotch flavor and typically don’t contain chocolate. Now that we got that straightened out, we can sleep peacefully tonight.

Print Recipe
Raspberry Lemonade Brownies
Course Dessert
Servings
bars
Ingredients
Raspberry Lemonade Bownies
Raspberry Lemonade Icing
Course Dessert
Servings
bars
Ingredients
Raspberry Lemonade Bownies
Raspberry Lemonade Icing
Instructions
Raspberry Lemonade Bownies
  1. Preheat the oven to 325ºF (165ºC). Line an 8-inch square baking pan* with parchment paper.
  2. In a medium microwaveable bowl, heat the white chocolate and butter in the microwave for 20 second intervals until melted. Alternately, melt the white chocolate and butter on the stove in a large heat safe bowl set over a pan of barely simmering water. Stir gently until smooth.
  3. In a large bowl, whisk together the sugar, eggs, egg yolk, lemon juice, zest and salt until smooth and well combined. Stir in the melted white chocolate mixture with a rubber spatula. Add the flour and stir just until combined.
  4. Gently fold in the raspberries.
  5. Transfer the batter to the prepared baking pan. Bake until the top is set, the edges are light golden brown and a toothpick inserted into the center comes out with a few moist crumbs on it, about 23-28 minutes.
  6. Let cool completely. Top with Raspberry Lemonade Icing.
Raspberry Lemonade Icing
  1. In a small bowl, smash the raspberries with a fork.
  2. Add the powdered sugar, melted butter and 1 tablespoon of lemon juice. Whisk until smooth, adding more lemon juice as needed.
  3. Spread the icing over cooled brownies.
  4. Cut into 2-inch squares and serve with additional raspberries, if desired.
Recipe Notes

*To find the 8 x 8 inch pan I used, click here.


Strawberries & Cream Tarts

Strawberries & Cream Tarts

May is when I get to pull out all of my summery recipes. These pretty little Strawberries & Cream Tarts remind me of a summer day. The kind of day when you’re outside enjoying the sunshine and you’re craving a cool, refreshing dessert. This strawberry cream filling alone is so delicious that I could just eat the entire bowl with a spoon. But since I’m extra, I had to create an aesthetic dessert with it.

I used my favorite tart shells for this recipe, but this would also be delicious with those little pre-made graham cracker pie crusts if you want to take a shortcut. The reason I love this tart crust recipe so much though, is that it actually tastes delicious. Once, a few years ago, I purchased a beautiful, small fruit tart from a famous bakery. The fruit was vibrant and glistening and the pastry cream filling was sweet and silky. Now we need the sound of a mic drop, because the tart crust was hard and flavorless, like cardboard! Ever since then, I knew I would settle for nothing less than a delicious tart crust.

Print Recipe
Strawberries & Cream Tarts
Course Dessert
Keyword strawberry, tarts
Servings
4-inch tarts
Ingredients
Tart Crust
Strawberry Cream Filling
Course Dessert
Keyword strawberry, tarts
Servings
4-inch tarts
Ingredients
Tart Crust
Strawberry Cream Filling
Instructions
Tart Crust
  1. In a bowl, whisk together flour, powdered sugar and salt. Set aside.
  2. Work in butter and egg yolk with a pastry blender or with your fingers, until pea size pieces are formed.
  3. Add ice water, one tablespoon at a time, until dough comes together.
  4. Form dough into a disc. Wrap in plastic and refrigerate for one hour.
  5. On a lightly floured surface, roll dough to a scant 1/4-inch thickness
  6. Cut dough into six 5-inch rounds. Press rounds into six 4-inch or 4 1/4-inch tart pans.*
  7. Dock the bottoms of pie crusts with a fork. Freeze for 30 minutes.
  8. Heat oven to 375ºF. Place tart pans on a large baking sheet.
  9. Line tart shells with six 6-inch parchment rounds. Fill with pie weights. (You can use dried beans or rice if you don't have pie weights.)
  10. Bake tart shells for 12 minutes. Remove parchment paper and pie weights. Continue baking until tart shells are light golden brown, about 4-6 more minutes.
  11. Transfer to cooling rack to cool completely.
Strawberry Cream Filling
  1. Pass the strawberry purée through a mesh sieve to remove large seeds.
  2. In a medium saucepan, simmer the strawberry purée until it's reduced by half. Stir in the sugar and continue cooking over medium heat, until the sugar is dissolved. Transfer to a medium bowl.
  3. Meanwhile, place 3 tablespoons of water into a small bowl. Sprinkle gelatin powder over the top of water. Let sit until water is absorbed, about 5 minutes.
  4. Pour the gelatin mixture into the warm strawberry reduction mixture and stir until fully incorporated.
  5. In a large bowl, beat cream cheese on low speed with an electric mixer until smooth.
  6. Add extracts and beat until combined.
  7. Add the strawberry reduction mixture to the cream cheese a little at time. Beat until well combined.
  8. In a medium bowl, beat heavy whipping cream with an electric mixer at high speed until stiff peaks form.
  9. Fold whipped cream into strawberry mixture.
  10. Spoon into cooled tart shells. Smooth tops with a small offset spatula. Refrigerate for two hours. Garnish with sliced, fresh strawberries.
Recipe Notes

*To find the tart pans I used, click here.

Marshmallow Mudslide Cookies

marshmallow mudslide cookies

Have you ever had mudslide cake? It’s a deliciously messy chocolate cake with chocolate frosting and marshmallows, also known as Mississippi mud cake. I saw one covered in a layer of marshmallow fluff and it made its way into my dreams. I woke up with the inspiration to make a cookie version of the gooey mudslide cake.

I saw a few mudslide cookie recipes out there that used standard size marshmallows and chocolate chips mixed into the cookie dough. If you’ve ever baked with marshmallows, you know that they nearly disappear during the baking process. Chocolate chips melt beautifully into little pools of chocolate, but then harden once cooled to room temperature. I happily volunteered to address these challenges! After some trial and error, I created a satisfying cookie with plenty of gooey marshmallow goodness and a rich fudge filling that stays soft at room temperature. Dreams do come true!

marshmallow mudslide cookies

Print Recipe
Marshmallow Mudslide Cookies
Chocolate fudge-filled cookies topped with toasted marshmallows
Course Dessert
Keyword chocolate, cookies
Servings
cookies
Ingredients
Fudge filling
Cookies
Course Dessert
Keyword chocolate, cookies
Servings
cookies
Ingredients
Fudge filling
Cookies
Instructions
Fudge filling
  1. Melt chocolate chips and sweetened condensed milk together in a double boiler or in the **microwave in a medium microwave safe bowl.
  2. Stir in chopped nuts. Set aside to cool to room temperature.
Cookies
  1. Heat oven to 350º.
  2. In a medium bowl, sift together flour, cocoa powder, baking powder, baking soda, and salt. Set aside.
  3. In a large bowl, cream butter with an electric mixer.
  4. Add granulated sugar and brown sugar and mix on medium speed until light and fluffy.
  5. Add eggs one at a time and mix until well combined.
  6. Add vanilla and mix until combined.
  7. Add dry ingredients in two increments, mixing just until combined.
  8. Roll fudge filling into tablespoon sized balls
  9. Roll cookie dough into 1/8 cup balls then flatten into a disc with your fingers and place a ball of fudge filling in the middle of each disc. Wrap the cookie dough around the ball of filling, sealing it completely.
  10. Place cookies about 2 inches apart on large baking sheets.
  11. Bake for 10 minutes. Remove from oven.
  12. Turn on broiler.
  13. Place a marshmallow on top of each cookie.
  14. Broil cookies until marshmallows are toasted. This takes about 1 minute. CAUTION Watch cookies carefully when broiling! They can go from done to burnt in the blink of an eye!
Recipe Notes

*I used Kraft Jet-Puffed S'moreMallows, but if you're unable to find them, use jumbo marshmallows. Cut them in half lengthwise with kitchen shears. Place on cookies cut side down.

**To melt fudge filling in microwave, heat for 30 seconds. Stir, then microwave for 10 second intervals, stirring until melted.

Pumpkin Cheesecake Crumble Brownies

pumpkin cheesecake crumble brownies

It’s Fall 2020. We need chocolate! We need pumpkin spice! And we need it drenched with caramel! These satisfying brownies check all of the boxes with multiple layers of comfort. A rich chocolate brownie is the base. The next layer is heavenly pumpkin cheesecake. The topping is a buttery crumble that rivals the best crumb cake. Finally, as if that isn’t enough, it’s drizzled with caramel sauce!

If it sounds complicated, don’t worry, it’s not. Each layer is super easy to make. You can use your favorite store bought caramel sauce to top it with. Vanilla ice cream and/or whipped cream are optional, but highly recommended toppings also. Just saying.

The layers go unexpectedly well together and make the perfect dessert for Halloween or Thanksgiving. I’m even going to add these beauties to my Christmas dessert table this year. Enjoy! You deserve it.

Print Recipe
Pumpkin Cheesecake Crumble Brownies
Chocolate brownies with pumpkin cheesecake and crumb topping, topped with caramel sauce.
Course Dessert
Servings
Ingredients
Crumb Topping
Pumpkin Cheesecake Layer
Brownie Layer
Course Dessert
Servings
Ingredients
Crumb Topping
Pumpkin Cheesecake Layer
Brownie Layer
Instructions
Crumb Topping
  1. In a medium bowl, combine flour, brown sugar, cinnamon and salt.
  2. Cut in butter using a pastry blender or your fingers until well-combined and crumbles are pea-sized. Press crumbles together to make large quarter-sized chunks.
  3. Set aside in refrigerator.
Pumpkin Cheesecake Layer
  1. Preheat oven to 350º. Line a 9-inch square baking pan with parchment paper.
  2. In a medium bowl, beat cream cheese with an electric mixer until smooth.
  3. Add pumpkin, eggs, sugar, cinnamon, ginger and nutmeg and beat until well combined. Set aside.
Brownie Layer
  1. Melt 1 stick of butter in a large microwaveable bowl.
  2. Stir in sugar until combined
  3. Stir in cocoa powder, vanilla, baking powder and salt.
  4. Add the eggs and beat until smooth
  5. Add the flour and mix until just combined.
  6. Spread brownie batter into prepared baking pan. Smooth with a spatula.
  7. Spread pumpkin cheesecake batter over the top of brownie batter. Smooth with a spatula.
  8. Sprinkle crumb topping evenly over the top of pumpkin cheesecake layer.
  9. Bake for 40-50 minutes until a toothpick inserted into pumpkin cheesecake layer comes out clean.
  10. Let cool completely. Cut into squares and serve with caramel sauce.