Purple Berry Cake with Silky Cream Cheese Frosting

Purple Berry Cake with Silky Cream Cheese Frosting by Brownie Mischief

Purple is passionate. It’s mystical. It’s regal. Don’t we all know someone whose favorite color is purple? It’s painfully obvious. They can’t hide it. They don’t want to hide it. They can’t just be friends with purple. They’re in a relationship with purple. The first time I made this Purple Berry Cake, a purple lover I know said that when she saw it, it spoke to her soul. This cake is, what I like to call, a double-take cake. People stare. They can’t resist it’s charismatic charm. Once they stop staring and taste it, they fall hopelessly in love.

Purple Berry Cake with Silky Cream Cheese Frosting by Brownie Mischief

Fresh berry purée is added to the batter, creating a soft, moist cake. The layers are brushed with berry syrup, which helps keeps the cake moist and gives it a nice punch of berry flavor.  I used blackberries and blueberries, but you can use any combination of purple berries that you like. After baking, the color of the cake layers will be a brownish gray with a hint of purple, depending on your berries. I think I need to come up with name for this color. How about Silverberry? You can see tiny flecks of the berries in the cake and I think the color is lovely, especially with the lavender frosting. If you want a more purple cake, feel free to add some gel food color to the batter. I used Wilton Violet gel food color to achieve the pretty lavender cream cheese frosting. The extra butter and the addition of heavy cream makes this frosting silky and spreadable.

Purple Berry Cake with Silky Cream Cheese Icing by Brownie Mishchief

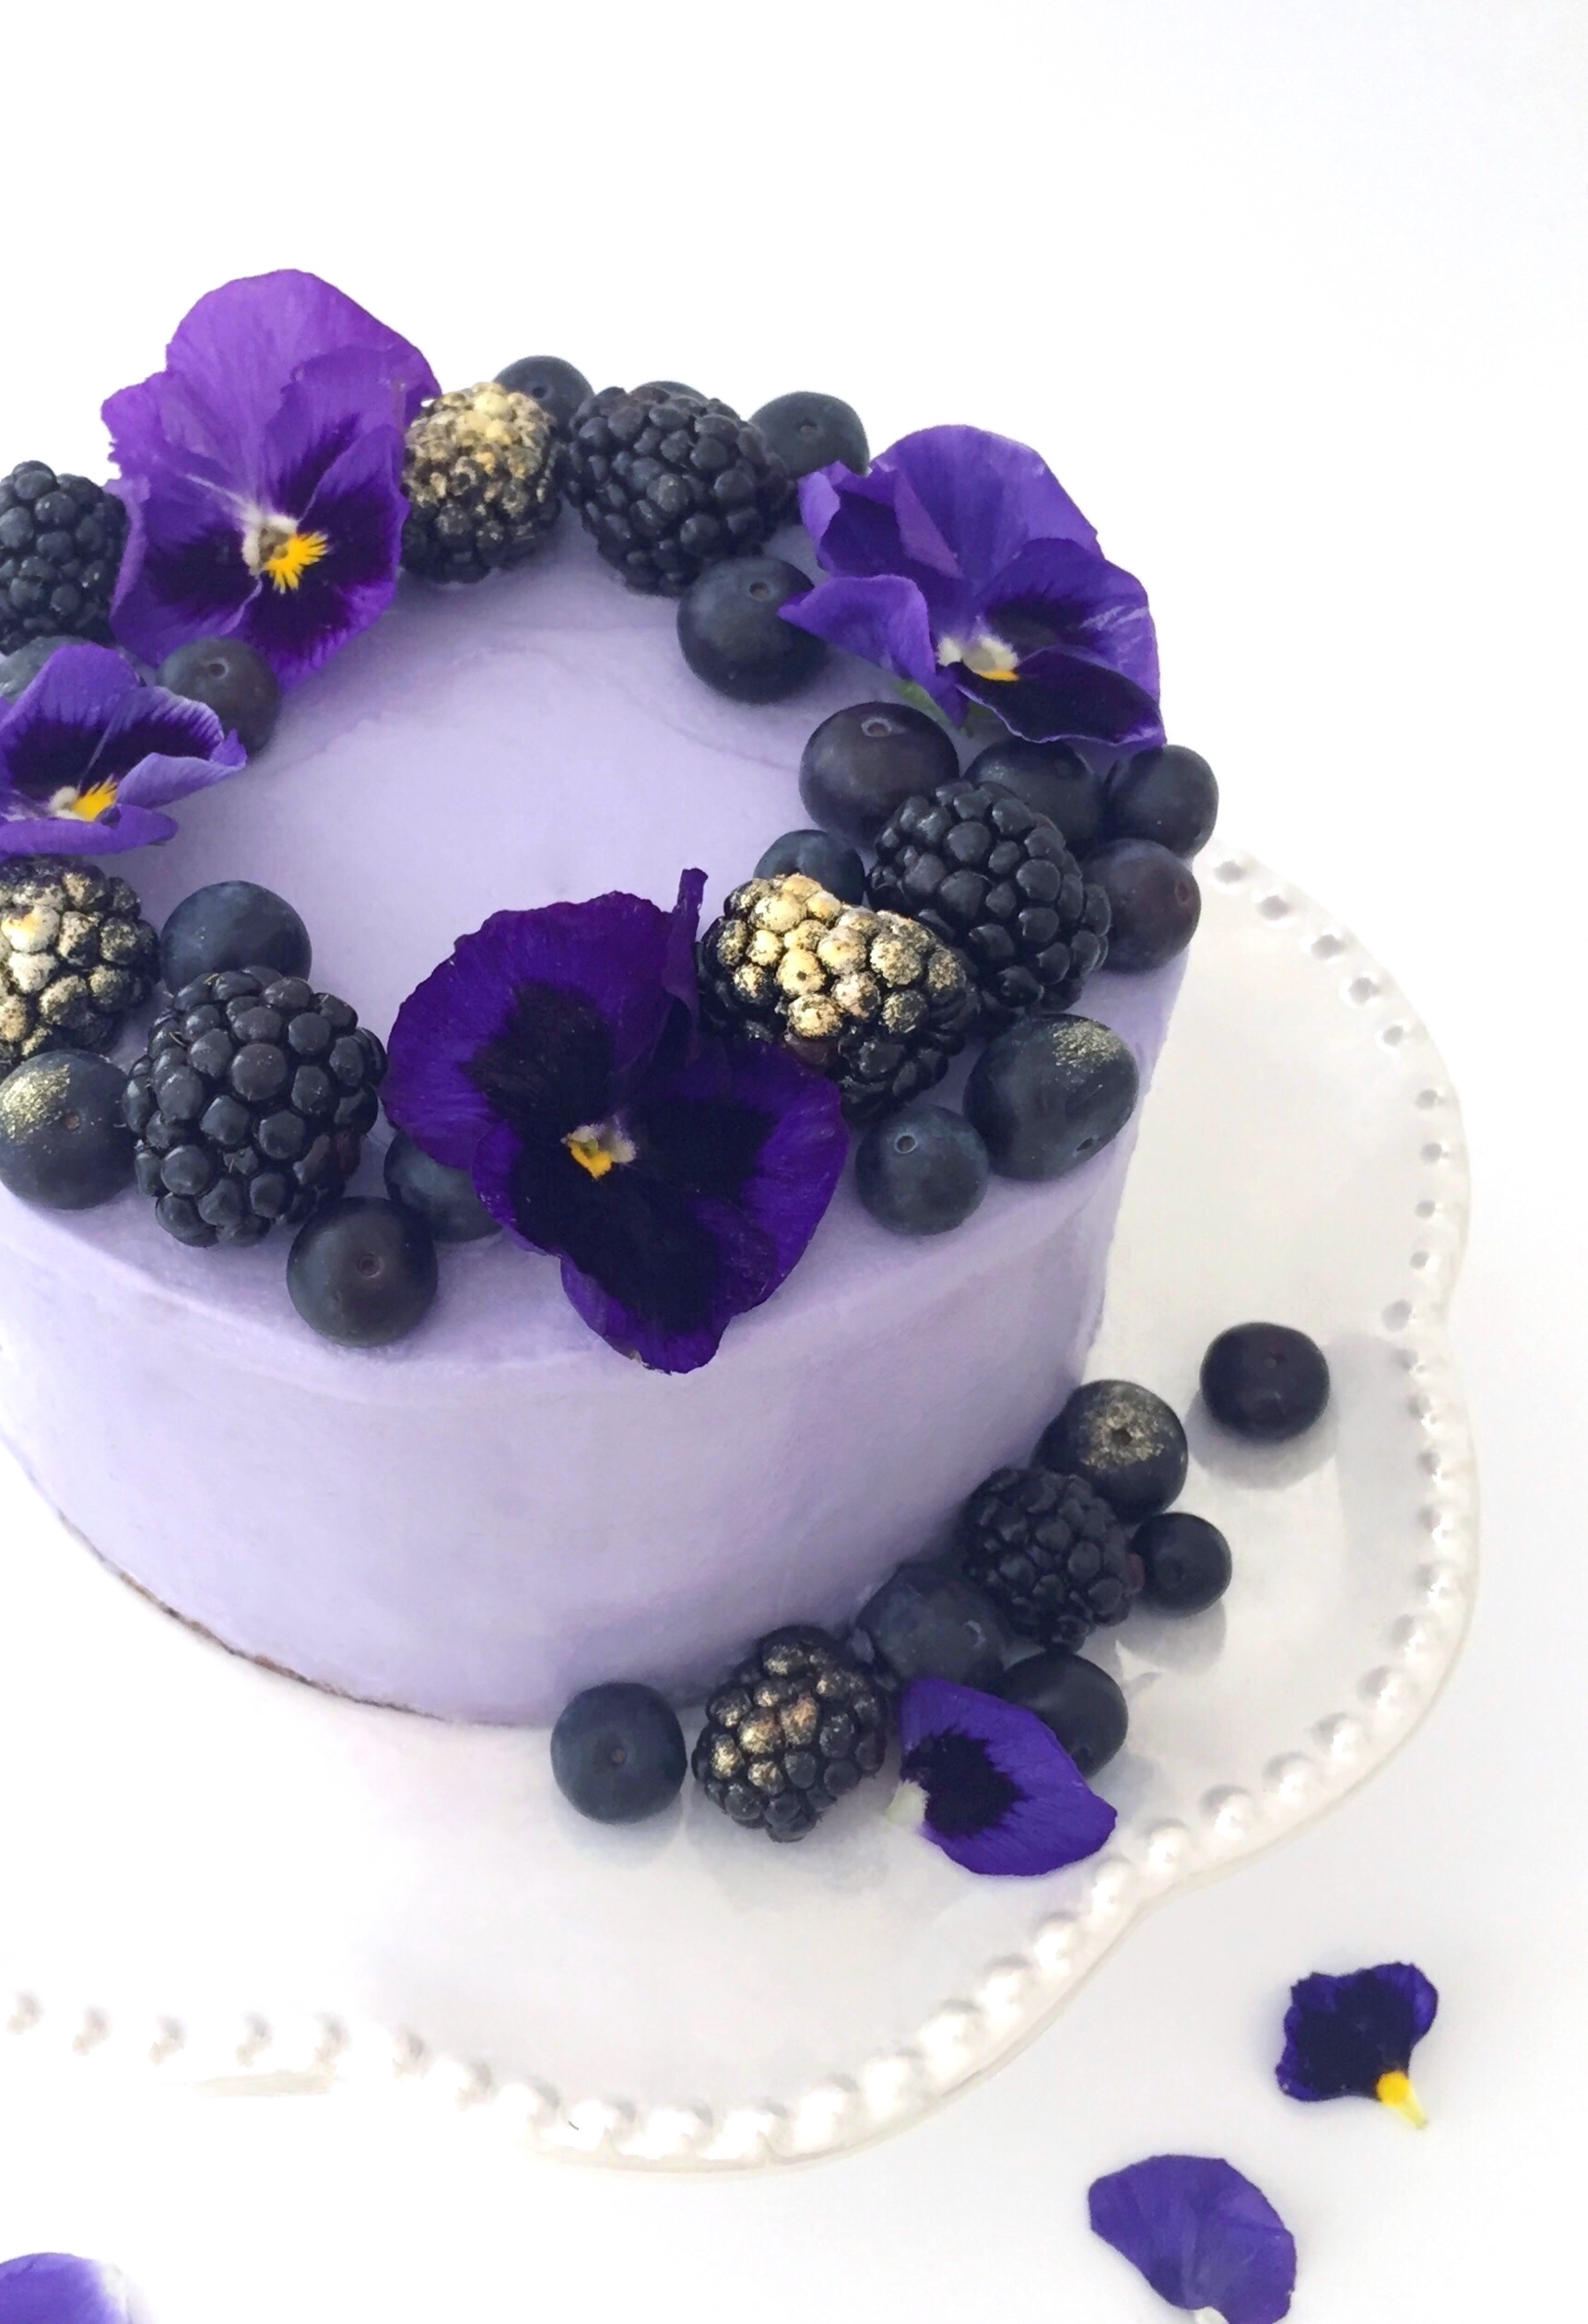
I’m obsessed with edible flowers lately, so I garnish my baked goods with them whenever I can get my hands on some. I found these pansies in the produce department of my local food market. If you can’t find pansies, pesticide free violets or rose petals would also be pretty. Make sure to apply them to your cake right before serving, since they are delicate and will wilt over time. Brush some of your berries with a little dab of edible gold luster dust for an extra regal touch.

Print Recipe
Purple Berry Cake with Silky Cream Cheese Frosting
Course Dessert
Servings
6-inch cake (serves 6)
Ingredients
Purple Berry Cake
Silky Cream Cheese Frosting
Finishing Touches
Course Dessert
Servings
6-inch cake (serves 6)
Ingredients
Purple Berry Cake
Silky Cream Cheese Frosting
Finishing Touches
Instructions
Purple Berry Cake
  1. Preheat oven to 350º F. Spray two 6-inch cake pans with non-stick cooking spray and line with parchment paper circles.
  2. Purée the berries in a blender or small food processor.
    Puree fresh berries.
  3. Strain puréed berries through a sieve. Reserve 2/3 cup berry puree. Set aside remaining puree for syrup.
  4. In a medium bowl, sift together flour, baking powder, baking soda, and salt. Set aside.
  5. In a large bowl, beat 1 1/4 cups (8.75 ounces) sugar, oil, eggs and vanilla extract with an electric mixer on medium speed, until light and fluffy, about 1 minute.
  6. Add flour in two additions, alternating with buttermilk, beating at medium speed just until combined.
  7. Stir in the reserved 2/3 cup berry purée.
  8. Pour batter evenly into the prepared cake pans. Bake until a toothpick inserted into center of cakes comes out clean, about 30-35 minutes.
  9. Cool cakes in pans for 10 minutes. Remove cakes from pans and continue cooling on wire racks.
  10. Meanwhile, make berry syrup. In a small saucepan, heat the remaining berry purée, remaining 1/4 cup sugar (1.75 ounces) and 1/4 cup water over medium-low heat. Stir together and bring to a boil. Cook until sugar is dissolved. Set aside to cool.
  11. Split each cake layer into two and brush with berry syrup. Fill and frost cake with Silky Cream Cheese Frosting.
Silky Cream Cheese Frosting
  1. In a large bowl, beat butter and cream cheese with an electric mixer at medium speed, until smooth.
  2. Add vanilla extract and salt and beat until combined.
  3. Gradually add powdered sugar and beat at medium speed until combined.
  4. Add heavy cream and beat at low speed until smooth and creamy.
  5. Add gel food color with a toothpick, a little at a time, until desired shade is reached. Beat at low speed until well blended.
Finishing Touches
  1. Garnish top of cake with fresh berries. Brush a few of the berries with edible gold luster dust. Garnish with fresh flowers immediately before serving.

Baby Bunny Coconut Cakes

Baby Bunny Coconut Cakes


Spring is the time for blue skies, flowers blooming, bunnies scampering around and Easter celebrations. What better time to make cute Baby Bunny Coconut Cakes? I wanted to make them look like newborn bunnies curled up peacefully for a nap, so I decided to use a hemisphere pan.

When I was shopping around for hemisphere pans, also know as ball pans, I considered metal pans and silicone pans. In general, I prefer metal pans for baking cakes, but I decided on silicone, hoping to get more use out them. I plan on using them for frozen and refrigerated desserts as well. You can find hemisphere pans at kitchen stores, craft stores, baking supply stores and online. To find the pan I chose, click here.

My next dilemma was whether or not to coat the pans before baking. From what I’ve read, many people seem to have trouble getting their baked goods out of silicone pans, even though the majority of these pans claim to be non-stick. I decided to experiment, trying three different ways. I coated some of the wells with grease and flour, some with only grease, and some were left uncoated. I found that when I inverted the pan, the cakes released effortlessly from the coated wells. The cakes in the uncoated wells took a slight amount of prodding and a bit of residue was left behind, but the cakes were in tact. All three ways seem to work fine, but I decided that, for my own peace of mind, I will grease all of the wells in the future.

Decorating these bunny cakes is fun and easy, so this would make a great project for the little ones. You can use the candies of your choice to make eyes and noses. I used white candy pearls for the noses and colored them pink with edible petal dust. I made sleepy eyes out of black fondant. Black fondant is difficult to make, so I always buy it. It’s available for purchase in small quantities. I used edible wafer paper to make the bunny ears, but fondant would also work. A little puff of cotton candy makes a sweet tail. So many possibilities! Whether you make Baby Bunny Coconut Cakes for Easter, a child’s birthday party, a baby shower or simply to celebrate spring.


Baby Bunny Coconut Cakes
Print Recipe
Baby Bunny Coconut Cakes
Fluffy, moist mini hemisphere coconut cakes with coconut buttercream frosting, topped with shredded coconut.
Course Dessert
Servings
mini cakes
Ingredients
Mini Coconut Cakes
Coconut Buttercream
Course Dessert
Servings
mini cakes
Ingredients
Mini Coconut Cakes
Coconut Buttercream
Instructions
Mini Coconut Cakes
  1. Preheat oven to 325ºF (165ºC). Grease 2 silicone 6-serving mini hemisphere pans. Place the pans on large baking sheet.
  2. In a medium bowl, sift together the flour, baking powder and salt. Set aside.
  3. In a large bowl, beat the butter, sugar and oil together with an electric mixer at medium speed, until light and fluffy. Beat in coconut extract. Gradually beat in egg whites, until mixture is well combined, stopping to scrape the sides of the bowl.
  4. On low speed, beat in the flour mixture in three additions, alternating with the coconut milk, stopping to scrape the sides of the bowl as needed.
  5. Fill the hemisphere pan wells, 2/3 full with batter. Bake for 20-24 minutes, until a toothpick inserted into the center of cakes comes out clean.
  6. Place the silicone pans on a cooling rack to cool for 10 minutes. Invert the pans to remove mini cakes and place on cooling racks to cool completely.
Coconut Buttercream
  1. In a large bowl, beat the the butter with an electric mixer on medium speed, until light and fluffy.
  2. Add the powdered sugar and mix on low speed until smooth and well combined.
  3. Add the coconut extract and salt. Beat until combined.
  4. Add the coconut milk a little at a time until desired consistency is reached. Beat at low speed until the buttercream is smooth.
  5. Frost the domed tops of the mini cakes with a small offset spatula. Cover with shredded coconut, pressing lightly to adhere. Decorate as desired.
Finishing Touches
  1. To make bunny ears, cut twenty-four 1 1/2-inch by 1-inch rectangles out of edible wafer paper. Cut each rectangle into a long football shape, flat at one end. Cut a 1/2-inch slit at the flat end. With a small paint brush, dab a bit of piping gel on one side of the slit. Overlap the cut ends of the slit and press together with your fingers. Let dry. Brush pink luster dust into the center of the ears. Skip this step if you are using floral wafer paper. Cut small slits into the bunny cakes and insert the ears.
    Baby Bunny Coconut Cakes Tutorial
  2. To make sleepy eyes, roll out a bit of black fondant to 1/16-inch thickness. Cut circles using the small end of a #12 piping tip. Cut thin crescent shapes from the circles using the small end of the piping tip. For easier handling, let eyes dry for a few minutes. If the coconut on your bunny cakes is still moist and tacky, the eyes will stick. If not, brush them with a small bit of water or piping gel.
    Baby Bunny Coconut Cakes Tutorial
  3. To make noses, use the candy of your choice, such as candy pearls or candy hearts. I used white candy pearls, brushed with edible pink luster dust.
  4. To make tails, you can use cotton candy or mini marshmallows attached with a bit of buttercream. If using cotton candy, keep in mind that it melts when exposed to air, so it's best applied right before serving.
Recipe Notes

*Do not substitute all-purpose flour. For best results, weigh your dry ingredients.

**For best results, use natural coconut extract. Imitation coconut flavorings may give your baked goods an unpleasant flavor.

***If your coconut milk is separated when you open the can, simply place it in a blender to emulsify it before using.

To find the hemisphere pan I used, click here.

To find white edible wafer paper,  click here. Floral wafer paper can be found on Etsy.

To find black fondant, click here.


Marshmallow Love


Marshmallow Cake by Brownie Mischief

Dear marshmallows, why are you so sweet and fluffy? I shall call you squishy and you shall be mine! Yes, it’s true, I’m a bit crazy about marshmallows. This post is nothing short of a marshmallow fest! First, my daughter and I made some Sparkly Marshmallow Hearts that are super fun and easy to make. I literally want to put them on everything! How cute do they look on this mini cake? They also make adorable cupcake toppers! To view the Sparkly Marshmallow Hearts tutorial click here.

We also had some fun with Puffy Poles. In case you’re not marshmallow savvy, Puffy Poles are marshmallows that look like chubby barber poles. They’re very popular on dessert tables and candy buffets. We used pink ones, which have a subtle strawberry flavor. We applied them to the pictured 4-inch diameter by 2 1/4 inch tall strawberry cake, which was crumb coated with a thin layer of vanilla buttercream. We used buttercream to adhere them to the sides of the cake. To find Puffy Poles click here.

Marshmallow Cake by Brownie Mischief

Next, I made some Billowy Sky Blue Marshmallow Frosting to share with you. One of the things you’re going to love about this frosting, besides being yummy, is it’s natural beauty. You can simply spoon it on, no piping or fancy tricks necessary. Everything it touches becomes an ethereal cloud of deliciousness! The recipe is below.


Print Recipe


Billowy Sky Blue Marshmallow Frosting

Fluffy, glossy, sweet marshmallow frosting.

Course Dessert

Prep Time 10 minutes
Cook Time 15 minutes

Servings
cups


Ingredients

Course Dessert

Prep Time 10 minutes
Cook Time 15 minutes

Servings
cups


Ingredients


Instructions
  1. In a large heatproof bowl, whisk together sugar, egg whites, water and cream of tartar until frothy.

  2. Place bowl over a pan of gently simmering water, making sure the water isn't touching the bottom of the bowl. Whisk mixture until temperature reaches 160° and sugar is completely dissolved.

  3. Remove bowl from heat. Add extracts. Beat mixture with the whisk attachment of an electric mixer on high speed until stiff and glossy.

  4. Add a small amount of food color with a toothpick and mix on low speed. Continue adding food color, a little at a time, until desired shade is reached. Use a clean toothpick for each addition.


Recipe Notes

*It's important to dissolve all of the sugar when making this frosting. Ultra fine sugar dissolves easier, but if you are unable to find it, you can use regular granulated sugar.

Chocolate Lovers’ Valentine Cake for Two

Chocolate Lovers' Valentine Drip Cake for Two

My relationship with Valentine’s Day has transformed over the years. When I was a child, I joyfully skipped home from school with my bounty of tiny Valentine cards, candy hearts and a cupcake someone’s mother baked. As I grew older, I was hot and cold towards Valentine’s Day, depending on the state of my love life at the time. After having kids, Valentine’s Day became about red construction paper, doily hearts and glue sticks. I happily cleaned up sprinkles and kissed chubby, frosting-stained cheeks. Now I think of Valentine’s Day as simply a day to celebrate love. I embrace Valentine’s Day and all the hearts, roses and chocolates that go with it! Show your loved ones that you love them on Valentine’s Day, but more importantly, show them throughout the year, by loving, respecting and accepting them for who they are every day.

If your heart beats for a chocolate lover, then this Valentine cake for two will have them swooning. It’s small in size, but grand in chocolate indulgence. It has three layers of moist chocolate cake, rich, white chocolate buttercream and a silky chocolate glaze. As if that isn’t enough, I loaded the top with chocolate candy! Some of the candy is store bought and some I made with candy melts and chocolate molds. Click here to find the cherub mold. Click here to find the heart mold.

Chocolate Lovers' Valentine Drip Cake for Two

I hope you share this Valentine cake with someone you love! However you celebrate the day and whoever you love, have a happy one!

Print Recipe
Chocolate Lovers' Valentine Cake for Two
A mini chocolate cake with white chocolate buttercream, topped with chocolate glaze and chocolate Valentine candy. Perfect for sharing!
Course Dessert
Prep Time 1 hour
Cook Time 30 minutes
Passive Time 1 1/2 hours
Servings
Ingredients
Chocolate Cake for Two
White Chocolate Buttercream
Chocolate Drip Glaze
Course Dessert
Prep Time 1 hour
Cook Time 30 minutes
Passive Time 1 1/2 hours
Servings
Ingredients
Chocolate Cake for Two
White Chocolate Buttercream
Chocolate Drip Glaze
Instructions
Chocolate Cake for Two
  1. Preheat oven to 350°F. Grease & flour three 4-inch cake pans. *See note below.
  2. Sift flour, cocoa powder, baking powder, baking soda and salt together in a medium bowl. Add sugar and stir to combine.
  3. Combine egg, buttermilk, vegetable oil and vanilla extract in a small bowl. Whisk lightly to combine.
  4. Add egg mixture to dry ingredients and mix on low speed with a handheld electric mixer, until combined. Stop mixer. Scrape sides of bowl with spatula. Turn mixer up to medium speed and beat for 1 minute.
  5. Add hot coffee and stir until incorporated.
  6. Pour batter into prepared cake pans, dividing batter evenly between the pans. Bake for 20-25 minutes or until a toothpick inserted into the center of the cake comes out clean.
  7. Cool cakes in pans 10 minutes, then invert onto a wire rack to cool.
White Chocolate Buttercream
  1. Melt white chocolate in a double boiler over gently simmering water. (Alternately, you can melt the white chocolate in the microwave. In a small microwaveable bowl, heat the white chocolate for 30 seconds, then stir. Heat again for 10 second intervals, stirring until melted, being very careful not to overheat it.)
  2. Set white chocolate aside to cool until lukewarm and still soft.
  3. In a medium bowl, beat butter with an electric mixer at medium speed until pale and creamy.
  4. Add vanilla extract, salt and melted white chocolate. Beat at low speed until combined. Stop mixer. Scrape sides of bowl with spatula.
  5. Add powdered sugar. Beat at low speed, until powdered sugar is combined. Beat at medium speed until buttercream is smooth, stopping to scrape the bowl occasionally. Keep covered at room temperature until ready to use.
Cake Assembly
  1. When cakes have cooled completely, trim the cake layers to 1-inch tall.
  2. Attach one of the layers to a cake board with some of the white chocolate buttercream. Apply 1/4-inch thick layer of buttercream to the top of the cake layer, followed by the second cake layer, another 1/4-inch thick layer of buttercream, then the final cake layer.
  3. Apply a crumb coat (thin layer) of buttercream to the cake. Chill the cake in the refrigerator for 20 minutes.
  4. Frost the cake with the remaining buttercream. Apply chocolate sprinkles to the bottom edge of the cake.
  5. Melt chocolate drip glaze ingredients together in a double boiler over gently simmering water. Let cool slightly.
  6. Spoon chocolate glaze into a piping bag. Snip off the end of the bag with kitchen scissors. Drizzle chocolate glaze along the edges of the perimeter of the cake, then fill in the middle. Smooth top with a small offset spatula.
  7. Top cake with assorted chocolate candy. If desired, you can stack some of the candy and adhere them with melted chocolate to give some variation in height.

Rainbow Marble Mini Cake with a Unicorn Cookie Topper

Rainbow Marble Mini Cake with Unicorn Cookie Topper by Brownie Mischief

Here we are! We’ve landed safely in 2017. That year that we left behind was a bumpy ride. Glad that’s over! I’m so hopeful about the New Year that I’m sprinkling good wishes around like confetti! Let’s forget all of our problems today and skip around amongst the unicorns and rainbows!

I’ve been experimenting with marbleized fondant lately, so, based on my current mood, I inevitably ended up with rainbow marble fondant. It looked so pretty on my little four inch cake, but it was screaming for a unicorn. By the way, did you know a group of unicorns is called a blessing? I made a batch, I mean a blessing, of Unicorn Cookie Cake Toppers using a small unicorn cookie cutter. They’re decorated with fondant, which is yummier than royal icing and doesn’t require any special skills. There’s no piping involved. (Phew!) These unicorn cookies are so cute and angelic, I imagine they would prance around in the clouds. If only I had some cotton candy for my unicorn to prance around on! Then, magically, I stumbled upon some cotton candy at my local discount store. Thanks Universe!

This colorful little cake will certainly brighten anyone’s day! It would be perfect for a birthday or to give to a special person “just because”. Thanks for spending a few minutes here in my happy place. Wishing you a blessing of unicorns in 2017!


*A note about working with cotton candy:  Apply cotton candy to your cake right before serving. When cotton candy is exposed to air, it will start to shrivel after an hour or so. If you don’t have cotton candy, a fluffy dollop of whipped buttercream would also be pretty!

To view Unicorn Cookie Cake Toppers instructions click here.

To view Rainbow Marble Fondant instructions click here.