French toast in all forms is welcome here! Everything from classic French toast to stuffed, sticks, bricks, casseroles and even cubes. I came up with this recipe for French Toast Cubes after I had a French toast brick at a restaurant. I like the idea of tall, thick pieces of French toast, but the cubes are a bit more manageable. This is a fun to make, well-loved recipe. I love to serve the cubes with warm maple syrup and fresh whipped cream.
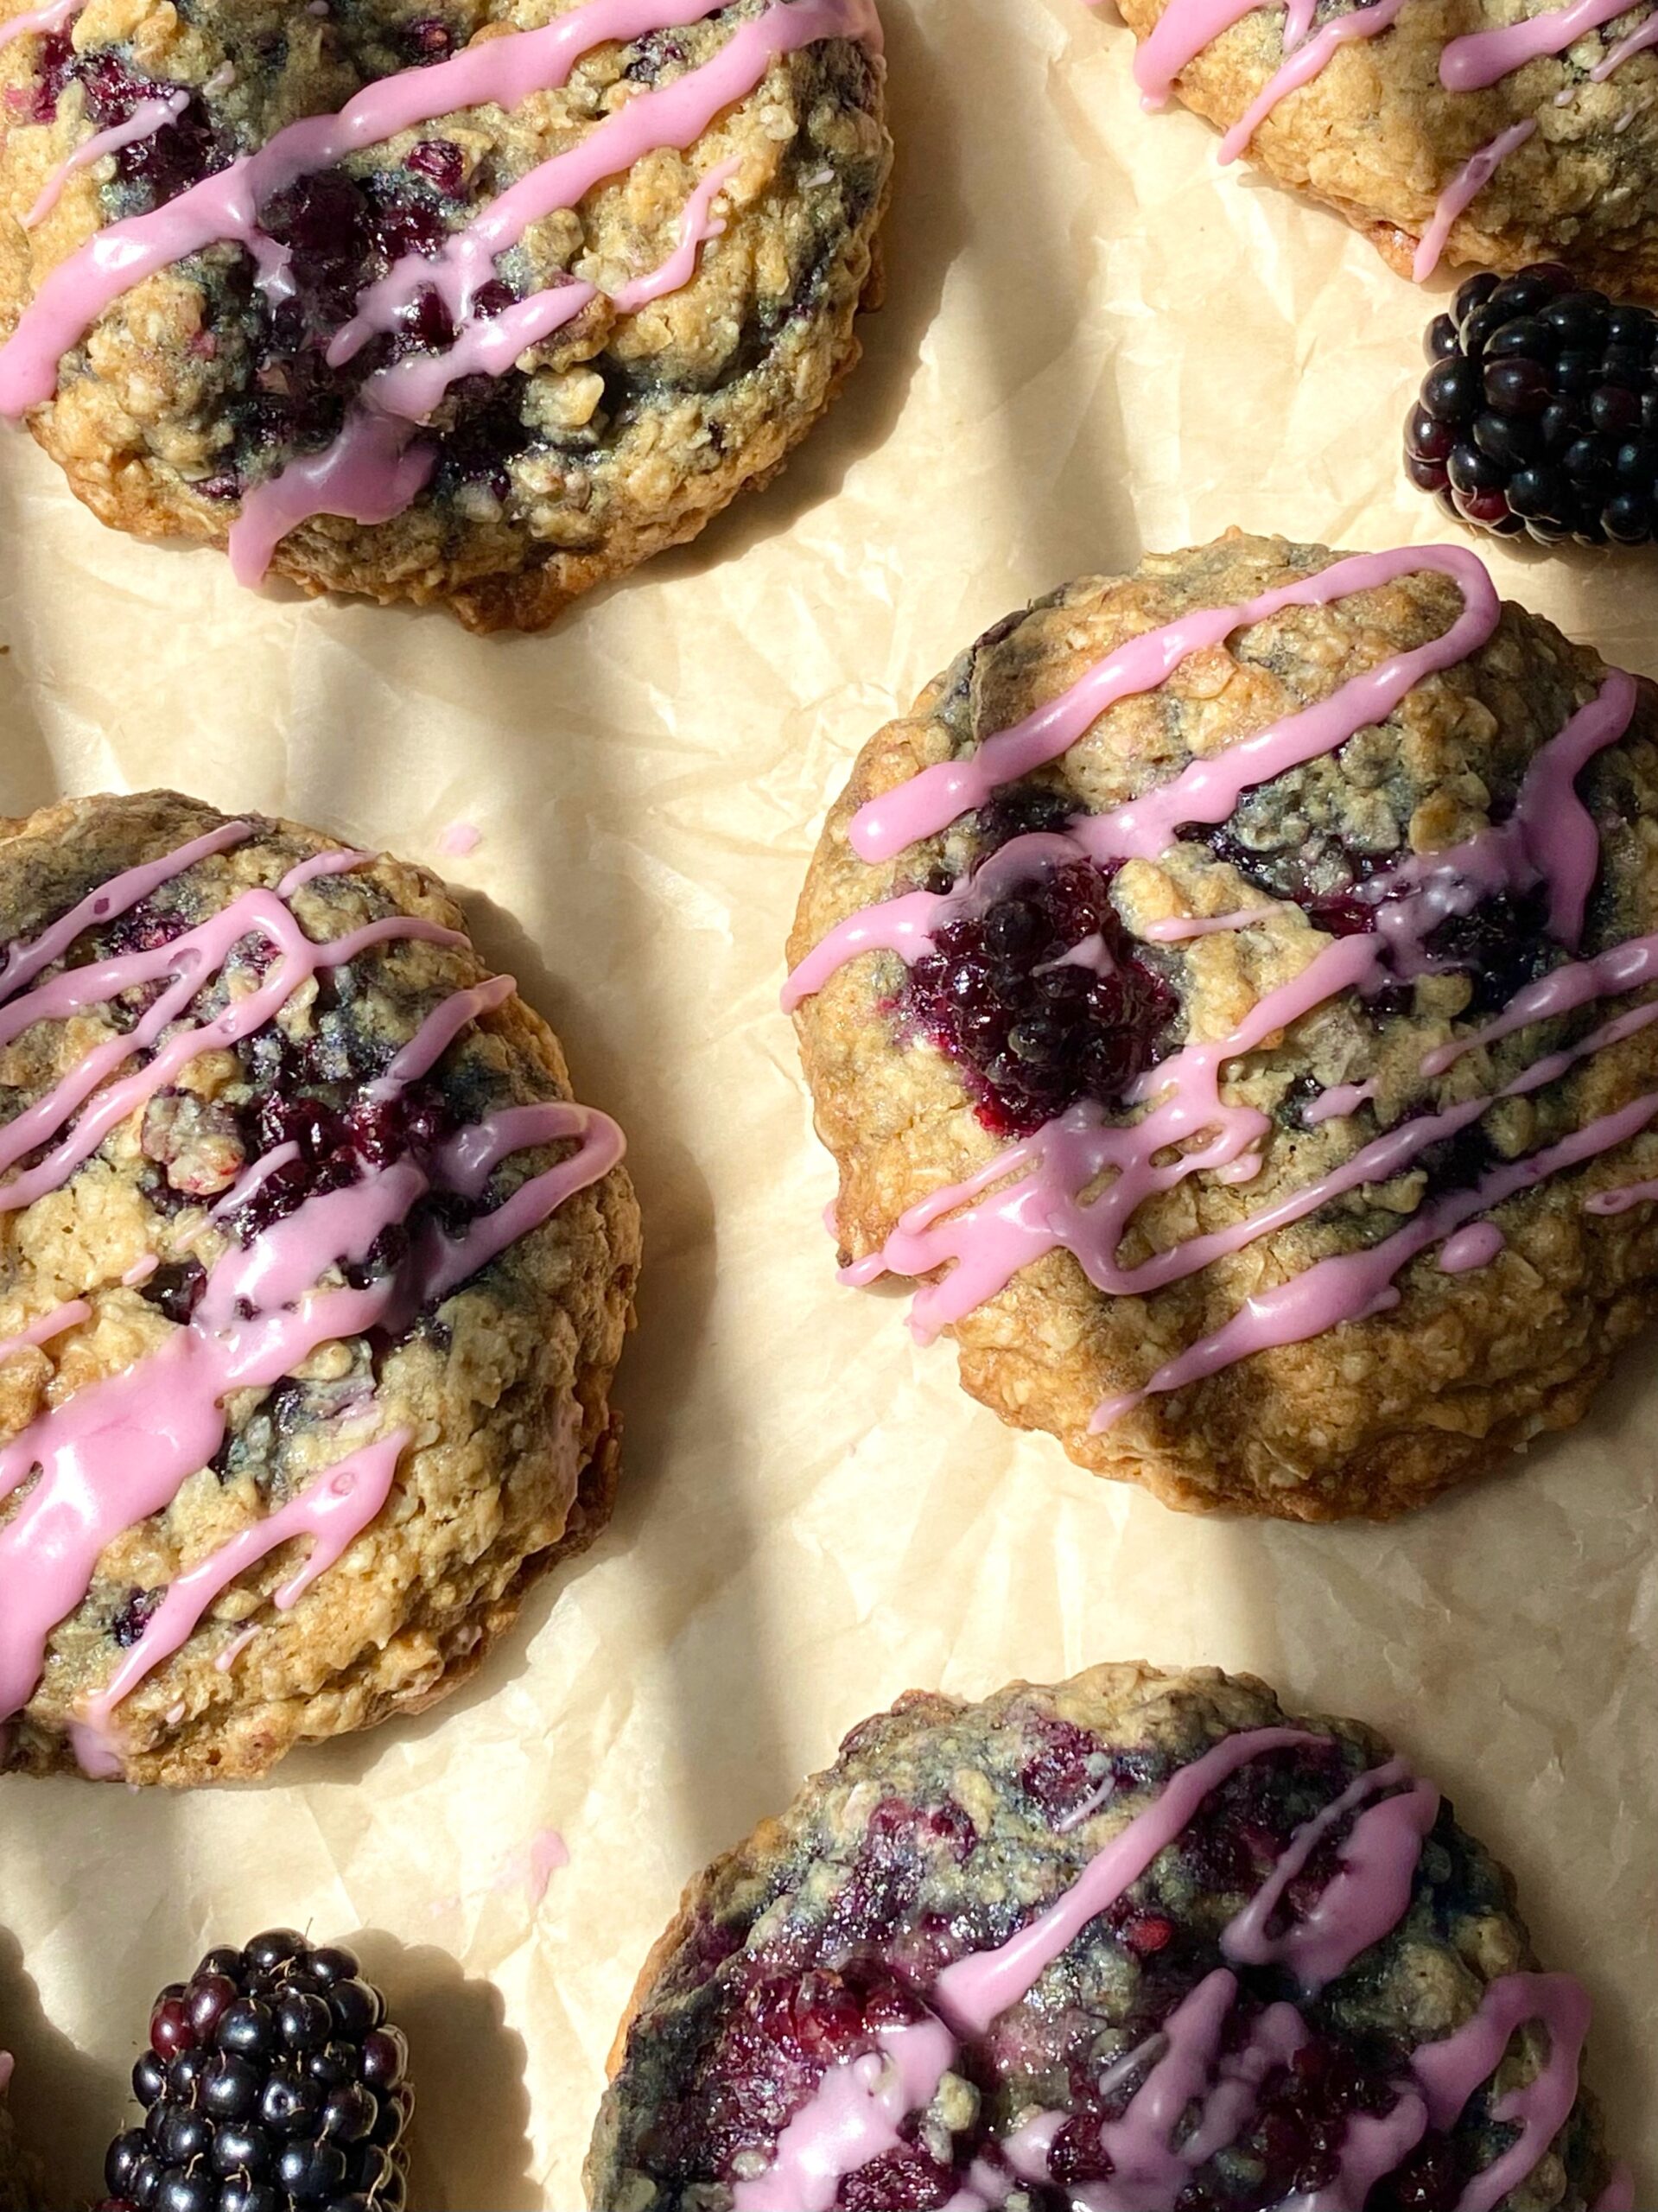
We’ve all heard our parents telling their childhood stories of walking miles to school and suffering worse hardships than we ever had to. My mom used to tell me stories like that, but she had a sense of humor, so her stories were always fun to listen to. She used to tell me about her friend’s mother, who would make big, delicious oatmeal cookies. My mom would trade her baloney sandwich nearly every day to get one of those cookies from her friend. She reminisced about those cookies so much, that I set out to make her some when I learned to bake. She and my grandmother would taste test batch after batch of my cookies over the years. I have probably baked enough oatmeal cookies to circle the earth. Okay that’s an exaggeration, but seriously I have baked quite a few. Of all the oatmeal cookies I’ve baked, these are one of my favorites!
Most of the time when you see fruit added to an oatmeal cookie, it’s dried fruit, like raisins or cranberries. That’s mostly because if you just dump fruit into your cookie dough, the fruit releases water, leaving soggy spots in your cookies. To solve that issue, for this recipe, I macerate the blackberries before baking. The purple blackberry juice that’s released from the berries is used to make a beautiful lilac icing to drizzle over the cookies.
2cups (about 8-10 oz or 227-283g)fresh blackberriesCut large berries in half
2tablespoons (25g)granulated sugar
Oatmeal Cookies
1 ¾cups (7 7/8 oz or 223g)all purpose flour, sifted
1 teaspoonbaking soda
1teaspoonfine sea salt
½teaspoonground cinnamon
½cup (4 or 113g)unsalted butter, softened
1 ¼cups (8 3/4 oz or 250g)packed brown sugar
2 largeeggs
1 ½teaspoonspure vanilla extract
3cups (10 oz or 283g)quick oatsNot instant oats
Icing
¾cup (3 oz or 85g)powdered sugar, sifted
1tablespoon heavy cream
2-3tablespoonsreserved juice from blackberries
Instructions
In a small, light colored saucepan, melt 1/2 cup (4 oz or 113g) of butter over medium heat, stirring occasionally, until deep golden and fragrant. Keep a close eye on it. It can go from toasted to burned very quickly. When you see brown particles form, remove from heat and immediately transfer the butter, including the particles, to a small bowl. Refrigerate until solid, about one hour.
Place the blackberries in a medium-size bowl. Sprinkle with granulated sugar and toss to coat. Let sit for 30 minutes until the berries release their juices.
Drain the blackberries and reserve the juices.
Preheat oven to 350ºF (180ºC). Line two large cookie sheets with parchment paper.
In a separate medium-size bowl, whisk together the flour, baking soda, salt and cinnamon. Set aside.
In a large bowl, beat the brown butter, softened butter and brown sugar until light and fluffy.
Add the eggs and vanilla extract in three separate additions and beat until well combined.
Stir in the flour mixture just until combined. Stir in the oats just until combined. Gently fold in the blackberries.
Scoop 1/4 cup sized portions of dough, about 2 inches apart, onto the prepared cookie sheets. *I used a #16 2-ounce scoop.
Bake until the cookie tops are set and the edges are golden brown, about 13-15 minutes. Transfer the cookies to a cooling rack to cool completely.
Pass reserved blackberry juice through a sieve to remove the seeds.
In a small bowl, whisk together the powdered sugar, heavy cream and one tablespoon of the reserved blackberry juice until smooth. Add more blackberry juice, a little at a time, until the desired consistency is reached. Drizzle the icing over the cooled cookies.
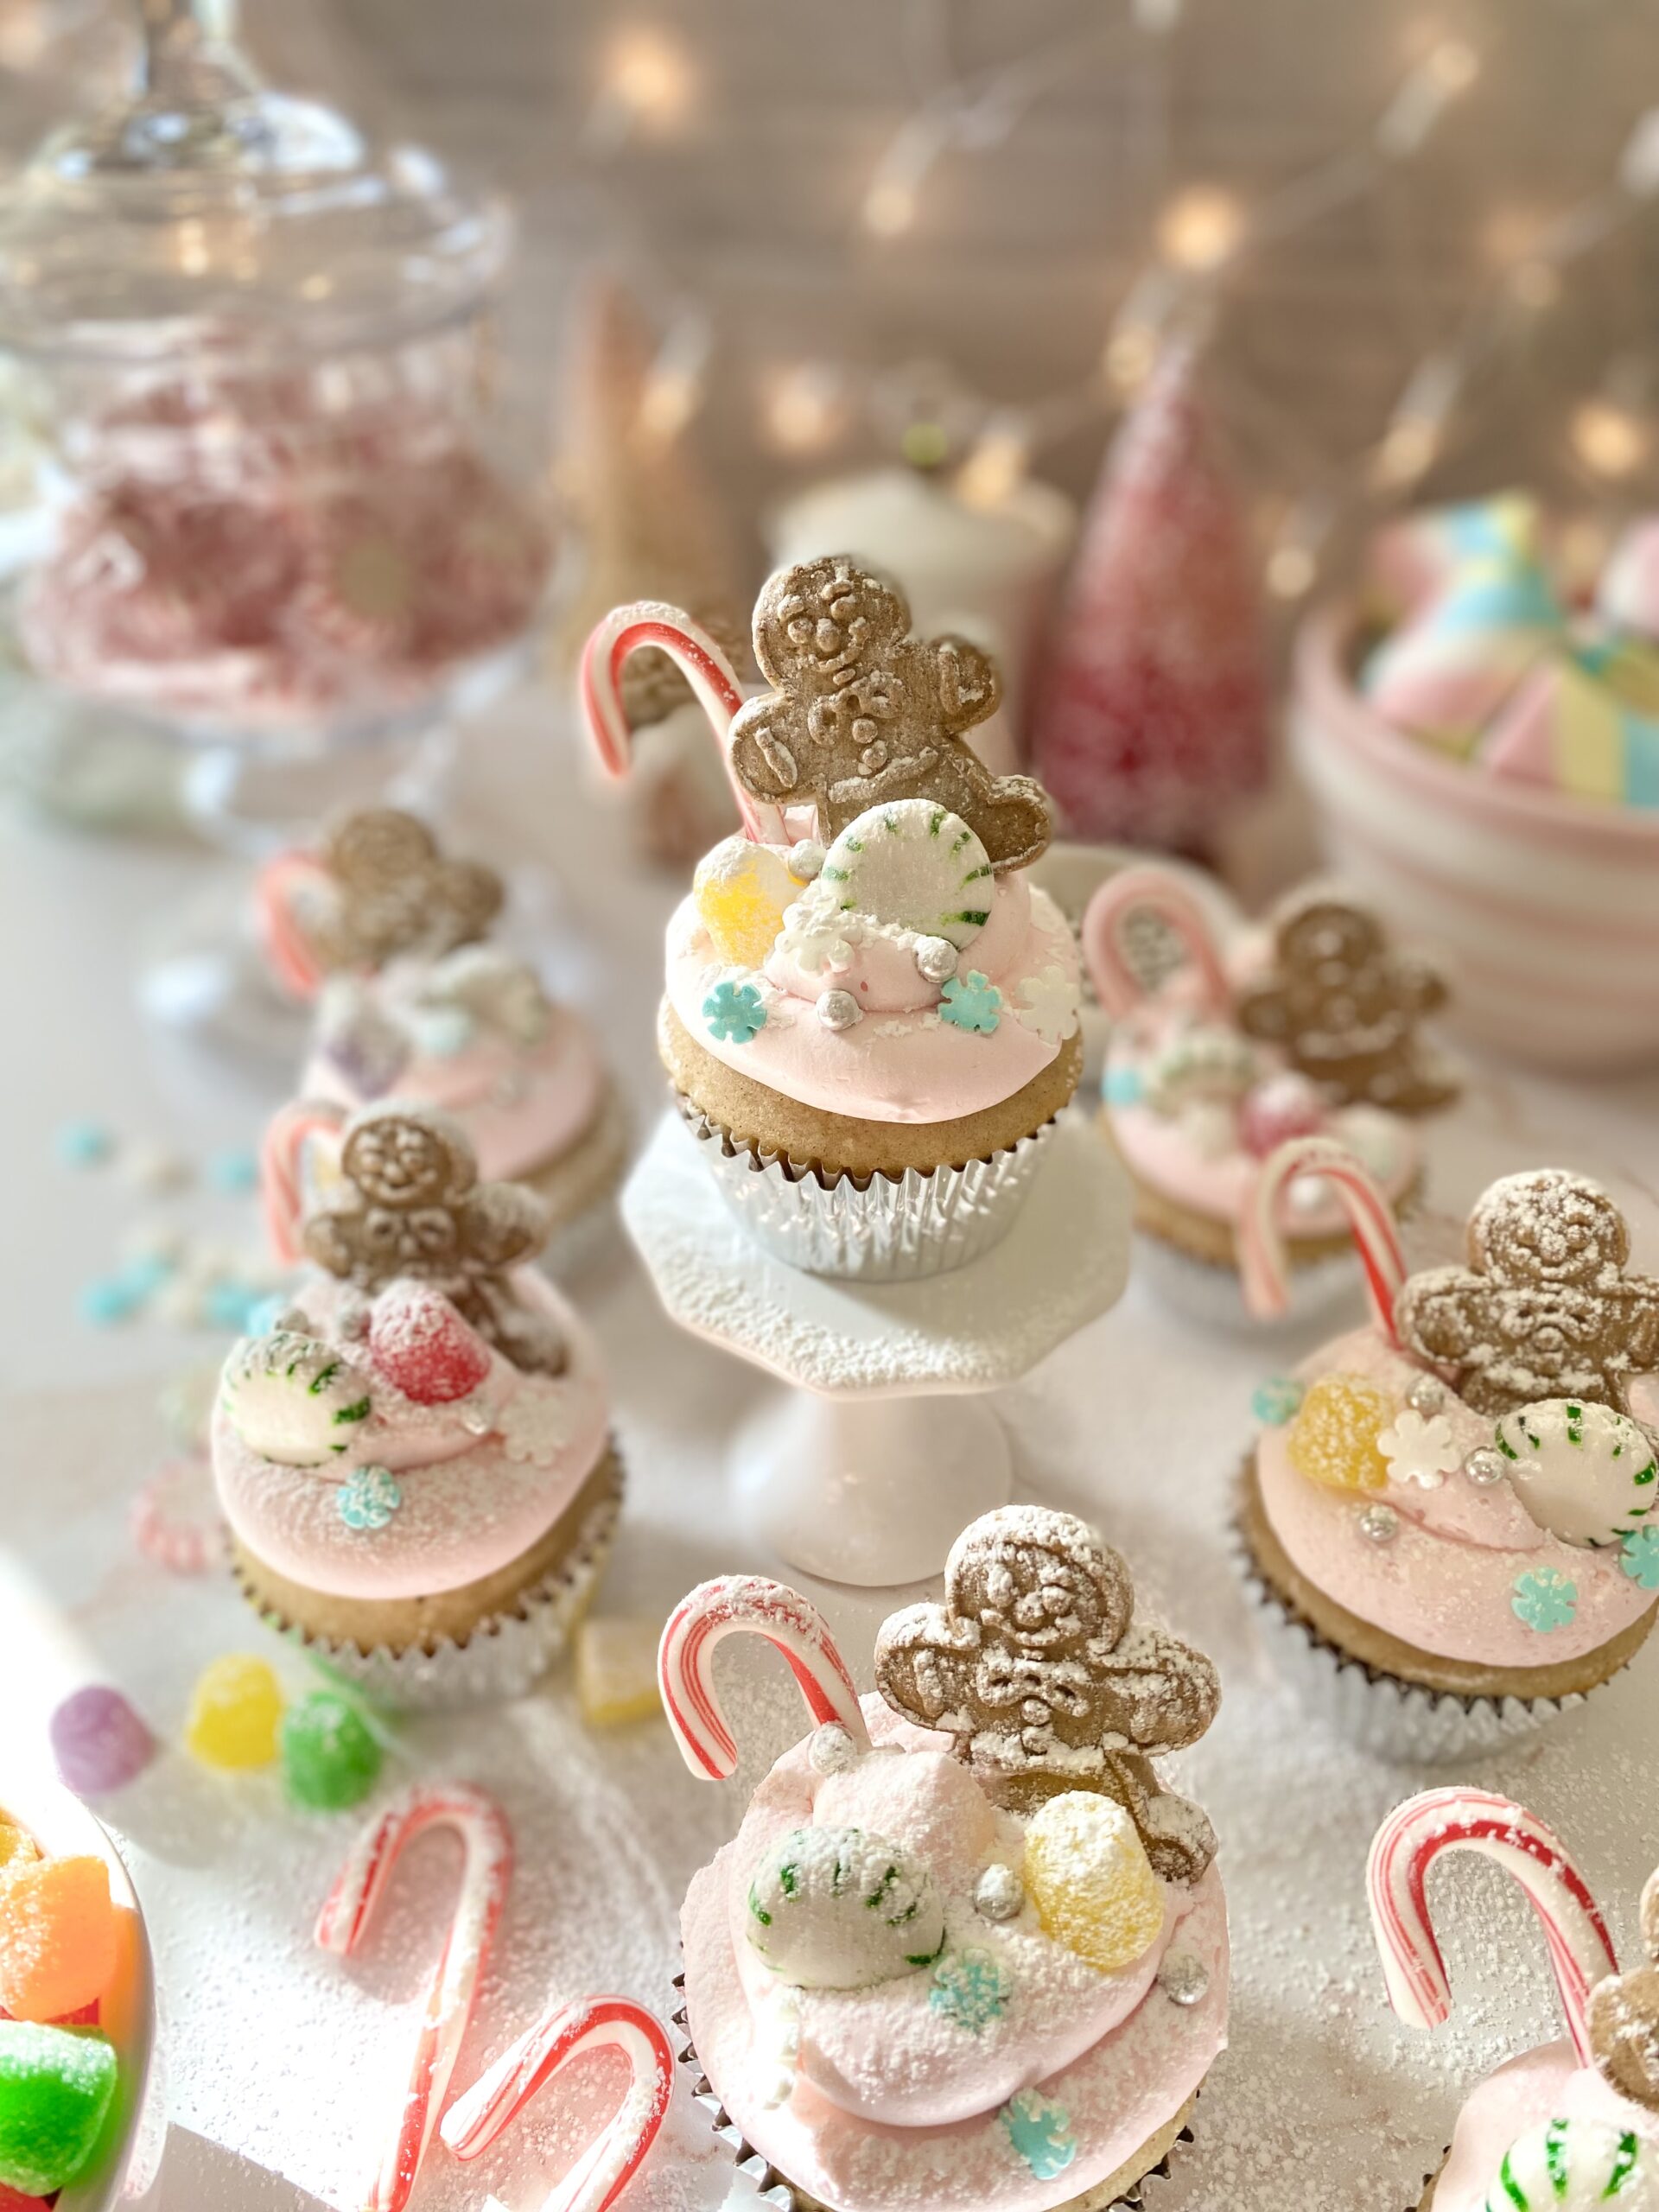
The tradition of enjoying the Nutcracker Ballet at Christmastime has been in my family for over 20 years. The Nutcracker Land of Sweets is a magical theme that has me mesmerized. Gingerbread, candy canes, gumdrops and billowy clouds of pink frosting are what dreams are made of. And that’s exactly what these dreamy cupcakes are made of. The cupcake flavor is a subtle spice cake. The recipe is adapted from a Martha Stewart cake recipe I made last summer. The original cake was paired with blackberry jam, but I knew plum jam would be perfect for these cupcakes. I topped them with a mildly sweet, fluffy Swiss meringue buttercream.
Part of the fun of making these cupcakes began at the store as I collected the sweets to decorate the cupcakes. Another perk of the job is taste testing the candy. I discovered that purple spice drops are licorice flavored and red spice drops are cinnamon. Who knew?
You might also like my Nutcracker Land of Sweets inspired candy bark. It’s a delightful holiday bark I designed that is often imitated. To view it, click here.
The Nutcracker Land of Sweets Cupcakes
Spice cupcakes filled with plum jam, topped with fluffy pink frosting, gingerbread men and Christmas candy, and dusted with sugar snow
Combine egg whites and sugar in a heatproof bowl. Set over a pan of gently simmering water.
Whisk constantly until sugar is dissolved and temperature of 160ºF is reached.
Transfer mixture to the bowl of a stand mixture with a whisk attachment. Whisk on low speed, gradually increasing to medium-high speed. Whisk until glossy, stiff peaks form and mixture reaches room temperature.
Turn mixer to medium-low speed. Add butter, a few pieces at a time, allowing the butter to fully incorporate each time before adding more.
Switch to paddle attachment. On low speed, mix in vanilla, salt and food color. Continue mixing on low speed for a few minutes until smooth.
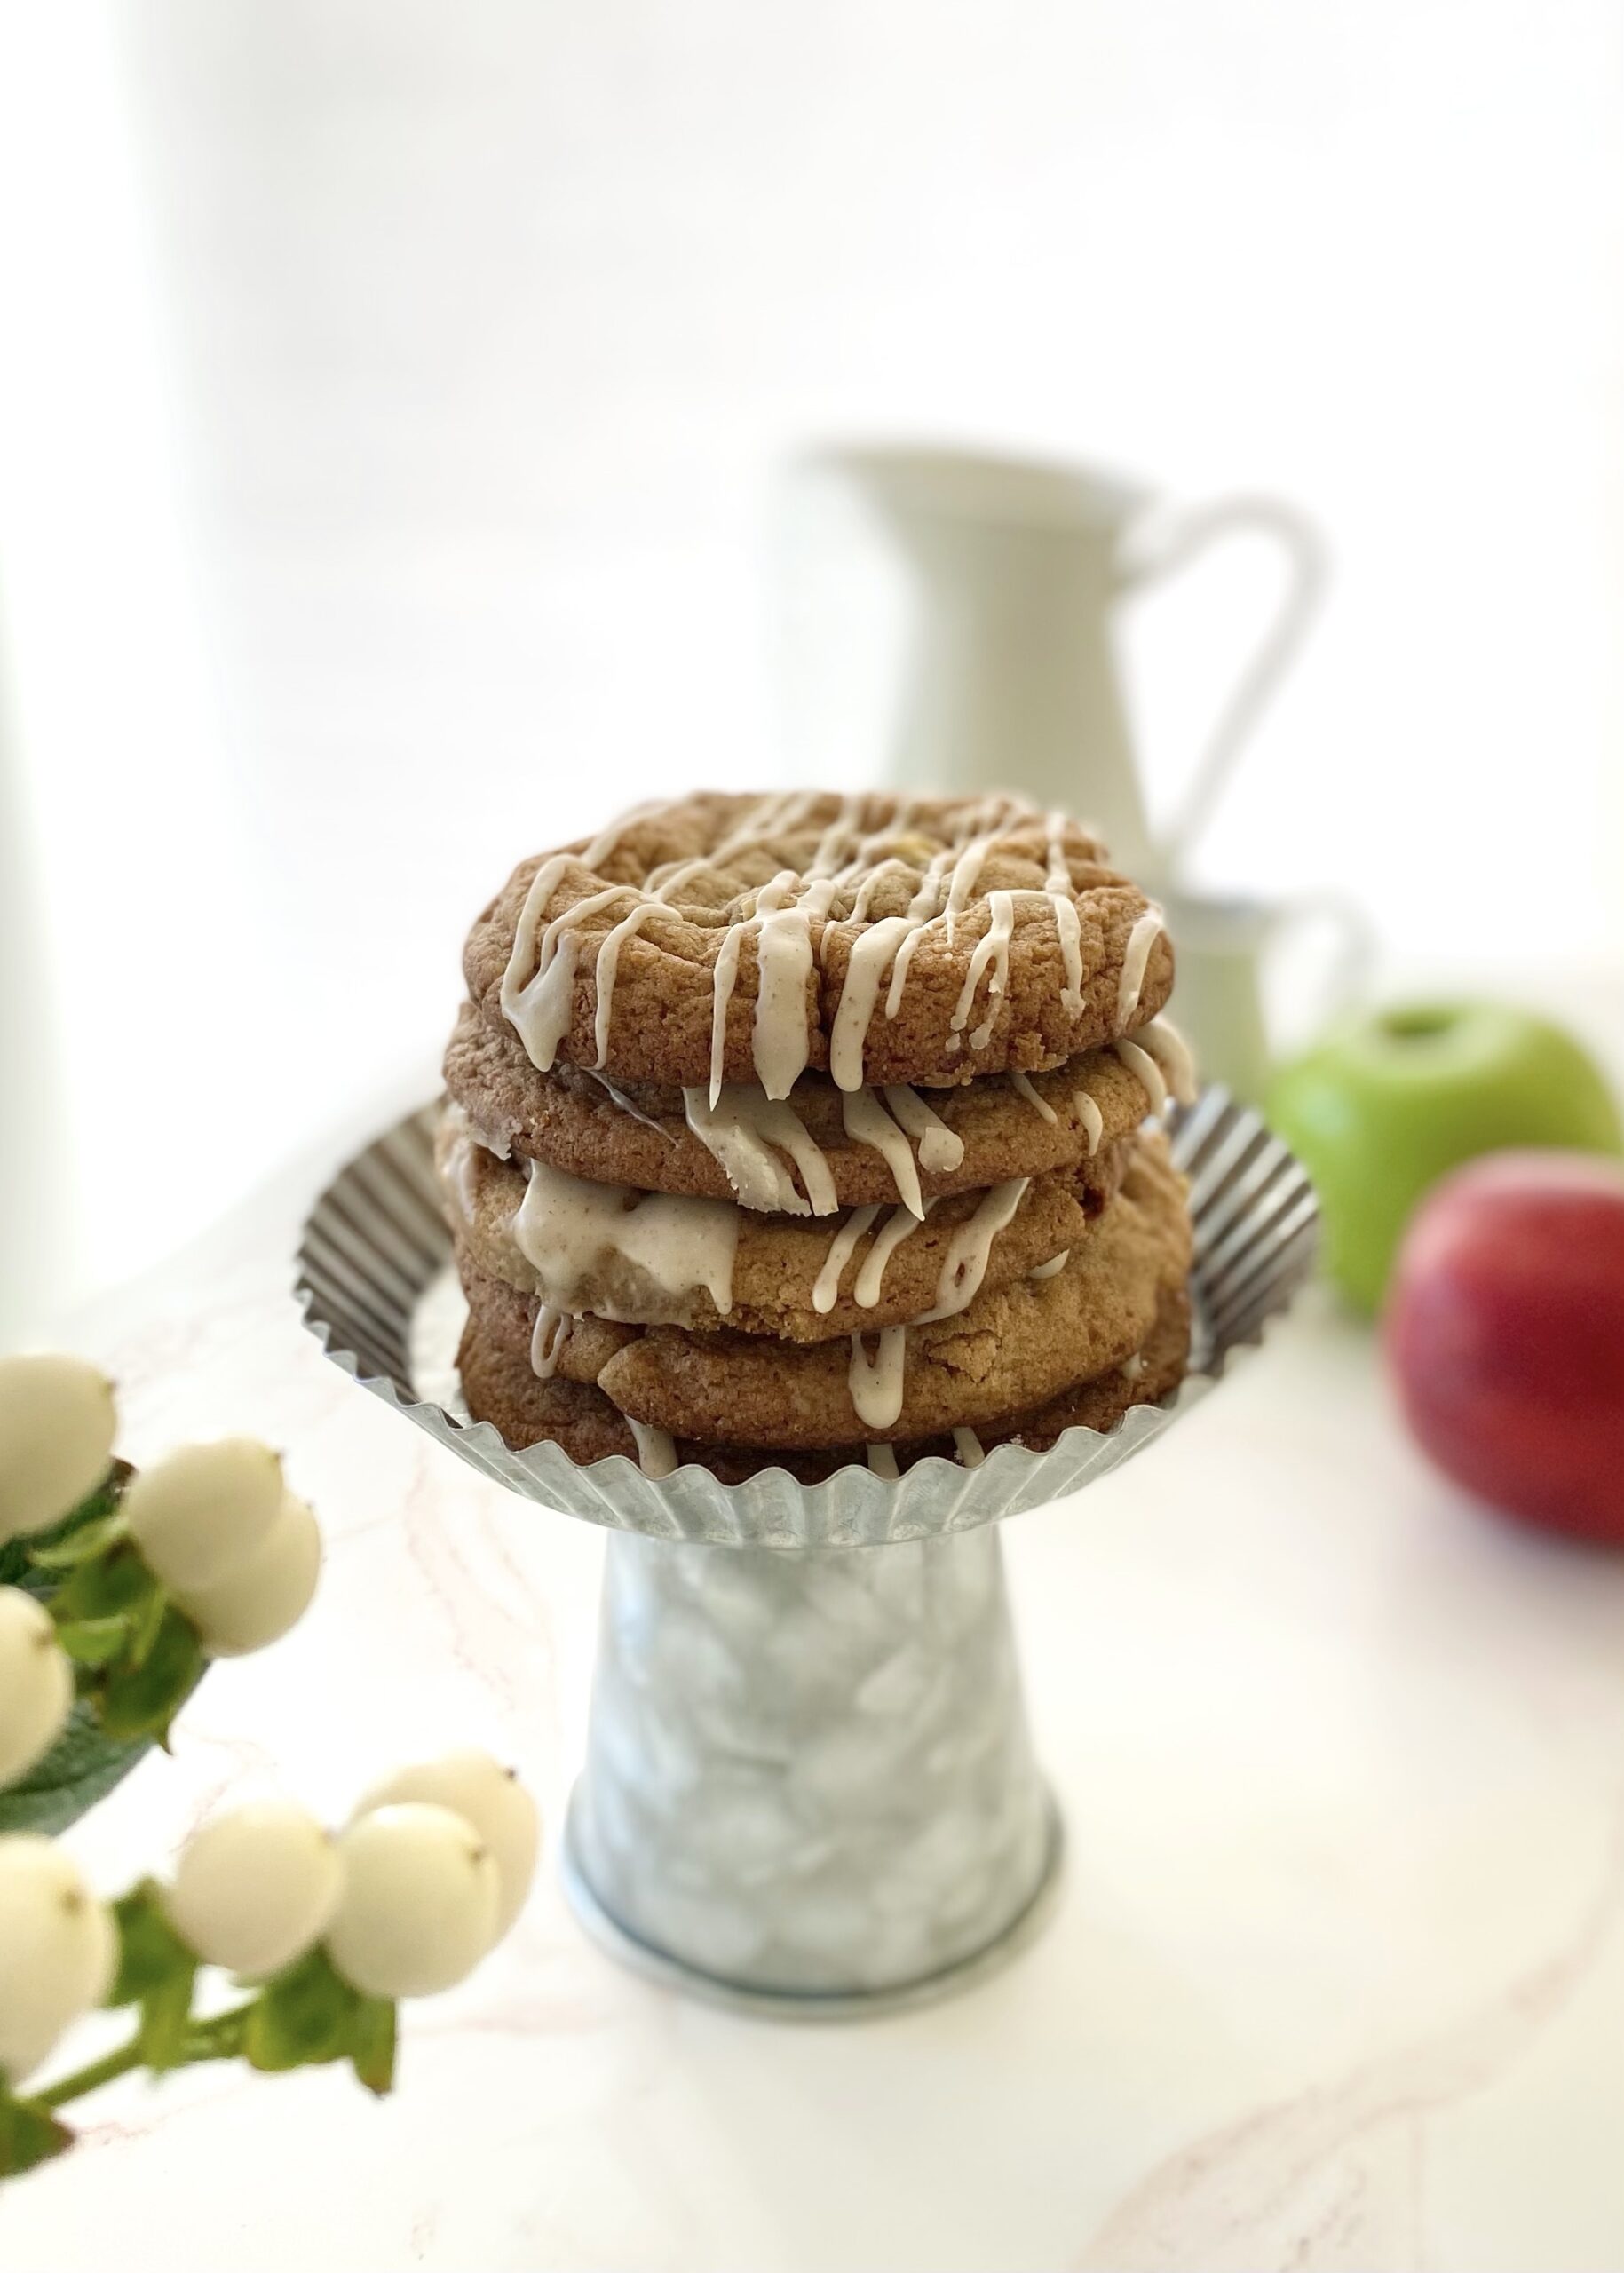
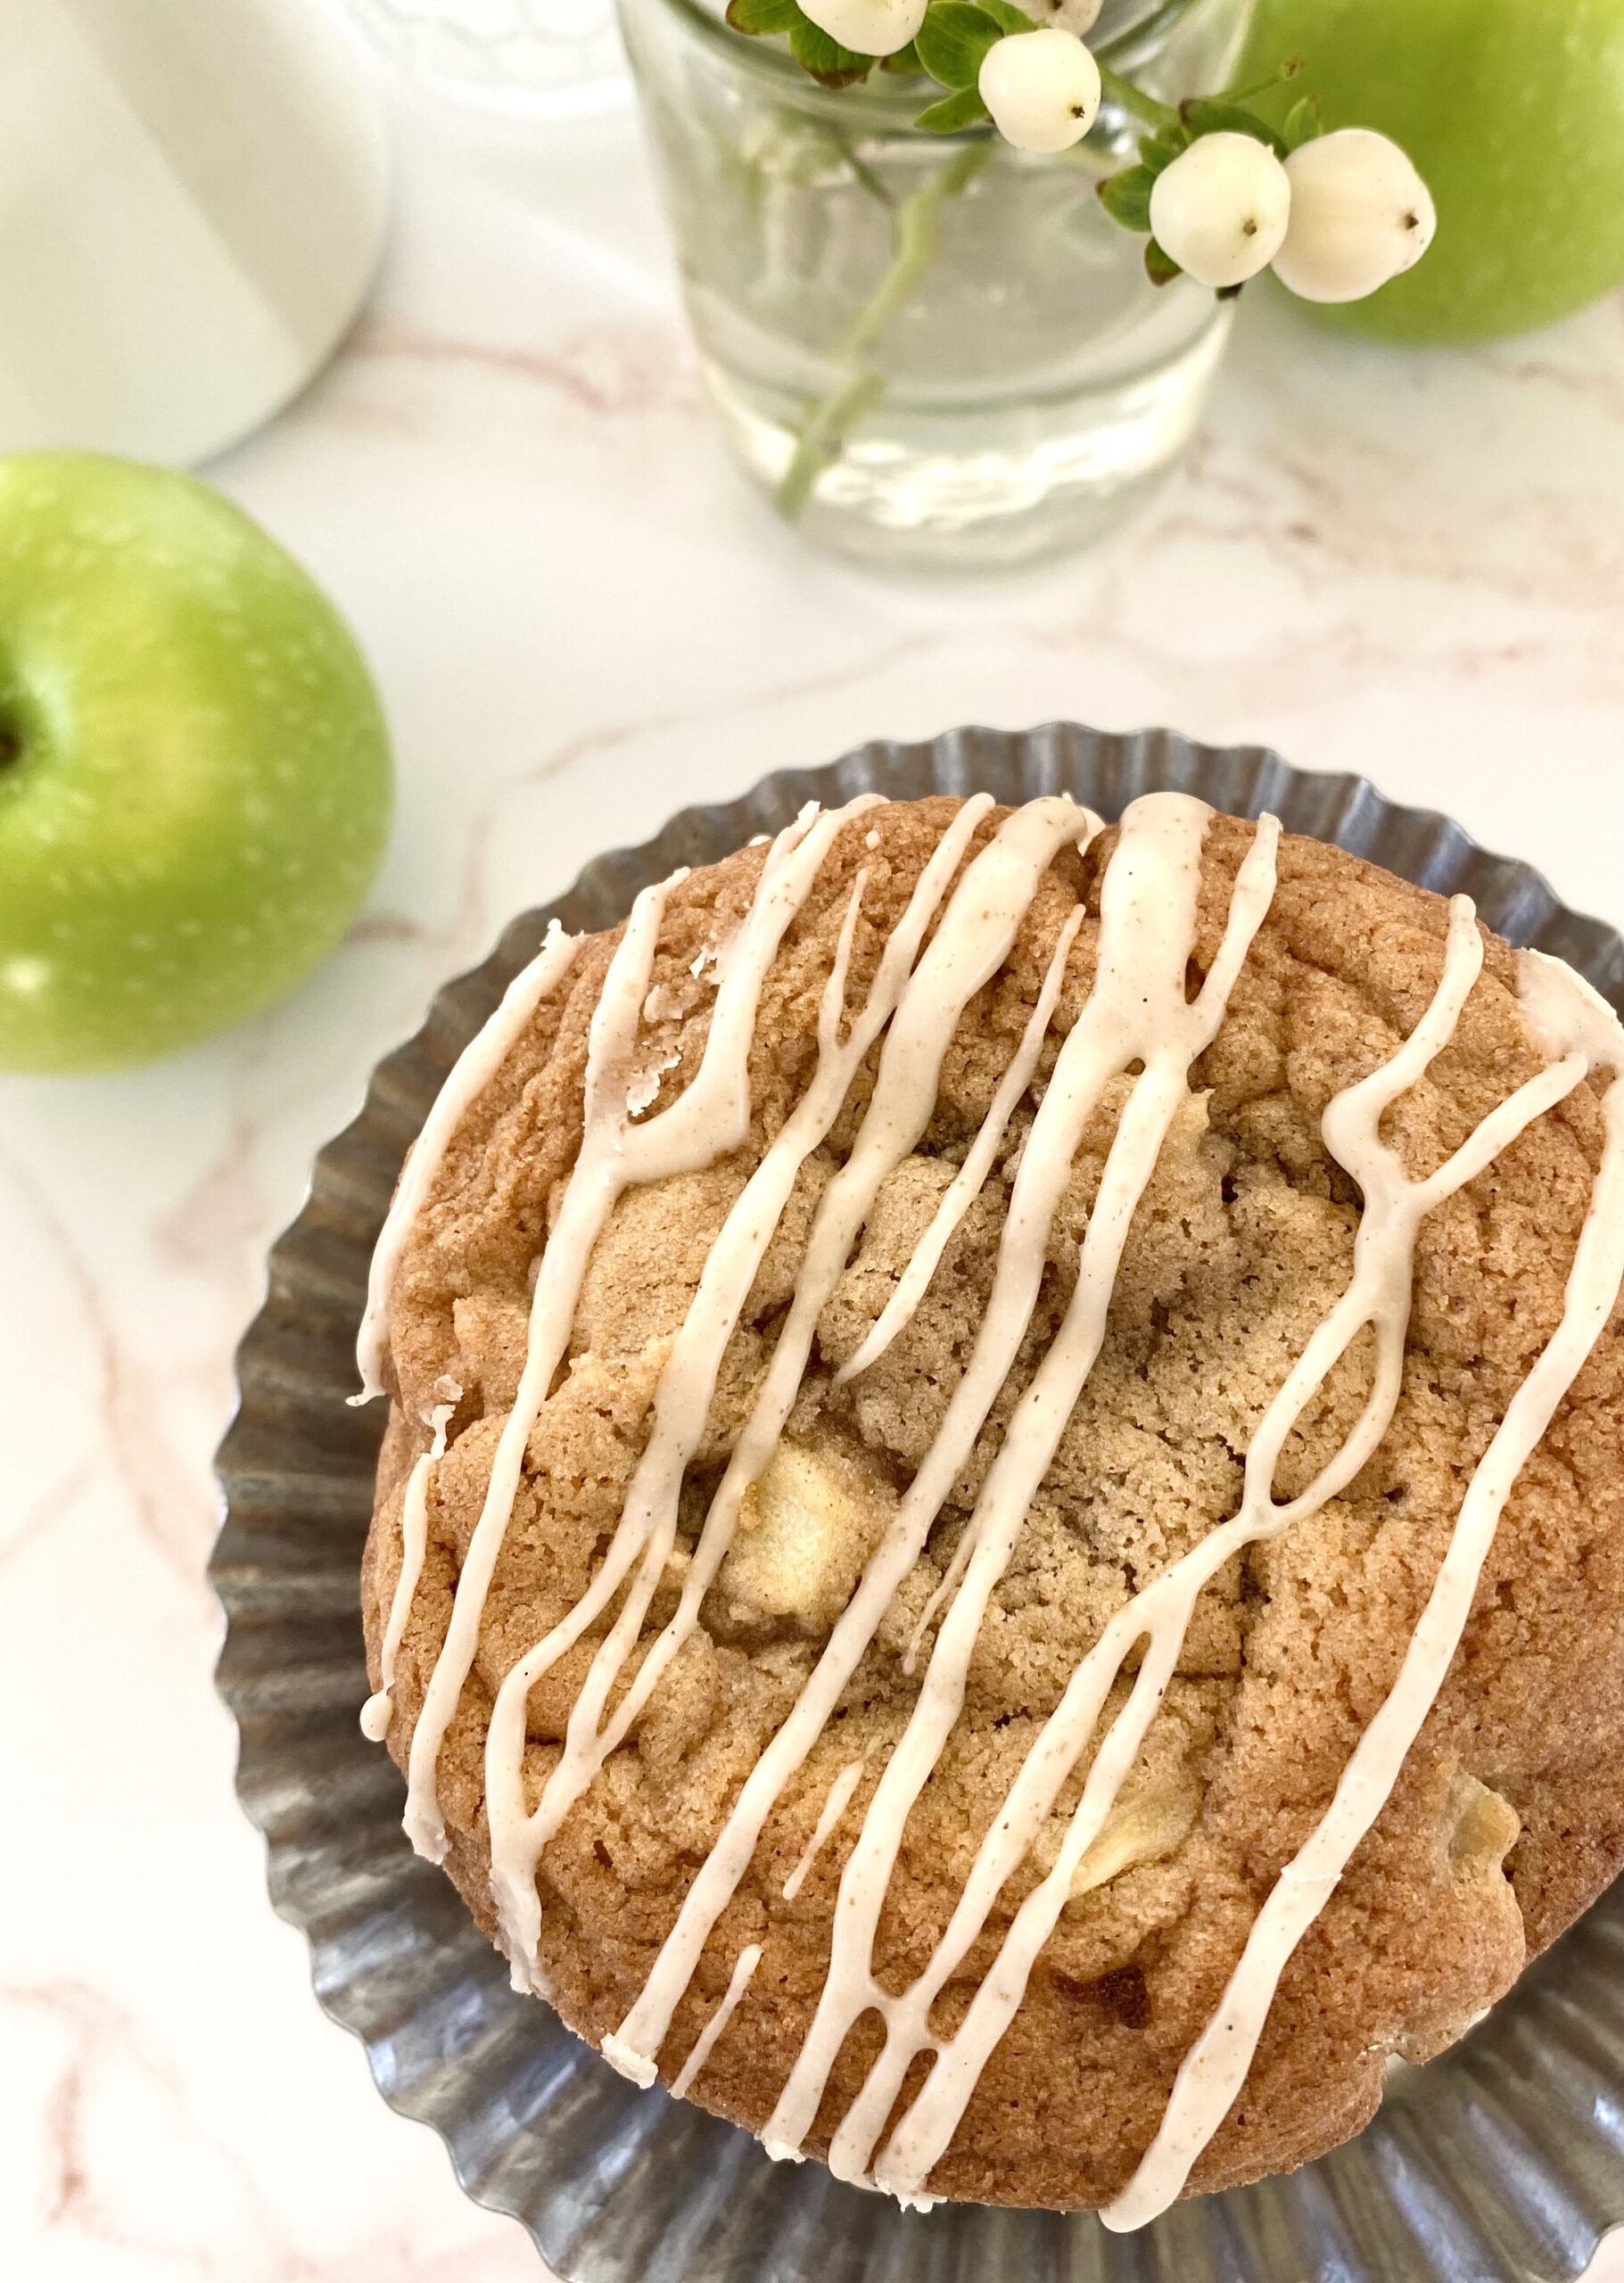
These Apple Spice Cookies were one of my most popular cookies last fall so I decided to bring them back a little early this year. The combination of cinnamon, nutmeg and vanilla in this cookie dough will remind you of cinnamon rolls and apple pie and inspire you look forward to fall.
The apples in this recipe are cooked briefly on the stovetop to bring out the flavor and create the perfect texture. Dropping raw apple chunks into cookie dough or cake batter is usually not a good idea. If you’ve ever baked an apple pie, you know that apples release liquid as they cook and that liquid will end up in your baked cookies, creating soggy spots. So definitely don’t skip this step!
These gorgeous, golden brown cookies are perfectly delicious on their own, but extra credit goes to the Brown Butter Icing for taking them over the top!
Make sure to head over to Instagram to watch the video of these Apple Spice Cookies being created: Click here
Apple Spice Cookies with Brown Butter Icing
Spice cookies with fresh apples and brown butter icing
1 cup (4 oz or 113g)chopped apples (1/4-inch pieces)I used one large Granny Smith apple
1tablespoonsugar
¼teaspoonground cinnamon
Apple Spice Cookie Dough
1 ½cups (6 3/4 oz or 191g)all purpose flour, sifted
½teaspoonbaking soda
½teaspoonsalt
1teaspoonground cinnamon
¼teaspoonground nutmeg
½cup (4 oz 113g)unsalted butter, softened
1cup (7 oz or 200g)packed brown sugar
1 largeegg
1 largeegg yolk
½teaspooonpure vanilla extract
Brown Butter Icing
2tablespoonsunsalted butter
½cup (2 oz or 57g)powdered sugar, sifted
½teaspoonpure vanilla extract
pinchfine sea salt
1-2tablespoonswhole milk
Instructions
Cooked Apples
Melt the butter in a small skillet over medium heat. Add apples, sugar and cinnamon to the skillet.
Cook, stirring occasionally, until the apples are tender, about 4-5 minutes.
Remove from heat and let cool completely. Drain any excess liquid from the cooled apples.
Apple Spice Cookies
Preheat the oven to 375ºF (190ºC). Line two large baking sheets with parchment paper.
In a medium bowl, whisk together the flour, baking soda, salt, cinnamon and nutmeg. Set aside.
In a large bowl, beat the butter and brown sugar with an electric mixer at medium speed until light and fluffy.
Beat in the egg, egg yolk and vanilla extract, one at a time, until well combined
Stir in the flour mixture, just until combined.
Fold the the cooled apples into the cookie dough.
Divide the dough into 12 equal golf ball size portions and place them 3 inches apart on the prepared baking sheets.
Bake until golden brown, about 11-13 minutes. Let cool 1 minute on the baking sheet, then transfer to a cooling rack to cool completely.
Brown Butter Icing
In a small saucepan, cook the butter over medium heat until golden brown and fragrant. When brown specks start to form in the bottom of the pan, remove from heat.
Immediately transfer the browned butter to a small bowl. Whisk in the the powdered sugar, vanilla extract, salt and 1 tablespoon milk. Add more milk as needed to reach desired consistency.
Drizzle the icing over the cooled cookies.
Notes
NOTE: If your cookies spread too much when baking, refrigerate dough for 30 minutes, then bake as directed.
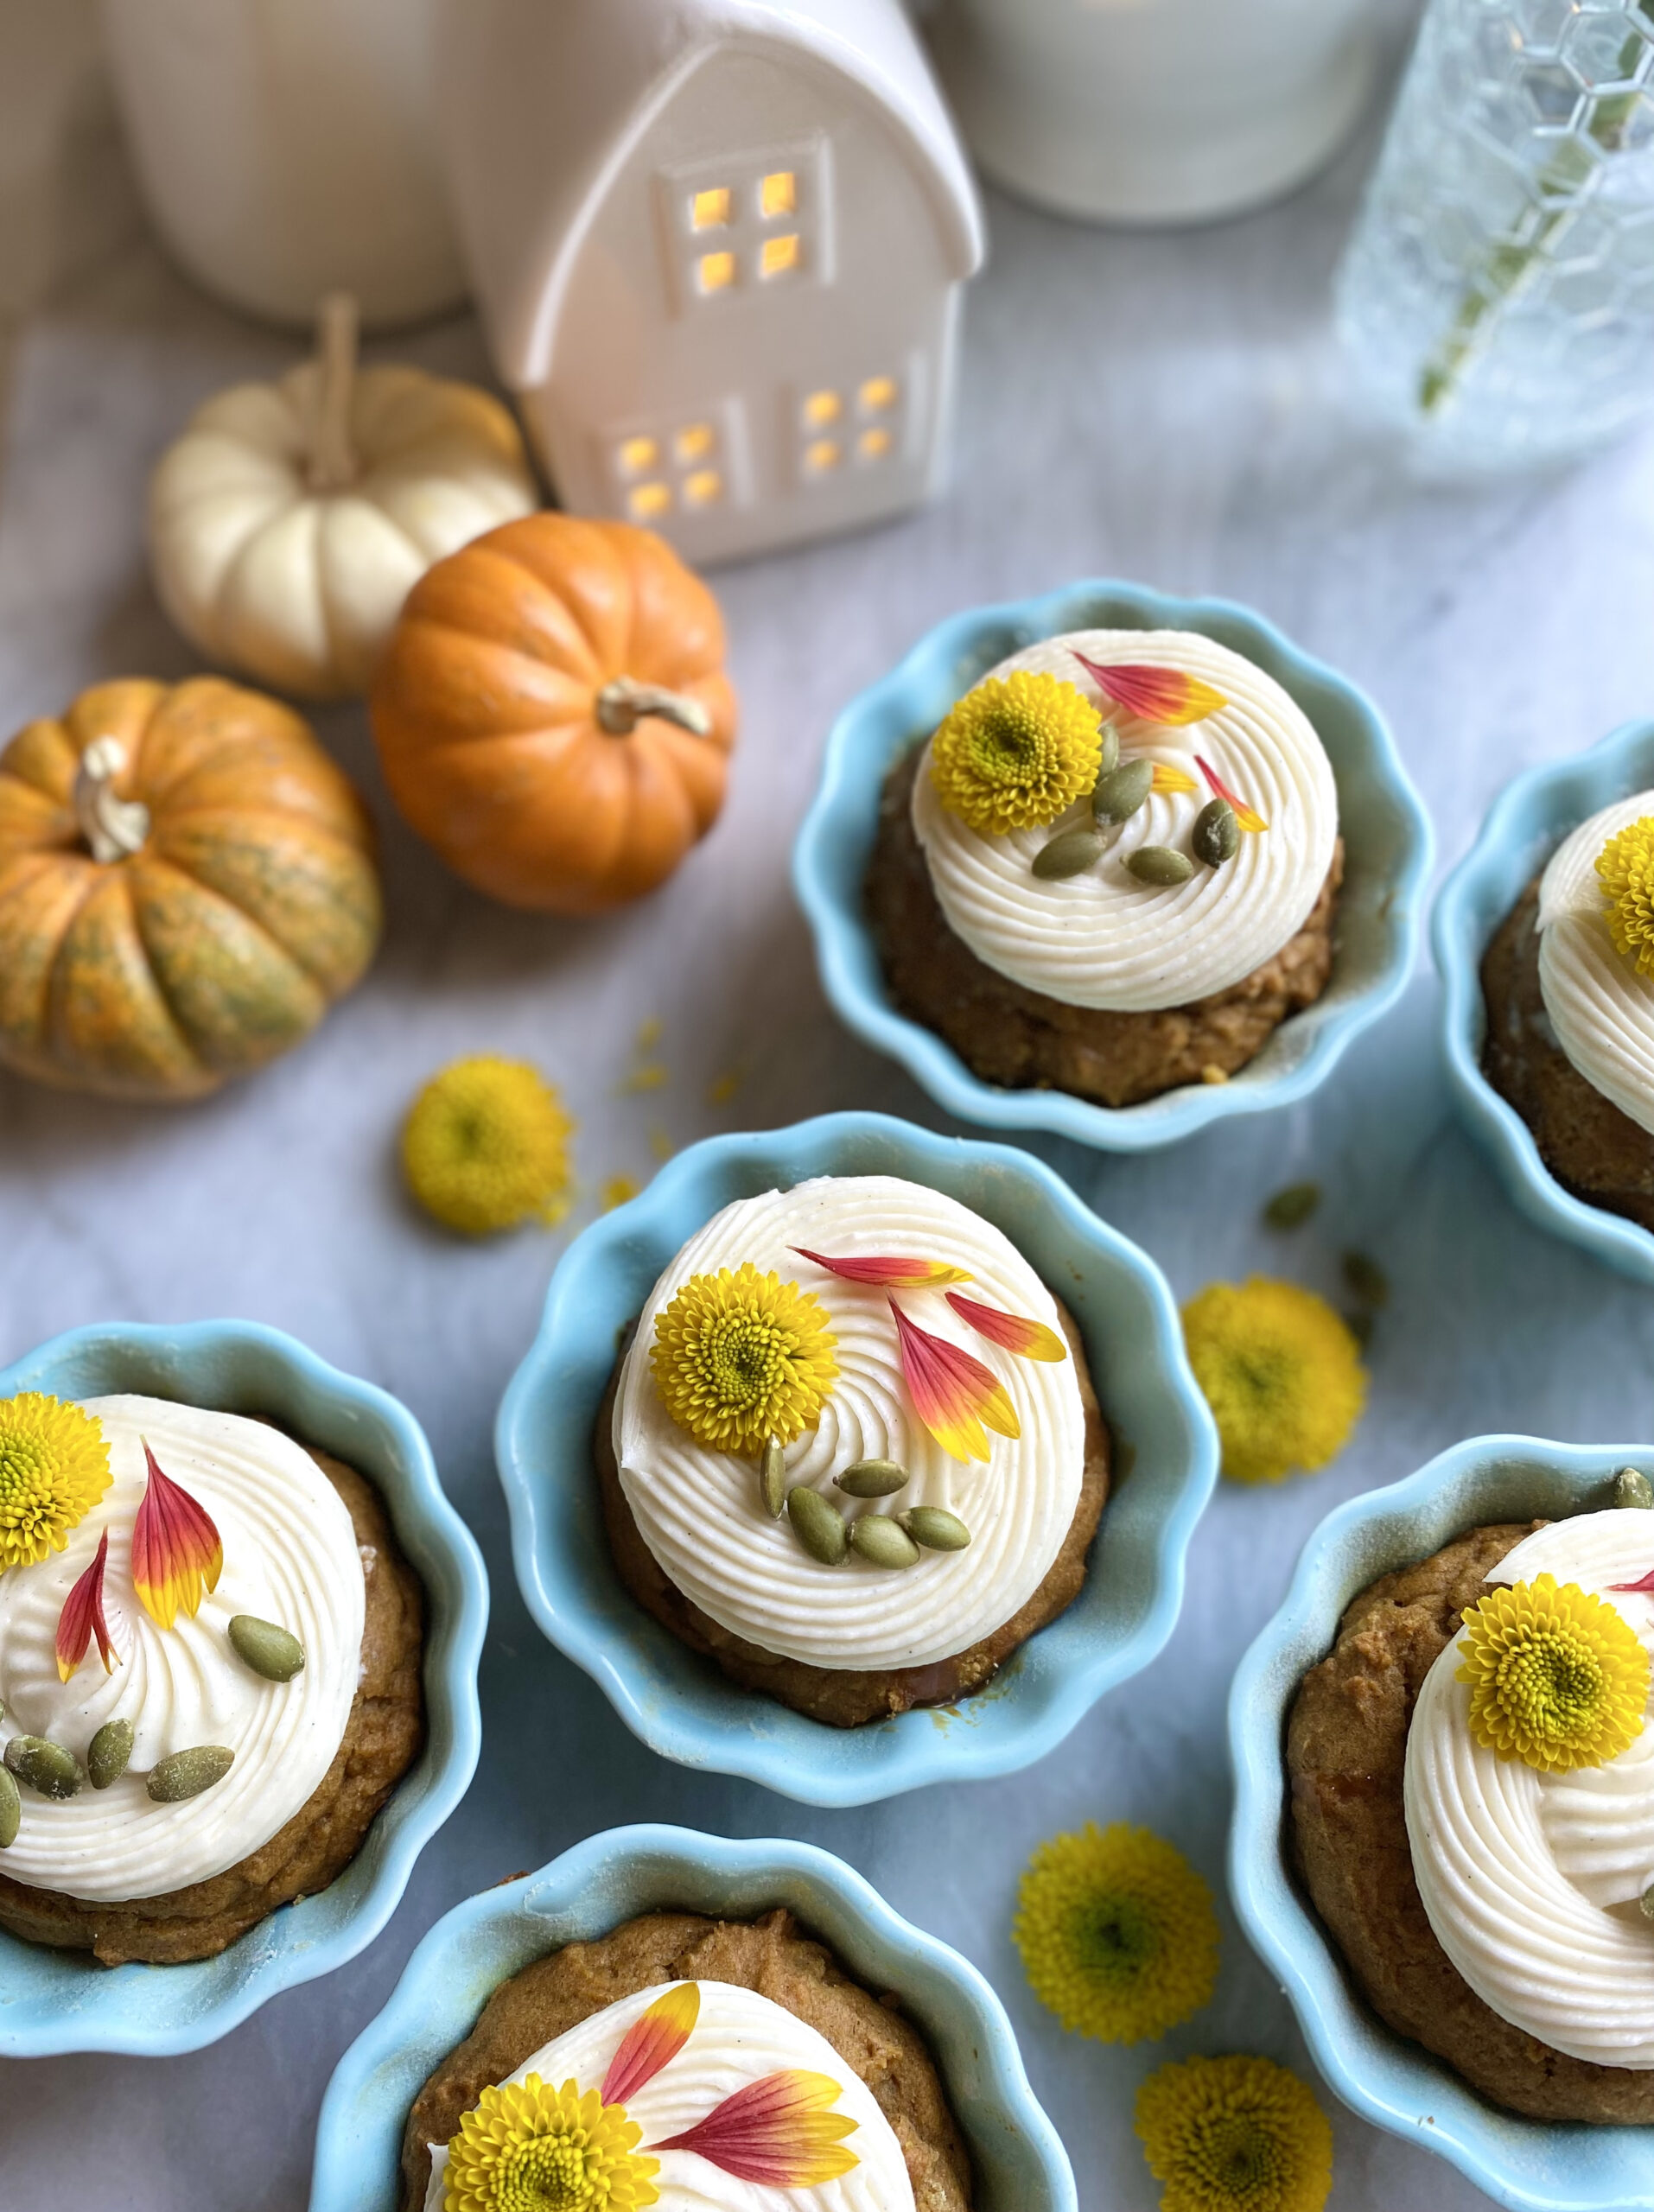
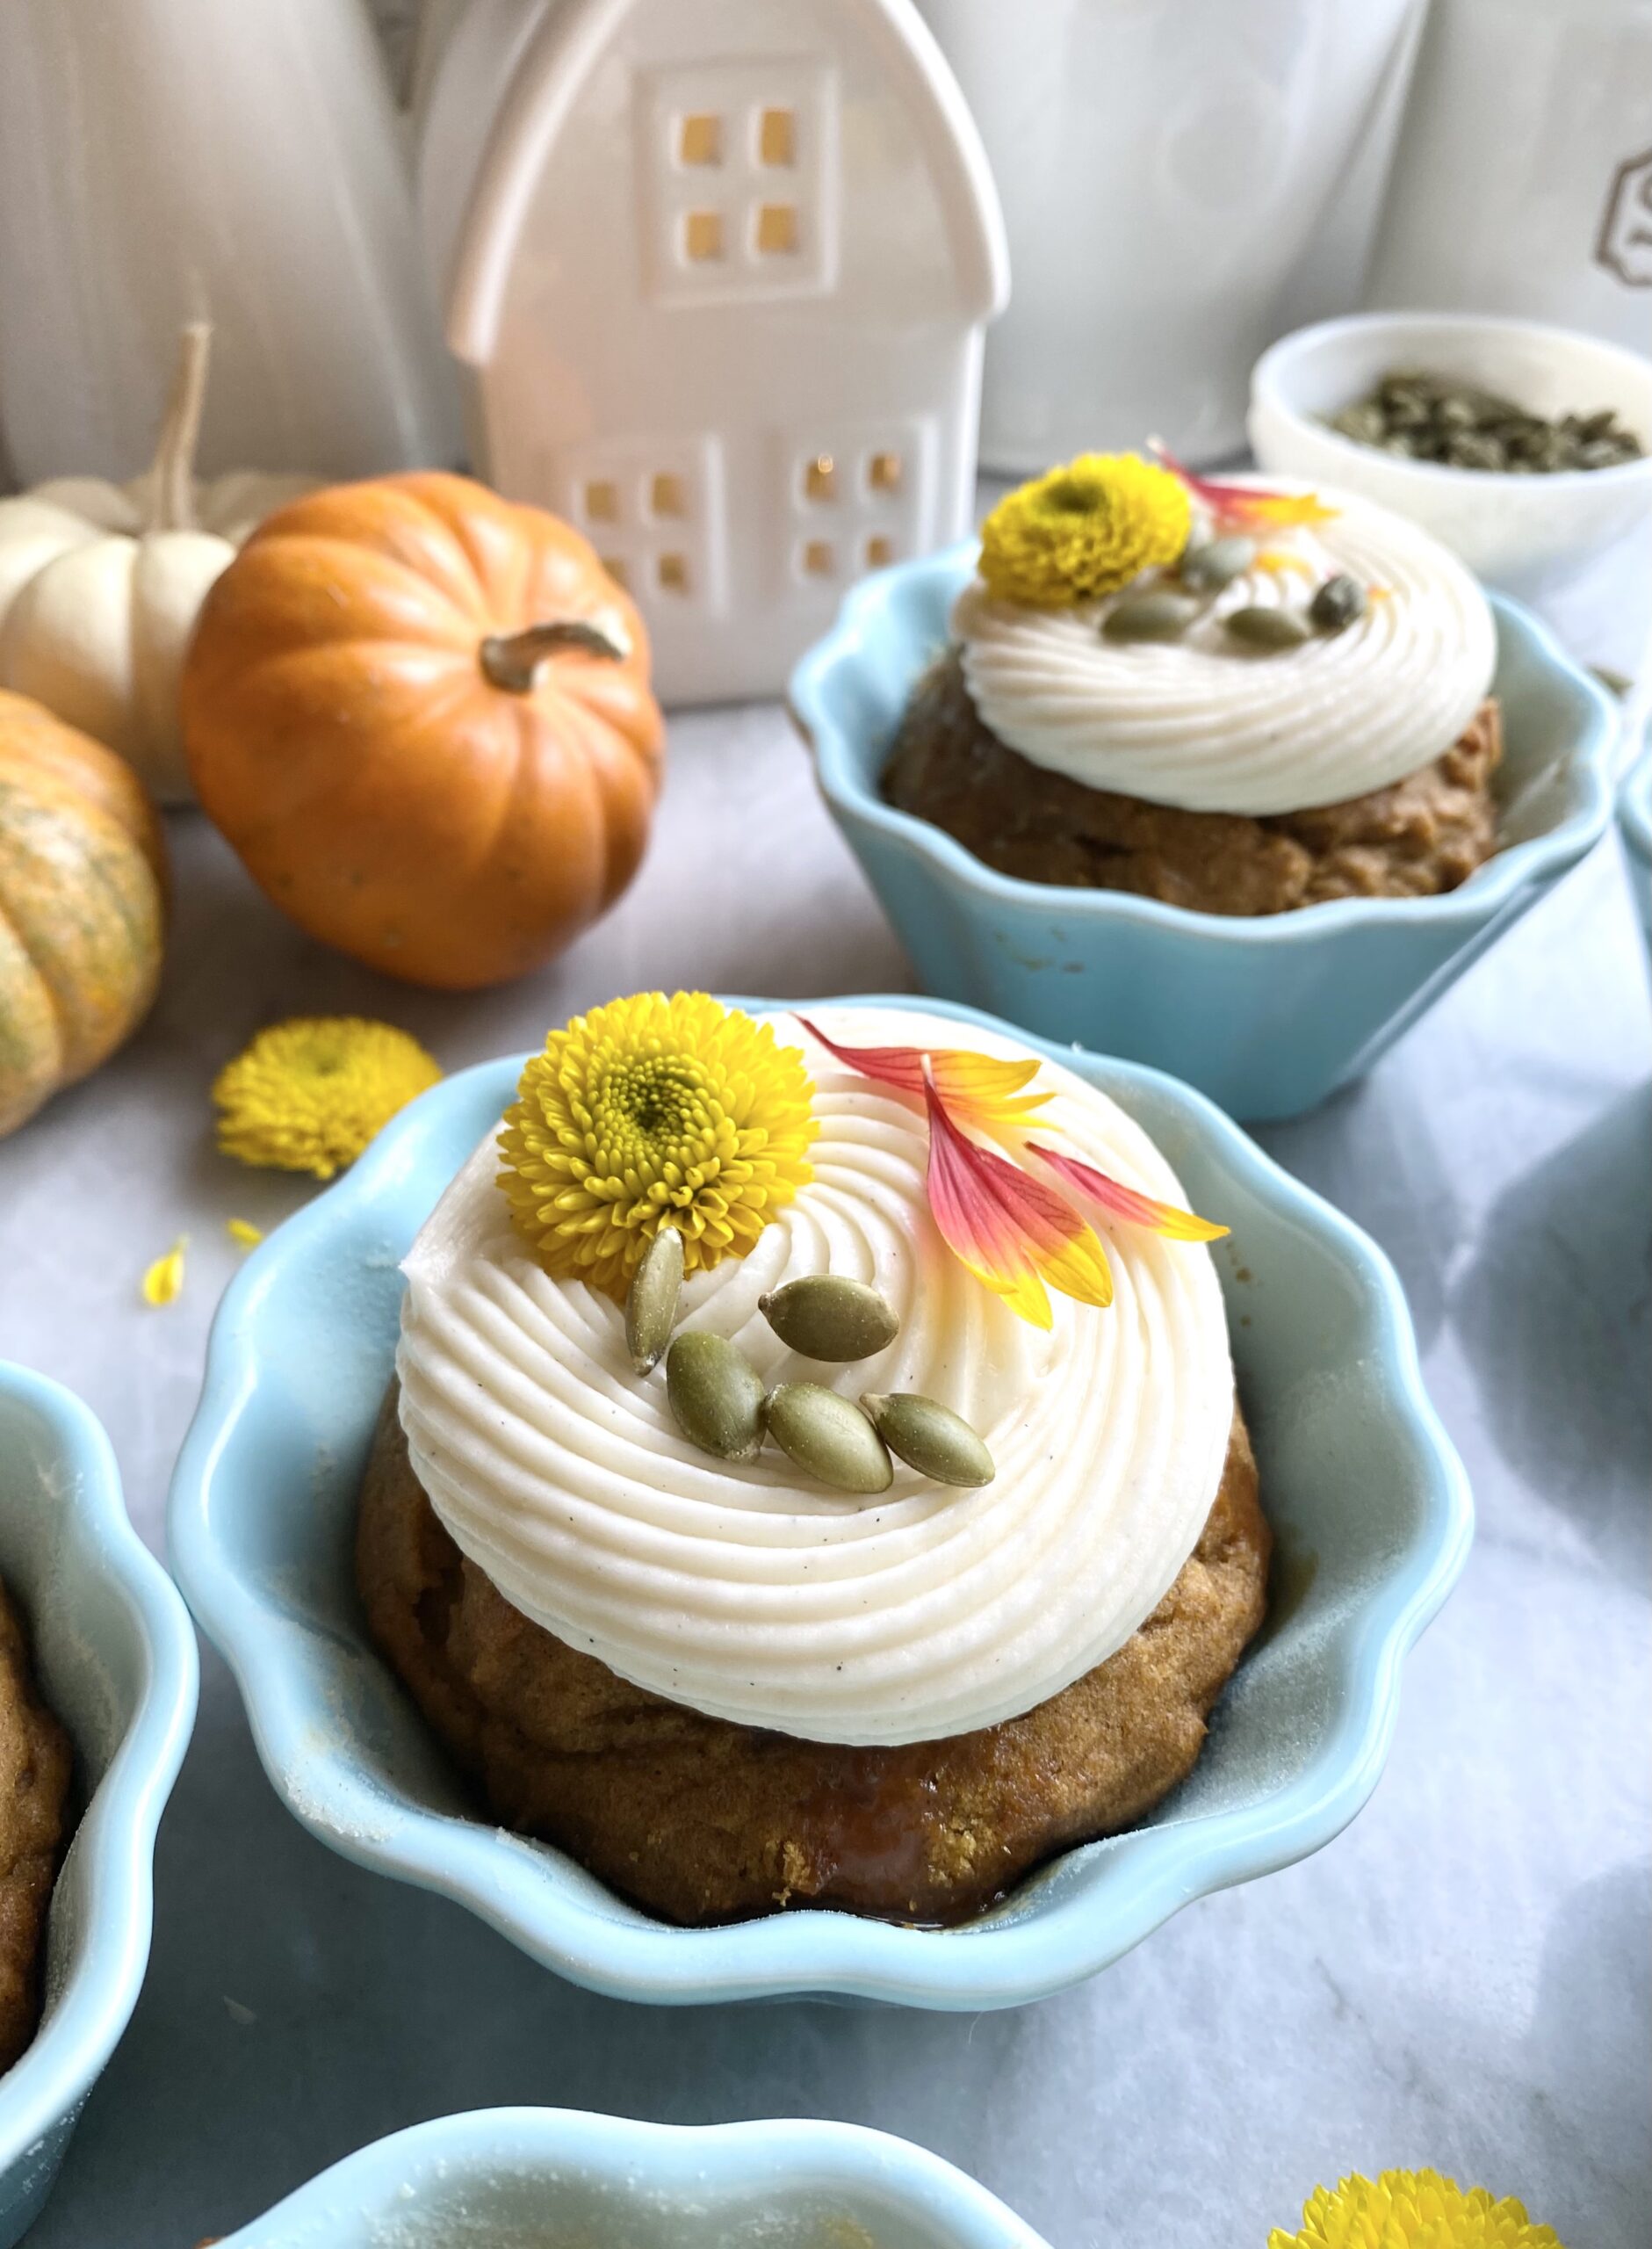
In early September, I saw someone announce the fall season on social media. In addition to people pointing out that it was too early for the announcement, the word police corrected the person with the word autumn. Since both terms are correct, we can call the season whatever we prefer. I think autumn is a pleasant sounding word, so I’ll use it for the rest of this post. Whatever you call it, these Pumpkin Spice Muffins are a perfect little celebration of the season. They have just the right amount of warm spices, making them so fragrant that your kitchen will smell like cozy autumn heaven.
I originally made them in mini loaf pans, but I thought they would be cute as muffins too. They’re so cute and delicious that I often give them as holiday gifts. This year I decided to try them in ramekins and I loved the results! I used 6-ounce ramekins, but you can use 8-ounce ramekins, any size mini loaf pans, a muffin pan or even an 8 or 9-inch loaf pan. Keep in mind that baking times will differ. To find the ramekins I used, click here.
Pumpkin Spice Muffins with Caramel Filling
by Mari Vasseur
Tender pumpkin spice muffins with caramel filling and luscious cream cheese frosting
Preheat the oven to 350ºF (180ºC). Grease and flour seven 6-ounce ramekins or six 8-ounce ramekins or any mini loaf pans of your choice.
In a large bowl, sift together the flour, cinnamon, baking powder, baking soda, salt, ginger, nutmeg and cloves until well blended.
In a separate large bowl, beat the butter and brown sugar together, with an electric mixer at medium speed, until pale and fluffy. Beat in the eggs, one at a time, until incorporated. Beat in the pumpkin purée and vanilla extract until well blended. Stir in the flour mixture just until combined.
Divide the batter evenly into the prepared ramekins. Bake for 15-25 minutes or until golden brown and a toothpick inserted in the center comes out clean. Do not overbake.
Cool completely if serving in ramekins or remove from pans after cooling for 10 minutes. Continue to cool on wire rack.
Make 3/4-inch wells in the center of each muffin. Fill with caramel sauce. (For loaves, poke multiple holes with a skewer. Fill with caramel sauce.) Top with cream cheese frosting and pumpkin seeds
Cream Cheese Frosting
In a large bowl, beat the cream cheese and butter together, with an electric mixer at medium speed until smooth and well blended. Do not over beat.
Add the vanilla extract and salt and beat until combined. On low speed, gradually beat in the powdered sugar incorporated. Add the heavy cream and continue beating at low speed smooth. Remove any bubbles by gently stirring with a spatula.
1 ¾cups (7 7/8 oz or 223g)all purpose flour, sifted
1tablespoon baking powder
½teaspoonfine sea salt
½teaspoonground cinnamon
7tablespoons (3 1/2 oz or 100g)cold, unsalted butter, cubed
½cup (4 oz or (118 ml)cold sour cream
¼cup (2 oz or 59ml)cold heavy creamPlus more for tops
1teaspoonpure vanilla extract
1cup (about 7 oz or 200g)chopped fresh peaches, patted dryPeaches should be ripe but still firm, not over ripe.
egg wash (optional)1 egg whisked with 1 tablespoon of water
Icing
¼cup (2 oz or 57g)salted butter
½ cup (3 1/2 oz or 100g)packed brown sugar
⅓cup (2 5/8 oz or 78 ml)heavy cream
Instructions
Preheat the oven to 375ºF. Line a large baking sheet with parchment paper.
In a large bowl, whisk together the flour, baking powder, salt and cinnamon.
Work the butter into the flour mixture with a pastry blender or with your fingertips until pea size pieces form.
In a medium bowl, whisk together the sour cream, heavy cream and vanilla.
Mix the sour cream mixture into the flour mixture until a shaggy dough forms. Fold in the peaches.
Turn dough out onto a lightly floured surface. Press the dough together and fold it over onto itself a couple of times.
Pat or roll dough into a 7-inch round. Cut dough into 8 wedges. Transfer to the prepared baking pan. Brush the scones lightly with egg wash or heavy cream.
Bake until golden brown, about 18-22 minutes. Transfer the scones to a cooling rack.
Caramel Icing
Melt the butter a small saucepan over medium heat. Whisk in the brown sugar until smooth, about 2 minutes.
Whisk in the heavy cream and heat until bubbly. Remove from heat. Set aside to cool slightly. Drizzle or spoon the icing over the cooled scones.
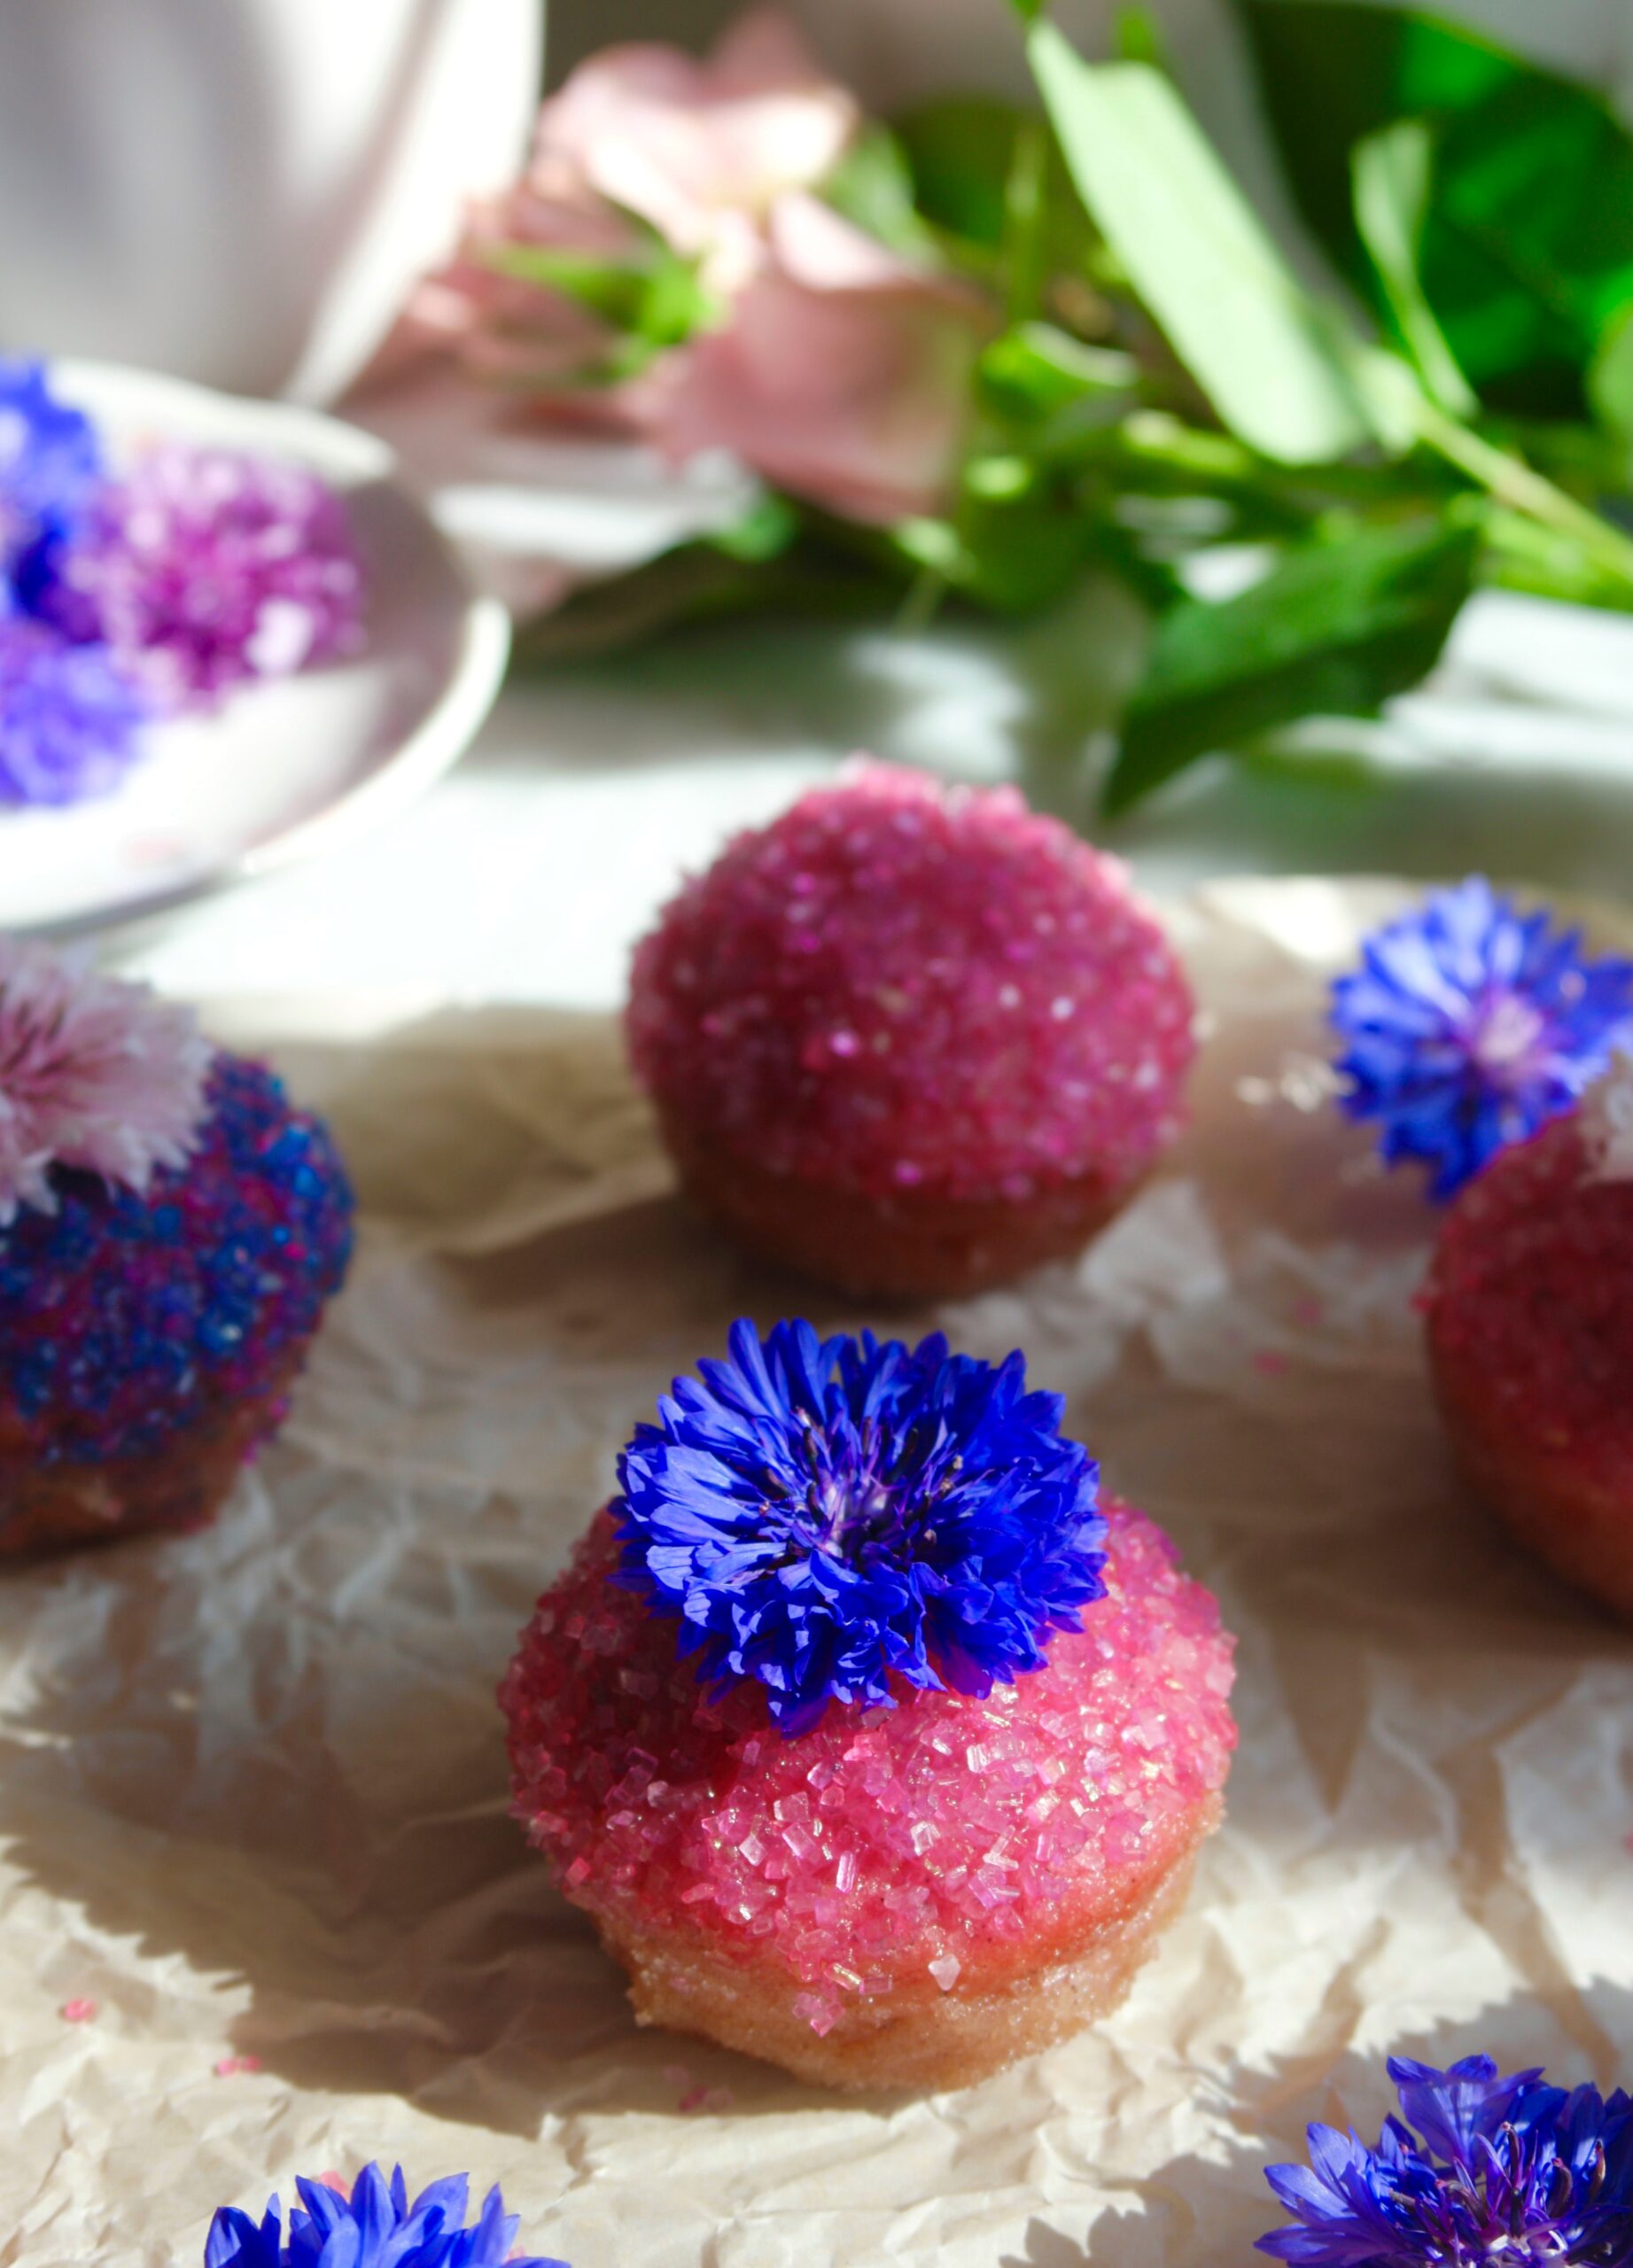
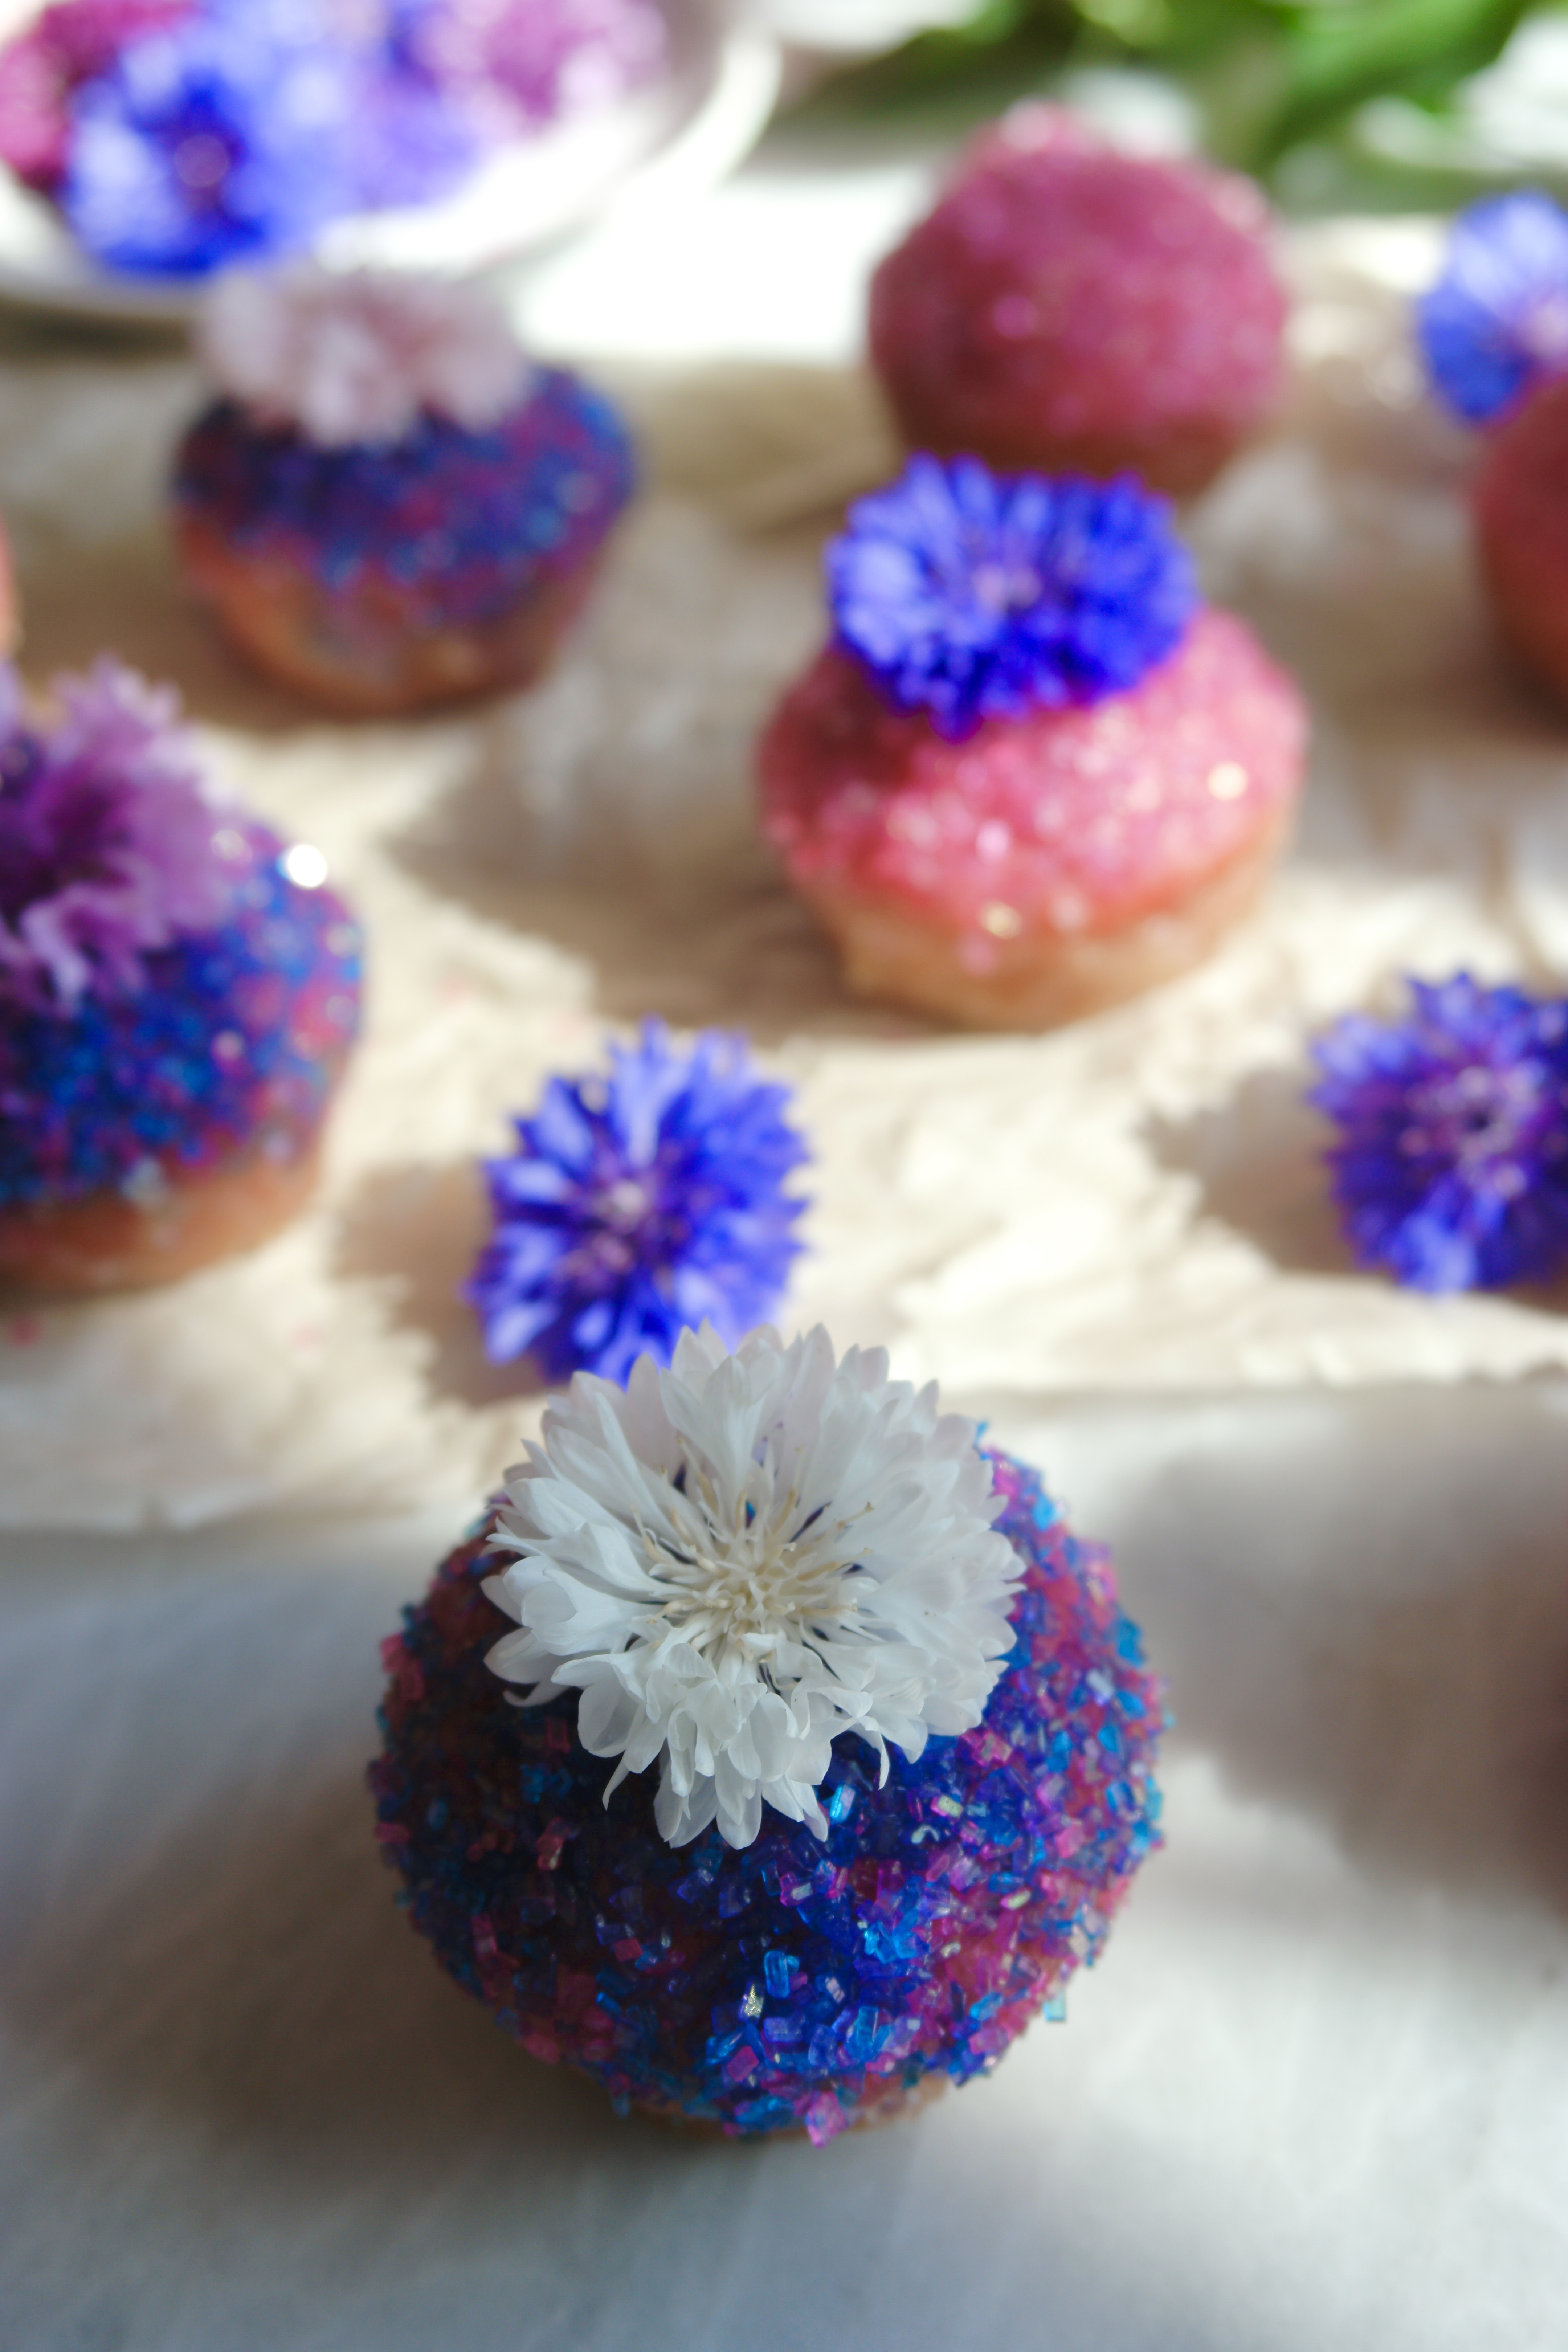
My dad used to take me on walks in the woods to look for fairy rings when I was a child. I wanted to see a real fairy so badly! I read a book about fairies, hoping to learn more about them. Fairies love little cakes, milk, honey and butter so I’m sure these Fairy Puffs would be fairy approved.
My Fairy Puffs recipe is loosely based on an old favorite mini muffin recipe. I tweaked it quite a bit, including the addition of pink dragonfruit powder. Dragonfruit has a subtle flavor, so the bright fuchsia powder is mostly for color. But oh what a beautiful color it is! You can find dragonfruit powder in healthy food stores or online. To find the dragonfruit powder, also known as pink pitaya powder, I used, click here.
Decorating these little cuties was so entertaining! After sampling multiple variations of sparkling sugar and cinnamon sugar, I decided that dipping the bottoms of the muffins in butter and cinnamon sugar, then dipping the tops in butter and sparkling sugar gave them the perfect balance of sugar and spice. I had purchased some edible flowers a couple of days prior, and they added a pretty, magical touch. The flowers I used are called bachelor’s buttons and I got them at a local gourmet flower seller.
½cup (3 1/2 oz or 100g)sparkling sugar crystals**I used combinations of white, pink, purple & blue
edible flowers (optional)
Instructions
Fairy Puffs
Preheat oven to 350ºF. Grease and flour a 24 serving mini muffin pan.
In a medium bowl, whisk together flour, dragonfruit powder, baking powder, salt and nutmeg. Set aside.
In a large bowl, cream butter and sugar with an electric mixer until light and fluffy.
Add egg and beat until smooth.
Add flour mixture and milk alternately in two additions and mix just until combined.
Transfer batter to prepared muffin pan, filling muffin cups about 3/4 full.
Bake until toothpick inserted in center of muffins comes out clean, about 12-14 minutes. (Be careful not to over bake. Check a few minutes early. Small muffins can dry out easily.)
Let cool in pan for 5 minutes. Remove puffs from pan and transfer to cooling rack. (Loosen puffs with a small offset spatula or butter knife if necessary.)
Topping
Combine granulated sugar and cinnamon in a shallow bowl.
Place colored sparkling sugar crystals in another shallow bowl.
Dip the bottoms of each puff in melted butter, then into cinnamon sugar mixture.
Dip the tops of each puff in melted butter, then into sparkling sugar.
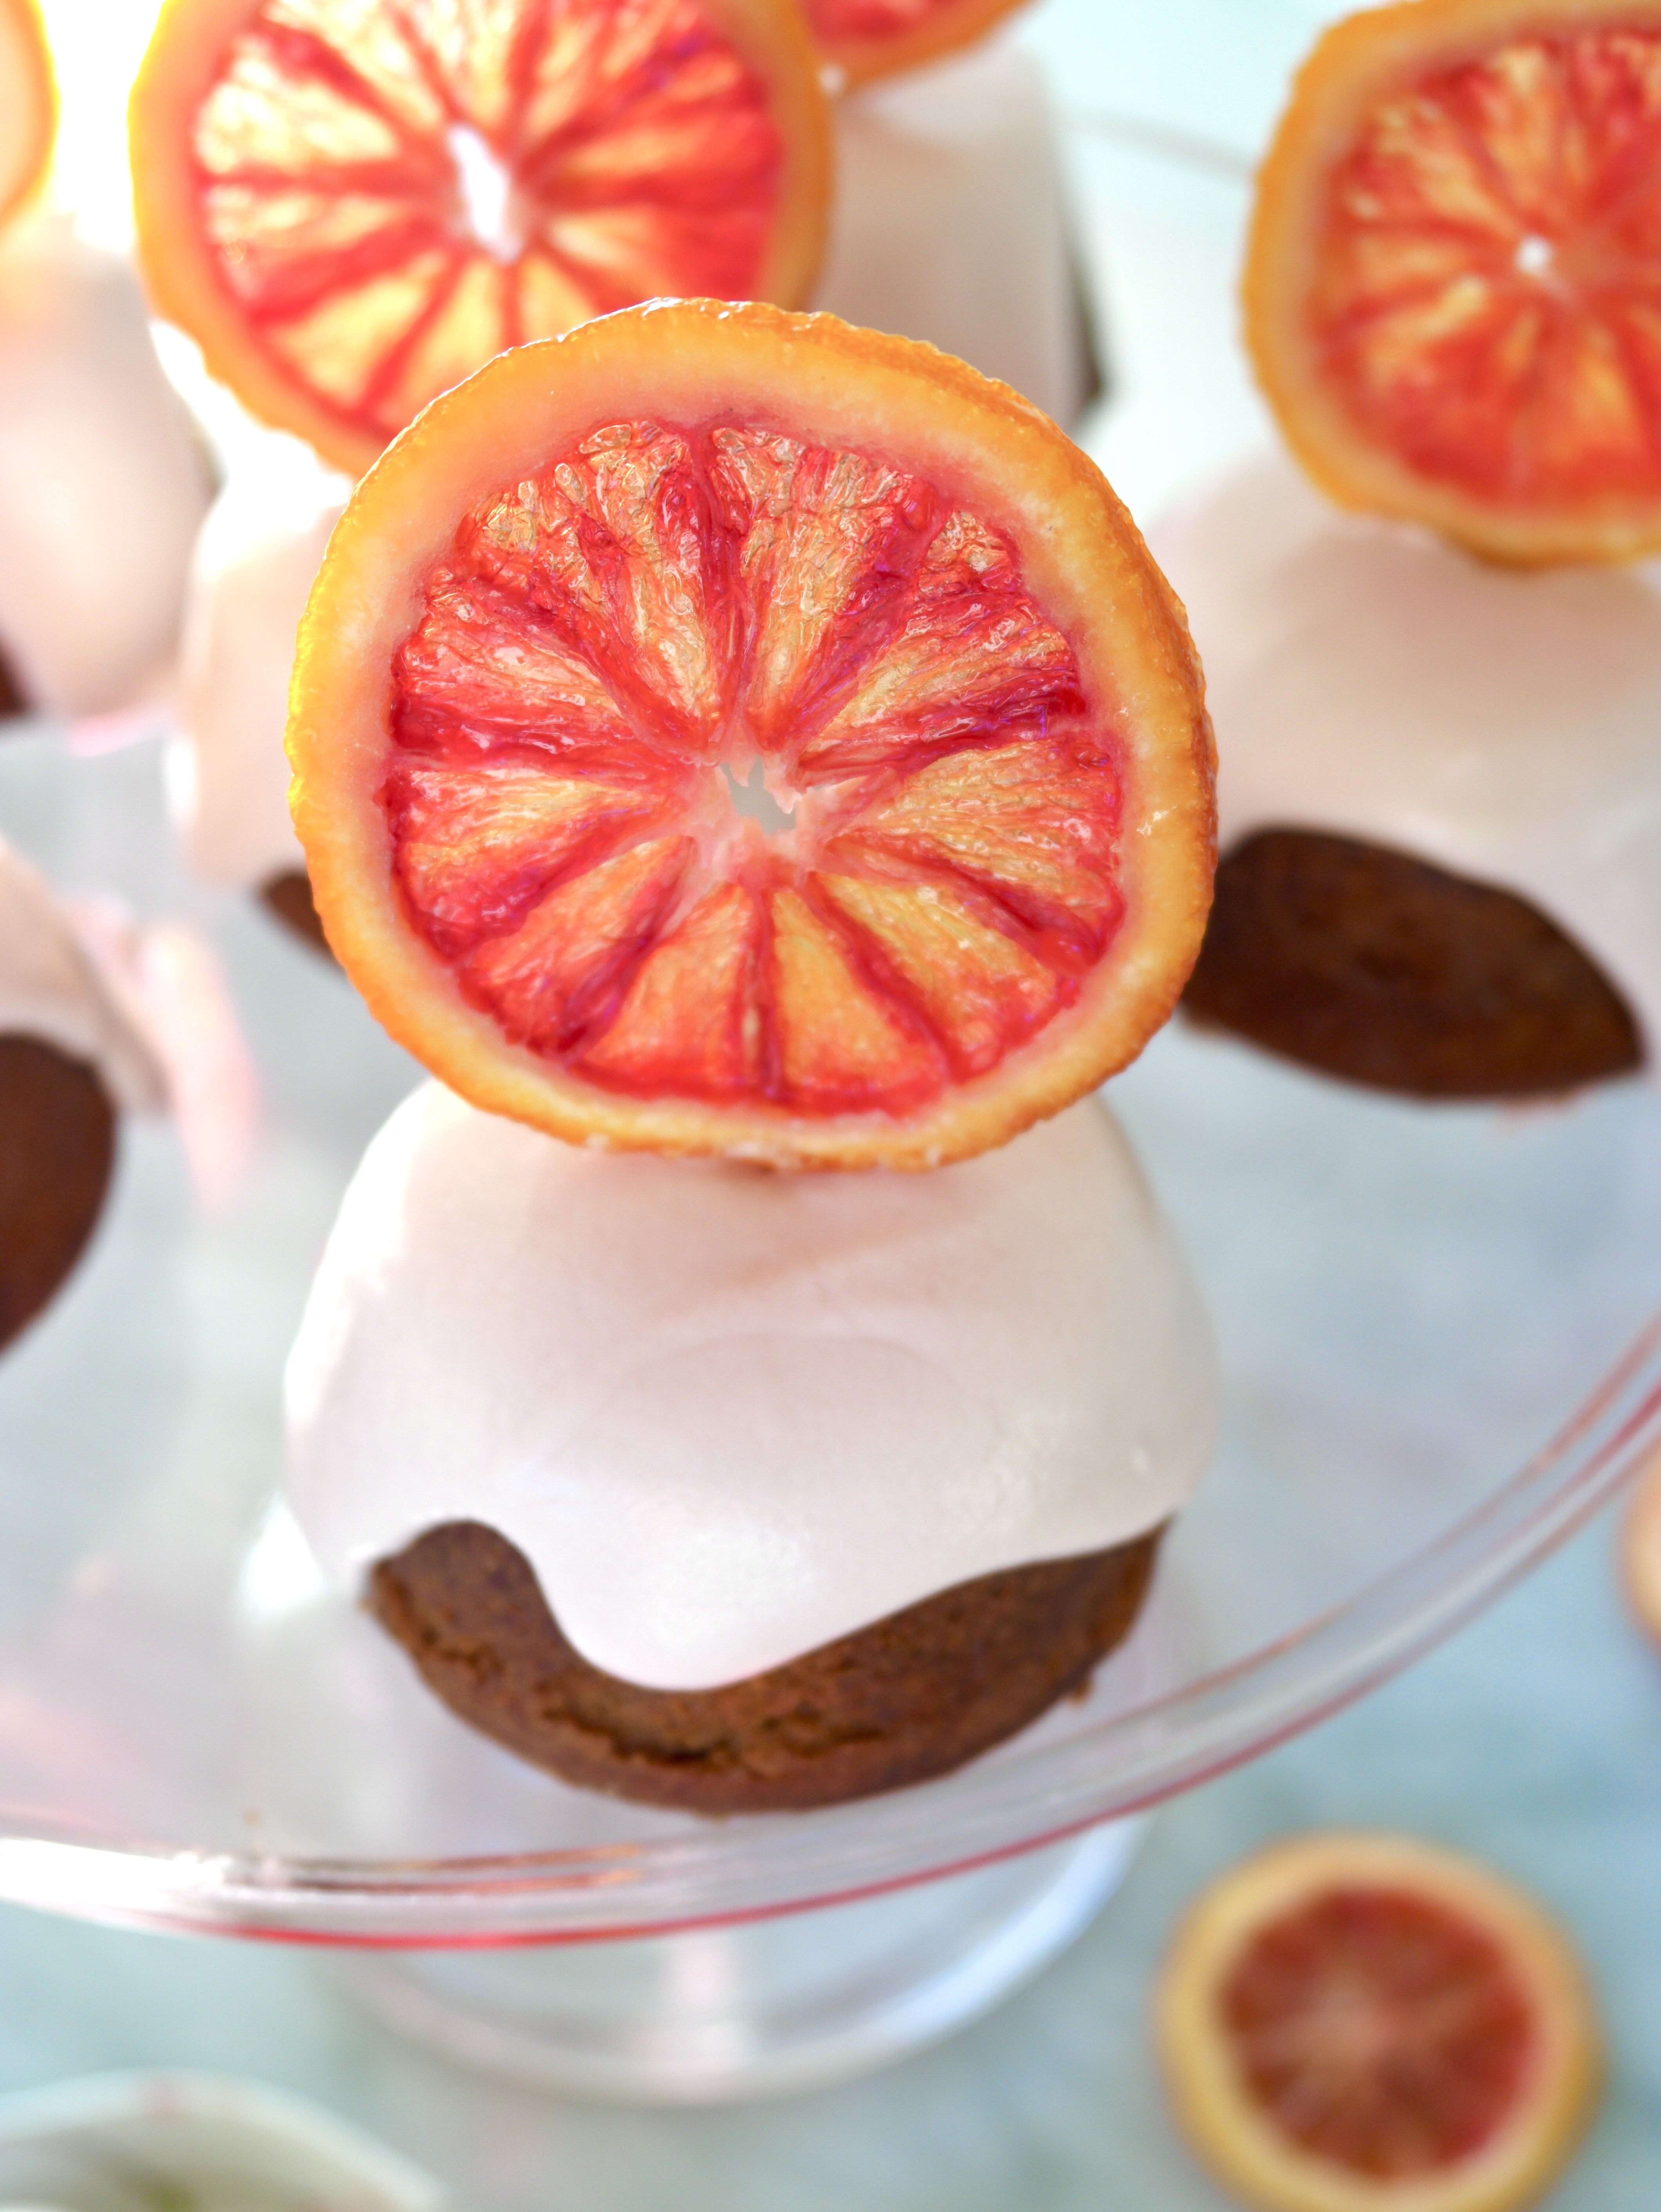
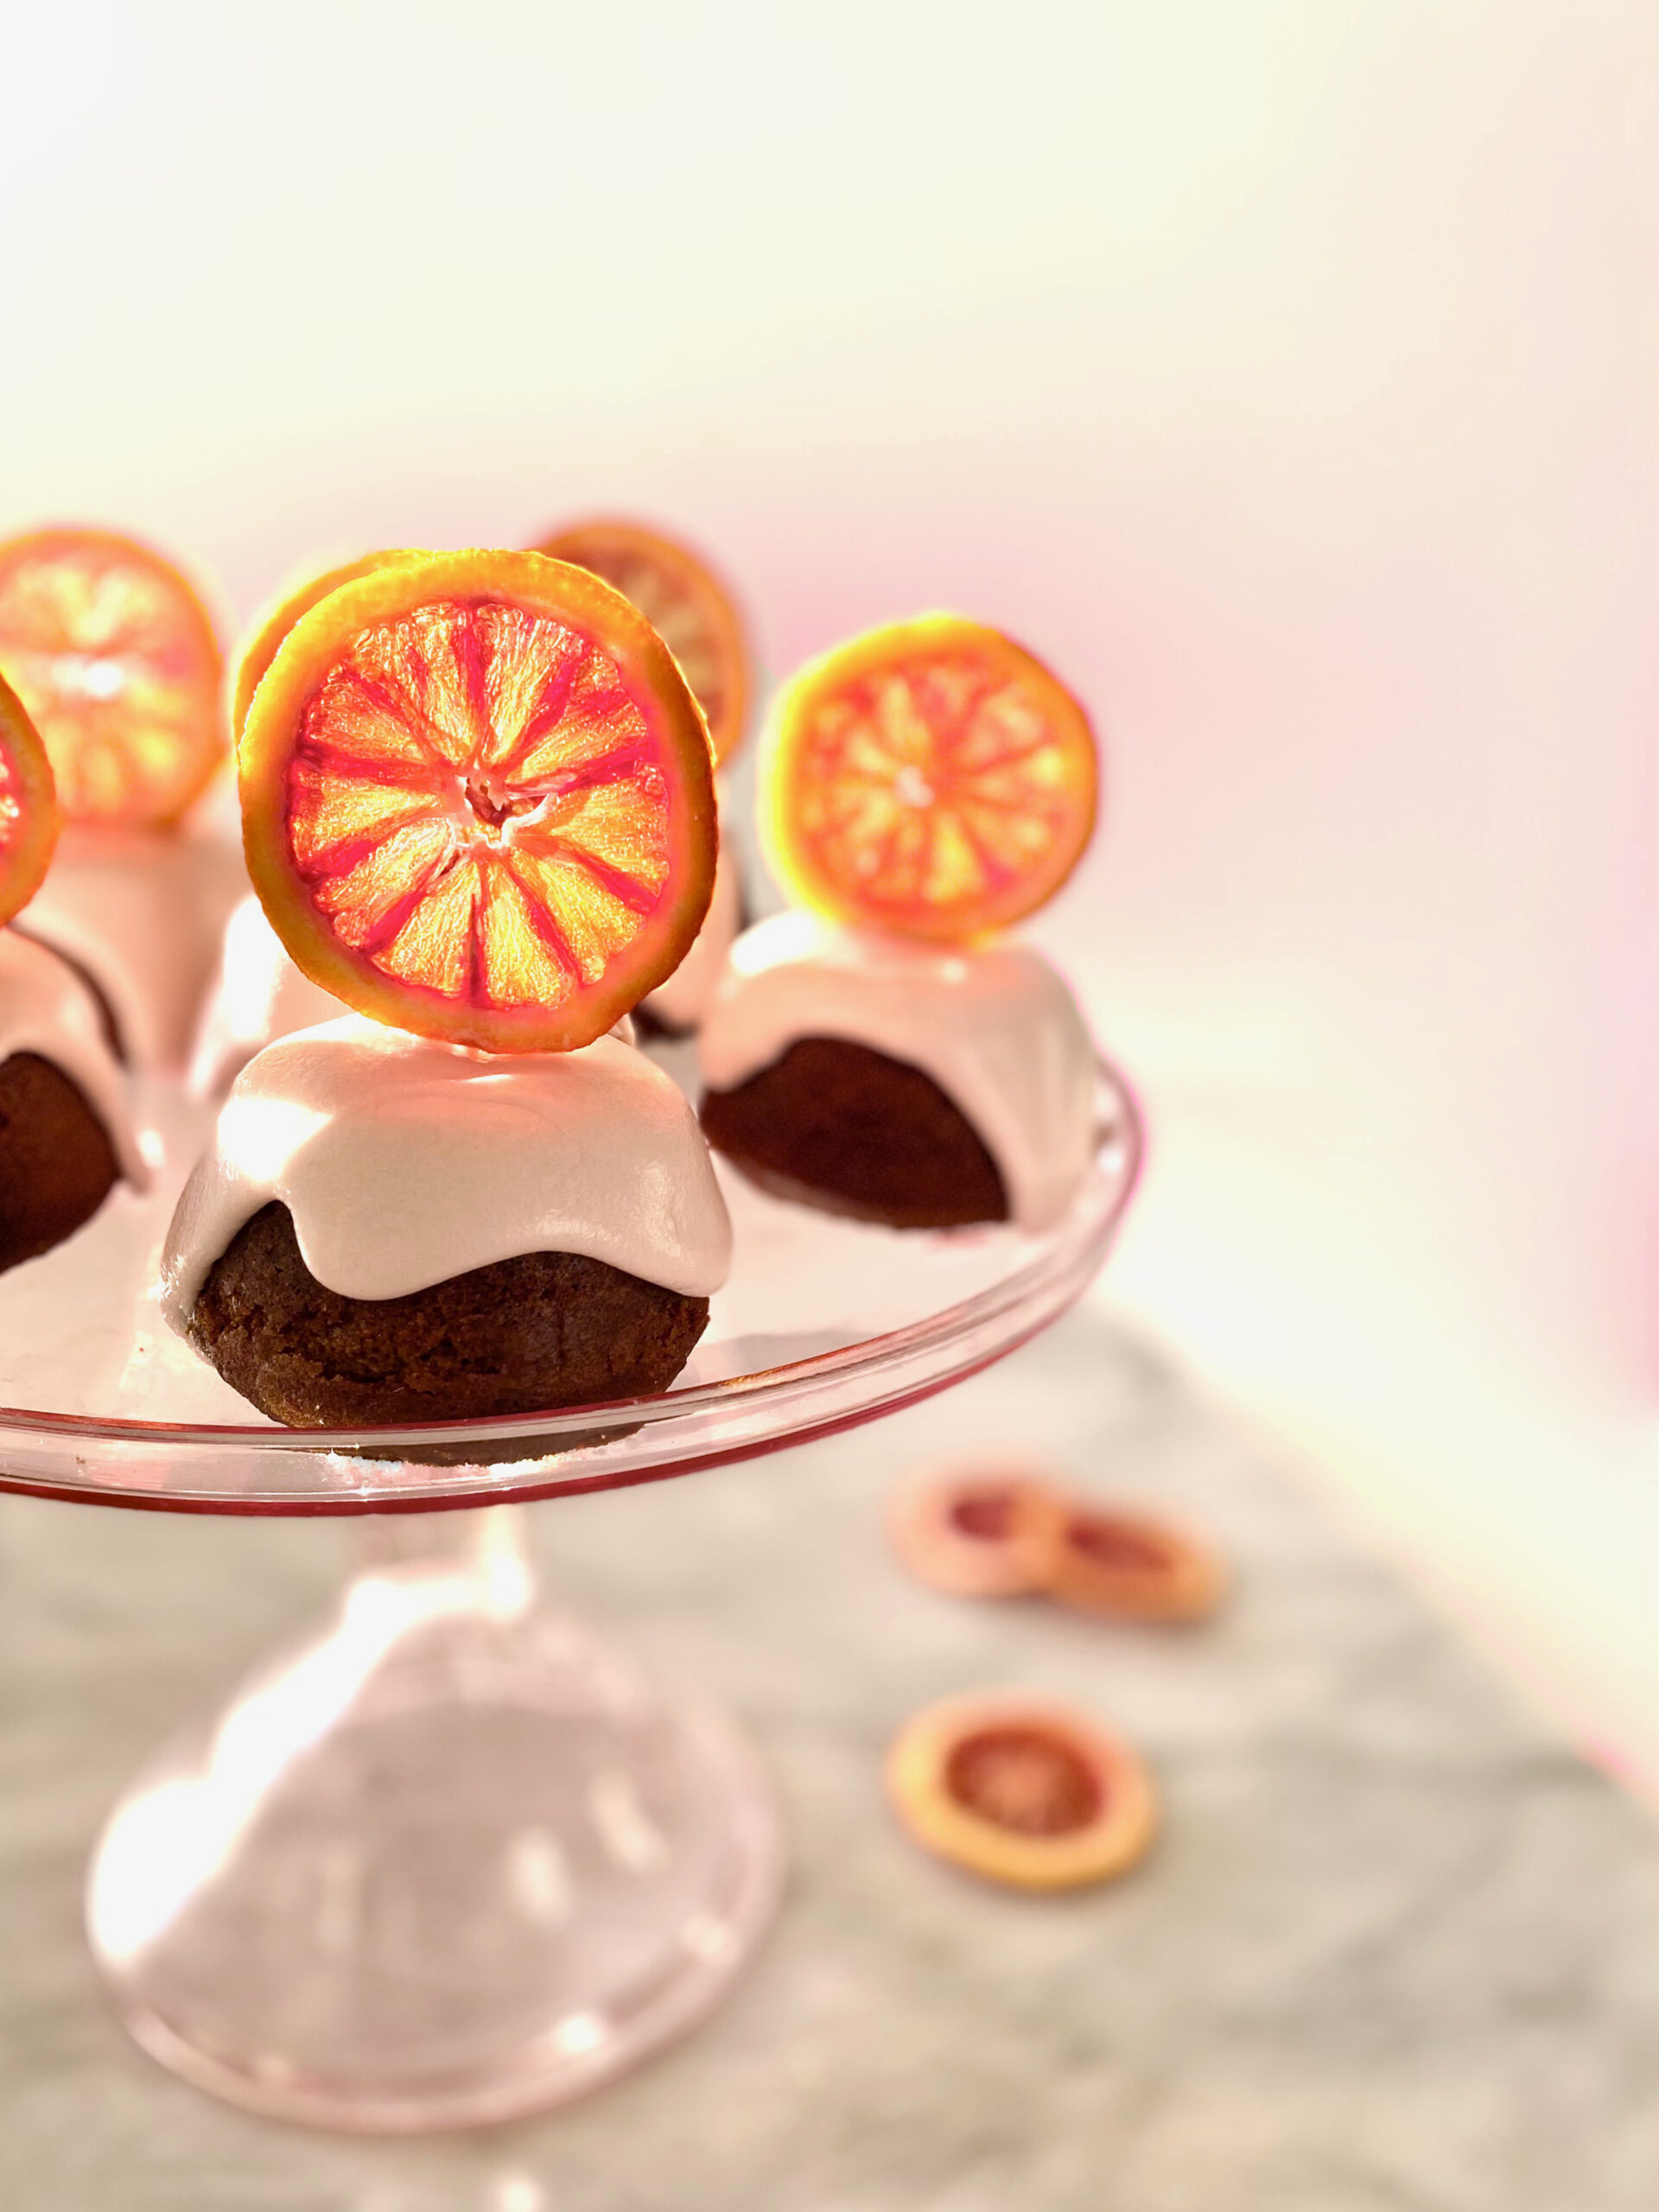
Every winter, when blood oranges come back in season, I start keeping an eye out for them at grocery stores and farmers markets. This year was different. I’ve been at home, having my groceries delivered instead of perusing the local produce aisles. If you’ve been entrusting strangers to do your shopping like I have, then you know delivery produce selections are hit and miss. So I was elated when a bag of perfectly beautiful, ripe blood oranges landed on my doorstep. This simple joy made my day. There was no choice. I had to make something worthy of the gorgeous red beauties!
I didn’t get enough of gingerbread this holiday season, so I decided to make a gingerbread cupcake recipe that I created a few years ago when I was experimenting with blood oranges. I used blood orange zest in the cupcake batter and brushed the warm cupcakes with the blood orange syrup left over from making the candied oranges. If you don’t make the candied oranges, you can easily make a batch of the syrup* or skip this step altogether. They will still be delicious. I topped the cupcakes with cream cheese icing made with more orange zest and some blood orange juice mixed in. The juice makes the icing turns a soft shade of pink.
Candied blood orange slices are so stunning, that I can’t bring myself to just lay them on top of a dessert. They remind me of stained glass windows. I like to place them on toothpicks so they can stand up in regal style! Many recipes out there will instruct you to boil the orange slices, then let them air dry. This is perfectly fine if you don’t mind floppy candied oranges. For this recipe, boiling the slices, then letting them dry in the oven on low heat will give them enough stiffness to stand up.
If you can’t find blood oranges where you live, here’s a link to get blood oranges shipped to you. This recipe will also work with other types of oranges. You won’t get the deep scarlet color and the flavor will have a bit more tartness, but it will still be beautiful and delicious!
Gingerbread Cupcakes with Blood Orange Cream Cheese Icing
3-4tablespoons (45-59ml)blood orange juiceor orange juice
Candied Blood Orange Slices
2mediumblood orangesor oranges
½cup (100g)granulated sugar
¾cup (177ml)water
Instructions
Gingerbread Cupcakes
Preheat the oven to 350º. Spray the wells a 12-serving muffin pan with non-stick spray.
In a medium-sized bowl, whisk together flour, cinnamon, ginger, allspice, baking soda and salt until well blended.
In a large bowl, beat the butter, brown sugar and orange zest with an electric mixer at medium speed, until pale and fluffy.
Add the molasses and beat until combined. Beat in the eggs one at a time until incorporated. On low speed, mix in the flour mixture in two additions, alternating with the buttermilk. Beat just until combined.
Scoop the batter into prepared the muffin pan, filling the wells 2/3 full.
Bake until a toothpick inserted into the center of the cupcakes comes out clean, about 15-18 minutes. Allow the cupcakes to cool in pan for 7 minutes, then remove them from pan and place them upside down on a cooling rack.
Brush the warm cupcakes generously with orange simple syrup. Allow them to cool completely before frosting.
Blood Orange Cream Cheese Icing
In a large bowl, beat the cream cheese, on low speed with an electric mixer, until smooth.
Add the butter, orange zest and salt and beat until smooth and well blended.
Add the powdered sugar. Beat on low speed until the powdered sugar is incorporated. Increase the speed to medium and beat until smooth.
Beat in the blood orange juice, one tablespoon (15ml) at a time until the desired consistency is reached.
Candied Blood Orange Slices
Slice the oranges into thin 1/4 inch slices.
Combine the sugar and water in a shallow saucepan and bring to a simmer. Add the orange slices to the saucepan. Simmer for 10 minutes.
Drain the oranges, reserving the syrup.
Preheat the oven to 175ºF (80ºC). Place on a large baking sheet lined with a baking mat in a single layer and bake until the orange slices begin to stiffen, about 2 hours.
Remove the orange slices from the oven and let them cool on the baking sheet. If desired, insert toothpicks when the slices are cool enough to handle. The slices will continue to stiffen as they cool.
Notes
*To make orange simple syrup, combine the juice of one orange with enough water to make 1/2 cup. Combine mixture with the zest of one orange and 1/2 cup sugar in a small saucepan over medium heat. Stir until sugar is dissolved. Let cool and transfer to a glass container. Refrigerate until ready to use.
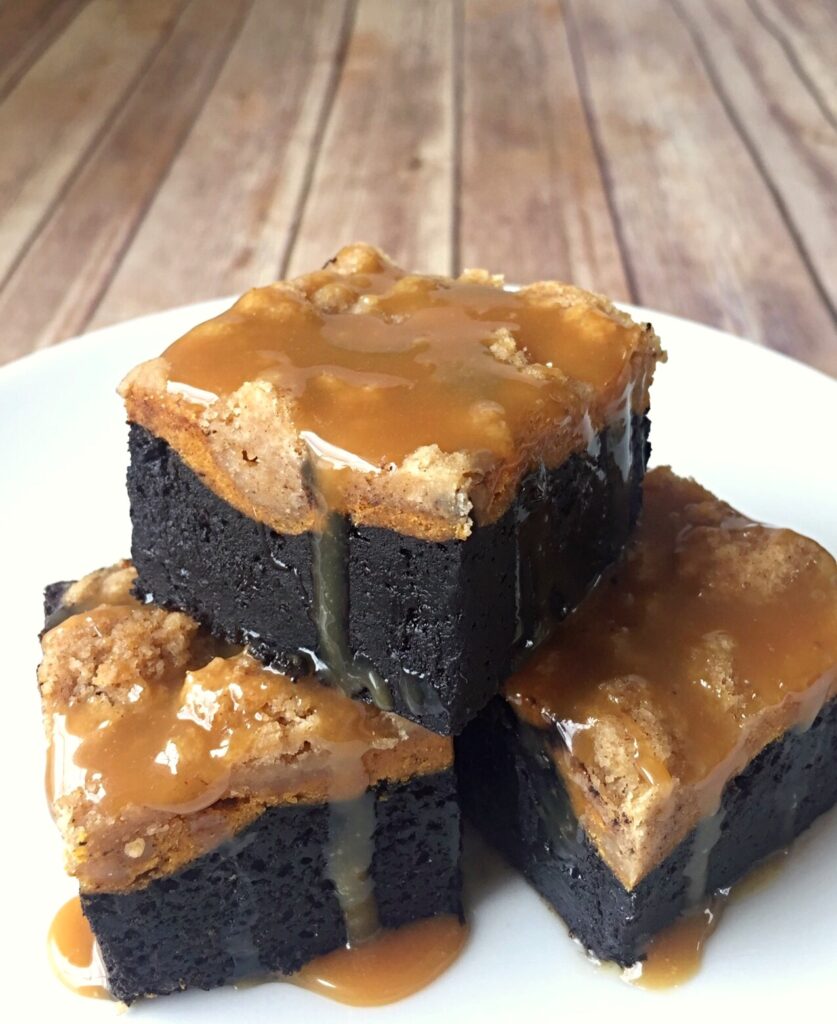
It’s Fall 2020. We need chocolate! We need pumpkin spice! And we need it drenched with caramel! These satisfying brownies check all of the boxes with multiple layers of comfort. A rich chocolate brownie is the base. The next layer is heavenly pumpkin cheesecake. The topping is a buttery crumble that rivals the best crumb cake. Finally, as if that isn’t enough, it’s drizzled with caramel sauce!
If it sounds complicated, don’t worry, it’s not. Each layer is super easy to make. You can use your favorite store bought caramel sauce to top it with. Vanilla ice cream and/or whipped cream are optional, but highly recommended toppings also. Just saying.
The layers go unexpectedly well together and make the perfect dessert for Halloween or Thanksgiving. I’m even going to add these beauties to my Christmas dessert table this year. Enjoy! You deserve it.
Pumpkin Cheesecake Crumble Brownies
Chocolate brownies with pumpkin cheesecake and crumb topping, topped with caramel sauce.
½cupcaramel sauce, purchased or homemadewarmed if desired
Instructions
Crumb Topping
In a medium bowl, combine flour, brown sugar, cinnamon and salt.
Cut in butter using a pastry blender or your fingers until well-combined and crumbles are pea-sized. Press crumbles together to make large quarter-sized chunks.
Set aside in refrigerator.
Pumpkin Cheesecake Layer
Preheat oven to 350º. Line a 9-inch square baking pan with parchment paper.
In a medium bowl, beat cream cheese with an electric mixer until smooth.
Add pumpkin, eggs, sugar, cinnamon, ginger and nutmeg and beat until well combined. Set aside.
Brownie Layer
Melt 1 stick of butter in a large microwaveable bowl.
Stir in sugar until combined
Stir in cocoa powder, vanilla, baking powder and salt.
Add the eggs and beat until smooth
Add the flour and mix until just combined.
Spread brownie batter into prepared baking pan. Smooth with a spatula.
Spread pumpkin cheesecake batter over the top of brownie batter. Smooth with a spatula.
Sprinkle crumb topping evenly over the top of pumpkin cheesecake layer.
Bake for 40-50 minutes until a toothpick inserted into pumpkin cheesecake layer comes out clean.
Let cool completely. Cut into squares and serve with caramel sauce.