Strawberry Shortcake Crumble Muffins

strawberrry shortcake crumble muffins

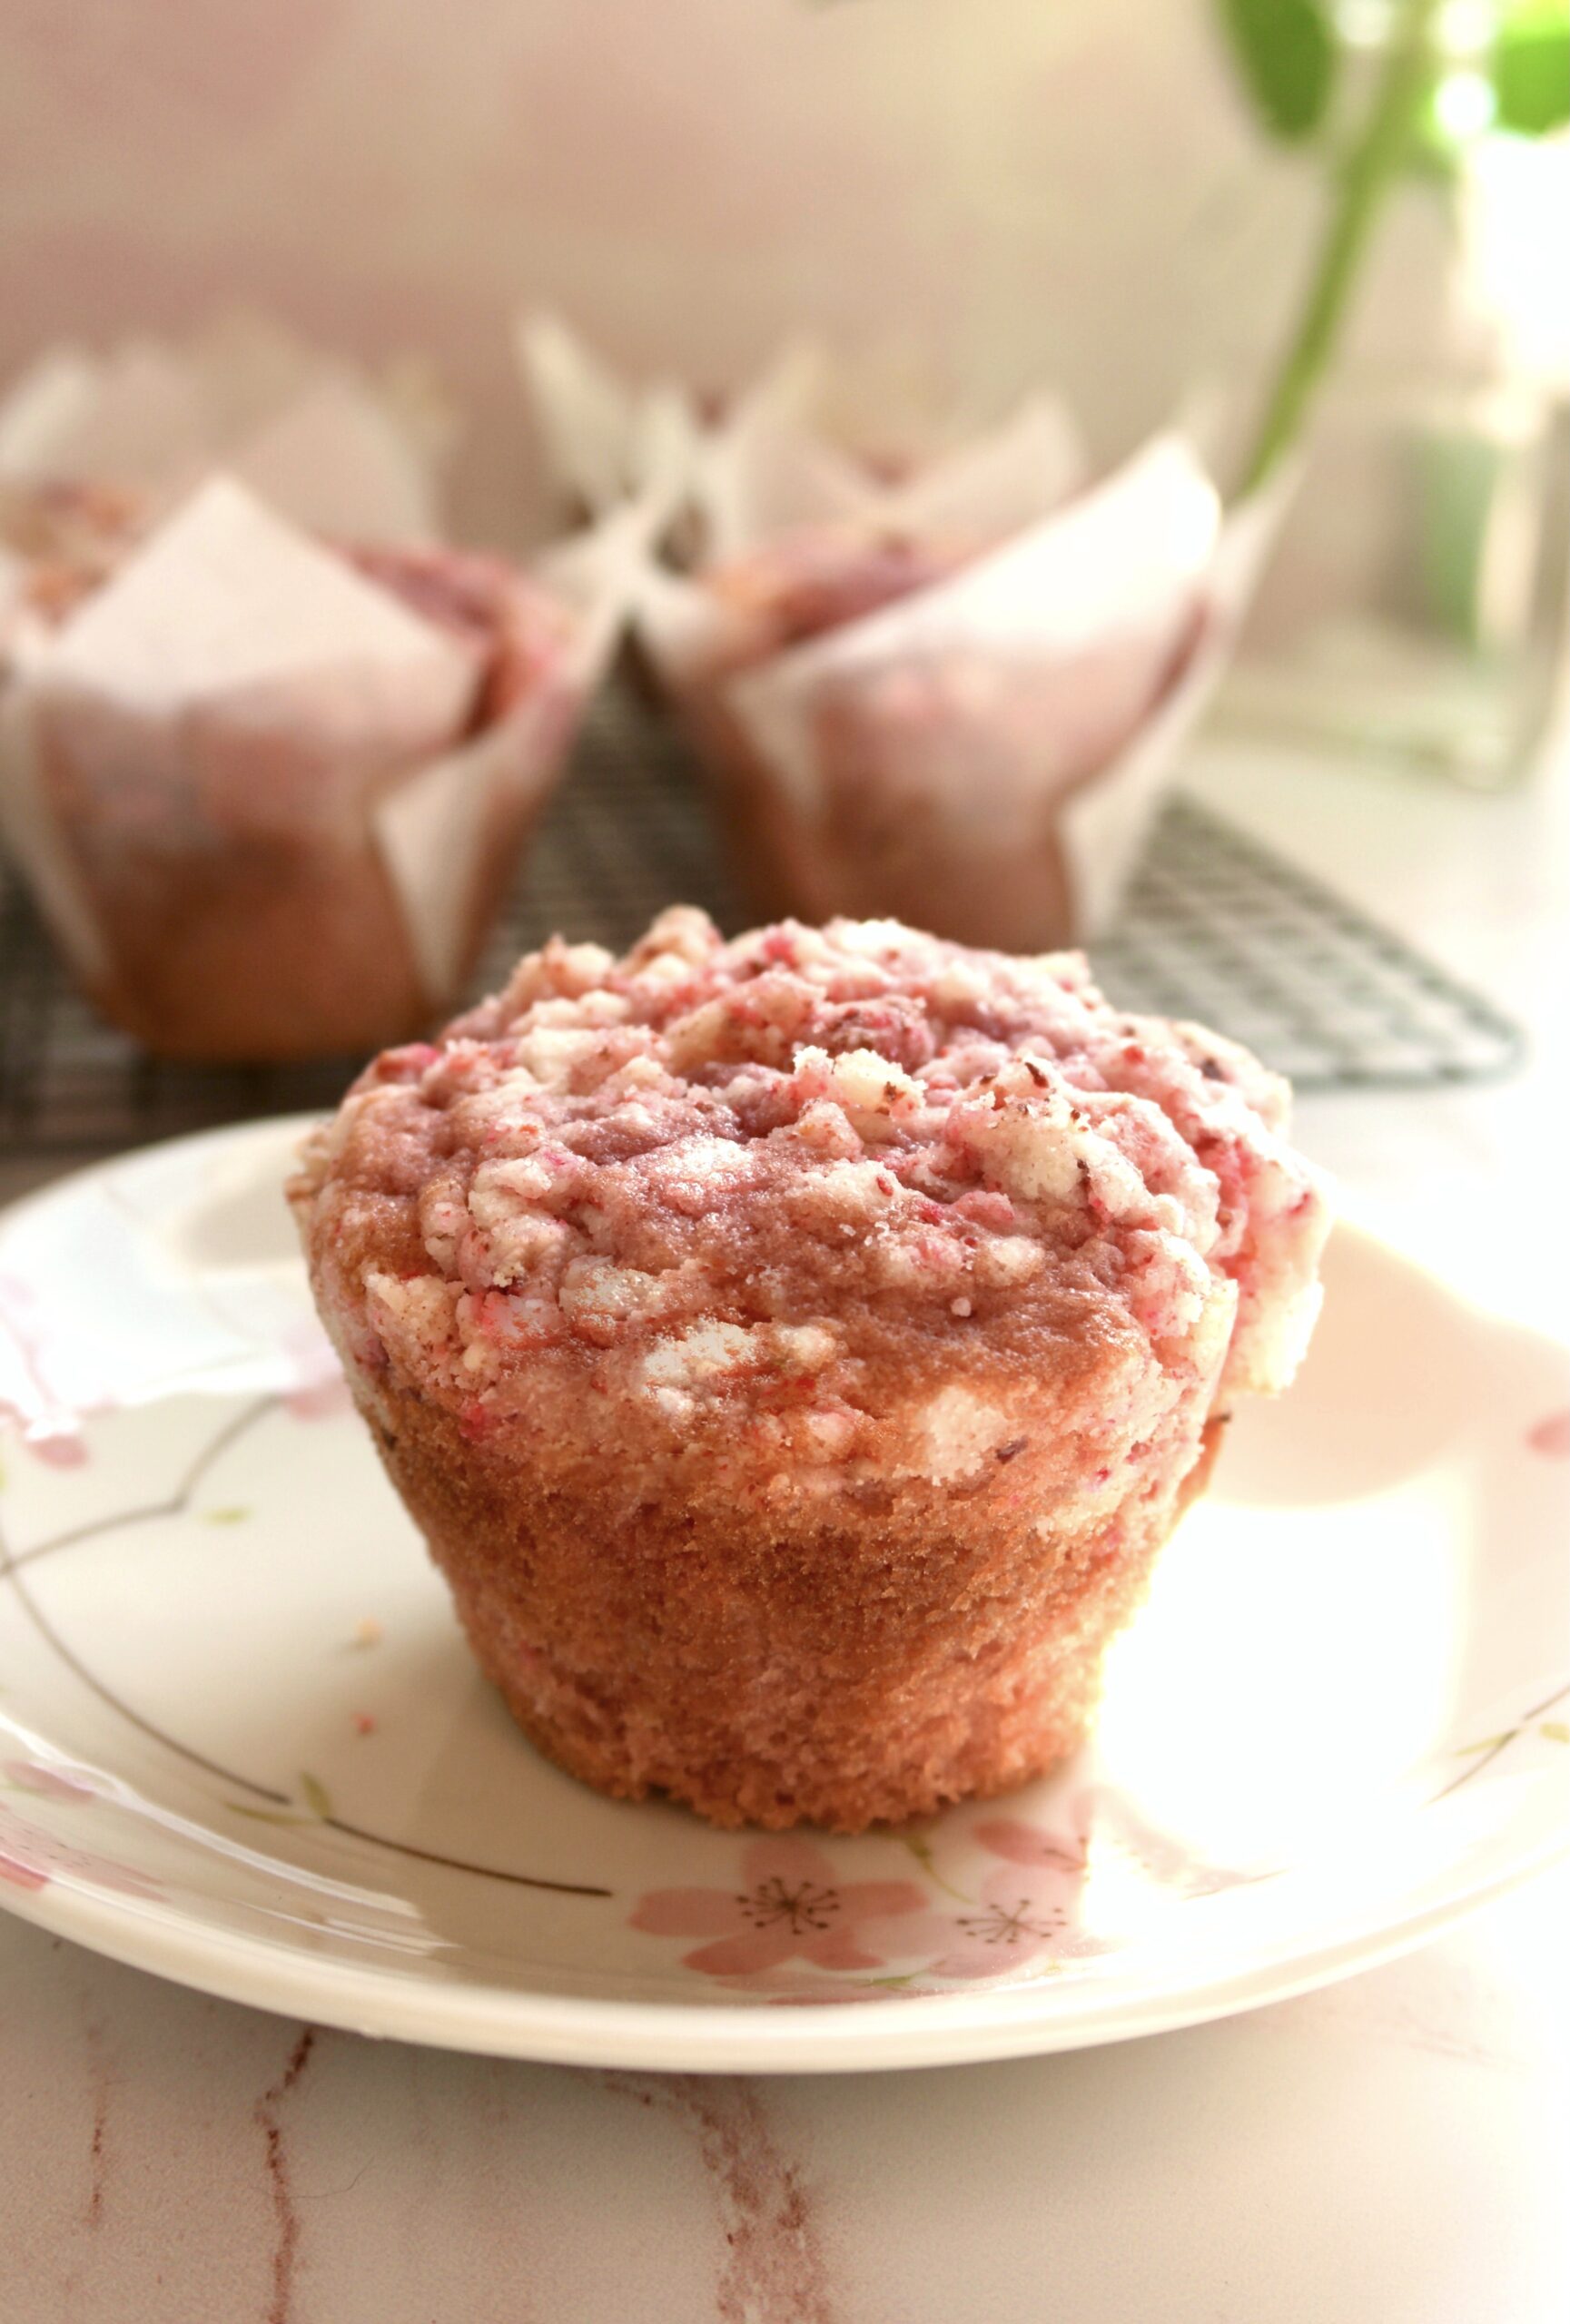
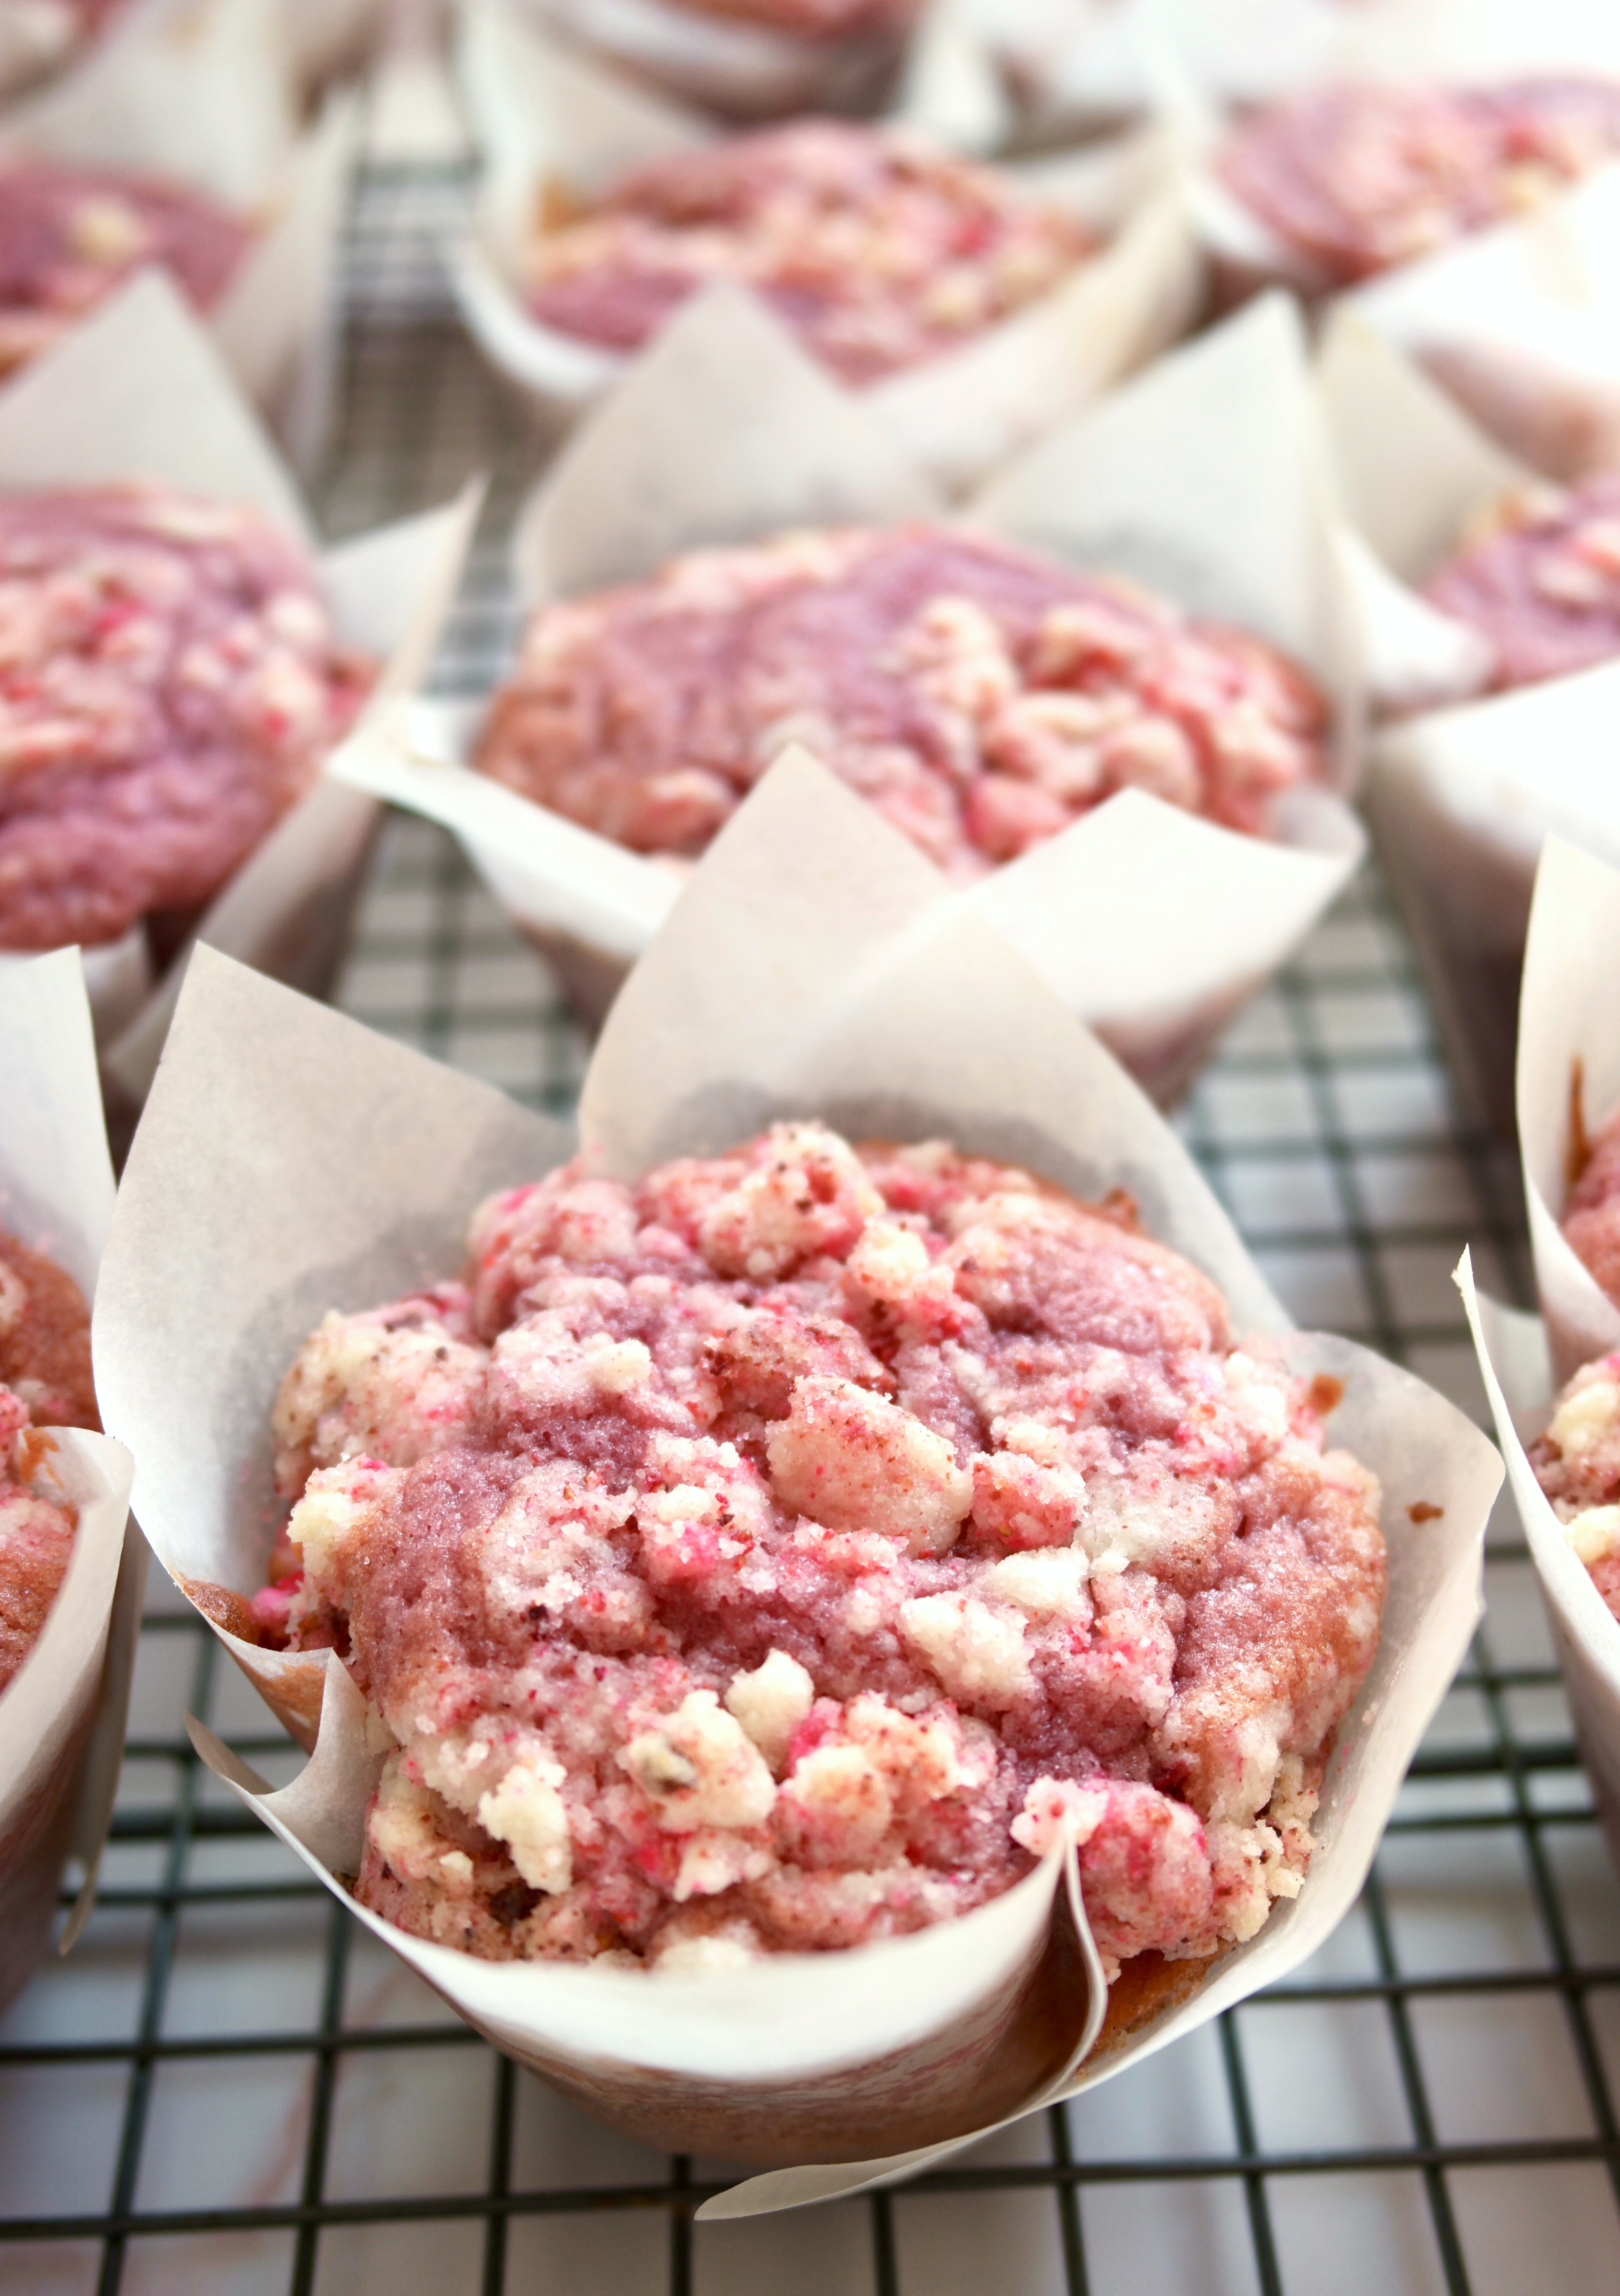
Have you noticed the strawberry shortcake crumble topping trend? I noticed many people sharing various versions of the crumble recipe all over Tiktok. I’ve seen the topping on cake, cupcakes and countless other desserts. Most people seem to make it using strawberry gelatin mix and vanilla pudding mix. The version I’m sharing here uses freeze dried strawberries instead. I’m not opposed to using gelatin mix, I just seriously love the tart, natural flavor of freeze dried strawberries.

This topping is irresistible on these tender strawberry muffins. I wanted to pile on as much crumble topping as possible so I used tulip baking cups. They’re made of grease-proof parchment paper squares. You can buy them online or make them yourself with squares of parchment. You can use the link provided at the end of the recipe to find the ones I used. Keep in mind, if you use standard muffin liners, you’ll use less batter and topping for each muffin, so you’ll end up with a few more muffins.

I used fresh strawberries for the puree in the muffins, but feel free to use frozen, defrosted strawberries if you cant get fresh ones.

Strawberry shortcake crumble muffins


Strawberry Shortcake Crumble Muffins

by Mari Vasseur
Strawberry muffins topped with strawberry shortcake crumble
Course Breakfast, Brunch, Dessert
Servings 12 muffins

Ingredients
  

Strawberry Shortcake Crumble Topping

  • 1 cup (128g) all purpose flour
  • ½ cup (100g) sugar
  • ¼ teaspoon salt
  • ½ cup (113g) cold, unsalted butter, cubed
  • 1 cup (14g) freeze-dried strawberries, finely crushed* (weigh or measure before crushing the strawberries)

Strawberry Muffins

  • 2 ¼ cups (287g) all purpose flour, sifted
  • 2 teaspoons baking powder
  • ½ teaspoon baking soda
  • ¾ teaspoon salt
  • ¾ cup (170g) unsalted butter, softened
  • 1 â…› cups (225g) sugar
  • 2 large eggs
  • 1 teaspoon strawberry extract
  • ½ cup (118ml) buttermilk
  • ½ cup (118ml) strawberry purée
  • 1-2 drops pink or red gel food coloring optional

Instructions
 

Strawberry Shortcake Crumble Topping

  • In a medium-sized bowl, combine the flour, sugar and salt until well blended. Work the butter into the flour mixture with your fingertips until it looks like sandy, with no large pieces of butter remaining.
  • Place half of crumble mixture into another medium-sized bowl and combine it with the crushed freeze dried strawberries. Mix well and press it together with your fingers to form pea sized pieces. Gently combine the two bowls of crumble together. Set aside in refrigerator while preparing the muffin batter.

Strawberry Muffins

  • Preheat the oven to 375ºF (190ºC). Line a 12 serving muffin pan with tulip baking liners or parchment squares.
  • In a medium-sized bowl, whisk together the flour, baking powder, baking soda and salt until well combined.
  • In a large bowl, beat the butter and sugar, with an electric mixer on medium speed, until pale and fluffy.
  • Beat in the eggs one at a time until incorporated. Beat in the extract until well combined. Add the flour mixture and beat on low speed, just until combined. Add the buttermilk, strawberry puree and food coloring. Beat on low speed, just until combined.
  • Divide batter evenly into the tulip muffin liners. (If using standard muffin liners, fill them 2/3 full.) Sprinkle crumble topping evenly over the batter.
  • Bake at 375ºF (190ºC) for 5 minutes, then turn oven temperature down to 350ºF (180º) and continue baking until topping is golden and a toothpick inserted in center is clean, about 12-17 more minutes. (If your topping starts to brown too quickly, you can cover the muffins with a bit of aluminum foil.) Let the muffins cool in the pan for 5 minutes, then transfer them to a cooling rack.

Notes

* A small food processor or a clean spice grinder is helpful to pulverize the freeze-dried strawberries. Pass the crushed strawberries through a sieve to remove seeds if desired.
To find tulip baking cups, click here
To find floral tulip baking cups, as seen on TikTok, click here
 
Keyword muffins, strawberry

(118ml)

Gingerbread Cupcakes with Blood Orange Cream Cheese Icing and Candied Blood Orange Slices

Gingerbread Cupcakes with Blood Orange Cream Cheese Icing and Candied Blood Oranges

Every winter, when blood oranges come back in season, I start keeping an eye out for them at grocery stores and farmers markets. This year was different. I’ve been at home, having my groceries delivered instead of perusing the local produce aisles. If you’ve been entrusting strangers to do your shopping like I have, then you know delivery produce selections are hit and miss. So I was elated when a bag of perfectly beautiful, ripe blood oranges landed on my doorstep. This simple joy made my day. There was no choice. I had to make something worthy of the gorgeous red beauties!

I didn’t get enough of gingerbread this holiday season, so I decided to make a gingerbread cupcake recipe that I created a few years ago when I was experimenting with blood oranges. I used blood orange zest in the cupcake batter and brushed the warm cupcakes with the blood orange syrup left over from making the candied oranges. If you don’t make the candied oranges, you can easily make a batch of the syrup* or skip this step altogether. They will still be delicious. I topped the cupcakes with cream cheese icing made with more orange zest and some blood orange juice mixed in. The juice makes the icing turns a soft shade of pink.

Gingerbread Cupcakes with Blood Orange Cream Cheese Icing and Candied Blood Oranges

Candied blood orange slices are so stunning, that I can’t bring myself to just lay them on top of a dessert. They remind me of stained glass windows. I like to place them on toothpicks so they can stand up in regal style! Many recipes out there will instruct you to boil the orange slices, then let them air dry. This is perfectly fine if you don’t mind floppy candied oranges. For this recipe, boiling the slices, then letting them dry in the oven on low heat will give them enough stiffness to stand up.

If you can’t find blood oranges where you live, here’s a link to get blood oranges shipped to you. This recipe will also work with other types of oranges. You won’t get the deep scarlet color and the flavor will have a bit more tartness, but it will still be beautiful and delicious!


Gingerbread Cupcakes with Blood Orange Cream Cheese Icing

by Mari Vasseur
Course Dessert
Servings 12 cupcakes

Ingredients
  

Gingerbread Cupcakes

  • 2 ¼ cups (287g) all purpose flour, sifted
  • 2 teaspoons ground ginger
  • 1 ¾ teaspoons ground cinnamon
  • ½ teaspoon baking soda
  • ¼ teaspoon ground allspice
  • â…› teaspoon fine sea salt
  • ½ cup (113g) unsalted butter, softened
  • ½ cup (100g) packed brown sugar
  • 2 teaspoons blood orange zest or orange zest
  • ¾ cup (245ml) molasses
  • 2 large eggs
  • ¾ cup (174ml) buttermilk

Blood Orange Cream Cheese Icing

  • ¾ cup (170g) cream cheese, softened
  • 6 tablespoons (85g) unsalted butter, softened
  • 1 teaspoon blood orange zest or orange zest
  • 1 pinch fine sea salt
  • 3 ½ cups (450g) powdered sugar, sifted
  • 3-4 tablespoons (45-59ml) blood orange juice or orange juice

Candied Blood Orange Slices

  • 2 medium blood oranges or oranges
  • ½ cup (100g) granulated sugar
  • ¾ cup (177ml) water

Instructions
 

Gingerbread Cupcakes

  • Preheat the oven to 350º. Spray the wells a 12-serving muffin pan with non-stick spray.
  • In a medium-sized bowl, whisk together flour, cinnamon, ginger, allspice, baking soda and salt until well blended.
  • In a large bowl, beat the butter, brown sugar and orange zest with an electric mixer at medium speed, until pale and fluffy.
  • Add the molasses and beat until combined. Beat in the eggs one at a time until incorporated. On low speed, mix in the flour mixture in two additions, alternating with the buttermilk. Beat just until combined.
  • Scoop the batter into prepared the muffin pan, filling the wells 2/3 full.
  • Bake until a toothpick inserted into the center of the cupcakes comes out clean, about 15-18 minutes. Allow the cupcakes to cool in pan for 7 minutes, then remove them from pan and place them upside down on a cooling rack.
  • Brush the warm cupcakes generously with orange simple syrup. Allow them to cool completely before frosting.

Blood Orange Cream Cheese Icing

  • In a large bowl, beat the cream cheese, on low speed with an electric mixer, until smooth.
  • Add the butter, orange zest and salt and beat until smooth and well blended.
  • Add the powdered sugar. Beat on low speed until the powdered sugar is incorporated. Increase the speed to medium and beat until smooth.
  • Beat in the blood orange juice, one tablespoon (15ml) at a time until the desired consistency is reached.

Candied Blood Orange Slices

  • Slice the oranges into thin 1/4 inch slices.
  • Combine the sugar and water in a shallow saucepan and bring to a simmer. Add the orange slices to the saucepan. Simmer for 10 minutes.
  • Drain the oranges, reserving the syrup.
  • Preheat the oven to 175ºF (80ºC). Place on a large baking sheet lined with a baking mat in a single layer and bake until the orange slices begin to stiffen, about 2 hours.
  • Remove the orange slices from the oven and let them cool on the baking sheet. If desired, insert toothpicks when the slices are cool enough to handle. The slices will continue to stiffen as they cool.

Notes

*To make orange simple syrup,  combine the juice of one orange with enough water to make 1/2 cup. Combine mixture with the zest of one orange and 1/2 cup sugar in a small saucepan over medium heat. Stir until sugar is dissolved. Let cool and transfer to a glass container. Refrigerate until ready to use.
Keyword blood oranges, candied oranges, cupcakes, gingerbread

Pastel Snowball Cookies

pastel snowball cookies

This delightful melt-in-your-mouth cookie recipe has been in my family for decades. We call them Snowballs, but they’re also known as Mexican Wedding Cakes or Greek Kourabiedes. I make them every year for Christmas, but they would also be perfect for Easter, Mother’s Day, birthday parties, tea parties, weddings, bridal showers, and baby showers.

Pecans are my favorite nuts to use in this recipe, but you can use almost any nuts you have on hand. The original snowy white version is a classic but you can take them up a notch with pretty pastels and fruit flavors. You can use crushed, freeze-dried fruit for color and subtle flavor. Spirulina is a nutritious, vibrant powder you can use to make beautiful blue cookies. You can also dress up your snowballs with edible glitter or luster dust used for cake decorating. There are endless ways to be creative with these cute cookies!


Pastel Snowball Cookies

by Mari Vasseur
Melt-in-your-mouth shortbread cookie balls covered in pastel powdered sugar
Course Dessert
Servings 36 cookies

Ingredients
  

Cookies

  • 1 cup (227g) unsalted butter, softened
  • 1 cup (120g) powdered sugar, sifted and divided plus more for desired pastel powdered sugar color
  • 1 teaspoon vanilla extract
  • ¼ teaspoon fine sea salt
  • 2 cups (255g) all purpose flour, sifted
  • ½ cup (64g) finely chopped pecans

Pink powdered sugar

  • â…“ cup (40g) powdered sugar, sifted
  • ½ cup (14g) freeze-dried strawberries or raspberries see note below*

Blue powered sugar

  • â…“ cup (40g) powdered sugar, sifted
  • 1 ½ teaspoons blue spirulina powder

Lavender powered sugar

  • â…“ cup (40g) powdered sugar, sifted
  • ½ cup (14g) freeze-dried blueberries see note below*
  • ¼ teaspoon violet edible petal dust optional

Instructions
 

Cookies

  • Preheat the oven to 325ºF (165ºC). Line two cookie sheets with parchment paper.
  • In a large bowl, beat the butter, with an electric mixer at medium speed, until smooth and creamy. Add 1/2 cup (60g)of powdered sugar, the vanilla and salt. Beat until pale and fluffy.
  • In a separate medium-sized bowl, combine the flour and pecans. Gradually add the flour and pecan mixture to the butter mixture, beating on low speed until combined.
  • Shape the dough into scant 1-inch balls. Place the balls about 2 inches apart onto the prepared cookie sheets. Bake until light golden brown, about 17-20 minutes.
  • Place the remaining 1/2 cup (60g) of powdered sugar in a plastic bag. With a spatula, transfer three warm cookies into the bag. Shake gently to coat the cookies with powdered sugar. Transfer them to a cooling rack. Repeat with the remaining cookies.
  • Cool the cookies completely then proceed to the instructions for pastel powdered sugar, depending on which color you have selected.

Pink powdered sugar

  • Process the freeze-dried strawberries or raspberries into a fine powder in a mini food processor.
  • Whisk the freeze-dried berry powder with 1/3 cup (40g) powered sugar together in a small bowl.
  • Transfer the powered sugar mixture to a plastic bag. Place three cookies in the bag and shake gently until coated with the powdered sugar mixture. Transfer the cookies back to the rack and repeat with remaining cookies.

Blue powered sugar

  • Whisk 1/3 cup (40g) powdered sugar and the spriulina powder in a small bowl.
  • Transfer the powered sugar mixture to a plastic bag. Place three cookies in the bag and shake gently until coated with the powdered sugar mixture. Transfer the cookies back to the rack and repeat with the remaining cookies.

Lavender powered sugar

  • Process the freeze-dried blueberries into a fine powder in a mini food processor.
  • Whisk the freeze-dried blueberry powder with 1/3 cup (40g) powered sugar together in a small bowl. Whisk in petal dust for a more vibrant color, if desired.
  • Transfer the powered sugar mixture to a plastic bag. Place three cookies in the bag and shake gently until coated with the powdered sugar mixture. Transfer the cookies back to the rack and repeat with the remaining cookies.

Notes

*The ratios for the pastel powered sugar are approximate. Freeze-dried fruit varies in color. Add more or less to achieve your desired shade.
Keyword cookies

Honeydukes Inspired Pink Coconut Ice Cake

Honeydukes Inspired Pink Coconut Ice Cake by Brownie Mischief

I recently enjoyed a girls’ day out at Universal Studios Hollywood. My daughter is a Harry Potter fan, so of course we beelined straight to the Wizarding World of Harry Potter upon arrival at the theme park. We were spellbound by the ominous looking Hogwart’s Castle and the sparkling snow-topped shops of Hogsmeade. My daughter was in Harry Potter fan heaven, flitting around Hogsmeade, testing out her interactive wand and sipping some refreshing Butter Beer. It’s definitely a must-try

Our favorite shop was Honeydukes sweet shop, where anyone with a sweet tooth can get his or her candy wishes fulfilled. The candy selection was nothing short of magical. We picked up some Chocolate Flies, a Chocolate Frog and some Pink Coconut Ice candy.

Honeydukes Candy                   Pink Coconut Ice Candy

I was most excited to try the Pink Coconut Ice. I’ve been intrigued by the thought of this candy ever since it was mentioned in the book, Harry Potter and the Prisoner of Azkaban by J.K. Rowling. The Pink Coconut Ice candy is similar to a stiff fudge. It’s very sweet, so you can cut it into small squares and have plenty to share with friends.

Pink Coconut Ice Candy

I imagined the “shimmery pink squares” a little differently so, I decided to build on my imagined version of the coconut candy by making a shimmery pink coconut cake. I used my favorite coconut cake recipe and pink coconut buttercream. I tinted my buttercream with Americolor gel food color soft pink. I covered my cake in large flakes of unsweetened coconut. To find unsweetened coconut flakes, click here. I think the large flakes look more whimsical and add texture, but feel free to use whatever kind of coconut you prefer. I colored my coconut a shimmery, soft pink. Click here to see how I colored my coconut flakes.

Honeydukes Inspired Pink Coconut Ice Cake by Brownie Mischief

You don’t have to be a Harry Potter fan to appreciate this pink, fluffy, coconut-covered cake. I can imagine this pretty cake at any party or event with a pink theme. I hope you enjoy this perfectly Pink Coconut Ice Cake as much as we did!

Pink Coconut Ice Cake

Moist, fluffy coconut cake with pink buttercream and coconut flakes
Course Dessert
Servings 1 6-inch cake (serves 6)

Ingredients
  

Coconut Cake

  • 3 1/2 cups (11 1/2 ounces) cake flour *see note below
  • 2 teaspoons baking powder
  • 1 teaspoon fine sea salt
  • 1 stick (4 ounces) unsalted butter, softened
  • 1 ¾ cups (12 1/4 ounces) granulated sugar preferably ultra fine
  • ¼ cup vegetable oil
  • 2 teaspoons natural coconut extract **see note below
  • 6 large egg whites
  • 1 ½ cups canned light coconut milk ***see note below

Pink Coconut Buttercream

  • 2 sticks (8 ounces) unsalted butter, softened
  • â…› teaspoon fine sea salt
  • 3 ¾ cups (1 pound) powdered sugar, sifted
  • ¼ cup canned light coconut milk
  • ½ teaspoon natural coconut extract
  • pink gel food color I used Americolor soft pink (link below)

Pink Coconut Flakes

  • 3 cups unsweetened coconut flakes (link below)
  • 1 tablespoon powdered sugar
  • edible pink petal dust I used Rosie Sterling Pearl Dust by GSA (link below)
  • food safe gloves

Instructions
 

Coconut Cake

  • Preheat oven to 350º F. Grease three 6-inch cake pans.
  • In a large bowl, sift together flour, baking powder and salt. Set aside.
  • In a large bowl, beat butter, sugar and oil together with an electric mixer at medium speed, until light and fluffy, about 2-3 minutes.
  • Beat in coconut extract. Gradually beat in egg whites until mixture is well combined, stopping to scrape the sides of the bowl.
  • Beat in flour mixture in three additions, alternating with coconut milk, stopping to scrape the sides of the bowl.
  • Pour batter into prepared pans, evenly distributing batter between the pans. Bake for 28-32 minutes, until a toothpick inserted into the center of pans comes out clean.
  • Place pans on wire rack to cool for 10 minutes. Remove cakes from pans and place on rack to cool completely.

Pink Coconut Buttercream

  • In a large bowl, beat butter with an electric mixer on medium speed, until light and fluffy.
  • Add salt. Beat until combined.
  • Turn off mixer. Add powdered sugar. Mix on low speed until sugar is moistened, then turn up to medium speed and beat until combined.
  • Add coconut milk a little at a time, until desired consistency is reached. Add coconut extract and beat at medium speed until buttercream is smooth.
  • Add gel food color with a toothpick, a little at a time, until desired consistency is reached. Beat at low speed until well blended.
  • Fill and frost cake with Pink Coconut Buttercream.

Pink Coconut Flakes

  • Place powdered sugar in a small bowl. Add a small amount of petal dust. Whisk together with a small whisk. Add additional petal dust until desired color is reached.
  • Spread coconut flakes out onto a large shallow dish. Sprinkle powdered sugar mixture over coconut with a small sieve. Toss gently with gloved hands.
  • Place cake on a baking sheet to catch excess coconut. Press colored coconut onto sides and top of cake.

Notes

*Do not substitute all-purpose flour. For best results weigh your dry ingredients. **For best results, use natural coconut extract. Imitation coconut flavorings may give your baked goods an unpleasant flavor. ***If your coconut milk is separated when you open the can, simply place it in a blender to emulsify before using. To find my favorite 6-inch cake pans, click here. To find the gel food color I used, click here. To find unsweetened coconut flakes, click here. To find the edible pearl dust I used, click here.

Peaches & Cream Profiteroles

Peaches & Cream Profiteroles by Brownie Mischief

Summer is nearly over, and after the recent heatwave here in Southern California, I’m more than ready to welcome fall weather. But before I put on my fluffy sweater and dive into pumpkin spice everything, I want to enjoy the tail end of peach season, don’t you? Farmer’s markets and stores near my home are still brimming over with fresh peaches, so I picked up some peaches and decided to give them a proper goodbye and send them off in style.

Peaches & Cream Profiteroles by Brownie Mischief

I created some luscious peaches and cream filled, bite-size puffs of choux pastry, called profiteroles. They’re like cream puffs, only smaller. The filling is creamy, but so light and airy that I’m convinced that these profiteroles have no calories! The recipe I’m sharing with you uses fresh peaches, but feel free to substitute frozen peaches if fresh peaches aren’t available. There are a lot of steps to this recipe, but the steps are done in stages and are very easy to do.

Peaches & Cream Profiteroles by Brownie Mischief

I decorated my profiteroles with fresh, pesticide-free miniature rosebuds, also known as spray roses. If you can’t find miniature rosebuds, pesticide-free rose petals would be a good substitute. You may not get a chance to embellish these little beauties. They have a way of popping into people’s mouths even before you can decorate them!

Peaches & Cream Profiteroles

Bite-sized puffs of choux pastry filled with a creamy, fresh peach filling and topped with fresh peach icing.
Course Dessert
Cuisine French
Servings 18

Ingredients
  

Peach Purée

  • 2 large fresh peaches, peeled, pitted and sliced *see note below
  • ½ teaspoon fresh lemon juice
  • ½ teaspoon natural peach flavoring

Peaches & Cream Filling

  • 1 cup whole milk
  • â…“ cup (2 ounces) granulated sugar
  • 2 tablespoons (1/2 ounce) cornstarch
  • ¼ teaspoon fine sea salt
  • 1 egg
  • 2 tablespoon (1 ounce) unsalted butter
  • ¼ teaspoon pure vanilla extract
  • â…› teaspoon pure almond extract
  • peach purée recipe above
  • â…” cup heavy whipping cream

Profiteroles

  • ½ cup water
  • 4 tablespoons (2 ounces) unsalted butter, cubed
  • â…› teaspoon fine sea salt
  • ½ cup (2 1/4 ounces) all purpose flour
  • 2 eggs room temperature

Peach Icing

  • ¾ cup (3 ounces) powdered sugar, sifted
  • 2 tablespoons reserved peach puree
  • 1 tablespoon heavy whipping cream
  • ¼ teaspoon natural peach flavoring

Instructions
 

Peach Purée

  • Purée peaches in a blender or food processor. Strain puréed peaches through a sieve. Stir in lemon juice.
  • Place puréed peaches in a small saucepan. Bring to a boil over medium heat.
  • Reduce heat and simmer until peach purée is reduced by half.
  • Remove from heat. Stir in peach flavoring and set aside to cool completely.

Peaches and Cream Filling

  • Bring milk to a boil in a small saucepan over medium heat.
  • Meanwhile, whisk sugar, cornstarch and salt together in a medium bowl. Add the egg and whisk until smooth.
  • When milk starts to boil, remove from heat and pour 1/3 of the hot milk into the egg mixture and whisk to combine.
  • Pour the egg mixture into the remaining hot milk and cook over medium heat, stirring continuously, until the mixture comes to a boil and thickens.
  • Remove from heat. Stir in butter and extracts.
  • Pour mixture through a sieve placed over a bowl. Cover the surface of pastry cream with plastic wrap. Let cool.
  • Set aside 2 tablespoons of cooled peach purée. Add remaining peach purée to cooled pastry cream and stir to combine. Chill in refrigerator.
  • In a medium bowl, whip heavy cream to stiff peaks with an electric mixer at high speed. Fold whipped cream into peach pastry cream mixture. Set aside in refrigerator.

Profiteroles

  • Preheat oven to 400ºF. Line two large baking sheets with parchment paper.
  • Combine water, butter and salt in a medium saucepan and bring to a boil over medium heat.
  • Reduce heat. Add flour and stir vigorously with a wooden spoon until mixture pulls away from sides of the pan and forms a ball.
  • Transfer mixture to the bowl of a stand mixer. Mix on low speed until steam dissipates and mixture cools to lukewarm.
  • Add eggs one at a time and beat with an electric mixer at medium speed, until smooth, stopping to scrape down bowl.
  • Transfer mixture to a piping bag, fitted with a large round tip. (**I used Ateco tip 808.)
  • Pipe 1 1/4 inch mounds, about 2 inches apart onto prepared baking sheets. Smooth tops with a wet finger.
  • Bake for 15 minutes, then turn oven temperature down to 350ºF and continue baking until golden brown, about 8-10 more minutes. Using a toothpick or skewer poke a small hole in each profiterole to let steam escape. Place on a wire rack to cool completely.
  • Using the tip of a paring knife, poke a pilot hole in the bottom of each profiterole.
  • Place peaches and cream filling into a piping bag fitted with a medium round piping tip. (***I used Wilton tip 12.)
  • Place piping tip into the pilot holes and fill each profiterole with filling.

Peach Icing

  • In a small bowl, whisk all icing ingredients together and spoon over filled profiteroles. Refrigerate until ready to serve.

Notes

*To make peaches easy to peel, blanch them  in boiling water for about 30 seconds, then dunk  in ice water.
**To find Ateco tip 808, click here. ***To find Wilton tip 12, click here.

Chocolate Snack Attack Cookies

Fully Loaded Chocolate Snack Attack Cookies by Brownie Mischief

I’ve seen some cookies loaded with add-ins out there, but these extreme cookies just won the title! They’ve got enough chunky, chocolatey, sweet and saltiness to satisfy the most ravenous cookie craving! But, before we even go one step further, I must mention a few disclaimers. I strongly urge you to make sure your fridge is stocked with milk. Please change into your comfiest pants before attempting this recipe. Canceling all plans for the rest of the day is recommended, as a nap may ensue immediately following consumption of these cookies. OK, now that we got that out of the way, let’s jump in with both feet!

Fully Loaded Chocolate Snack Attack Cookies by Brownie Mischief

First we need a moody photo that looks like it was taken in a rustic cabin to emphasize the seriousness of these chocolate cookies. It’s no coincidence that I’m sharing this recipe with you right before Father’s Day. Every Dad I know is an accomplished snacker. Dad will love these cookies for his personal snack stash! Package them up and deliver them to your Pop with a jug of milk or a thermos of coffee. You can probably skip the straw. We all know that Dad is going to chug his milk, but every respectable blog photo of milk must contain a pretty straw.

Fully Loaded Chocolate Snack Attack Cookie Ice Cream Sandwiches by Brownie Mischief

These cookies make amazing ice cream sandwiches, too. Press a scoop of softened vanilla ice cream between two cookies and pop it in the freezer. If you want to make these cookies picture perfect, use a scoop to portion out your dough. This will make them uniform in size and they’ll bake more evenly. Click here to find the scoop I used. For even more visual appeal, don’t crush the pretzels before adding to the cookie dough. Some of them will break when you are mixing them into the dough and this is fine, because the large pieces help make these cookies chunky. This recipe makes eighteen large cookies. That’s one dozen for Dad plus six for you to snack on, because when these babies come out of the oven with their melted chocolate chunks and little pools of caramel, resisting will be impossible! Now it’s cookie time…you’ve got this!

Fully Loaded Chocolate Snack Attack Cookies

Large chunky, sweet and salty chocolate cookies loaded with chocolate chunks, pretzels, caramel, rice cereal and nuts.
Prep Time 15 minutes
Cook Time 15 minutes
Total Time 30 minutes
Course Dessert
Servings 18 cookies

Ingredients
  

  • 2 â…› cups (270g) all purpose flour, sifted
  • ½ cup (45g) dark cocoa powder, sifted
  • ½ teaspoon baking powder
  • ¼ teaspoon baking soda
  • ¼ teaspoon fine sea salt
  • 1 cup (227g) unsalted butter, softened
  • 1 cup (200g) granulated sugar
  • ¼ cup (50g) brown sugar
  • 2 large eggs
  • 1 teaspoon pure vanilla extract
  • 1 ½ cups (213g) semisweet chocolate chunks
  • 1 ½ cup (43g) mini pretzel twists
  • 1 cup (170g) caramel baking bits
  • 1 cup (43g) chocolate rice cereal (I used Cocoa Pebbles)
  • ¾ cup (92g) honey roasted peanuts (or roasted mixed nuts)

Instructions
 

  • Preheat the oven to 350º F (180ºC). Line 2 large baking sheets with parchment paper.
  • In a medium-sized bowl, whisk together the flour, cocoa powder, baking powder, baking soda and salt until well blended.
  • In a large bowl, beat the butter, granulated sugar, and brown sugar together, with an electric mixer at medium speed until pale and fluffy. Add eggs, one at a time, beating until incorporated. Add vanilla and beat until combined. On low speed, mix in the flour mixture just until combined. Stir in the chocolate chunks, pretzels, caramel bits, chocolate rice cereal and peanuts.
  • Scoop 1/4 cup portions of cookie dough and place them about 2 inches apart onto the prepared baking sheets. Bake until set, about 13-15 minutes. Let the cookies cool on cookie sheets for 1 minute before transferring to a cooling rack.

Sparkling Sweetheart Palmiers

Sparkling Sweetheart Palmier Cookies

Crisp, delicate French palmiers, also known as elephant ears, are the perfect ladylike pastries to enjoy with hot cocoa, tea or coffee. There’s certainly no shortage of palmier recipes out there, but if you’re in the mood for simplicity, this is the recipe for you! This version is very easy to make and only requires two ingredients. Puff pastry dough and sparkling sugar, that’s it! Pretty stress-free, right? Since Valentine’s Day is coming soon, I formed the palmiers into hearts, rather than the traditional palm shape. I used some pale pink sparkling sugar that I had on hand, but feel free to use any color you like.

Sparkling Sweetheart Palmier Cookies

These palmier cookies are as delicious as they are lovely. Wouldn’t they be the perfect addition to a bridal or baby shower sweets table? I also envision them as a simple, but elegant Valentine’s Day breakfast or a sweet, homemade Valentine’s Day gift wrapped in tissue paper and ribbon. Most people love receiving sweet treats, I know I do! (Hint…hint…Hubby if you’re reading this!) I hope this simple recipe provides you with a bit of inspiration. I’ll be sharing more heart-shaped inspiration in the days ahead, so stop by again soon!

Sparkling Sweetheart Palmier Cookies

Sparkling Sweetheart Palmiers

by Mari Vasseur
Sweet, crisp, flaky puff pastry cookies.
Prep Time 15 minutes
Cook Time 15 minutes
Total Time 1 hour
Course Dessert
Servings 28 palmiers

Ingredients
  

  • 1 1 lb. (454g) package (two sheets) frozen puff pastry, thawed
  • ½ cup (100g) sparkling sugar, divided

Instructions
 

  • Sprinkle 2 tablespoons (25g) of sparkling sugar on your work surface. Place 1 puff pastry sheet on the sugared surface. Sprinkle evenly with 2 tablespoons (25g)of sparkling sugar. Roll gently with a rolling pin, pressing the sugar into the dough.
    Sparkling Sweetheart Palmier Tutorial
  • Roll the short ends of the puff pastry sheet in towards the center, jelly roll style, leaving a 1-inch gap in the center. Repeat the steps with the remaining puff pastry sheet. Transfer the puff pastry rolls to a tray. Cover with plastic wrap and chill in the refrigerator for 30 minutes.
  • Preheat the oven to 400°F (205ºC). Line 2 large baking sheets with parchment paper.
  • Slice each roll into 1/2-inch slices. Place the slices 2 inches apart onto the prepared baking sheets, cut side down, forming into heart shapes. Sprinkle any remaining sparkling sugar over the hearts.
    Sparkling Sweetheart Palmiers Tutorial
  • Bake until 15-17 minutes, until golden brown. Transfer to a cooling rack to cool before serving.

Notes

Palmiers are best served the day they are made. Store in an airtight container for up to a few days.

Cocoa Meringue Brownies

One of my favorite things to top desserts with are meringue cookies. They’re as light as air and they look so pretty and whimsical! The color and flavor combinations are endless, so you can really have some fun getting creative. I decided to whip some up, especially for placing on top of my favorite brownies. They take even the most humble brownies to a new level. You can use your favorite brownie recipe or even a boxed brownie mix. I won’t judge! I like to make the meringues a day or two ahead since they take quite a while to bake in the oven. While they bake, a subtle chocolate scent will waft through your kitchen, reminding you of the smell of hot cocoa. They even taste like hot cocoa! You can make your brownies a few hours ahead or the night before. I cut mine into rounds with a 2 1/2-inch cutter. I cut 12 rounds of this size from a 13 x 9-inch batch of brownies. Right before serving, spoon some thick, glossy chocolate ganache on the brownies, then top them with your pretty meringues! To make these little bits of chocolate heaven, you’ll need:

  • 1 batch Cocoa Meringues (recipe below)
  • 1 batch of your favorite brownies
  • 1 batch chocolate ganache (see notes)

Cocoa Meringues

Pretty, light and crispy treats that taste like hot cocoa!
Prep Time 30 minutes
Cook Time 2 hours
Total Time 4 hours 30 minutes
Course Dessert
Servings 1 batch

Ingredients
  

  • 4 large egg whites, room temperature
  • â…› teaspoon cream of tartar
  • â…› teaspoon fine sea salt
  • â…“ cup (67g) fine granulated sugar
  • ½ cup (60g) powdered sugar
  • ¼ cup (25g) unsweetened cocoa powder, sifted
  • Brown gel food coloring *optional

Instructions
 

  • Preheat oven to 200ºF (95ºC). Line two baking sheets with parchment paper.
  • Sift together the powdered sugar and cocoa powder in a medium-sized bowl and whisk until well blended.
  • Place the egg whites in a large bowl. Whip the egg whites with the whip attachment of an electric mixer, at medium speed, until foamy.
  • Add the cream of tartar and salt to the egg whites. Whip at medium-high speed until soft peaks form.
  • Gradually add the granulated sugar and continue whipping, at medium-high speed until stiff, glossy peaks form.
  • Stop the mixer. Sprinkle the powdered sugar and cocoa mixture over the egg whites and whip at low speed until incorporated, about 10 seconds.
  • *This step is optional. Place a large, disposable pastry bag, fitted with a round piping tip, into a tall drinking glass. (I used a Wilton tip #12.) Fold the top third of the bag over the glass, forming a cuff. Using a small, clean paintbrush, paint thin, vertical stripes of food coloring on the inside of the bag, from the piping tip to the edge of the fold.
  • Spoon the egg white mixture into the pastry bag. Pipe small kisses, 1 inch apart, onto the prepared baking sheets. (I made mine about 3/4-inch to 1-inch in diameter. If you'd like larger kisses, use a larger size piping tip.)
  • Bake for 1 1/2 hours. Turn off the oven and leave the meringues in oven to cool and continue drying out for an additional 2 hours. Store tightly covered at room temperature for up to 3 days.

Notes

To make the chocolate ganache, I used a ratio of two parts semi-sweet chocolate to one part heavy cream. (Weighing the ingredients will give you the most accurate ratio.) Place 8 ounces. (227g) of chopped semi-sweet chocolate into a medium bowl. Heat 1/2 cup (4 oz/ 118ml) of heavy cream in a small saucepan over medium heat. Bring the cream just to a boil. Pour the hot cream over the chocolate, making sure to cover it completely. Let sit for 2 minutes, then stir gently until smooth.