The Nutcracker Land of Sweets Cupcakes

Nutcracker Land of Sweets Cupcakes

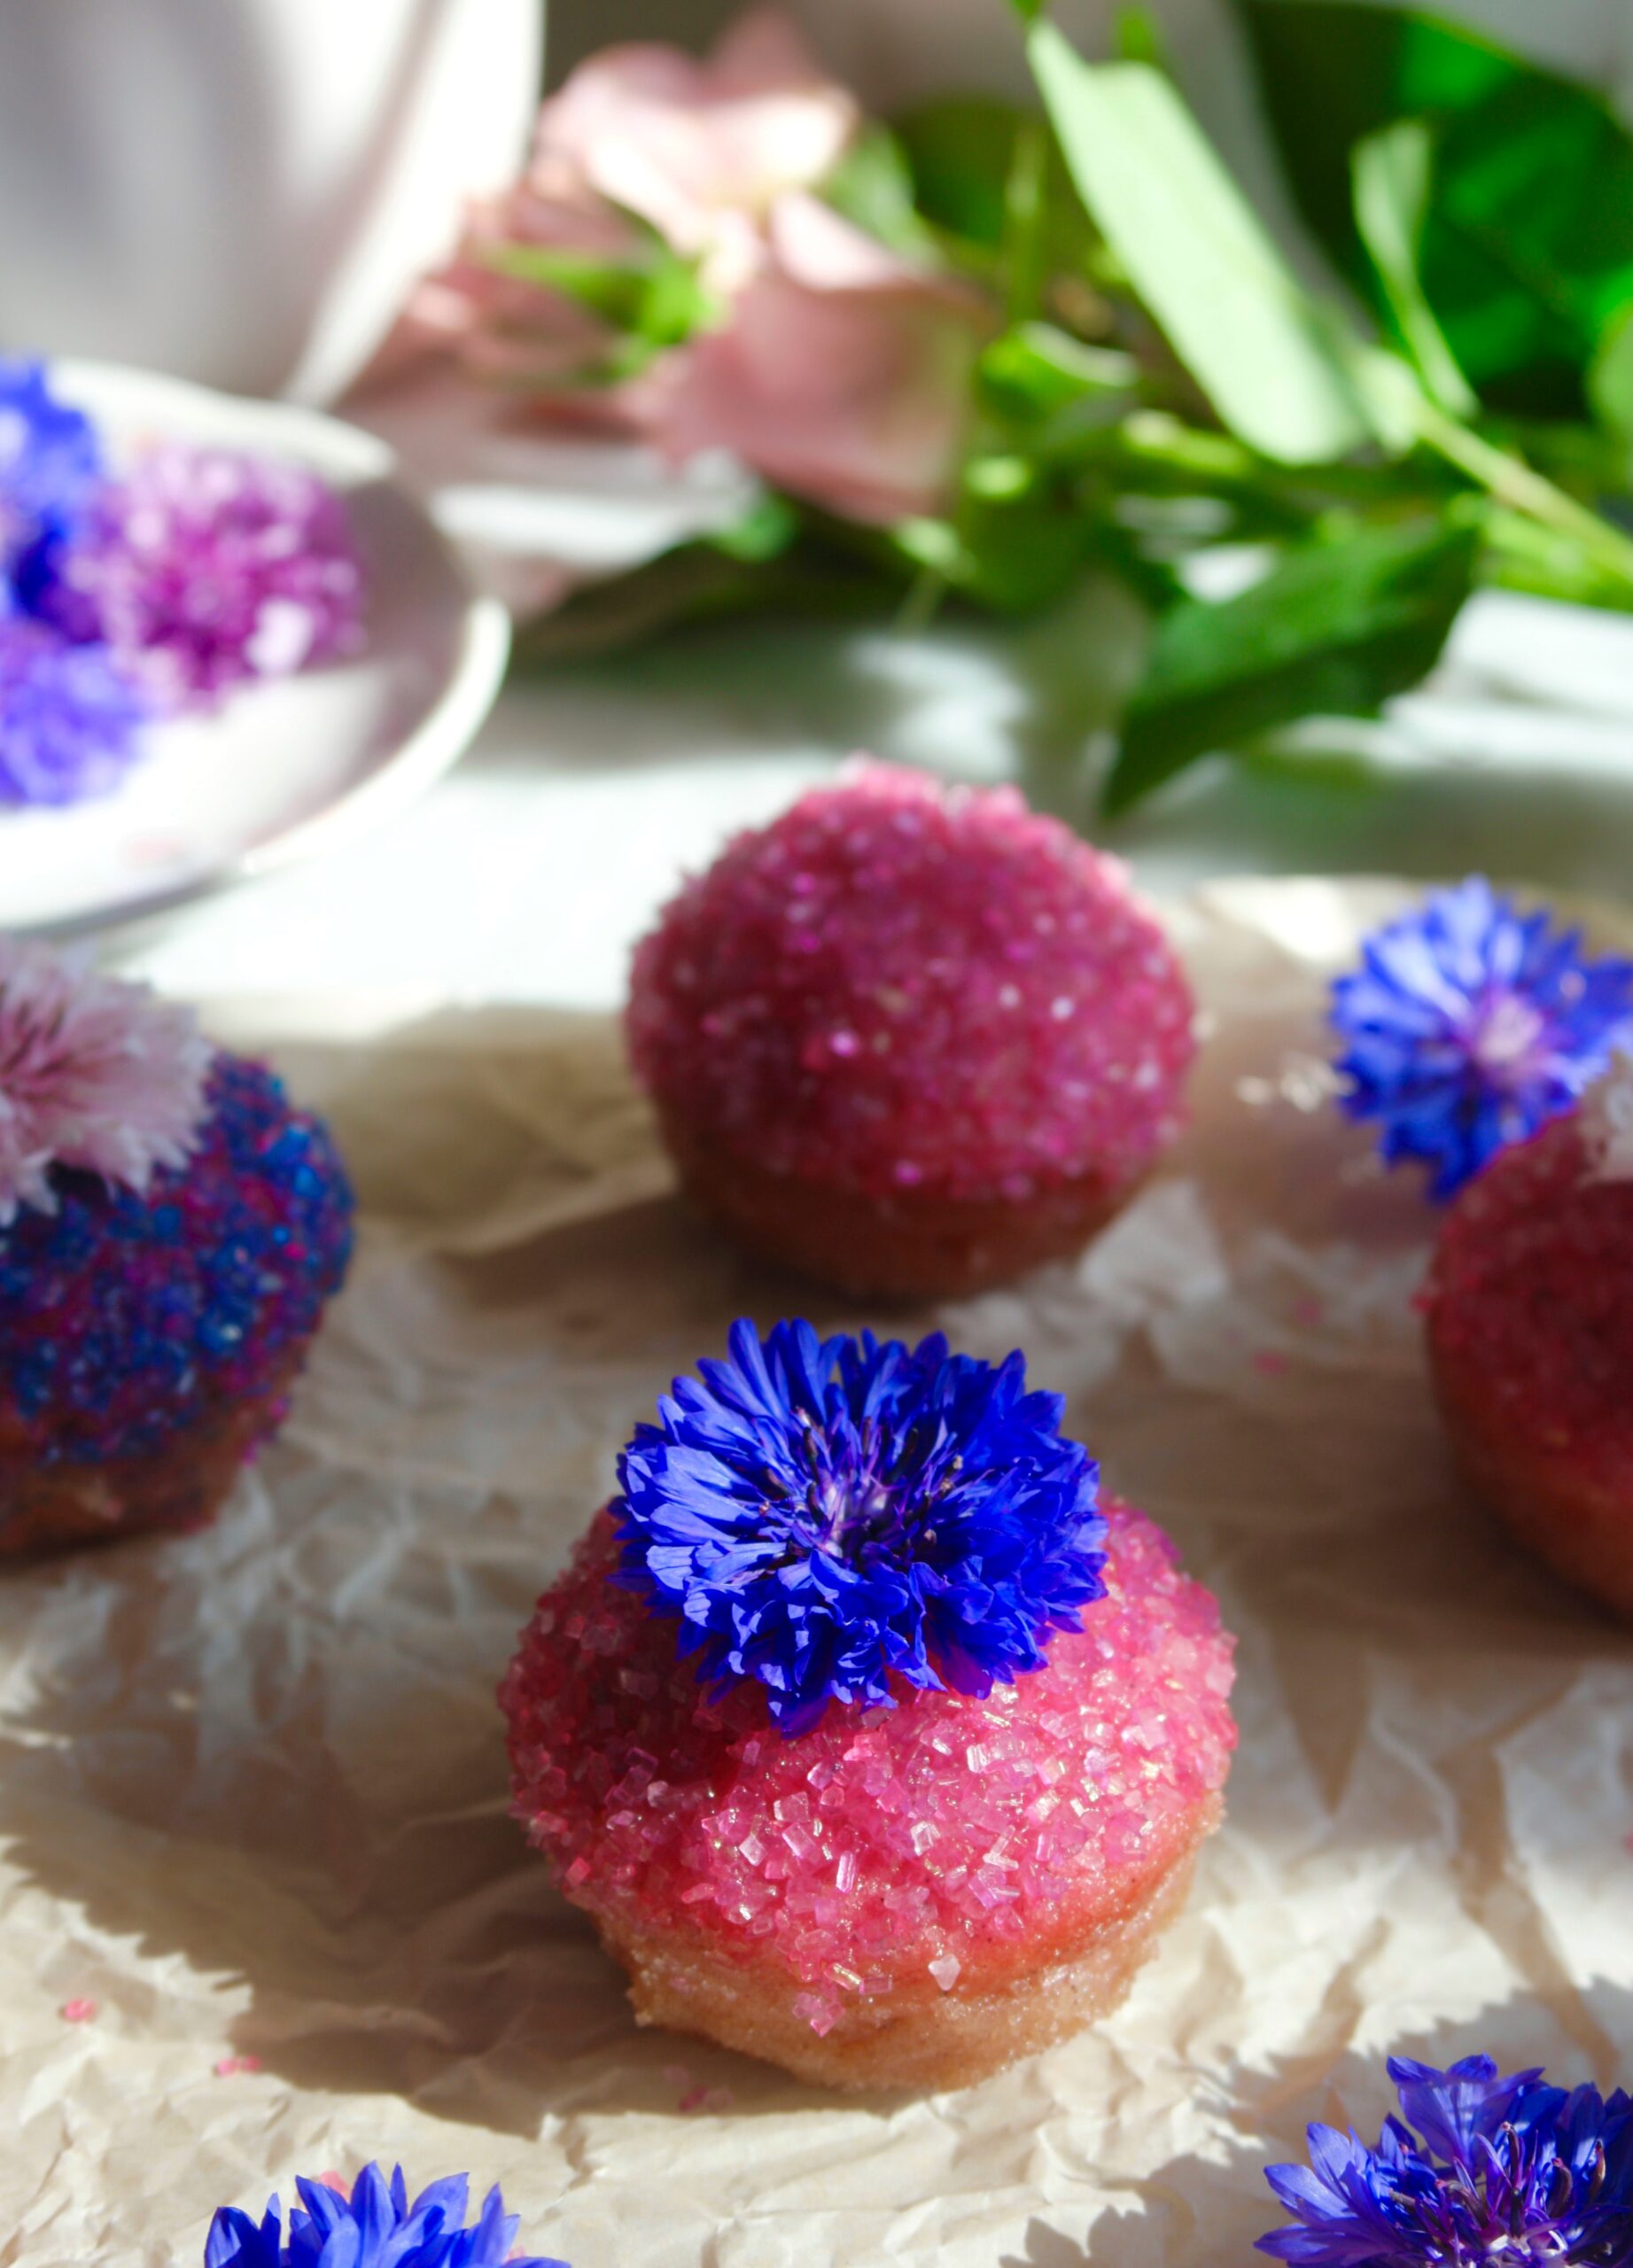
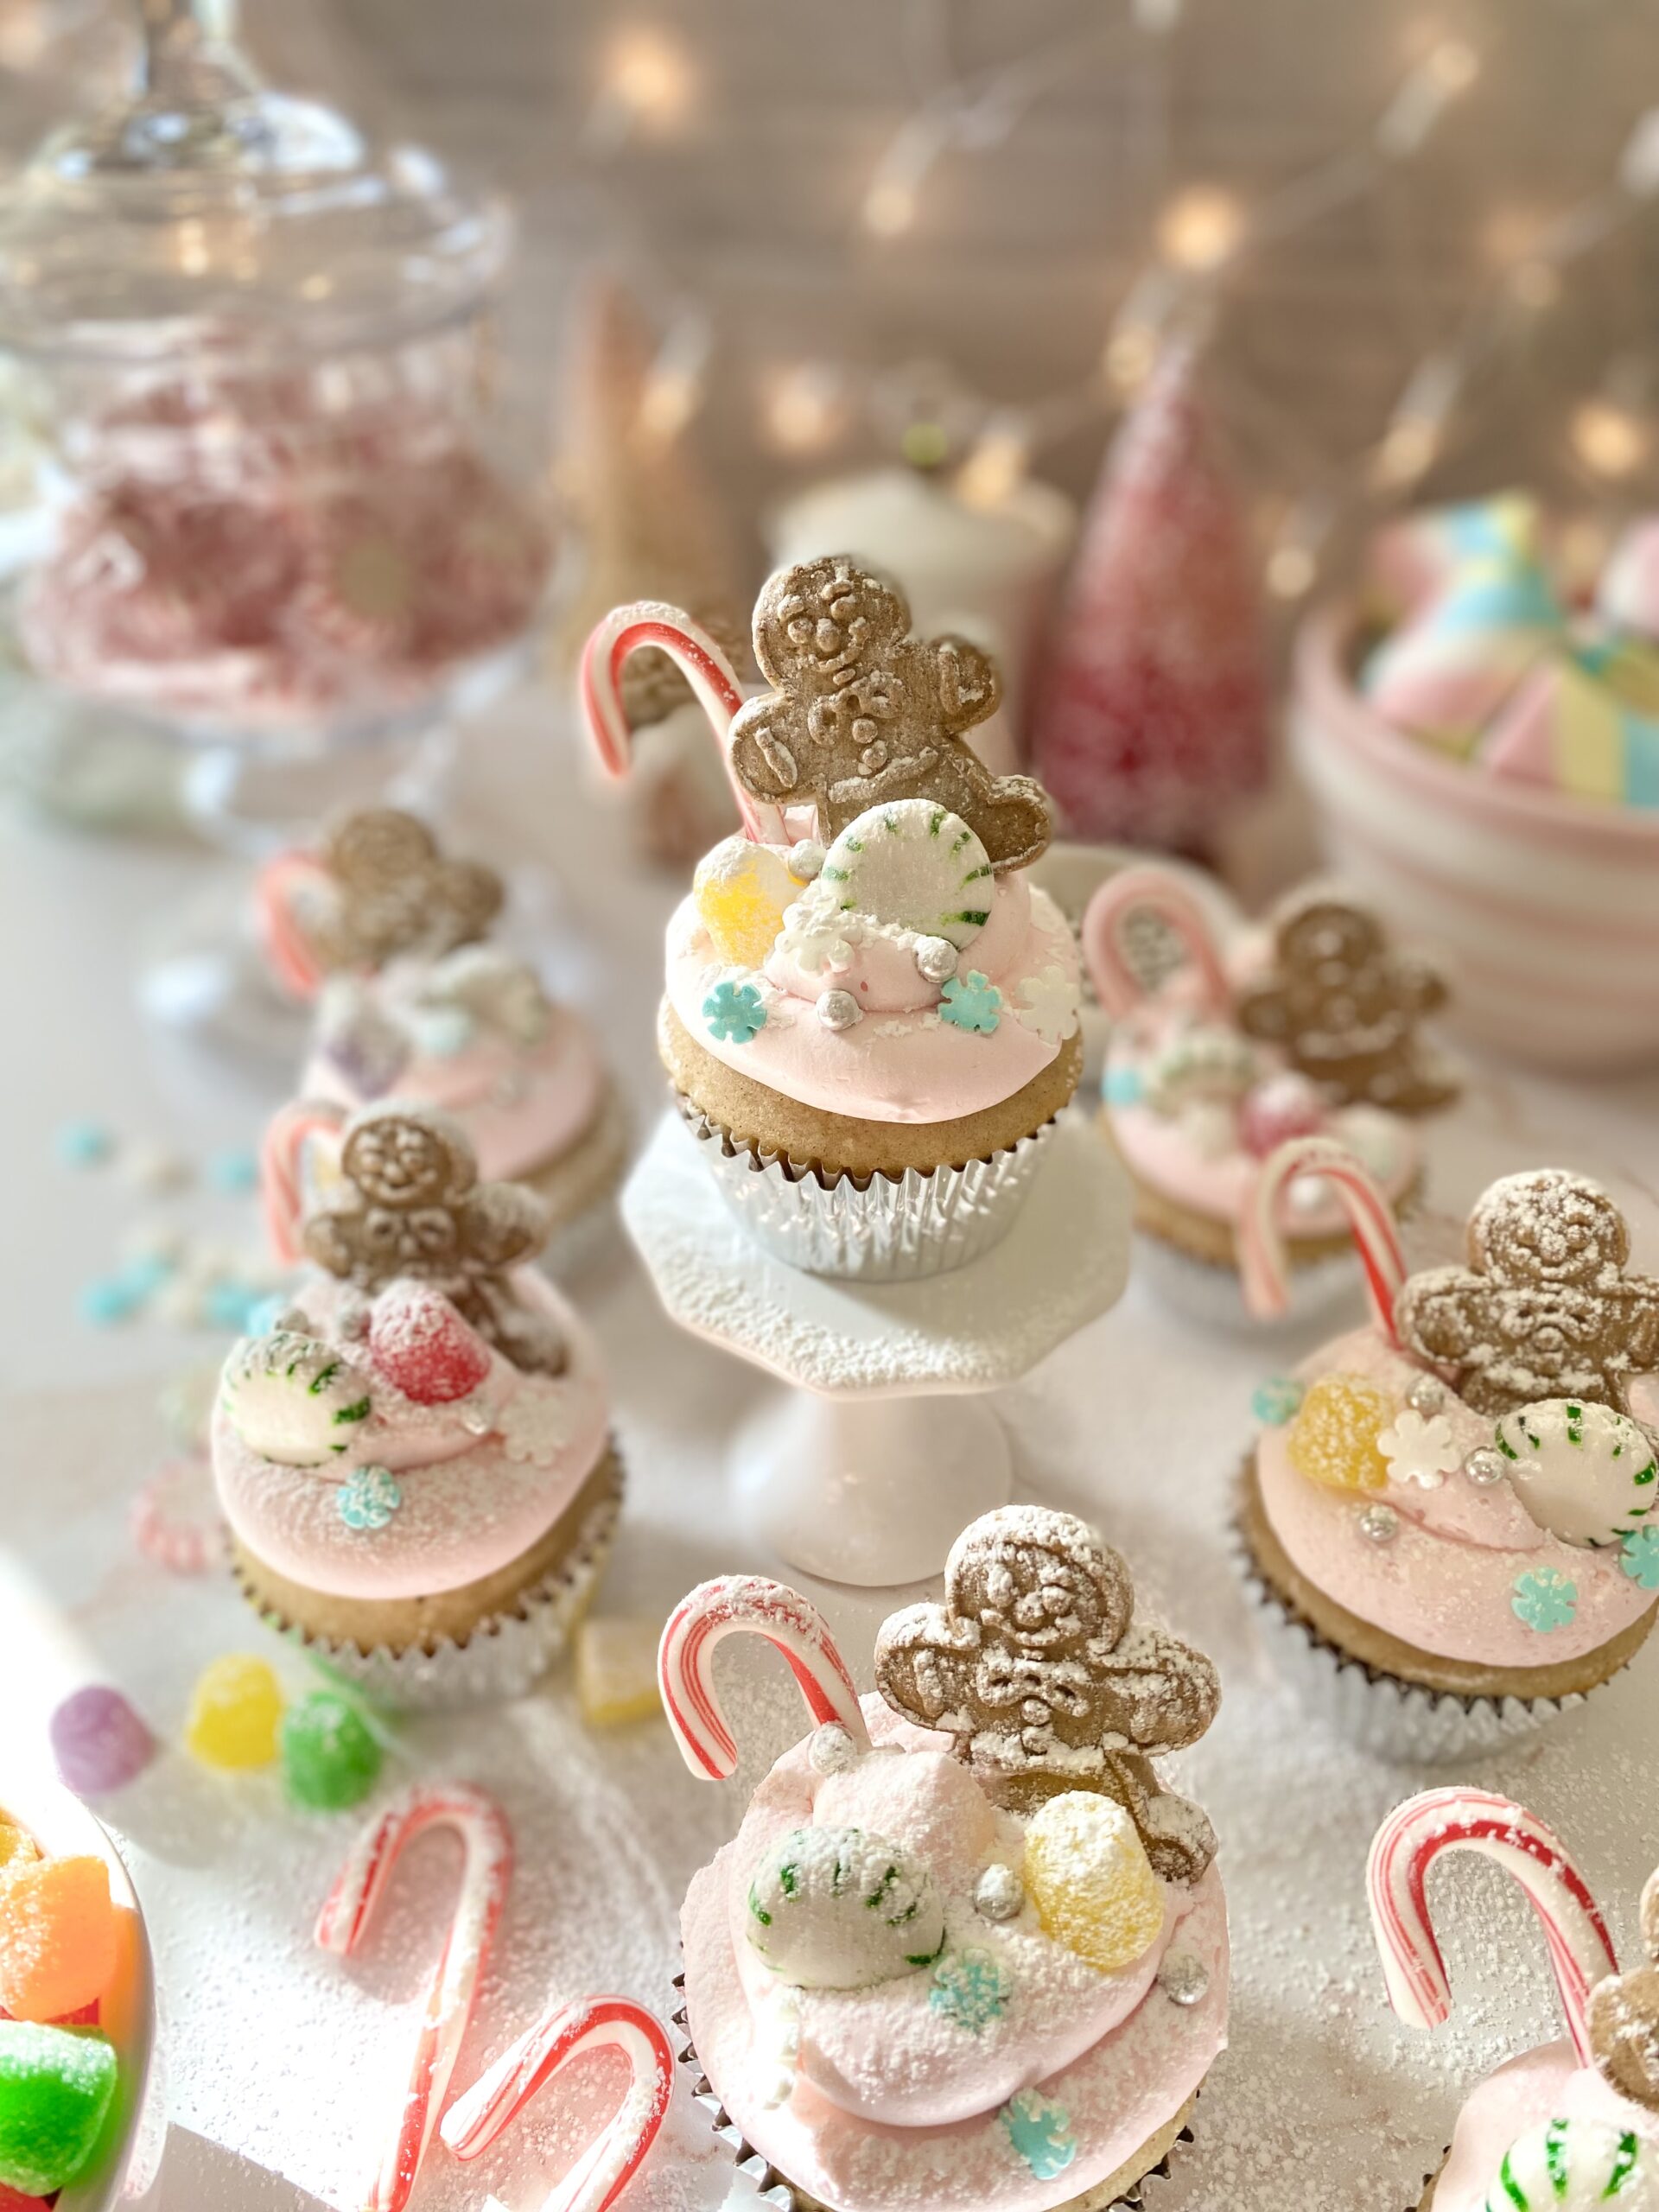
The tradition of enjoying the Nutcracker Ballet at Christmastime has been in my family for over 20 years. The Nutcracker Land of Sweets is a magical theme that has me mesmerized. Gingerbread, candy canes, gumdrops and billowy clouds of pink frosting are what dreams are made of. And that’s exactly what these dreamy cupcakes are made of. The cupcake flavor is a subtle spice cake. The recipe is adapted from a Martha Stewart cake recipe I made last summer. The original cake was paired with blackberry jam, but I knew plum jam would be perfect for these cupcakes. I topped them with a mildly sweet, fluffy Swiss meringue buttercream.

Part of the fun of making these cupcakes began at the store as I collected the sweets to decorate the cupcakes. Another perk of the job is taste testing the candy. I discovered that purple spice drops are licorice flavored and red spice drops are cinnamon. Who knew?

You might also like my Nutcracker Land of Sweets inspired candy bark. It’s a delightful holiday bark I designed that is often imitated. To view it, click here.

The Nutcracker Land of Sweets Cupcakes

Spice cupcakes filled with plum jam, topped with fluffy pink frosting, gingerbread men and Christmas candy, and dusted with sugar snow
Course Dessert
Servings 12 cupcakes

Ingredients
  

Spice cupcakes

  • ¾ cups (3 1/4 ounces) all purpose flour, sifted
  • ¾ cups (3 ounces) cake flour, sifted
  • 1 ½ teaspoons baking powder
  • ½ teaspoon ground cinnamon
  • ¼ teaspoon ground nutmeg
  • small pinch ground cloves
  • ¼ teaspoon fine sea salt
  • ½ cup (4 ounces) unsalted butter, softened
  • ¾ cup plus 2 tablespoons (6 1/8 ounces) fine granulated sugar or regular granulated sugar
  • 1 large egg
  • 1 large egg white
  • 1 teaspoon vanilla bean paste or pure vanilla extract
  • â…” cup whole milk
  • ¾ cup plum jam I used red plum jam

Pink Vanilla Swiss Meringue Buttercream

  • 4 large egg whites
  • 1 â…“ cups (9 3/8 ounces) fine granulated sugar or regular granulated sugar
  • 1 ½ cups (12 ounces) softened, unsalted butter, cubed
  • 1 teaspoon clear vanilla extract or pure vanilla etract
  • ¼ teaspoon fine sea salt
  • 2 drops pink gel food color I used Americolor deep pink

Decorations

  • small gingerbread cookies
  • mini candy canes
  • assorted candies such as spice drops, gumdrops, peppermints,
  • sprinkles or sugar pearls
  • powdered sugar

Instructions
 

Spice Cupcakes

  • Preheat oven to 350ºF. Line a 12 serving muffin pan with disposable baking cups. (I used silver foil liners.)
  • In a medium bowl, whisk together flours, baking powder, spices and salt. Set aside.
  • In a large bowl, cream butter and sugar together with an electric mixer until light and fluffy.
  • Add egg, egg white, and vanilla, one at a time, mixing until well combined.
  • Add flour mixture in two additions, alternating with milk. Mix until combined.
  • Divide batter evenly into wells of prepared muffin pan, filling about 2/3 full.
  • Bake until light golden and toothpick inserted comes out clean, about 16-18 minutes.
  • Let cool in muffin pan for 5 minutes. Gently transfer cupcakes to cooling rack to cool completely.
  • Core the center of each cupcake, removing a 3/4-inch deep circle. Fill with jam and replace the circle top.
  • Frost cupcakes with pink Swiss meringue buttercream. Decorate with cookies and candies. Lightly sprinkle with powdered sugar.

Pink Vanilla Swiss Meringue Buttercreamgue Buttercream

  • Combine egg whites and sugar in a heatproof bowl. Set over a pan of gently simmering water.
  • Whisk constantly until sugar is dissolved and temperature of 160ºF is reached.
  • Transfer mixture to the bowl of a stand mixture with a whisk attachment. Whisk on low speed, gradually increasing to medium-high speed. Whisk until glossy, stiff peaks form and mixture reaches room temperature.
  • Turn mixer to medium-low speed. Add butter, a few pieces at a time, allowing the butter to fully incorporate each time before adding more.
  • Switch to paddle attachment. On low speed, mix in vanilla, salt and food color. Continue mixing on low speed for a few minutes until smooth.

Notes

Recipe adapted from Martha Stewart Spice Cake
Keyword cupcakes

Maple Pecan Brownies

maple pecan brownies

Pecan pie was my mom’s favorite, but she didn’t bake pies, so I always used to bake her one for Thanksgiving. One year, I made a chocolate version. It was delicious, but let’s just say it wasn’t user friendly. It was gooey and hard to serve. Over the years, it eventually morphed into these Maple Pecan Brownies. The brownie version is still delicious, rich and gooey with toasty pecans, but much more user friendly.

Enjoying Maple Pecan Brownies with a glass of milk or a cup of coffee is a must. Thinking of it brings back memories. I can practically smell my dad brewing the coffee to go with these brownies.

Maple Pecan Brownies

Rich, gooey brownies topped with pecan pie filling
Course Dessert
Servings 16 brownies

Ingredients
  

Brownies

  • ¾ cup (6 ounces) unsalted butter, melted
  • 1 cup (7 ounces) granulated sugar
  • ¾ cup (5 1/4 ounces) brown sugar
  • 3 large eggs
  • ½ teaspoon vanilla bean paste or pure vanilla extract
  • ¾ cup (2 1/4 ounces) unsweetened cocoa powder, sifted preferably Dutch process cocoa
  • ½ teaspoon baking soda
  • ½ teaspoon salt
  • 1 ¼ cups (5 5/8 ounces) flour

Pecan Topping

  • ¼ cup pure maple syrup
  • 2 tablespoons (1 ounce) unsalted butter, melted
  • ½ cup (3 1/2 ounces) brown sugar
  • 1 large egg
  • 1 teaspoon maple extract
  • ¼ teaspoon salt
  • 2 cups (7 ounces) pecan halves or pieces

Instructions
 

Brownies

  • Preheat oven to 350ºF. Line a 9-inch square baking pan with parchment paper, overlapping the sides an inch or two. Spray parchment paper with nonstick cooking spray.
  • In a large bowl, stir together melted butter, granulated sugar and brown sugar until well combined.
  • Mix in eggs and vanilla, one at a time, until well combined.
  • Mix in cocoa powder, baking soda and salt until well combined.
  • Stir in flour just until combined.
  • Spread batter into prepared baking pan. Bake just until top is set, about 25 minutes.
  • Meanwhile, prepare pecan topping.
  • When brownie top is set, remove from oven. Gently pour pecan topping around the outer perimeter of brownies, to avoid making brownies sink in the middle. Evenly distribute the pecan topping over the top gently with a spoon.
  • Return the brownies to the oven and continue baking until the topping is set, about 20-25 minutes. Brownies will stop jiggling and topping will look deep golden brown. Toothpick inserted inside will have a few moist crumbs on it. (If your topping starts to brown too much on the edges before the inside is done, apply aluminum foil around the edges as you would with a pie.)
  • Remove from oven and cool completely before cutting, about 2- 2 1/2 hours.
  • Cut into squares, wiping knife between cuts.

Pecan Topping

  • In a medium bowl, stir together maple syrup, butter, brown sugar, egg, maple extract and salt until well combined.
  • Stir in pecans until well coated with maple syrup mixture.
  • Set aside until brownies are partially baked.
Keyword brownies, chocolate, maple pecan

Apple Spice Cookies with Brown Butter Icing

Apple Spice Cookies with Brown Butter Icing

These Apple Spice Cookies were one of my most popular cookies last fall so I decided to bring them back a little early this year. The combination of cinnamon, nutmeg and vanilla in this cookie dough will remind you of cinnamon rolls and apple pie and inspire you look forward to fall.

The apples in this recipe are cooked briefly on the stovetop to bring out the flavor and create the perfect texture. Dropping raw apple chunks into cookie dough or cake batter is usually not a good idea. If you’ve ever baked an apple pie, you know that apples release liquid as they cook and that liquid will end up in your baked cookies, creating soggy spots. So definitely don’t skip this step!

These gorgeous, golden brown cookies are perfectly delicious on their own, but extra credit goes to the Brown Butter Icing for taking them over the top!

apple spice cookies with brown butter icing

Make sure to head over to Instagram to watch the video of these Apple Spice Cookies being created: Click here

Apple Spice Cookies with Brown Butter Icing

Spice cookies with fresh apples and brown butter icing
Course Dessert
Servings 12 cookies

Ingredients
  

Cooked Apples

  • 1 tablespoon butter
  • 1 cup (4 oz or 113g) chopped apples (1/4-inch pieces) I used one large Granny Smith apple
  • 1 tablespoon sugar
  • ¼ teaspoon ground cinnamon

Apple Spice Cookie Dough

  • 1 ½ cups (6 3/4 oz or 191g) all purpose flour, sifted
  • ½ teaspoon baking soda
  • ½ teaspoon salt
  • 1 teaspoon ground cinnamon
  • ¼ teaspoon ground nutmeg
  • ½ cup (4 oz 113g) unsalted butter, softened
  • 1 cup (7 oz or 200g) packed brown sugar
  • 1 large egg
  • 1 large egg yolk
  • ½ teaspooon pure vanilla extract

Brown Butter Icing

  • 2 tablespoons unsalted butter
  • ½ cup (2 oz or 57g) powdered sugar, sifted
  • ½ teaspoon pure vanilla extract
  • pinch fine sea salt
  • 1-2 tablespoons whole milk

Instructions
 

Cooked Apples

  • Melt the butter in a small skillet over medium heat. Add apples, sugar and cinnamon to the skillet.
  • Cook, stirring occasionally, until the apples are tender, about 4-5 minutes.
  • Remove from heat and let cool completely. Drain any excess liquid from the cooled apples.

Apple Spice Cookies

  • Preheat the oven to 375ºF (190ºC). Line two large baking sheets with parchment paper.
  • In a medium bowl, whisk together the flour, baking soda, salt, cinnamon and nutmeg. Set aside.
  • In a large bowl, beat the butter and brown sugar with an electric mixer at medium speed until light and fluffy.
  • Beat in the egg, egg yolk and vanilla extract, one at a time, until well combined
  • Stir in the flour mixture, just until combined.
  • Fold the the cooled apples into the cookie dough.
  • Divide the dough into 12 equal golf ball size portions and place them 3 inches apart on the prepared baking sheets.
  • Bake until golden brown, about 11-13 minutes. Let cool 1 minute on the baking sheet, then transfer to a cooling rack to cool completely.

Brown Butter Icing

  • In a small saucepan, cook the butter over medium heat until golden brown and fragrant. When brown specks start to form in the bottom of the pan, remove from heat.
  • Immediately transfer the browned butter to a small bowl. Whisk in the the powdered sugar, vanilla extract, salt and 1 tablespoon milk. Add more milk as needed to reach desired consistency.
  • Drizzle the icing over the cooled cookies.

Notes

NOTE:  If your cookies spread too much when baking, refrigerate dough for 30 minutes, then bake as directed.
Keyword cookies, holiday, thanksgiving

Fairy Puffs

Fairy Puffs sugared mini muffins wtih edible flowers

My dad used to take me on walks in the woods to look for fairy rings when I was a child. I wanted to see a real fairy so badly! I read a book about fairies, hoping to learn more about them. Fairies love little cakes, milk, honey and butter so I’m sure these Fairy Puffs would be fairy approved.

My Fairy Puffs recipe is loosely based on an old favorite mini muffin recipe. I tweaked it quite a bit, including the addition of pink dragonfruit powder. Dragonfruit has a subtle flavor, so the bright fuchsia powder is mostly for color. But oh what a beautiful color it is! You can find dragonfruit powder in healthy food stores or online. To find the dragonfruit powder, also known as pink pitaya powder, I used, click here.

fairy puff muffins

Decorating these little cuties was so entertaining! After sampling multiple variations of sparkling sugar and cinnamon sugar, I decided that dipping the bottoms of the muffins in butter and cinnamon sugar, then dipping the tops in butter and sparkling sugar gave them the perfect balance of sugar and spice. I had purchased some edible flowers a couple of days prior, and they added a pretty, magical touch. The flowers I used are called bachelor’s buttons and I got them at a local gourmet flower seller.

sugared mini muffins with edible flowers

Fairy Puffs

Course Breakfast, Brunch
Servings 24 mini muffins

Ingredients
  

Fairy Puffs

  • 1 â…“ cups (6 oz or 99g) all purpose flour, sifted
  • 3 tablespoons dragonfruit powder *See note below
  • 1 ½ teaspoons baking powder
  • ¼ teaspoon ground nutmeg
  • Scant ½ teaspoon fine sea salt
  • â…“ cup (2 5/8 oz or 75g) unsalted butter, softened
  • ½ cup (3 1/2 oz or 100g) granulated sugar
  • 1 large egg
  • ½ cup (4 oz or 118ml) whole milk

Topping

  • ½ cup (4 oz or 113g) unsalted butter, melted
  • ½ cup (3 1/2 oz or 100g) granulated sugar
  • ½ teaspoon ground cinnamon
  • ½ cup (3 1/2 oz or 100g) sparkling sugar crystals **I used combinations of white, pink, purple & blue
  • edible flowers (optional)

Instructions
 

Fairy Puffs

  • Preheat oven to 350ºF. Grease and flour a 24 serving mini muffin pan.
  • In a medium bowl, whisk together flour, dragonfruit powder, baking powder, salt and nutmeg. Set aside.
  • In a large bowl, cream butter and sugar with an electric mixer until light and fluffy.
  • Add egg and beat until smooth.
  • Add flour mixture and milk alternately in two additions and mix just until combined.
  • Transfer batter to prepared muffin pan, filling muffin cups about 3/4 full.
  • Bake until toothpick inserted in center of muffins comes out clean, about 12-14 minutes. (Be careful not to over bake. Check a few minutes early. Small muffins can dry out easily.)
  • Let cool in pan for 5 minutes. Remove puffs from pan and transfer to cooling rack. (Loosen puffs with a small offset spatula or butter knife if necessary.)

Topping

  • Combine granulated sugar and cinnamon in a shallow bowl.
  • Place colored sparkling sugar crystals in another shallow bowl.
  • Dip the bottoms of each puff in melted butter, then into cinnamon sugar mixture.
  • Dip the tops of each puff in melted butter, then into sparkling sugar.
  • Decorate with edible flowers if desired.

Notes

*To purchase dragonfruit powder, click here.
 **To purchase pink sparkling sugar crystals, click here.
 
Keyword cake, muffins

Mini Hummingbird Cake

Mini Hummingbird Cake

If you haven’t noticed already, I love little cakes. Mini cakes are not only cute and charming, they’re likely to make you very popular. This recipe makes two darling Mini Hummingbird Cakes, one to keep and one to share. Hummingbird Cake is a delightful way to use your ripe bananas. The version I’m sharing here also contains pineapple, pecans and coconut. This fruity, nutty combination reminds me of spring and would be perfect for Easter or a spring picnic.

Mini Hummingbird Cake

by Mari Vasseur
Hummingbird Cakes filled with bananas, pineapple, pecans and coconut, topped with cream cheese frosting and decorated with graham cracker crumb moss and fresh chamomile flowers.
Course Dessert
Servings 2 4-inch 2-layer cakes

Ingredients
  

Hummingbird Cakes

  • 1 ½ cups (191g) all purpose flour, sifted
  • ½ teaspoon baking soda
  • ½ teaspoon fine sea salt
  • ½ teaspoon cinnamon
  • ½ cup (113g) unsalted butter, softened
  • ½ cup (100g) granulated sugar
  • ½ cup packed (100g) packed brown sugar
  • 1 tablespoon (15ml) vegetable oil or neutral oil of your choice
  • 1 large egg
  • 1 large egg yolk
  • 1 teaspoon pure vanilla extract
  • 1 cup (227g) mashed ripe bananas (about 2 large bananas)
  • 1 8 oz (227g) can crushed pineapple, drained
  • ½ cup (60g) chopped pecans, toasted
  • ¼ cup (28g) sweetened dried coconut flakes, chopped* See note below

Cream Cheese Frosting

  • 1 cup (227g) unsalted butter, softened
  • 2 tablespoons (30ml) heavy whipping cream, room temperature, divided
  • 1 ½ teaspoons pure vanilla extract
  • ¼ teaspoon fine sea salt
  • 4 cups (482g) powdered sugar, sifted
  • 1 8 oz (227g) package cream cheese, softened

Optional Decor

  • Green gel food color I used Americolor avocado green**
  • Yellow gel food cool I used Americolor lemon yellow***
  • Vodka
  • 6 graham crackers (two squares each), crushed
  • Fresh pesticide free chamomile flowers

Instructions
 

Hummingbird Cakes

  • Preheat oven to 350ºF (180ºC). Line the bottoms of four 4-inch cake pans**** with parchment paper. Grease and flour the insides.
  • In a medium-sized bowl, whisk together the flour, baking soda, salt and cinnamon until well blended.
  • In a large bowl, beat the butter, sugar, brown sugar and oil with an electric mixer, until pale and fluffy. Beat in the egg, egg yolk, and vanilla extract in three separate additions, making sure each one is incorporated before adding the next. Stir in the bananas, pineapple, pecans and coconut until combined.
  • Transfer the batter to prepared cake pans, about 1 cup of batter in each pan. Place the filled cake pans on a baking sheet.
  • Bake until toothpick inserted in centers comes out clean, about 25-28 minutes. Cool the cakes in pans 10 minutes then turn the cakes out onto a cooling rack.
  • Trim the cakes to 1-inch thickness. Fill, stack and frost the cakes with cream cheese frosting.

Cream Cheese Frosting

  • In a large bowl, beat the butter with an electric mixer until smooth and pale. Beat 1 tablespoon (15ml)of heavy cream, the vanilla extract and salt into the butter until well combined. On low speed, beat in the powdered sugar a half cup at a time, until well combined.
  • In a medium-sized bowl, mix cream the cheese with remaining 1 tablespoon (15ml) heavy cream, with a spatula until smooth. On low speed, beat the cream cheese mixture into the butter mixture until smooth and well blended. Smooth out any bubbles by stirring by hand with a spatula.

Decor

  • To make the graham cracker crumb moss: In two small bowls, dilute 1/8 teaspoon of each gel food color with a few drops of vodka. (Vodka will dissipate as the crumbs dry.) Place the graham cracker crumbs in a plastic food bag. Add diluted food colors a little at a time and seal the bag. Shake the bag and gently massage it to distribute the color. Add more diluted food color as needed until desired your shade of green is reached. Spread the crumbs out onto a parchment lined baking sheet to dry. Apply the crumbs to bottom edges of the frosted cakes.

Notes

*Chop the coconut flakes to achieve a finer texture. This step is optional.
**To find the avocado green food color gel I used, click here.
***To find the lemon yellow food color gel I used, click here.
****To find the 4-inch cake pans I used, click here.
Keyword cake, hummingbird

Happy Jam Tarts

Happy Jam Tarts

We’ve all needed a little cheering up at times, especially this past past year. These cute, happy tarts won’t take your problems away, but they can certainly make you smile, especially if you make them for someone else. They’re super easy to make and they taste better than the ones in the box we ate as kids. You can use store bought pie dough if you want to streamline the process. Any flavor of jam or preserves you have on hand works too!

Feel free to have fun decorating these little cuties. The possibilities are endless. You can use edible glitter, purchased candy eyes or even add mustaches. Happy baking!

Happy Jam Tarts

Jam-filled tarts with icing
Course Breakfast, Brunch, Dessert
Servings 8 tarts

Ingredients
  

Jam Tarts

  • 2 9-inch pie crusts, store bought or homemade
  • 1 cup strawberry jam or preserves or any flavor of your choice
  • 1 egg
  • 1 tablespoon milk or water

Icing

  • 1 ½ cups powdered sugar
  • 2 tablespoons milk
  • ½ teaspoon pure vanilla extract
  • 1 pinch salt
  • gel food color * I used Wilton Rose gel food color
  • ½ teaspoon meringue powder ** optional but helps icing to set

Decorations

  • sprinkles
  • black fondant
  • blue fondant or any color of your choice

Instructions
 

Jam Tarts

  • Preheat oven to 375º.
  • Line a large baking sheet with parchment paper.
  • Roll pie dough onto lightly floured surface. Cut into 8 6-inch by 4-inch rectangles, re-rolling dough as necessary.
  • Make egg wash by beating egg together with milk in a small bowl.
  • Spread 2 tablespoons of jam onto right half of each rectangle to within 1/2-inch of edges. Brush edges with egg wash.
  • Fold dough in half, left side over right. Seal edges by pressing with a fork
  • Poke several holes in the top of each tart with a toothpick.
  • Bake until golden, about 15-20 minutes.
  • Transfer to a cooling rack and let cool completely.

Icing

  • In a medium bowl, whisk powdered sugar, milk, vanilla extract and salt together until smooth.
  • Using a toothpick, add food color a little at a time until desired shade is achieved.
  • Stir in meringue powder, if using.
  • Spoon icing onto tarts.
  • Add sprinkles while icing is wet. When icing has set, add eyes, mouths and bows if desired.

Decorations

  • For the eyes, make 16 1/8-inch balls of black fondant. Flatten slightly. Adhere with a bit of water.
  • For the mouths, make 8 1/2-inch long, very thin strips of black fondant. Adhere with a tiny bit of water, using tweezers if necessary.
  • For the bows, roll out blue fondant to 1/16th-inch thickness. Cut out bows using ***bow cutter. Adhere with a bit of water.

Notes

*To find Wilton Rose gel food color, click here
**To find meringue powder, click here
***To find bow cutter, click here

Cherry Blossom Cookies

cherry blossom cookies

Each spring, I look forward to the sight and fragrance of beautiful botanical blooms, especially cherry blossoms. We often think of cherry blossoms as something unique to Washington D.C. or Japan, but cherry blossoms can be found in many regions of the United States. Georgia has many thousands of the beautiful pink trees. They can also be found in my home state, California. Here in California we also have many other types of beautiful blossoming fruit trees.

Inspired by the beautiful pink blossoms, I baked some cherry blossom cookies. There are many varieties of the blossoming pink trees. The Yoshino variety that we love to admire is not the same as the trees that produce cherries that we typically eat, but I decided to make the cookies cherry flavor. Cherry extract is more accessible, but it’s also possible to make the cookies sakura blossom flavor if you prefer. You can purchase culinary sakura blossoms or sakura powder and flavor the cookies with it.

These perfectly pretty, pink cookies are easy to make and fun to decorate. You can sprinkle sparkling sugar on them before baking and call it a day or you can make some pink cherry icing and add sugar pearls or sprinkles. Either way, they look beautiful and taste delicious!


Cherry Blossom Cookies

by Mari Vasseur
Pink cherry flavored sugar cookies with cherry icing
Course Brunch, Dessert
Servings 6 dozen

Ingredients
  

Cherry Blossom Cookies

  • 1 cup (227g) unsalted butter, softened
  • 6 tablespoons (3 oz / 85g) cream cheese, softened
  • ¾ cup (150g) sugar
  • ¼ teaspoon fine sea salt
  • 1 large egg
  • 1 teaspoon pure cherry extract or natural cherry flavoring *see note below
  • â…› teaspoon pure almond extract
  • 3 cups (383g) all purpose flour, sifted
  • Pink gel food color **see note below

Cherry Icing

  • 1 cup (120g) powdered sugar
  • 1 pinch fine sea salt
  • 4-5 tablespoons (59-67ml) whole milk
  • ½ teaspoon pure cherry extract or natural cherry flavoring
  • Pink gel food color

Optional Cookie Decorations

  • White sparkling sugar
  • Pink sugar pearls
  • Pink nonpareils

Instructions
 

Cherry Blossom Cookies

  • In a large bowl, beat the butter and cream cheese together with an electric mixer on medium speed, just until smooth and well blended.
  • Add the sugar and salt. Beat on medium speed until pale and fluffy. Mix in the egg, then the extracts until incorporated.
  • On low speed, mix in the flour in two additions, just until combined.
  • Mix in the food coloring, a tiny bit at a time, until the desired shade is achieved.
  • Divide the dough into two disks. Wrap them in plastic wrap and refrigerate until firm, about 2 hours or up to overnight.
  • Preheat the oven to 375ºF (190ºC). Line two large cookie sheets with parchment paper.
  • On a lightly floured surface, roll the dough to 1/8" thickness. Cut out cookies with a 2-inch blossom cutter..***
  • Place the cookies about 2 inches apart onto the prepared baking sheets. Sprinkle with sparkling sugar if using.
  • Bake for 7-9 minutes until the bottom edges are lightly browned. Remove from the oven and transfer the cookies to a cooling rack.
  • Cool completely then ice with cherry icing, if desired. Decorate with sugar pearls or sprinkles before the icing sets.

Cherry Icing

  • In a small bowl, whisk together the powdered sugar, salt, 3 tablespoons (45ml) of milk and the cherry extract. Add additional milk until the desired consistency is reached. Whisk together until smooth.
  • Mix in pink gel food color, a tiny bit at a time, until the desired shade is achieved.

Notes

*Do not use imitation cherry flavoring or extract. Imitation extracts may make your cookies taste medicinal. 
** I used Wilton gel food color in shade rose. Click here to find it. 
*** Use your favorite blossom cookie cutter or click here to find the blossom cutters I used.
Keyword cherry, cherry blossom, cookies

Peaches & Cream Profiteroles

Peaches & Cream Profiteroles by Brownie Mischief

Summer is nearly over, and after the recent heatwave here in Southern California, I’m more than ready to welcome fall weather. But before I put on my fluffy sweater and dive into pumpkin spice everything, I want to enjoy the tail end of peach season, don’t you? Farmer’s markets and stores near my home are still brimming over with fresh peaches, so I picked up some peaches and decided to give them a proper goodbye and send them off in style.

Peaches & Cream Profiteroles by Brownie Mischief

I created some luscious peaches and cream filled, bite-size puffs of choux pastry, called profiteroles. They’re like cream puffs, only smaller. The filling is creamy, but so light and airy that I’m convinced that these profiteroles have no calories! The recipe I’m sharing with you uses fresh peaches, but feel free to substitute frozen peaches if fresh peaches aren’t available. There are a lot of steps to this recipe, but the steps are done in stages and are very easy to do.

Peaches & Cream Profiteroles by Brownie Mischief

I decorated my profiteroles with fresh, pesticide-free miniature rosebuds, also known as spray roses. If you can’t find miniature rosebuds, pesticide-free rose petals would be a good substitute. You may not get a chance to embellish these little beauties. They have a way of popping into people’s mouths even before you can decorate them!

Peaches & Cream Profiteroles

Bite-sized puffs of choux pastry filled with a creamy, fresh peach filling and topped with fresh peach icing.
Course Dessert
Cuisine French
Servings 18

Ingredients
  

Peach Purée

  • 2 large fresh peaches, peeled, pitted and sliced *see note below
  • ½ teaspoon fresh lemon juice
  • ½ teaspoon natural peach flavoring

Peaches & Cream Filling

  • 1 cup whole milk
  • â…“ cup (2 ounces) granulated sugar
  • 2 tablespoons (1/2 ounce) cornstarch
  • ¼ teaspoon fine sea salt
  • 1 egg
  • 2 tablespoon (1 ounce) unsalted butter
  • ¼ teaspoon pure vanilla extract
  • â…› teaspoon pure almond extract
  • peach purée recipe above
  • â…” cup heavy whipping cream

Profiteroles

  • ½ cup water
  • 4 tablespoons (2 ounces) unsalted butter, cubed
  • â…› teaspoon fine sea salt
  • ½ cup (2 1/4 ounces) all purpose flour
  • 2 eggs room temperature

Peach Icing

  • ¾ cup (3 ounces) powdered sugar, sifted
  • 2 tablespoons reserved peach puree
  • 1 tablespoon heavy whipping cream
  • ¼ teaspoon natural peach flavoring

Instructions
 

Peach Purée

  • Purée peaches in a blender or food processor. Strain puréed peaches through a sieve. Stir in lemon juice.
  • Place puréed peaches in a small saucepan. Bring to a boil over medium heat.
  • Reduce heat and simmer until peach purée is reduced by half.
  • Remove from heat. Stir in peach flavoring and set aside to cool completely.

Peaches and Cream Filling

  • Bring milk to a boil in a small saucepan over medium heat.
  • Meanwhile, whisk sugar, cornstarch and salt together in a medium bowl. Add the egg and whisk until smooth.
  • When milk starts to boil, remove from heat and pour 1/3 of the hot milk into the egg mixture and whisk to combine.
  • Pour the egg mixture into the remaining hot milk and cook over medium heat, stirring continuously, until the mixture comes to a boil and thickens.
  • Remove from heat. Stir in butter and extracts.
  • Pour mixture through a sieve placed over a bowl. Cover the surface of pastry cream with plastic wrap. Let cool.
  • Set aside 2 tablespoons of cooled peach purée. Add remaining peach purée to cooled pastry cream and stir to combine. Chill in refrigerator.
  • In a medium bowl, whip heavy cream to stiff peaks with an electric mixer at high speed. Fold whipped cream into peach pastry cream mixture. Set aside in refrigerator.

Profiteroles

  • Preheat oven to 400ºF. Line two large baking sheets with parchment paper.
  • Combine water, butter and salt in a medium saucepan and bring to a boil over medium heat.
  • Reduce heat. Add flour and stir vigorously with a wooden spoon until mixture pulls away from sides of the pan and forms a ball.
  • Transfer mixture to the bowl of a stand mixer. Mix on low speed until steam dissipates and mixture cools to lukewarm.
  • Add eggs one at a time and beat with an electric mixer at medium speed, until smooth, stopping to scrape down bowl.
  • Transfer mixture to a piping bag, fitted with a large round tip. (**I used Ateco tip 808.)
  • Pipe 1 1/4 inch mounds, about 2 inches apart onto prepared baking sheets. Smooth tops with a wet finger.
  • Bake for 15 minutes, then turn oven temperature down to 350ºF and continue baking until golden brown, about 8-10 more minutes. Using a toothpick or skewer poke a small hole in each profiterole to let steam escape. Place on a wire rack to cool completely.
  • Using the tip of a paring knife, poke a pilot hole in the bottom of each profiterole.
  • Place peaches and cream filling into a piping bag fitted with a medium round piping tip. (***I used Wilton tip 12.)
  • Place piping tip into the pilot holes and fill each profiterole with filling.

Peach Icing

  • In a small bowl, whisk all icing ingredients together and spoon over filled profiteroles. Refrigerate until ready to serve.

Notes

*To make peaches easy to peel, blanch them  in boiling water for about 30 seconds, then dunk  in ice water.
**To find Ateco tip 808, click here. ***To find Wilton tip 12, click here.

Lemon Buttermilk Donuts with Honey Cream Cheese Icing

Lemon Buttermilk Donuts with Honey Cream Cheese Icing by Brownie Mischief

I was seriously happy when I started seeing donuts appearing at weddings, bridal showers and occasions other than work meetings. I’ve always felt those sweet, fluffy rings of dough had a higher calling. They had such potential! And honestly who doesn’t love donuts? They’re delicious, but they can also be beautiful. These Lemon Buttermilk Donuts could certainly win a beauty contest. They would make a gorgeous edition to any breakfast, brunch or dessert table. The fresh lemon zest and the earthy flavor of honey will bring springtime right into your kitchen.

Lemon Buttermilk Donuts with Honey Cream Cheese Frosting by Brownie Mischief

If you’re on the lookout for a Mother’s Day recipe, any mom will love these pretty, fragrant treats. This is a very easy recipe and the donuts bake up quickly, so you’ll have time to fix mom a cup of her favorite tea. If you don’t have a donut pan, and you’ve been reluctant to buy one, I can honestly say I love mine. It was very affordable and I’m pleased with the performance and ease of clean up with the pan I purchased. To find the donut pan click here.

In keeping with the springtime feel, I decorated my donuts with pesticide-free edible flowers. I used pansies, but if you’re unable to find them, you can substitute pesticide-free rose petals. I found these edible pansies at my local food market in the produce department, near the fresh herbs. You can also find edible flowers at farmers’ markets and online. For a list of edible flowers, click here.  Note:  The above pictured orange ranunculus flowers on the table are not edible.  

Lemon Buttermilk Donuts with Honey Cream Cheese Icing by Brownie Mischief

Lemon Buttermilk Donuts with Honey Cream Cheese Icing

Prep Time 20 minutes
Cook Time 7 minutes
Total Time 27 minutes
Course Breakfast, Brunch, Dessert
Servings 6

Ingredients
  

Lemon Buttermilk Donuts

  • 1 cup (113g) cake flour, sifted
  • ½ cup (100g) fine granulated sugar
  • 1 teaspoon baking powder
  • ¼ teaspoon fine sea salt
  • â…“ cup (78ml) buttermilk
  • 1 large egg
  • 2 tablespoons (28g) unsalted butter, melted
  • Zest of 1 medium lemon

Honey Cream Cheese Icing

  • ¼ cup (85g) cream cheese, softened
  • 2 tablespoons (28g) unsalted butter, softened
  • ¼ teaspoon vanilla extract
  • 1 pinch fine sea salt
  • 1 cup (120g) powdered sugar, sifted
  • 2 tablespoons honey
  • 2 teaspoons milk

Finishing Touches

  • Pesticide-free edible flowers
  • Sugar pearls*
  • Nonpareils**

Instructions
 

Lemon Buttermilk Donuts

  • Preheat oven to 375ºF (190ºC). Spray the wells of a donut pan*** with non-stick cooking spray.
  • In a medium-sized bowl, whisk together the cake flour, sugar, baking powder and salt until well blended.
  • In a separate medium-sized bowl, whisk the buttermilk, egg, melted butter, and lemon zest together until creamy and well combined. Add this mixture to the flour mixture and stir just until combined. Do not over mix.
  • Transfer the batter to a piping bag or plastic zip bag. Snip off the tip of the bag and pipe batter into the prepared donut pan, filling the wells 2/3 full.
  • Bake until a toothpick inserted into donuts comes out clean, about 7-8 minutes. Let cool in the pan for a couple of minutes, then remove the donuts to a cooling rack to cool completely.
  • Prepare Honey Cream Cheese Icing while the donuts are cooling. Dip the tops of the donuts into the icing and decorate as desired. Serve immediately.

Honey Cream Cheese Icing

  • In a medium-sized bowl, beat the cream cheese and butter together, with an electric mixer at medium speed, until smooth and well blended. Do not over beat. Add the vanilla extract and salt. Mix until combined.
  • On low speed, gradually add powdered sugar and mix until incorporated. Add the honey and beat on medium speed until smooth. Add milk, a little at a time until the desired consistency is reached. Beat on low speed until smooth.
  • Lemon Buttermilk Donuts with Honey Cream Cheese Frosting by Brownie Mischief

Mini Chocolate Hand Pies for Pi Day

Mini Chocolate Hand Pies by Brownie Mischief

Pi Day is a day to celebrate mathematics, or more specifically, the ratio of a circle’s circumference to it’s diameter. While I do appreciate math for it’s precision, I also feel a bit annoyed at math for making my brain hurt! Ok, I’m sorry math. I forgive you. I do need you! How would I bake without you? So today I will celebrate math (and also my love for puns) with these tender, fudgy mini hand pies!

Mini Chocolate Hand Pies by Brownie Mischief

Since pi is all about circles, I used a 2 3/4-inch circle cutter to make round pies, but you can cut them into any shape you like. You could cut larger circles, fold them in half and call them empanadas. Rectangles are very popular with Pop Tart fans and you don’t need a special cutter, but a ruler would be helpful. I think squares would be cute, too! Whatever your shape of choice, math is always there to help!

I used a stencil to add some powdered sugar polka dots to my mini pies. I may have gone a little overboard with my circles, but who’s going to stop me? I think they look pretty cute, but If you don’t have a stencil, a sprinkle or two of powdered sugar will do just fine! Alternately, you could drizzle them with some melted white chocolate. I had a bit of white chocolate on hand, so I can confidently say, that version is yummy too!

Mini Chocolate Hand Pies

by Mari Vasseur
Mini chocolate pies with fudgy filling and a tender chocolate crust.
Prep Time 45 minutes
Cook Time 25 minutes
Total Time 2 hours 10 minutes
Course Dessert
Servings 10

Ingredients
  

Crust

  • 1 â…› cup (142g) all purpose flour, sifted plus more for your work surface
  • 3 tablespoons (17g) unsweetened cocoa powder
  • 1 tablespoon (12g) granulated sugar
  • â…› teaspoon fine sea salt
  • â…› teaspoon baking powder
  • ½ cup (113g) cold, unsalted butter, cubed
  • 3 ounces (85g) cold cream cheese, cubed
  • 3 tablespoons (45ml) cold water, divided
  • ½ of 1 whisked egg

Filling

  • ½ cup (85g) bittersweet or semi-sweet chocolate chips *see notes
  • â…“ cup (107ml) sweetened condensed milk

Finishing Touches

  • 2 tablespoons (15g) powdered sugar optional
  • OR 2 tablespoons (22g) melted white chocolate optional

Instructions
 

Crust

  • In a large bowl, sift together the flour, cocoa powder, sugar, salt and baking powder until well blended.
  • Use a pastry cutter or your fingertips to work the butter and cream cheese into the flour mixture until it resembles pea-sized crumbs.
  • Add 2 tablespoons (30ml) of the cold water to the mixture. Stir gently just until the dough comes together.
  • Turn the dough out onto a lightly floured surface. Fold the dough over onto itself a couple of times. Form the dough into a disk. Cover with plastic wrap and chill for at least 1 hour.

Filling

  • In a small microwavable bowl, melt the chocolate chips and sweetened condensed milk together in the microwave. Heat for 10-15 second bursts, stirring until smooth. Set aside to cool to room temperature.

Assembly

  • Preheat the oven to 375ºF (190ºC). Line a large baking sheet with parchment paper.
  • In a small bowl, whisk together the egg and remaining 1 tablespoon (15ml) water.
  • On lightly floured surface, roll the dough to 1/8-inch thickness. Cut out 20 rounds with a 2 3/4-inch circle cutter (or cut into desired shapes of your choice).
  • Place 10 dough rounds about 1 inch apart onto the prepared baking sheet. Top each with 1 tablespoon of filling.
    Mini Chocolate Hand Pies
  • With a small pastry brush or your finger, brush the egg mixture around the perimeter of each of the filled dough circles.
  • Top each with the 10 remaining dough circles. Crimp the edges together with a fork. Brush the pies with the remaining egg mixture.
    Mini Chocolate Hand Pies
  • Bake until the crust is crisp and browned, about 15-20 minutes. Transfer to a cooling rack. Sprinkle the cooled pies with powdered sugar or drizzle with melted white chocolate.
  • Mini Chocolate Hand Pies

Notes

*The chocolate chips you use depends on personal preference. Bittersweet chocolate chips give a more intense chocolate flavor, while semi-sweet chocolate chips yield a slightly sweeter finished product.
To find my favorite circle cutters click here.                                                                                  To find the polka-dot stencil click here.

Chocolate Lovers’ Valentine Cake for Two

Chocolate Lovers' Valentine Drip Cake for Two

My relationship with Valentine’s Day has transformed over the years. When I was a child, I joyfully skipped home from school with my bounty of tiny Valentine cards, candy hearts and a cupcake someone’s mother baked. As I grew older, I was hot and cold towards Valentine’s Day, depending on the state of my love life at the time. After having kids, Valentine’s Day became about red construction paper, doily hearts and glue sticks. I happily cleaned up sprinkles and kissed chubby, frosting-stained cheeks. Now I think of Valentine’s Day as simply a day to celebrate love. I embrace Valentine’s Day and all the hearts, roses and chocolates that go with it! Show your loved ones that you love them on Valentine’s Day, but more importantly, show them throughout the year, by loving, respecting and accepting them for who they are every day.

If your heart beats for a chocolate lover, then this Valentine cake for two will have them swooning. It’s small in size, but grand in chocolate indulgence. It has three layers of moist chocolate cake, rich, white chocolate buttercream and a silky chocolate glaze. As if that isn’t enough, I loaded the top with chocolate candy! Some of the candy is store bought and some I made with candy melts and chocolate molds. Click here to find the cherub mold. Click here to find the heart mold.

Chocolate Lovers' Valentine Drip Cake for Two

I hope you share this Valentine cake with someone you love! However you celebrate the day and whoever you love, have a happy one!

Chocolate Lovers' Valentine Cake for Two

A mini chocolate cake with white chocolate buttercream, topped with chocolate glaze and chocolate Valentine candy. Perfect for sharing!
Prep Time 1 hour
Cook Time 30 minutes
Total Time 2 hours 30 minutes
Course Dessert
Servings 2

Ingredients
  

Chocolate Cake for Two

  • â…” cup (3 ounces) all purpose flour
  • â…“ cup (1 ounce) unsweetened cocoa powder
  • ½ teaspoon baking powder
  • ½ teaspoon baking soda
  • ¼ plus â…› teaspoons salt
  • ¾ cup (5.25 ounces) sugar
  • 1 small egg
  • â…“ cup buttermilk
  • 3 tablespoons vegetable oil
  • ¾ teaspoon vanilla extract
  • ½ cup hot coffee

White Chocolate Buttercream

  • 6 ounces white chocolate, chopped
  • 1 ½ sticks (6 ounces) unsalted butter, softened
  • ½ teaspoon vanilla extract
  • pinch salt
  • â…” cup (3 ounces) powdered sugar, sifted

Chocolate Drip Glaze

  • 3 ounces semi-sweet chocolate, chopped
  • 2 tablespoons unsalted butter
  • 1 teaspoon corn syrup or honey

Cake Decorating Supplies

  • cake board
  • piping bag
  • chocolate sprinkles
  • assorted chocolate candy

Instructions
 

Chocolate Cake for Two

  • Preheat oven to 350°F. Grease & flour three 4-inch cake pans. *See note below.
  • Sift flour, cocoa powder, baking powder, baking soda and salt together in a medium bowl. Add sugar and stir to combine.
  • Combine egg, buttermilk, vegetable oil and vanilla extract in a small bowl. Whisk lightly to combine.
  • Add egg mixture to dry ingredients and mix on low speed with a handheld electric mixer, until combined. Stop mixer. Scrape sides of bowl with spatula. Turn mixer up to medium speed and beat for 1 minute.
  • Add hot coffee and stir until incorporated.
  • Pour batter into prepared cake pans, dividing batter evenly between the pans. Bake for 20-25 minutes or until a toothpick inserted into the center of the cake comes out clean.
  • Cool cakes in pans 10 minutes, then invert onto a wire rack to cool.

White Chocolate Buttercream

  • Melt white chocolate in a double boiler over gently simmering water. (Alternately, you can melt the white chocolate in the microwave. In a small microwaveable bowl, heat the white chocolate for 30 seconds, then stir. Heat again for 10 second intervals, stirring until melted, being very careful not to overheat it.)
  • Set white chocolate aside to cool until lukewarm and still soft.
  • In a medium bowl, beat butter with an electric mixer at medium speed until pale and creamy.
  • Add vanilla extract, salt and melted white chocolate. Beat at low speed until combined. Stop mixer. Scrape sides of bowl with spatula.
  • Add powdered sugar. Beat at low speed, until powdered sugar is combined. Beat at medium speed until buttercream is smooth, stopping to scrape the bowl occasionally. Keep covered at room temperature until ready to use.

Cake Assembly

  • When cakes have cooled completely, trim the cake layers to 1-inch tall.
  • Attach one of the layers to a cake board with some of the white chocolate buttercream. Apply 1/4-inch thick layer of buttercream to the top of the cake layer, followed by the second cake layer, another 1/4-inch thick layer of buttercream, then the final cake layer.
  • Apply a crumb coat (thin layer) of buttercream to the cake. Chill the cake in the refrigerator for 20 minutes.
  • Frost the cake with the remaining buttercream. Apply chocolate sprinkles to the bottom edge of the cake.
  • Melt chocolate drip glaze ingredients together in a double boiler over gently simmering water. Let cool slightly.
  • Spoon chocolate glaze into a piping bag. Snip off the end of the bag with kitchen scissors. Drizzle chocolate glaze along the edges of the perimeter of the cake, then fill in the middle. Smooth top with a small offset spatula.
  • Top cake with assorted chocolate candy. If desired, you can stack some of the candy and adhere them with melted chocolate to give some variation in height.