Strawberries & Cream Profiteroles

Strawberries & Cream Profiteroles

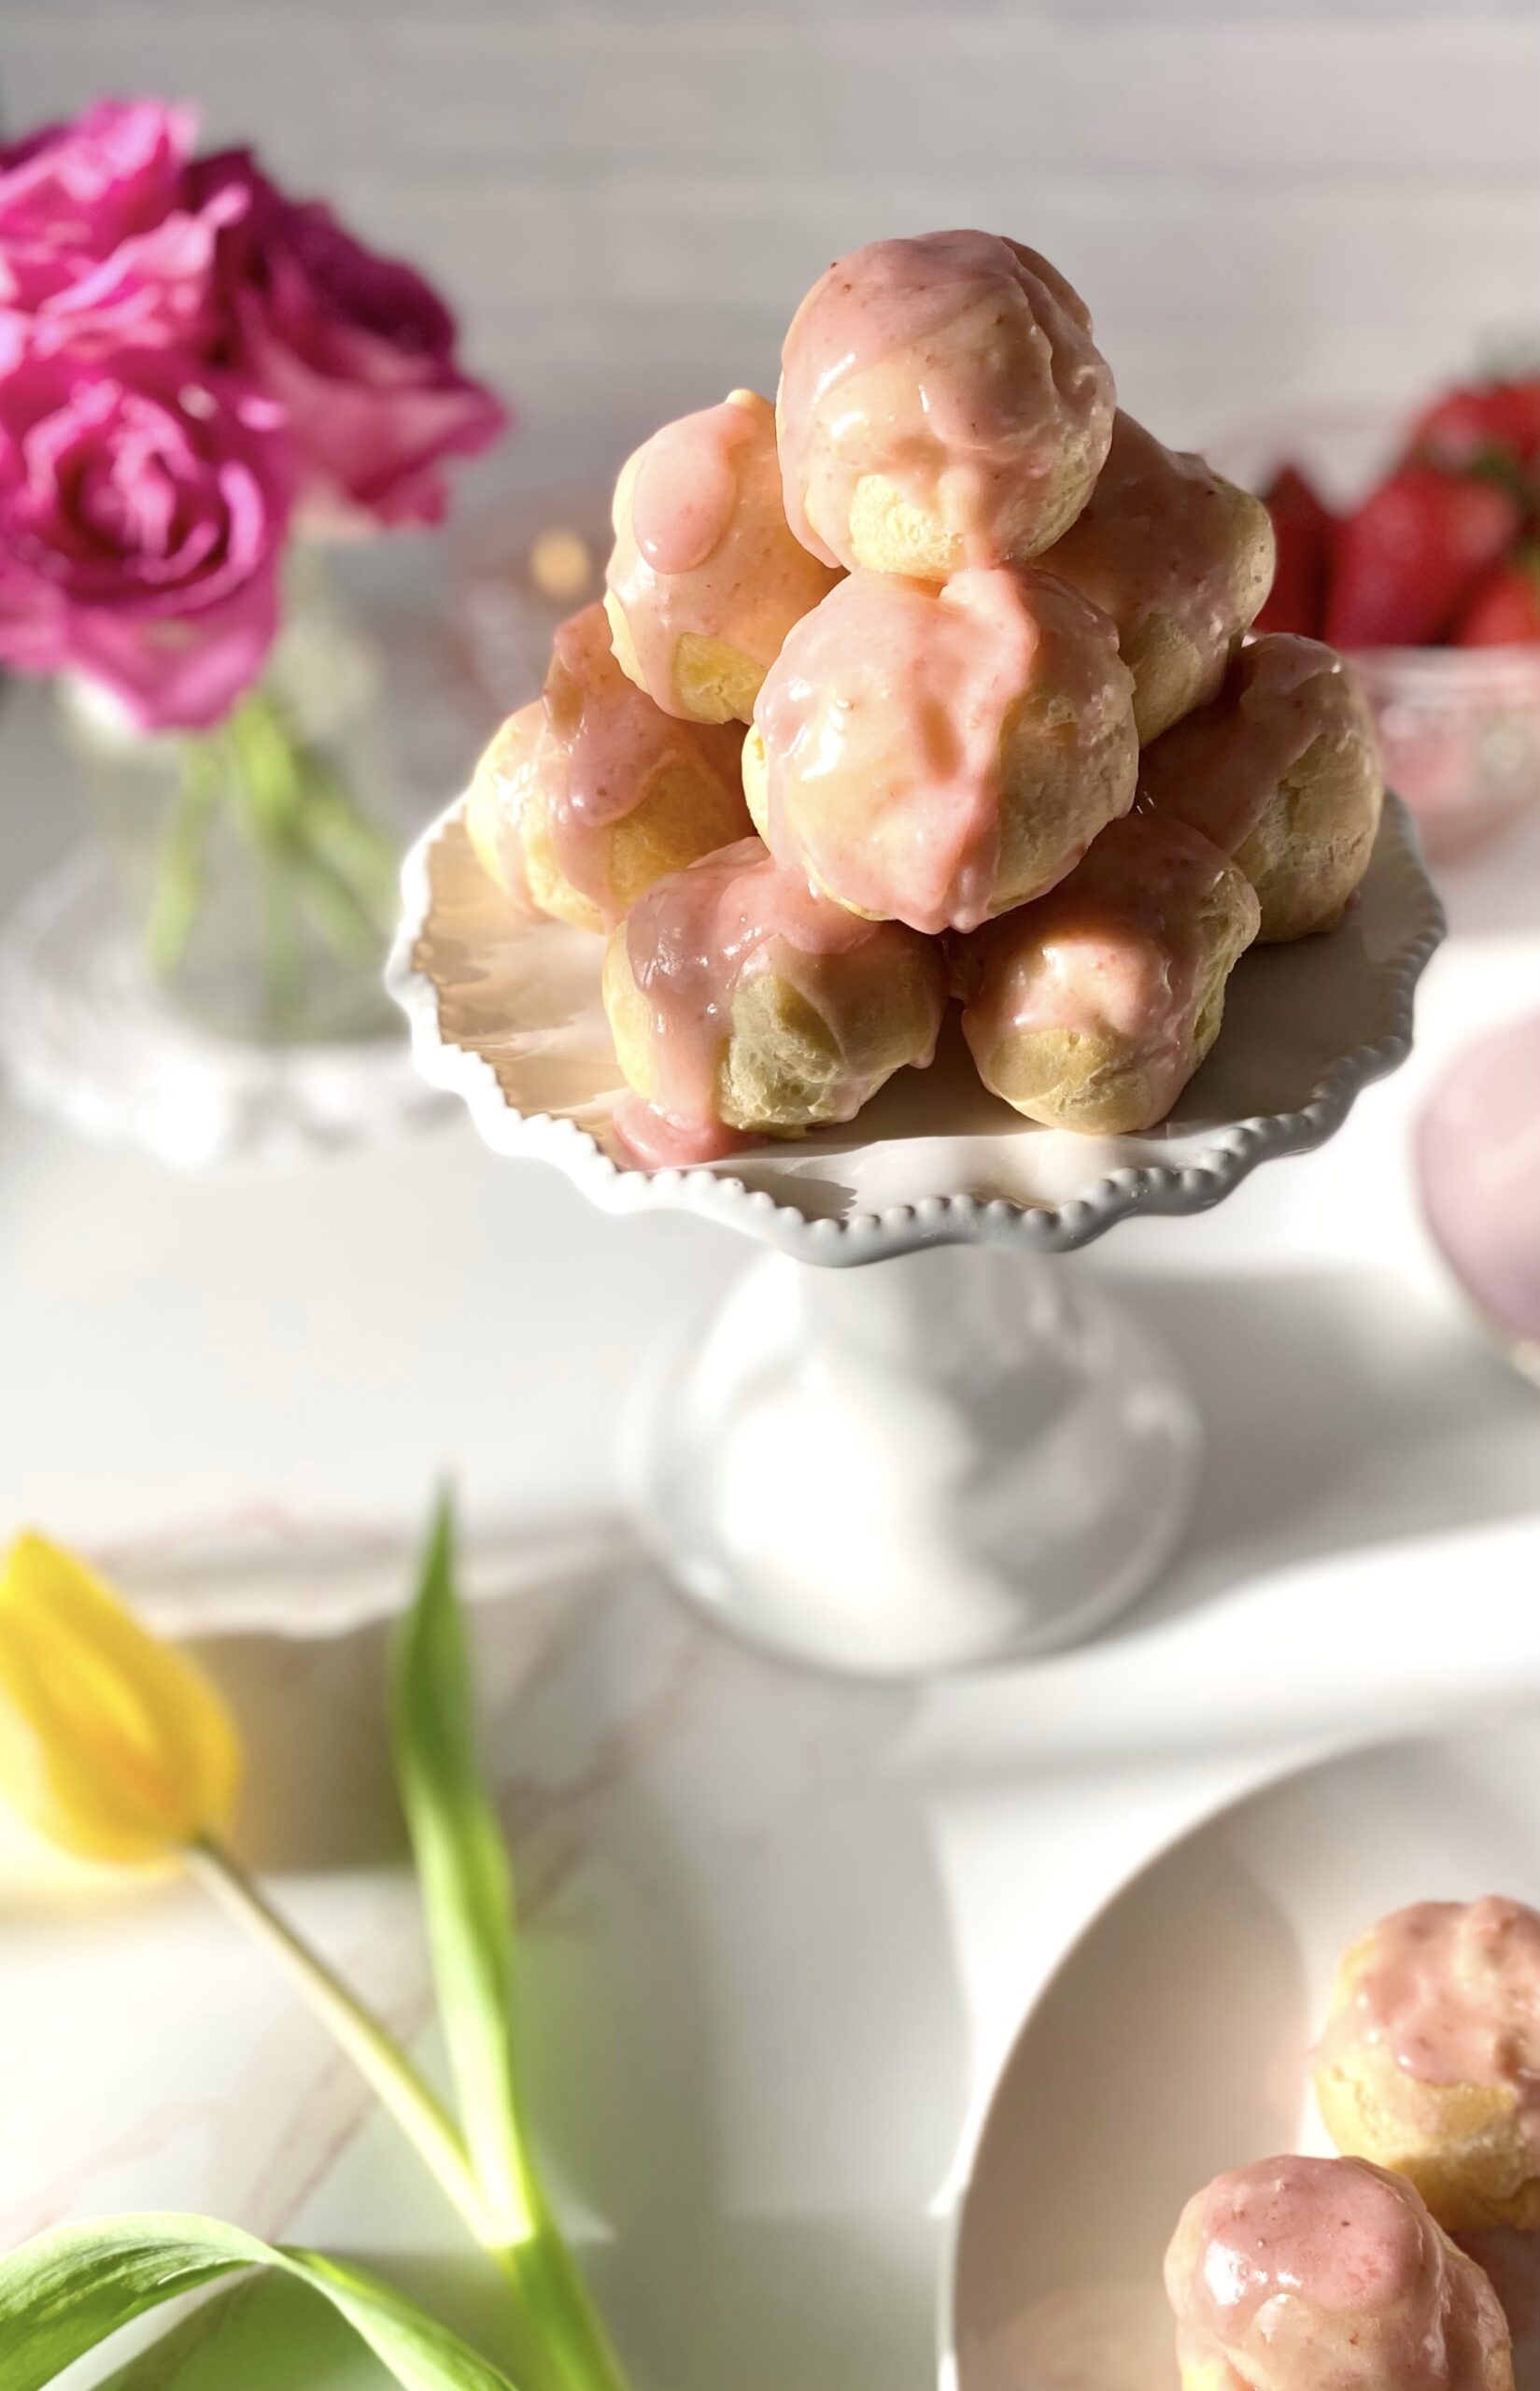
Imagine you’re in a beautiful room, reclining on a plush velvet chaise lounge. There’s a dainty table nearby. On the table is a cake pedestal with a little pyramid of small, perfectly plump, pink pastries. They’re filled with sweet, luscious strawberry cream. And they’re all yours. This Strawberries & Cream Profiteroles recipe can make that dream come true. Maybe not the velvet chaise lounge, but really any comfortable chair will do while you indulge in these delicious little gems. Profiteroles have a way of making you feel regal and majestic. I think princesses and princes snack on them. Most of us don’t have a personal pastry chef or the budget to order from a French bakery every day, but we can certainly follow a recipe and make one of the easiest pastry doughs there is. Choux pastry or pate à choux is used to make profiteroles, cream puffs, eclairs, churros and other pastries. Once you get the hang of it, the possibilities are endless.

This recipe features fresh strawberries, but frozen strawberries will work too. You can also substitute raspberries or peaches. To find the recipe for Peaches & Cream Profiteroles, click here. The strawberry purée can be made a day or two ahead and stored in the refrigerator. To make it easy on myself, I like to make the strawberry purée on day one, the pastry cream on day two, then make the profiteroles and strawberry icing and assemble on day three. It’s also helpful to practice the French culinary style of prep, mise en place, which means to have all of your ingredients and equipment in place before you begin. Everything will go much smoother and prevent you from feeling overwhelmed.


Strawberries & Cream Profiteroles

Mari Vasseur
Bite sized choux pastry puffs filled with fresh strawberries and cream filling and topped with fresh strawberry icing
Course Dessert
Cuisine French
Servings 18 profiteroles

Ingredients
  

Strawberry Pureé

  • 12 ounces (340g) strawberries, hulled and sliced About 2 1/2 cups after hulling and slicing
  • 1 teaspoon lemon juice
  • ½ teaspoon strawberry extract

Strawberries and Cream Filling

  • 1 cup (237ml) whole milk
  • â…“ cup (66g) sugar
  • 2 tablespoons (17g) cornstarch
  • ¼ teaspoon fine sea salt
  • 1 large egg
  • 2 tablespoons (28g) unsalted butter, cubed
  • ½ teaspoon pure vanilla extract
  • Strawberry puree recipe above
  • â…” cup (156ml) heavy whipping cream

Profiteroles

  • ½ cup (118ml) water
  • ¼ cup (57g) unsalted butter, cubed
  • â…› teaspoon fine sea salt
  • ½ cup (64g) all purpose flour
  • 2 large eggs room temperature

Strawberry Icing

  • ¾ cup (90g) powdered sugar
  • 2 tablespoons (30ml) reserved strawberry purée
  • 1 tablespoon (15ml) heavy whipping cream
  • ¼ teaspoon strawberry extract

Instructions
 

Strawberry Purée

  • Purée the strawberries in a blender or food processor. Strain the puréed strawberries through a sieve into a small saucepan. Stir in the lemon juice.
  • Bring to a boil over medium heat. Reduce heat and simmer until the strawberry purée is reduced by half. Remove from heat. Stir in the strawberry extract. Set aside to cool completely

Strawberries and Cream Filling

  • Bring the milk to a boil in a small saucepan over medium heat.
  • Meanwhile, whisk the sugar, cornstarch and salt together in a medium bowl. Add the egg and whisk until smooth.
  • When the milk starts to boil, remove from heat and pour 1/3 of the hot milk into the egg mixture and whisk to combine.
  • Pour the egg mixture back into the remaining hot milk and cook over medium heat, whisking continuously, until the mixture comes to a boil and thickens.
  • Remove from heat. Stir in the butter and vanilla extract. Pour the mixture through a sieve placed over a bowl. Cover the surface with plastic wrap and let cool completely.
  • Set aside 2 tablespoons (30ml) of strawberry purée. Add the remaining strawberry purée to the cooled pastry cream and stir until well combined. Cover strawberry pastry cream and chill in refrigerator.
  • In a medium-sized bowl, whip the heavy cream, with an electric mixer at high speed, until stiff peaks begin to form. Fold the whipped cream into cooled strawberry pastry cream. Set aside in the refrigerator.

Profiteroles

  • Preheat oven to 400ºF (205ºC). Line 2 large baking sheets with parchment paper.
  • Combine the water, butter and salt in a medium-sized saucepan. Bring to a boil over medium heat. Reduce the heat. Add the flour and stir vigorously with a wooden spoon until the mixture pulls away from sides of pan and forms a ball.
  • Transfer the mixture to the bowl of a stand mixer. Mix on low speed until steam dissipates and mixture cools to lukewarm. Add the eggs one at a time and beat on medium speed until smooth, stopping to scrape down the bowl.
  • Transfer the mixture to a piping bag fitted with a large round tip. (I used Ateco tip 808.*) Pipe 1 1/4-inch mounds, about 2 inches apart, onto the prepared baking sheets. Smooth the tops lightly with a wet finger.
  • Bake for 15 minutes, then turn down the oven heat to 350ºF (180ºC) and continue baking until golden brown, about 8-10 more minutes. Using a toothpick or skewer, prick a small hole in each profiterole to allow steam to escape. Place on a wire rack to cool completely.
  • Use the tip of a paring knife to make a pilot hole in the bottom of each profiterole.
  • Place strawberries and cream filling into a piping bag fitted with a medium round piping tip. (I used Wilton tip 12**) Place the tip into the pilot holes and fill each profiterole with filling.

Strawberry Icing

  • In a medium -sized bowl, whisk all of the icing ingredients together until smooth. Spoon over the filled profiteroles. Refrigerate profiteroles until ready to serve.

Notes

*To find Ateco tip 808 click here.
**To find Wilton tip 12 click here.
Keyword profiteroles, strawberry

Mini Orange Olive Oil Cakes

mini orange olive oil cakes

Ever since a certain celebrity cut a hole from the middle of her favorite olive oil cake back in 2020, the internet has been obsessed with olive oil cakes. I must confess that I was a fan of olive oil cakes long before that. I first tasted one at a restaurant years ago and fell in love. The flavor and texture was so delightful, that all it needed was a dusting of powdered sugar on top. Now that the dust has settled, I’m sharing my favorite orange olive oil cake recipe. Not because it’s trendy, but because it’s a really delicious recipe that tastes like spring.

I made cute little orange scented, personal cakes that are really just elegant cupcakes. The recipe is easily adapted to your tastes. You can switch up the orange flavor and substitute with lemon or any citrus of your choice. Even if you don’t like olive oil, you’ll still like these little cakes. I used light olive oil, rather than extra virgin olive oil, for a more subtle olive oil flavor. It’s also able to withstand higher temperatures. Feel free to use your favorite olive oil or replace it with the oil you prefer. Grape seed, avocado, canola and vegetable oil are some examples of oils you can use as a replacement.

This recipe contains almond flour. It helps with texture and flavor, so it’s a necessary ingredient. Almond flour can be pricey, but it’s good to have on hand. Adding it to your baked goods will make them more moist and tender. To find almond flour click here,


Mini Orange Olive Oil Cakes

Mari Vasseur
Soft, tender mini orange cakes brushed with orange syrup & dusted with powdered sugar
Course Dessert
Servings 12 mini cakes

Ingredients
  

Mini Orange Olive Oil Cakes

  • 1 cup (113g) cake flour, sifted
  • ¼ cup (28g) almond flour
  • 1 teaspoon baking powder
  • ½ teaspoon baking soda
  • ¼ teaspoon fine sea salt
  • â…” cup (133g) sugar
  • 2 large eggs
  • 2 teaspoons orange zest
  • ½ teaspoon pure vanilla extract
  • ½ cup (115ml) light olive oil
  • ¼ cup (59ml) whole milk
  • ¼ cup (59ml orange juice

Orange Simple Syrup

  • ¼ cup (50g) sugar
  • 2 tablespoons (30ml) orange juice
  • 2 tablespoons (30ml) lemon juice
  • 1 teaspoon orange zest
  • Powdered sugar for dusting the tops

Instructions
 

Mini Orange Olive Oil Cakes

  • Heat the oven to 350ºF (180ºC). Grease and flour a 12 serving muffin pan.
  • In a medium-sized bowl, whisk together the cake flour, almond flour, baking powder, baking soda and salt until well blended.
  • In a large bowl, beat the sugar, eggs, orange zest and vanilla extract together until smooth. Gradually mix in the olive oil and beat until creamy and well blended.
  • Stir in the dry ingredients in two additions, alternating with the milk and orange juice. Stir just until combined. Do not over mix.
  • Fill the prepared muffin pan cups 2/3 full with batter. Do not overfill or cakes will be more difficult to remove.
  • Bake for 10-12 minutes or until the tops look light golden, but still moist and a toothpick inserted comes out clean. They bake very quickly, so check them a few minutes early to avoid over baking.
  • Cool the cakes in pan for 5 minutes. Remove them from pan and transfer to a cooling rack. Brush the warm cakes with orange simple syrup and allow to cool completely. When the cakes have cooled, dust with powdered sugar.

Orange Simple Syrup

  • In a small saucepan, stir together the sugar, orange juice, lemon juice, and orange zest. Cook over low heat, stirring occasionally, just until the sugar is dissolved.
  • Remove from heat and set aside to cool.
Keyword cake, olive oil, orange

Lemon Buttermilk Cakelets

Sending sunshine your way with these cute, delicious bite-size mini cakes. Lemon Buttermilk Cakelets are tender and moist with a burst of fresh lemon flavor. They’re easy to make and they bake up quickly. They make an adorable addition to a spring teatime, baby shower or summer picnic.

Lemon Buttermilk Cakelets

by Mari Vasseur
Soft, tender mini lemon cakes with lemon icing
Course Dessert
Servings 24 cakelets

Ingredients
  

Lemon Simple Syrup

  • Juice of 1 medium lemon
  • ¼ cup (50g) granulated sugar
  • ½ teaspoon lemon zest

Cakelets

  • 1 ¼ cups (142g) cake flour, sifted
  • 1 teaspoon baking powder
  • ½ teaspoon baking soda
  • ½ teaspoon fine sea salt
  • ¾ cup (150g) granulated sugar
  • ½ cup (115ml) vegetable oil or neutral oil of your choice
  • 2 large eggs
  • 2 teaspoons lemon zest
  • ½ teaspoon pure vanilla extract
  • ½ teaspoon pure lemon extract
  • ½ cup (118ml) buttermilk

Icing

  • 1 ½ cups (180g) powdered sugar, sifted
  • 1 tablespoon (14g) unsalted butter, melted
  • 3-4 tablespoons (45-60ml) fresh lemon juice

Instructions
 

Lemon Simple Syrup

  • Measure the juice of 1 lemon. Add enough water to equal 1/4 cup (89ml). In a small saucepan, simmer the lemon juice and water mixture with the sugar and lemon zest, stirring occasionally, until the sugar is dissolved. Set aside to cool, then strain out the lemon zest.

Cakelets

  • Preheat the oven to 350ºF (180ºC). Grease and flour a 24-serving mini muffin pan* or use liners.
  • In a medium-sized bowl, whisk the flour, baking powder, baking soda and salt together until well blended.
  • In a large bowl, whisk the sugar, oil, eggs, lemon zest and extracts together until smooth and well blended. Mix in the flour mixture in 2 additions alternating with half of the buttermilk after each addition. Stir just until combined. Do not over mix.
  • Fill the muffin cups 2/3 full. (I used a portion scoop). Bake until a toothpick inserted into the center of the cakes comes out clean, about 8-10 minutes. Be careful not to over bake to avoid drying out the cakes. Let the cakes cool in the pan for 5 minutes, then remove them from the pan and transfer them to a cooling rack. (Repeat with any remaining batter.)

Icing

  • In a medium-sized bowl, whisk together the powdered sugar, melted butter and 3 tablespoons of lemon juice. Add additional lemon juice as needed to achieve the desired consistency. Whisk until smooth. Spoon the icing over the cooled cakes.

Notes

*To find the mini muffin pan I used, click here.
Keyword cake, cupcakes, lemon

by

Blueberry Skillet Cornbread

This is a sweet, fluffy blueberry cornbread that my family loves. It’s heavenly served with honey and butter. I love baking it in a cast iron skillet because of the delicious crust that forms from the steady high heat conducted with cast iron. If you don’t have a cast iron skillet, you can use an 8-inch round cake pan instead. To find the 8-inch cast iron skillet I used, click here.

The texture of this cornbread is more like a quick bread than a cake and my family has always called it cornbread. When I posted this recipe previously, I called it a skillet cornmeal cake because I was trying to shy away from the cornbread police who inevitably show up when I post sweet cornbread recipes. These enforcers of non existent cornbread laws no longer intimidate me because I’ve done my cornbread research. There are different regions who make cornbread in many different ways. Various groups of people in the United States argue over whether or not cornbread should contain sugar. Historically, some people had to add sugar to cornbread because of the lower quality cornmeal they had access to. But the first cornbread was made long before that in ancient Mexico. People then and now use the ingredients available to them to create food that tastes good to them. So by any name, it’s all good.


Blueberry Skillet Cornbread

by Mari Vasseur
Sweet cornbread with blueberries baked in a cast iron skillet.
Servings 6

Ingredients
  

  • 1 ¼ cups (about 177-198g) blueberries, divided
  • 1 ¼ cups (159g) all purpose flour, sifted, plus one teaspoon for the blueberries
  • â…” cup (132g) sugar
  • ¼ cup (35g) cornmeal
  • 2 teaspoons baking powder
  • ½ teaspoon fine sea salt
  • 2 large eggs
  • ¾ cup (170g) sour cream
  • ¼ cup (1 7/8 oz or 55ml) vegetable oil or neutral oil of your choice
  • 2 tablespoons (28g) unsalted butter, melted

Instructions
 

  • Preheat the oven to 350ºF (177ºC). Grease an 8-inch cast iron skillet.*
  • Set aside 1/4 cup of blueberries. In a small bowl, toss the remaining 1 cup of blueberries with 1 teaspoon of flour.
  • In a large bowl, whisk together the flour, sugar, cornmeal, baking powder and salt until well blended.
  • In a medium-sized bowl, whisk together the eggs, sour cream, oil and melted butter until creamy and well combined. Add the egg mixture to flour mixture and stir just until combined. A few small lumps are okay. Gently mix one cup of blueberries into the batter.
  • Transfer the batter to prepared skillet. Top with the reserved 1/4 cup of blueberries.
  • Bake until top looks golden brown and a toothpick inserted in center comes out clean, about 35-45 minutes. Let cool in pan for 10 minutes.

Notes

*To find the skillet I used, click here.
If you don't have a cast iron skillet, you can use and 8-inch round cake pan.
Keyword blueberry, cornbread

Dark Chocolate Strawberry Marble Cookies

Dark Chocolate Strawberry Marble Cookies

To the indecisive German baker who invented marble cake, I thank you! Marble cake, sampler platters and tasting flights are the perfect solution for those times when you just can’t decide. Let’s take one more decision off the table. No longer will we have to decide between chocolate and strawberry cookies. These marble cookies are the best of both worlds. Chocolate and strawberry are opposites in many ways, but complement each other so well. After all, who doesn’t love chocolate covered strawberries?

The dark chocolate cocoa powder gives these cookies a deep chocolate flavor. Freeze dried strawberries provide the sweet strawberry flavor and color. I crushed the strawberries with a mini food processor, but you can also use a mortar and pestle, a clean spice grinder or a sturdy plastic bag and a rolling pin. When you crush the 1 1/2 cups of freeze dried strawberries called for in the recipe, you’ll end up with about 1/3 cup of strawberry powder. To find freeze dried strawberries, click here.

This recipe makes about eighteen cookies but you can also make nine large cookies. Follow the instructions in parentheses for large cookies.


Dark Chocolate Strawberry Marble Cookies

by Mari Vasseur
Dark chocolate & strawberry marbled sugar cookies
Course Dessert
Servings 18 cookies

Ingredients
  

  • 2 ¼ cups (284g) all purpose flour, sifted
  • 1 teaspoon baking soda
  • 1 teaspoon fine sea salt
  • 1 cup (227g) unsalted butter, softened
  • 1 cup (200g) granulated sugar
  • ½ cup (100g) packed brown sugar
  • 2 large eggs
  • 1 teaspoon pure vanilla extract
  • 1 ½ cups (35g) freeze-dried strawberries, finely crushed to a powder (1 1/2 cups before crushing)
  • â…“ cup (28g) dark unsweetened cocoa powder

Instructions
 

  • In a medium-sized bowl, whisk together the flour, baking soda and salt until well blended.
  • In a large bowl, beat the butter, granulated sugar and brown sugar, with an electric mixer at medium speed, until pale and fluffy.
  • Beat in the eggs and vanilla extract in three separate additions, making sure each addition is incorporated before adding the next. On low speed, mix in flour mixture just until combined.
  • Divide the dough in half. Leave half of dough in the bowl and place the other half in a separate bowl.
  • Add the freeze dried strawberries to half of the dough and mix just until combined. Add the cocoa powder to the other half of the dough and mix just until combined.
  • Roll the dough into 1 1/2 teaspoon size balls. (For large cookies, roll the dough into tablespoon size balls.) To form the cookies, place two chocolate dough balls and two strawberry dough balls in your hand in a checkerboard pattern. Roll into a ball. Repeat with the remaining dough balls and refrigerate for 30 minutes.
  • Preheat oven to 350ºF (180ºC). Line two large cookie sheets with parchment paper.
  • Place the dough balls about two inches apart on the prepared cookie sheets. Bake 10-12 minutes, until cookies are set and edges are golden. (For large cookies, bake 14-15 minutes.) Transfer to cooling rack. (For large cookies, cool on cookie sheet one minute, then transfer to cooling rack.
Keyword chocolate, cookies, marble, strawberry

Maple Pecan Brownies

maple pecan brownies

Pecan pie was my mom’s favorite, but she didn’t bake pies, so I always used to bake her one for Thanksgiving. One year, I made a chocolate version. It was delicious, but let’s just say it wasn’t user friendly. It was gooey and hard to serve. Over the years, it eventually morphed into these Maple Pecan Brownies. The brownie version is still delicious, rich and gooey with toasty pecans, but much more user friendly.

Enjoying Maple Pecan Brownies with a glass of milk or a cup of coffee is a must. Thinking of it brings back memories. I can practically smell my dad brewing the coffee to go with these brownies.

Maple Pecan Brownies

Rich, gooey brownies topped with pecan pie filling
Course Dessert
Servings 16 brownies

Ingredients
  

Brownies

  • ¾ cup (6 ounces) unsalted butter, melted
  • 1 cup (7 ounces) granulated sugar
  • ¾ cup (5 1/4 ounces) brown sugar
  • 3 large eggs
  • ½ teaspoon vanilla bean paste or pure vanilla extract
  • ¾ cup (2 1/4 ounces) unsweetened cocoa powder, sifted preferably Dutch process cocoa
  • ½ teaspoon baking soda
  • ½ teaspoon salt
  • 1 ¼ cups (5 5/8 ounces) flour

Pecan Topping

  • ¼ cup pure maple syrup
  • 2 tablespoons (1 ounce) unsalted butter, melted
  • ½ cup (3 1/2 ounces) brown sugar
  • 1 large egg
  • 1 teaspoon maple extract
  • ¼ teaspoon salt
  • 2 cups (7 ounces) pecan halves or pieces

Instructions
 

Brownies

  • Preheat oven to 350ºF. Line a 9-inch square baking pan with parchment paper, overlapping the sides an inch or two. Spray parchment paper with nonstick cooking spray.
  • In a large bowl, stir together melted butter, granulated sugar and brown sugar until well combined.
  • Mix in eggs and vanilla, one at a time, until well combined.
  • Mix in cocoa powder, baking soda and salt until well combined.
  • Stir in flour just until combined.
  • Spread batter into prepared baking pan. Bake just until top is set, about 25 minutes.
  • Meanwhile, prepare pecan topping.
  • When brownie top is set, remove from oven. Gently pour pecan topping around the outer perimeter of brownies, to avoid making brownies sink in the middle. Evenly distribute the pecan topping over the top gently with a spoon.
  • Return the brownies to the oven and continue baking until the topping is set, about 20-25 minutes. Brownies will stop jiggling and topping will look deep golden brown. Toothpick inserted inside will have a few moist crumbs on it. (If your topping starts to brown too much on the edges before the inside is done, apply aluminum foil around the edges as you would with a pie.)
  • Remove from oven and cool completely before cutting, about 2- 2 1/2 hours.
  • Cut into squares, wiping knife between cuts.

Pecan Topping

  • In a medium bowl, stir together maple syrup, butter, brown sugar, egg, maple extract and salt until well combined.
  • Stir in pecans until well coated with maple syrup mixture.
  • Set aside until brownies are partially baked.
Keyword brownies, chocolate, maple pecan

Raspberry Lemonade Brownies

Raspberry Lemonade Brownies by Brownie Mischief

Raspberry Lemonade Brownies are the perfect easy recipe for spring and summer. They’re so pretty and delightfully delicious! The fudgy lemon batter is brightened with fresh lemon zest and raspberries, then topped with a sweet-tart burst of flavor and color from fresh raspberries. The icing contains no food coloring. Just three raspberries will give you that luscious shade of pink!

I want to clarify that lemon brownies are not lemon bars. We all know what a lemon bar is. The one we all know and love has a lemon curd filling on a shortbread crust, possibly drizzled with lemon icing or sprinkled with powdered sugar. The lemon brownie is a whole different animal. Don’t mistake lemon brownies for lemon cake either. Lemon brownies contain white chocolate which gives them a rich, fudgy texture like their chocolate cousins. We may be tempted to call them blondies, but blondies have a butterscotch flavor and typically don’t contain chocolate. Now that we got that straightened out, we can sleep peacefully tonight.

Raspberry Lemonade Brownies

Course Dessert
Servings 16 bars

Ingredients
  

Raspberry Lemonade Bownies

  • 6 ounces (170g) white chocolate, finely chopped
  • ½ cup (113g) unsalted butter, cubed
  • ¾ cup (150g) granulated sugar
  • 2 large eggs
  • 1 large egg yolk
  • ¼ cup (59ml) fresh lemon juice
  • Zest of two medium lemons
  • ½ teaspoon fine sea salt
  • 1 ¾ cups (223g) all purpose flour, sifted
  • 1 cup (170g) raspberries plus extra for serving, if desired

Raspberry Lemonade Icing

  • 3 raspberries
  • 1 ¼ cups (142g) powdered sugar, sifted
  • 1 tablespoon (14g) melted butter
  • 2-3 tablespoons (30-45ml) fresh lemon juice

Instructions
 

Raspberry Lemonade Bownies

  • Preheat the oven to 325ºF (165ºC). Line an 8-inch square baking pan* with parchment paper.
  • In a medium microwaveable bowl, melt the white chocolate and butter in the microwave for 20 second bursts, stirring after each one. Alternately, melt the white chocolate and butter on the stovetop in a heat safe bowl set over a pan of barely simmering water. Stir gently until smooth.
  • In a large bowl, whisk together the sugar, eggs, egg yolk, lemon juice, zest and salt until smooth and well combined. Stir in the melted white chocolate mixture. Add the flour and mix just until combined. Gently stir in the raspberries.
  • Transfer the batter to the prepared baking pan. Bake until the top is set, the edges are light golden brown and a toothpick inserted into the center comes out with a few moist crumbs on it, about 23-28 minutes. Let the brownies cool in the pan.

Raspberry Lemonade Icing

  • In a medium-size bowl, smash the raspberries with a fork.
  • Add the powdered sugar, melted butter and 1 tablespoon of lemon juice. Whisk until smooth, adding more lemon juice as needed. Spread the icing over the cooled brownies.
  • Cut into 2-inch squares and serve with additional raspberries, if desired.

Notes

*To find the 8 x 8 inch pan I used, click here.
 

Strawberry Shortcake Crumble Muffins

strawberrry shortcake crumble muffins

Have you noticed the strawberry shortcake crumble topping trend? I noticed many people sharing various versions of the crumble recipe all over Tiktok. I’ve seen the topping on cake, cupcakes and countless other desserts. Most people seem to make it using strawberry gelatin mix and vanilla pudding mix. The version I’m sharing here uses freeze dried strawberries instead. I’m not opposed to using gelatin mix, I just seriously love the tart, natural flavor of freeze dried strawberries.

This topping is irresistible on these tender strawberry muffins. I wanted to pile on as much crumble topping as possible so I used tulip baking cups. They’re made of grease-proof parchment paper squares. You can buy them online or make them yourself with squares of parchment. You can use the link provided at the end of the recipe to find the ones I used. Keep in mind, if you use standard muffin liners, you’ll use less batter and topping for each muffin, so you’ll end up with a few more muffins.

I used fresh strawberries for the puree in the muffins, but feel free to use frozen, defrosted strawberries if you cant get fresh ones.

Strawberry shortcake crumble muffins


Strawberry Shortcake Crumble Muffins

by Mari Vasseur
Strawberry muffins topped with strawberry shortcake crumble
Course Breakfast, Brunch, Dessert
Servings 12 muffins

Ingredients
  

Strawberry Shortcake Crumble Topping

  • 1 cup (128g) all purpose flour
  • ½ cup (100g) sugar
  • ¼ teaspoon salt
  • ½ cup (113g) cold, unsalted butter, cubed
  • 1 cup (14g) freeze-dried strawberries, finely crushed* (weigh or measure before crushing the strawberries)

Strawberry Muffins

  • 2 ¼ cups (287g) all purpose flour, sifted
  • 2 teaspoons baking powder
  • ½ teaspoon baking soda
  • ¾ teaspoon salt
  • ¾ cup (170g) unsalted butter, softened
  • 1 â…› cups (225g) sugar
  • 2 large eggs
  • 1 teaspoon strawberry extract
  • ½ cup (118ml) buttermilk
  • ½ cup (118ml) strawberry purée
  • 1-2 drops pink or red gel food coloring optional

Instructions
 

Strawberry Shortcake Crumble Topping

  • In a medium-sized bowl, combine the flour, sugar and salt until well blended. Work the butter into the flour mixture with your fingertips until it looks like sandy, with no large pieces of butter remaining.
  • Place half of crumble mixture into another medium-sized bowl and combine it with the crushed freeze dried strawberries. Mix well and press it together with your fingers to form pea sized pieces. Gently combine the two bowls of crumble together. Set aside in refrigerator while preparing the muffin batter.

Strawberry Muffins

  • Preheat the oven to 375ºF (190ºC). Line a 12 serving muffin pan with tulip baking liners or parchment squares.
  • In a medium-sized bowl, whisk together the flour, baking powder, baking soda and salt until well combined.
  • In a large bowl, beat the butter and sugar, with an electric mixer on medium speed, until pale and fluffy.
  • Beat in the eggs one at a time until incorporated. Beat in the extract until well combined. Add the flour mixture and beat on low speed, just until combined. Add the buttermilk, strawberry puree and food coloring. Beat on low speed, just until combined.
  • Divide batter evenly into the tulip muffin liners. (If using standard muffin liners, fill them 2/3 full.) Sprinkle crumble topping evenly over the batter.
  • Bake at 375ºF (190ºC) for 5 minutes, then turn oven temperature down to 350ºF (180º) and continue baking until topping is golden and a toothpick inserted in center is clean, about 12-17 more minutes. (If your topping starts to brown too quickly, you can cover the muffins with a bit of aluminum foil.) Let the muffins cool in the pan for 5 minutes, then transfer them to a cooling rack.

Notes

* A small food processor or a clean spice grinder is helpful to pulverize the freeze-dried strawberries. Pass the crushed strawberries through a sieve to remove seeds if desired.
To find tulip baking cups, click here
To find floral tulip baking cups, as seen on TikTok, click here
 
Keyword muffins, strawberry

(118ml)

Orange Vanilla Bean Donut Holes

Orange Vanilla Bean Donut Holes

During citrus season, in the heart of winter, my backyard orange tree is brimming over with fresh oranges. So I love bringing some fresh-picked sunshine to my family with these fluffy Orange Vanilla Bean Donut Holes from my childhood. When I was a child, my parents used to love taking our family to a smorgasbord. The owner would always come out from the kitchen and say hello to my parents. He made delicious fried donut holes that my brother and I looked forward to at the end of our meal. At home we duplicated the donut holes using a recipe from an old cookbook. Unfortunately the cookbook is lost, but this recipe is pretty close to the original. Tossing the little donuts in vanilla sugar makes them even more fragrant and delicious. The vanilla sugar can be used immediately, but for the best flavor, make it in advance.

The original recipe had vanilla and nutmeg in it, which are classic cake donut flavors. The addition of fresh orange zest and juice makes them vibrant and flavorful. I love making different flavors of these donut holes. To view Blueberry Donut Holes, click here.


Orange Vanilla Bean Donut Holes

by Mari Vasseur
Orange & vanilla donut holes, fluffy & fragrant on the inside, crisp & sugary on the outside
Course Breakfast, Brunch, Dessert
Servings 24 donut holes

Ingredients
  

Donut Holes

  • 2 cups (255g) all purpose flour, sifted
  • 2 teaspoons baking powder
  • ¼ teaspoon fine sea salt
  • 2 large eggs
  • ½ cup (100g) sugar
  • Zest of 1 large orange
  • 2 tablespoons (28g) melted butter
  • ½ cup (118ml) orange juice
  • 1 ½ teaspoons vanilla bean paste
  • ½ cup (100g) vanilla sugar Recipe below
  • Oil for frying

Vanilla Sugar

  • ½ split vanilla bean
  • ½ cup (100g) sugar

Instructions
 

Donut Holes

  • In a large, whisk together the flour, baking powder and salt until well blended.
  • In a medium-sized bowl, whisk the eggs, sugar, orange zest, melted butter, orange juice and vanilla bean paste until creamy and well combined. Add this mixture to the flour mixture and mix just until combined. Do not over mix. A few small lumps are okay.
  • In a heavy saucepan, heat 1 1/2 inches of oil to 340ºF (170ºC). Place the vanilla sugar in a medium-sized bowl.
  • Drop tablespoon-sized portions of batter into the hot oil. (I used a #60 portion scoop**) Don't over crowd the pan.
  • Fry the donut holes until golden brown on all sides, about 2-4 minutes, flipping halfway through. If the donut holes cook too quickly on the outside, turn heat down a bit.
  • Briefly drain the donut holes on paper towels, then toss them in vanilla sugar. Serve warm.

Vanilla Sugar

  • With the dull side of a knife, scrape the seeds out of the vanilla bean.
  • In a small bowl, whisk the vanilla seeds together with sugar, breaking up any clumps. Use immediately or make in advance and let the flavor develop 1-2 weeks in a covered container.

Notes

**To find vanilla beans, click here.
*To find the scoop I used, click here.
 
Keyword donuts, orange vanilla

Marshmallow Mudslide Cookies

marshmallow mudslide cookies

Have you ever had mudslide cake? It’s a deliciously messy chocolate cake with chocolate frosting and marshmallows, also known as Mississippi mud cake. I saw one covered in a layer of marshmallow fluff and it made its way into my dreams. I woke up with the inspiration to make a cookie version of the gooey mudslide cake.

I saw a few mudslide cookie recipes out there that used standard size marshmallows and chocolate chips mixed into the cookie dough. If you’ve ever baked with marshmallows, you know that they nearly disappear during the baking process. Chocolate chips melt beautifully into little pools of chocolate, but then harden once cooled to room temperature. I happily volunteered to address these challenges! After some trial and error, I created a satisfying cookie with plenty of gooey marshmallow goodness and a rich fudge filling that stays soft at room temperature. Dreams do come true!

marshmallow mudslide cookies


Marshmallow Mudslide Cookies

by Mari Vasseur
Chocolate & nut fudge-filled cookies topped with toasted marshmallows
Course Dessert
Servings 22 cookies

Ingredients
  

Fudge filling

  • 1 â…“ cup (227g) semisweet chocolate chips
  • 1 cup (319g) sweetened condensed milk
  • â…” cup (74g) chopped toasted pecans or walnuts

Cookies

  • 2 â…› cups (287g) all purpose flour, sifted
  • ½ cup (45g) unsweetened Dutch Process cocoa powder, sifted preferably dark
  • ½ teaspoon baking powder
  • ½ teaspoon baking soda
  • ¼ teaspoon fine sea salt
  • 1 cup (227g) unsalted butter, softened
  • 2 large eggs
  • 1 teaspoon pure vanilla extract
  • 1 cup (200g) granulated sugar
  • ¼ cup (50g) packed brown sugar
  • 22-24 *s'mores marshmallows or jumbo marshmallows I used Kraft Jet-Puffed S'moreMallows

Instructions
 

Fudge filling

  • Melt the chocolate chips and sweetened condensed milk together in a double boiler or in the microwave in a medium-sized microwave safe bowl.
  • Stir in the chopped nuts. Set aside to cool to room temperature.

Cookies

  • Preheat the oven to 350º (180ºC). Line 2 large cookie sheets with parchment paper.
  • In a medium-sized bowl, sift together the flour, cocoa powder, baking powder, baking soda, and salt until well blended.
  • In a large bowl, beat the butter, granulated sugar and brown sugar with an electric mixer at medium speed, until pale and fluffy. Mix in the eggs and the vanilla in 3 separate additions, making sure each addition is incorporated before adding the next. On low speed, mix in the flour mixture in 2 additions, just until combined.
  • Roll the fudge filling into tablespoon-sized balls.
  • Roll the cookie dough into 2-tablespoon-sized balls then flatten them into disks. Place a ball of fudge filling in the middle of each disk. Wrap the cookie dough around the ball of filling, sealing it completely.
  • Place the cookies about 2 inches apart onto the prepared baking sheets. Bake until the tops of the cookies are set, about 9-11 minutes. Remove from oven.
  • Turn on the broiler. Place a marshmallow on top of each cookie.
  • Broil the cookies until the marshmallows are toasted. This takes about 1 minute. CAUTION: Watch the cookies carefully when broiling. They can go from done to burnt in the blink of an eye!

Notes

*I used Kraft Jet-Puffed S'moreMallows, but if you're unable to find them, use jumbo marshmallows. Cut them in half lengthwise with kitchen shears. Place on cookies cut side down.
**To melt fudge filling in microwave, heat for 30 seconds. Stir, then microwave for 10 second intervals, stirring until melted.
Keyword chocolate, cookies

Gingerbread Cupcakes with Blood Orange Cream Cheese Icing and Candied Blood Orange Slices

Gingerbread Cupcakes with Blood Orange Cream Cheese Icing and Candied Blood Oranges

Every winter, when blood oranges come back in season, I start keeping an eye out for them at grocery stores and farmers markets. This year was different. I’ve been at home, having my groceries delivered instead of perusing the local produce aisles. If you’ve been entrusting strangers to do your shopping like I have, then you know delivery produce selections are hit and miss. So I was elated when a bag of perfectly beautiful, ripe blood oranges landed on my doorstep. This simple joy made my day. There was no choice. I had to make something worthy of the gorgeous red beauties!

I didn’t get enough of gingerbread this holiday season, so I decided to make a gingerbread cupcake recipe that I created a few years ago when I was experimenting with blood oranges. I used blood orange zest in the cupcake batter and brushed the warm cupcakes with the blood orange syrup left over from making the candied oranges. If you don’t make the candied oranges, you can easily make a batch of the syrup* or skip this step altogether. They will still be delicious. I topped the cupcakes with cream cheese icing made with more orange zest and some blood orange juice mixed in. The juice makes the icing turns a soft shade of pink.

Gingerbread Cupcakes with Blood Orange Cream Cheese Icing and Candied Blood Oranges

Candied blood orange slices are so stunning, that I can’t bring myself to just lay them on top of a dessert. They remind me of stained glass windows. I like to place them on toothpicks so they can stand up in regal style! Many recipes out there will instruct you to boil the orange slices, then let them air dry. This is perfectly fine if you don’t mind floppy candied oranges. For this recipe, boiling the slices, then letting them dry in the oven on low heat will give them enough stiffness to stand up.

If you can’t find blood oranges where you live, here’s a link to get blood oranges shipped to you. This recipe will also work with other types of oranges. You won’t get the deep scarlet color and the flavor will have a bit more tartness, but it will still be beautiful and delicious!


Gingerbread Cupcakes with Blood Orange Cream Cheese Icing

by Mari Vasseur
Course Dessert
Servings 12 cupcakes

Ingredients
  

Gingerbread Cupcakes

  • 2 ¼ cups (287g) all purpose flour, sifted
  • 2 teaspoons ground ginger
  • 1 ¾ teaspoons ground cinnamon
  • ½ teaspoon baking soda
  • ¼ teaspoon ground allspice
  • â…› teaspoon fine sea salt
  • ½ cup (113g) unsalted butter, softened
  • ½ cup (100g) packed brown sugar
  • 2 teaspoons blood orange zest or orange zest
  • ¾ cup (245ml) molasses
  • 2 large eggs
  • ¾ cup (174ml) buttermilk

Blood Orange Cream Cheese Icing

  • ¾ cup (170g) cream cheese, softened
  • 6 tablespoons (85g) unsalted butter, softened
  • 1 teaspoon blood orange zest or orange zest
  • 1 pinch fine sea salt
  • 3 ½ cups (450g) powdered sugar, sifted
  • 3-4 tablespoons (45-59ml) blood orange juice or orange juice

Candied Blood Orange Slices

  • 2 medium blood oranges or oranges
  • ½ cup (100g) granulated sugar
  • ¾ cup (177ml) water

Instructions
 

Gingerbread Cupcakes

  • Preheat the oven to 350º. Spray the wells a 12-serving muffin pan with non-stick spray.
  • In a medium-sized bowl, whisk together flour, cinnamon, ginger, allspice, baking soda and salt until well blended.
  • In a large bowl, beat the butter, brown sugar and orange zest with an electric mixer at medium speed, until pale and fluffy.
  • Add the molasses and beat until combined. Beat in the eggs one at a time until incorporated. On low speed, mix in the flour mixture in two additions, alternating with the buttermilk. Beat just until combined.
  • Scoop the batter into prepared the muffin pan, filling the wells 2/3 full.
  • Bake until a toothpick inserted into the center of the cupcakes comes out clean, about 15-18 minutes. Allow the cupcakes to cool in pan for 7 minutes, then remove them from pan and place them upside down on a cooling rack.
  • Brush the warm cupcakes generously with orange simple syrup. Allow them to cool completely before frosting.

Blood Orange Cream Cheese Icing

  • In a large bowl, beat the cream cheese, on low speed with an electric mixer, until smooth.
  • Add the butter, orange zest and salt and beat until smooth and well blended.
  • Add the powdered sugar. Beat on low speed until the powdered sugar is incorporated. Increase the speed to medium and beat until smooth.
  • Beat in the blood orange juice, one tablespoon (15ml) at a time until the desired consistency is reached.

Candied Blood Orange Slices

  • Slice the oranges into thin 1/4 inch slices.
  • Combine the sugar and water in a shallow saucepan and bring to a simmer. Add the orange slices to the saucepan. Simmer for 10 minutes.
  • Drain the oranges, reserving the syrup.
  • Preheat the oven to 175ºF (80ºC). Place on a large baking sheet lined with a baking mat in a single layer and bake until the orange slices begin to stiffen, about 2 hours.
  • Remove the orange slices from the oven and let them cool on the baking sheet. If desired, insert toothpicks when the slices are cool enough to handle. The slices will continue to stiffen as they cool.

Notes

*To make orange simple syrup,  combine the juice of one orange with enough water to make 1/2 cup. Combine mixture with the zest of one orange and 1/2 cup sugar in a small saucepan over medium heat. Stir until sugar is dissolved. Let cool and transfer to a glass container. Refrigerate until ready to use.
Keyword blood oranges, candied oranges, cupcakes, gingerbread

Pumpkin Cheesecake Crumble Brownies

pumpkin cheesecake crumble brownies

It’s Fall 2020. We need chocolate! We need pumpkin spice! And we need it drenched with caramel! These satisfying brownies check all of the boxes with multiple layers of comfort. A rich chocolate brownie is the base. The next layer is heavenly pumpkin cheesecake. The topping is a buttery crumble that rivals the best crumb cake. Finally, as if that isn’t enough, it’s drizzled with caramel sauce!

If it sounds complicated, don’t worry, it’s not. Each layer is super easy to make. You can use your favorite store bought caramel sauce to top it with. Vanilla ice cream and/or whipped cream are optional, but highly recommended toppings also. Just saying.

The layers go unexpectedly well together and make the perfect dessert for Halloween or Thanksgiving. I’m even going to add these beauties to my Christmas dessert table this year. Enjoy! You deserve it.

Pumpkin Cheesecake Crumble Brownies

Chocolate brownies with pumpkin cheesecake and crumb topping, topped with caramel sauce.
Course Dessert
Servings 12

Ingredients
  

Crumb Topping

  • 1 ½ cups (6 3/4 ounces) all purpose flour
  • ½ cup (3 1/4 ounces) brown sugar
  • 1 ½ teaspoons ground cinnamon
  • ½ teaspoon salt
  • ¾ cup (1 1/2 sticks) unsalted butter

Pumpkin Cheesecake Layer

  • ¾ cup (6 ounces) cream cheese, softened
  • 1 cup (8 ounces) canned pumpkin
  • 2 eggs
  • 6 tablespoons sugar
  • 1 ½ teaspoons ground cinnamon
  • ¼ teaspoon ground ginger
  • ¼ teaspoon ground nutmeg

Brownie Layer

  • ½ cup (1 stick) unsalted butter
  • 1 â…› cup (8 ounces) granulated sugar
  • ½ cup (2 1/8 ounces) Dutch-Process cocoa powder
  • 1 teaspoon vanilla extract
  • ½ teaspoon baking powder
  • ¼ teaspoon salt
  • 3 eggs
  • ¾ cup (3 3/8 ounces) all purpose flour
  • ½ cup caramel sauce, purchased or homemade warmed if desired

Instructions
 

Crumb Topping

  • In a medium bowl, combine flour, brown sugar, cinnamon and salt.
  • Cut in butter using a pastry blender or your fingers until well-combined and crumbles are pea-sized. Press crumbles together to make large quarter-sized chunks.
  • Set aside in refrigerator.

Pumpkin Cheesecake Layer

  • Preheat oven to 350º. Line a 9-inch square baking pan with parchment paper.
  • In a medium bowl, beat cream cheese with an electric mixer until smooth.
  • Add pumpkin, eggs, sugar, cinnamon, ginger and nutmeg and beat until well combined. Set aside.

Brownie Layer

  • Melt 1 stick of butter in a large microwaveable bowl.
  • Stir in sugar until combined
  • Stir in cocoa powder, vanilla, baking powder and salt.
  • Add the eggs and beat until smooth
  • Add the flour and mix until just combined.
  • Spread brownie batter into prepared baking pan. Smooth with a spatula.
  • Spread pumpkin cheesecake batter over the top of brownie batter. Smooth with a spatula.
  • Sprinkle crumb topping evenly over the top of pumpkin cheesecake layer.
  • Bake for 40-50 minutes until a toothpick inserted into pumpkin cheesecake layer comes out clean.
  • Let cool completely. Cut into squares and serve with caramel sauce.