Gingerbread Cupcakes with Blood Orange Cream Cheese Icing and Candied Blood Orange Slices

Gingerbread Cupcakes with Blood Orange Cream Cheese Icing and Candied Blood Oranges

Every winter, when blood oranges come back in season, I start keeping an eye out for them at grocery stores and farmers markets. This year was different. I’ve been at home, having my groceries delivered instead of perusing the local produce aisles. If you’ve been entrusting strangers to do your shopping like I have, then you know delivery produce selections are hit and miss. So I was elated when a bag of perfectly beautiful, ripe blood oranges landed on my doorstep. This simple joy made my day. There was no choice. I had to make something worthy of the gorgeous red beauties!

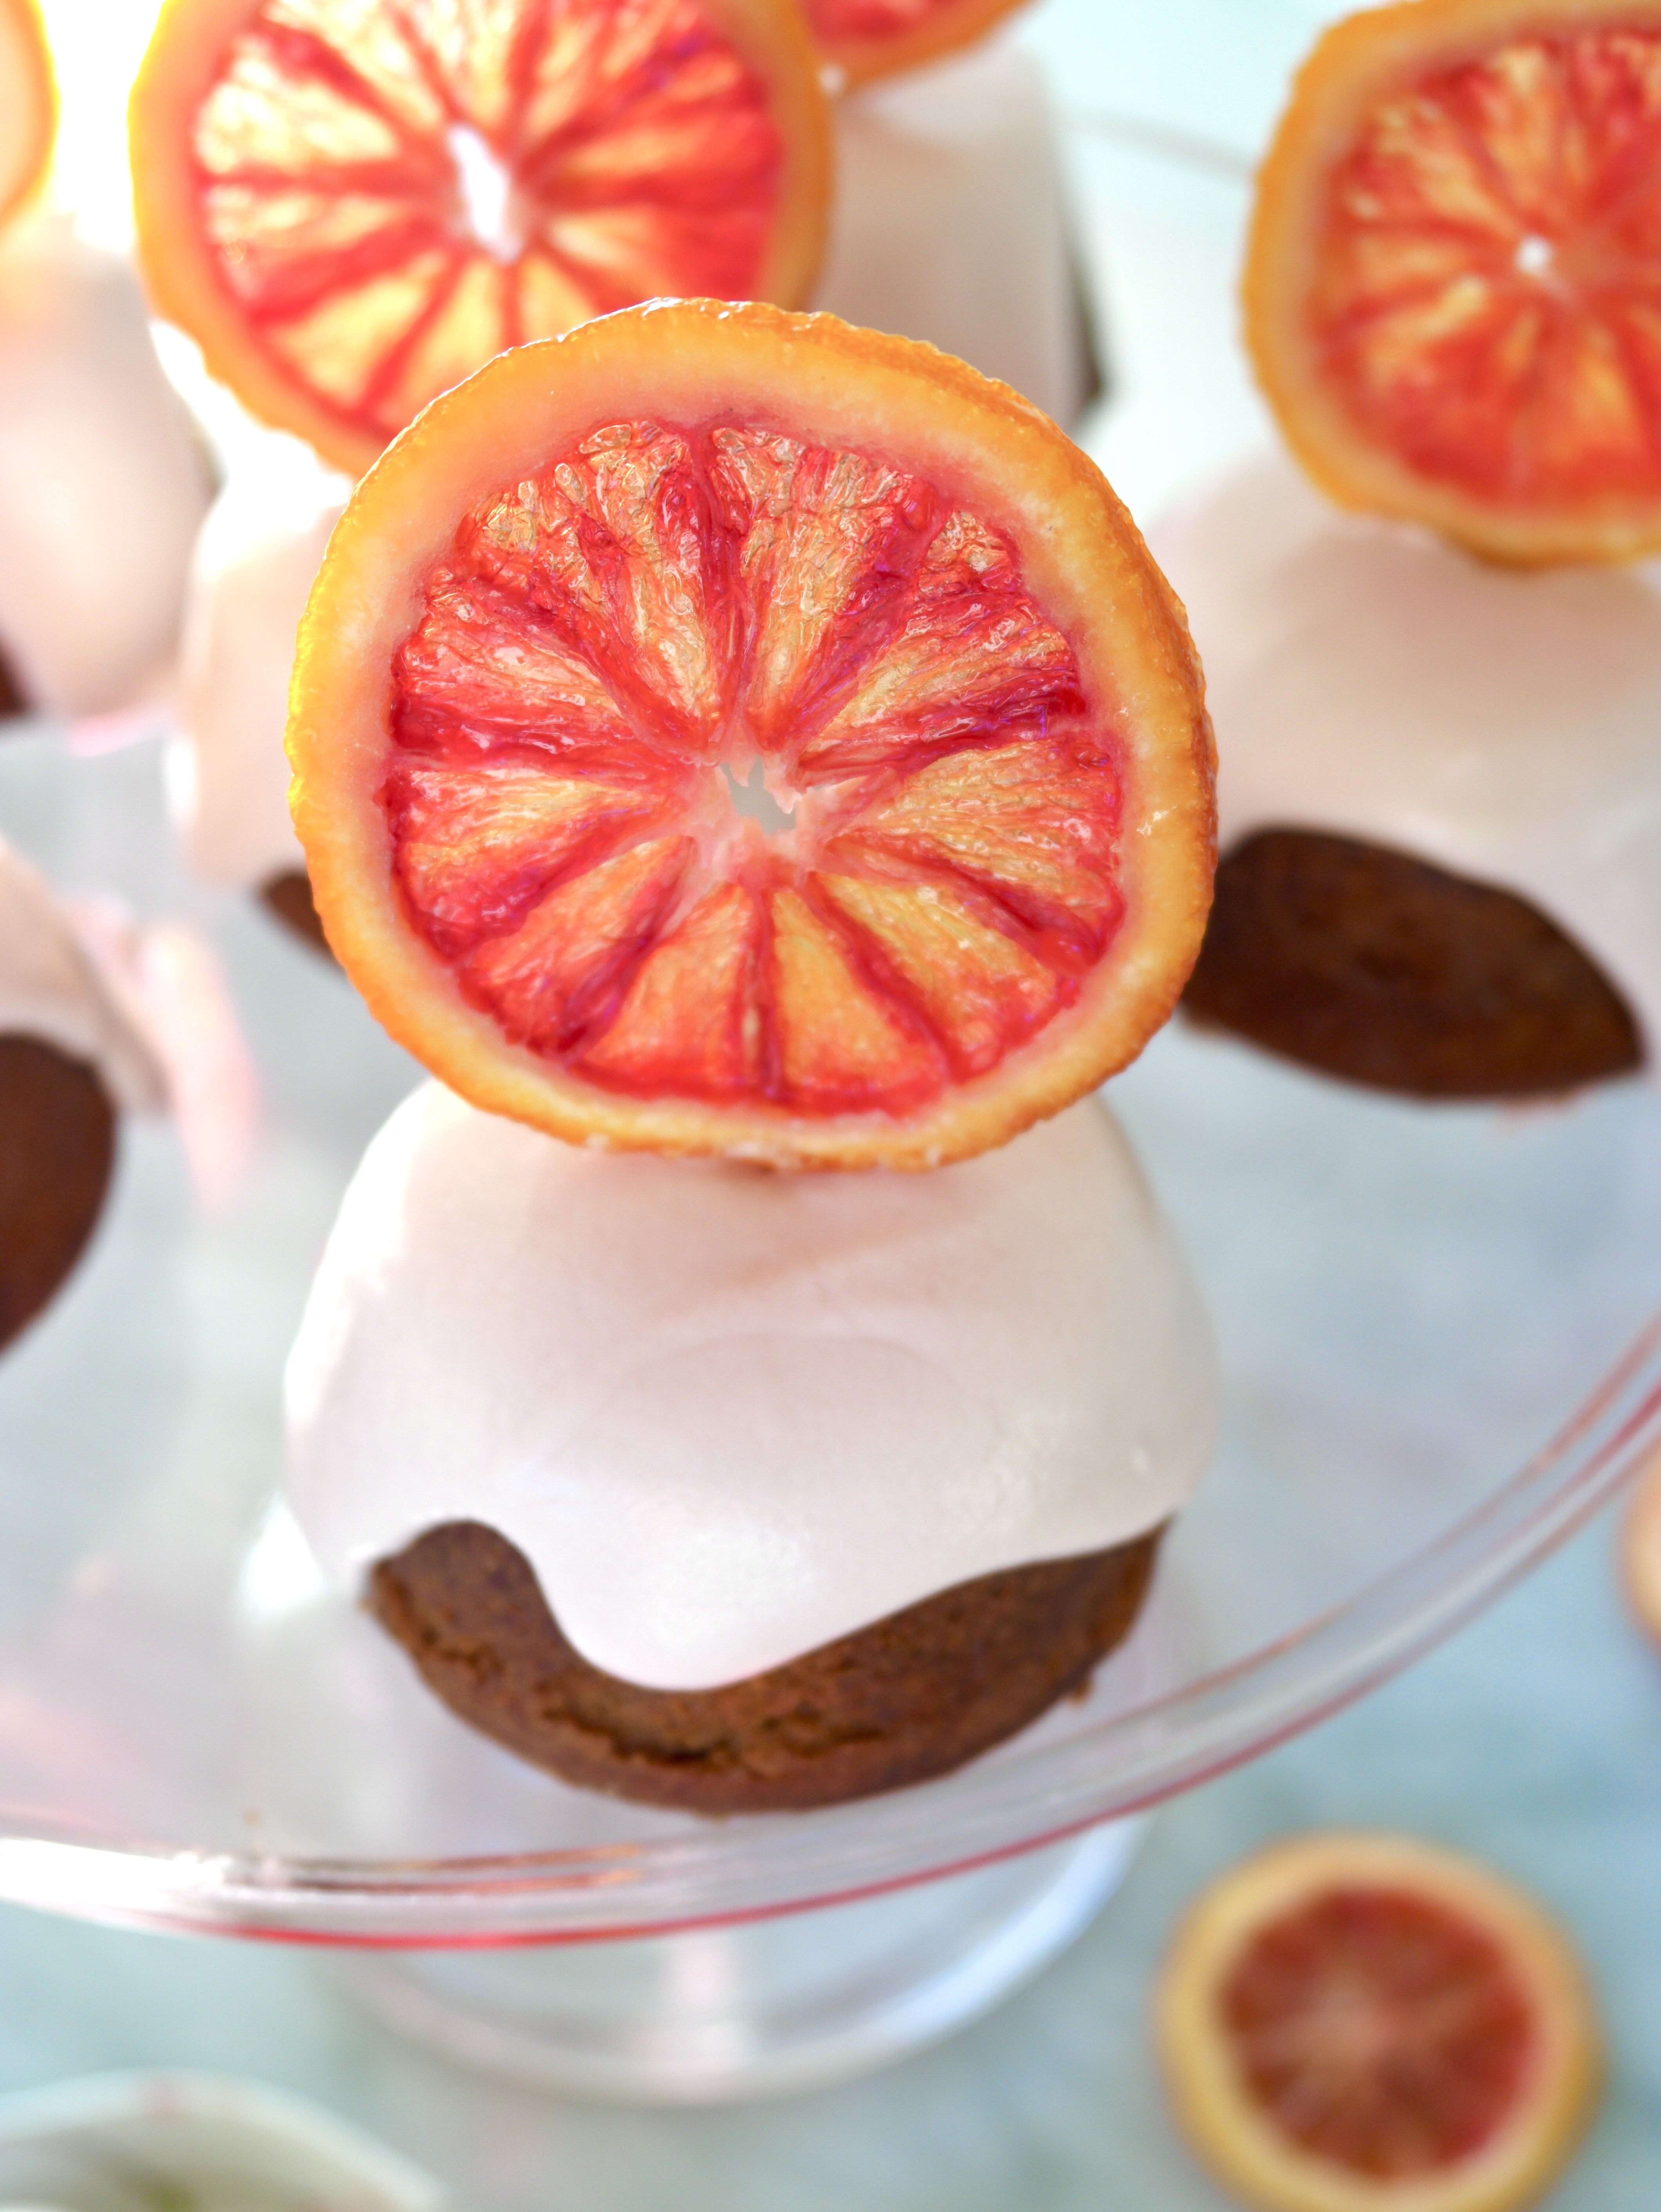
I didn’t get enough of gingerbread this holiday season, so I decided to make a gingerbread cupcake recipe that I created a few years ago when I was experimenting with blood oranges. I used blood orange zest in the cupcake batter and brushed the warm cupcakes with the blood orange syrup left over from making the candied oranges. If you don’t make the candied oranges, you can easily make a batch of the syrup* or skip this step altogether. They will still be delicious. I topped the cupcakes with cream cheese icing made with more orange zest and some blood orange juice mixed in. The juice makes the icing turns a soft shade of pink.

Gingerbread Cupcakes with Blood Orange Cream Cheese Icing and Candied Blood Oranges

Candied blood orange slices are so stunning, that I can’t bring myself to just lay them on top of a dessert. They remind me of stained glass windows. I like to place them on toothpicks so they can stand up in regal style! Many recipes out there will instruct you to boil the orange slices, then let them air dry. This is perfectly fine if you don’t mind floppy candied oranges. For this recipe, boiling the slices, then letting them dry in the oven on low heat will give them enough stiffness to stand up.

If you can’t find blood oranges where you live, here’s a link to get blood oranges shipped to you. This recipe will also work with other types of oranges. You won’t get the deep scarlet color and the flavor will have a bit more tartness, but it will still be beautiful and delicious!


Gingerbread Cupcakes with Blood Orange Cream Cheese Icing

by Mari Vasseur
Course Dessert
Servings 12 cupcakes

Ingredients
  

Gingerbread Cupcakes

  • 2 ¼ cups (287g) all purpose flour, sifted
  • 2 teaspoons ground ginger
  • 1 ¾ teaspoons ground cinnamon
  • ½ teaspoon baking soda
  • ¼ teaspoon ground allspice
  • â…› teaspoon fine sea salt
  • ½ cup (113g) unsalted butter, softened
  • ½ cup (100g) packed brown sugar
  • 2 teaspoons blood orange zest or orange zest
  • ¾ cup (245ml) molasses
  • 2 large eggs
  • ¾ cup (174ml) buttermilk

Blood Orange Cream Cheese Icing

  • ¾ cup (170g) cream cheese, softened
  • 6 tablespoons (85g) unsalted butter, softened
  • 1 teaspoon blood orange zest or orange zest
  • 1 pinch fine sea salt
  • 3 ½ cups (450g) powdered sugar, sifted
  • 3-4 tablespoons (45-59ml) blood orange juice or orange juice

Candied Blood Orange Slices

  • 2 medium blood oranges or oranges
  • ½ cup (100g) granulated sugar
  • ¾ cup (177ml) water

Instructions
 

Gingerbread Cupcakes

  • Preheat the oven to 350º. Spray the wells a 12-serving muffin pan with non-stick spray.
  • In a medium-sized bowl, whisk together flour, cinnamon, ginger, allspice, baking soda and salt until well blended.
  • In a large bowl, beat the butter, brown sugar and orange zest with an electric mixer at medium speed, until pale and fluffy.
  • Add the molasses and beat until combined. Beat in the eggs one at a time until incorporated. On low speed, mix in the flour mixture in two additions, alternating with the buttermilk. Beat just until combined.
  • Scoop the batter into prepared the muffin pan, filling the wells 2/3 full.
  • Bake until a toothpick inserted into the center of the cupcakes comes out clean, about 15-18 minutes. Allow the cupcakes to cool in pan for 7 minutes, then remove them from pan and place them upside down on a cooling rack.
  • Brush the warm cupcakes generously with orange simple syrup. Allow them to cool completely before frosting.

Blood Orange Cream Cheese Icing

  • In a large bowl, beat the cream cheese, on low speed with an electric mixer, until smooth.
  • Add the butter, orange zest and salt and beat until smooth and well blended.
  • Add the powdered sugar. Beat on low speed until the powdered sugar is incorporated. Increase the speed to medium and beat until smooth.
  • Beat in the blood orange juice, one tablespoon (15ml) at a time until the desired consistency is reached.

Candied Blood Orange Slices

  • Slice the oranges into thin 1/4 inch slices.
  • Combine the sugar and water in a shallow saucepan and bring to a simmer. Add the orange slices to the saucepan. Simmer for 10 minutes.
  • Drain the oranges, reserving the syrup.
  • Preheat the oven to 175ºF (80ºC). Place on a large baking sheet lined with a baking mat in a single layer and bake until the orange slices begin to stiffen, about 2 hours.
  • Remove the orange slices from the oven and let them cool on the baking sheet. If desired, insert toothpicks when the slices are cool enough to handle. The slices will continue to stiffen as they cool.

Notes

*To make orange simple syrup,  combine the juice of one orange with enough water to make 1/2 cup. Combine mixture with the zest of one orange and 1/2 cup sugar in a small saucepan over medium heat. Stir until sugar is dissolved. Let cool and transfer to a glass container. Refrigerate until ready to use.
Keyword blood oranges, candied oranges, cupcakes, gingerbread

Pastel Snowball Cookies

pastel snowball cookies

This delightful melt-in-your-mouth cookie recipe has been in my family for decades. We call them Snowballs, but they’re also known as Mexican Wedding Cakes or Greek Kourabiedes. I make them every year for Christmas, but they would also be perfect for Easter, Mother’s Day, birthday parties, tea parties, weddings, bridal showers, and baby showers.

Pecans are my favorite nuts to use in this recipe, but you can use almost any nuts you have on hand. The original snowy white version is a classic but you can take them up a notch with pretty pastels and fruit flavors. You can use crushed, freeze-dried fruit for color and subtle flavor. Spirulina is a nutritious, vibrant powder you can use to make beautiful blue cookies. You can also dress up your snowballs with edible glitter or luster dust used for cake decorating. There are endless ways to be creative with these cute cookies!


Pastel Snowball Cookies

by Mari Vasseur
Melt-in-your-mouth shortbread cookie balls covered in pastel powdered sugar
Course Dessert
Servings 36 cookies

Ingredients
  

Cookies

  • 1 cup (227g) unsalted butter, softened
  • 1 cup (120g) powdered sugar, sifted and divided plus more for desired pastel powdered sugar color
  • 1 teaspoon vanilla extract
  • ¼ teaspoon fine sea salt
  • 2 cups (255g) all purpose flour, sifted
  • ½ cup (64g) finely chopped pecans

Pink powdered sugar

  • â…“ cup (40g) powdered sugar, sifted
  • ½ cup (14g) freeze-dried strawberries or raspberries see note below*

Blue powered sugar

  • â…“ cup (40g) powdered sugar, sifted
  • 1 ½ teaspoons blue spirulina powder

Lavender powered sugar

  • â…“ cup (40g) powdered sugar, sifted
  • ½ cup (14g) freeze-dried blueberries see note below*
  • ¼ teaspoon violet edible petal dust optional

Instructions
 

Cookies

  • Preheat the oven to 325ºF (165ºC). Line two cookie sheets with parchment paper.
  • In a large bowl, beat the butter, with an electric mixer at medium speed, until smooth and creamy. Add 1/2 cup (60g)of powdered sugar, the vanilla and salt. Beat until pale and fluffy.
  • In a separate medium-sized bowl, combine the flour and pecans. Gradually add the flour and pecan mixture to the butter mixture, beating on low speed until combined.
  • Shape the dough into scant 1-inch balls. Place the balls about 2 inches apart onto the prepared cookie sheets. Bake until light golden brown, about 17-20 minutes.
  • Place the remaining 1/2 cup (60g) of powdered sugar in a plastic bag. With a spatula, transfer three warm cookies into the bag. Shake gently to coat the cookies with powdered sugar. Transfer them to a cooling rack. Repeat with the remaining cookies.
  • Cool the cookies completely then proceed to the instructions for pastel powdered sugar, depending on which color you have selected.

Pink powdered sugar

  • Process the freeze-dried strawberries or raspberries into a fine powder in a mini food processor.
  • Whisk the freeze-dried berry powder with 1/3 cup (40g) powered sugar together in a small bowl.
  • Transfer the powered sugar mixture to a plastic bag. Place three cookies in the bag and shake gently until coated with the powdered sugar mixture. Transfer the cookies back to the rack and repeat with remaining cookies.

Blue powered sugar

  • Whisk 1/3 cup (40g) powdered sugar and the spriulina powder in a small bowl.
  • Transfer the powered sugar mixture to a plastic bag. Place three cookies in the bag and shake gently until coated with the powdered sugar mixture. Transfer the cookies back to the rack and repeat with the remaining cookies.

Lavender powered sugar

  • Process the freeze-dried blueberries into a fine powder in a mini food processor.
  • Whisk the freeze-dried blueberry powder with 1/3 cup (40g) powered sugar together in a small bowl. Whisk in petal dust for a more vibrant color, if desired.
  • Transfer the powered sugar mixture to a plastic bag. Place three cookies in the bag and shake gently until coated with the powdered sugar mixture. Transfer the cookies back to the rack and repeat with the remaining cookies.

Notes

*The ratios for the pastel powered sugar are approximate. Freeze-dried fruit varies in color. Add more or less to achieve your desired shade.
Keyword cookies

Purple Berry Cake with Silky Cream Cheese Frosting

Purple Berry Cake with Silky Cream Cheese Frosting by Brownie Mischief

Purple is passionate. It’s mystical. It’s regal. Don’t we all know someone whose favorite color is purple? It’s painfully obvious. They can’t hide it. They don’t want to hide it. They can’t just be friends with purple. They’re in a relationship with purple. The first time I made this Purple Berry Cake, a purple lover I know said that when she saw it, it spoke to her soul. Purple Berry Cake with Silky Cream Cheese Frosting by Brownie Mischief

Fresh berry purée is added to the batter, creating a soft, moist cake. The layers are brushed with berry syrup, which helps keeps the cake moist and gives it a nice punch of berry flavor.  I used blackberries and blueberries, but you can use any combination of purple berries that you like. After baking, the color of the cake layers will be a brownish gray with a hint of purple, depending on your berries. I think I need to come up with name for this color. How about Silverberry? You can see tiny flecks of the berries in the cake and I think the color is lovely, especially with the lavender frosting. If you want a more purple cake, feel free to add some gel food color to the batter. I used Wilton Violet gel food color to achieve the pretty lavender cream cheese frosting. The extra butter and the addition of heavy cream makes this frosting silky and spreadable.

Purple Berry Cake with Silky Cream Cheese Icing by Brownie Mishchief

I’m obsessed with edible flowers lately, so I garnish my baked goods with them whenever I can get my hands on some. I found these pansies in the produce department of my local food market. If you can’t find pansies, pesticide free violets or rose petals would also be pretty. Make sure to apply them to your cake right before serving, since they are delicate and will wilt over time. Brush some of your berries with a little dab of edible gold luster dust for an extra regal touch.

Purple Berry Cake with Silky Cream Cheese Frosting

A soft, moist cake made with berry purée and topped with silky lavender cream cheese icing
Course Dessert
Servings 1 6-inch cake (serves 6)

Ingredients
  

Purple Berry Cake

  • 12 ounces (340g) fresh berries (plus more to garnish cake) I used blackberries and blueberries
  • 1 ½ cups (191g) all purpose flour, sifted
  • 1 teaspoon baking powder
  • ½ teaspoon baking soda
  • ½ teaspoon fine sea salt
  • 1 ½ cups (300g) sugar, divided
  • â…“ cup (75ml) vegetable oil
  • 2 large eggs, room temperature
  • 1 teaspoon pure vanilla extract
  • ½ cup (118ml) buttermilk, room temperature

Silky Cream Cheese Frosting

  • ¾ cup (170g) cream cheese, softened
  • ¾ cup (170g) unsalted butter, softened
  • 1 teaspoon pure vanilla extract
  • â…› teaspoon fine sea salt
  • 1 pound (454g) powdered sugar, sifted
  • 1 tablespoon heavy cream, room temperature
  • Purple gel food color I used Wilton Violet

Garnishes

  • Fresh berries
  • Edible gold luster dust I used Alan Tetreault Edible Hybrid Luster Dust Soft Gold
  • Edible flowers I used pesticide free pansies

Instructions
 

Purple Berry Cake

  • Preheat the oven to 350º F (180ºC). Like the bottoms of two 6-inch round cake pans with parchment paper circles. Grease and flour the insides.
  • Purée the berries in a blender or small food processor. Strain the puréed berries through a sieve. Reserve 2/3 cup (150g) of the berry puree. Set aside the remaining puree for the syrup.
    Puree fresh berries.
  • In a medium-size bowl, whisk together the flour, baking powder, baking soda, and salt until well combined.
  • In a large bowl, beat 1 1/4 cups (250g) of sugar with the oil, eggs and vanilla extract, with an electric mixer on medium speed, until light and fluffy. Stir in the reserved 2/3 cup berry purée. Add the flour mixture in two additions, alternating with the buttermilk, beating at low speed just until combined.
  • Pour the batter evenly into the prepared cake pans. Bake until a toothpick inserted into center of cakes comes out clean, about 30-35 minutes. Cool the cakes in the pans for 10 minutes. Remove the cakes from pans and transfer them to cooling racks to cool.
  • While the cakes are baking, make the berry syrup. In a small saucepan, heat the remaining berry purée with the remaining 1/4 cup sugar (50g) and 1/4 cup (59ml) of water over medium-low heat. Stir together and cook until sugar is dissolved. Set aside to cool.
  • Split each cooled cake llayer into two and brush with berry syrup. Fill and frost the cake with Silky Cream Cheese Frosting.

Silky Cream Cheese Frosting

  • In a large bowl, beat cream cheese with an electric mixer on speed or by hand with a spatula, until smooth. Add the butter and beat until smooth and well combined. Add the vanilla extract and salt and beat until combined.
  • Gradually add the powdered sugar and beat at medium speed until combined. Add the heavy cream and beat at low speed until smooth and creamy.
  • Add the food color with a toothpick, a little at a time, until the desired shade is reached. Beat at low speed until well blended. Smooth out any air bubbles by stirring slowly by hand with a spatula.

Garnishes

  • Garnish the top of the cake with fresh berries. Brush a few of the berries with edible gold luster dust. Garnish with fresh flowers immediately before serving.