Dainty pink sparkly cookies are for fairies, princesses and charming people who love pretty, petite treats. These pink shortbread hearts are as cute as a button and so tender and delicious. They’re very simple to make and go perfectly with tea or lemonade. They also make a nice gift for Mother’s Day, baby showers, and especially for Valentine’s Day and Galentine celebrations.
Dainty Pink Shortbread Hearts
by Mari Vasseur
Tender, buttery mini shortbread cookies with sparkling sugar
In a medium-sized bowl, whisk the flour and powdered sugar together until well blended.
In a large bowl, beat the butter, with an electric mixer on medium speed, until pale and fluffy. Beat in the extracts until well combined. Add the flour mixture and beat just until incorporated. The dough may seem crumbly at first, but it will come together.
Divide the dough into 2 portions. Roll the dough between 2 sheets of parchment paper to 1/4-inch thickness. Place the parchment-covered dough onto trays and chill in the refrigerator for at least 1 hour or up to overnight.
Preheat the oven to 350ºF (180ºC). Line 2 cookie sheets with parchment paper.
Cut out 36 heart shapes with a 1 1/2-inch cookie cutter. Place the hearts about 2 inches apart onto the cookie sheets. Sprinkle the cookies with sparkling sugar. Bake until the edges start to turn light golden brown, about 8-9 minutes. Transfer the cookies to a cooling rack.
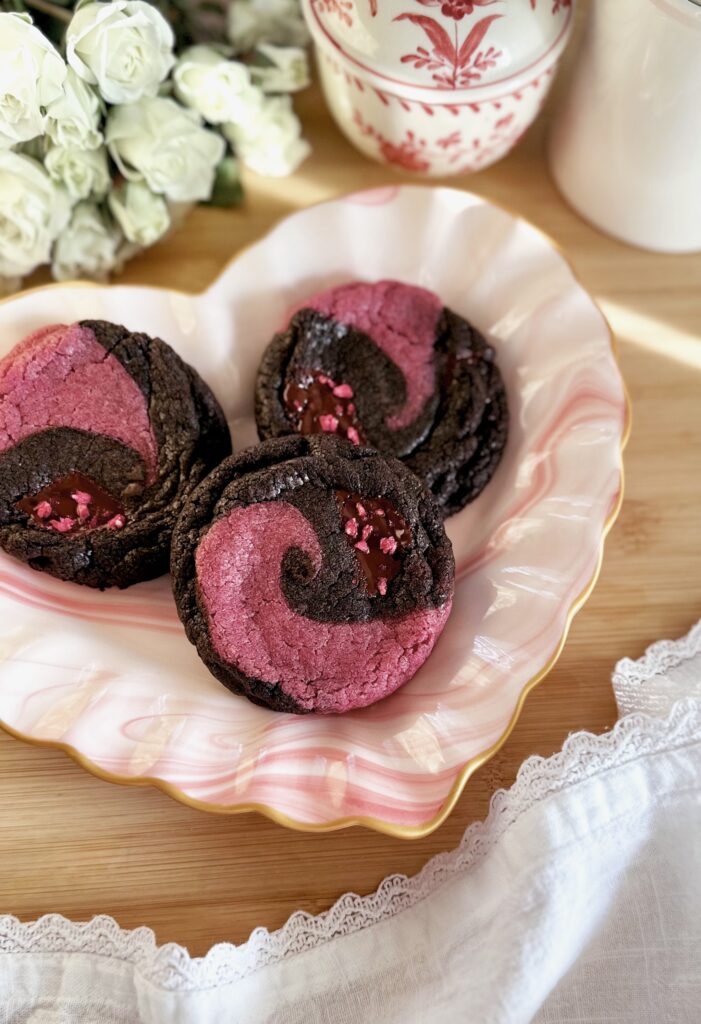
Since it’s getting close to Valentine’s Day, I created these beautiful, enchanting cookies using flavors which evoke love and romance. Rich, pleasantly bitter dark chocolate and sweet, tart raspberries are a perfectly balanced, elegant combination. I used freeze-dried raspberries in the cookie dough for the most bright, pure raspberry flavor. The raspberries turn the cookie dough a mauve-red color, but if you want a more intense red, you can add a drop or two of red gel good coloring.
Dark Chocolate Raspberry Swirl Cookies
Beautiful, enchantingly delicious cookies made of rich dark chocolate cookie dough with dark chocolate pieces, swirled together with sweet-tart raspberry cookie dough by Brownie Mischief
13.5-4 ounce (99-113g)dark chocolate bar, chopped into pieces & divided
Instructions
Line two large cookie sheets with parchment paper.
Set aside 5 freeze-dried raspberries. Process the remaining raspberries into a powder in a small food processor or a clean spice grinder. Pass the powder through a fine sieve to remove the seeds. Coarsely crush the 5 reserved freeze-dried raspberries.
In a medium-sized bowl, whisk together the flour, salt, baking powder and baking soda until well blended.
In a large bowl, beat the butter, brown sugar and granulated sugar together until pale and fluffy. Beat in the egg, egg yolk and vanilla extract in three separate additions, making sure each one is incorporated before adding the next. Stir in the flour mixture just until combined.
Transfer 1/3 of the cookie dough (about 275g), to a medium-sized bowl, using a kitchen scale for accuracy. Mix the freeze-dried raspberry powder and the food coloring into the smaller portion of cookie dough. Mix the cocoa powder into the larger portion of cookie dough. Set aside 16 of the larger pieces of chocolate. Mix the remaining pieces of chocolate into the chocolate dough.
Divide the raspberry cookie dough into 16 equal portions, about 1 tablespoon each. Divide the chocolate cookie dough into 32 equal portions. Roll all of the cookie dough portions into balls. Divide the dough balls into 16 groups of 1 raspberry dough ball with 2 chocolate dough balls. Place a group of 3 dough balls on the palm of your hand. Place your other palm on the dough balls and roll in a circular motion until the doughs are swirled together. Place the swirled dough balls on the cookie sheet at least 3 inches apart. Top each one with a piece of reserved chocolate. Chill in the refrigerator for 20 minutes. Meanwhile, preheat the oven to 350ºF (180ºC).
Bake the cookies until the tops are set and start to puff, about 10-12 minutes. The cookies will spread a bit. Remove the cookies form the oven. Immediately use a large round cookie cutter to shape the hot cookies by sliding it around each one in a circular motion a couple of times. Work quickly before the cookies set. Cool the cookies on the cookie sheet for 3 minutes, then transfer them to a cooling rack. Sprinkle the crushed freeze-dried raspberries onto the melted chocolate on each cookie.
Notes
Make sure to use freeze-dried fruit, not dried fruit. I purchased my freeze-dried raspberries at Trader Joe's. They are also available at large grocery stores or online. Aluminum cookie sheet pans will give you the most success when baking cookies. We used them in culinary school and many bakeries use them. To find my favorite sheet pan for cookies, click here.To find the gel food coloring I used, click here.
Chocolate is the most popular cake flavor, so there’s no doubt that Chocolate Cake Cookies would be well-loved also. These cookies are so tempting that they’ll be the most popular cookies on your cookie platter. These soft, rich cookies have the elements we all love about chocolate cake, without the cake mix. The perfectly silky, smooth chocolate buttercream makes them absolutely delicious! They look so festive and nostalgic with sprinkles on top. They remind me of the popular grocery store cookies, but better. Make sure to make a pot of coffee or grab a jug of milk to enjoy with these chocolatey treats.
Chocolate Cake Cookies
Mari Vasseur
Soft, rich chocolate cookies with silky, smooth chocolate frosting
⅔cup (60g)unsweetened Dutch process cocoa powder, sifted
1teaspoonbaking powder
½ teaspoonfine sea salt
1cup (227g)unsalted butter, softened
1 ¼cups (250g)granulated sugar
2largeeggsroom temperature
2teaspoonspure vanilla extract
sprinklesoptional
Chocolate Buttercream Frosting
¼cup (74ml)maple syrup
2tablespoons (30ml)water
¼cup plus 2 tablespoons (34g)Dutch process unsweetened cocoa powder, sifted
4ounces (113g)bittersweet 70-72%) or semisweet chocolate, choppedsee note below*
10tablespoons (142g)unsalted butter, softened
⅔cup (80g)powdered sugar, sifted
1pinchfine sea salt
Instructions
Cookies
In a medium-sized bowl, whisk together the all purpose flour, cake flour, cocoa powder, baking powder and salt until well blended.
In a large bowl, beat the butter and sugar together, with an electric mixer at medium speed, until light and fluffy. Beat in the eggs and vanilla extract in 3 separate additions, making sure each one is incorporated before adding the next. On low speed, or by hand, stir in the flour mixture just until combined. Refrigerate the dough just until it's easier to work with, about 10-15 minutes.
Meanwhile, preheat the oven to 350ºF. (180ºC). Line 2 large cookie sheets with parchment paper.
Divide the cookie dough into 24 portions, about 2 tablespoons (35g) each. (I used a #30 portion scoop.**) Roll them into 1 1/2-inch balls. Place the cookie dough balls onto the baking sheets about 3 inches apart. Bake until the cookies are puffed and start to darken around the edges, about 9-11 minutes. Do not over bake. Let the cookies cool on the baking sheet for 1 minute, then transfer them to a cooling rack.
Chocolate Frosting
In a small saucepan over low heat, whisk together the maple syrup, water, and cocoa powder until smooth. Remove from heat and set aside to cool to room temperature.
Melt the chocolate in a medium-sized bowl set over a pan of barely simmering water, making sure the water doesn't touch the bottom of the bowl. Stir gently until smooth. Remove from heat and set aside to cool to lukewarm.
In a large bowl, beat the butter, with an electric mixer at medium speed, until smooth and pale. Add the powdered sugar and salt and continue beating until smooth and well blended.
Gradually add the cooled maple syrup mixture and beat on low speed until combined. Stir in the melted chocolate until well combined. Smooth out any air bubbles by stirring gently with a rubber spatula.
Frost the cooled cookies. Top with sprinkles if desired.
Notes
*For the smoothest results, use chopped bar chocolate for your frosting and make sure the chocolate is completely melted. Do not use chocolate chips. They contain an ingredient which prevents them from melting completely and may make your frosting lumpy.**To find the portion scoop I used, click here.
Little chocolate donuts are a fun, nostalgic treat from my childhood. I’m talking about the ones at the local market that come in a plastic sleeve. I remember sharing the waxy little donuts with a friend, and at the time we thought they were delicious. Now that I’m an adult, I realize that homemade ones taste soo much better and they’re surprisingly quick and easy to make. They’re delicious with either naturally pink strawberry icing or chocolate glaze. I shared the recipe for both options below.
For Valentine’s Day, I used a heart-shaped mini donut pan for the donuts shown in the photo, but a standard round mini donut pan works too. A sprinkle of pink sparkling sugar makes them extra special, especially for Galentine’s Day.
½cup (115ml)vegetable oil or neutral oil of your choice
1largeegg
½cup (128ml)buttermilk
½teaspoonpure vanilla extract
Strawberry icing or chocolate glazerecipes below
Pink sparkling sugar,optional
Pink Strawberry Icing
1 ½cups (181g)powdered sugar, sifted
2tablespoons (30ml)puréed strawberries, strainedfresh or frozen
1tablespoon (14g)unsalted butter, melted
1pinch fine sea salt
1-2tablespoons (15-30ml)whole milk, room temperature
Chocolate Glaze
6tablespoons (85g)unsalted butter
4ounces (113g)semisweet chocolate, chopped
2teaspoonslight corn syrup
Instructions
Little Chocolate Donuts
Preheat the oven to 350ºF (180ºC). Spray a mini donut pan with nonstick spray. (I used a heart-shaped mini donut pan** but a standard round mini donut pan***works too.)
In a medium-size bowl, whisk together the flour, cocoa powder, salt, baking powder and baking soda until well combined.
In a large bowl, whisk together the brown sugar, oil, egg, buttermilk and vanilla until smooth. Add the flour mixture and stir just until combined.
Transfer the batter to the donut pan, using a piping bag or a plastic food storage bag with the corner cut off. Bake until a toothpick inserted into the centers of the donuts comes out clean, about 6-8 minutes. Do not over bake or the donuts will dry out. Transfer the donuts to a cooling rack. Clean the pan and repeat with the remaining batter.
Strawberry Icing
In a medium-size bowl, whisk together the powdered sugar, pureéd strawberries, melted butter, salt and 1 tablespoon (15ml) of milk until well combined. Add additional milk as needed to reach your desired consistency. Whisk until smooth. Dunk the top surface of the cooled donuts into the icing.
Chocolate Glaze
In a heat safe bowl set over a pan of barely simmering water, melt the butter, chocolate and corn syrup together, stirring occasionally, until smooth. Remove from heat and set aside to cool slightly. Dunk the top surface of the cooled donuts into the glaze or spoon it over the tops.
Notes
*To find pink sparkling sugar, click here.**To find the heart-shaped mini donut pan I used, click here.***To find a standard mini donut pan, click here.
Have you seen those cute Teddy bear cookies on social media with the bear holding an almond or a heart? I’m not sure where they originated but they’re sometimes called Pinterest cookies because so many people have found them there. I had an idea to have the Teddy bears hold baby bear cookies instead of nuts and I was going to save them for Mother’s Day. But then I thought they would also be so cute for Valentine’s Day. I made them in three different flavors and I just know that you’ll love them beary much!
Teddy Bear Sugar Cookies
by Mari Vasseur
Teddy bear cookies with baby bear cookies in vanilla, cinnamon and chocolate variations
¼ cup plus 2 tablespoons (85g)cream cheese, softened
½cup (100g)granulated sugar
¼cup (50g)packed brown sugar
½teaspoonfine sea salt
1largeegg
1 ½teaspoons pure vanilla extract
¼teaspoonpure almond extract
3cups (383g)all purpose flour, sifted
½teaspooncinnamon
1tablespoonunsweetened cocoa powder
Black gel food coloring
Pink edible luster dust
Small candy hearts
Icing or melted chocolate
Instructions
In a large bowl, beat the butter and cream cheese together, with an electric mixer on low speed, until smooth. Add both sugars and the salt and beat on medium speed until pale and fluffy. Beat in the egg until well incorporated, then beat in the extracts. On low speed, beat in the flour just until combined.
Divide the dough into 3 equal portions, using a kitchen scale for accuracy. Mix the cinnamon into one portion of dough. Mix the cocoa powder into another portion of dough. Form the dough portions into disks, wrap them with plastic wrap and refrigerate for at least 2 hours or up to overnight.
Line 2 large cookie sheets with parchment paper. Roll the dough to a scant 1/4-inch thickness. Cut out 24 bears using a 3 1/2-inch cookie cutter* and 24 mini bears using a 1 3/4-inch or smaller cookie cutter.** (Re-roll the dough scraps as needed, letting the dough rest in the refrigerator until chilled before cutting again.) Place the bears onto the cookie sheets about 2 inches apart. Top each one with a mini bear. Fold over one or both arms of each bear. Chill in the refrigerator until firm, about 20 minutes.
Meanwhile, preheat the oven to 350ºF (180ºC). Bake the cookies until set and the edges barely start to brown, about 9-11 minutes. Let the cookies cool on the baking sheet for 2-3 minutes then transfer them to a cooling rack.
Using food coloring and a toothpick, draw the bears faces. With a small food safe paintbrush apply luster dust to make rosy cheeks. Use a dab of icing or melted chocolate to apply the candy hearts.
Notes
*To find the bear cookie cutter I used, click here.**To find mini bear cookie cutters click here.
These cheerful Pink Lemonade Cookie Bars are sweet, summery and nostalgic. They remind me of the pink lemonade cake my elderly neighbor used to make. She shared her recipe when I was about 10 years old. It was so easy and it was one of the first things I baked on my own. These cookie bars have that same delicious, vibrant flavor, but in the form of a soft, tender cookie and they’re just as easy to make.
Pink Lemonade Cookie Bars
Soft, lemony cookie bars topped with silky, smooth pink lemonade frosting and pink sprinkles
1tiny droppink gel food coloringI used Americolor deep pink*
Pink confetti sprinkles
Instructions
Cookie Bars
Preheat the oven to 350ºF (180ºC). Line an 8-inch square baking pan with parchment paper, leaving a couple of inches of overhang.
In a medium bowl, whisk together the flour, cornstarch and salt.
In a large bowl, beat the butter, sugar and lemon zest until light and fluffy. Beat in the egg until incorporated, then beat in the extracts. Beat in the flour mixture just until combined. Do not over mix.
Spread the batter into the prepared pan. Smooth the top with a spatula. Bake until the top is set and the edges start to turn light golden brown, about 18-20 minutes. Let cool in the pan.
Once cooled, remove the bars from the pan using the parchment paper as handles. Frost and add sprinkles. Cut into squares.
Frosting
In a medium bowl, beat the butter and cream cheese together just until smooth and combined. Add the powdered sugar, lemon juice, cherry extract and salt. Beat until smooth. Mix in the food coloring a little at a time, with the tip of a toothpick, until your desired shade of pink is achieved.
Notes
*To find the pink gel food coloring I used, click here.
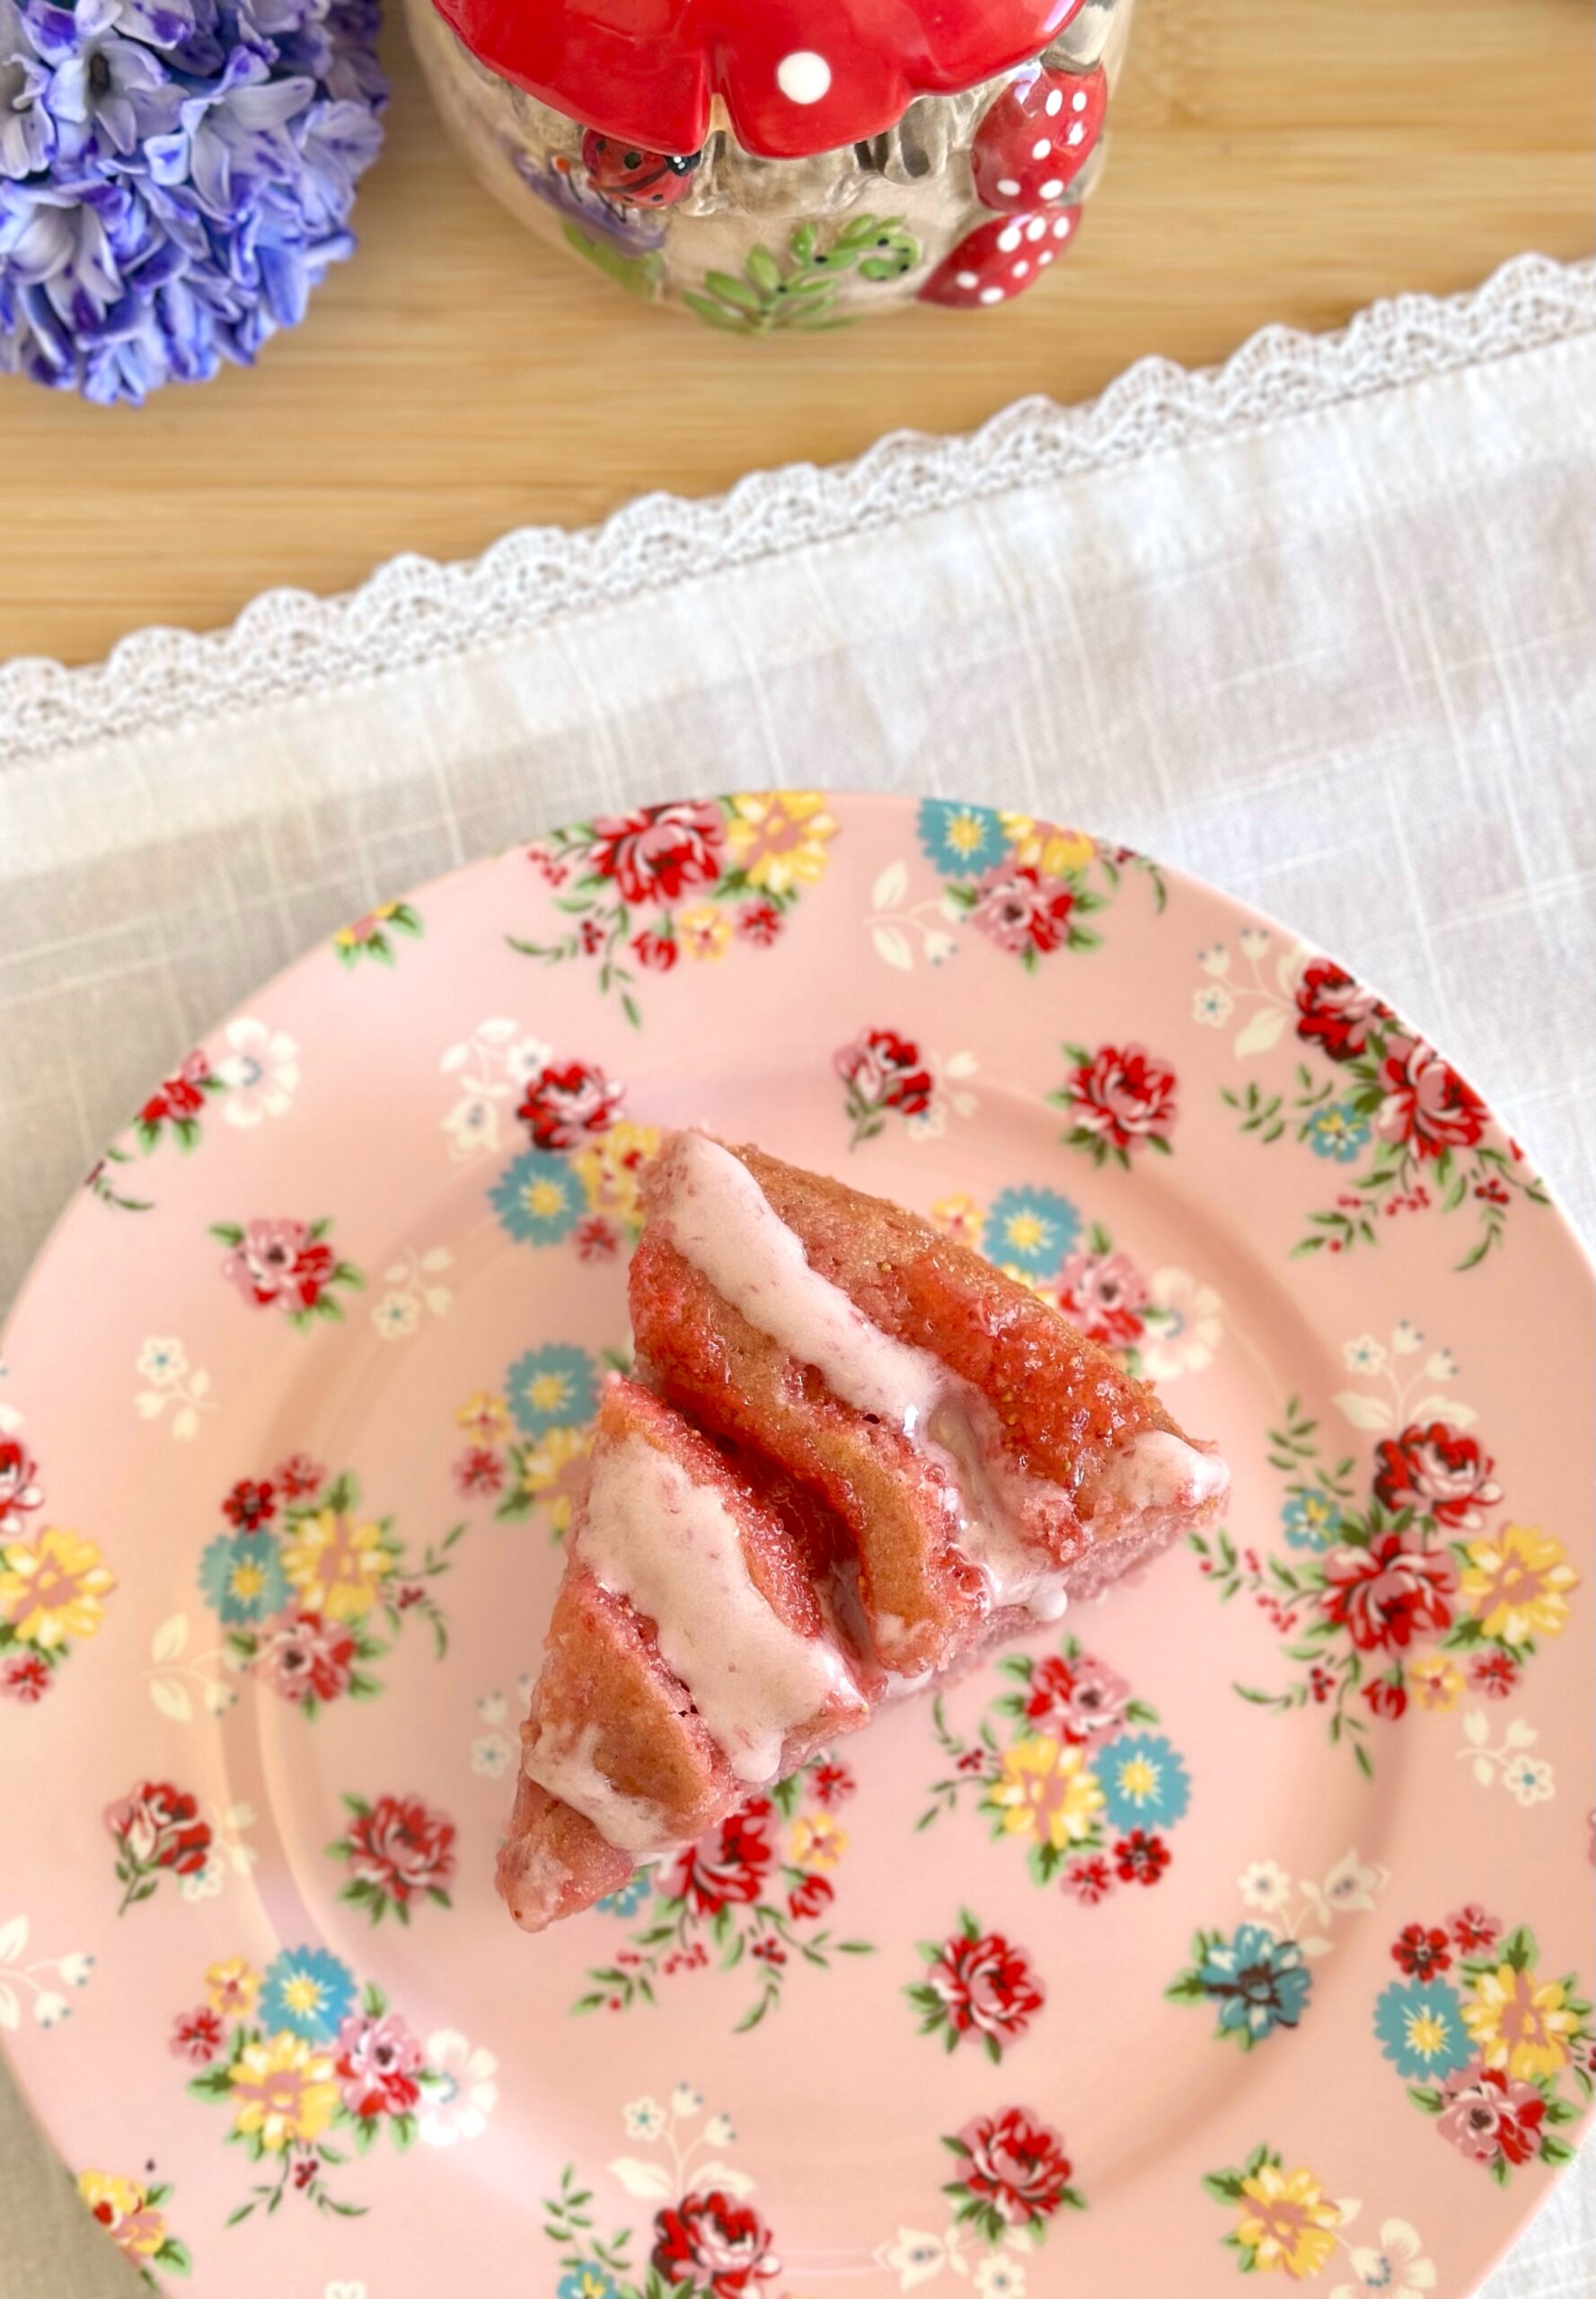
This soft, incredibly moist cake is a happy experiment that successfully combines my favorite strawberry cake with cinnamon roll cake. Instead of cinnamon sugar, it has a swirl of strawberry sugar. It’s bursting with fresh strawberry flavor and it’s so good it doesn’t even need frosting. But of course, I added strawberry cream cheese icing, in the tradition of cinnamon roll cake, which takes it over the top.
Strawberry Swirl Cake
Fresh strawberry cake with a strawberry sugar swirl and strawberry cream cheese icing
¼cup (55ml)vegetable oil or neutral oil of your choice
1largeegg
1largeegg white
½teaspoonpure vanilla extract
½teaspoonpure strawberry extract
1droppink gel food coloringOptional
⅓cup (75g)sour cream
Strawberry Cream Cheese Icing
2tablespoons (28g)cream cheese, softened
1tablespoon (14g)unsalted butter, softened
½cup (60g)powdered sugar, sifted
2teaspoonsstrawberry reductionReserved from cake recipe
1tablespoon (15ml)buttermilk or whole milk
Instructions
Strawberry Swirl
In a small food processor or a clean spice grinder, pulse the freeze dried strawberries to break them up a bit. Add the sugar and process to a fine consistency. Strain the sugar mixture through a sieve into a bowl. Mix in the flour, melted butter, salt and lemon juice until well combined.
Transfer the mixture to a piping bag fitted with a medium round tip. I used an Ateco #12 tip.** Alternately, you can snip the corner off a disposable piping bag or food storage bag, creating a 3/8-inch wide opening.
Strawberry Cake
In a small saucepan over medium-low heat, simmer the puréed strawberries until reduced by half. Set aside to cool to room temperature.
Preheat the oven to 350ºF (180ºC). Line the bottom of an 8-inch round cake pan*** with parchment paper. Grease and flour the inside.
In a medium bowl, whisk together the flour, baking powder, baking soda and salt.
In a large bowl, beat the sugar, oil, egg, egg white, and extracts, with an electric mixer at medium speed, until smooth. Alternately, you can whisk the mixture together by hand until smooth. Stir in 1/3 cup of the cooled strawberry reduction and the food coloring. (Reserve the remaining strawberry reduction for the icing.)
Stir the flour mixture into the batter, in 2 additions, alternating with the sour cream. Mix just until combined. Transfer the batter to the cake pan.
Pipe the strawberry swirl mixture onto the batter in a spiral pattern. Bake until a toothpick inserted into the center of the cake comes out clean, about 25-30 minutes.
Let the cake cool in the pan for 10 minutes, then transfer it to a cooling rack.
Strawberry Cream Cheese Icing
In a small bowl, beat the cream cheese and butter together until smooth. Add the powdered sugar and strawberry reduction and beat until smooth and well combined. Whisk in the buttermilk a little at a time until your desired consistency is reached. Drizzle over the cooled cake.
In a medium bowl, whisk the flour, sugar , brown sugar and salt together.
Work in the butter with your fingertips until the mixture looks like wet sand. Press it together to form chunks. Set aside in the refrigerator until ready to use.
Cake
Preheat the oven to 350ºF (180ºC). Line the bottom of an 8-inch cake pan with a removable bottom or an 8-inch springform pan, with parchment paper. Grease and flour the insides or line with a strip of parchment paper.
In a medium bowl, whisk together the flour, baking powder and salt. Set aside.
In a large bowl, cream the butter and sugar with an electric mixer on medium speed, until light and fluffy.
Beat the egg, egg yolk and vanilla into the butter mixture in 3 separate additions, making sure each addition is incorporated before adding the next.
In a small bowl, whisk the milk and sour cream together. On low speed, mix the flour mixture into the batter in two additions alternating with half of the milk mixture. Beat just until combined.
Transfer the batter to the prepared pan. Smooth the batter with a spatula. Place the strawberries evenly on top of the batter. Sprinkle the crumb topping over the top.
Bake until the topping is golden brown and a toothpick inserted into the center of the cake comes out clean, about 48-55 minutes. Do not over bake. Let the cake cool in the pan for 10 minutes, then remove it from the pan and transfer it to a cooling rack.
Fresh Strawberry Icing
In a medium bowl, whisk together the powdered sugar and puréed strawberries. Add the half & half a little at a time until your desired consistency is achieved. Whisk until smooth. Drizzle over the cooled cake.
½ cup (113g) plus 2 tablespoons (28g)unsalted melted butter, divided
zest of 1 medium lemon
1 teaspoonpure vanilla extract
¾cup plus 2 tablespoons (110g)all purpose flour, sifted
¼teaspoonbaking powder
¼teaspoon fine sea salt
2largeeggs, room temperature
½cup (100g)granulated sugar
1cup (120g)powdered sugar, sifted
2 1/2-3tablespoons puréed strawberries
Instructions
In a small bowl, mix together 1/2 cup (113g) of the melted butter with the lemon zest and vanilla extract. Set aside.
In a medium bowl, whisk together the flour, baking powder and salt. Set aside
In a large bowl, beat the eggs and granulated sugar, with an electric mixer at medium-high speed, to ribbon stage, about 8 minutes. The batter should look thick, voluminous and light in color.
Sift the flour mixture into the egg mixture in 2 additions, gently folding it in just until combined.
Gently fold the butter mixture into the batter in 3 additions. Cover and refrigerate the batter for 30-45 minutes.
Meanwhile, preheat the oven to 350ºF (180ºC). Brush the molds of a heart-shaped madeleine pan* with melted butter, making sure to get butter into all of the crevices.
Scoop about a generous tablespoon of batter into each of the molds. Bake until the tops are puffed and springy and the edges start to turn light golden brown, about 8-10 minutes. Transfer the madeleines to a cooling rack.
To make the icing, whisk the powdered sugar together with 1 tablespoon of melted butter and 2 tablespoons of puréed strawberries in a medium bowl. Add more of the puréed strawberries until your desired consistency is achieved.
Brush the scalloped side of the cooled madeleines with the strawberry icing, using a small pastry brush. (Alternately, you can thin the icing with a bit of milk and dunk one side fo the madeleines into the icing.
Notes
To find the heart-shaped madeleine pan I used, click here.
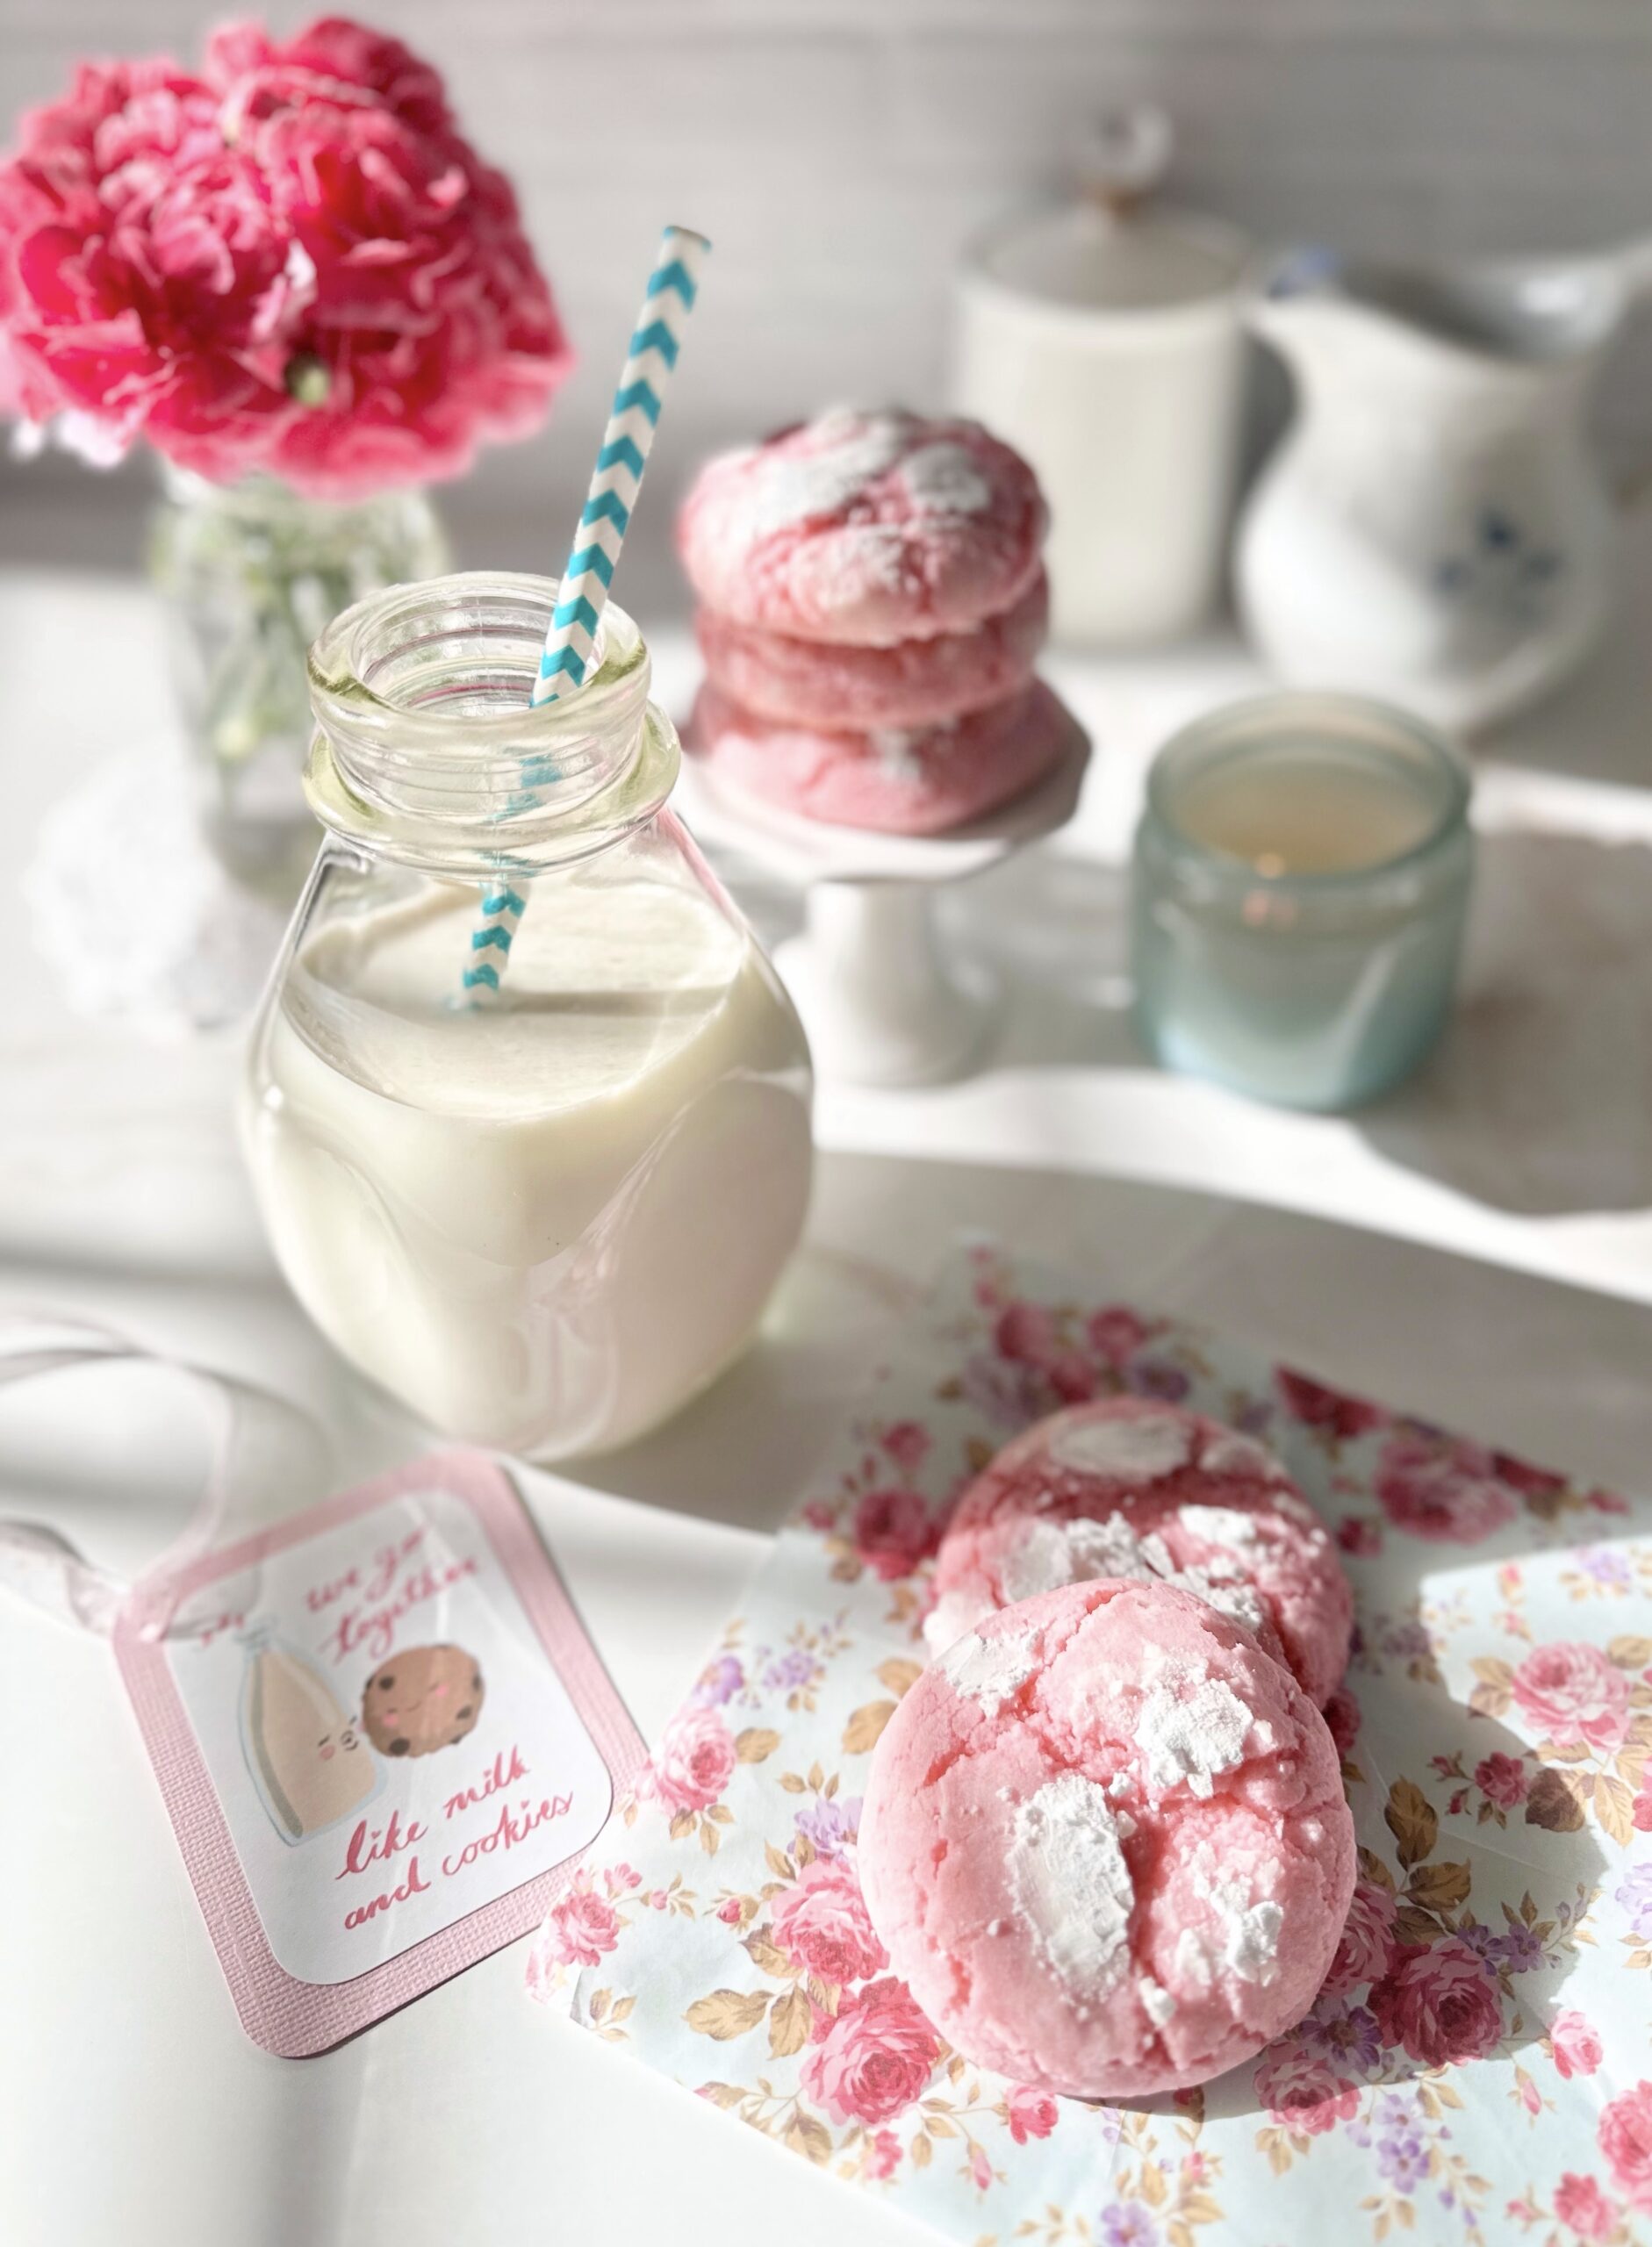
Whenever I walk into a bakery, my eyes are always drawn to anything pink. Pink cupcakes, cookies, donuts or anything with pink icing will inevitably come home with me. This probably started in childhood. Most bakeries back then, including the bakery my aunt always took me to, had pink boxes, so I associate it with delicious, freshly baked treats. Maybe pink desserts do taste better or maybe our minds just tell us that. Either way, if you love pink treats, you’ll love these cookies.
Pink velvet is similar to red velvet, but without the cocoa powder and red food color. The texture should be somewhat velvety, like red velvet cake. I have yet to taste a velvety red velvet cookie, but I think the texture of these cookies is pretty velvety as long as they’re not over baked. Pink velvet desserts are typically vanilla flavored. I upgraded the flavor by adding a touch of cherry flavoring. It’s not enough to give you cherry flavored cookies, but it will add depth to vanilla flavored treats. It’s an old bakery trick that I learned years ago that adds a fruity note in the background.
For best baking results, I recommend using a scale to weigh your ingredients, especially your dry ingredients. If you love baking, you should invest in a food scale if you don’t already have one.
To watch the Pink Velvet Cookies TikTok video, click here. To watch the Pink Velvet Cookies Instagram video, click here.
Pink Velvet Cookies
Pink vanilla flavored crinkle cookies with chewy exteriors and soft, velvety centers
1tablespoonvegetable oil or neutral oil of your choice
2largeegg whites
1teaspoonpure vanilla extract
½teaspoonnatural cherry flavoringSee notes below*
1small pea size droppink gel food colorI used Americolor deep pink**
Optional
½cupwhite chocolate chips
Instructions
Preheat oven to 350ºF. Line two large cookie sheets with parchment paper.
In a medium bowl, whisk together flour, cornstarch, baking powder, and salt.
In a large bowl, cream butter, sugar and oil until light and fluffy.
Beat egg whites into butter mixture in two addition, until well combined.
Beat in extracts until well combined.
Add gel food color, a little at a time with a toothpick, until desired shade of pink is reached. (Adding remaining ingredients will lighten the color slightly.) Beat until evenly distributed.
Add flour mixture to batter and beat just until combined. Mix in white chocolate chips if using.
Roll dough into balls, about 2 tablespoons each. I used a #30 portion scoop.*** Roll dough very generously in powdered sugar. Place two inches apart onto prepared cookie sheets.
Bake until cookies are puffed and tops are set, about 11-13 minutes. Transfer cookies to a cooling rack.
Notes
*The cherry flavoring in this recipe is not intended to make a cherry flavored cookie. The addition of cherry flavoring adds a subtle fruity note. You can also use pure cherry extract. Use a bit less (scant 1/2 teaspoon) because extracts tend to be stronger than flavorings. DO NOT use imitation cherry extract. It has a medicinal flavor that will disappoint you. If you want your cookies to be cherry or strawberry flavor, reduce vanilla extract to 1/2 teaspoon and use 1- 1 1/2 teaspoons of natural cherry or strawberry flavoring.**To find the pink gel food color I used, click here.***To find the portion scoop I used, click here.This recipe was updated on 2/14/23.
A cute little, stress-free, perfectly pink heart cake is my gift to you for Valentine’s Day. The vanilla cake is soft and fluffy. The frosting is super easy and delicious, with only two ingredients. It all comes together with fresh strawberries and it’s so good, you won’t want to share.
Little Strawberry Heart Cake
A six inch heart shaped vanilla cake with fresh strawberries and two-ingredient frosting
1tablespoonvegetable oil or neutral oil of your choice
1largeegg
½teaspoon pure vanilla extract
⅓cup whole milk, room temperature
3tablespoonssour cream, room temperature
8ouncescream cheese, softened
17.5 ounce jarMarshmallow Fluff
tiny droppink gel food colorI used Americolor deep pink*
Optional Decor
strawberries
meringue powder** or pasteurized egg whites
sugar
Instructions
In a small bowl, combine strawberries and 2 teaspoons sugar. Set aside to macerate for about 30 minutes.
Preheat oven to 350ºF. Line the bottom of a 6-inch heart shaped cake pan*** with parchment paper. Grease and flour the sides.
In a medium bowl, whisk together flour, baking powder and salt.
In a large bowl, cream butter, sugar and oil with an electric mixer, until light and fluffy.
Beat in egg and vanilla in two separate additions until well combined.
In a small bowl, whisk together milk and sour cream.
Beat flour mixture into batter in two additions, alternating with milk mixture.
Transfer batter to prepared cake pan. Bake until toothpick inserted in the center comes out clean, about 25-30 minutes. Let cake cool in pan 10 minutes then turn out onto a cooling rack to cool.
In a large bowl, stir cream cheese with a spatula to smooth out lumps.
Add marshmallow fluff and beat until well combined. Add food gel color with a toothpick and beat until evenly distributed.
Split cake into two layers. Top the bottom layer with frosting. Drain strawberries and spoon onto cake. Top with second layer, then more frosting.
Optional Decor
To make sugared strawberries, mix 1 part meringue powder with 3 parts water. Dip strawberries in meringue mixture, cover with sugar, then let dry. Alternately you can dip the strawberries in pasteurized egg whites, cover with sugar, then let dry.
Notes
*To find the gel food color I used, click here.**To find meringue powder, click here.***To find the heart cake pan I used, click here.