Mini Pumpkin Bear Muffins

Mini Pumpkin Bear Muffins

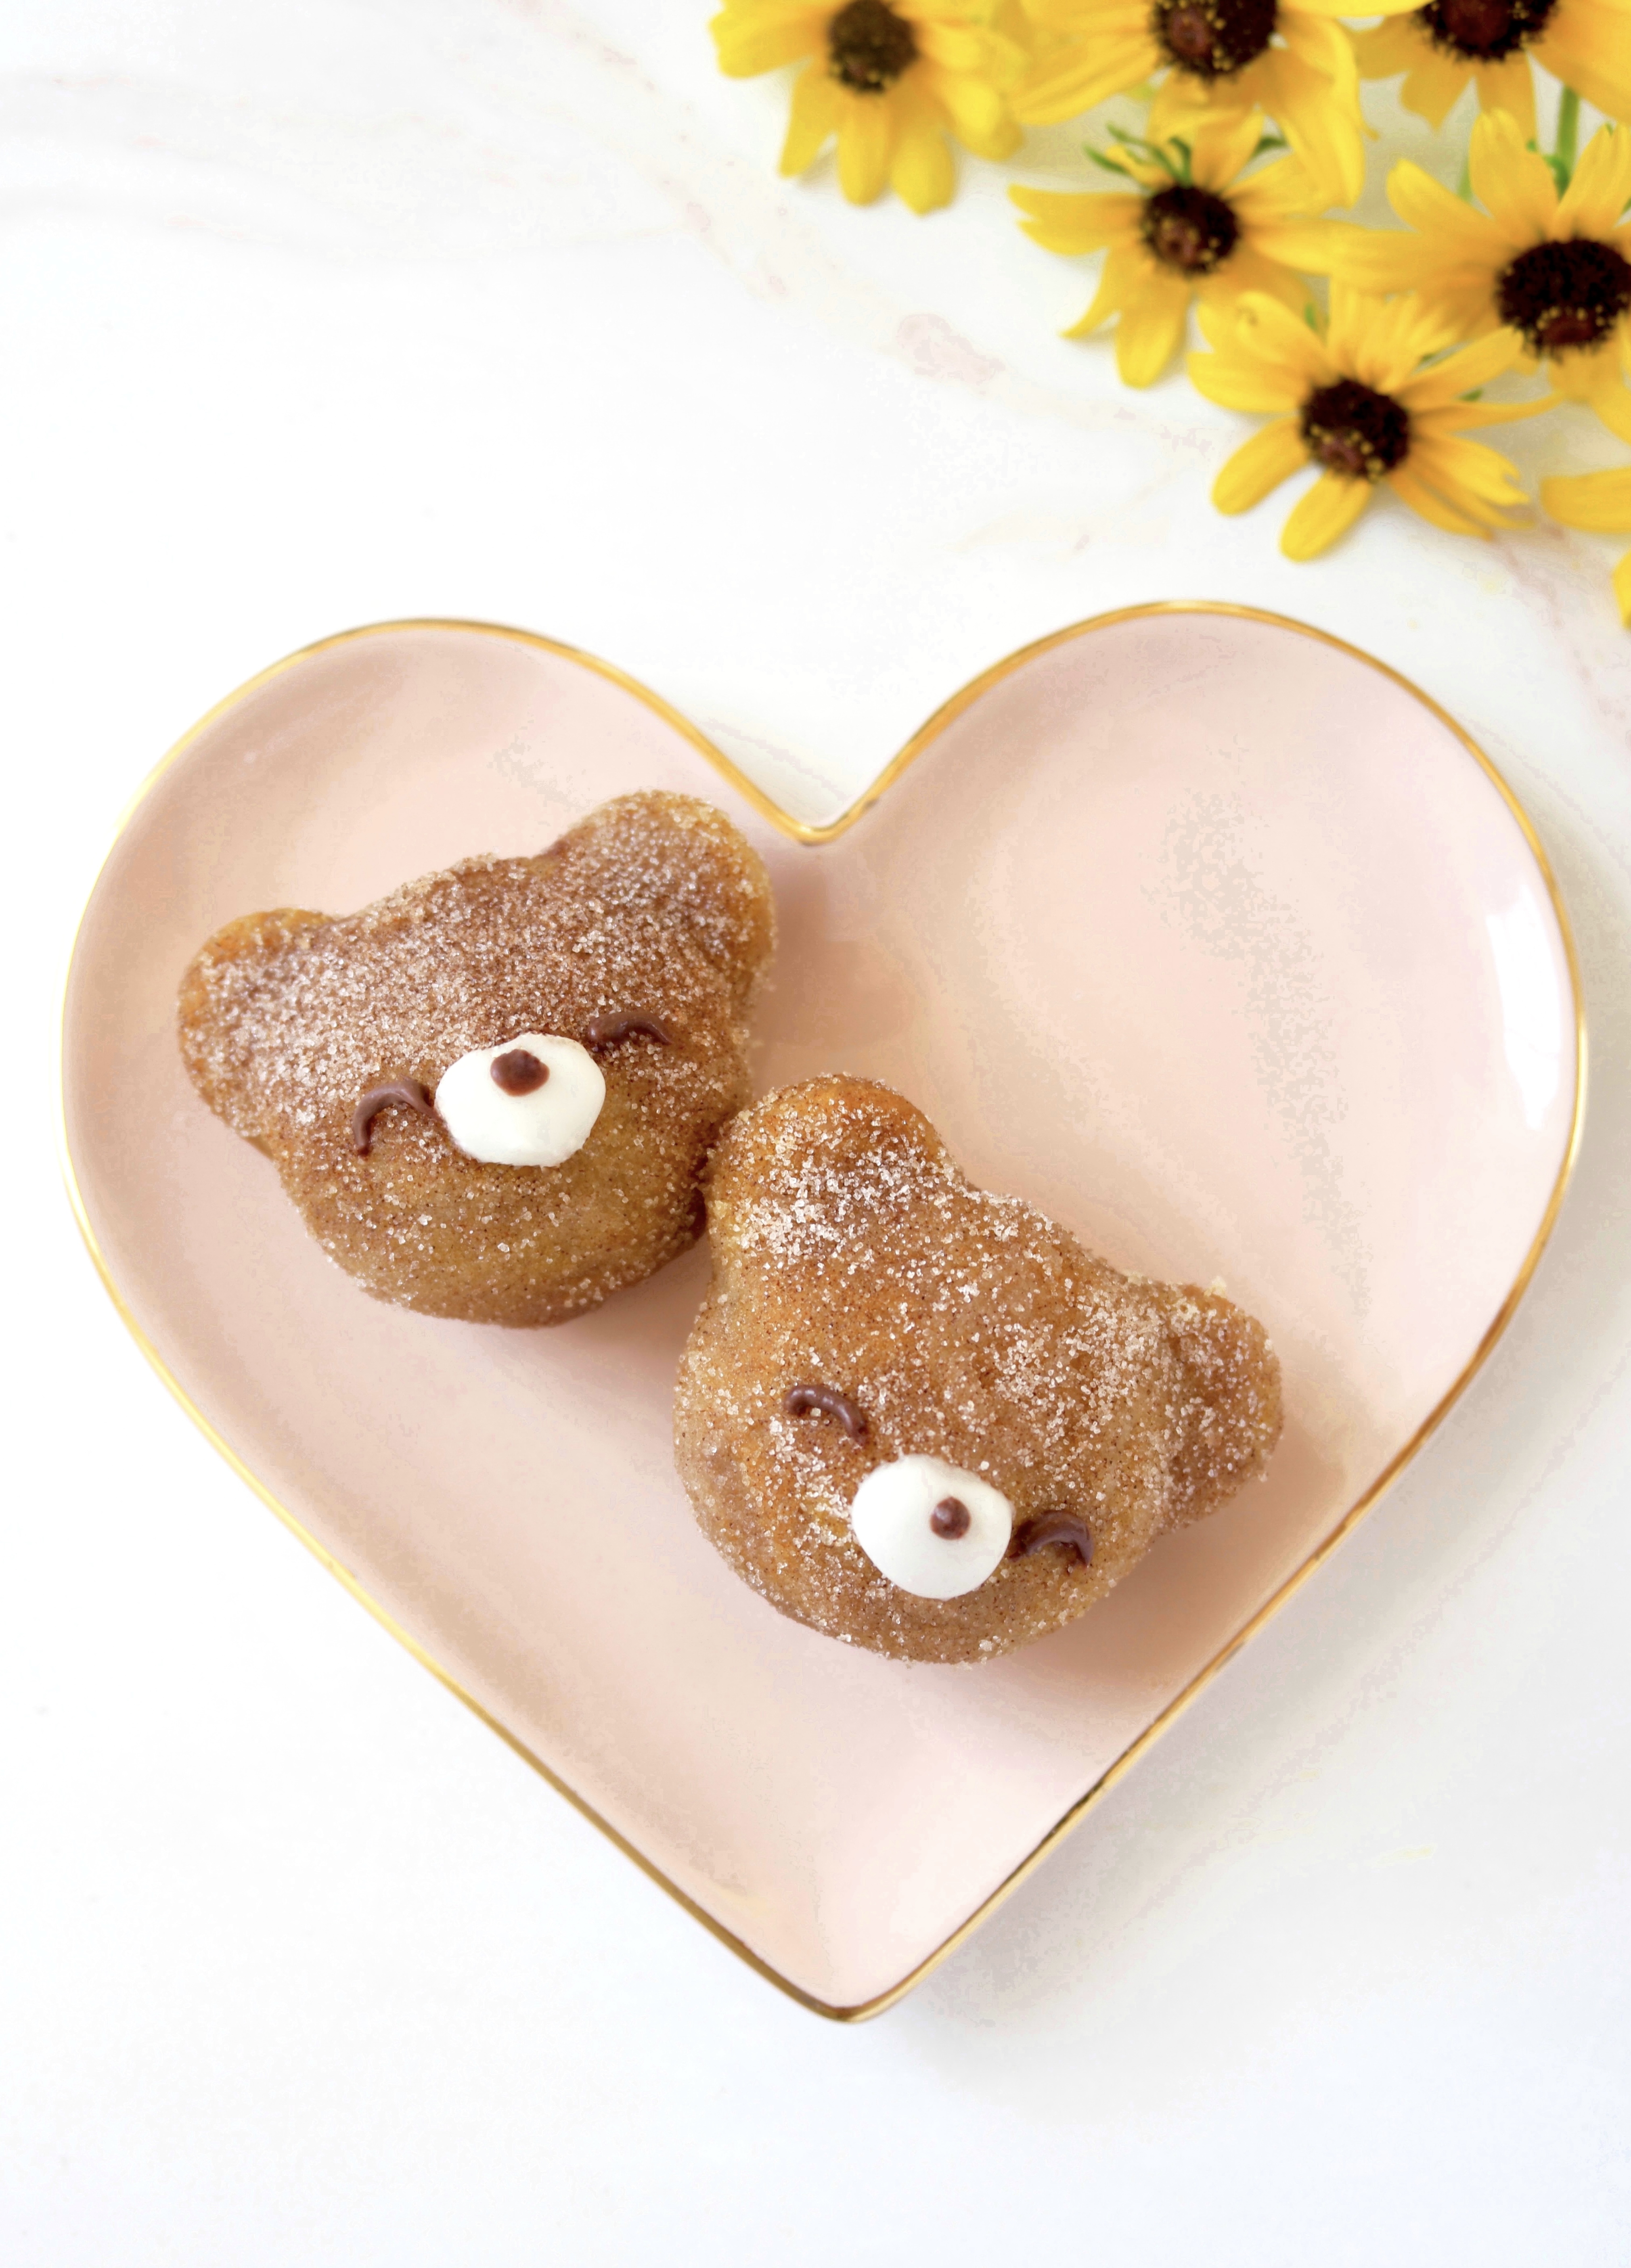
These cute little bear-shaped pumpkin muffins are almost too cute to eat. But if you try one, it’ll be gobbled up without hesitation because they’re so moist, fluffy and delicious! The cinnamon sugar coating gives them the perfect fall flavor and a subtle crunch. I used cream cheese icing to form the snouts and melted chocolate for the eyes and noses. You can also use melted chocolate chips or candy melts to decorate their faces if you prefer. I used a bear-shaped mini muffin pan, which is also called a Madeleine pan or a financier pan. To find a bear mini muffin pan, click here. A standard mini muffin pan will also work, but the muffins won’t be bear-shaped. If you end up using a standard mini muffin pan, you can add round, flat candies to form the ears.

To watch the TikTok video of Mini Pumpkin Bear Muffins being made, click here.

To watch the Instagram video of Mini Pumpkin Bear Muffins being made, click here.

Print Recipe
Mini Pumpkin Bear Muffins
Moist, fluffy bear-shaped pumpkin mini muffins with cream cheese icing snouts
Course Breakfast, Brunch
Keyword muffins, pumpkin
Servings
mini muffins
Ingredients
Mini Pumpkin Bear Muffins
Cinnamon Sugar
Bear Faces
Course Breakfast, Brunch
Keyword muffins, pumpkin
Servings
mini muffins
Ingredients
Mini Pumpkin Bear Muffins
Cinnamon Sugar
Bear Faces
Instructions
Mini Pumpkin Bear Muffins
  1. Preheat the oven to 325ºF (165ºC). Grease and flour a bear-shaped mini muffin pan. (This recipe also works in a mini muffin pan but the muffins won't be bear shaped.)
  2. In a medium bowl, whisk together the flour, baking powder, baking soda, salt, cinnamon, ginger and nutmeg.
  3. In a large bowl, whisk together the brown sugar, oil and egg until smooth and well combined. Mix in the pumpkin purée until incorporated. Stir in the flour mixture just until combined.
  4. Scoop or pipe the batter into the muffin pan, filling the cups 2/3 full (about 3/4 oz or 21g in each). Use a small offset spatula to smooth the top of the batter, making sure to get batter into the ears.
  5. Bake until a toothpick inserted into the center of the muffins comes out clean, about 9-11 minutes. Let the muffins cool in the pan for 5 minutes then remove them from the pan and transfer to a cooling rack.
  6. Clean the pan and repeat with the remaining batter.
Cinnamon Sugar
  1. In a small bowl, whisk together the sugar and cinnamon until well combined. Brush the warm muffins with with melted butter using a small pastry brush. Coat them with the cinnamon sugar mixture.
Bear Faces
  1. In a small bowl, beat the butter, cream cheese, powdered sugar and 1/2 teaspoon of milk until smooth. Add more milk as needed.
  2. Transfer the icing to a piping bag fitted with a medium round tip or snip off the end of the piping bag making a 1/4-inch wide opening. Pipe a small blob of icing onto each bear's face to form the snouts.
  3. Transfer the melted chocolate to a piping bag fitted with a small round tip or snip off the end of the piping bag making a 1/16-inch wide opening. Pipe dots of chocolate onto the snouts to make the noses. Pipe dots or curved lines to make the eyes. Alternately you can apply the melted chocolate dots with the tip of a toothpick
Recipe Notes

*To find a bear-shaped mini muffin pan, click here.

Pumpkin Cinnamon Roll Cakes

Summer was such a happy season for me as a child that I didn’t want it to end. I still love summer, but now that I’m an adult, I begin to anticipate fall right around the time when I’m tired of harsh, hot temperatures, rumbling air conditioners and flies buzzing around at cookouts. Now is that time for me. It’s so hot where I live right now, that I’m welcoming the cool, crisp fall weather and all it brings.

The beautiful warm flavors of fall are perfectly captured in these Pumpkin Cinnamon Roll Cakes. The moist, perfectly spiced cakes are topped with a cinnamon swirl which is basically cinnamon roll filling. I topped them with Vanilla Bean Icing, but you can also make it cream cheese icing by swapping out 1 tablespoon of the melted butter for 1 tablespoon of softened cream cheese, if you prefer. The optional addition of meringue powder helps the icing set up and gives it that crunch we love on glazed donuts. To find meringue powder, click here.

I used a shallow jumbo muffin pan to make these cakes. The muffin cups are 4 inches wide and 1 inch deep. A hamburger bun pan for 4-inch buns or six 4-inch cake pans will also work. To find the pan I used, click here.

Print Recipe
Pumpkin Cinnamon Roll Cakes
Moist pumpkin cakes with cinnamon swirls and vanilla bean icing
Servings
4-inch cakes
Ingredients
Pumpkin Cakes
Cinnamon Swirl
Vanilla Bean Icing
Servings
4-inch cakes
Ingredients
Pumpkin Cakes
Cinnamon Swirl
Vanilla Bean Icing
Instructions
Pumpkin Cakes
  1. Preheat the oven to 350ºF (180ºC). Line a 6-serving shallow jumbo muffin pan with jumbo muffin liners.* (The liners will fit by pressing them in around the inside bottom edges.) The muffin pan I used has cups that are 4-inches across by 1-inch deep. A hamburger bun pan for 4-inch buns or six 4-inch cake pans will also work.
  2. In a medium-size bowl, whisk together the flour, baking powder, baking soda, salt, cinnamon, ginger and nutmeg until well combined.
  3. In a large bowl, whisk together the sugar, oil, eggs and vanilla until smooth and well combined. Mix in the pumpkin purée. Stir in the flour in two additions, just until combined.
  4. Transfer the batter to the muffin cups, evenly dividing the batter among the cups. Pipe the cinnamon swirl mixture in a spiral on the top of the batter of each one.
  5. Bake until a toothpick inserted into the center of the cake part comes out clean, about 23-27 minutes. Let the cakes cool in the pan for 5 minutes, then transfer to a cooling rack.
Cinnamon Swirl
  1. In a small bowl, whisk together the brown sugar, flour, cinnamon and salt. Add the melted butter and whisk until well combined.
  2. Transfer the mixture to a piping bag fitted with a 1/4-inch wide round tip.
Vanilla Bean Icing
  1. In a small bowl, whisk together the butter, vanilla bean paste, powdered sugar, meringue powder, salt and 1 tablespoon (15ml) of milk until well combined. Whisk in more milk as needed to reach your desired consistency.
  2. Brush the icing on the cooled cakes with a small pastry brush or make the icing a little thinner and drizzle the icing on if you prefer.
Recipe Notes

*To find jumbo muffin liners, click here.

To find the baking pan I used, click here.

To find 4-inch cake pans, click here.

To find meringue powder click here.

Peach Crumble Pie Cookies

Peach Crumble Pie Cookies

I couldn’t decide whether to call these cookies or pies, so I made a compromise. They’re about the size of cookies, but they taste like little peach crumble pies. The base is tender like shortbread or pie crust and the filling is made with fresh peaches. I’ve seen people make something similar with jam and call them cookies, but since I used fresh fruit for these, they deserve to be elevated to pie status.

The peaches are macerated to draw out the excess juices, to help avoid making your cookies soggy. If you’re impatient, don’t be tempted to skip this step. It’ll go by fast as you prep the crumb topping and the remaining ingredients.

When I first made these, I used cupcake liners because I was worried that they might stick to the pan. It turns out that they stick to the cupcake liners more than the pan. So the next time I made them, I opted to lightly spray the pan with nonstick spray instead of using liners. I ran a small thin offset spatula around the perimeter of the cookies to loosen them from the pan and they popped out nicely.

I love topping these little peach delights with caramel sauce. Salted caramel is also a delicious addition. Or you can simply sprinkle them with powdered sugar if you prefer.

Print Recipe
Peach Crumble Pie Cookies
Tender, peach-filled cookies with crumble topping and caramel drizzle
Keyword cookies, peach
Servings
cookie tarts
Ingredients
Macerated Peaches
Crumble Topping
Cookies
Topping
Keyword cookies, peach
Servings
cookie tarts
Ingredients
Macerated Peaches
Crumble Topping
Cookies
Topping
Instructions
Macerated Peaches
  1. In a medium bowl, toss the peaches with lemon juice. Add the brown sugar and cinnamon. Stir gently to combine. Let stand 30 minutes.
  2. Drain the peaches, reserving 1 tablespoon of the juices. In a small bowl, whisk together the reserved peach juice with the corn starch. Mix with the drained peaches.
Crumble Topping
  1. In a medium bowl, whisk together the flour, sugar, brown sugar, cinnamon and salt.
  2. With your fingertips, work the butter into the flour mixture until it looks like wet sand. Press the mixture together to form chunks.
Cookies
  1. Preheat the oven to 350ºF (180ºC). Lightly spray a 12-serving muffin pan with nonstick spray. (If you're concerned about the cookies sticking to the pan, see notes below.*)
  2. In a medium bowl, whisk together the flour, baking powder and salt.
  3. In a large bowl, beat the butter and powdered sugar with an electric mixer until light and fluffy.
  4. Mix in the flour mixture on low speed or by hand, just until combined.
  5. Press generous tablespoon size (about 20g each) portions of dough into the bottoms of the muffin pan cups with a pastry tamper dipped in flour. You can also use the bottom of a flat shot glass.
  6. Top with the peaches, then the crumble topping mixture. Bake until the cookies are set and the topping is golden brown, about 15-17 minutes.
  7. Cool the cookies completely in the pan. Once cool, remove the cookies from the pan by running a small offset spatula or paring knife around the inside perimeter of the muffin cups to loosen them. Drizzle with caramel sauce.
Recipe Notes

*You can line the bottoms of the muffin cups with 2-inch parchment circles to make sure your cookies release. I don't recommend cupcake liners because the cookies stick to the ridges of the liners. You can, however, cut the circles from the bottom of the cupcake liners if you don't have parchment paper.

White Chocolate Peach Muffins

I have strong opinions about muffins. Maybe a little controversial too. When baked correctly, muffins should be soft, fluffy and tender. I get a little sad and disappointed when I buy a big, domed bakery muffin and the inside is rubbery. Many of the pretty muffins I see on social media are painfully rubbery too, as the creators break open a muffin in a dramatic moment of triumph. The muffin recipe I’m sharing here is tender and delicious if baked correctly.

One of the most important ways to achieve tender muffins is by not over mixing your batter once the flour is added. Muffins are technically cake, not bread, so we don’t want gluten formation. Another way to get tender muffins is to use an acidic ingredient such as sour cream, yogurt or buttermilk. Lastly, and very importantly, don’t over bake or under bake your muffins. Baking times in recipes are a guide and not necessarily exact because everyone’s ovens and baking pans are different. Keep an eye on your muffins and test them for doneness with a cake tester or a toothpick. My grandma used to say that when you start to smell them, they’re probably done or close to being done.

Soggy muffins also make me run the other way. Muffins loaded with too much fruit or fruit that hasn’t been macerated can make your muffins soggy or dense. In this recipe, I macerated the peaches to draw out some of the moisture, so it helps to avoid creating soggy spots in your muffins. The waiting time goes by fast as you prep the rest of your ingredients.

Print Recipe
White Chocolate Peach Muffins
Tender muffins with white chocolate chips and chunks of fresh peaches.
Servings
muffins
Ingredients
Macerated Peaches
Crumb Topping
Muffins
Servings
muffins
Ingredients
Macerated Peaches
Crumb Topping
Muffins
Instructions
Macerated Peaches
  1. In a medium bowl, toss the peaches with lemon juice. Add the brown sugar and cinnamon and stir to combine. Let stand 30 minutes.
  2. Drain the peaches well and toss with flour. Reserve 1/4 cup of peaches for the muffin tops.
Crumb Topping
  1. In a medium bowl, whisk together the flour, sugar, brown sugar, cinnamon and salt.
  2. With a pastry blender, or with your fingertips, work the butter into the flour mixture until it looks like wet sand. Press together to form chunks. Set aside in the refrigerator until ready to use.
Muffins
  1. Preheat the oven to 375ºF (190ºC). Line a 12-serving muffin pan with tulip muffin liners.* (Tulip muffin liners are preferable because they hold more batter, but you can also use standard muffin liners.)
  2. In a medium bowl, whisk together the flour, baking powder, baking soda, salt, cinnamon and nutmeg.
  3. In a large bowl, beat the butter and sugar together until light and fluffy. Beat in the eggs and extracts in 3 separate additions, making sure each one is incorporated before adding the next.
  4. Mix in the flour mixture with a wooden spoon or spatula, in two additions, followed by half of the sour cream after each addition. Mix just until combined. The batter will be thick.
  5. Toss the white chocolate chips with flour, then fold them into the batter. Gently fold in the drained peaches.
  6. Transfer batter to the prepared muffin pan, equally dividing the batter among the muffin cups. (If you're using standard muffin liners, fill them 2/3 full.) Top with the reserved peaches and the crumb topping. Optional: Top each muffin with a piece of white chocolate.
  7. Bake muffins for 5 minutes. Turn down the oven heat to 350ºF (180ºC). Continue baking until the muffins are light golden brown and a toothpick inserted into the centers of the muffins comes out clean, about 15-20 more minutes. Cool in the pan for 5 minutes, then remove the muffins from the pan and continue cooling on a cooling rack.
Recipe Notes

*To find tulip muffin liners, click here.


Blueberry Lavender Cookies

Blueberry Lavender Cookies

Blueberry cookies remind me of a time when I was little. Every year my family would take a road trip up to Northern California. My parents loved stopping at roadside stands to buy fresh produce on the way back. One year my dad bought an enormous box of blueberries. When we got home, for the next couple of weeks, we ate far too many blueberry pancakes. My dad also used the blueberries in his famous cobbler, which was delightful. Then he made biscuits which turned out like rocks and we all laughed. My favorite blueberry creations that year were the blueberry shortcake and blueberry cookies. I’m sharing my version of the blueberry cookies, with the addition of lavender to make them a little more special.

My Blueberry Lavender Cookies start with butter and homemade lavender sugar. The original cookies had fresh blueberries plopped into the dough, which is perfectly fine if you’re making muffins. To reduce the soggy spots that form as the fruit releases its juices while baking, I typically macerate or cook fruit before it’s added to many of my recipes. The extra step makes a big difference. A quick, cooked blueberry compote is folded into the batter of these cookies, making pretty blueberry swirls. I finished these cookies with a sprinkle of sparkly sanding sugar in a lilac shade. This is optional, but very pretty. You can also make extra lavender sugar to use for sprinkling on your cookies. Sprinkle the sugar on before baking or after the cookies bake, while they’re still warm.

Print Recipe
Blueberry Lavender Cookies
Chewy lavender scented sugar cookies with crisp exteriors and swirls of blueberry compote.
Servings
cookies
Ingredients
Blueberry Compote
Lavender Sugar
Blueberry Lavender Cookies
Servings
cookies
Ingredients
Blueberry Compote
Lavender Sugar
Blueberry Lavender Cookies
Instructions
Blueberry Compote
  1. In a small bowl, whisk together the cornstarch with 1 tablespoon of water.
  2. In a small saucepan over medium heat, combine the blueberries, lemon juice and remaining 1 tablespoon of water, stirring until the blueberries soften and start to release their juices. Smash the blueberries slightly with the back of the spoon. Stir in cornstarch mixture. Turn the heat down to low. Simmer until thickened to a jam consistency, about 1-2 minutes.
  3. Transfer the blueberry compote to a small bowl and set aside to cool to room temperature.
Lavender Sugar
  1. In a small food processor or a clean spice grinder, combine 1/4 cup of the sugar with the lavender. Pulse a few times to chop the lavender into smaller bits. Add the remaining sugar and pulse a few more times to combine.
Blueberry Lavender Cookies
  1. Preheat your oven to 350ºF (180ºC) Line two large baking sheets with parchment paper.
  2. In a medium bowl, whisk together the flour, cornstarch, baking powder and salt.
  3. In a large bowl, beat the butter and lavender sugar with an electric mixer, until light and fluffy.
  4. Add the the egg white and vanilla and beat until well combined.
  5. On low speed, add the flour mixture in two additions and mix just until combined.
  6. Add dollops of the blueberry compote to the batter. Fold in gently, but don't completely combine it. You want to see swirls of blueberry.
  7. Place 2-tablespoon size portions of dough about 2 inches apart onto prepared baking sheets. I used a #30 portion scoop.*** Sprinkle with decorative sugar if desired.
  8. Bake until tops of cookies are set and bottom edges turn light golden brown, about 10-14 minutes. Transfer the cookies to a cooling rack. Do not over bake. Test one cookie before baking the entire batch if you are unsure about how to determine the doneness of cookies.
Recipe Notes

*To find culinary lavender, click here.

**To find the decorative sanding sugar I used, click here.

***To find the scoop I used, click here.

Caramel Latte Brownies

These rich, fudgy, coffee scented brownies, with caramel and whipped cream topping are inspired by one of my favorite coffee shop drinks, a caramel latte. I was thinking about how to get the caramel inside the brownies. With some methods, the caramel ends up over baked and chewy. Then I remembered poke cakes from my childhood. You poke holes all over a baked cake and pour whatever you like on top to soak into the holes. It worked beautifully with these brownies. To finish them off, I topped them with fluffy cream cheese whipped cream and a drizzle of caramel.

Print Recipe
Caramel Latte Brownies
Rich, moist coffee scented brownies soaked with caramel, topped with fluffy cream cheese whipped cream and drizzled with more caramel.
Servings
Ingredients
Servings
Ingredients
Instructions
  1. Preheat your oven to 325ºF. Line an 8-inch square baking pan with parchment paper, leaving a couple of inches of overhang.
  2. In a large heat safe bowl, melt the butter together with the chocolate, in the microwave or on the stovetop over a pan of barely simmering water. Stir until smooth.
  3. In a small bowl, whisk together the cocoa powder, hot water and espresso powder until smooth.
  4. Whisk the cocoa powder mixture, sugar and salt into the warm melted chocolate mixture until well combined.
  5. Add the eggs, egg yolk and 1 teaspoon of vanilla to the chocolate mixture and whisk until smooth.
  6. Stir in the flour just until combined, scraping the bottom of the bowl as needed.
  7. Transfer the batter to the prepared baking pan. Bake until a toothpick inserted into the center of the brownies comes out with moist crumbs on it, about 25-28 minutes. Do not over bake. Let cool completely.
  8. Once cool, remove the brownies from the pan and place on a serving platter. Using a chopstick, poke holes in the brownies, about 1 inch apart, to within 1 inch from the edges.
  9. Spread caramel sauce over the surface of the brownies with a small offset spatula.
  10. In a large bowl, beat the cream cheese, powdered sugar and 1/2 teaspoon of vanilla, with an electric mixer, until smooth. Gradually add the heavy cream and beat to stiff peaks.
  11. Spread or pipe the whipped cream onto the brownies. Drizzle with additional caramel sauce.

Pineapple Coconut Cake Bars

Pineapple Coconut Cake

If you like tropical flavors, you’ll love this spring dessert from my childhood. We used to call it Pineapple Coconut Snack Cake, but I would consider it more of a bar, so I changed the name to Pineapple Coconut Cake Bars. We would enjoy it on Easter or Mother’s Day because it was my mom’s favorite. It’s buttery, moist and rich. It’s also kind of addicting, because everyone always asks for seconds. You can double the recipe if you need to.

Print Recipe
Pineapple Coconut Cake Bars
Course Dessert
Servings
Ingredients
Cake
Topping
Course Dessert
Servings
Ingredients
Cake
Topping
Instructions
Cake
  1. Preheat oven to 350ºF. Grease an 8-inch square baking pan.
  2. In a medium bowl, whisk together flour, baking powder and salt.
  3. In a large bowl, whisk melted butter, sugar, egg, egg yolk and vanilla until smooth.
  4. Stir in pineapple until well combined. Stir in flour mixture just until combined.
  5. Transfer batter to prepared baking pan. Bake until top is golden brown and toothpick inserted into center of cake comes out clean, about 20-25 minutes.
Topping
  1. In a medium saucepan over medium heat, melt butter with sugar, brown sugar and salt. Whisk in heavy cream.
  2. When mixture starts to bubble, turn heat down to low and simmer until thickened, about 3 minutes.
  3. Remove from heat and stir in coconut, pecans and vanilla. Spread over warm cake. Let cool at least 15 minutes before cutting cake.

Pink m&m’s Chocolate Cookies


Print Recipe


Pink m&m's Chocolate Cookies

Chocolate cookies with pink m&m's candies

Course Dessert
Keyword chocolate, cookies

Servings
cookies


Ingredients

Course Dessert
Keyword chocolate, cookies

Servings
cookies


Ingredients


Instructions
  1. Preheat oven to 350ºF. Line two cookie sheets with parchment paper.

  2. In a medium bowl, whisk together flour, cocoa powder, baking soda and salt.

  3. In a large bowl, cream butter with sugar and brown sugar until light and fluffy.

  4. Add egg and vanilla in separate additions and beat until well incorporated.

  5. Add flour mixture and beat just until combined.

  6. Gently fold in m&m's.

  7. Place 2-tablespoon size portions, about 2 inches apart, onto prepared cookie sheets. I used a #30 portion scoop.**

  8. Add a few more m&m's to the top of each cookie.

  9. Bake until edges are set and tops puff slightly, about 8-10 minutes. Let cookies cool on cookie sheet for 1 minute, then transfer to cooling rack.


Recipe Notes

*To find pink m&m's, click here.

**To find the portion scoop I used, click here.

Blueberry Ripple Scones

Blueberry Ripple Scones

Once there was a blueberry scone. She was good and reliable. One day she felt bored and tired of her soggy blueberries. She thought about her friend, the other blueberry scone. The one with the dried blueberries. The shriveled up blueberries reminded her of raisin bran. “It’s time for a change,” she thought. So she grabbed her friend, and they headed over to Brownie Mischief for a makeover.

That’s how Blueberry Ripple Scones were born, at least in my imagination. These scones are the new and improved, elevated version of blueberry scones. They have a ribbon of sweet blueberry compote swirling through the tender vanilla dough, making them look beautiful and taste delicious. Although the blueberry compote is quick to make, it requires a little more effort than simply folding blueberries into the dough. But it’s definitely worth it. I like to make my compote the night before, then it’s ready to go when I make my scones in the morning.

Print Recipe
Blueberry Ripple Scones
Vanilla scones with ribbons of sweet blueberry compote and crunchy sugar topping
Course Breakfast, Brunch
Keyword blueberry, scones
Servings
scones
Ingredients
Scones
Blueberry Compote
Course Breakfast, Brunch
Keyword blueberry, scones
Servings
scones
Ingredients
Scones
Blueberry Compote
Instructions
Scones
  1. Line a large baking sheet with parchment paper.
  2. In a large bowl, whisk together the flour, sugar, baking powder and salt.
  3. Work the butter into the flour with your fingertips or with a pastry blender, until pea size pieces form.
  4. In a small bowl whisk together the heavy cream, sour cream and vanilla.
  5. Stir the cream mixture into flour mixture until a shaggy dough is formed.
  6. Turn the dough out onto a lightly floured surface. Pat the dough into an oval. Spoon dollops of blueberry compote onto the dough. Fold the dough over onto itself 3 times.
  7. Form the dough into a 1-inch thick round, about 6 1/2-inches in diameter. Cut the dough into 8 wedges.
  8. Place the scones 2 inches apart on the prepared baking sheet. Chill the scones in refrigerator for 20 minutes.
  9. Heat your oven to 375ºF. Brush the tops of scones with heavy cream. Sprinkle with coarse sugar.
  10. Bake until the edges look golden brown, about 18-22 minutes.
Blueberry Compote
  1. In a small saucepan over medium heat, cook the blueberries, sugar, cornstarch and lemon juice, stirring until the sugar is dissolved and the blueberries start to release their juices.
  2. Turn the heat down to low and simmer, stirring occasionally, until thick and jammy, about 3-4 minutes. Remove from heat and let cool completely. Cover and store in refrigerator until ready to use.
Recipe Notes

*To find coarse sugar, click here.

To find purple coarse sugar, click here.

Glazed Lemon Muffins

Glazed Lemon Muffins

However your day is going today, it’s about to get better. I can confidently say these lemon muffins are some of the best you will ever taste. Follow the recipe exactly, weigh your ingredients and you’ll be enjoying these soft, tender muffins in no time. These delightful muffins are perfect for breakfast, brunch or an anytime snack. I love enjoying one with a cup of strawberry green tea or chamomile tea.

Print Recipe
Glazed Lemon Muffins
Soft, tender lemon muffins glazed with lemon icing
Course Breakfast, Brunch
Keyword lemon, muffins
Servings
muffins
Ingredients
Muffins
Icing
Course Breakfast, Brunch
Keyword lemon, muffins
Servings
muffins
Ingredients
Muffins
Icing
Instructions
Muffins
  1. Preheat the oven to 375ºF (190ºC). Line a 12-serving muffin pan with tulip baking liners.* (You can also use standard muffin liners. They hold less batter so you may end up with a couple of extra muffins.)
  2. In a medium-size bowl, whisk together the flour, baking powder, baking soda and salt until well combined.
  3. In a large bowl, cream the butter, sugar and lemon zest, with an electric mixer, until light and fluffy. Add the eggs one at a time and beat until well incorporated. Add the extracts and beat until combined.
  4. On low speed, mix in the flour mixture in two additions, alternating with half of sour cream after each addition. Mix just until combined. The batter will be thick.
  5. Divide the batter evenly into muffin liners. (If using standard muffin liners, fill 3/4 full.) Bake at 375ºF (190ºC) for 5 minutes. Turn the oven heat down to 350ºF (180ºC) and continue baking the muffins until a toothpick inserted into the centers comes out clean, about 12-16 more minutes. Do not over bake.
  6. Transfer the muffins to a cooling rack to cool completely. Brush icing onto the muffin tops with a small pastry brush.
Icing
  1. Whisk the powdered sugar, melted butter, and 1 tablespoon (15ml) of lemon juice together until smooth. Add additional lemon juice until your desired consistency is reached.
Recipe Notes

*To find  tulip muffin liners, click here.

To find floral tulip muffin liners, click here.

Pink Velvet Cookies

Pink Velvet Cookies

Whenever I walk into a bakery, my eyes are always drawn to anything pink. Pink cupcakes, cookies, donuts or anything with pink icing will inevitably come home with me. This probably started in childhood. Most bakeries back then, including the bakery my aunt always took me to, had pink boxes, so I associate it with delicious, freshly baked treats. Maybe pink desserts do taste better or maybe our minds just tell us that. Either way, if you love pink treats, you’ll love these cookies.

Pink velvet is similar to red velvet, but without the cocoa powder and red food color. The texture should be somewhat velvety, like red velvet cake. I have yet to taste a velvety red velvet cookie, but I think the texture of these cookies is pretty velvety as long as they’re not over baked. Pink velvet desserts are typically vanilla flavored. I upgraded the flavor by adding a touch of cherry flavoring. It’s not enough to give you cherry flavored cookies, but it will add depth to vanilla flavored treats. It’s an old bakery trick that I learned years ago that adds a fruity note in the background.

For best baking results, I recommend using a scale to weigh your ingredients, especially your dry ingredients. If you love baking, you should invest in a food scale if you don’t already have one.

To watch the Pink Velvet Cookies TikTok video, click here. To watch the Pink Velvet Cookies Instagram video, click here.

Print Recipe
Pink Velvet Cookies
Pink vanilla flavored crinkle cookies with chewy exteriors and soft, velvety centers
Course Dessert
Keyword cookies, pink velvet
Servings
cookies
Ingredients
Optional
Course Dessert
Keyword cookies, pink velvet
Servings
cookies
Ingredients
Optional
Instructions
  1. Preheat oven to 350ºF. Line two large cookie sheets with parchment paper.
  2. In a medium bowl, whisk together flour, cornstarch, baking powder, and salt.
  3. In a large bowl, cream butter, sugar and oil until light and fluffy.
  4. Beat egg whites into butter mixture in two addition, until well combined.
  5. Beat in extracts until well combined.
  6. Add gel food color, a little at a time with a toothpick, until desired shade of pink is reached. (Adding remaining ingredients will lighten the color slightly.) Beat until evenly distributed.
  7. Add flour mixture to batter and beat just until combined. Mix in white chocolate chips if using.
  8. Roll dough into balls, about 2 tablespoons each. I used a #30 portion scoop.*** Roll dough very generously in powdered sugar. Place two inches apart onto prepared cookie sheets.
  9. Bake until cookies are puffed and tops are set, about 11-13 minutes. Transfer cookies to a cooling rack.
Recipe Notes

*The cherry flavoring in this recipe is not intended to make a cherry flavored cookie. The addition of cherry flavoring adds a subtle fruity note. You can also use pure cherry extract. Use a bit less (scant 1/2 teaspoon)  because extracts tend to be stronger than flavorings. DO NOT use imitation cherry extract. It has a medicinal flavor that will disappoint you. If you want your cookies to be cherry or strawberry flavor, reduce vanilla extract to 1/2 teaspoon and  use 1- 1 1/2 teaspoons of natural cherry or strawberry flavoring.

**To find the pink gel food color I used, click here.

***To find the portion scoop I used, click here.

This recipe was updated on 2/14/23.

Little Strawberry Heart Cake

A cute little, stress-free, perfectly pink heart cake is my gift to you for Valentine’s Day. The vanilla cake is soft and fluffy. The frosting is super easy and delicious, with only two ingredients. It all comes together with fresh strawberries and it’s so good, you won’t want to share.

Print Recipe
Little Strawberry Heart Cake
A six inch heart shaped vanilla cake with fresh strawberries and two-ingredient frosting
Course Dessert
Keyword cake, strawberry
Servings
Ingredients
Course Dessert
Keyword cake, strawberry
Servings
Ingredients
Instructions
  1. In a small bowl, combine strawberries and 2 teaspoons sugar. Set aside to macerate for about 30 minutes.
  2. Preheat oven to 350ºF. Line the bottom of a 6-inch heart shaped cake pan*** with parchment paper. Grease and flour the sides.
  3. In a medium bowl, whisk together flour, baking powder and salt.
  4. In a large bowl, cream butter, sugar and oil with an electric mixer, until light and fluffy.
  5. Beat in egg and vanilla in two separate additions until well combined.
  6. In a small bowl, whisk together milk and sour cream.
  7. Beat flour mixture into batter in two additions, alternating with milk mixture.
  8. Transfer batter to prepared cake pan. Bake until toothpick inserted in the center comes out clean, about 25-30 minutes. Let cake cool in pan 10 minutes then turn out onto a cooling rack to cool.
  9. In a large bowl, stir cream cheese with a spatula to smooth out lumps.
  10. Add marshmallow fluff and beat until well combined. Add food gel color with a toothpick and beat until evenly distributed.
  11. Split cake into two layers. Top the bottom layer with frosting. Drain strawberries and spoon onto cake. Top with second layer, then more frosting.
Optional Decor
  1. To make sugared strawberries, mix 1 part meringue powder with 3 parts water. Dip strawberries in meringue mixture, cover with sugar, then let dry. Alternately you can dip the strawberries in pasteurized egg whites, cover with sugar, then let dry.
Recipe Notes

*To find the gel food color I used, click here.

**To find meringue powder, click here.

***To find the heart cake pan I used, click here.