Harry Potter Inspired Pumpkin Pasties

Pumpkin Pasties

Even though the weather is warm where I live at the moment, I’m dreaming about all the delicious fall treats I’ll be baking this year. Let’s look forward to cool, crisp weather, the smell of pumpkin or apples baking, and sipping a warm mug of something spicy while we wait for our bakes to come out of the oven.

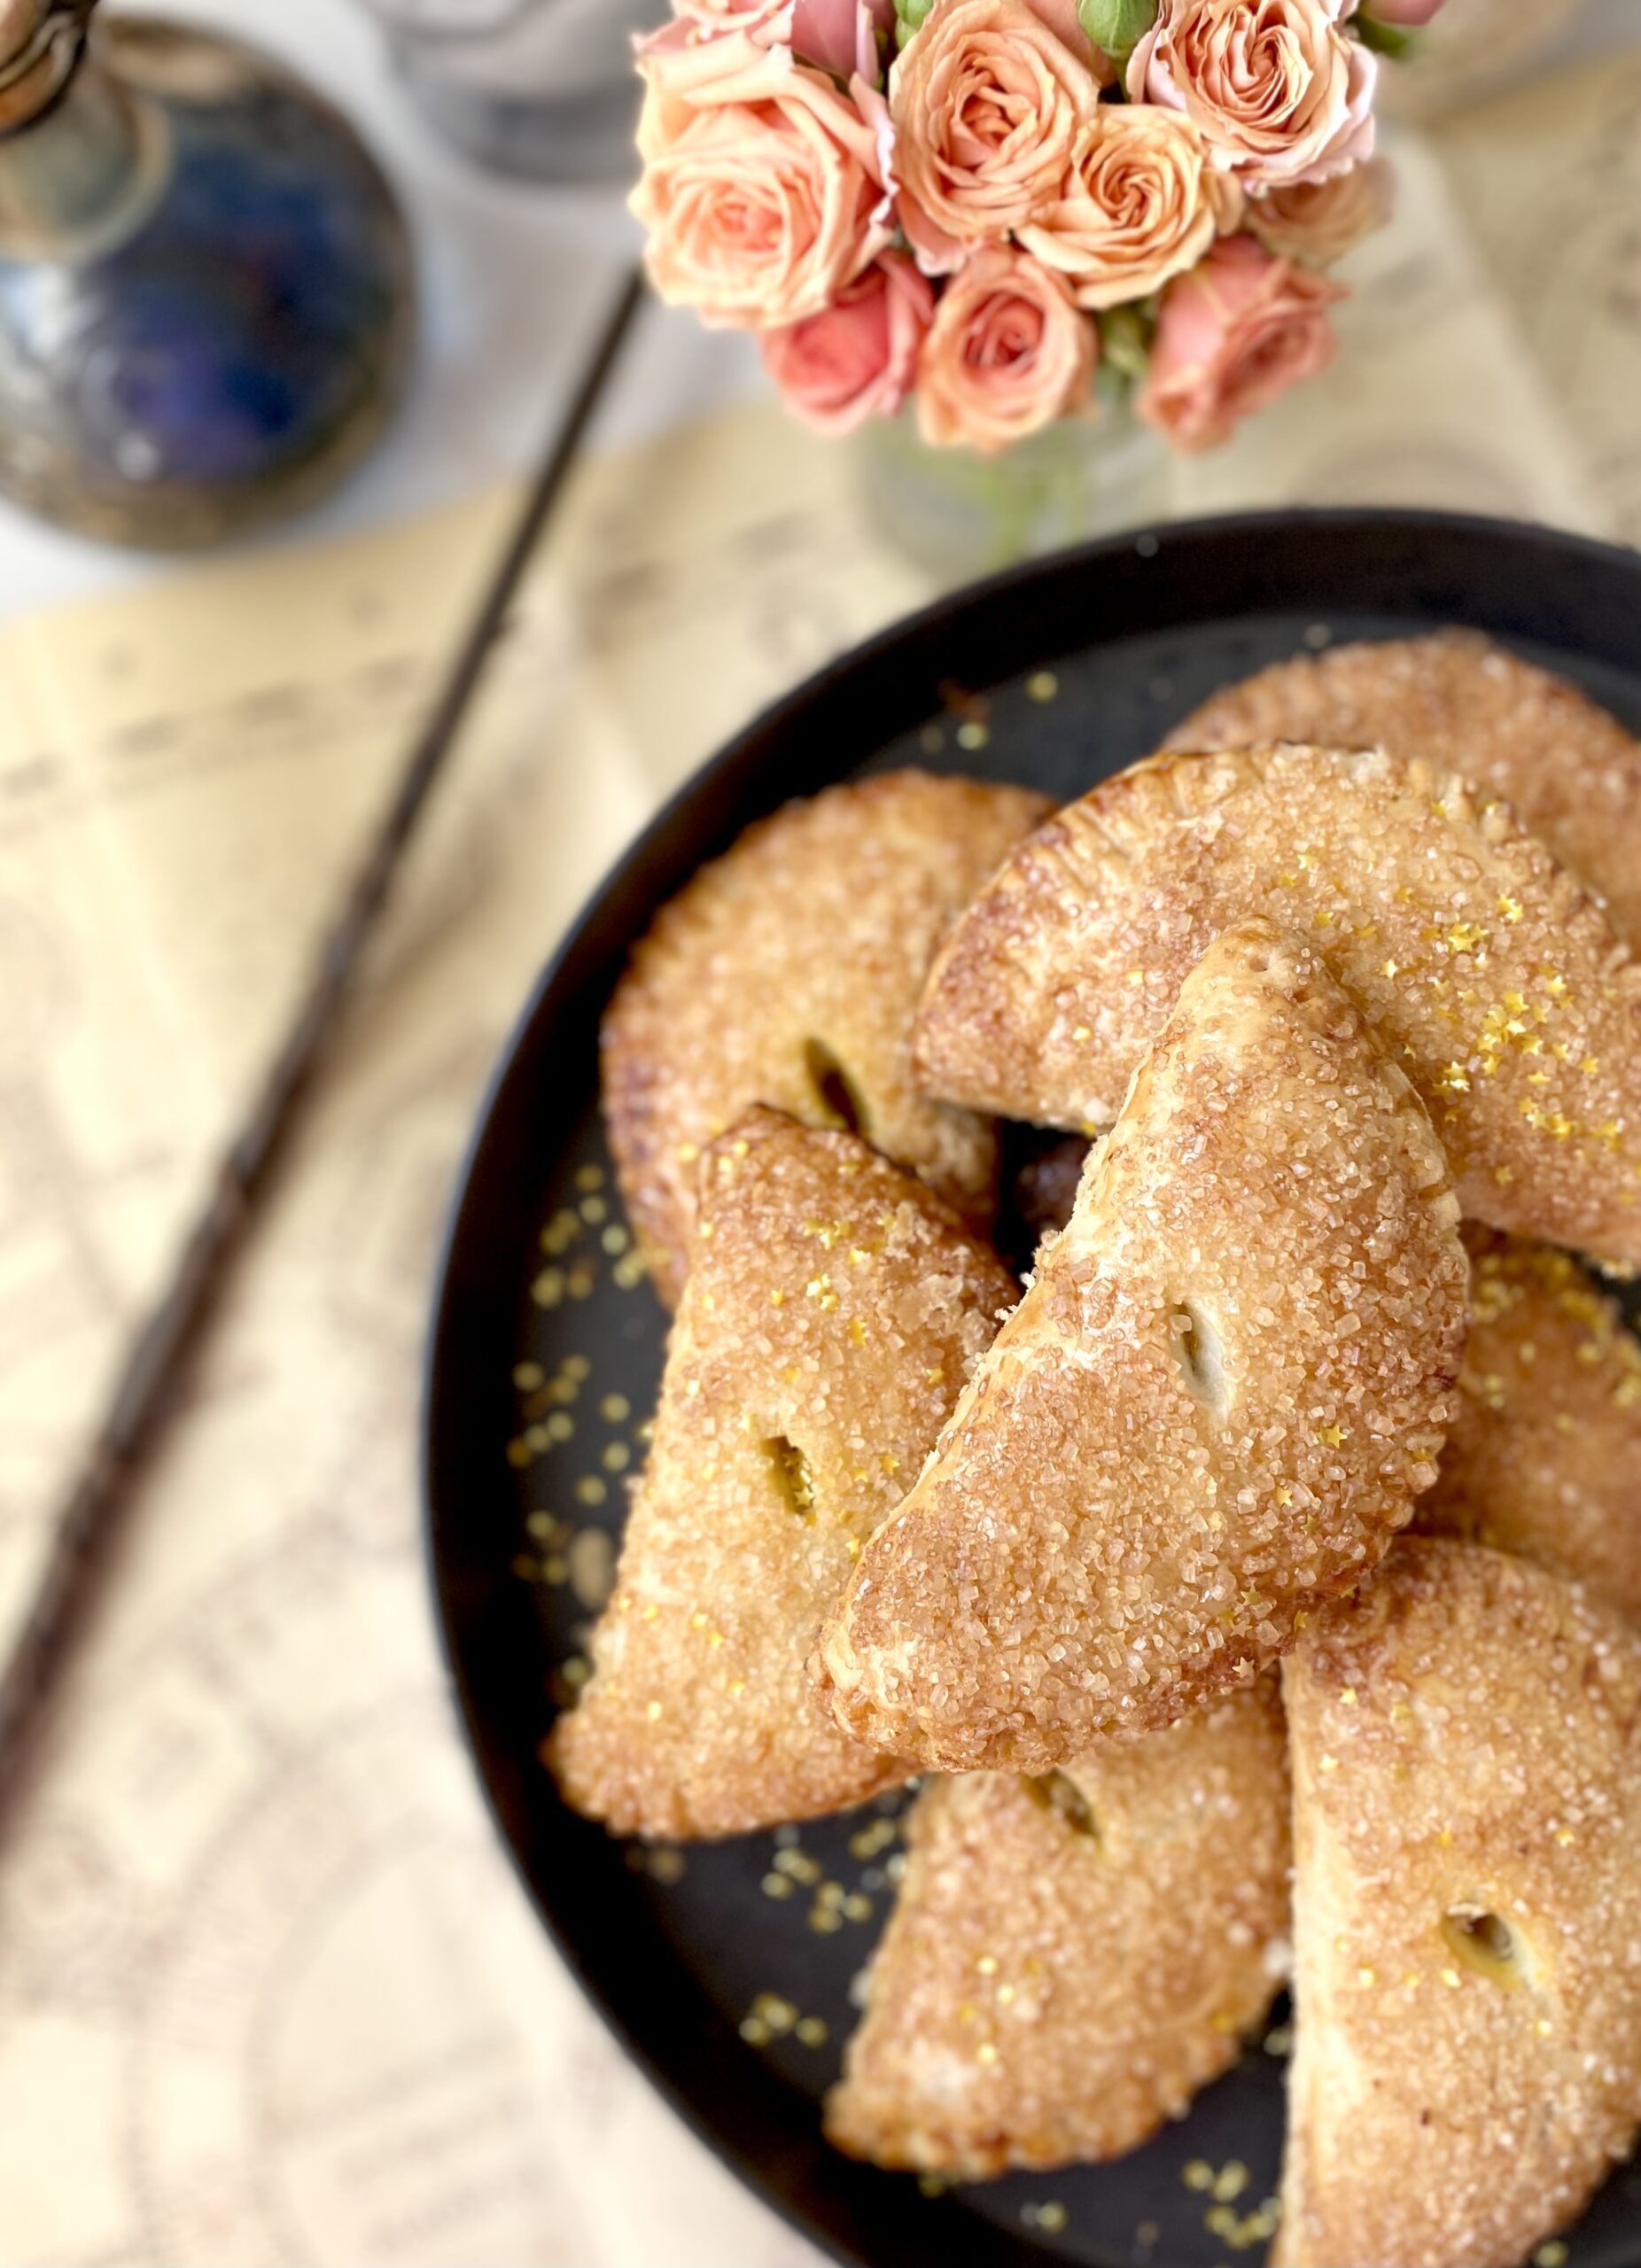
Inevitably, every fall, the Harry Potter movies come on at my house and it’s nice to have some popcorn and sweet treats to enjoy while watching the movies. And these Harry Potter Inspired Pumpkin Pasties are perfect for that! If you’ve read the Harry Potter books, you may remember the Pumpkin Pasties being mentioned. There are many interpretations out there, but I imagined them to be crispy and flaky on the outside with a sweet pumpkin filling. I included a delicious flaky pie crust recipe here, but feel free to use store bought pie dough if you want to streamline the process. I sprinkled mine with raw turbinado sugar before baking which provides a sweet delicious crunch. You can also use maple sugar or sparkling sugar. To find the sugar I used, click here. And as a magical touch, I added some edible gold star glitter. To find the edible gold stars, click here.

Pumpkin Pasties

Harry Potter inspired sweet pumpkin filled hand pies
Course Dessert
Servings 12 hand pies

Ingredients
  

Pie Crust

  • 2 â…” cup (340g) all purpose flour, sifted
  • 2 tablespoons (25g) sugar
  • ½ teaspoon fine sea salt
  • ¼ cup (50g) vegetable shortening
  • ¾ cup (170g) cold, unsalted butter, cubed
  • ½ cup (118ml) ice water
  • 1 tablespoon (15ml) apple cider vinegar

Pumpkin Filling

  • ¾ cup (170g) canned pure pumpkin purée Not pie filling
  • â…“ cup (66g) sugar
  • 1 large egg
  • 2 tablespoons (30ml) heavy cream
  • ½ teaspoon ground cinnamon
  • ¼ teaspoon ground ginger
  • â…› teaspoon ground nutmeg preferably freshly ground

Assembly

  • egg wash 1 egg beaten with 1 tablespoon (15ml) of water
  • coarse sugar

Instructions
 

Pie Crust

  • In a large bowl, whisk together the flour, sugar and salt. Work the shortening into the flour mixture with your fingertips until evenly dispersed throughout.
  • Work the butter into the flour mixture with your fingertips, creating flat dime size pieces.
  • Mix the ice water and vinegar together. Sprinkle over the flour mixture a little at a time, stirring until dough comes together. You may not need all of the water depending on your climate.
  • Turn the dough out onto a lightly floured surface. Fold the dough over onto itself a few times. Do not overwork the dough! Form the dough into two disks. Cover with plastic wrap and refrigerate at least two hours or up to overnight.

Pumpkin Filling

  • In a medium-size bowl, mix together the pumpkin purée, sugar, egg, heavy cream, cinnamon, ginger and nutmeg until well combined.

Assembly

  • Preheat the oven to 400ºF (200ºC). Line two baking sheets with parchment paper.
  • On a lightly floured surface, roll the dough to 1/8-inch thickness. Cut the dough into twelve 5-inch* rounds, re-rolling the scraps as needed. Place the dough rounds a couple of inches apart onto the prepared baking sheets.
  • Place about 2 tablespoons of filling on each round, leaving a half-inch border. Apply egg wash to the edges of the rounds.
  • Fold the dough over and press the edges together. Crimp the edges with a fork. If any filling oozes out, wipe it up with a paper towel or it will burn.
  • Brush the pasties with egg wash. Cut a half-inch slit into the top of each pastie. Sprinkle with coarse sugar.
  • Bake until golden brown, about 18-20 minutes. Transfer to a cooling rack.

Notes

*To find a 5-inch round cutter, click here.
Keyword pastry

Skillet Chicken Pot Pie with Herb Crust

Pot pies belong to everyone. They date back to ancient times and many cultures worldwide have various versions of savory pies. It’s a very popular comfort food dish here in the U.S. and many people already have a favorite recipe. The recipe I’m sharing here isn’t the only way to make a pot pie, but it’s one way to do it that happens to be delicious! I usually bake pot pies in a casserole dish, and you can certainly bake this one in a casserole dish if you want to. But I thought it would be nice to save a step and try baking one in a skillet. I love baking other things, such as cornbread, in a skillet so I had a feeling it would be good. I used an 8-inch cast iron skillet. Click here to find the skillet I used.

I had a ton of fresh herbs on hand, so they ended up in my pie crust on a whim. I was very pleased with the results. Feel free to switch up the herbs and use your favorites. Typically when you bake or roast something with fresh herbs, they tend to turn black and crispy. But don’t worry, they’ll be safely nestled inside the crust. And speaking of the crust, this one is tender and flaky due to my grandmother’s method of working the fat into the dough with your fingertips. You want to end up with flat dime size pieces throughout. A little vegetable shortening helps to add structure and flakiness and the butter makes it taste good. A touch of vinegar helps to inhibit gluten formation, so you’ll have a tender, flaky crust rather than a chewy one. And if you’re one of those people who tends to over work your dough, the vinegar can help with that. But please do yourself a favor and don’t over work your dough!!

Now I’m going to give you the best piece of cooking advice my grandmother ever gave me: Taste as you go! Taste everything as you are preparing it, not just when it’s done. So when you’re making your filling for this pot pie, add the herbs, salt, pepper and sage a little bit at a time until it tastes good to you.

Skillet Chicken Pot Pie with Herb Crust

Skillet chicken pot pie with fresh herbs baked into the crust
Course Main Dish
Servings 3

Ingredients
  

Herb Crust

  • 1 â…“ cups (6 ounces) all purpose flour, sifted
  • 1 tablespoon sugar
  • ¼ teaspoon fine sea salt
  • 2 tablespoons vegetable shortening
  • 6 tablespoons (3 ounces) cold, unsalted butter, cubed
  • 1 ½ tablespoons minced fresh Italian parsley
  • 1 tablespoon minced fresh rosemary
  • 1 tablespoon minced fresh chives
  • 2 teaspoons fresh thyme leaves
  • ¼ cup ice water
  • 2 teaspoons white vinegar

Filling

  • 3 tablespoons (1 1/2 ounces) unsalted butter
  • ¼ cup (1 ounce) diced onions
  • â…“ cup (1 1/2 ounces) chopped celery
  • ½ cup (2 1/4 ounces) sliced carrots
  • 3 tablespoons all purpose flour
  • 1 ½ cups chicken broth
  • â…“ cup heavy cream
  • 1 tablespoon minced fresh Italian parsley
  • 1 tablespoon minced fresh chives
  • 2 teaspoons minced fresh rosemary
  • 1 teaspoon fresh thyme leaves
  • ½ teaspoon fine sea salt or to taste
  • ½ teaspoon pepper or to taste
  • ¼ teaspoon ground sage
  • 2 ¾ cups (11 ounces) shredded cooked chicken
  • â…“ cup (2 ounces) frozen peas
  • egg wash 1 egg beaten with one tablespoon water

Instructions
 

Herb Crust

  • In a large bowl, whisk together flour, sugar and salt. Work shortening into the flour mixture with your fingertips until evenly dispersed throughout.
  • Work butter and herbs into the flour mixture with your fingertips, creating flat dime size pieces.
  • Mix ice water and vinegar together. Sprinkle over flour mixture a little at a time, stirring until dough comes together. You may not need all of the water depending on your climate.
  • Turn dough out onto a lightly floured surface. Knead dough briefly by folding dough over onto itself a few times. Do not over work dough! Form dough into a disk. Cover with plastic wrap and refrigerate at least one hour or up to overnight.

Filling

  • In an 8-inch cast iron skillet, heat butter over medium heat. Sauté onions, celery and carrots until onions are translucent, stirring occasionally. Sprinkle with flour and cook one to two more minutes, stirring frequently.
  • Stir in chicken broth slowly. If your sauce seems lumpy, use a whisk and vigorously whisk until smooth. Simmer on low until thickened. Stir in heavy cream. Add herbs and seasonings to taste. Add a splash of chicken broth if your sauce seems too thick.
  • Mix in chicken and peas. Remove form heat. Set aside until skillet is cool enough to handle.

Assembly

  • Preheat oven to 400ºF.
  • On a lightly floured surface, roll dough out to a 10-inch round. Place dough over filling, tucking ends under and crimping with your fingers or with a fork. Brush pie with egg wash. Cut a 1-inch X in the center of pie to allow steam to escape.
  • Bake until golden brown, about 40 minutes. Cover edges of crust with strips of foil if they start to brown too fast.
Keyword chicken pot pie, pastry

Lemon Scones

Lemon Scones

Yellow is the color of happiness and sunshine. These adorable Lemon Scones will bring you a burst of lemony brightness even on the grayest day. The pretty, vibrant yellow sparkling sugar adds a pleasant crunch to the tops. It’s a nice contrast to the soft, tender interior of the scones. These little gems would shine on any breakfast or brunch table. I served them with blueberry jam and green tea, which was so delightful, I’m still smiling.


Lemon Scones

by Mari Vasseur
Course Breakfast, Brunch
Servings 12 scones

Ingredients
  

Lemon Scones

  • 1 ¾ cups (223g) all purpose flour, sifted
  • 1 tablespoon baking powder
  • ½ teaspoon fine sea salt
  • ¼ cup (50g) sugar
  • 7 tablespoons (99g) cold, unsalted butter, cubed
  • Zest of 2 medium lemons
  • â…” cup (156ml) cold heavy cream plus more for tops
  • 2 tablespoons (30ml) lemon juice
  • Yellow sparkling sugar*

Icing

  • â…“ cup (40g) powdered sugar, sifted
  • 1 teaspoon heavy cream
  • 1-2 teaspoons lemon juice

Instructions
 

Lemon Scones

  • Preheat the oven to 375ºF (190ºC). Line a large baking sheet with parchment paper.
  • In a large bowl, whisk together the flour, baking powder, salt and sugar until well blended
  • Work the butter and lemon zest into the flour mixture with your fingertips or with a pastry blender until pea size chunks form.
  • Stir in the heavy cream and lemon juice until a shaggy dough is formed. If your dough seems too dry, you can add 1-2 more teaspoons of heavy cream.
  • Turn the dough out onto a lightly floured surface. Fold the dough over onto itself a couple of times. Do not overwork the dough.
  • Pat or roll the dough into an 8-inch round, about 3/4-inch thick. Cut out rounds using a 2" or 2 1/4" inch round cutter.**
  • Place the scones about 2 inches apart onto the prepared baking sheet. Brush the scones with heavy cream. Sprinkle generously with sparkling sugar.
  • Bake until the edges are golden brown, about 16-19 minutes.
  • Cool completely on a wire rack. Decorate with icing.

Icing

  • In a small bowl, whisk together the powdered sugar, heavy cream and enough lemon juice to form a stiff icing.
  • Transfer the icing to a piping bag or a plastic zip bag. Snip off the tip of the bag. Pipe lines in a spoke pattern onto the scones.

Notes

*To find the sparkling sugar I used, click here.
**To find the cutter I used, click here.
Keyword lemon, scones

Blackberry Oatmeal Cookies

Blackberry Oatmeal Cookies by Brownie Mischief

We’ve all heard our parents telling their childhood stories of walking miles to school and suffering worse hardships than we ever had to. My mom used to tell me stories like that, but she had a sense of humor, so her stories were always fun to listen to. She used to tell me about her friend’s mother, who would make big, delicious oatmeal cookies. My mom would trade her baloney sandwich nearly every day to get one of those cookies from her friend. She reminisced about those cookies so much, that I set out to make her some when I learned to bake. She and my grandmother would taste test batch after batch of my cookies over the years. I have probably baked enough oatmeal cookies to circle the earth. Okay that’s an exaggeration, but seriously I have baked quite a few. Of all the oatmeal cookies I’ve baked, these are one of my favorites!

Most of the time when you see fruit added to an oatmeal cookie, it’s dried fruit, like raisins or cranberries. That’s mostly because if you just dump fruit into your cookie dough, the fruit releases water, leaving soggy spots in your cookies. To solve that issue, for this recipe, I macerate the blackberries before baking. The purple blackberry juice that’s released from the berries is used to make a beautiful lilac icing to drizzle over the cookies.

Blackberry Oatmeal Cookies

Course Dessert
Servings 18 cookies

Ingredients
  

Brown Butter

  • ½ cup (4oz or 113g) unsalted butter

Macerated Berries

  • 2 cups (about 8-10 oz or 227-283g) fresh blackberries Cut large berries in half
  • 2 tablespoons (25g) granulated sugar

Oatmeal Cookies

  • 1 ¾ cups (7 7/8 oz or 223g) all purpose flour, sifted
  • 1 teaspoon baking soda
  • 1 teaspoon fine sea salt
  • ½ teaspoon ground cinnamon
  • ½ cup (4 or 113g) unsalted butter, softened
  • 1 ¼ cups (8 3/4 oz or 250g) packed brown sugar
  • 2 large eggs
  • 1 ½ teaspoons pure vanilla extract
  • 3 cups (10 oz or 283g) quick oats Not instant oats

Icing

  • ¾ cup (3 oz or 85g) powdered sugar, sifted
  • 1 tablespoon heavy cream
  • 2-3 tablespoons reserved juice from blackberries

Instructions
 

  • In a small, light colored saucepan, melt 1/2 cup (4 oz or 113g) of butter over medium heat, stirring occasionally, until deep golden and fragrant. Keep a close eye on it. It can go from toasted to burned very quickly. When you see brown particles form, remove from heat and immediately transfer the butter, including the particles, to a small bowl. Refrigerate until solid, about one hour.
  • Place the blackberries in a medium-size bowl. Sprinkle with granulated sugar and toss to coat. Let sit for 30 minutes until the berries release their juices.
  • Drain the blackberries and reserve the juices.
  • Preheat oven to 350ºF (180ºC). Line two large cookie sheets with parchment paper.
  • In a separate medium-size bowl, whisk together the flour, baking soda, salt and cinnamon. Set aside.
  • In a large bowl, beat the brown butter, softened butter and brown sugar until light and fluffy.
  • Add the eggs and vanilla extract in three separate additions and beat until well combined.
  • Stir in the flour mixture just until combined. Stir in the oats just until combined. Gently fold in the blackberries.
  • Scoop 1/4 cup sized portions of dough, about 2 inches apart, onto the prepared cookie sheets. *I used a #16 2-ounce scoop.
  • Bake until the cookie tops are set and the edges are golden brown, about 13-15 minutes. Transfer the cookies to a cooling rack to cool completely.
  • Pass reserved blackberry juice through a sieve to remove the seeds.
  • In a small bowl, whisk together the powdered sugar, heavy cream and one tablespoon of the reserved blackberry juice until smooth. Add more blackberry juice, a little at a time, until the desired consistency is reached. Drizzle the icing over the cooled cookies.

Notes

*To find the portion scoop I used, click here.
Keyword blackberry, cookies

Raspberry Rose Shortbread Cookies

Raspberry Rose Shortbread Cookies

I don’t think I’ve ever created a recipe that delighted all of my senses as much as these cookies. I used dried rosebuds in the cookie dough, but you can also use dried rose petals. Whether you purchase dried rose petals or make them yourself, they’re pleasantly fragrant with a subtle flavor. To find dried rose petals, click here. To find dried rosebuds, click here. I pinched the calyx and stem off of the rosebuds to avoid large crunchy bits in the cookies, then I crushed the roses with a mortar and pestle. You’ll hear the satisfying crunch of the delicate, dried rose petals. You can also place them in a plastic bag and roll over them gently with a rolling pin.

The finished cookies have a rustic, almost shabby chic look with their cracks, rose-speckled dough and beautifully imperfect dried roses. And of course, you’ll want to sample a warm cookie. The cookies will taste tender and slightly sweet with a hint of rose. I like a more subtle rose flavor in my baked goods. But if you prefer a stronger rose flavor, feel free to add a small amount of rose water to your dough. Start with 1/4 teaspoon, because a little goes a long way.

If you’re like me, you’ll taste a spoonful of the raspberry ganache because you can and should. For the raspberry ganache, please use a good quality white chocolate! In some recipes, it’s fine to use white chocolate chips or candy melts if you prefer, but NOT this one. In my humble, yet educated opinion, you should never use chocolate chips to make ganache. I studied chocolate in culinary school with a master chocolatier. I never use chocolate chips for ganache because they contain stabilizers that keep them from melting completely, which prevents you from having the smoothest ganache possible. They also contain less cocoa butter and tend to have a waxy mouth feel.

For this recipe, when it comes to butter, you should also be a little bit picky for successful baking. Low quality butter tends to contain more water and your cookies may spread too much. So make sure to use good butter. Your butter should be room temperature, but not warm. If the butter is shiny, it’s too warm. Don’t try to speed up the softening of butter with your microwave. That’s not a hack, in spite of what you may hear on the internet. Microwaves heat unevenly and will potentially melt your butter. The best way to speed up the softening of your butter is to simply cut it into cubes. By the time you get the rest of your ingredients ready, the butter should be soft enough to use. My last, but most important success tip, is to weigh your ingredients.

You’ll find this recipe and more delightful bakes, in my cookbook “Enchanted Baking.” Click here for more info.


Raspberry Rose Shortbread Cookies

Mari Vasseur
Rose petal shortbread cookies filled with white chocolate raspberry ganache
Course Dessert
Servings 30 cookies

Ingredients
  

Cookies

  • 1 cup (227g) unsalted butter, softened
  • 3 tablespoons (2g) crushed dried rose petals
  • 1 cup (113g) powdered sugar, sifted
  • 1 teaspoon pure vanilla extract
  • ½ teaspoon fine sea salt
  • 2 ¼ cups (284g) all purpose flour, sifted

Filling

  • â…“ cup (59ml) raspberry purée, strained
  • ¼ cup (59ml) heavy cream
  • 3 ounces (or 85g) white chocolate, finely chopped Do not use white chocolate chips
  • 30 dried rosebuds for decoration optional

Instructions
 

Cookies

  • Preheat the oven to 350ºF (180ºC). Line two large baking sheets with parchment paper
  • In a large bowl, beat the butter, with an electric mixer on medium speed, until smooth. Add the rose petals and beat on low speed until combined.
  • Add the powdered sugar, vanilla extract and salt. Beat until well combined.
  • On low speed, mix in the flour in two additions. Beat just until combined.
  • Roll the dough into 1 1/4-inch balls, about 1/2 ounce (14g) each. Place the dough balls about 2 inches apart onto the prepared baking sheets.
  • Bake for 7 minutes, then remove from the oven. Press indentations into each cookie with a 1-inch diameter pastry tamper or with the flat top of a 1-inch diameter bottle cap.
  • Return the cookies to the oven and continue baking until the edges are light golden brown, about 5-6 more minutes.
  • If the indentations in your cookies lose definition, press again with the tamper or bottle cap while the cookies are still hot on the baking sheet.
  • Transfer the cookies to a cooling rack to cool completely.

Filling

  • In a small saucepan, bring the pureéd raspberries to a simmer over medium heat. Simmer until the purée is reduced by half, about 5 minutes. Transfer the raspberry reduction to a small bowl and set aside.
  • Place the white chocolate in a medium heat safe bowl and set aside.
  • In a small saucepan over medium heat, bring the heavy cream to a simmer, just until bubbles form around the edges. Do not boil. Stir in the raspberry reduction and heat just to a simmer again. Do not boil.
  • Pour the hot cream mixture over the white chocolate, making sure all of the white chocolate is submerged. Let it sit for 3 minutes, then stir with a spatula until smooth. Let the ganache cool until slightly thickened. Spoon about 1/2 teaspoon into the indentation of each cookie. The ganache will continue to firm up as it sits.
  • When the ganache in the cookies has firmed up, decorate with dried rosebud or rose petals, if desired.

Notes

*To find dried rose petals, click here.
**To find dried rosebuds, click here.

Chocolate Peanut Butter Tarts

Does anyone else remember those old peanut butter cup commercials where two people on the street would collide and a chocolate bar would miraculously end up inside of a jar of peanut butter? Then the person carrying the open jar of peanut butter would say, “Hey you got chocolate in my peanut butter!” and they would suddenly discover it’s a delicious combination. The real question is, why was anyone walking around outside with an open jar of peanut butter? I miss those silly commercials.

If you love chocolate and peanut butter together, you’ll absolutely love these tarts. The creamy peanut butter filling and the silky chocolate ganache topping are perfect together. The chocolate cookie crust adds a nice crunch. I used heart shaped tart pans to make the tarts a little more special for Valentine’s Day. To find the tart pans I used, click here. You can also use round tart pans if you prefer.


Chocolate Peanut Butter Tarts

Mari Vasseur
Personal peanut butter tarts with chocolate cookie crusts and chocolate ganache topping
Course Dessert
Servings 4 tarts

Ingredients
  

Crust

  • 14 chocolate sandwich cookies, crushed including filling
  • 2 tablespoons (28g) unsalted butter, melted

Filling

  • ½ cup (128g) creamy peanut butter, room temperature
  • 2 tablespoons (28g) unsalted butter, softened
  • ½ cup (60g) powdered sugar, sifted
  • 2 tablespoons (30ml) heavy cream, room temperature
  • ¼ teaspoon pure vanilla extract
  • 1 Pinch fine sea salt

Topping

  • 3 ounces (85g) bittersweet or semi-sweet chocolate, finely chopped
  • ¼ cup plus 2 tablespoons (88ml) heavy cream
  • Chopped peanuts optional
  • Mini peanut butter cups optional

Instructions
 

Crust

  • Preheat the oven to 350ºF. (180ºC). Place four 4-inch tart pans with removable bottoms* on a baking sheet.
  • In a medium-sized bowl, mix the crushed sandwich cookies with the melted butter until well combined. Press the crumb mixture into the tart pans.
  • Bake for 8 minutes. Let cool completely.

Filling

  • In a medium-sized bowl, beat the peanut butter and softened butter until smooth. Add the remaining filling ingredients and beat until smooth and well blended.
  • Fill the cooled tart shells with the filling. Refrigerate the tarts until set, at least 2 hours.

Topping

  • Place the chopped chocolate in a small bowl.
  • In a small saucepan, heat the heavy cream over medium-low heat just until bubbles form around the edges. Do not boil. Pour the hot cream over the chocolate. Let sit two minutes then stir until smooth.
  • Spoon over the peanut butter filling. Add toppings if desired. Refrigerate until chocolate is set. Carefully remove tarts from pans.

Notes

To find the tart pans I used, click here.
Keyword chocolate peanut butter, tarts

Lavender White Chocolate Scones

Lavender white chocolate scone
Click here to watch the video of Lavender White Chocolate Scones

If you headed over here from TikTok or Instagram, welcome! Most of my recipes can be found here. I share some recipes in the caption on Instagram reels and some recipes are written in text on TikTok videos. One major drawback of sharing recipes in Instagram captions is the character limit. For these reasons and a few others, my preferred method of sharing recipes is here on my website. I’m able to provide detailed instructions with the option for you to print out the recipe.

Now, let’s talk a little bit about lavender. I used one teaspoon of lavender in these scones, which I think is the perfect amount to give a hint of lavender, without tasting too floral. You can adjust the amount to your preference. Just taste the cream before adding it to the scones. You can use any culinary lavender in this recipe. English lavender is usually used for culinary purposes. Spanish and French varieties tend to be too strong. People are enchanted by lavender because of its beauty and soothing scent. A little touch of lavender makes these scones magical.


Lavender White Chocolate Scones

Servings 9 scones

Ingredients
  

  • ¾ cup (177ml) heavy cream
  • 1 teaspoon culinary lavender *
  • 1 ¾ cups (223g) all purpose flour, sifted
  • 1 tablespoon baking powder
  • ½ teaspoon fine sea salt
  • 7 tablespoons (99g) cold, unsalted butter, cubed
  • ¼ cup (57g) cold sour cream
  • 1 cup (170g) white chocolate chunks or chips (not chopped white chocolate)
  • Lavender coarse sparkling sugar**

Instructions
 

  • In a small saucepan, heat the heavy cream and lavender over medium heat, just until bubbles form around the edges. Turn the heat to low and simmer gently for 1 minute. Strain the lavender cream into a small bowl. Cover and refrigerate until chilled, about 1 hour.
  • Heat the oven to 375ºF (190ºC). Line a large baking sheet with parchment paper.
  • In a large bowl, whisk together flour, baking powder and salt until well combined. Work the butter into the flour mixture with your fingertips or with a pastry blender until pea size chunks form.
  • Whisk together 1/2 cup (118ml) of the chilled lavender cream with the sour cream. Stir this mixture into the flour mixture until a shaggy dough is formed. If your dough seems too dry, add 1-2 more teaspoons of heavy cream. Fold in the white chocolate chunks.
  • Turn the dough out onto a lightly floured surface. Fold the dough over onto itself a few times. Do not overwork the dough! Pat or roll the dough into an 8-inch round, about 3/4 inch thick. I used 2 3/4-inch heart biscuit cutter*** to cut out 9 scones.
  • Place the scones about 2 inches apart onto the prepared baking sheet. Brush the scones with the remaining cream. Sprinkle with sparkling sugar. Bake until golden, about 15-17 minutes.

Notes

*To find culinary lavender click here
** To find the lavender sparkling sugar I used click here
***To find the heart shape biscuit cutter I used click here
Keyword lavender white chocolate, scones

Peaches & Cream Scones with Caramel Icing

Peaches & Cream Scones with Caramel Icing

Tender scones with fresh peaches, topped with a quick caramel icing
Course Breakfast, Brunch
Servings 8

Ingredients
  

Scones

  • 1 ¾ cups (7 7/8 oz or 223g) all purpose flour, sifted
  • 1 tablespoon baking powder
  • ½ teaspoon fine sea salt
  • ½ teaspoon ground cinnamon
  • 7 tablespoons (3 1/2 oz or 100g) cold, unsalted butter, cubed
  • ½ cup (4 oz or (118 ml) cold sour cream
  • ¼ cup (2 oz or 59ml) cold heavy cream Plus more for tops
  • 1 teaspoon pure vanilla extract
  • 1 cup (about 7 oz or 200g) chopped fresh peaches, patted dry Peaches should be ripe but still firm, not over ripe.
  • egg wash (optional) 1 egg whisked with 1 tablespoon of water

Icing

  • ¼ cup (2 oz or 57g) salted butter
  • ½ cup (3 1/2 oz or 100g) packed brown sugar
  • â…“ cup (2 5/8 oz or 78 ml) heavy cream

Instructions
 

  • Preheat the oven to 375ºF. Line a large baking sheet with parchment paper.
  • In a large bowl, whisk together the flour, baking powder, salt and cinnamon.
  • Work the butter into the flour mixture with a pastry blender or with your fingertips until pea size pieces form.
  • In a medium bowl, whisk together the sour cream, heavy cream and vanilla.
  • Mix the sour cream mixture into the flour mixture until a shaggy dough forms. Fold in the peaches.
  • Turn dough out onto a lightly floured surface. Press the dough together and fold it over onto itself a couple of times.
  • Pat or roll dough into a 7-inch round. Cut dough into 8 wedges. Transfer to the prepared baking pan. Brush the scones lightly with egg wash or heavy cream.
  • Bake until golden brown, about 18-22 minutes. Transfer the scones to a cooling rack.

Caramel Icing

  • Melt the butter a small saucepan over medium heat. Whisk in the brown sugar until smooth, about 2 minutes.
  • Whisk in the heavy cream and heat until bubbly. Remove from heat. Set aside to cool slightly. Drizzle or spoon the icing over the cooled scones.
Keyword peach, scones

Easy Caramel Sauce

Easy Caramel Sauce

Course Dessert

Ingredients
  

  • 15 soft caramel candies I used Werther's
  • 3 tablespoons (45ml) heavy cream
  • â…› teaspoon fine sea salt or too taste

Instructions
 

  • Combine the caramel candies and the heavy cream in a small saucepan over medium heat. Stir gently until melted and smooth. Stir in the salt.
Keyword caramel sauce, condiments