Pastel Snowball Cookies

pastel snowball cookies

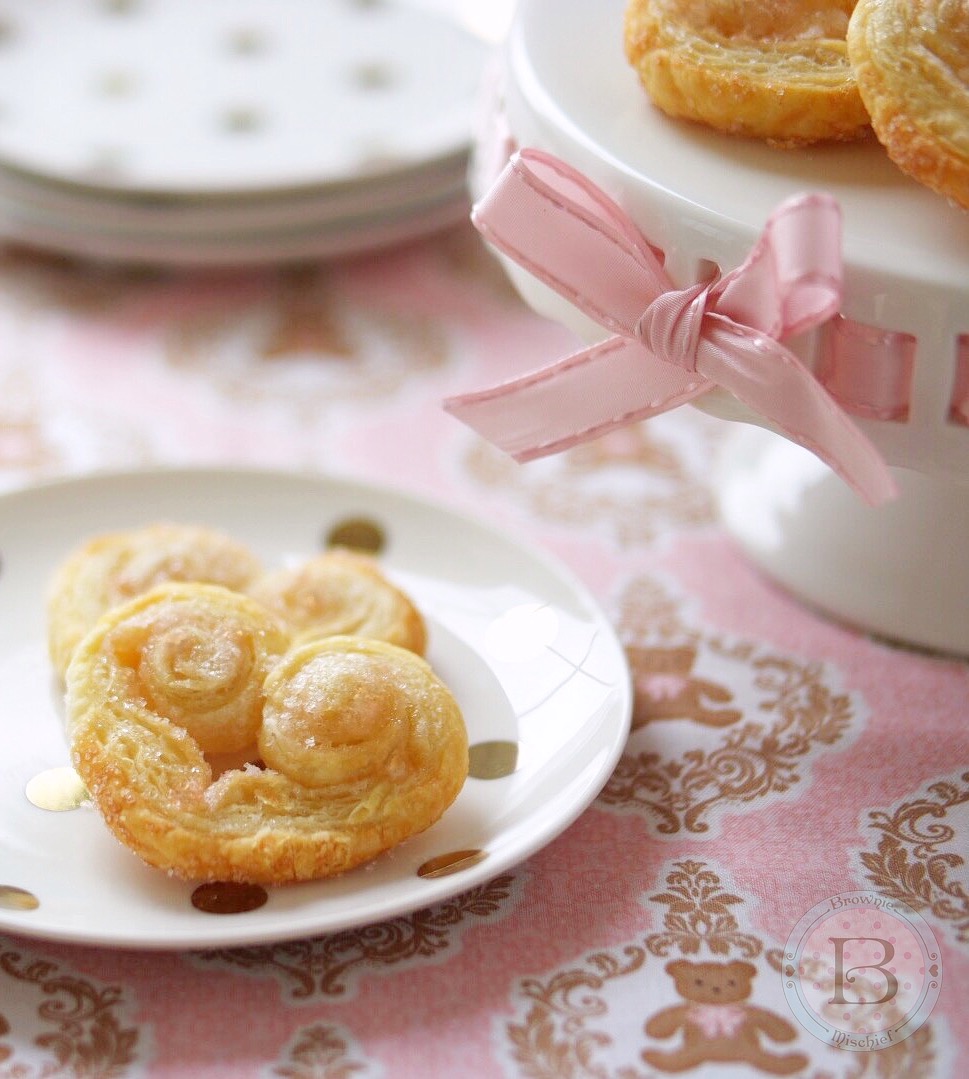
This delightful melt-in-your-mouth cookie recipe has been in my family for decades. We call them Snowballs, but they’re also known as Mexican Wedding Cakes or Greek Kourabiedes. I make them every year for Christmas, but they would also be perfect for Easter, Mother’s Day, birthday parties, tea parties, weddings, bridal showers, and baby showers.

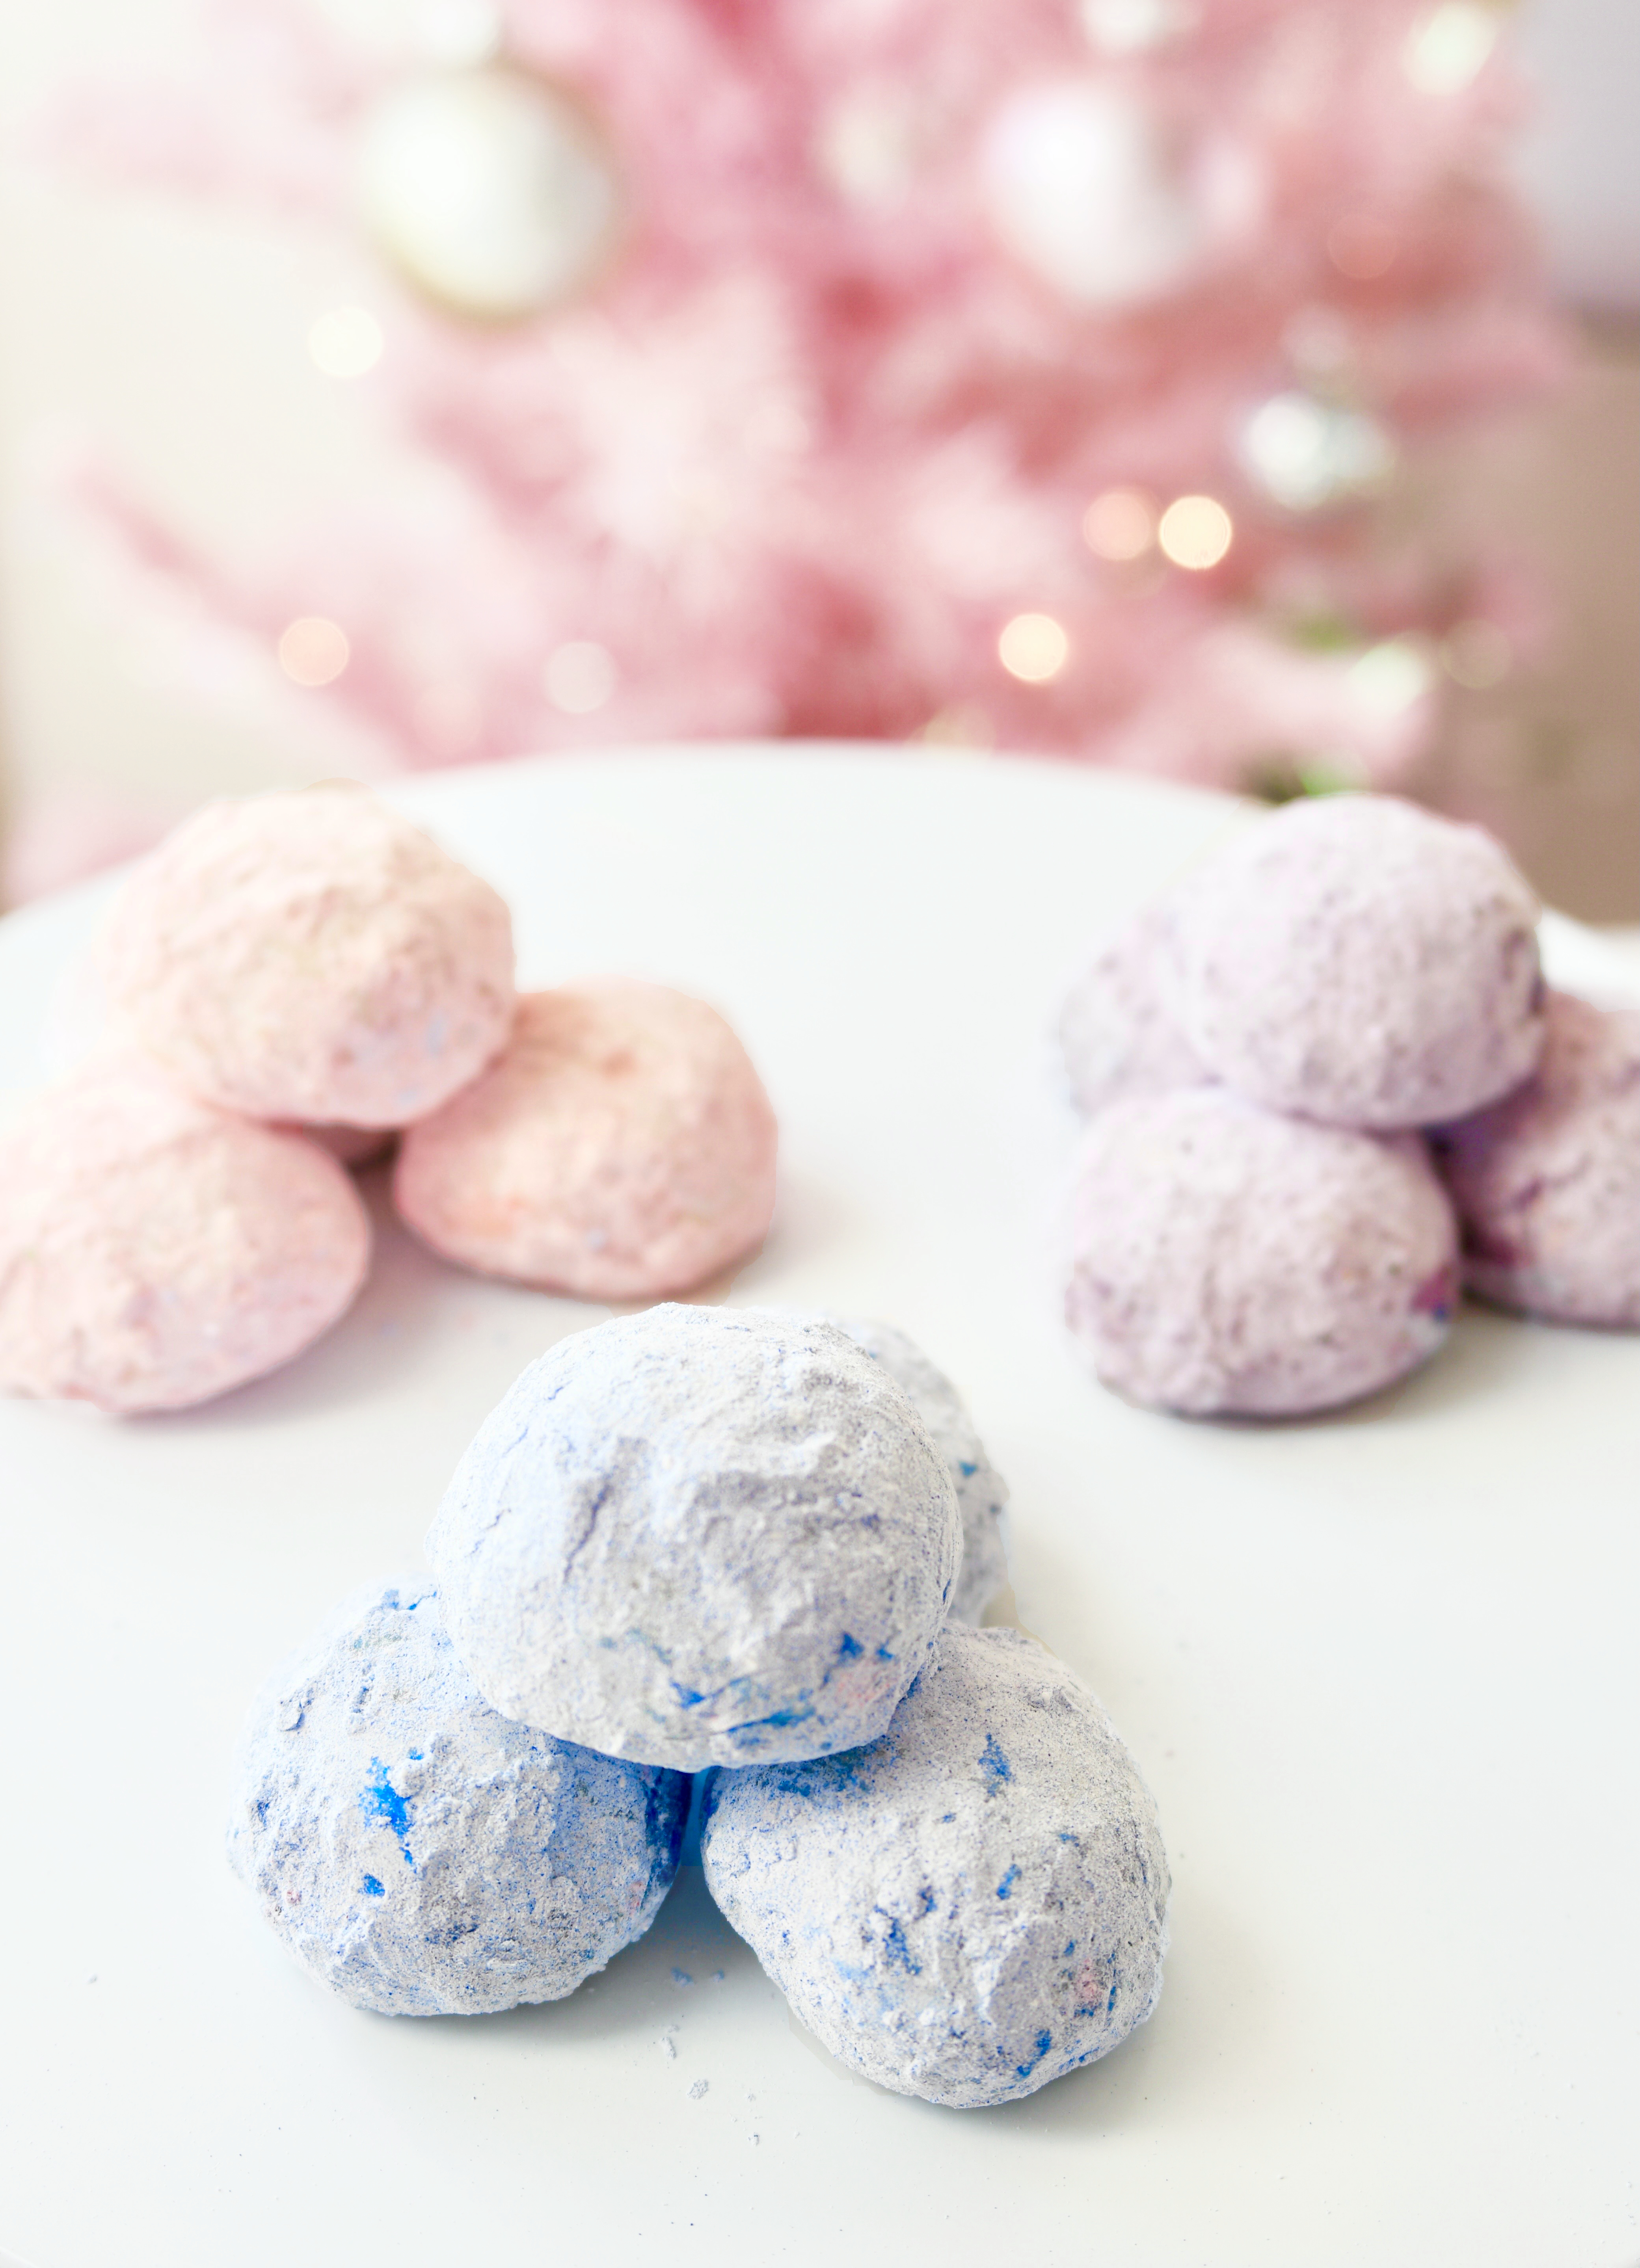
Pecans are my favorite nuts to use in this recipe, but you can use almost any nuts you have on hand. The original snowy white version is a classic but you can take them up a notch with pretty pastels and fruit flavors. You can use crushed, freeze-dried fruit for color and subtle flavor. Spirulina is a nutritious, vibrant powder you can use to make beautiful blue cookies. You can also dress up your snowballs with edible glitter or luster dust used for cake decorating. There are endless ways to be creative with these cute cookies!


Pastel Snowball Cookies

by Mari Vasseur
Melt-in-your-mouth shortbread cookie balls covered in pastel powdered sugar
Course Dessert
Servings 36 cookies

Ingredients
  

Cookies

  • 1 cup (227g) unsalted butter, softened
  • 1 cup (120g) powdered sugar, sifted and divided plus more for desired pastel powdered sugar color
  • 1 teaspoon vanilla extract
  • ¼ teaspoon fine sea salt
  • 2 cups (255g) all purpose flour, sifted
  • ½ cup (64g) finely chopped pecans

Pink powdered sugar

  • â…“ cup (40g) powdered sugar, sifted
  • ½ cup (14g) freeze-dried strawberries or raspberries see note below*

Blue powered sugar

  • â…“ cup (40g) powdered sugar, sifted
  • 1 ½ teaspoons blue spirulina powder

Lavender powered sugar

  • â…“ cup (40g) powdered sugar, sifted
  • ½ cup (14g) freeze-dried blueberries see note below*
  • ¼ teaspoon violet edible petal dust optional

Instructions
 

Cookies

  • Preheat the oven to 325ºF (165ºC). Line two cookie sheets with parchment paper.
  • In a large bowl, beat the butter, with an electric mixer at medium speed, until smooth and creamy. Add 1/2 cup (60g)of powdered sugar, the vanilla and salt. Beat until pale and fluffy.
  • In a separate medium-sized bowl, combine the flour and pecans. Gradually add the flour and pecan mixture to the butter mixture, beating on low speed until combined.
  • Shape the dough into scant 1-inch balls. Place the balls about 2 inches apart onto the prepared cookie sheets. Bake until light golden brown, about 17-20 minutes.
  • Place the remaining 1/2 cup (60g) of powdered sugar in a plastic bag. With a spatula, transfer three warm cookies into the bag. Shake gently to coat the cookies with powdered sugar. Transfer them to a cooling rack. Repeat with the remaining cookies.
  • Cool the cookies completely then proceed to the instructions for pastel powdered sugar, depending on which color you have selected.

Pink powdered sugar

  • Process the freeze-dried strawberries or raspberries into a fine powder in a mini food processor.
  • Whisk the freeze-dried berry powder with 1/3 cup (40g) powered sugar together in a small bowl.
  • Transfer the powered sugar mixture to a plastic bag. Place three cookies in the bag and shake gently until coated with the powdered sugar mixture. Transfer the cookies back to the rack and repeat with remaining cookies.

Blue powered sugar

  • Whisk 1/3 cup (40g) powdered sugar and the spriulina powder in a small bowl.
  • Transfer the powered sugar mixture to a plastic bag. Place three cookies in the bag and shake gently until coated with the powdered sugar mixture. Transfer the cookies back to the rack and repeat with the remaining cookies.

Lavender powered sugar

  • Process the freeze-dried blueberries into a fine powder in a mini food processor.
  • Whisk the freeze-dried blueberry powder with 1/3 cup (40g) powered sugar together in a small bowl. Whisk in petal dust for a more vibrant color, if desired.
  • Transfer the powered sugar mixture to a plastic bag. Place three cookies in the bag and shake gently until coated with the powdered sugar mixture. Transfer the cookies back to the rack and repeat with the remaining cookies.

Notes

*The ratios for the pastel powered sugar are approximate. Freeze-dried fruit varies in color. Add more or less to achieve your desired shade.
Keyword cookies

Chocolate Snack Attack Cookies

Fully Loaded Chocolate Snack Attack Cookies by Brownie Mischief

I’ve seen some cookies loaded with add-ins out there, but these extreme cookies just won the title! They’ve got enough chunky, chocolatey, sweet and saltiness to satisfy the most ravenous cookie craving! But, before we even go one step further, I must mention a few disclaimers. I strongly urge you to make sure your fridge is stocked with milk. Please change into your comfiest pants before attempting this recipe. Canceling all plans for the rest of the day is recommended, as a nap may ensue immediately following consumption of these cookies. OK, now that we got that out of the way, let’s jump in with both feet!

Fully Loaded Chocolate Snack Attack Cookies by Brownie Mischief

First we need a moody photo that looks like it was taken in a rustic cabin to emphasize the seriousness of these chocolate cookies. It’s no coincidence that I’m sharing this recipe with you right before Father’s Day. Every Dad I know is an accomplished snacker. Dad will love these cookies for his personal snack stash! Package them up and deliver them to your Pop with a jug of milk or a thermos of coffee. You can probably skip the straw. We all know that Dad is going to chug his milk, but every respectable blog photo of milk must contain a pretty straw.

Fully Loaded Chocolate Snack Attack Cookie Ice Cream Sandwiches by Brownie Mischief

These cookies make amazing ice cream sandwiches, too. Press a scoop of softened vanilla ice cream between two cookies and pop it in the freezer. If you want to make these cookies picture perfect, use a scoop to portion out your dough. This will make them uniform in size and they’ll bake more evenly. Click here to find the scoop I used. For even more visual appeal, don’t crush the pretzels before adding to the cookie dough. Some of them will break when you are mixing them into the dough and this is fine, because the large pieces help make these cookies chunky. This recipe makes eighteen large cookies. That’s one dozen for Dad plus six for you to snack on, because when these babies come out of the oven with their melted chocolate chunks and little pools of caramel, resisting will be impossible! Now it’s cookie time…you’ve got this!

Fully Loaded Chocolate Snack Attack Cookies

Large chunky, sweet and salty chocolate cookies loaded with chocolate chunks, pretzels, caramel, rice cereal and nuts.
Prep Time 15 minutes
Cook Time 15 minutes
Total Time 30 minutes
Course Dessert
Servings 18 cookies

Ingredients
  

  • 2 â…› cups (270g) all purpose flour, sifted
  • ½ cup (45g) dark cocoa powder, sifted
  • ½ teaspoon baking powder
  • ¼ teaspoon baking soda
  • ¼ teaspoon fine sea salt
  • 1 cup (227g) unsalted butter, softened
  • 1 cup (200g) granulated sugar
  • ¼ cup (50g) brown sugar
  • 2 large eggs
  • 1 teaspoon pure vanilla extract
  • 1 ½ cups (213g) semisweet chocolate chunks
  • 1 ½ cup (43g) mini pretzel twists
  • 1 cup (170g) caramel baking bits
  • 1 cup (43g) chocolate rice cereal (I used Cocoa Pebbles)
  • ¾ cup (92g) honey roasted peanuts (or roasted mixed nuts)

Instructions
 

  • Preheat the oven to 350º F (180ºC). Line 2 large baking sheets with parchment paper.
  • In a medium-sized bowl, whisk together the flour, cocoa powder, baking powder, baking soda and salt until well blended.
  • In a large bowl, beat the butter, granulated sugar, and brown sugar together, with an electric mixer at medium speed until pale and fluffy. Add eggs, one at a time, beating until incorporated. Add vanilla and beat until combined. On low speed, mix in the flour mixture just until combined. Stir in the chocolate chunks, pretzels, caramel bits, chocolate rice cereal and peanuts.
  • Scoop 1/4 cup portions of cookie dough and place them about 2 inches apart onto the prepared baking sheets. Bake until set, about 13-15 minutes. Let the cookies cool on cookie sheets for 1 minute before transferring to a cooling rack.

Unicorn Horn Cookie Party Favors

Unicorn Horn Cookie Party Favors by Brownie Mischief

Have you noticed a unicorn or two around lately? The unicorn craze is still going strong and it’s no wonder that unicorns have become so beloved. Unicorns are beautiful, majestic creatures with just the right amount of mystery and elusiveness, and they symbolize the spirit of individuality. So it’s no surprise that so many people, adults and children alike, are clamoring for unicorn-theme parties. If you’re planning a graduation party or a summer birthday party for your unicorn fan, you’ve probably searched the internet for some ideas. Every unicorn party will likely have a unicorn head cake. By the way, does anyone know who the original designer of that cake is? Just wondering. A unicorn party also needs some unicorn treats. Look no further! These Unicorn Horn Cookies make perfect party favors. They’re fun to make and don’t require any special skills. You can also make them ahead which means they’re stress-free!

Unicorn Horn Cookies by Brownie Mischief

I came up with Unicorn Horn Cookies when making a Unicorn Rainbow Milkshake. I had extra cookies left, so I decided to take them up a notch by dunking them in candy melts and adding sprinkles. They looked so festive, that they instantly became official party favors. I designed some unicorn gift tags to go with them and I’ve created a free printable to share with you! Click here for free unicorn gift tag printable. You can find the cookie recipe at the bottom of the Unicorn Rainbow Milkshake post. Click here to find the Unicorn Horn Cookies recipe.

To make Unicorn Horn Cookie Party Favors, you’ll need:

Bake unicorn cookies and cool completely. Place candy melts in a microwaveable container and heat in a microwave at 50% power for 1 minute. Stir and heat for 20 second intervals until melted. If the melted candy is too thick, add melted vegetable shortening a half teaspoon at a time until desired consistency is reached. Dip cookies into melted candy and tap off excess. Place cookies on a tray lined with wax paper. Decorate with sprinkles before the candy sets. Place cookies in refrigerator for a few minutes, until set.

Print unicorn gift tags on card stock. Click here for free unicorn gift tag printable. Cut out desired number of unicorn gift tags. Cut out one extra to use as a pattern. Cut mane, muzzle and ear out of scrapbook paper. Affix with craft glue. (Alternately, you can omit the scrapbook paper step and simply print out the unicorn gift tags and color them with colored pencils or markers.) Punch two holes, about 1/2-inch apart near the top of each gift tag.

Unicorn Gift Tag DIY with Free Printable

Place cookies in treat bags, if using. Tie ribbon onto the lollipop sticks at the base of the cookies. Thread ribbon through the holes of the gift tags and tie into bows.

Unicorn Horn Cookie Party Favors with Free Printable by Brownie Mischief

Unicorn Rainbow Milkshake

Unicorn Rainbow Milkshake by Brownie Mischief

I’ve been dying to try one of those over-the-top milkshakes that have been catching my eye on social media for some time now. Also known as freakshakes, some magnificently indulgent ones can be found in Australia, the UK and New York City. It’s certainly on my bucket list to go meet up with one of those glorious creations in person and dig in! In the meantime, I decided to concoct my humble version here at home, in honor of National Unicorn Day. Yup, unicorns have their own day! Whoever invented celebrating national days, I thank you. It gives me a great excuse to indulge in a delicious treat…not that I need an excuse.

There are so many versions of unicorn milkshakes out there and I love every one of them! In fact, anything that’s unicorn related sets my heart aflutter. The current unicorn craze won’t seem to go away and, as you can imagine, that is just fine by me! One of the cutest unicorn things I’ve seen is my adorable cousin Nicole, scooting around in her fluffy unicorn slippers. Unicorn slippers are a must while drinking a Unicorn Rainbow Milkshake!

To make the Unicorn Rainbow Milkshake, you’ll need:

  • Unicorn Horn Cookie (Recipe below.)
  • Fondant Rainbow Topper (Click here for instructions.)
  • 3 ounces (about 1/2 cup) candy melts in the color of your choice
  • vegetable shortening, melted (about 1 tablespoon)
  • piping bag or squeeze bottle
  • tall glass (24 ounce)
  • rainbow sprinkles
  • 8 ounces vanilla ice cream
  • 1/3 cup milk (any kind)
  • 6 ounces rainbow sherbet
  • cotton candy
  • whipped cream
  • edible gold star glitter (Click here to find glitter.)

Place candy melts in a microwave safe container. Heat in the microwave for 1 minute at 50% power. Stir. Heat in the microwave for 10 second intervals until melted and smooth. If your melted candy melts are too thick, stir in melted shortening a teaspoon at a time until desired consistency is reached. Transfer the melted candy melts to a disposable piping bag or a squeeze bottle. (Alternately, you can use a plastic zip bag.) Place your glass on a rimmed plate or baking sheet. Snip off the tip of the piping bag and drizzle the melted candy along the rim of the glass. Immediately sprinkle on the rainbow sprinkles, before the melted candy sets.

Combine vanilla ice cream and milk in a blender and blend until smooth. Place 3 scoops of rainbow sherbet into your glass. Pour vanilla milkshake over the sherbet scoops in your glass. Top with cotton candy, whipped cream, a Unicorn Horn Cookie, a Fondant Rainbow Topper and a sprinkle of edible gold star glitter. Put on your unicorn slippers and enjoy your unicorn milkshake!

Unicorn Horn Cookie by Brownie Mischief

Unicorn Horn Cookies

Sugar cookies shaped like unicorn horns.
Prep Time 15 minutes
Cook Time 15 minutes
Total Time 11 hours 30 minutes
Course Dessert
Servings 14 cookies (*see note)

Ingredients
  

  • 1 â…“ cups (5.75 ounces) all purpose flour
  • ½ teaspoon baking powder
  • ¼ teaspooon fine sea salt
  • ½ cup (4 ounce stick) unsalted butter, softened
  • ½ cup (2.25 ounces) powdered sugar
  • 1 egg yolk, room temperature
  • ½ teaspoon vanilla extract
  • ¼ teaspoon almond extract
  • 14 4.5-inch skewers or 6-inch lollipop sticks **optional, depending on use
  • 1 can edible gold spray ***I used Wilton Gold Color Mist

Instructions
 

  • In a medium bowl, sift together flour, baking powder and salt. Set aside.
  • In a large bowl, cream butter and sugar with an electric mixer at medium speed until light and fluffy, about 2-3 minutes.
  • Add the egg yolk and extracts. Beat at medium speed until combined.
  • Gradually add the flour mixture, beating at low speed just until combined. Do not over mix.
  • Cover dough with plastic wrap and chill in the refrigerator for 30 minutes.
  • Line 2 large cookie sheets with parchment paper.
  • Form dough into tablespoon size balls. (I used a tablespoon cookie scoop to make them uniform in size.) Form each ball of dough into a log, tapering at one end.
    Unicorn Horn Cookie Tutorial
  • Twist two logs together to form a horn shape. Repeat with remaining logs. Insert skewers or lollipop sticks, if using. Place about 2 inches apart on prepared cookie sheets.
  • Cover with plastic wrap and chill in the refrigerator for 30 minutes.
  • Preheat oven to 350ºF. Bake until golden brown, about 13-15 minutes. Transfer cookies to wire rack to cool.
    Unicorn Horn Cookies Tutorial
  • When cookies have cooled completely, place them on a parchment paper lined work surface. (You can use the same pieces of parchment paper that you baked them on.) If you are using lollipop sticks, you may want to cover the sticks with plastic wrap to keep them clean. Spray with edible gold spray. Let dry. Apply an additional coat of edible gold spray, if desired.

Notes

*This recipe makes about 14 unicorn horn cookies, but if you only need a few, you can roll out the remaining dough and use your favorite cookie cutter to make cookies. The baking time will be a bit less. You can also make as many unicorn horns as you need and freeze the remaining dough for later use.
**To make toppers as shown, use wooden skewers. To make cookie pops, use lollipop sticks.
***Click here to find Wilton Gold Color Mist
Keyword drinks, milkshake

Sparkling Sweetheart Palmiers

Sparkling Sweetheart Palmier Cookies

Crisp, delicate French palmiers, also known as elephant ears, are the perfect ladylike pastries to enjoy with hot cocoa, tea or coffee. There’s certainly no shortage of palmier recipes out there, but if you’re in the mood for simplicity, this is the recipe for you! This version is very easy to make and only requires two ingredients. Puff pastry dough and sparkling sugar, that’s it! Pretty stress-free, right? Since Valentine’s Day is coming soon, I formed the palmiers into hearts, rather than the traditional palm shape. I used some pale pink sparkling sugar that I had on hand, but feel free to use any color you like.

Sparkling Sweetheart Palmier Cookies

These palmier cookies are as delicious as they are lovely. Wouldn’t they be the perfect addition to a bridal or baby shower sweets table? I also envision them as a simple, but elegant Valentine’s Day breakfast or a sweet, homemade Valentine’s Day gift wrapped in tissue paper and ribbon. Most people love receiving sweet treats, I know I do! (Hint…hint…Hubby if you’re reading this!) I hope this simple recipe provides you with a bit of inspiration. I’ll be sharing more heart-shaped inspiration in the days ahead, so stop by again soon!

Sparkling Sweetheart Palmier Cookies

Sparkling Sweetheart Palmiers

by Mari Vasseur
Sweet, crisp, flaky puff pastry cookies.
Prep Time 15 minutes
Cook Time 15 minutes
Total Time 1 hour
Course Dessert
Servings 28 palmiers

Ingredients
  

  • 1 1 lb. (454g) package (two sheets) frozen puff pastry, thawed
  • ½ cup (100g) sparkling sugar, divided

Instructions
 

  • Sprinkle 2 tablespoons (25g) of sparkling sugar on your work surface. Place 1 puff pastry sheet on the sugared surface. Sprinkle evenly with 2 tablespoons (25g)of sparkling sugar. Roll gently with a rolling pin, pressing the sugar into the dough.
    Sparkling Sweetheart Palmier Tutorial
  • Roll the short ends of the puff pastry sheet in towards the center, jelly roll style, leaving a 1-inch gap in the center. Repeat the steps with the remaining puff pastry sheet. Transfer the puff pastry rolls to a tray. Cover with plastic wrap and chill in the refrigerator for 30 minutes.
  • Preheat the oven to 400°F (205ºC). Line 2 large baking sheets with parchment paper.
  • Slice each roll into 1/2-inch slices. Place the slices 2 inches apart onto the prepared baking sheets, cut side down, forming into heart shapes. Sprinkle any remaining sparkling sugar over the hearts.
    Sparkling Sweetheart Palmiers Tutorial
  • Bake until 15-17 minutes, until golden brown. Transfer to a cooling rack to cool before serving.

Notes

Palmiers are best served the day they are made. Store in an airtight container for up to a few days.