Dainty pink sparkly cookies are for fairies, princesses and charming people who love pretty, petite treats. These pink shortbread hearts are as cute as a button and so tender and delicious. They’re very simple to make and go perfectly with tea or lemonade. They also make a nice gift for Mother’s Day, baby showers, and especially for Valentine’s Day and Galentine celebrations.
Dainty Pink Shortbread Hearts
by Mari Vasseur
Tender, buttery mini shortbread cookies with sparkling sugar
In a medium-sized bowl, whisk the flour and powdered sugar together until well blended.
In a large bowl, beat the butter, with an electric mixer on medium speed, until pale and fluffy. Beat in the extracts until well combined. Add the flour mixture and beat just until incorporated. The dough may seem crumbly at first, but it will come together.
Divide the dough into 2 portions. Roll the dough between 2 sheets of parchment paper to 1/4-inch thickness. Place the parchment-covered dough onto trays and chill in the refrigerator for at least 1 hour or up to overnight.
Preheat the oven to 350ºF (180ºC). Line 2 cookie sheets with parchment paper.
Cut out 36 heart shapes with a 1 1/2-inch cookie cutter. Place the hearts about 2 inches apart onto the cookie sheets. Sprinkle the cookies with sparkling sugar. Bake until the edges start to turn light golden brown, about 8-9 minutes. Transfer the cookies to a cooling rack.
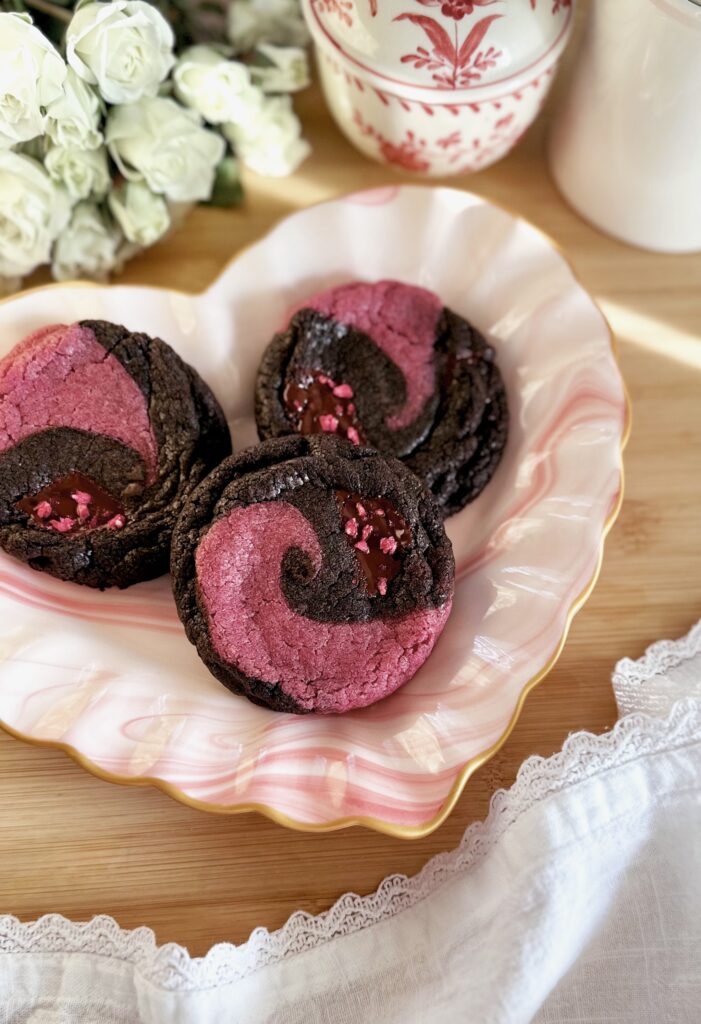
Since it’s getting close to Valentine’s Day, I created these beautiful, enchanting cookies using flavors which evoke love and romance. Rich, pleasantly bitter dark chocolate and sweet, tart raspberries are a perfectly balanced, elegant combination. I used freeze-dried raspberries in the cookie dough for the most bright, pure raspberry flavor. The raspberries turn the cookie dough a mauve-red color, but if you want a more intense red, you can add a drop or two of red gel good coloring.
Dark Chocolate Raspberry Swirl Cookies
Beautiful, enchantingly delicious cookies made of rich dark chocolate cookie dough with dark chocolate pieces, swirled together with sweet-tart raspberry cookie dough by Brownie Mischief
13.5-4 ounce (99-113g)dark chocolate bar, chopped into pieces & divided
Instructions
Line two large cookie sheets with parchment paper.
Set aside 5 freeze-dried raspberries. Process the remaining raspberries into a powder in a small food processor or a clean spice grinder. Pass the powder through a fine sieve to remove the seeds. Coarsely crush the 5 reserved freeze-dried raspberries.
In a medium-sized bowl, whisk together the flour, salt, baking powder and baking soda until well blended.
In a large bowl, beat the butter, brown sugar and granulated sugar together until pale and fluffy. Beat in the egg, egg yolk and vanilla extract in three separate additions, making sure each one is incorporated before adding the next. Stir in the flour mixture just until combined.
Transfer 1/3 of the cookie dough (about 275g), to a medium-sized bowl, using a kitchen scale for accuracy. Mix the freeze-dried raspberry powder and the food coloring into the smaller portion of cookie dough. Mix the cocoa powder into the larger portion of cookie dough. Set aside 16 of the larger pieces of chocolate. Mix the remaining pieces of chocolate into the chocolate dough.
Divide the raspberry cookie dough into 16 equal portions, about 1 tablespoon each. Divide the chocolate cookie dough into 32 equal portions. Roll all of the cookie dough portions into balls. Divide the dough balls into 16 groups of 1 raspberry dough ball with 2 chocolate dough balls. Place a group of 3 dough balls on the palm of your hand. Place your other palm on the dough balls and roll in a circular motion until the doughs are swirled together. Place the swirled dough balls on the cookie sheet at least 3 inches apart. Top each one with a piece of reserved chocolate. Chill in the refrigerator for 20 minutes. Meanwhile, preheat the oven to 350ºF (180ºC).
Bake the cookies until the tops are set and start to puff, about 10-12 minutes. The cookies will spread a bit. Remove the cookies form the oven. Immediately use a large round cookie cutter to shape the hot cookies by sliding it around each one in a circular motion a couple of times. Work quickly before the cookies set. Cool the cookies on the cookie sheet for 3 minutes, then transfer them to a cooling rack. Sprinkle the crushed freeze-dried raspberries onto the melted chocolate on each cookie.
Notes
Make sure to use freeze-dried fruit, not dried fruit. I purchased my freeze-dried raspberries at Trader Joe's. They are also available at large grocery stores or online. Aluminum cookie sheet pans will give you the most success when baking cookies. We used them in culinary school and many bakeries use them. To find my favorite sheet pan for cookies, click here.To find the gel food coloring I used, click here.
My personal eating philosophy is to eat everything in moderation. As you may know, I love enjoying desserts on occasion, but in my daily life I try to eat a variety of foods, mostly plants. One of my favorite plant foods, which happen to be loaded with antioxidants, are blueberries. Wild blueberries are especially rich in antioxidants. Wild blueberry season is during the summer, but luckily the frozen ones are available year around. I can happily eat a handful of blueberries, but it’s so much fun to make blueberry recipes too! I reached for my bag of frozen wild blueberries to make this subtly sweet breakfast cake. It reminds me of blueberry muffins or fluffy blueberry pancakes. For this recipe, I topped the cake with whipped cream and homemade Blueberry Maple Syrup, which is perfect for a weekend breakfast or brunch. For a more simple, cozy breakfast, try this cake served warm with butter and maple syrup. So delicious and comforting!
Wild Blueberry & Maple Breakfast Cake
Subtly sweet, rustic wild blueberry and maple cake, topped with whipped cream and homemade blueberry maple syrup by Brownie Mischief
2teaspoons pure maple extract or natural maple flavoring
½cup (118ml)whole milk, room temperature
⅓cup (75g)sour cream, room temperature
1cup (142g)wild blueberries, fresh or frozenSee note below*
Blueberry Maple Syrup
1cup (142g)wild blueberries, fresh or frozen
¼cup (60ml)real maple syrup
1pinchfine sea salt
⅓ cup (78ml) plus 1 tablespoon (15ml)water, divided
2teaspoonscornstarch
Sweetened Whipped Cream
¾cup (177ml)cold heavy whipping cream
2tablespoons (15g)powdered sugar, sifted
¼teaspoonpure vanilla extract
Instructions
Cake
Preheat the oven to 350ºF (180ºC). Line the bottom of an 8-inch square cake pan with parchment paper. Grease and flour the insides.
In a medium-sized bowl, whisk together the flour, baking powder, salt, cinnamon and nutmeg until well blended.
In a large bowl, beat the butter, brown sugar and granulated sugar together, with an electric mixer on medium speed, until pale and fluffy. Beat in the eggs and maple extract in three additions, making sure each one is incorporated before adding the next.
In a small bowl, whisk together the milk and sour cream until well blended. Stir the flour mixture into the batter by hand, in two additions, followed by half of the milk mixture after each addition. Mix just until combined. Do not over mix. Gently stir in the blueberries.
Transfer the batter to the prepared cake pan. Smooth the top with a spatula. Bake until a toothpick inserted into the center comes out clean, about 25-30 minutes. Do not over bake. Let the cake cool in the pan for 10 minutes, then remove the cake from the pan and transfer it to a cooling rack. Serve warm or at room temperature.
Blueberry Maple Syrup
In a small saucepan over medium heat, cook the blueberries, maple syrup, salt and 1/3 cup (78ml) of water until the blueberries are softened, about 3-4 minutes. In a small bowl, create a slurry by whisking together the cornstarch with the remaining 1 tablespoon (15ml) of water. Stir the slurry into the blueberry mixture. Continue cooking and stirring until thickened, about 1-2 more minutes. Remove from heat and set aside to cool.
Sweetened Whipped Cream
In a large bowl, whip the heavy whipping cream, with an electric mixer at medium speed, until frothy. Add the powdered sugar and vanilla. Continue whipping, at medium-high speed, until medium peaks form. Do not over whip. Cover and refrigerate until ready to use.
Notes
*If you're using frozen blueberries, there's no need to defrost them first. Just gently pat them dry with paper towels before adding them to your batter. If your blueberries are very icy, rinse them with cold water, then gently pat them dry with paper towels.
Chocolate is the most popular cake flavor, so there’s no doubt that Chocolate Cake Cookies would be well-loved also. These cookies are so tempting that they’ll be the most popular cookies on your cookie platter. These soft, rich cookies have the elements we all love about chocolate cake, without the cake mix. The perfectly silky, smooth chocolate buttercream makes them absolutely delicious! They look so festive and nostalgic with sprinkles on top. They remind me of the popular grocery store cookies, but better. Make sure to make a pot of coffee or grab a jug of milk to enjoy with these chocolatey treats.
Chocolate Cake Cookies
Mari Vasseur
Soft, rich chocolate cookies with silky, smooth chocolate frosting
⅔cup (60g)unsweetened Dutch process cocoa powder, sifted
1teaspoonbaking powder
½ teaspoonfine sea salt
1cup (227g)unsalted butter, softened
1 ¼cups (250g)granulated sugar
2largeeggsroom temperature
2teaspoonspure vanilla extract
sprinklesoptional
Chocolate Buttercream Frosting
¼cup (74ml)maple syrup
2tablespoons (30ml)water
¼cup plus 2 tablespoons (34g)Dutch process unsweetened cocoa powder, sifted
4ounces (113g)bittersweet 70-72%) or semisweet chocolate, choppedsee note below*
10tablespoons (142g)unsalted butter, softened
⅔cup (80g)powdered sugar, sifted
1pinchfine sea salt
Instructions
Cookies
In a medium-sized bowl, whisk together the all purpose flour, cake flour, cocoa powder, baking powder and salt until well blended.
In a large bowl, beat the butter and sugar together, with an electric mixer at medium speed, until light and fluffy. Beat in the eggs and vanilla extract in 3 separate additions, making sure each one is incorporated before adding the next. On low speed, or by hand, stir in the flour mixture just until combined. Refrigerate the dough just until it's easier to work with, about 10-15 minutes.
Meanwhile, preheat the oven to 350ºF. (180ºC). Line 2 large cookie sheets with parchment paper.
Divide the cookie dough into 24 portions, about 2 tablespoons (35g) each. (I used a #30 portion scoop.**) Roll them into 1 1/2-inch balls. Place the cookie dough balls onto the baking sheets about 3 inches apart. Bake until the cookies are puffed and start to darken around the edges, about 9-11 minutes. Do not over bake. Let the cookies cool on the baking sheet for 1 minute, then transfer them to a cooling rack.
Chocolate Frosting
In a small saucepan over low heat, whisk together the maple syrup, water, and cocoa powder until smooth. Remove from heat and set aside to cool to room temperature.
Melt the chocolate in a medium-sized bowl set over a pan of barely simmering water, making sure the water doesn't touch the bottom of the bowl. Stir gently until smooth. Remove from heat and set aside to cool to lukewarm.
In a large bowl, beat the butter, with an electric mixer at medium speed, until smooth and pale. Add the powdered sugar and salt and continue beating until smooth and well blended.
Gradually add the cooled maple syrup mixture and beat on low speed until combined. Stir in the melted chocolate until well combined. Smooth out any air bubbles by stirring gently with a rubber spatula.
Frost the cooled cookies. Top with sprinkles if desired.
Notes
*For the smoothest results, use chopped bar chocolate for your frosting and make sure the chocolate is completely melted. Do not use chocolate chips. They contain an ingredient which prevents them from melting completely and may make your frosting lumpy.**To find the portion scoop I used, click here.
Sometimes when I imagine a recipe idea, it takes a few tries to get it right. Then, when I finally achieve what I imagined, it’s satisfying to enjoy and share my creation. In this case, I was craving big, soft, buttery ginger cookies, not necessarily gingerbread cookies though. I wanted them to have crisp, golden brown edges with soft, chewy centers. These cookies hit the mark with the warm combination of spices, the rich nuttiness of the brown butter and just a touch of molasses. Baking the cookies until almost done, then letting them finish baking on the baking sheet gives them the perfect texture. They will spread, but don’t panic. Grab a large round cookie cutter or a small bowl and slide it around each hot cookie on the cookie sheet to shape them into perfectly round, cracked, bumpy beauties.
These cookies keep their soft texture for days, so they’re perfect for gift giving. Store them in a covered container at room temperature. You can also make the dough the day before, roll the cookies into balls, cover and refrigerate until ready to use. So helpful during the holidays.
Brown Butter Ginger Spice Cookies
Big, soft ginger spice cookies with crisp, buttery edges
¼ cup plus 2 tablespoons (75g)granulated sugar, divided
1largeegg
2largeegg yolks
1 ½teaspoonspure vanilla extract
1tablespoon (15ml)unsulphured molasses
Instructions
In a medium-size light-colored saucepan over medium heat, melt the butter and cook until it's deep golden and fragrant. When brown specks start to appear, remove it from the heat and immediately transfer the butter with the brown specks to a small bowl. Let it sit until it reaches room temperature, then refrigerate it until firm. (I like to do this step the day before.)
Line two large cookie sheets with parchment paper. In a medium-size bowl, whisk together the flour, ginger, cinnamon, baking powder, baking soda, salt, nutmeg, cloves and star anise until well blended.
In a large bowl, beat the brown butter, brown sugar and 1/4 cup (50g) of the granulated sugar, with an electric mixer at medium speed, until pale and creamy. Beat in the egg and the egg yolks in 3 separate additions, making sure each one is incorporated before adding the next. Beat in the vanilla extract until combined followed by the molasses. Stir in the flour mixture by hand.
If your cookie dough is very soft, refrigerate it until it's easier to work with, about 15-20 minutes. Meanwhile, preheat the oven to 350ºF (180ºC). Place the remaining 2 tablespoons (25g) of granulated sugar into a small shallow bowl. Divide the cookie dough into 16 equal portions, about a generous 2 1/2 tablespoons each. I used a #24 portion scoop.* Roll the portions into balls, then roll the balls into the granulated sugar, coating them all over. Place the cookies at least 3 inches apart onto the cookie sheets.
Bake the cookies until the edges are golden brown and the centers are still a bit pale but no longer shiny and just beginning to crack a bit, about 10-12 minutes. The cookies will spread. Remove the cookies from the oven. Immediately use a large round cookie cutter to shape the hot cookies by sliding it around each one in a circular motion a couple of times. Work quickly before the cookies set. Cool the cookies on the cookie sheet for 5 minutes, then transfer them to a cooling rack
This subtly sweet, perfectly spiced, soft pumpkin cake, with a touch of honey, is perfect for those autumn pumpkin-spice cravings. The delicious honey butter glaze gives this cake the perfect balance and helps to keep it moist for days. The recipe is easy enough to make as a breakfast cake, but elegant enough for afternoon tea. I decorated my cake, fairy-style, with edible flowers and roasted, salted pumpkin seeds. It’s also delicious served with dollops of whipped cream.
Honey Butter Pumpkin Cake
by Mari Vasseur
Subtly sweet and perfectly spiced soft, moist single layer pumpkin cake topped with honey butter glaze
⅔cup (150ml)avocado oil or neutral oil of your choice
2tablespoons (42g)honey
1 ½teaspoons pure vanilla extract
1cup (227g)canned pure pumpkin puréenot pie filling
Honey Butter Glaze
¼cup (57g)unsalted butter
2tablespoons (30ml)orange juice
2tablespoons (42g)honey
½cup (60g)powdered sugar
⅛ teaspoonfine sea saltor to taste
Instructions
Pumpkin Cake
Preheat the oven to 325ºF (165ºC). Line the bottom of an 8-inch cake pan with parchment paper. Grease and flour the insides.
In a medium-sized bowl, whisk together the flour, baking powder, baking soda, salt, cinnamon, ginger and nutmeg until well blended.
In a large bowl, beat the sugar, oil, honey, eggs and vanilla, with an electric mixer at medium speed, until smooth and well blended, Beat in the pumpkin purée. Stir in the flour mixture by hand, just until combined.
Transfer the batter to the prepared cake pan. Bake until a toothpick inserted into the center of the cake comes out clean, about 33-40 minutes. Do not over bake. Cool the cake in the pan for 10-12 minutes. Remove the cake from the pan and transfer to a cooling rack.
Honey Butter Glaze
In a medium-sized saucepan, melt the butter over medium-low heat. Whisk in the orange juice, powdered sugar and salt until smooth and well blended. Add additional salt to taste if desired. Brush the glaze generously over the warm cake.
These buttery, lightly spiced apple cookies with candied walnuts remind me of snacking on fresh walnuts from the tree in my grandma’s garden. Walnuts are delicious right out of the shell but even better toasted and simply irresistible when they’re candied. I always wanted to add my favorite candied walnuts into a cookie, and these apple cookies were the perfect choice. The apples are cooked on the stovetop briefly which adds flavor and helps to prevent soggy spots in the cookies while keeping the crisp edges and soft centers They also make your kitchen smell like the flavors of autumn.
Candied Walnut Apple Cookies
Fresh apple cookies with crisp, buttery edges and soft centers, studded with candied walnuts
Line a baking sheet with parchment paper. In a medium-size non-stick skillet, cook the sugar, water, cinnamon and salt until melted, about 1 minute. Stir in the vanilla and walnuts. Cook until the liquid is evaporated and the walnuts start to caramelize, about 2-4 minutes.
Spread the walnuts out in a single layer onto the baking sheet. Allow to cool completely. Coarsely chop enough walnuts to equal 3/4 cup (80g). These will be stirred into the cookie dough. Reserve the remaining walnut halves for the tops of the cookies,
Cooked Apples
Melt the butter in small skillet over medium heat. When the butter starts to bubble, add the apples, sugar, cinnamon. Cook, stirring occasionally, until the apples are tender, about 3-5 minutes.
Remove the apples from heat and let cool completely. Drain any excess liquid from the cooled apples.
Cookies
In a medium-sized bowl, whisk together the flour, baking soda, salt, cinnamon and nutmeg until well blended.
In a large bowl, beat the butter, brown sugar and granulated sugar, with an electric mixer at medium speed, or by hand, until light and fluffy. Beat in the egg, egg yolk and vanilla extract, one at a time, until well blended. Stir in the flour mixture just until combined. Stir in the cooled apples and 3/4 cup of the candied walnuts.
If your dough is soft, chill it in the refrigerator until it's easier to work with, about 15-20 minutes. Divide the dough into 14 equal golf ball-size portions, about 1 1/2 oz (43g) each. Roll them into balls and chill in the refrigerator for 1 hour.
Preheat the oven to 350ºF (180ºC). Line 2 large cookie sheets with parchment paper. Place the dough balls at least 3 inches apart onto the cookies sheets. Top with candied walnut halves.
Bake until the tops of the cookies are set and the edges are golden brown, about 12-14 minutes. The cookies will spread a bit. Remove the cookies from the oven. Immediately use a large round cookie cutter to shape the hot cookies by sliding it around each one in a circular motion a couple of times. Cool on the cookie sheet for 3 minutes, then transfer to a cooling rack.
If you love the flavors of chocolate and bananas together, these Caramel Pecan Banana Brownies are for you! These rich, fudgy brownies are the perfect decadent chocolate-banana dessert. The addition of caramel, pecans and sea salt gives them texture and balance. This recipe was a challenge to create because, while adding bananas to a brownie recipe does add moisture, it can also give the brownies a cake-like texture. That’s desirable in banana bread, but for brownies, most of us love a traditional fudgy texture. I solved that issue and I’m excited to share this fudgy, gooey Banana Brownie recipe with you!
These brownies are on the sweeter side, so I like adding dark chocolate chips or a combination of dark and semisweet chocolate chips. Adding the nuts to the top of the batter, rather than stirring them in, gives them a toasty flavor and helps maintain their crunch. An optional sprinkle of flaky sea salt adds the perfect finishing touch. They’re TDF served warm with a scoop of vanilla ice cream.
Caramel Pecan Banana Brownies
Fudgy banana brownies with chocolate chips, topped with pecans, caramel and sea salt
2tablespoons (30ml)avocado oil or neutral oil of your choice
1cup (200g)packed brown sugar
½teaspoonfine sea salt
2 largeeggs
1largeegg yolk
1 ½teaspoons pure vanilla extract
½cup (45g)unsweetened cocoa powder, sifted
¼teaspooncinnamon
½cup (125g)mashed very ripe bananasabout 1 medium banana
½cup (65g)all purpose flour
1cup (170g)dark or semisweet chocolate chipsor a combination of both
½cup (55g)pecan halves or pieces
Caramel sauce, purchased or homemade
Flaky sea saltoptional but recommended
Instructions
Preheat the oven to 325ºF (165ºC). Line an 8-inch square baking pan with parchment paper, leaving a couple of inches of overhang.
In a medium-size light-colored saucepan over medium heat, melt the butter and cook until it's deep golden and fragrant. When brown specks start to appear, remove it from the heat and immediately transfer the butter with the brown specks to a large bowl. Stir in the brown sugar and salt until well combined.
Add the eggs and vanilla and whisk until well blended and most of the brown sugar is dissolved. Mix in the cocoa powder and cinnamon until thoroughly combined. Stir in the mashed bananas. Mix in the flour, just until combined. Stir in the chocolate chips.
Transfer the batter to the prepared baking pan. Arrange the pecan halves on top of the batter or if you're using pecan pieces, sprinkle them evenly on top of the batter. Bake until a toothpick inserted into the center of the brownies comes out with a few moist crumbs attached, about 20-25 minutes. (If you hit a melted chocolate chip with the toothpick, test again in a different spot.) Do not over bake!
Let the brownies cool in the pan. Remove the cooled brownies from the pan and drizzle with caramel sauce. Sprinkle with flaky sea salt, if desired.
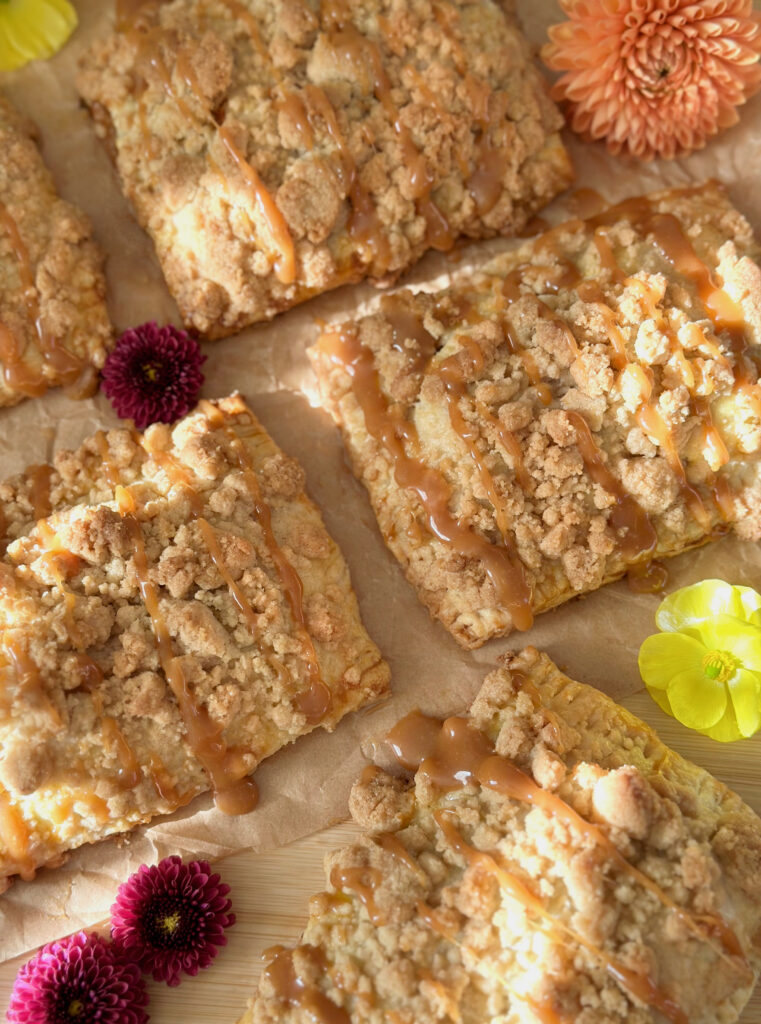
Fresh apples + flaky pie crust + buttery streusel topping + caramel drizzle = a heavenly combination of autumn flavors, textures and aromas in one handheld treat. These Caramel Apple Crumble Hand Pies are irresistible and even a little addicting. They’re the perfect bake for a crisp autumn day and they go beautifully with all of the warm, cozy fall drinks from lattes to teas.
With this recipe, I’m sharing an idea I use to fill the pies with even more apples, which is cutting the top crusts a bit larger than the bottom crusts. It’s also helpful to arrange the apples on the crusts by hand which helps to avoid any air pockets.
The buttery crumb topping takes these hand pies to another level. You can add as much or as little of the crumb topping as you like. Typically I say to follow measurements strictly when baking, because it’s an exact science, but with this streusel crumb topping, go ahead and measure with your heart when topping your hand pies.
Caramel Apple Crumble Hand Pies
Fresh apple hand pies with buttery streusel crumb topping and caramel drizzle
3 1/2-4cups (14 oz or 397g)peeled, sliced applesSee notes below*
2teaspoonslemon juice
1tablespoon (14g)butter
6tablespoons (75g)packed brown sugar
2teaspoons (20g)cornstarch
¾teaspooncinnamon
⅛teaspoonfine sea salt
1tablespoon (15ml)apple cider or apple juice
Crumb Topping
¾cup (96g)all purpose flour
¼cup (50g)granulated sugar
2tablespoons (25g)packed brown sugar
¼teaspooncinnamon
1pinchfine sea salt
¼cupcold, unsalted butter, cubed
Assembly
1 ½tablespoons (21g)butter, softened
egg wash1 egg yolk beaten with 2 teaspoons of water
caramel saucestore bought or homemade**
Instructions
Pie Crust
In a large bowl, whisk together the flour, granulated sugar and salt. Work in the shortening with your fingertips until it's evenly dispersed. Work in the butter until flat dime-sized pieces are formed.
In a small bowl, combine the ice water and vinegar. Sprinkle the ice water mixture over the flour mixture a little at a time and stir just until the dough comes together. You may not need all of the liquid, depending on your climate. Turn the dough out onto a lightly floured surface. Fold the dough over onto itself a couple of times. Do not overwork the dough! Divide the dough into 2 equal portions and form the portions into 1/2-inch thick rectangular blocks. Wrap them with plastic wrap and refrigerate for at least 2 hours or up to overnight.
Apple Filling
In a small bowl whisk the apple juice together with the cornstarch. Set aside. Toss the apples and lemon juice together in a large bowl. Melt the butter in a large skillet over medium heat. When the butter is melted and starts to sizzle add the apples, brown sugar, cinnamon, and salt. Stir gently until well combined. Cook until the sugar melts and the mixture starts to bubble. Turn the heat down to medium-low and simmer until the apples soften a bit, about 2-3 minutes. Stir in the cornstarch mixture. Continue cooking until the sauce thickens, about 2 minutes. Transfer the contents of the pan to a bowl and set aside to cool to room temperature, about 20 minutes.
Crumb Topping
In a medium-sized bowl, whisk together the flour, sugar, brown sugar, cinnamon and salt until well blended. Work the butter into the flour mixture with your fingertips until it looks sandy with no large pieces of butter remaining. Press the mixture together to form chunks. Set aside in the refrigerator until ready to use.
Assembly
Line a large baking sheet with parchment paper. On a lightly floured surface, roll the dough to 1/8-inch thickness. Cut out 6 rectangles measuring 3 by 4 1/2-inches for the bottoms. Cut out 6 rectangles measuring 3 1/4 by 4 3/4-inches for the tops.
Chill the cut dough rectangles in the refrigerator for 15 minutes. Meanwhile preheat the oven to 375ºF (190ºC). Place the 6 bottom pieces on the baking sheet about 2 inches apart. Brush the perimeter edges of the dough with egg wash. Top with filling to within 1/2 inch of the edges. Pinch off pieces of the softened butter and dot the tops of the filling. Place on the top pieces of dough and press the edges together to seal. Crimp the edges with a fork. Brush the pies with egg wash. Cut a 1/2-inch ventilation slit in the top of each one. Top with crumb topping, pressing it lightly to adhere.
Bake until golden brown, about 20-25 minutes. Let the pies cool on the baking sheet for 5 minutes, then transfer them to a cooling rack. Drizzle the warm or room temperature pies with caramel sauce.
Notes
*Slice the apples about 3/8-inch thick, then cut the slices in half**For my Homemade Caramel Sauce recipe, click here. For my Easy Caramel Sauce recipe, click here. For store bought caramel sauce, click here.
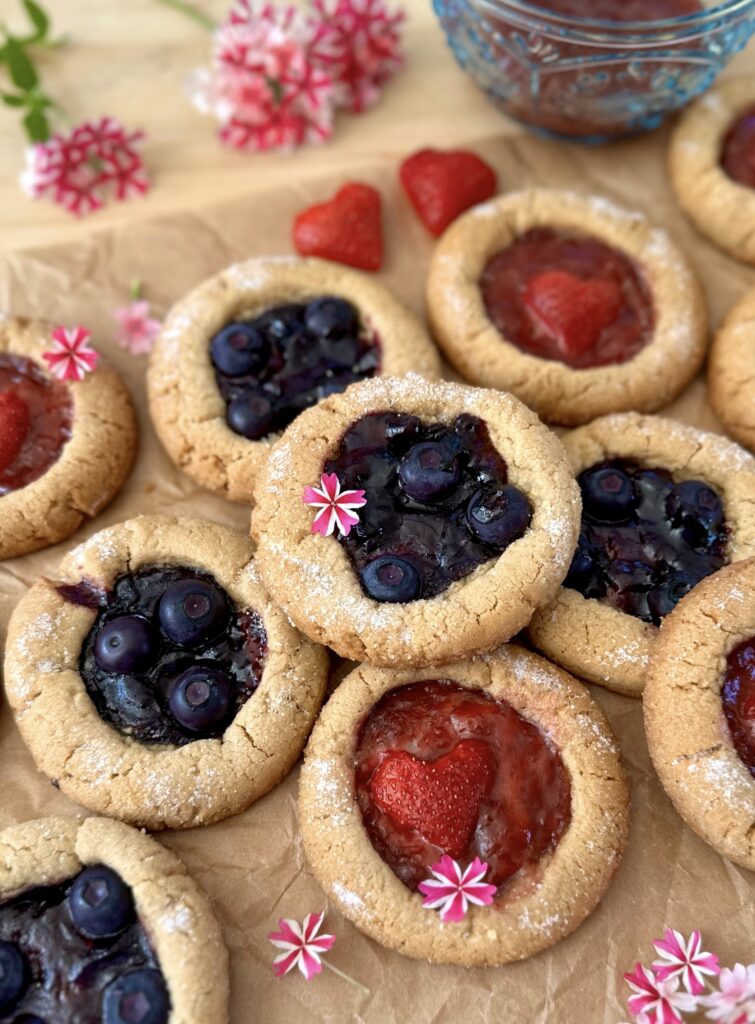
Many of us think of peanut butter & jelly as nostalgic comfort food. It brings back happy memories of childhood. A peanut butter & jelly sandwich in my school lunch box was a welcome favorite in the sandwich rotation. I created my ideal PB & J cookies with those nostalgic flavors in mind. These deluxe jumbo peanut butter cookies are worthy of packing in a grown-up lunch or enjoying as a comforting snack with a tall glass of ice-cold milk or with your favorite coffee drink.
These cookies are a generous 3-inch size, but you can make them smaller if you wish. Keep in mind that the baking time will be shorter for smaller cookies. My favorite way to make these cookies is with blueberry jam and fresh blueberries. The strawberry ones took a few attempts to get right due to the juiciness of the strawberries. The instructions for the strawberry version of these cookies are in the notes below. Feel free to use your favorite jam flavor and have fun experimenting with different fruits or berries.
Bakery-Style PB & J Cookies
Jumbo bakery-style peanut butter cookies filled with jam & fresh fruit
Preheat the oven to 350ºF. Line 2 large cookie sheets with parchment paper.
In a medium-sized bowl, whisk together the all purpose flour, cake flour, baking powder and salt until well blended.
In a large bowl, beat the butter and peanut butter together, with an electric mixer on medium speed, until smooth. Place 2 tablespoons (25g) of the granulated sugar in a small, shallow bowl and set aside. Beat the remaining granulated sugar and the brown sugar into the butter mixture until light and fluffy. Beat in the egg, then the vanilla extract until well incorporated. On low speed, beat in the flour mixture just until combined.
Chill the cookie dough in the refrigerator, just until easier to work with, about 15 minutes. Divide the dough into 12 equal portions, (about 60g each). Form the portions into balls, then roll them in the reserved granulated sugar. Place them about 2 inches apart onto the cookie sheets. Make indentations in each ball using a 1-inch pastry tamper or use your thumbs. Fill each indentation with about a teaspoon of jam, then top with blueberries.
Bake the cookies until the edges start to turn golden brown and the jam begins to bubble, about 14-15 minutes. (The cookies will spread, but if your cookies spread too much, you can shape the hot cookies when they come out of the oven by immediately placing a large round cookie cutter onto the cookie sheet over each cookie and slide it around in a circular motion a couple of times. (Or you can refrigerate the dough balls until firm prior to baking to help reduce spreading.) Let the cookies cool on the cookie sheets for 1 minute, then transfer them to a cooling rack.
Notes
To make the strawberry version of these cookies, replace the blueberry jam with strawberry jam. Optional: Cut out 12 strawberry hearts (as shown in the photo). Place the strawberries in a small bowl. Sprinkle with 1 teaspoon of sugar and let macerate for 20-30 minutes to draw out the excess juices. If you skip this step, the juice from the strawberries may make the centers of your cookies soggy. Drain the strawberries, pat dry, then place them on the cookies with the jam before baking.
These Chocolate Chip Strawberry Shortcakes are Grandma’s classic tender strawberry shortcakes, but with a twist. The addition of chocolate chips makes them extra delicious! Top with a cloud of fresh homemade whipped cream and you’ll have the most delightful dessert to share with family and friends.
Chocolate Chip Strawberry Shortcakes
Soft tender chocolate chip shortcakes topped with fresh sweetened strawberries and homemade whipped cream.
Heavy cream or buttermilkfor the tops of the shortcakes
coarse sugarfor the tops of the shortcakes
Whipped Cream
1cup (237ml)cold heavy whipping cream
½teaspoon pure vanilla extract
2tablespoons (15g)powdered sugar
Instructions
Macerated Strawberries
Stir the strawberries and sugar together. Cover and refrigerate at least 30 minutes or up to a few hours.
Chocolate Chip Shortcakes
Preheat the oven to 375°F (190°C). Line a large baking sheet with parchment paper.
In a large bowl, whisk the flour, sugar, baking powder and salt together until well blended. Work the butter into the flour mixture with a pastry blender or with your fingertips until small pea-size pieces are formed. Stir in the mini chocolate chips.
In a small bowl, whisk the buttermilk and vanilla extract together. Stir this mixture into the dry ingredients just until a shaggy dough forms
Turn the dough out into a lightly floured surface. Fold the dough over into itself a few times. Do not overwork the dough! Form the dough into a 1-inch thick, 6-inch diameter round. Cut out 6 rounds with a 2 3/4-inch floured biscuit cutter. Place them about 2 inches apart on the baking sheet. (It’s important to keep the dough cold. If your kitchen is very warm, freeze the rounds for 5-10 min. before baking.)
Brush the shortcakes with heavy cream & sprinkle with coarse sugar. Bake until golden, about 17-22 minutes. Immediately transfer the shortcakes to a cooling rack. Split the cooled shortcakes and top with strawberries and whipped cream.
Whipped Cream
In a large bowl, mix the heavy cream and vanilla, with an electric mixer on low speed. Sift the powdered sugar into the heavy cream and mix until combined. Turn the speed up to medium-high and beat until medium peaks form. Refrigerate until ready to use.
1 ¼cups (160g)all purpose flour, siftedplus 1 teaspoon for the mini chocolate chips
⅓cup (30g)Dutch process unsweetened dark cocoa powder, sifted
1teaspoon baking powder
½teaspoonbaking soda
½teaspoonfine sea salt
¼teaspooncinnamon
½cup (100g)packed brown sugar
6tablespoons (75g)granulated sugar
½cup (115m)vegetable oil or neutral oil of your choice
2largeeggs
1teaspoonpure vanilla extract
⅓cup (78ml)buttermilk
⅔cup (160g)mashed very ripe bananas(about 2 medium bananas)
½cup (85g)mini semisweet chocolate chips
Maple Espresso Icing
1 ½tablespoons (23ml)maple syrup
2-3tablespoons (30-45ml)heavy cream
1 teaspoonespresso powder
½teaspoonpure maple extract
1cup (120g)powdered sugar, sifted
Instructions
Double Chocolate Banana Bread
Preheat the oven to 350ºF (180ºC). Line the bottom of an 8 x 4-inch or 9 x 5-inch loaf pan with parchment paper. Grease and flour the inside of the baking pan with a mixture of equal parts flour and cocoa powder.
In a medium-size bowl, whisk together the flour, cocoa powder, baking powder, baking soda, salt and cinnamon until well combined.
In a large bowl, whisk together, by hand or with an electric mixer, the brown sugar, granulated sugar, oil, eggs, vanilla and buttermilk until smooth and well blended. Stir in the mashed bananas. Stir in the flour mixture just until combined. In a small bowl, toss the mini chocolate chips with 1 teaspoon of flour, then stir them into the batter.
Transfer the batter to the loaf pan. Bake until a toothpick inserted into the center of the loaf comes out clean, about 45-55 minutes. If you hit melted chocolate chips, insert another toothpick in a different spot. You can also use an instant read thermometer to check for doneness. The internal temperature should be approximately 200ºF (95ºC). Let the banana bread cool in the pan for 15 minutes, then remove it from the pan and transfer it to a cooling rack.
Maple Espresso Icing
In a medium-size bowl, whisk together the maple syrup, 2 tablespoons of cream, the espresso powder and maple extract, until the espresso powder is dissolved. Gradually whisk in the powdered sugar and continue whisking until well combined. Add additional cream until the desired consistency is reached. whisk until smooth. Spread the icing over the top of the cooled loaf.