Pumpkin Cinnamon Mini Muffins

Pumpkin Cinnamon Mini Muffins

My mom had a cupboard in the kitchen containing a few old cookbooks that she rarely used. As a child, I used to enjoy perusing them and looking at the baked treats. Some of the cookbooks were so old, they had black and white photos or even just drawings of the food. The ones with drawings interested me because they often depicted smiling children enjoying the treats.

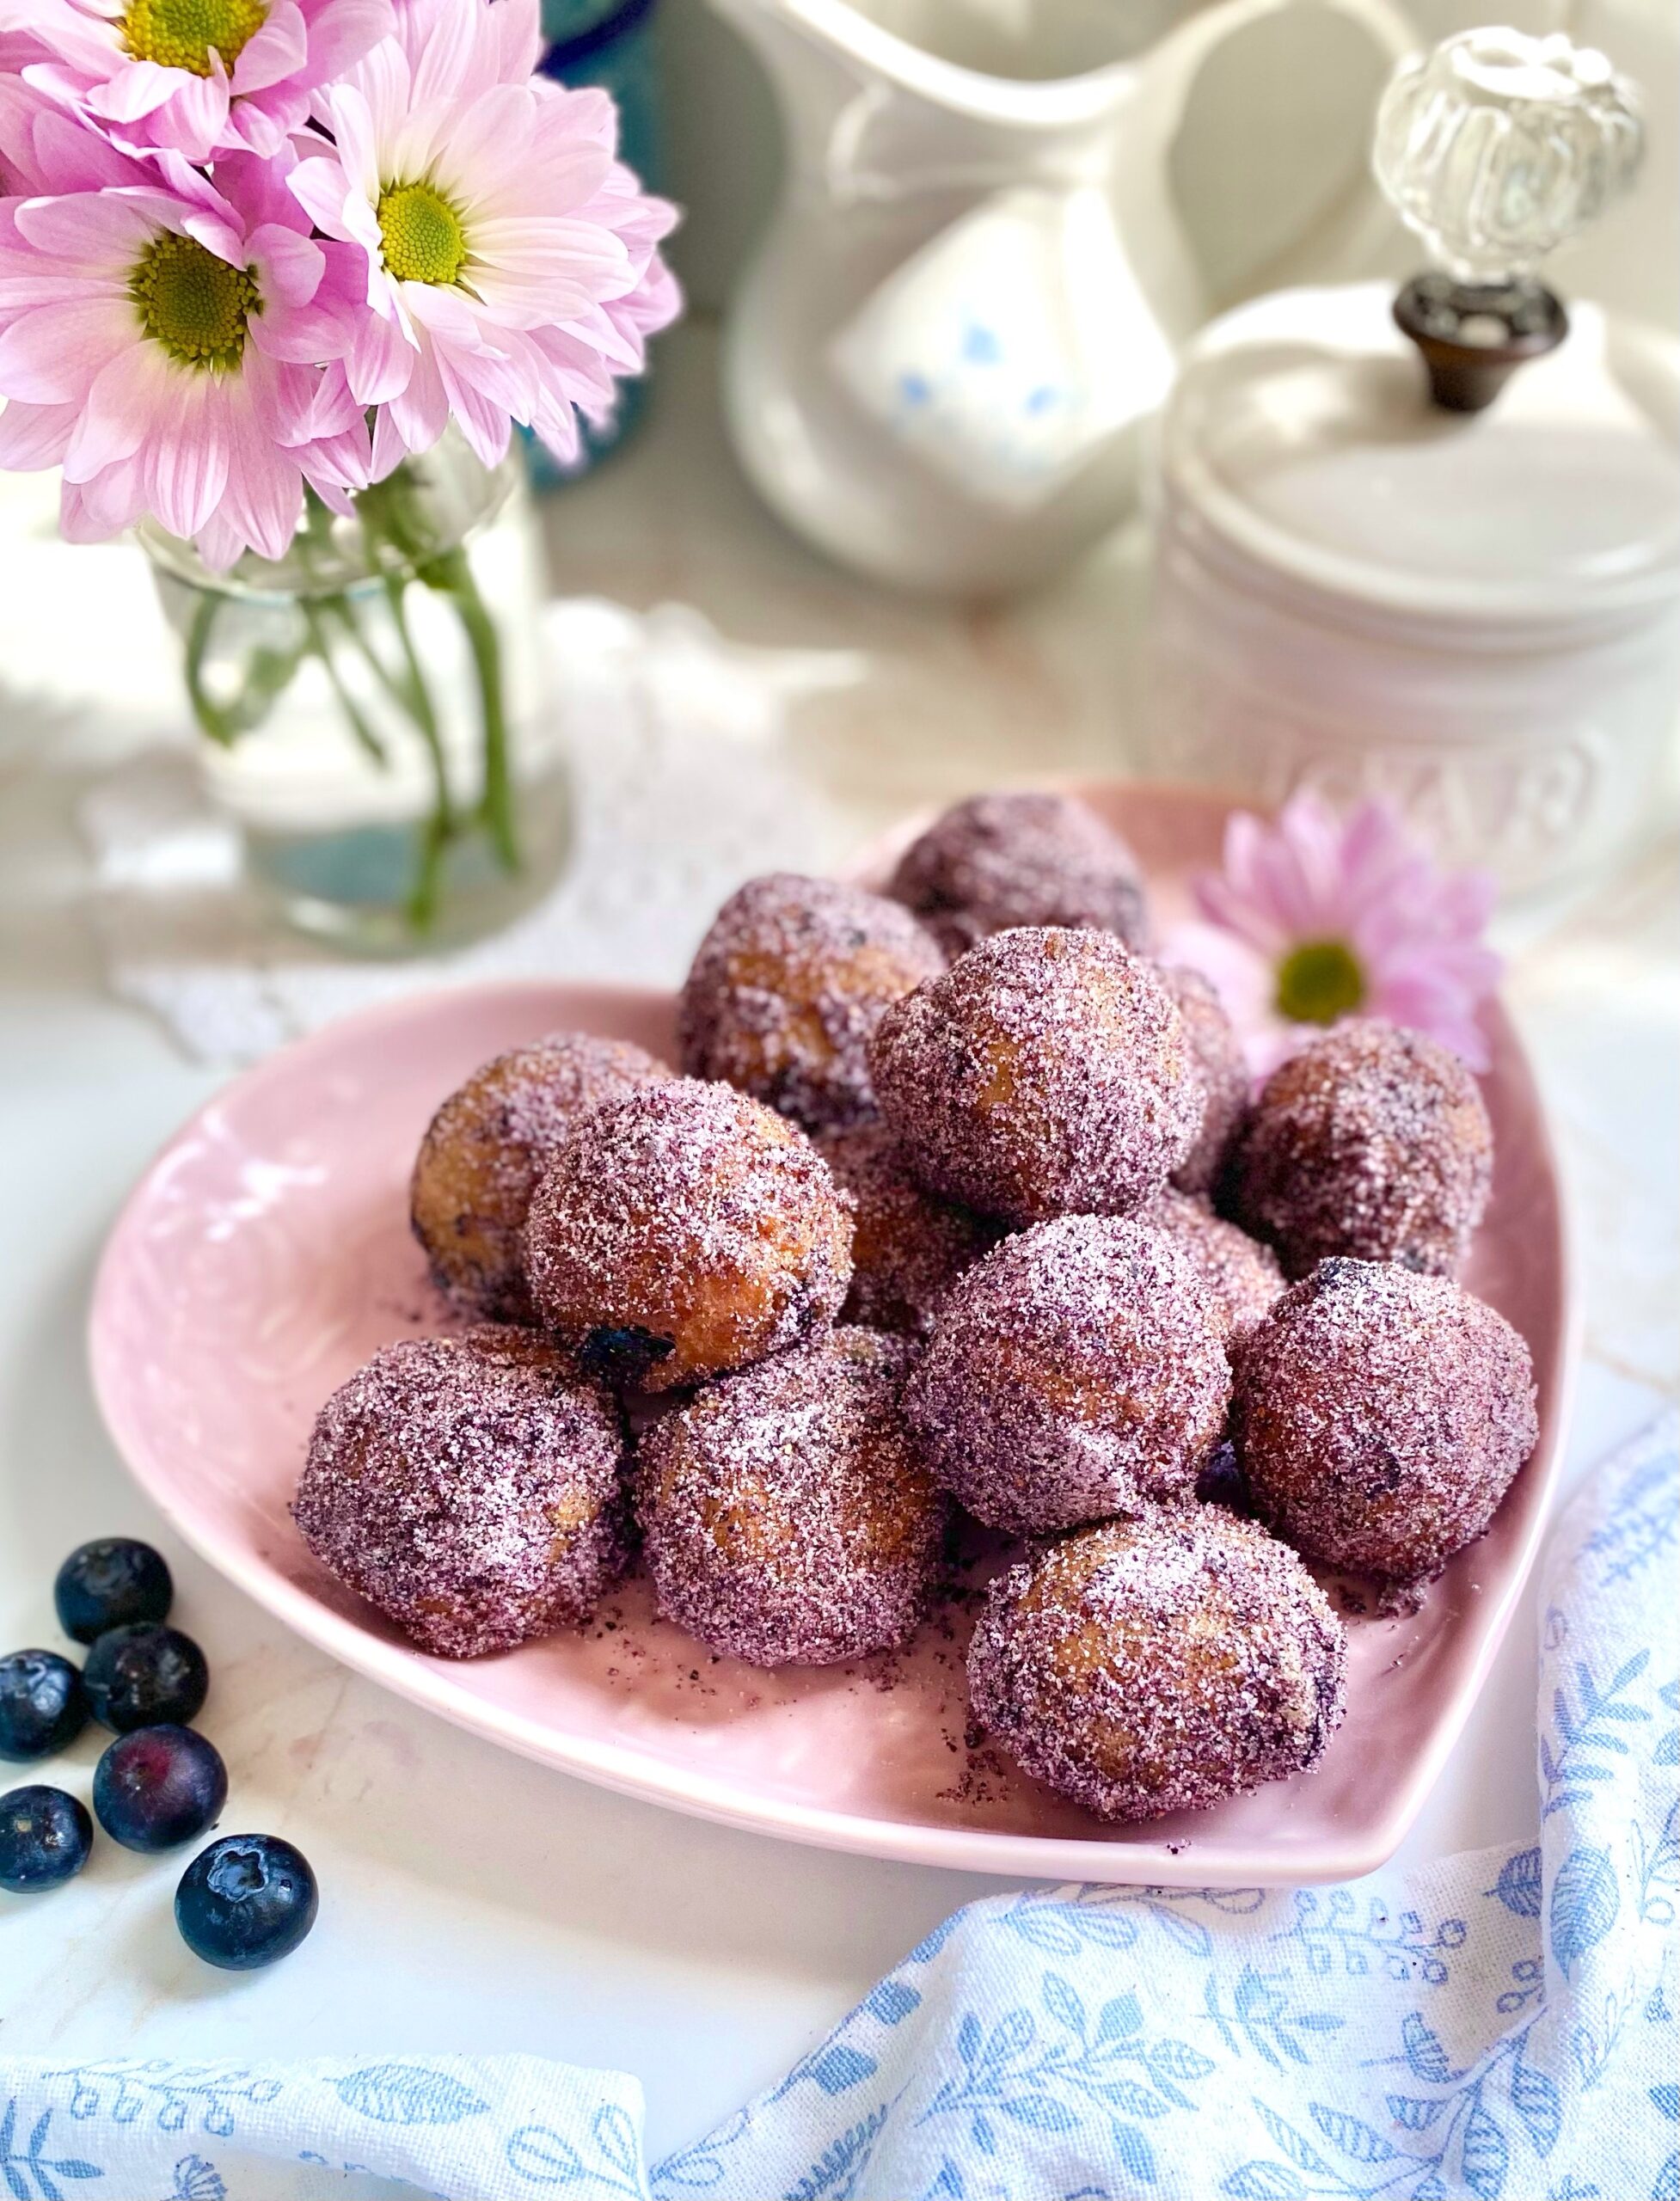
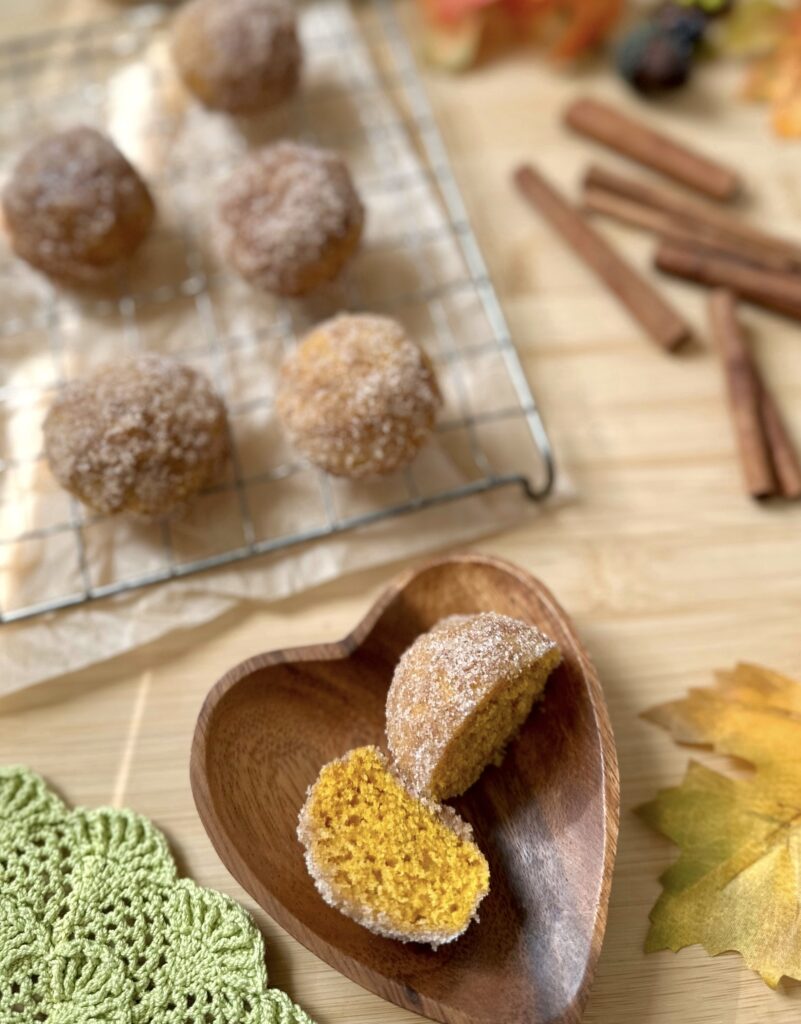
When I started learning to bake, I found a recipe for French Breakfast Puffs in one of those old books. The title sounded so fancy, but they were really just simple muffins dunked in butter and rolled in cinnamon sugar. I have no idea what the name of the cookbook was or what happened to it, but the delicious muffin recipe stuck around for a while. I’ve tweaked the recipe so many times over the years, and most recently, I added pumpkin to it. These Pumpkin Cinnamon Mini Muffins are one of the best versions I’ve created. The inside texture of the muffins is soft and moist and it contrasts nicely with the slight crunch you get from the cinnamon sugar on the outside. They look so cute too, like little pumpkins, and they definitely make children smile!

To watch the Instagram video of these mini muffins being made, click here.

Pumpkin Cinnamon Mini Muffins

Soft, tender pumpkin mini muffins rolled in cinnamon sugar
Course Breakfast, Brunch, Dessert
Servings 22 mini muffins

Ingredients
  

Muffins

  • 1 ½ cups (190g) all purpose flour, sifted
  • 1 ½ teaspoons baking powder
  • ½ teaspoon fine sea salt
  • 1 teaspoon ground cinnamon
  • ½ teaspoon ground ginger
  • ¼ teaspoon ground nutmeg, preferably freshly ground
  • ½ cup (100g) granulated sugar
  • â…“ cup (80ml) vegetable oil or neutral oil of your choice
  • 1 large egg
  • ½ cup (113g) canned pure pumpkin purée Not pie filling

Topping

  • â…” cup (132g) granulated sugar
  • 1 ½ teaspoons ground cinnamon
  • 6 tablespoons (85g) melted butter

Instructions
 

Muffins

  • Preheat the oven to 350ºF (180ºC). Grease and flour a 24-serving mini muffin pan.* Do not use muffin liners. (The muffins need to form an outer crust. This prevents them from absorbing too much melted butter later in the recipe.)
  • In a medium-size bowl, whisk together the flour, baking powder, salt, cinnamon, ginger and nutmeg until well combined.
  • In a large bowl, whisk together the sugar, oil, egg and pumpkin purée until smooth and well combined. Stir in the flour mixture just until combined. The batter will be thick.
  • Transfer the batter to the prepared pan, filling the muffin cups about 2/3 full. (I ended up with 22 muffins.)
  • Bake until toothpick inserted into the muffins comes out clean, about 10-13 minutes. Do not over bake! Be diligent, since over baking can happen very quickly with mini muffins. Let the muffins cool in the pan for 5 minutes. Turn the muffins out and place on a cooling rack.

Topping

  • Whisk the sugar and cinnamon together in a shallow bowl until well combined.
  • Briefly dunk the warm muffins in melted butter, then roll in cinnamon sugar.

Notes

To find the mini muffin pan I used, click here.
Keyword muffins, pumpkin, pumpkin spice

Blueberry Nectarine Cobbler

Many families have an old favorite recipe for cobbler. I’m sharing my dad’s recipe with you and it’s definitely comfort food. It took awhile to get the ingredient amounts right because he never measured them. He used whichever fruit was available and plopped the dough on top haphazardly with a big spoon. But it was always delicious and came from the heart and that’s what mattered.

This recipe is so easy and versatile. Feel free to use peaches instead or use the berries of your choice. Make sure to enjoy it warm with a scoop of vanilla ice cream.


Blueberry Nectarine Cobbler

Vintage fruit cobbler with blueberries & nectarines or peaches
Course Brunch, Dessert
Servings 6

Ingredients
  

  • 6 medium ripe nectarines or peaches, peeled and thickly sliced about 2 1/4 lbs (1 kg)
  • 2 teaspoons lemon juice
  • ½ teaspoon pure vanilla extract
  • â…“ cup (67g) packed brown sugar
  • 1 tablespoon (8g) corn starch
  • ¼ teaspoon ground cinnamon
  • 1 ½ cups (227g) blueberries
  • 1 cup (113g) all purpose flour
  • ½ cup (100g) granulated sugar
  • 1 ½ teaspoons baking powder
  • ¼ teaspoon fine sea salt
  • 5 tablespoons (70g) cold butter, cubed
  • â…“ cup (75g) cold sour cream
  • 1 tablespoon (15ml) cold milk
  • 1 tablespoon (13g) coarse sugar for sprinkling

Instructions
 

  • Preheat the oven to 400ºF (200ºC). Grease a 2 quart baking dish.
  • In a large bowl, toss the nectarines with the lemon juice. Add the vanilla, brown sugar, cornstarch and cinnamon. Stir gently to combine. Fold in the blueberries.
  • Transfer the fruit mixture to the prepared baking dish. Bake for 10 minutes.
  • Meanwhile, in a medium-sized bowl, whisk together the flour, granulated sugar, baking powder and salt until well blended. Work the butter into the flour mixture with your fingertips or with a pastry blender until pea size pieces from. Stir in the sour cream and milk just until a shaggy dough forms.
  • Remove the baking dish from the oven. Top the fruit with 2-tablespoon-sized portions of dough. Sprinkle the dough with coarse sugar.
  • Return the baking dish to the oven and continue baking until the topping is deep golden brown, about 25 minutes. Let cool at least 15 minutes before serving, to allow the sauce to thicken.
Keyword blueberry nectarine, cobbler

Chocolate Turtle Drop Cookies

A chocolate turtle is a confection made with caramel and pecans. The shape resembles a turtle, which is how it got the name. This is my version of a turtle cookie, loaded with plenty of delicious add-ins.

Chocolate Turtle Drop Cookies

Chocolate cookies loaded with chopped chocolate, caramel chips, and toffee bits, topped with pecans.
Course Dessert
Servings 20 cookies

Ingredients
  

  • 2 cups (9 oz or 255g) all purpose flour, sifted
  • ½ cup (1 1/2 oz or 43g) unsweetened cocoa powder, preferably Dutch process
  • ½ teaspoon baking soda
  • ½ teaspoon fine sea salt
  • ½ cup (4 oz or 113g) unsalted butter, softened
  • ½ cup (3 1/2 oz or 100g) granulated sugar
  • ¾ cup 5 1/4 oz or 150g) packed brown sugar
  • 2 large eggs
  • 1 teaspoon pure vanilla extract
  • 1 cup (6 oz or 170g) coarsely chopped dark or semi-sweet chocolate (not chips)
  • 1 cup (6 oz or (170g) caramel chips (not bits)
  • 1 cup (6 oz or 170g) toffee bits or chopped candied pecans
  • 20 pecan halves

Instructions
 

  • Preheat the oven to 350ºF (180ºC). Line two large cookie sheets with parchment paper.
  • In a large bowl, whisk together the flour, cocoa powder, baking soda and salt.
  • In a separate large bowl, cream the butter, granulated sugar and brown sugar together with an electric mixer at medium speed, until light and fluffy.
  • Beat in the eggs and vanilla in three separate additions, making sure each addition is incorporated before adding the next. Beat in the flour mixture just until combined.
  • Set aside 20 chunks of the chopped chocolate. Fold the remaining chopped chocolate, the caramel chips and the toffee bits into the dough.
  • Place twenty 2-inch size portions of dough about 2-inches apart onto the prepared cookie sheets. (I used a #24 portion scoop*)
  • Top each cookie with a chunk of the reserved chocolate and a pecan half. Bake until the surface of the cookies is set, about 10-11 minutes. Let cool on the baking sheet for 1 minute then transfer to a cooling rack.

Notes

To find the portion scoop I used, click here.
Keyword chocolate, cookies

Peaches and Cream Loaf Cake

Every peach season, I get excited by the abundance of peaches at my local farmers market and I end up buying way too many. So if you’re like me and you have ripe peaches sitting on your counter, turn them into peach purée. I love adding peach purée to my iced tea or adding it to desserts like this moist, tender cake. This is one of my most popular cake recipes on social media, and for good reason. It does not disappoint! To watch the TikTok video, click here.

Peaches and Cream Loaf Cake

Moist, tender peach cake with peach cream cheese icing
Course Breakfast, Brunch, Dessert
Servings 1 loaf

Ingredients
  

Cake

  • 1 ¼ cups (5 1/2 ounces) all purpose flour, sifted
  • 1 teaspoon baking powder
  • ½ teaspoon baking soda
  • ½ teaspoon fine sea salt
  • ½ teaspoon ground cinnamon
  • â…› teaspoon ground nutmeg, preferably freshly ground
  • 1 cup (7 ounces) granulated sugar
  • â…” cup vegetable oil or neutral oil of your choice
  • 2 large eggs
  • 1 cup peach purée, divided (About 1 1/3 cups peeled, sliced peaches puréed in a food processor or blender)
  • ½ teaspoon pure vanilla extract
  • â…› teaspoon pure almond extract

Icing

  • 2 tablespoons cream cheese, softened
  • 1 tablespoon unsalted butter, softened
  • 1 cup (4 ounces) powdered sugar, sifted
  • ¼ teaspoon pure vanilla extract
  • pinch fine sea salt
  • 1-2 tablespoons reserved peach puree
  • 2 tablespoons diced peaches

Instructions
 

Cake

  • Preheat oven to 350ºF. Line the bottom of an 8 x 4-inch loaf pan with parchment paper. Grease and flour the sides.
  • In a medium bowl, whisk together flour, baking powder, baking soda, salt, cinnamon and nutmeg.
  • Set aside 2 tablespoons peach purée for icing.
  • In a large bowl, beat sugar, oil, eggs, remaining peach purée and extracts until smooth.
  • Add flour mixture and beat just until combined.
  • Transfer batter to prepared baking pan. Bake until toothpick inserted into center comes out clean, about 38-45 minutes.
  • Let cake cool in pan for 10 minutes, then turn out onto a cooling rack to cool completely. Spread icing on cooled cake.

Icing

  • In a medium bowl, beat cream cheese and butter together until smooth.
  • Add powdered sugar, salt, vanilla extract and 1 tablespoon of peach purée. Beat until smooth. Add additional peach purée, if needed, until desired consistency is reached. Fold in diced peaches.
Keyword cake, peach

Cherry Cutie Pies

Cherry Cutie Pies

Cherry season is highly anticipated at my house. We love enjoying a bowl of fresh cherries during the summer. We also love fresh cherry desserts. These cute little hand pies are a family favorite. They have the most delicious fresh cherry filling, surrounded with buttery, flaky crust and topped with vanilla icing. The small size makes them perfect for sharing or taking them along in a picnic lunch. I like to make the crust and the filling the day before, which makes them come together quicker on baking day. I decorated mine with bright red maraschino cherries for the photo, but my favorite cherries to top them with are Italian-style maraschino cherries.


Cherry Cutie Pies

by Mari Vasseur
3-inch cherry hand pies with flaky crust, topped with vanilla icing
Course Dessert
Cuisine American
Servings 20 hand pies

Ingredients
  

Pie Crust

  • 2 â…” cups (340g) all purpose flour, sifted
  • 2 tablespoons (25g) sugar
  • ½ teaspoon fine sea salt
  • ¼ cup (48g) vegetable shortening
  • ¾ cup (170g) cold, unsalted butter, cubed
  • ½ cup (118ml) cold ice water
  • 1 tablespoon (15ml) apple cider vinegar

Cherry Filling

  • 12 ounces (340g) fresh cherries, pitted, halved and stems removed (about 1 3/4 cups after prep)
  • â…“ cup (66g) sugar
  • 1 tablespoon (10g) cornstarch
  • â…› teaspoon almond extract
  • Egg wash: 1 egg beaten with 1 tablespoon (15 ml) of water

Icing

  • 1 ¼ cups (150g) powdered sugar, sifted
  • ½ teaspoon meringue powder (optional)
  • 2-3 tablespoons (30-45ml) whole milk
  • ¼ teaspoon pure vanilla extract
  • 1 dash fine sea salt
  • Pitted cherries for garnish (optional)

Instructions
 

Pie Crust

  • In a large bowl, whisk together the flour, sugar and salt. Work the shortening into the flour with your fingertips until it's evenly dispersed throughout. Work the butter into the flour mixture, creating flat dime size pieces.
  • In a glass measuring cup, mix the ice water and vinegar together. Sprinkle the liquid over the flour mixture a little at a time, stirring until the dough comes together. You may not need all of the liquid depending on your climate.
  • Turn the dough out onto a lightly floured surface. Fold the dough over onto itself a couple of times. Do not overwork the dough. Divide the dough into 2 equal portions and form into disks. Wrap them in plastic wrap and refrigerate until firm, at least 2 hours or up to overnight.

Cherry Filling

  • In a medium-sized saucepan, combine the cherries, sugar and cornstarch. Simmer over low heat, stirring occasionally, until the cherries start to soften and the juices are thickened, about 5 minutes. Transfer the cherries to a bowl. Stir in the almond extract. Set aside to cool completely.

Icing

  • In a medium-sized bowl, whisk together the powdered sugar, meringue powder, 1 1/2 tablespoons (22ml) of milk, the salt and the vanilla extract. Add additional milk as needed to achieve the desired consistency. (If you decide to omit the meringue powder, you'll need less milk.)

Assembly

  • Preheat oven to 375°F (190°). Line a large baking sheet with parchment paper.
  • On a lightly floured surface, roll dough to about 1/8-inch (.3cm) thickness. Cut out 20-22 3-inch (7.6cm) rounds. Transfer half of the rounds to a baking sheet, placing them about 2 inches (5cm) apart. Using a slotted spoon, place the filling onto rounds to within 1/2-inch (1.3cm) of the edges. Using a small pastry brush or your finger, apply egg wash to the edges. Top with the remaining rounds. Press the edges to seal & crimp with a fork. Brush the pies with egg wash. Cut a small x in the top of each pie.
  • Bake until golden, about 18-24 min. Transfer the pies to a cooling rack to cool completely. Brush icing on the cooled pies with a pastry brush. When the icing is almost set, top the pies with pitted cherries if desired.
Keyword cherry, pastry, pie

Little Strawberry Charlotte

Little Strawberry Charlotte

Meet Little Strawberry Charlotte. She brings romance with her wherever she goes. Whether it’s a tea party, a birthday celebration or a romantic dinner, you’ll gaze at her beauty and sigh. This lovely Charlotte has luscious strawberry mascarpone cream filling layered with lady fingers and topped with fresh strawberries. I used store bought lady fingers to make life easier but you can certainly bake your own if you wish. I typically make this in spring or summer when the weather is warm and strawberries are plentiful. But since my local stores start carrying an abundance of strawberries around Valentine’s Day, I thought it would be a perfect time to make this pretty little Charlotte.

Little Strawberry Charlotte

A pretty no-bake dessert layered with strawberry mascarpone cream filling and lady fingers and topped with fresh strawberries.
Course Dessert
Servings 6

Ingredients
  

Simple Syrup

  • â…“ cup (67g) granulated sugar
  • â…“ cup (78ml) water
  • ½ teaspoon strawberry or vanilla extract

Strawberry Charlottte

  • 12 ounces (340g) strawberries, hulled and sliced about 2 cups after slicing
  • ¾ cup (150g)) granulated sugar
  • ¼ cup (59ml) cold water
  • 1 tablespoon unsweetened gelatin powder
  • 1 teaspoon pure strawberry extract
  • ½ teaspoon pure vanilla extract
  • 1 ¾ cups (397g) mascarpone cheese, softened
  • â…” cup (156ml) cold heavy whipping cream
  • 28 ladyfingers
  • 10-12 fresh strawberries for garnish
  • Clean pesticide free rose for garnish optional
  • Clean ribbon for garnish

Instructions
 

Simple Syrup

  • Combine the sugar and water in a small saucepan over medium-low heat. Heat and stir until sugar is dissolved. Do not boil.
  • Remove from heat and transfer to a small shallow bowl or dish wide enough to dip the ladyfingers. Stir in the extract.

Strawberry Charlotte

  • In a blender or food processor, purée the strawberries. Pass through a mesh sieve to strain out the seeds.
  • In a medium-size saucepan, combine the strawberry puree and sugar. Cook over medium heat until the sugar is dissolved, about 3-5 minutes. Remove from heat. Set aside two tablespoons of the strawberry purée mixture then cover it and refrigerate until ready to use.
  • Place the water in a small bowl and sprinkle with gelatin powder. Whisk together and let sit until dissolved, about 5 minutes. Add the gelatin mixture to the warm strawberry purée mixture and whisk until thoroughly combined. Set aside to cool.
  • In a large bowl, beat the mascarpone cheese with an electric mixer on low speed, until smooth. Add the strawberry purée mixture and the extracts. Beat just until well combined.
  • In a separate large bowl, whip the heavy cream with an electric mixer on medium-high speed until medium peaks form, being careful not to over whip. Fold the whipped cream into mascarpone mixture.
  • Slice one round end off of 16 ladyfingers. Dunk them briefly in the simple syrup then line them up along the inner sides of a 7-inch by 3 inch deep springform pan.* Typically you would line them smooth side in facing the filling, but I placed mine smooth side out which gives a smooth look on the outside and it makes removal from the pan easier. (You can also line the bottom of the pan with a cake board** if you don't want to serve the dessert from the base.)
  • Line the bottom snuggly with ladyfingers, cutting to fit where necessary. Top with half of the filling, about 2 cups. Then top with a layer of ladyfingers, cutting to fit. Top with the remaining filling. Smooth the top with a small offset spatula. Cover with plastic wrap and chill in refrigerator at least 4 hours.
  • Carefully remove the springform pan ring from the base. Separate the base from the cake board, if using. Garnish with fresh strawberries. Brush the strawberries with reserved strawberry purée mixture. Tie the ribbon around the finished Charlotte.

Notes

*To find a 7-inch springform pan, click here.
**To find a 7-inch cake board, click here.
Keyword cake, strawberry

Lavender Shortbread Sandwich Cookies with Honey Buttercream

Lavender Shortbread Sandwich Cookies with Honey Buttercream

Lavender and honey go so well together. Bees know it, fairies know it, princesses know it. The flavor combination is so delightful in these cookies, that I decided to share them with you. In addition to delicious, compatible flavors, these cookies have a divine texture combination. The shortbread cookies have a tender, melt-in-your-mouth texture. Together with the silky, smooth honey buttercream, they’ll make you feel fancy and regal. You’ll hold your head up higher, ring for your tea and declare that you do indeed deserve fine things!

Some people are nervous about baking with lavender because they don’t want their baked goods to taste like soap or perfume. That can be a concern if the lavender flavor is too pronounced. However, if you don’t use enough you won’t be able to taste it at all. There’s a fine balance. If you use the right amount, it will taste pleasant and have sweet undertones. I used two teaspoons of culinary lavender in these cookies, but you can adjust the amount to your tastes. You can start out with one teaspoon, bake a small sample of dough and taste it, to customize the flavor.

Speaking of tasting, my grandmother always said, “taste as you go.” This is also helpful when making the honey buttercream. Typically, when making other flavors of buttercream, you add more powdered sugar if your buttercream is too thin. In this case, adding more powdered sugar can make the buttercream too sweet. Once you have added the amount of honey that tastes good to you, you can add a little cornstarch if you need to stiffen it up a bit.

Lavender Shortbread Sandwich Cookies with Honey Buttercream

Tender lavender scented cookies with silky honey buttercream filling
Servings 18

Ingredients
  

Lavender Shortbread Cookies

  • 2 cups (9 oz or 255g) all purpose flour
  • ½ cup (2 1/4 oz or 64g) powdered sugar
  • ½ teaspoon fine sea salt
  • 1 cup (8 oz or 227g) unsalted butter, softened
  • 2 teaspoons culinary lavender

Honey Buttercream

  • ¾ cup (6 oz or 170g) unsalted butter, softened
  • ½ cup (2 1/4 or 64g) powdered sugar, sifted
  • 2-3 tablespoons honey
  • pinch fine sea salt
  • 1 tablespoon cornstarch optional

Instructions
 

Lavender Shortbread Cookie

  • In a large bowl, sift together the flour, sugar and salt.
  • In a separate large bowl, beat the butter with an electric mixer until smooth. Mix in the lavender. Beat in the flour mixture on low speed, just until combined.
  • Divide the dough into two discs. Wrap in plastic wrap and refrigerate for at least 1 hour, but not more than 8 hours.
  • Line 2 large baking sheets with parchment paper. On a lightly floured surface, roll the dough to 1/4-inch thickness. Cut into 2-inch circles. Place two inches apart on prepared cookie sheets. Refrigerate cut cookies for 30 minutes to 1 hour.
  • Preheat oven to 325ºF (165ºC). Bake cookies until the bottom edges are light golden brown, about 12-14 minutes.
  • Transfer cookies to a cooking rack to cool completely.
  • Pipe or spread about 1/2 tablespoon of buttercream on the bottom of half of the cookies. Top with remaining cookies.

Honey Buttercream

  • In a medium bowl, beat butter and sugar together until smooth. Add honey, one tablespoon at a time until desired sweetness and consistency is reached.
  • Mix in a pinch of salt to taste.
  • Mix in cornstarch, if necessary, to firm up buttercream. *See notes below.

Notes

*The addition of cornstarch helps to firm up buttercream without adding additional sweetness.
To find culinary lavender, click here.
Keyword cookies

Lemon Blueberry Cloud Cookies

Once, some time ago, I made some soft, melt-in-your mouth cookies and posted them on the internet. A viewer got triggered and insisted that cookies must be crunchy. I have to disagree! Cookies can be crunchy, crisp, soft, chewy, sandy or anything your heart desires. These soft, pillowy cookies are light and airy like little clouds. They could almost be called little cakes. The texture is similar to whoopee pies, but not as sticky. They’re delightfully delicious and have been well-loved by my family for two generations. They’re perfect for a spring teatime treat or alongside a glass of lemonade at a picnic.

Lemon Blueberry Cloud Cookies

Soft, pillowy cookies made with ricotta cheese and fresh blueberries, topped with a tangy lemon icing
Course Dessert
Servings 36 cookies

Ingredients
  

Cookies

  • 2 cups (255g) all purpose flour, sifted
  • 1 teaspoon baking powder
  • ¼ teaspoon fine sea salt
  • ½ cup (113g) unsalted butter, softened
  • 1 cup (240g) ricotta cheese, room temperature
  • Zest of 1 large lemon
  • 1 cup (200g) granulated sugar
  • 1 large egg, room temperature
  • 1 teaspoon pure vanilla extract
  • 1 cup (142g) blueberries plus extra for the tops

Icing

  • 1 ½ cups (181g) powdered sugar, sifted
  • 1 tablespoon (14g) unsalted butter, melted
  • 1 dash fine sea salt
  • 2-3 tablespoons (30-45ml) lemon juice

Instructions
 

Cookies

  • Preheat the oven to 350ºF (180ºC). Line two cookie sheets with parchment paper.
  • In a medium-size bowl, whisk together the flour, baking powder and salt until well combined.
  • In a large bowl, beat the butter, with an electric mixer on medium speed, until smooth Add the ricotta cheese, sugar and lemon zest. Beat until well combined. Beat in the egg and vanilla until incorporated. On low speed, gradually mix in the flour mixture, just until combined. Fold in the blueberries.
  • Place rounded tablespoon-size portions of dough about 2 inches apart onto the cookie sheets. Top the cookies with additional blueberries. (If your cookie dough is sticky and hard to work with, refrigerate it just until it's easier to work with, about 30 minutes to 1 hour.)
  • Bake until the bottom edges of the cookies are lightly browned, about 11-13 minutes. Transfer the cookies to a cooling rack. Top the cooled cookies with icing. Best eaten the day they're made.

Icing

  • In a medium-size bowl, whisk together the powdered sugar, melted butter, salt and 1 tablespoon (15ml) of lemon juice until well combined. Add additional lemon juice as needed to achieve the desired consistency. Whisk until smooth.
Keyword cookies, lemon blueberry

Blackberry Oatmeal Cookies

Blackberry Oatmeal Cookies by Brownie Mischief

We’ve all heard our parents telling their childhood stories of walking miles to school and suffering worse hardships than we ever had to. My mom used to tell me stories like that, but she had a sense of humor, so her stories were always fun to listen to. She used to tell me about her friend’s mother, who would make big, delicious oatmeal cookies. My mom would trade her baloney sandwich nearly every day to get one of those cookies from her friend. She reminisced about those cookies so much, that I set out to make her some when I learned to bake. She and my grandmother would taste test batch after batch of my cookies over the years. I have probably baked enough oatmeal cookies to circle the earth. Okay that’s an exaggeration, but seriously I have baked quite a few. Of all the oatmeal cookies I’ve baked, these are one of my favorites!

Most of the time when you see fruit added to an oatmeal cookie, it’s dried fruit, like raisins or cranberries. That’s mostly because if you just dump fruit into your cookie dough, the fruit releases water, leaving soggy spots in your cookies. To solve that issue, for this recipe, I macerate the blackberries before baking. The purple blackberry juice that’s released from the berries is used to make a beautiful lilac icing to drizzle over the cookies.

Blackberry Oatmeal Cookies

Course Dessert
Servings 18 cookies

Ingredients
  

Brown Butter

  • ½ cup (4oz or 113g) unsalted butter

Macerated Berries

  • 2 cups (about 8-10 oz or 227-283g) fresh blackberries Cut large berries in half
  • 2 tablespoons (25g) granulated sugar

Oatmeal Cookies

  • 1 ¾ cups (7 7/8 oz or 223g) all purpose flour, sifted
  • 1 teaspoon baking soda
  • 1 teaspoon fine sea salt
  • ½ teaspoon ground cinnamon
  • ½ cup (4 or 113g) unsalted butter, softened
  • 1 ¼ cups (8 3/4 oz or 250g) packed brown sugar
  • 2 large eggs
  • 1 ½ teaspoons pure vanilla extract
  • 3 cups (10 oz or 283g) quick oats Not instant oats

Icing

  • ¾ cup (3 oz or 85g) powdered sugar, sifted
  • 1 tablespoon heavy cream
  • 2-3 tablespoons reserved juice from blackberries

Instructions
 

  • In a small, light colored saucepan, melt 1/2 cup (4 oz or 113g) of butter over medium heat, stirring occasionally, until deep golden and fragrant. Keep a close eye on it. It can go from toasted to burned very quickly. When you see brown particles form, remove from heat and immediately transfer the butter, including the particles, to a small bowl. Refrigerate until solid, about one hour.
  • Place the blackberries in a medium-size bowl. Sprinkle with granulated sugar and toss to coat. Let sit for 30 minutes until the berries release their juices.
  • Drain the blackberries and reserve the juices.
  • Preheat oven to 350ºF (180ºC). Line two large cookie sheets with parchment paper.
  • In a separate medium-size bowl, whisk together the flour, baking soda, salt and cinnamon. Set aside.
  • In a large bowl, beat the brown butter, softened butter and brown sugar until light and fluffy.
  • Add the eggs and vanilla extract in three separate additions and beat until well combined.
  • Stir in the flour mixture just until combined. Stir in the oats just until combined. Gently fold in the blackberries.
  • Scoop 1/4 cup sized portions of dough, about 2 inches apart, onto the prepared cookie sheets. *I used a #16 2-ounce scoop.
  • Bake until the cookie tops are set and the edges are golden brown, about 13-15 minutes. Transfer the cookies to a cooling rack to cool completely.
  • Pass reserved blackberry juice through a sieve to remove the seeds.
  • In a small bowl, whisk together the powdered sugar, heavy cream and one tablespoon of the reserved blackberry juice until smooth. Add more blackberry juice, a little at a time, until the desired consistency is reached. Drizzle the icing over the cooled cookies.

Notes

*To find the portion scoop I used, click here.
Keyword blackberry, cookies

Pink Lemonade Cake

This cheerful little loaf cake feels like a spring or summer picnic with lemonade and sunshine. It’s similar to a pink lemonade cake that my elderly neighbor used to make when I was growing up. She made it for all the neighborhood kids and we always gobbled it up. When I was about ten years old she taught my friend and me how to make it. She used a yellow cake mix in a large baking pan and poked holes all over the cake, then drenched it in a pink, sugary lemon icing. I transformed that happy pink lemonade memory into a delightful loaf cake made from scratch.

To watch the TikTok video, click here.

Pink Lemonade Cake

A tender, moist loaf cake that tastes just like pink lemonade
Course Brunch, Dessert
Servings 1 8 x 4-inch loaf

Ingredients
  

Pink Lemonade Cake

  • 1 cup plus 2 tablespoons (5 oz or 142g) all purpose flour, sifted
  • 1 teaspoon baking powder
  • ½ teaspoon fine sea salt
  • ¼ teaspoon baking soda
  • ¼ cup (2 oz or 59ml) whole milk
  • ¼ cup (2 oz or 59ml) sour cream
  • 1 cup (7 oz or 200g) sugar
  • ½ cup vegetable oil or neutral oil of your choice
  • 2 large eggs
  • 1 tablespoon lemon zest
  • 1 ½ teaspoons strawberry extract
  • 1-2 drops pink gel food color I used Americolor deep pink*

Lemon Syrup

  • juice of one lemon
  • ¼ cup (1 3/4 oz or 50g) sugar

Icing

  • 2 tablespoons (1 oz or 28g) unsalted butter, softened
  • 1 cup (4 oz or 113g) powdered sugar, sifted
  • 2-2 ½ tablespoons lemon juice
  • ½ teaspoon strawberry extract
  • pinch fine sea salt
  • 1 tiny drop pink gel food color I used Americolor deep pink*

Instructions
 

Pink Lemonade Cake

  • Preheat oven to 325ºF (163ºC). Line the bottom of an 8 X 4-inch loaf pan with parchment paper. Grease and flour the sides.
  • In a medium bowl, whisk together the flour, baking powder, salt and baking soda.
  • In a small bowl, whisk together the milk and sour cream.
  • In a large bowl, beat the sugar, oil, eggs, lemon zest and strawberry extract until smooth.
  • Stir in the flour mixture in two additions, alternating with the milk mixture. Stir just until combined. Stir in food color a little at time until your desired shade is achieved.
  • Transfer the batter to the prepared baking pan. Bake until a toothpick inserted into center of the loaf comes out clean, about 45-50 minutes. Meanwhile, prepare lemon syrup.
  • Let the cake cool in the pan for 10 minutes, then remove from pan and transfer to a cooling rack. Poke holes all over the top of cake with a skewer.
  • Brush the warm cake generously with the lemon syrup. Let the cake cool completely, then top with icing.

Lemon Syrup

  • In a small saucepan, combine the juice of one lemon with enough water to equal 1/4 cup. Add sugar and stir over medium-low heat until sugar is dissolved. Remove from heat.

Icing

  • In a medium bowl, beat the butter, powdered sugar, 1 tablespoon lemon juice, the strawberry extract and a pinch of salt, until smooth. Add more lemon juice until your desired consistency is reached. Mix in gel food color.

Notes

*To find the gel food color I used, click here.
Keyword cake, pink lemonade

Blueberry Donut Holes with Homemade Blueberry Sugar

Blueberry Donut Holes with Homemade Blueberry Sugar

If you landed here from one of my social media accounts, welcome! I’m really glad you’re here. I love to create fun, pretty and sweet treats like these delicious blueberry donut holes! The thing that really makes these special is the homemade blueberry sugar, which adds a burst of blueberry flavor. Freeze dried blueberries are combined with sugar to create a beautiful, flavorful sugar that you can use for many other things. It can also be used in tea, lattes, lemonade, cocktails or sprinkled on cookies or scones. Keep in mind that freeze dried blueberries are not the same as dried blueberries. Dried blueberries still contain some moisture, so they won’t work for this purpose.

The donut hole batter comes together quickly and easily. The most challenging part for me is frying them. I found that using a thermometer and testing one donut hole first, helps you determine the perfect oil temperature. Using a small portion scoop helps you get uniform donut holes. Make sure the outside of the scoop is clean between each donut to help them keep the round shape and avoid pointy tails.

Blueberry Donut Holes with Homemade Blueberry Sugar

Course Breakfast, Dessert
Servings 24 donut holes

Ingredients
  

Blueberry Sugar

  • ¾ cup (3/4 oz or 21g)) freeze-dried blueberries*
  • ½ cup (3 1/2 oz or 100g) granulated sugar

Blueberry Donut Holes

  • 2 cups (9 oz or 255g) all purpose flour, sifted
  • 2 teaspoons baking powder
  • ¼ teaspoon ground nutmeg
  • ¼ teaspoon fine sea salt
  • ½ cup (3 1/2 oz or 100g) granulated sugar
  • 2 eggs
  • 2 tablespoons (1 oz or 28g)) unsalted butter, melted
  • ½ cup (4 oz or 118ml) whole milk
  • 1 teaspoon pure vanilla extract
  • 1 ¼ cups chopped fresh blueberries
  • oil for frying
  • ½ cup (3 1/2 oz or 100g) blueberry sugar

Instructions
 

Blueberry Sugar

  • Process freeze dried blueberries and sugar in a food processor or a clean spice grinder until finely ground. Be careful not to over process or you may end up with powdered sugar.

Blueberry Donut Holes

  • In a medium bowl, whisk together flour, baking powder, nutmeg and salt. Set aside.
  • In a large bowl, beat sugar, eggs, melted butter, milk and vanilla extract until well combined.
  • Add flour mixture and mix just until combined. Do not over mix. A few lumps are okay.
  • Fold in chopped blueberries.
  • In a heavy saucepan, heat 1 1/2 inches of oil to 340ºF.
  • Drop tablespoon size portions of batter into hot oil. I used a #60 portion scoop.** Don't overcrowd the pan.
  • Cook donut holes until golden brown on all sides, about 2-4 minutes, flipping halfway through. If donut holes cook too quickly on the outside, turn heat down.
  • Briefly drain donut holes on paper towels, then toss warm donut holes in blueberry sugar. Serve immediately.

Notes

Success tips: Use a small ice cream scoop sprayed with nonstick spray to drop donut holes into oil. Make sure the outside of scoop is clean between each donut hole to keep the round shape and avoid tails on your donut holes.
*To find freeze dried blueberries, click here.
**To find the portion scoop I used, click here.

Lemon Crinkle Cookies

Lemon Crinkle Cookies by Brownie Mischief
Click here to watch the video

Crinkle cookies, also known as crackle cookies, have been around for a very long time. The pretty, crispy, cracked exterior and the soft, moist interior are what we love about them! There’s definitely no shortage of recipes for crinkles out there, everything from chocolate to red velvet. I even saw an audacious cookie company selling lemon crinkles for twelve dollars each, more money than it will cost for this entire batch! So many of the recipes I tried were disappointing, especially the ones made with cake mix. So I created my own version which happened to go viral! Here’s to making sure delicious lemon crinkle cookies are available for all to enjoy.

This recipe requires a bit of chilling, which I know many people don’t like because they’re impatient. I happen to be one of those people. Old fashioned crinkle cookies require about 3 hours of chilling. My recipe has the addition of cornstarch, which helps prevent spreading and allows for a shorter chilling time. As an added bonus, cornstarch makes the cookies more tender. Win win!

Fresh lemon zest and lemon juice in these cookies is crucial to the best lemon flavor. A bit of pure lemon extract is added to enhance that flavor. Don’t be tempted to use imitation extracts. The flavor will disappoint you. I added two drops of lemon yellow food color, which made them so pretty they look like pure sunshine!


Lemon Crinkle Cookies

Lemon cookies with a crackled, crispy exterior and a soft, tender interior
Course Dessert
Servings 14 cookies

Ingredients
  

  • 1 ¾ cups (223g) all purpose flour, sifted
  • ¼ cup (28g) cornstarch
  • 1 teaspoon baking powder
  • ½ teaspoon fine sea salt
  • ¼ teaspoon baking soda
  • ½ cup (113g) unsalted butter, softened
  • 1 cup (200g) granulated sugar
  • Zest of 1 large lemon
  • 1 large egg
  • 2 tablespoons (30ml) fresh lemon juice
  • 1 teaspoon pure lemon extract
  • ½ teaspoon pure vanilla extract
  • 1-2 drops yellow gel food coloring (optional) *I used Americolor lemon yellow
  • ½ cup (60g) powdered sugar

Instructions
 

  • In a medium-sized bowl, whisk together the flour, cornstarch, baking powder, salt and baking soda until well blended.
  • In a large bowl, beat the butter, sugar and lemon zest together until pale and fluffy. Beat in the egg until well incorporated. Mix in the lemon juice, extracts and food coloring until well combined. Add the flour mixture and mix just until combined.
  • Refrigerate the cookie dough for 30 minutes to one hour.
  • Meanwhile, preheat the oven to 350ºF (180ºC). Line two large cookie sheets with parchment paper.
  • Roll the dough into balls, about 2 tablespoons each. I used a #30 portion scoop*. Roll the dough balls generously in powdered sugar.
  • Place the dough balls about 2 inches apart onto the prepared baking sheets.
  • Bake until the cookies are set, about 10-12 minutes. Let them cool on the cookie sheet for 1 minute then transfer to a cooling rack.

Notes

*To find Americolor lemon yellow gel food color, click here.
**To find a #30 cookie scoop, click here.
To find the striped wax paper pictured above, click here.