Caramel Pecan Banana Brownies

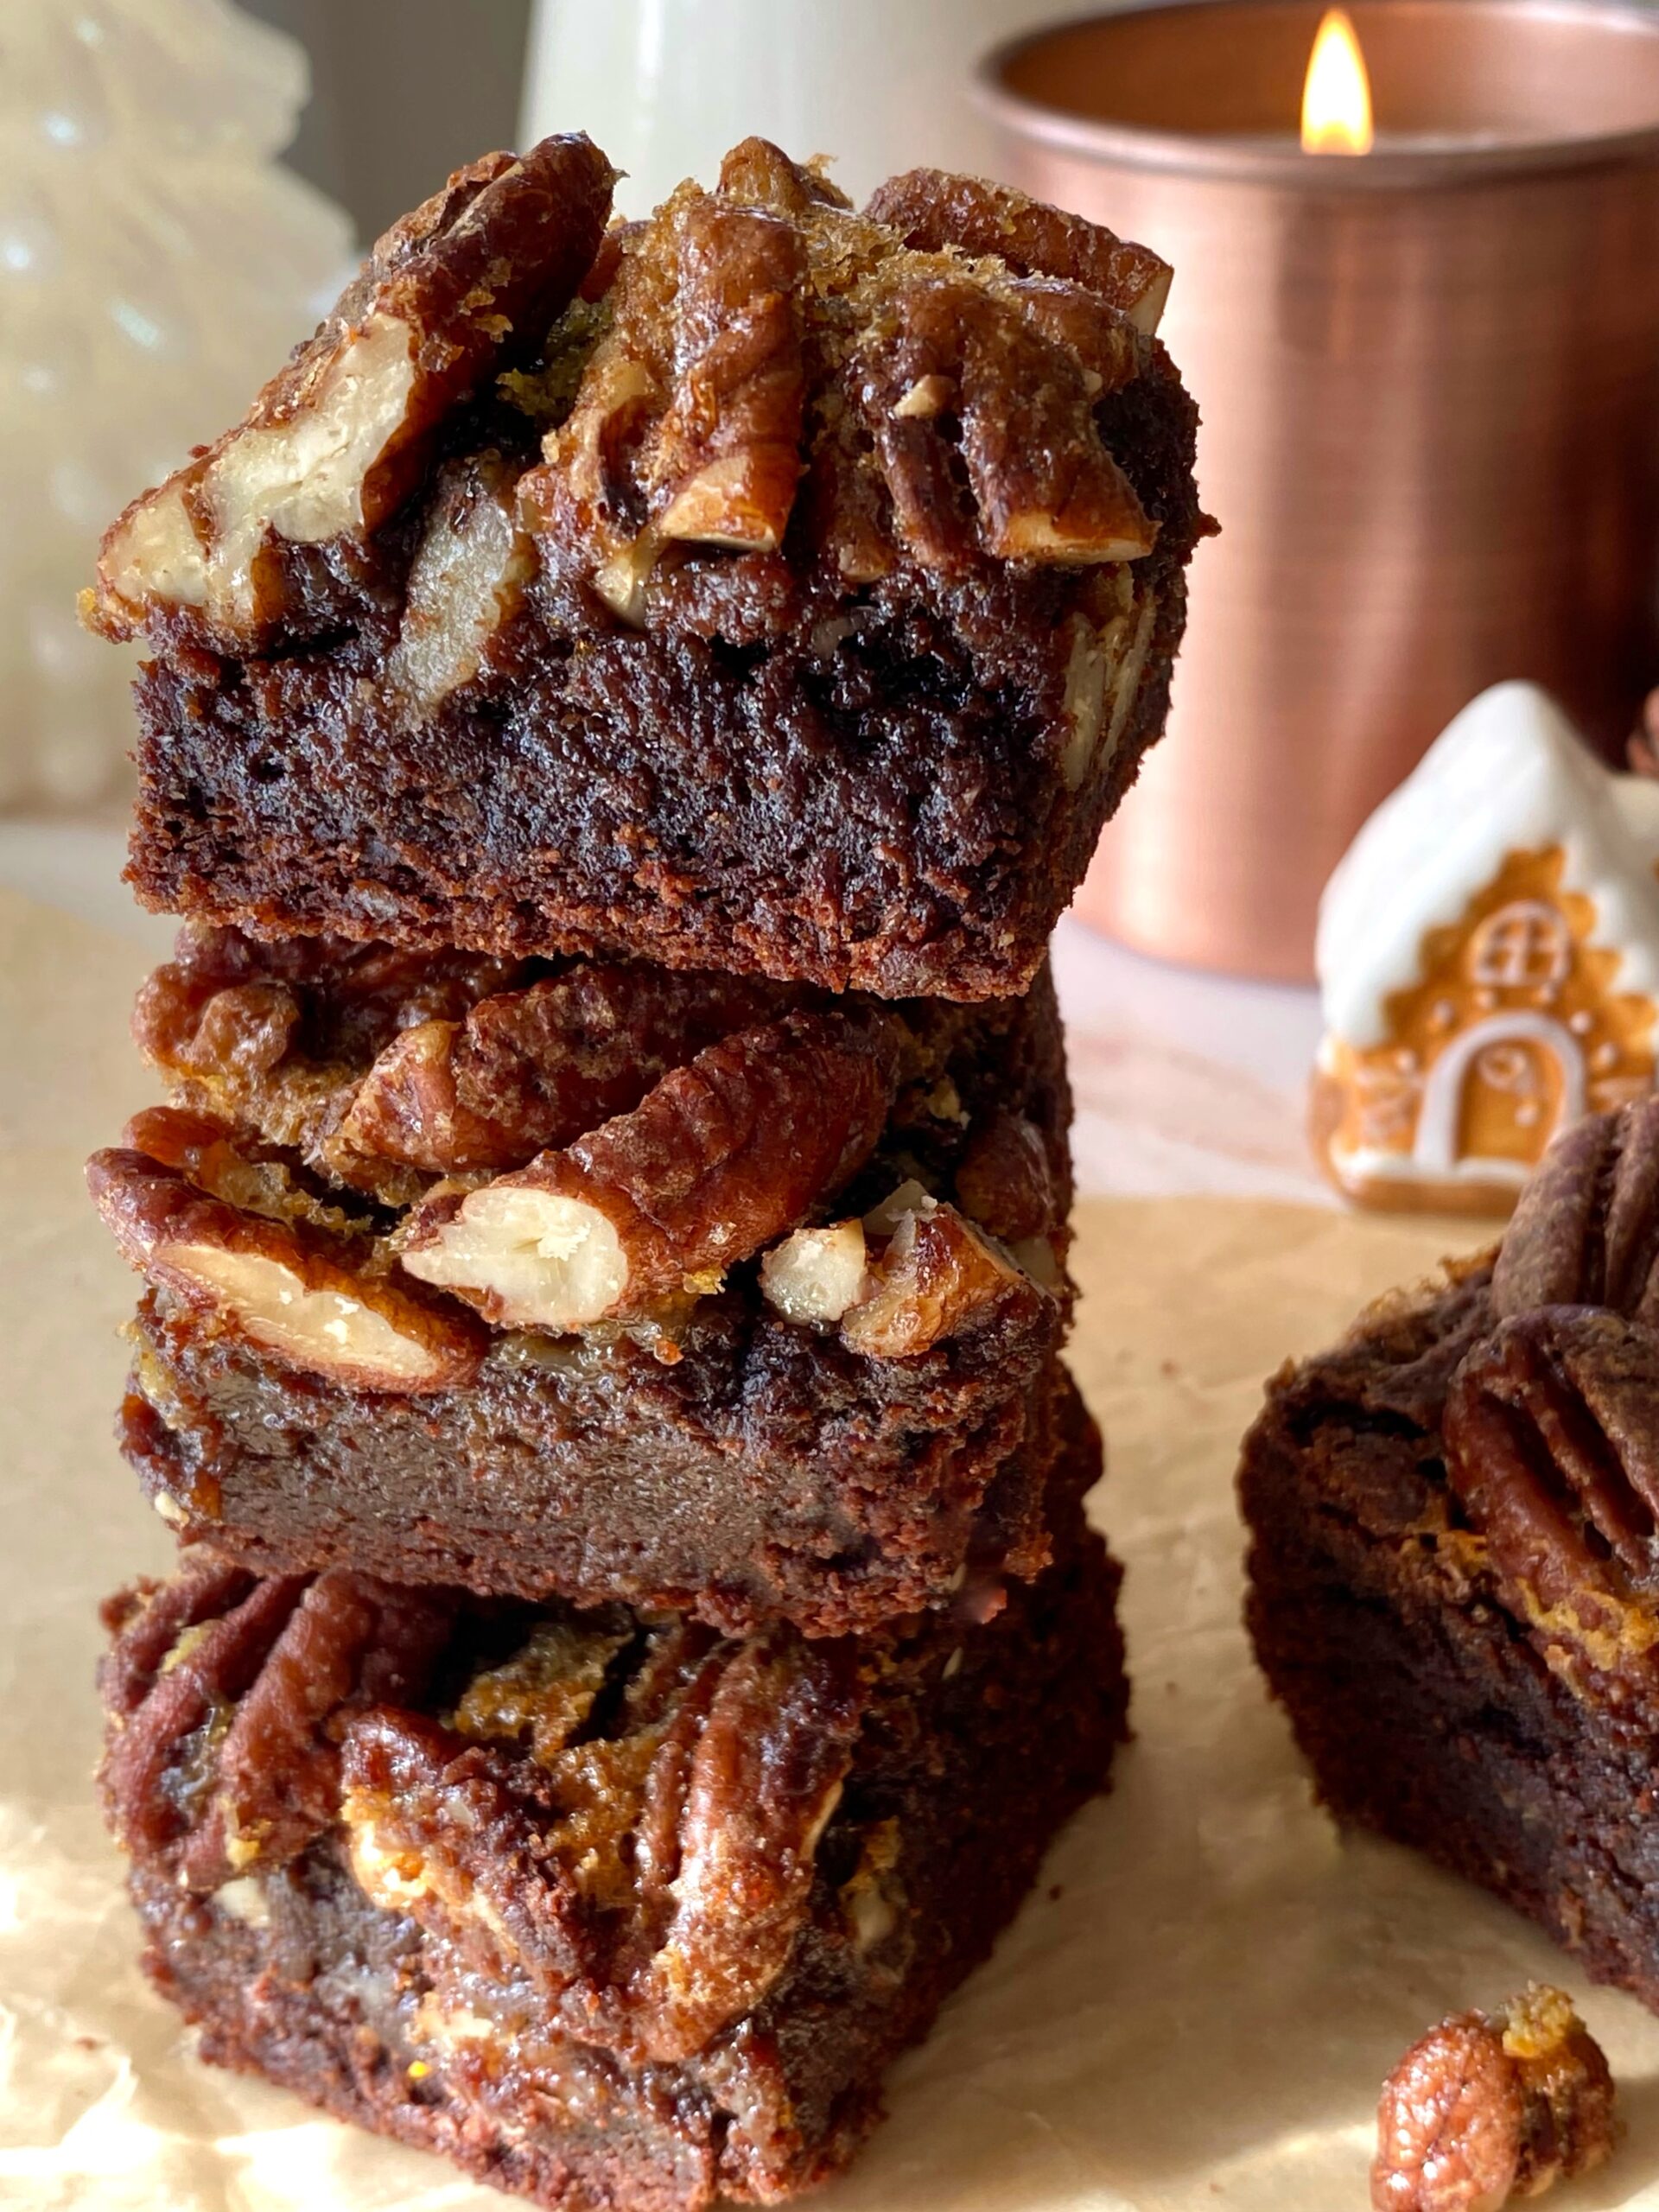
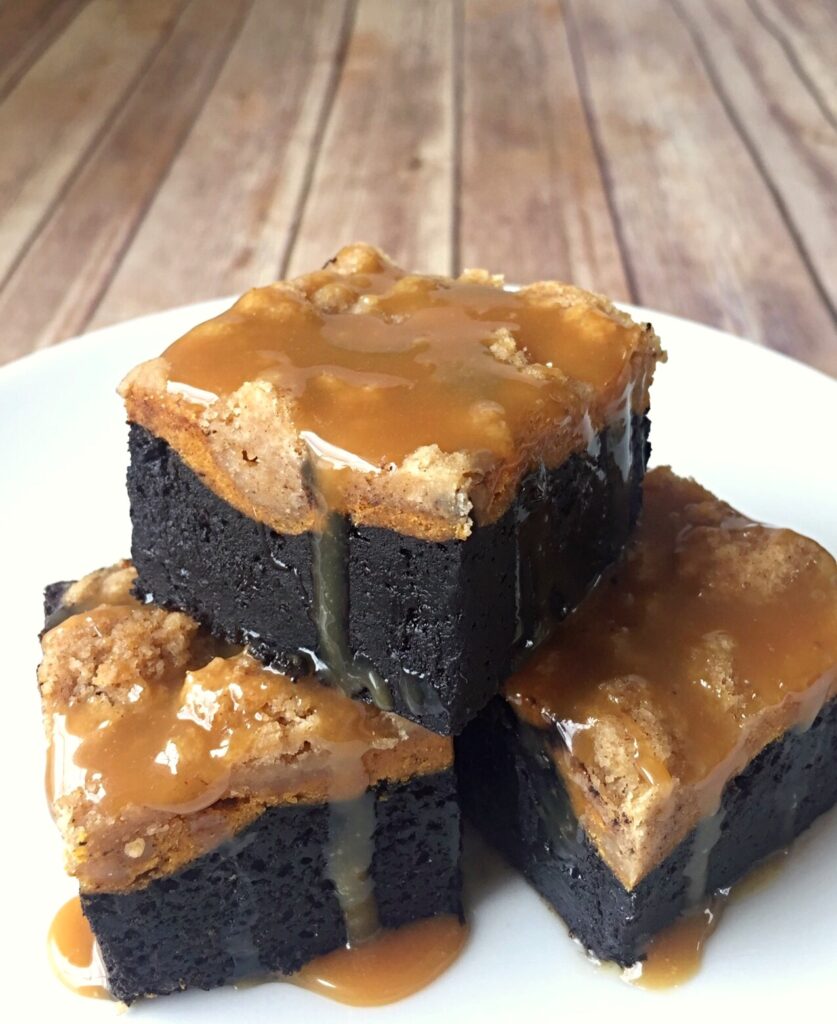
If you love the flavors of chocolate and bananas together, these Caramel Pecan Banana Brownies are for you! These rich, fudgy brownies are the perfect decadent chocolate-banana dessert. The addition of caramel, pecans and sea salt gives them texture and balance. This recipe was a challenge to create because, while adding bananas to a brownie recipe does add moisture, it can also give the brownies a cake-like texture. That’s desirable in banana bread, but for brownies, most of us love a traditional fudgy texture. I solved that issue and I’m excited to share this fudgy, gooey Banana Brownie recipe with you!

These brownies are on the sweeter side, so I like adding dark chocolate chips or a combination of dark and semisweet chocolate chips. Adding the nuts to the top of the batter, rather than stirring them in, gives them a toasty flavor and helps maintain their crunch. An optional sprinkle of flaky sea salt adds the perfect finishing touch. They’re TDF served warm with a scoop of vanilla ice cream.

Caramel Pecan Banana Brownies

Fudgy banana brownies with chocolate chips, topped with pecans, caramel and sea salt
Course Dessert
Servings 12

Ingredients
  

  • ½ cup (113g) unsalted butter, cubed
  • 2 tablespoons (30ml) avocado oil or neutral oil of your choice
  • 1 cup (200g) packed brown sugar
  • ½ teaspoon fine sea salt
  • 2 large eggs
  • 1 large egg yolk
  • 1 ½ teaspoons pure vanilla extract
  • ½ cup (45g) unsweetened cocoa powder, sifted
  • ¼ teaspoon cinnamon
  • ½ cup (125g) mashed very ripe bananas about 1 medium banana
  • ½ cup (65g) all purpose flour
  • 1 cup (170g) dark or semisweet chocolate chips or a combination of both
  • ½ cup (55g) pecan halves or pieces
  • Caramel sauce, purchased or homemade
  • Flaky sea salt optional but recommended

Instructions
 

  • Preheat the oven to 325ºF (165ºC). Line an 8-inch square baking pan with parchment paper, leaving a couple of inches of overhang.
  • In a medium-size light-colored saucepan over medium heat, melt the butter and cook until it's deep golden and fragrant. When brown specks start to appear, remove it from the heat and immediately transfer the butter with the brown specks to a large bowl. Stir in the brown sugar and salt until well combined.
  • Add the eggs and vanilla and whisk until well blended and most of the brown sugar is dissolved. Mix in the cocoa powder and cinnamon until thoroughly combined. Stir in the mashed bananas. Mix in the flour, just until combined. Stir in the chocolate chips.
  • Transfer the batter to the prepared baking pan. Arrange the pecan halves on top of the batter or if you're using pecan pieces, sprinkle them evenly on top of the batter. Bake until a toothpick inserted into the center of the brownies comes out with a few moist crumbs attached, about 20-25 minutes. (If you hit a melted chocolate chip with the toothpick, test again in a different spot.) Do not over bake!
  • Let the brownies cool in the pan. Remove the cooled brownies from the pan and drizzle with caramel sauce. Sprinkle with flaky sea salt, if desired.
Keyword brownies, caramel pecan banana

Iced Almond Brownies

Iced Almond Brownies

If you like almond desserts, you’ll love these Iced Almond Brownies. They have the base ingredients of frangipane or almond cream, but in brownie form. The addition of white chocolate gives them a fudgy texture and the toasted almonds add a satisfying crunch.

Iced Almond Brownies

Fudgy almond brownies made with white chocolate, topped with almond icing and toasted almonds
Course Dessert
Servings 16 2-inch brownies

Ingredients
  

Almond Brownies

  • ½ cup (113g) unsalted butter, cubed
  • 6 ounces (170g) white chocolate, finely chopped
  • ¼ cup (59ml) heavy cream
  • 1 ½ cups (190g) all purpose flour
  • ¼ cup (28g) almond flour
  • ½ teaspoon fine sea salt
  • ¾ cup (150g) sugar
  • 2 large eggs
  • 1 large egg yolk
  • 1 teaspoon pure almond extract
  • ½ teaspoon pure vanila extract
  • ½ cup (60g) sliced almonds, toasted

Almond Icing

  • ¾ cup (90g) powdered sugar, sifted
  • 1 tablespoon (15ml) heavy cream
  • 1-2 tablespoons (15-30ml) milk
  • â…› teaspoon pure almond extract

Instructions
 

Almond Brownies

  • Preheat the oven to 350ºF (180ºC). Line an 8-inch square baking pan** with parchment paper, leaving a couple of inches of overhang.
  • Melt the butter, white chocolate and heavy cream together in a large heat safe bowl set over a pan of simmering water, making sure the water doesn't touch the bottom of the bowl. Stir gently until smooth. Set aside to cool slightly.
  • In a medium bowl, whisk the together the all purpose flour, almond flour and salt.
  • In a large bowl, whisk together the sugar, eggs, egg yolk, and extracts until smooth and well combined. Stir in the white chocolate mixture until well combined. Stir in the flour mixture just until combined.
  • Transfer the batter to the prepared baking pan. Bake until a toothpick inserted into the center of the brownies has a few moist combs attached, about 18-23 minutes. Don't over bake. Let the brownies cool in the pan. Remove the brownies from the pan. Top with almond icing and toasted almonds.

Almond Icing

  • In a small bowl, whisk together the powdered sugar, heavy cream, 1 tablespoon (15ml) of milk and the almond extract until smooth. Add additional milk as needed to achieve your desired consistency.

Notes

*To toast sliced almonds, preheat the oven to 350ºF (180ºC).  Line a baking sheet with parchment paper or aluminum foil. Spread the almonds out onto the baking sheet in a single layer. Bake until lightly toasted, about 4-5 minutes. **To find the 8-inch baking pan I used, click here.
Keyword almond, bars, brownies

Caramel Latte Brownies

These rich, fudgy, coffee scented brownies, with caramel and whipped cream topping are inspired by one of my favorite coffee shop drinks, a caramel latte. I was thinking about how to get the caramel inside the brownies. With some methods, the caramel ends up over baked and chewy. Then I remembered poke cakes from my childhood. You poke holes all over a baked cake and pour whatever you like on top to soak into the holes. It worked beautifully with these brownies. To finish them off, I topped them with fluffy cream cheese whipped cream and a drizzle of caramel.

Caramel Latte Brownies

Rich, moist coffee scented brownies soaked with caramel, topped with fluffy cream cheese whipped cream and drizzled with more caramel.
Course Dessert
Servings 9

Ingredients
  

  • ¾ cup (6 oz or 170g) unsalted butter, cubed
  • 6 oz (170g) bittersweet chocolate (70-72%), finely chopped
  • 2 tablespoons unsweetened cocoa powder, preferably Dutch process or dark
  • 2 tablespoons hot water
  • 1 tablespoon espresso powder
  • 1 ½ cups (10 1/2 oz or 300g) sugar
  • ½ teaspoon fine sea salt
  • 3 large eggs
  • 1 large egg yolk
  • 1 ½ teaspoons pure vanilla extract, divided
  • 1 cup (4 1/2 oz or 128g) all purpose flour, sifted
  • â…“ cup (3 5/8 oz or 107ml) caramel sauce, purchased or homemade
  • 3 oz (85g) cream cheese, softened
  • 6 tablespoons (1 1/2 oz or 46g) powdered sugar, sifted
  • ¾ cup (6 oz or 177ml) cold heavy whipping cream

Instructions
 

  • Preheat your oven to 325ºF. Line an 8-inch square baking pan with parchment paper, leaving a couple of inches of overhang.
  • In a large heat safe bowl, melt the butter together with the chocolate, in the microwave or on the stovetop over a pan of barely simmering water. Stir until smooth.
  • In a small bowl, whisk together the cocoa powder, hot water and espresso powder until smooth.
  • Whisk the cocoa powder mixture, sugar and salt into the warm melted chocolate mixture until well combined.
  • Add the eggs, egg yolk and 1 teaspoon of vanilla to the chocolate mixture and whisk until smooth.
  • Stir in the flour just until combined, scraping the bottom of the bowl as needed.
  • Transfer the batter to the prepared baking pan. Bake until a toothpick inserted into the center of the brownies comes out with moist crumbs on it, about 25-28 minutes. Do not over bake. Let cool completely.
  • Once cool, remove the brownies from the pan and place on a serving platter. Using a chopstick, poke holes in the brownies, about 1 inch apart, to within 1 inch from the edges.
  • Spread caramel sauce over the surface of the brownies with a small offset spatula.
  • In a large bowl, beat the cream cheese, powdered sugar and 1/2 teaspoon of vanilla, with an electric mixer, until smooth. Gradually add the heavy cream and beat to stiff peaks.
  • Spread or pipe the whipped cream onto the brownies. Drizzle with additional caramel sauce.
Keyword brownies, caramel latte, chocolate

Strawberry Sweetheart Brownies

Strawberry Sweetheart Brownies

At the Brownie Mischief website, all types of brownies are welcome. We all know and love chocolate brownies. But there are other less common brownies in the universe, that deserve to shine too. Let me introduce you to Strawberry Sweetheart Brownies. These lovely pink creations aren’t strawberry cake or strawberry blondies. They contain white chocolate and they’re made with the same baking method as brownies. When you bake chocolate brownies, you want to be careful not to over bake them, to achieve the rich, fudgy texture. The same is true for these strawberry brownies. When you test for doneness, the toothpick should have a few moist crumbs attached to it. If the toothpick is clean, the brownies have baked too long and will likely be a little dry and cakey, although still edible. So make sure to test for doneness well before the end of the baking time!

The baking temperature for this recipe is 325ºF. I noticed that when baking in a heart shaped cake pan, things tend to bake unevenly because of the shape. So I used a lower temperature to help with even baking. If you don’t have an 8-inch heart shaped cake pan, you can also use an 8-inch round cake pan. To find the cake pan I used, click here.

Strawberry Sweetheart Brownies

To watch the Strawberry Sweetheart Brownies Instagram video, click here.

Strawberry Sweetheart Brownies

A heart shaped strawberry brownie made with fresh strawberries topped with strawberry icing.
Course Dessert
Servings 8

Ingredients
  

Strawberry Brownies

  • 7 tablespoons (3 1/2 ounces) unsalted butter, cubed
  • 6 ounces white chocolate, finely chopped
  • ¾ cup (5 1/4 ounces) sugar
  • ¼ teaspoon fine sea salt
  • 1 large egg
  • 2 large egg yolks
  • ½ cup (4 ounces) strawberry purée, divided
  • ½ teaspoon pure vanilla extract
  • ½ teaspoon pure strawberry extract
  • 1 petite pea size drop pink gel food color (optional) I used Americolor Deep Pink**
  • 1 ½ cups (6 3/4 ounces) all purpose flour, sifted

Strawberry Icing

  • ¾ cup (3 ounces) powdered sugar, sifted
  • 1 tablespoon unsalted butter, melted
  • 2 tablespoons reserved strawberry purée
  • ¼ teaspoon pure vanilla extract
  • ¼ teaspoon pure strawberry extract
  • dash fine sea salt

Instructions
 

Strawberry Brownies

  • Preheat oven to 325ºF. Line the bottom of an 8-inch heart shaped cake pan*** with parchment paper. Spray the insides with nonstick spray.
  • In a large heat safe bowl, melt butter and white chocolate together on the stovetop over a pan of barely simmering water or in the microwave for 20 seconds at time, stirring at each interval. White chocolate overheats easily, so be vigilant.
  • Add the sugar and salt to the butter mixture and mix until well combined.
  • Add egg and egg yolks. Whisk until smooth.
  • Pass strawberry purée through a sieve to remove seeds. Set aside 2 tablespoons of strawberry purée for icing. Add remaining purée to batter. Mix until well combined.
  • Add extracts and food color. Mix until combined.
  • Stir in flour until combined, scraping bowl as needed.
  • Transfer batter to prepared pan. Bake until toothpick inserted in center has a few moist crumbs on it, (not batter), about 25-30 minutes. Do not over bake. Let cool in pan. Remove from pan and top with strawberry icing.

Strawberry Icing

  • Whisk all icing ingredients together until smooth and well combined.

Notes

*To make strawberry purée:   Purée clean, hulled and quartered strawberries in a blender or food processor. **To find the food color I used, click here. **To find the heart cake pan I used, click here.
This recipe was updated on January 24th, 2023
Keyword brownies, strawberry

Raspberry Truffle Brownies

Raspberry Truffle Brownies

Who else loves those heart shaped boxes of chocolates we see at Valentine’s Day? That adventurous first bite of chocolate, when you don’t know which flavor you’re getting, is so much fun! I adore the fruit ganache filled chocolate bon bons. If you love bon bons too, you’ll love these brownies. They’re rich, fudgy and topped with a silky raspberry ganache that makes you feel like you’re biting into a raspberry truffle. The ganache adds an elegant touch to these brownies, so dried rose buds, rose petals and crispy chocolate pearls were my toppings of choice.

This isn’t the first time I’ve created elegant brownies. I displayed beautifully decorated brownies at two previous cookie conventions and they were well received. Elevated brownies are unexpected, but they’re definitely appreciated!

Raspberry Truffle Brownies

by Mari Vasseur
Rich, fudgy brownies topped with silky raspberry ganache
Course Dessert
Servings 9

Ingredients
  

  • 1 cup (128g) all purpose flour
  • 2 tablespoons unsweetened cocoa powder, preferably Dutch process
  • ½ teaspoon fine sea salt
  • ¾ cup (170g) unsalted butter, cubed
  • 8 ounces (227g) bittersweet chocolate (70-72%), chopped
  • 1 ½ cups (300g) sugar
  • 3 large eggs
  • 1 large egg yolk
  • 1 ½ teaspoons vanilla bean paste or pure vanilla extract
  • ½ cup (118ml) strained raspberry purée
  • ¼ cup (59ml) heavy cream
  • 4 ounces (113g) white chocolate, finely chopped

Instructions
 

  • Preheat oven to 325ºF (165ºC). Line an 8-inch square baking pan with parchment paper, leaving a couple of inches of overhang.
  • In a medium-sized bowl, sift together the flour, cocoa powder and salt.
  • In a medium-sized heat safe bowl set over a pot of barely simmering water, melt the chocolate, making sure the water doesn't touch the bottom of the bowl. Stir occasionally, until smooth. Remove from heat.
  • In a large heat safe bowl, melt the butter in the microwave or set the bowl over a pot of barely simmering water. Whisk the sugar, eggs, egg yolk and vanilla into butter until smooth and the sugar is mostly dissolved. Stir in the melted chocolate until well blended. Stir in the flour mixture just until combined.
  • Transfer the batter to the prepared baking pan. Bake until a toothpick inserted in the center comes out with moist crumbs on it, about 25-30 minutes. Do not over bake. Let cool completely.
  • Place the white chocolate in a medium-sized bowl.
  • In a small saucepan over medium-low heat, simmer the raspberry purée until reduced by half. Combine the heavy cream with the reduced purée in the saucepan. Heat until bubbles start to form around the edges. Do not boil.
  • Pour the hot cream mixture over the white chocolate, making sure its completely submerged, and let stand 5 minutes. Stir until smooth and well combined. Spread over the cooled brownies.

Notes

To find dried rosebuds, click here.
To find dried rose petals, click here.
 
Keyword brownies, raspberry truffle

Maple Pecan Brownies

maple pecan brownies

Pecan pie was my mom’s favorite, but she didn’t bake pies, so I always used to bake her one for Thanksgiving. One year, I made a chocolate version. It was delicious, but let’s just say it wasn’t user friendly. It was gooey and hard to serve. Over the years, it eventually morphed into these Maple Pecan Brownies. The brownie version is still delicious, rich and gooey with toasty pecans, but much more user friendly.

Enjoying Maple Pecan Brownies with a glass of milk or a cup of coffee is a must. Thinking of it brings back memories. I can practically smell my dad brewing the coffee to go with these brownies.

Maple Pecan Brownies

Rich, gooey brownies topped with pecan pie filling
Course Dessert
Servings 16 brownies

Ingredients
  

Brownies

  • ¾ cup (6 ounces) unsalted butter, melted
  • 1 cup (7 ounces) granulated sugar
  • ¾ cup (5 1/4 ounces) brown sugar
  • 3 large eggs
  • ½ teaspoon vanilla bean paste or pure vanilla extract
  • ¾ cup (2 1/4 ounces) unsweetened cocoa powder, sifted preferably Dutch process cocoa
  • ½ teaspoon baking soda
  • ½ teaspoon salt
  • 1 ¼ cups (5 5/8 ounces) flour

Pecan Topping

  • ¼ cup pure maple syrup
  • 2 tablespoons (1 ounce) unsalted butter, melted
  • ½ cup (3 1/2 ounces) brown sugar
  • 1 large egg
  • 1 teaspoon maple extract
  • ¼ teaspoon salt
  • 2 cups (7 ounces) pecan halves or pieces

Instructions
 

Brownies

  • Preheat oven to 350ºF. Line a 9-inch square baking pan with parchment paper, overlapping the sides an inch or two. Spray parchment paper with nonstick cooking spray.
  • In a large bowl, stir together melted butter, granulated sugar and brown sugar until well combined.
  • Mix in eggs and vanilla, one at a time, until well combined.
  • Mix in cocoa powder, baking soda and salt until well combined.
  • Stir in flour just until combined.
  • Spread batter into prepared baking pan. Bake just until top is set, about 25 minutes.
  • Meanwhile, prepare pecan topping.
  • When brownie top is set, remove from oven. Gently pour pecan topping around the outer perimeter of brownies, to avoid making brownies sink in the middle. Evenly distribute the pecan topping over the top gently with a spoon.
  • Return the brownies to the oven and continue baking until the topping is set, about 20-25 minutes. Brownies will stop jiggling and topping will look deep golden brown. Toothpick inserted inside will have a few moist crumbs on it. (If your topping starts to brown too much on the edges before the inside is done, apply aluminum foil around the edges as you would with a pie.)
  • Remove from oven and cool completely before cutting, about 2- 2 1/2 hours.
  • Cut into squares, wiping knife between cuts.

Pecan Topping

  • In a medium bowl, stir together maple syrup, butter, brown sugar, egg, maple extract and salt until well combined.
  • Stir in pecans until well coated with maple syrup mixture.
  • Set aside until brownies are partially baked.
Keyword brownies, chocolate, maple pecan

Raspberry Lemonade Brownies

Raspberry Lemonade Brownies by Brownie Mischief

Raspberry Lemonade Brownies are the perfect easy recipe for spring and summer. They’re so pretty and delightfully delicious! The fudgy lemon batter is brightened with fresh lemon zest and raspberries, then topped with a sweet-tart burst of flavor and color from fresh raspberries. The icing contains no food coloring. Just three raspberries will give you that luscious shade of pink!

I want to clarify that lemon brownies are not lemon bars. We all know what a lemon bar is. The one we all know and love has a lemon curd filling on a shortbread crust, possibly drizzled with lemon icing or sprinkled with powdered sugar. The lemon brownie is a whole different animal. Don’t mistake lemon brownies for lemon cake either. Lemon brownies contain white chocolate which gives them a rich, fudgy texture like their chocolate cousins. We may be tempted to call them blondies, but blondies have a butterscotch flavor and typically don’t contain chocolate. Now that we got that straightened out, we can sleep peacefully tonight.

Raspberry Lemonade Brownies

Course Dessert
Servings 16 bars

Ingredients
  

Raspberry Lemonade Bownies

  • 6 ounces (170g) white chocolate, finely chopped
  • ½ cup (113g) unsalted butter, cubed
  • ¾ cup (150g) granulated sugar
  • 2 large eggs
  • 1 large egg yolk
  • ¼ cup (59ml) fresh lemon juice
  • Zest of two medium lemons
  • ½ teaspoon fine sea salt
  • 1 ¾ cups (223g) all purpose flour, sifted
  • 1 cup (170g) raspberries plus extra for serving, if desired

Raspberry Lemonade Icing

  • 3 raspberries
  • 1 ¼ cups (142g) powdered sugar, sifted
  • 1 tablespoon (14g) melted butter
  • 2-3 tablespoons (30-45ml) fresh lemon juice

Instructions
 

Raspberry Lemonade Bownies

  • Preheat the oven to 325ºF (165ºC). Line an 8-inch square baking pan* with parchment paper.
  • In a medium microwaveable bowl, melt the white chocolate and butter in the microwave for 20 second bursts, stirring after each one. Alternately, melt the white chocolate and butter on the stovetop in a heat safe bowl set over a pan of barely simmering water. Stir gently until smooth.
  • In a large bowl, whisk together the sugar, eggs, egg yolk, lemon juice, zest and salt until smooth and well combined. Stir in the melted white chocolate mixture. Add the flour and mix just until combined. Gently stir in the raspberries.
  • Transfer the batter to the prepared baking pan. Bake until the top is set, the edges are light golden brown and a toothpick inserted into the center comes out with a few moist crumbs on it, about 23-28 minutes. Let the brownies cool in the pan.

Raspberry Lemonade Icing

  • In a medium-size bowl, smash the raspberries with a fork.
  • Add the powdered sugar, melted butter and 1 tablespoon of lemon juice. Whisk until smooth, adding more lemon juice as needed. Spread the icing over the cooled brownies.
  • Cut into 2-inch squares and serve with additional raspberries, if desired.

Notes

*To find the 8 x 8 inch pan I used, click here.
 

Pumpkin Cheesecake Crumble Brownies

pumpkin cheesecake crumble brownies

It’s Fall 2020. We need chocolate! We need pumpkin spice! And we need it drenched with caramel! These satisfying brownies check all of the boxes with multiple layers of comfort. A rich chocolate brownie is the base. The next layer is heavenly pumpkin cheesecake. The topping is a buttery crumble that rivals the best crumb cake. Finally, as if that isn’t enough, it’s drizzled with caramel sauce!

If it sounds complicated, don’t worry, it’s not. Each layer is super easy to make. You can use your favorite store bought caramel sauce to top it with. Vanilla ice cream and/or whipped cream are optional, but highly recommended toppings also. Just saying.

The layers go unexpectedly well together and make the perfect dessert for Halloween or Thanksgiving. I’m even going to add these beauties to my Christmas dessert table this year. Enjoy! You deserve it.

Pumpkin Cheesecake Crumble Brownies

Chocolate brownies with pumpkin cheesecake and crumb topping, topped with caramel sauce.
Course Dessert
Servings 12

Ingredients
  

Crumb Topping

  • 1 ½ cups (6 3/4 ounces) all purpose flour
  • ½ cup (3 1/4 ounces) brown sugar
  • 1 ½ teaspoons ground cinnamon
  • ½ teaspoon salt
  • ¾ cup (1 1/2 sticks) unsalted butter

Pumpkin Cheesecake Layer

  • ¾ cup (6 ounces) cream cheese, softened
  • 1 cup (8 ounces) canned pumpkin
  • 2 eggs
  • 6 tablespoons sugar
  • 1 ½ teaspoons ground cinnamon
  • ¼ teaspoon ground ginger
  • ¼ teaspoon ground nutmeg

Brownie Layer

  • ½ cup (1 stick) unsalted butter
  • 1 â…› cup (8 ounces) granulated sugar
  • ½ cup (2 1/8 ounces) Dutch-Process cocoa powder
  • 1 teaspoon vanilla extract
  • ½ teaspoon baking powder
  • ¼ teaspoon salt
  • 3 eggs
  • ¾ cup (3 3/8 ounces) all purpose flour
  • ½ cup caramel sauce, purchased or homemade warmed if desired

Instructions
 

Crumb Topping

  • In a medium bowl, combine flour, brown sugar, cinnamon and salt.
  • Cut in butter using a pastry blender or your fingers until well-combined and crumbles are pea-sized. Press crumbles together to make large quarter-sized chunks.
  • Set aside in refrigerator.

Pumpkin Cheesecake Layer

  • Preheat oven to 350º. Line a 9-inch square baking pan with parchment paper.
  • In a medium bowl, beat cream cheese with an electric mixer until smooth.
  • Add pumpkin, eggs, sugar, cinnamon, ginger and nutmeg and beat until well combined. Set aside.

Brownie Layer

  • Melt 1 stick of butter in a large microwaveable bowl.
  • Stir in sugar until combined
  • Stir in cocoa powder, vanilla, baking powder and salt.
  • Add the eggs and beat until smooth
  • Add the flour and mix until just combined.
  • Spread brownie batter into prepared baking pan. Smooth with a spatula.
  • Spread pumpkin cheesecake batter over the top of brownie batter. Smooth with a spatula.
  • Sprinkle crumb topping evenly over the top of pumpkin cheesecake layer.
  • Bake for 40-50 minutes until a toothpick inserted into pumpkin cheesecake layer comes out clean.
  • Let cool completely. Cut into squares and serve with caramel sauce.

Cocoa Meringue Brownies

One of my favorite things to top desserts with are meringue cookies. They’re as light as air and they look so pretty and whimsical! The color and flavor combinations are endless, so you can really have some fun getting creative. I decided to whip some up, especially for placing on top of my favorite brownies. They take even the most humble brownies to a new level. You can use your favorite brownie recipe or even a boxed brownie mix. I won’t judge! I like to make the meringues a day or two ahead since they take quite a while to bake in the oven. While they bake, a subtle chocolate scent will waft through your kitchen, reminding you of the smell of hot cocoa. They even taste like hot cocoa! You can make your brownies a few hours ahead or the night before. I cut mine into rounds with a 2 1/2-inch cutter. I cut 12 rounds of this size from a 13 x 9-inch batch of brownies. Right before serving, spoon some thick, glossy chocolate ganache on the brownies, then top them with your pretty meringues! To make these little bits of chocolate heaven, you’ll need:

  • 1 batch Cocoa Meringues (recipe below)
  • 1 batch of your favorite brownies
  • 1 batch chocolate ganache (see notes)

Cocoa Meringues

Pretty, light and crispy treats that taste like hot cocoa!
Prep Time 30 minutes
Cook Time 2 hours
Total Time 4 hours 30 minutes
Course Dessert
Servings 1 batch

Ingredients
  

  • 4 large egg whites, room temperature
  • â…› teaspoon cream of tartar
  • â…› teaspoon fine sea salt
  • â…“ cup (67g) fine granulated sugar
  • ½ cup (60g) powdered sugar
  • ¼ cup (25g) unsweetened cocoa powder, sifted
  • Brown gel food coloring *optional

Instructions
 

  • Preheat oven to 200ºF (95ºC). Line two baking sheets with parchment paper.
  • Sift together the powdered sugar and cocoa powder in a medium-sized bowl and whisk until well blended.
  • Place the egg whites in a large bowl. Whip the egg whites with the whip attachment of an electric mixer, at medium speed, until foamy.
  • Add the cream of tartar and salt to the egg whites. Whip at medium-high speed until soft peaks form.
  • Gradually add the granulated sugar and continue whipping, at medium-high speed until stiff, glossy peaks form.
  • Stop the mixer. Sprinkle the powdered sugar and cocoa mixture over the egg whites and whip at low speed until incorporated, about 10 seconds.
  • *This step is optional. Place a large, disposable pastry bag, fitted with a round piping tip, into a tall drinking glass. (I used a Wilton tip #12.) Fold the top third of the bag over the glass, forming a cuff. Using a small, clean paintbrush, paint thin, vertical stripes of food coloring on the inside of the bag, from the piping tip to the edge of the fold.
  • Spoon the egg white mixture into the pastry bag. Pipe small kisses, 1 inch apart, onto the prepared baking sheets. (I made mine about 3/4-inch to 1-inch in diameter. If you'd like larger kisses, use a larger size piping tip.)
  • Bake for 1 1/2 hours. Turn off the oven and leave the meringues in oven to cool and continue drying out for an additional 2 hours. Store tightly covered at room temperature for up to 3 days.

Notes

To make the chocolate ganache, I used a ratio of two parts semi-sweet chocolate to one part heavy cream. (Weighing the ingredients will give you the most accurate ratio.) Place 8 ounces. (227g) of chopped semi-sweet chocolate into a medium bowl. Heat 1/2 cup (4 oz/ 118ml) of heavy cream in a small saucepan over medium heat. Bring the cream just to a boil. Pour the hot cream over the chocolate, making sure to cover it completely. Let sit for 2 minutes, then stir gently until smooth.