4ounces (113g)shredded Gruyére cheese, divided(about 1 cup packed)
2slicescooked bacon, chopped
2teaspoons minced fresh Italian parsley, divided
2teaspoonsminced fresh chives, divided
Instructions
Preheat the oven to 400ºF (200ºC). Place the tomatoes on a baking sheet. Gently toss with a drizzle of olive oil. Season with salt and pepper.
Roast until the tomatoes are blistered, about 15-25 minutes, depending on the size of your tomatoes.
Turn the oven down to 350ºF (180ºC). Cook and drain the pasta according to the package directions.
Set aside 1/4 cup (28g) of each of the cheeses for the top. In a small bowl, whisk the milk and heavy cream together.
In a 2-quart oven safe pot,* melt the butter over medium heat. Stir in the flour and cook for 1 minute.
Slowly whisk in the milk and cream. Heat until thickened, whisking out any lumps. Season with salt and pepper to taste. (I used 1/2 teaspoon salt and 1/4 teaspoon pepper.)
Remove from heat. Gradually stir in 3/4 cup (85g) each cheddar and Gruyere cheeses. Taste the sauce and season with more salt or pepper if necessary.
Fold in the cooked pasta, roasted tomatoes, bacon, 1 teaspoon of parsley and 1 1/2 teaspoons of chives. Top with remaining cheese.
Bake in top third of the oven, just until cheese is melted, about 7-10 minutes. Sprinkle with the remaining parsley and chives.
Notes
If you watched the video on Instagram or TikTok, you may have noticed I baked my mac & cheese in a heart-shaped Dutch oven. To find a similar pink heart Dutch oven, click here. To find a blue heart Dutch oven , click here,
A cute little, stress-free, perfectly pink heart cake is my gift to you for Valentine’s Day. The vanilla cake is soft and fluffy. The frosting is super easy and delicious, with only two ingredients. It all comes together with fresh strawberries and it’s so good, you won’t want to share.
Little Strawberry Heart Cake
A six inch heart shaped vanilla cake with fresh strawberries and two-ingredient frosting
1tablespoonvegetable oil or neutral oil of your choice
1largeegg
½teaspoon pure vanilla extract
⅓cup whole milk, room temperature
3tablespoonssour cream, room temperature
8ouncescream cheese, softened
17.5 ounce jarMarshmallow Fluff
tiny droppink gel food colorI used Americolor deep pink*
Optional Decor
strawberries
meringue powder** or pasteurized egg whites
sugar
Instructions
In a small bowl, combine strawberries and 2 teaspoons sugar. Set aside to macerate for about 30 minutes.
Preheat oven to 350ºF. Line the bottom of a 6-inch heart shaped cake pan*** with parchment paper. Grease and flour the sides.
In a medium bowl, whisk together flour, baking powder and salt.
In a large bowl, cream butter, sugar and oil with an electric mixer, until light and fluffy.
Beat in egg and vanilla in two separate additions until well combined.
In a small bowl, whisk together milk and sour cream.
Beat flour mixture into batter in two additions, alternating with milk mixture.
Transfer batter to prepared cake pan. Bake until toothpick inserted in the center comes out clean, about 25-30 minutes. Let cake cool in pan 10 minutes then turn out onto a cooling rack to cool.
In a large bowl, stir cream cheese with a spatula to smooth out lumps.
Add marshmallow fluff and beat until well combined. Add food gel color with a toothpick and beat until evenly distributed.
Split cake into two layers. Top the bottom layer with frosting. Drain strawberries and spoon onto cake. Top with second layer, then more frosting.
Optional Decor
To make sugared strawberries, mix 1 part meringue powder with 3 parts water. Dip strawberries in meringue mixture, cover with sugar, then let dry. Alternately you can dip the strawberries in pasteurized egg whites, cover with sugar, then let dry.
Notes
*To find the gel food color I used, click here.**To find meringue powder, click here.***To find the heart cake pan I used, click here.
The weeks following the winter holidays always feel peaceful to me. The rush is over and it’s time to catch my breath and rest. When it’s chilly and raining outside, I love spending time at home curled up in my coziest fluffy pajama bottoms and fuzzy socks. Give me a blanket, 75 pillows, a warm cup of tea and these Cinnamon Crumble Scones for ultimate coziness!
The crumb topping on these scones will remind you of a cinnamon crumb cake, which makes them extra nostalgic and comforting. The technique of folding the dough over itself gives them a flaky layered texture. For the tenderest scones, make sure not to over work your dough.
To watch Instagram reel, click here. To watch extended TikTok video showing baking process, click here.
In a medium bowl, combine flour, brown sugar, sugar cinnamon and salt.
Work in butter with your fingertips until it looks like wet sand. Press together to make dime size chunks.
Set aside in refrigerator until ready to use.
Cinnamon Filling
In a small bowl, mix filling ingredients together until well combined.
Scones
Preheat oven to 375ºF. Line a large baking sheet with parchment paper.
In a large bowl, whisk together flour, baking powder and salt.
Work butter into flour mixture with your fingertips or with a pastry blender until pea sized pieces are formed.
In a small bowl, whisk together heavy cream, sour cream and vanilla extract.
Stir cream mixture into flour mixture a little at a time until dough comes together. If your dough is too dry add 1-2 more teaspoons of heavy cream.
Turn dough out onto a lightly floured surface. Fold dough over onto itself a couple of times.
Pat dough into an approximately 9 x 5-inch oval. Spread cinnamon filling on half of the dough to within 1/2-inch from the edges. Fold dough in half bringing short ends together. Press edges to seal.
Shape dough into a 7-inch round, about 3/4-inch thickness. Cut into 8 wedges. (Or 6 wedges if you prefer larger scones.)
Pinch the pointed tip of the wedges and tuck under to seal. This helps to prevent the top layer from sliding off while baking. Place wedges about 2-inches apart onto prepared baking sheet.
Brush tops of scones with heavy cream. Top with crumb topping. Bake until light golden brown, about 18-22 minutes.
Transfer scones to a cooling rack to cool. Drizzle with icing.
Icing
In a small bowl, whisk together powdered sugar, butter, 1 tablespoon of milk and vanilla. Add additional milk until desired consistency is reached.
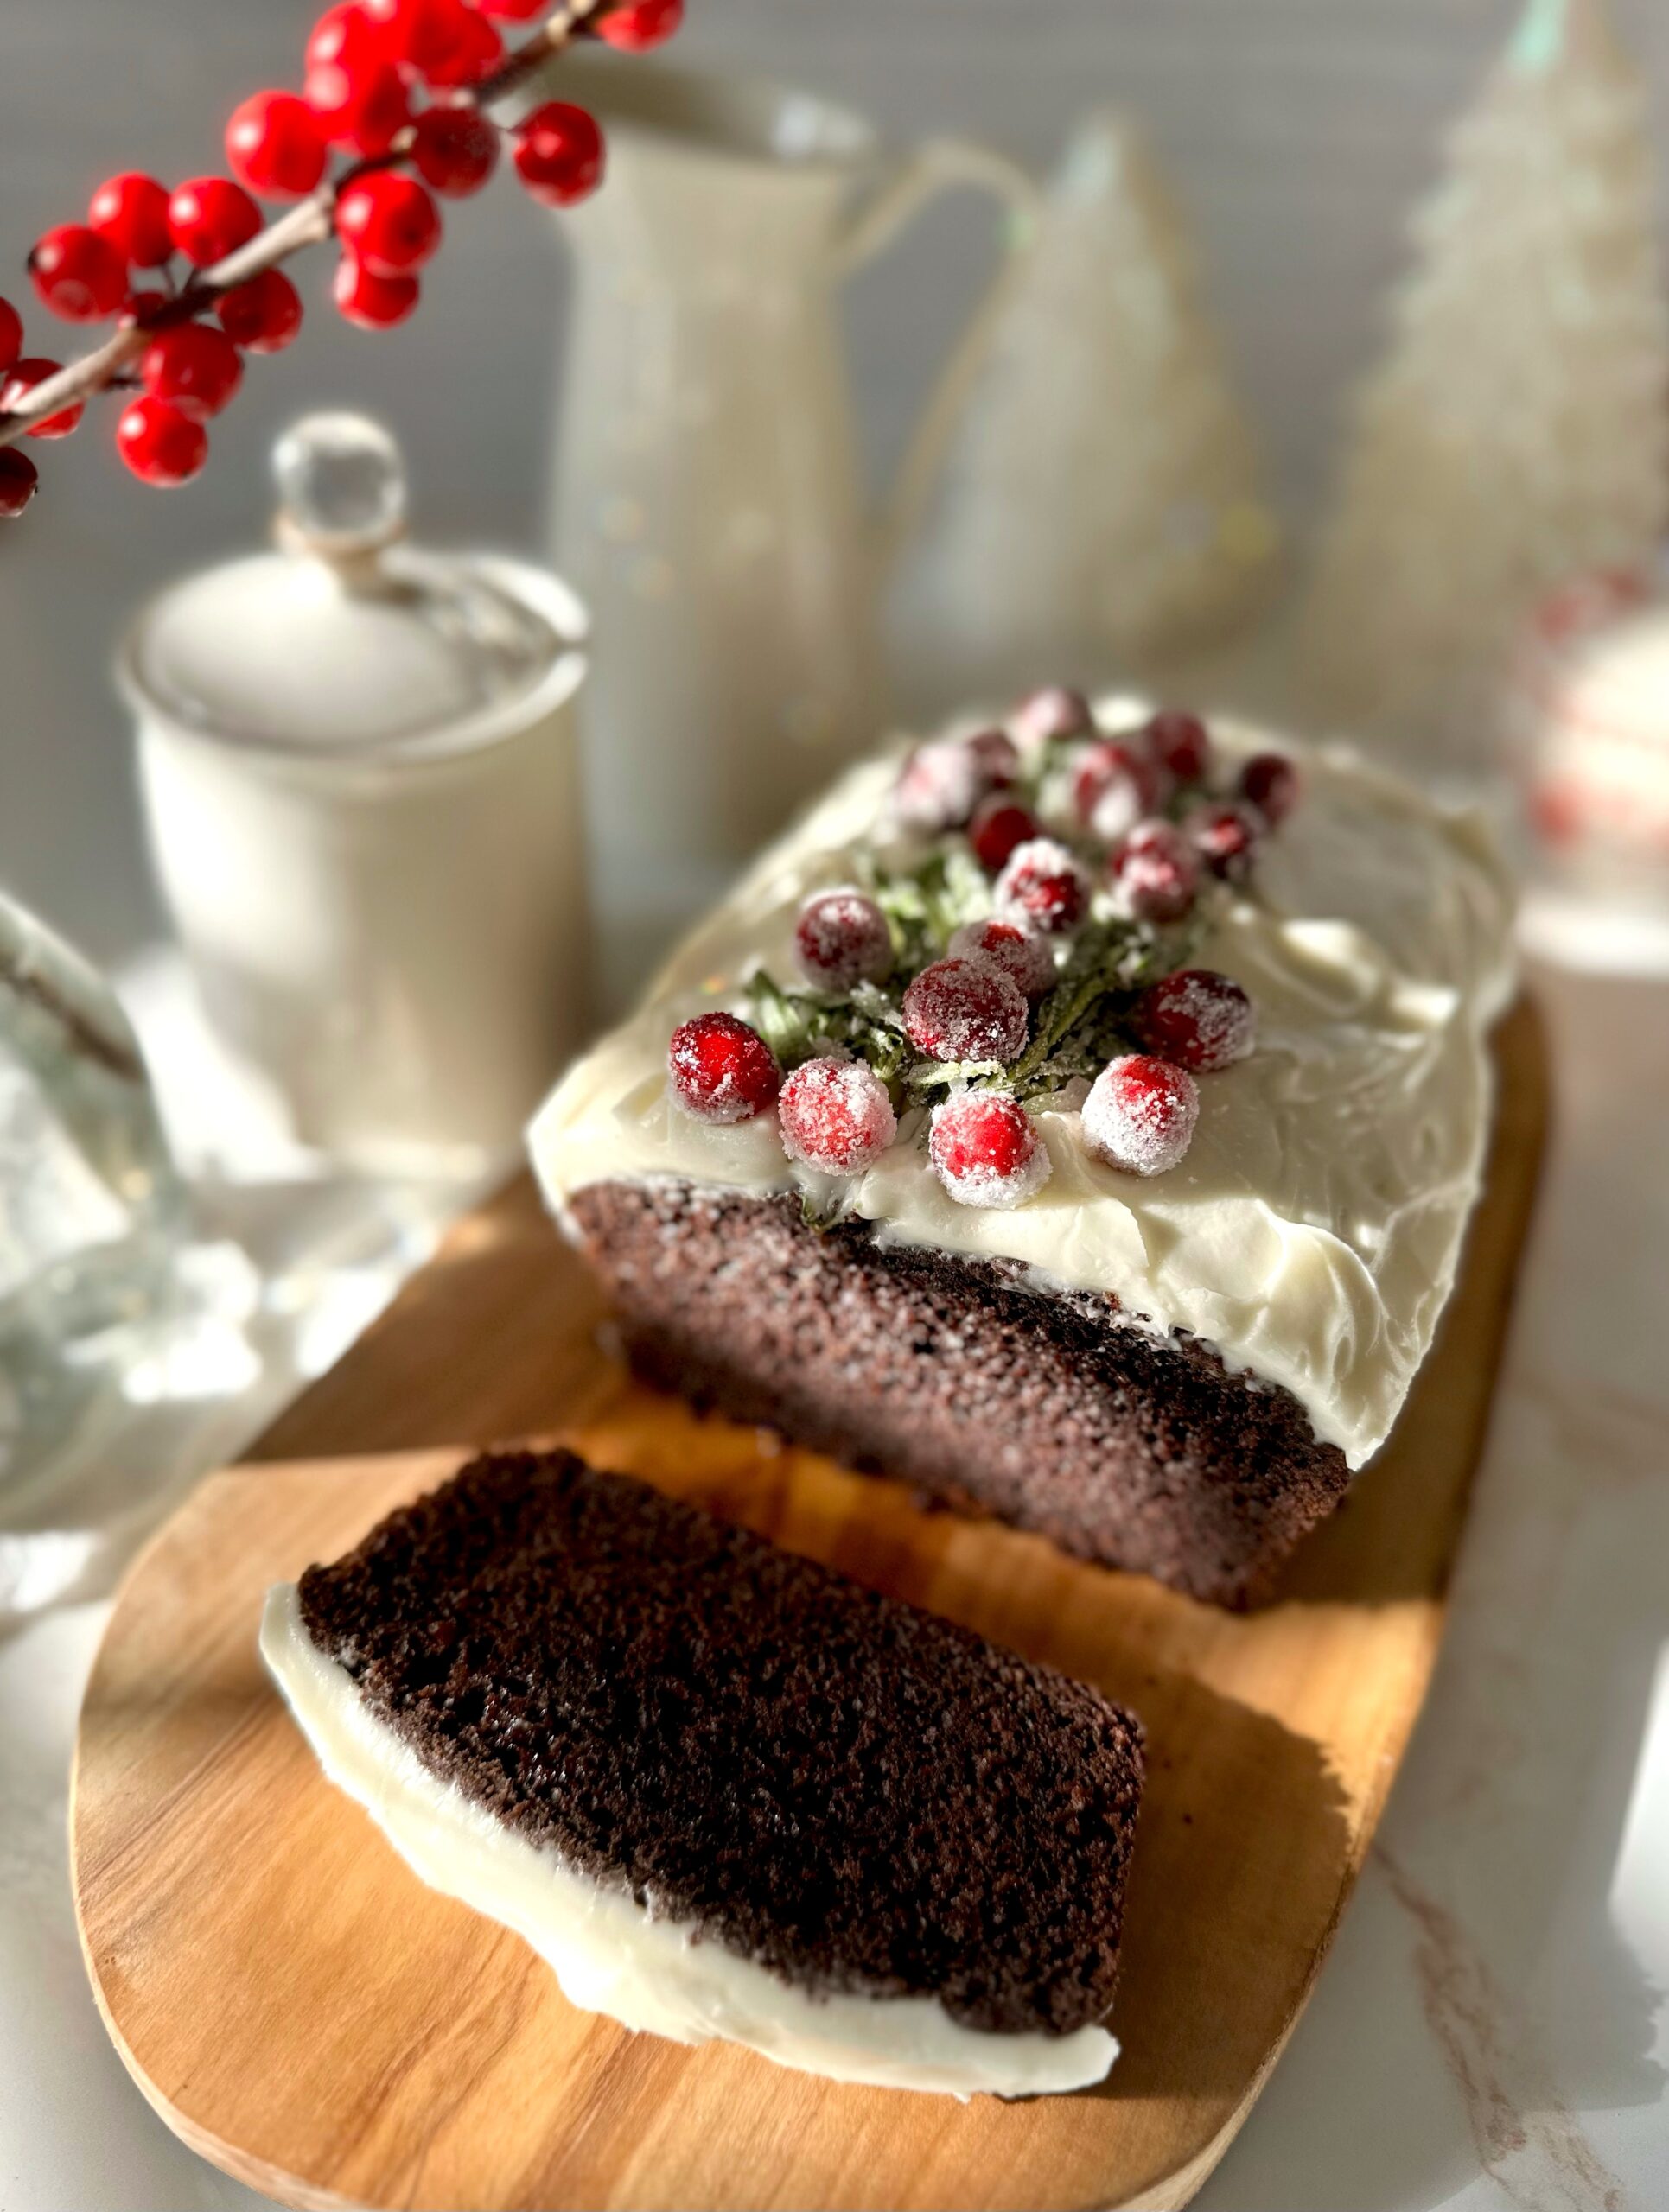
Chocolate gingerbread is gingerbread’s elegant sister. It has the warm spices we love in gingerbread combined with the earthy depth of chocolate. Topping this rich, tender loaf with silky cream cheese frosting is the best possible choice to take it over the top. It’s a lovely loaf to enjoy during the holiday season and beyond. Enjoy it with a hot drink for a cozy, comforting winter treat.
Make sure to check out my method for making sugared cranberries below. No raw eggs required!
½cup (115ml)vegetable oil or neutral oil of your choice
2largeeggs, room temperature
1teaspoonpure vanilla extract
½cup (113g)sour cream, room temperature
½cup (118ml)whole milk, room temperature
Cream Cheese Frosting
¼cup (57g)cream cheese, softened
2tablespoons (28g) unsalted butter, softened
2cups (234g)powdered sugar, sifted
2-3tablespoons (30-45ml)whole milk, room temperature
¼teaspoonpure vanilla extract
1pinchfine sea salt
Instructions
Chocolate Gingerbread
Preheat oven go 350ºF (180ºC). Line the bottom of a 9 x 5-inch loaf pan with parchment paper. Grease the insides and dust with a mixture of equal parts flour and cocoa powder.
In a medium-size bowl, whisk together the flour, cocoa powder, cinnamon, ginger, baking powder, baking soda, salt, nutmeg, and cloves until well blended
In a large bowl, beat the brown sugar, oil, eggs and vanilla together until smooth.
In a small bowl, whisk together the sour cream and milk.
Add flour the mixture to the batter in two additions, alternating with the milk mixture, beating just until combined.
Transfer the batter to the prepared pan. Bake until a toothpick inserted into the center comes out clean, about 38-45 minutes.
Cool the loaf in the pan for 10 minutes, then turn the loaf out onto a cooling rack to cool completely. Frost with cream cheese frosting.
Cream Cheese Frosting
In a medium bowl, beat the butter and cream cheese together until smooth.
Add the powdered sugar, 2 tablespoons (30 ml) of milk, the vanilla and salt. Beat until smooth. Add additional milk, if needed, until your desired consistency is reached.
Notes
To make sugared cranberries and rosemary for garnish: Mix 1 teaspoon of meringue powder* with 1 tablespoon of water. Place 1 cup of fresh cranberries in a bowl and coat them in the meringue powder mixture. Drain any excess liquid then coat the cranberries with granulated sugar. Place them on a parchment lined baking sheet to dry at room temperature for at least 1 hour. Use the same method for sprigs of rosemary.*To find meringue powder, click here.
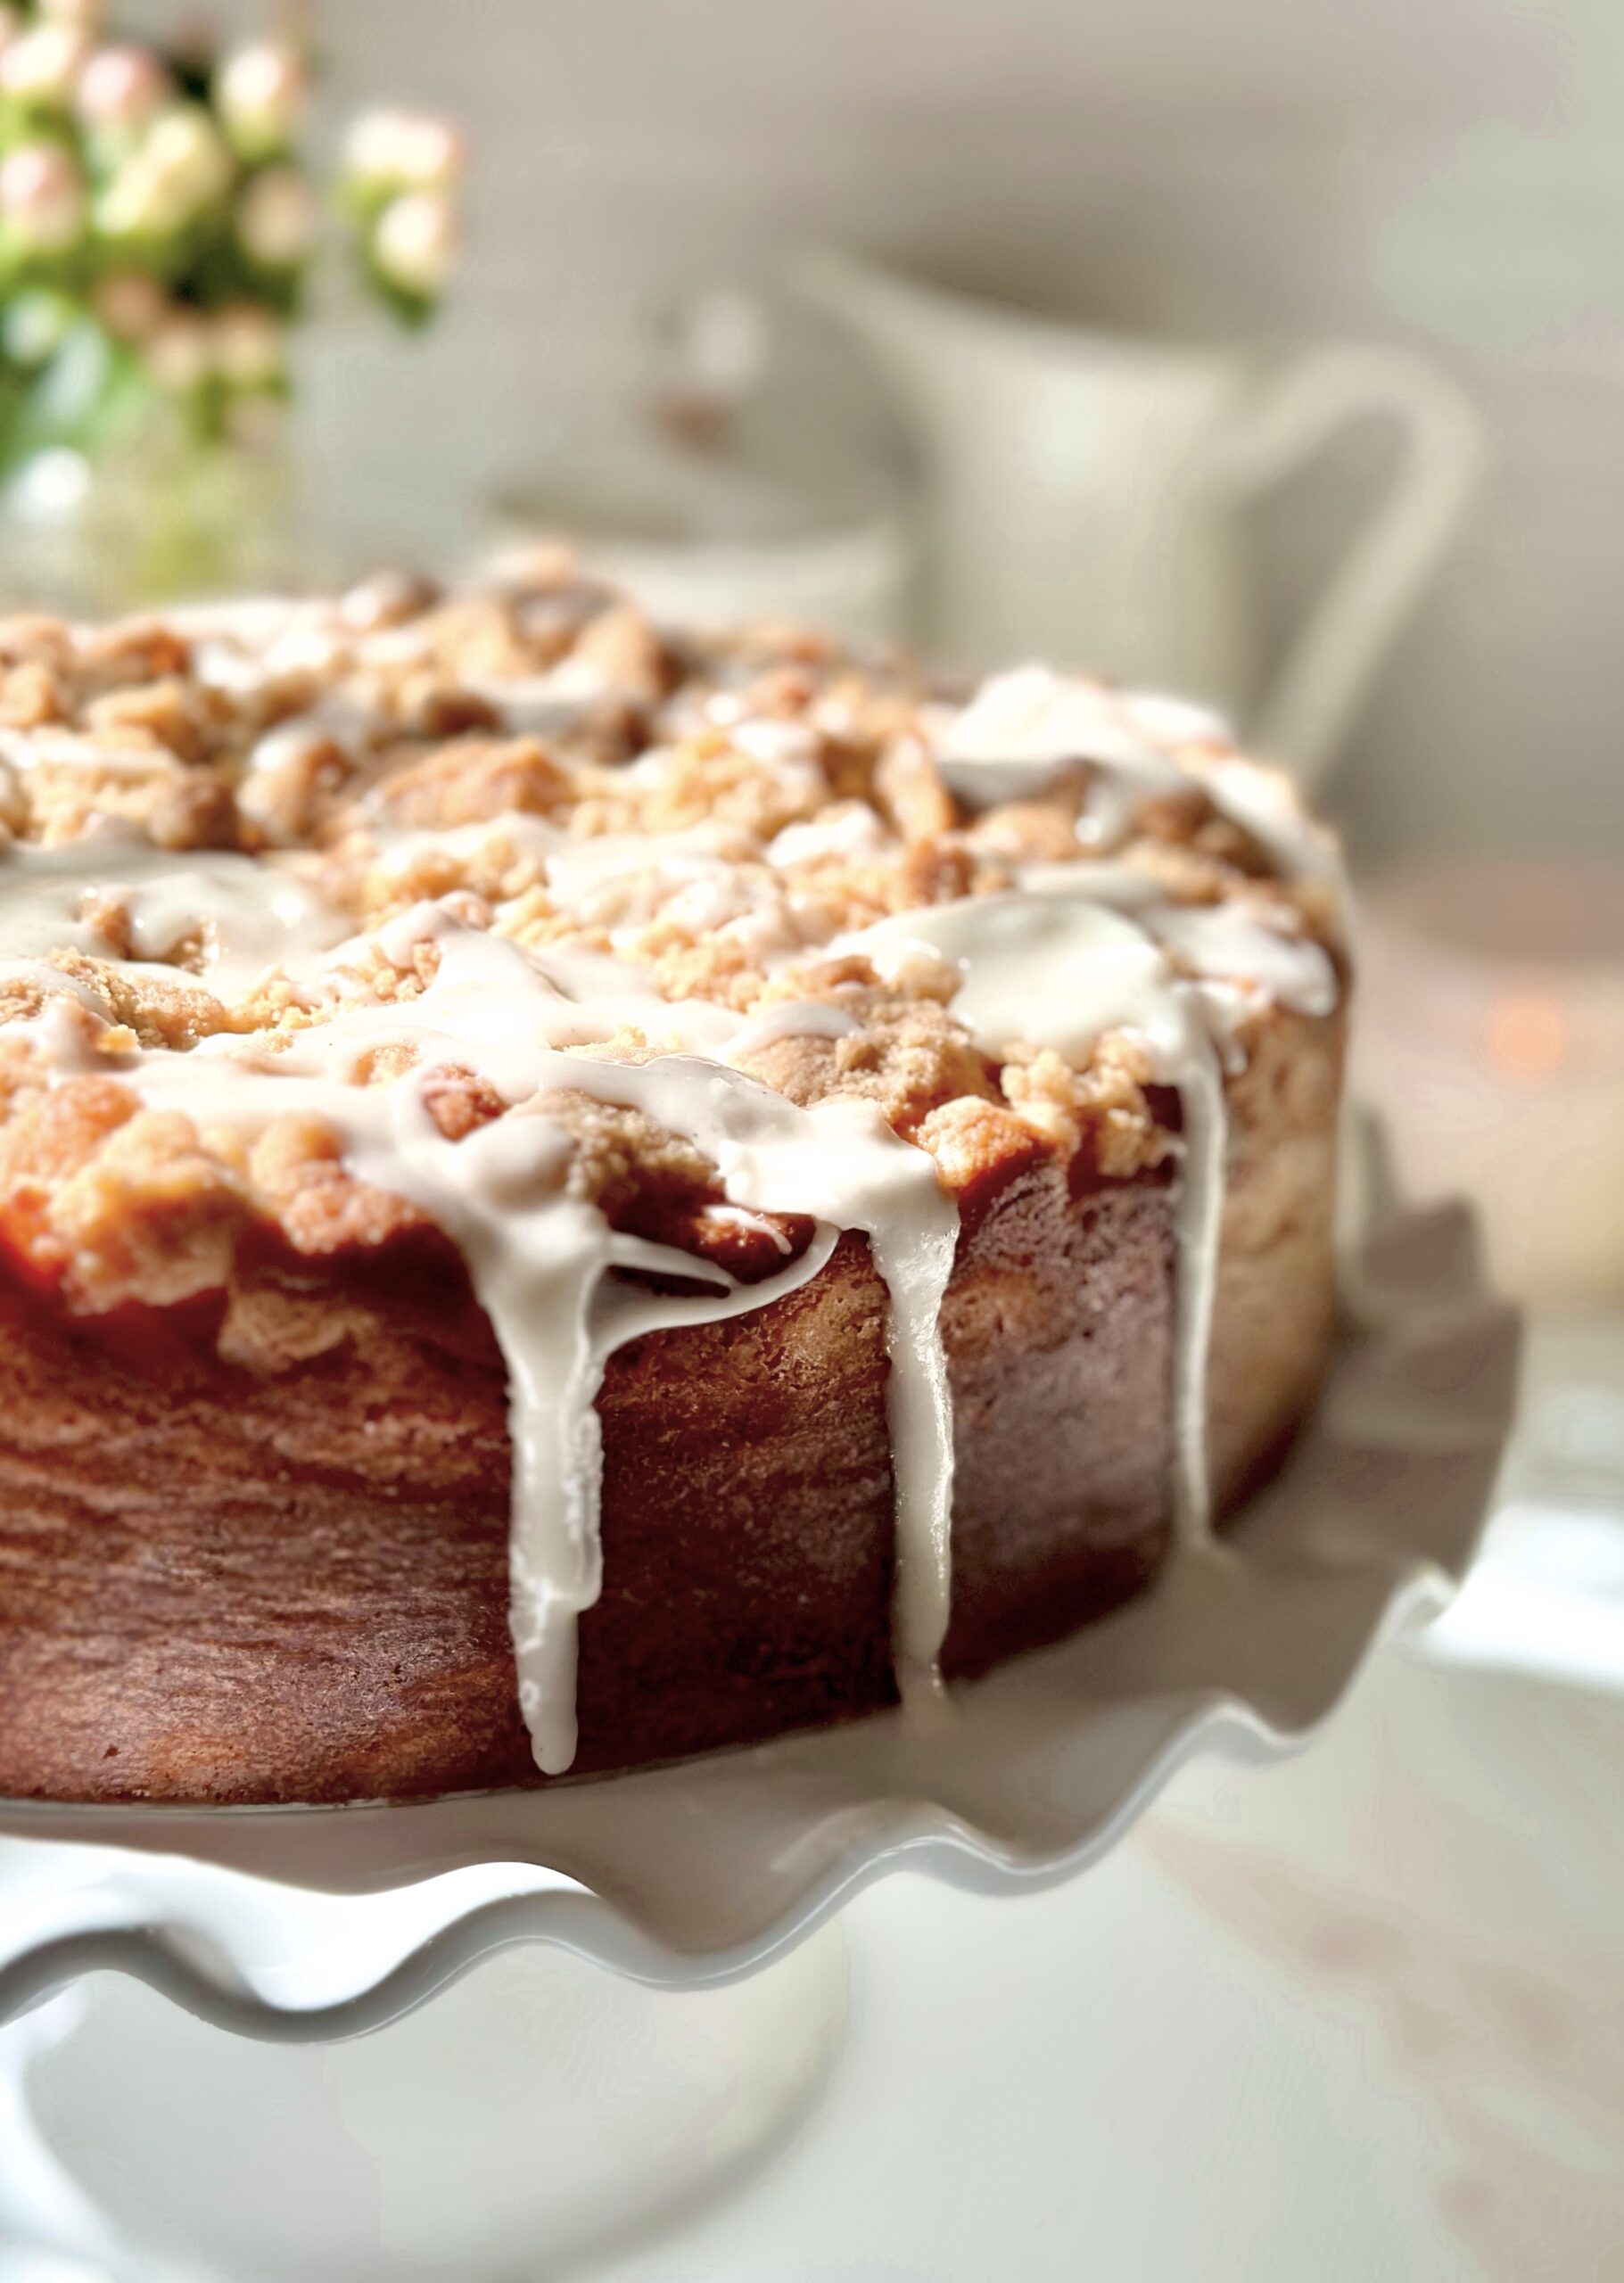
I remember my grandma making coffee cakes and sweet muffins for breakfast, along with eggs, sausages, hot coffee and a big pitcher of milk on the table. Why do most of our grandmothers cook and bake so well? Because they’ve had decades of trial and error to perfect their recipes, tweaking them here and there until they’re approved and loved by their families, neighbors and friends. This cake has had its share of trial and error. She has earned her place as a well-loved, delicious, beautiful queen of coffee cakes.
A classic coffee cake is usually a subtly sweet cake with cinnamon, crumb topping and maybe some icing. They’re called coffee cakes because they go so well with a cup of coffee, not necessarily because they contain coffee. This Apple Crumb Cake has the elements of a classic coffee cake, but so much better! The cake is fluffy and soft, the crumb topping is chunky and plentiful, and the apples are perfectly tender. And don’t get me started about the icing!
Grandma's Apple Crumb Cake
Tender vanilla cake with generous crumb topping and vanilla icing
3cups (340g)chopped apples (1/2-inch pieces)Use any combination of your favorite baking apples.
2tablespoons (25g)sugar
½teaspoonground cinnamon
Crumb Topping
1cup (128g)all purpose flour
⅓cup (67g)brown sugar
3tablespoons (38g)sugar
¼teaspoonground cinnamon
Scant ¼teaspoon fine sea salt
6tablespoons (85g)cold, unsalted butter, cubed
Cake
1 ⅔cups (213g)all purpose flour, sifted
2teaspoonsbaking powder
½teaspoonfine sea salt
½cup (113g)unsalted butter, softened
1cup (200g)sugar
2largeeggs, room temperature
1 ½teaspoonspure vanilla extract
½cup (118ml)whole milk, room temperature
⅓cup (75g)sour cream, room temperature
Icing
2cups (234g)powdered sugar, sifted
2 tablespoons (28g)unsalted butter, melted
½teaspoonvanilla bean paste or pure vanilla extract
1pinchfine sea salt
3-4tablespoons (45-60ml)half & half cream, room temperature
Instructions
Apples
In a large skillet, melt the butter over medium heat. Add the apples, sugar and cinnamon.
Cook, stirring occasionally, until the apples are tender, about 7-10 minutes. Transfer the apples to a bowl and let cool to room temperature.
Crumb Topping
In a medium bowl, mix the flour, brown sugar, sugar, cinnamon and salt.
Work in the butter with your fingertips until the mixture looks like wet sand with no large pieces of butter remaining. Press together to make 1/2-inch chunks.
Cake
Preheat the oven to 325ºF (165ºC). Line a 9-inch cake pan with a removable bottom*, or a 9-inch springform pan, with parchment paper. Wrap the bottom of the cake pan with aluminum foil and place pan on a baking sheet.
In a medium bowl, whisk together the flour, baking powder and salt until well blended.
In a large bowl, cream the butter and sugar, with an electric mixer on medium speed, until light and fluffy. Beat the eggs and vanilla into the butter mixture in three separate addition, making sure each addition is incorporated before adding the next.
In a small bowl, whisk the milk and sour cream together. On low speed, beat the flour mixture into batter in three additions, alternating with milk mixture. Mix just until combined.
Transfer the batter to the prepared cake pan. Smooth the top with a spatula. Drain any excess liquid from the apples. Top the cake batter evenly with apples, then the topping mixture.
Bake until a toothpick inserted into the center of the cake comes out clean, about 50-60 minutes. Cool the cake in pan for 10 minutes. Remove the cake from pan and transfer it to a cooling rack to cool completely.
Icing
In a medium bowl, whisk together the powdered sugar, melted butter, vanilla, salt and 2 tablespoons (30ml) of half & half. Add additional half & half until the desired consistency is reached. Drizzle over the cooled cake.
Once upon a time, there was a little black bear who woke up from a long nap. As she stretched, she felt her tummy growl. She ventured into the morning sunshine and smelled something sweet. She sniffed the air, following the sweet fragrance until she came upon a beautiful purple tree. She climbed up to a comfy branch and ate the tender, purple blossoms to her heart’s content.
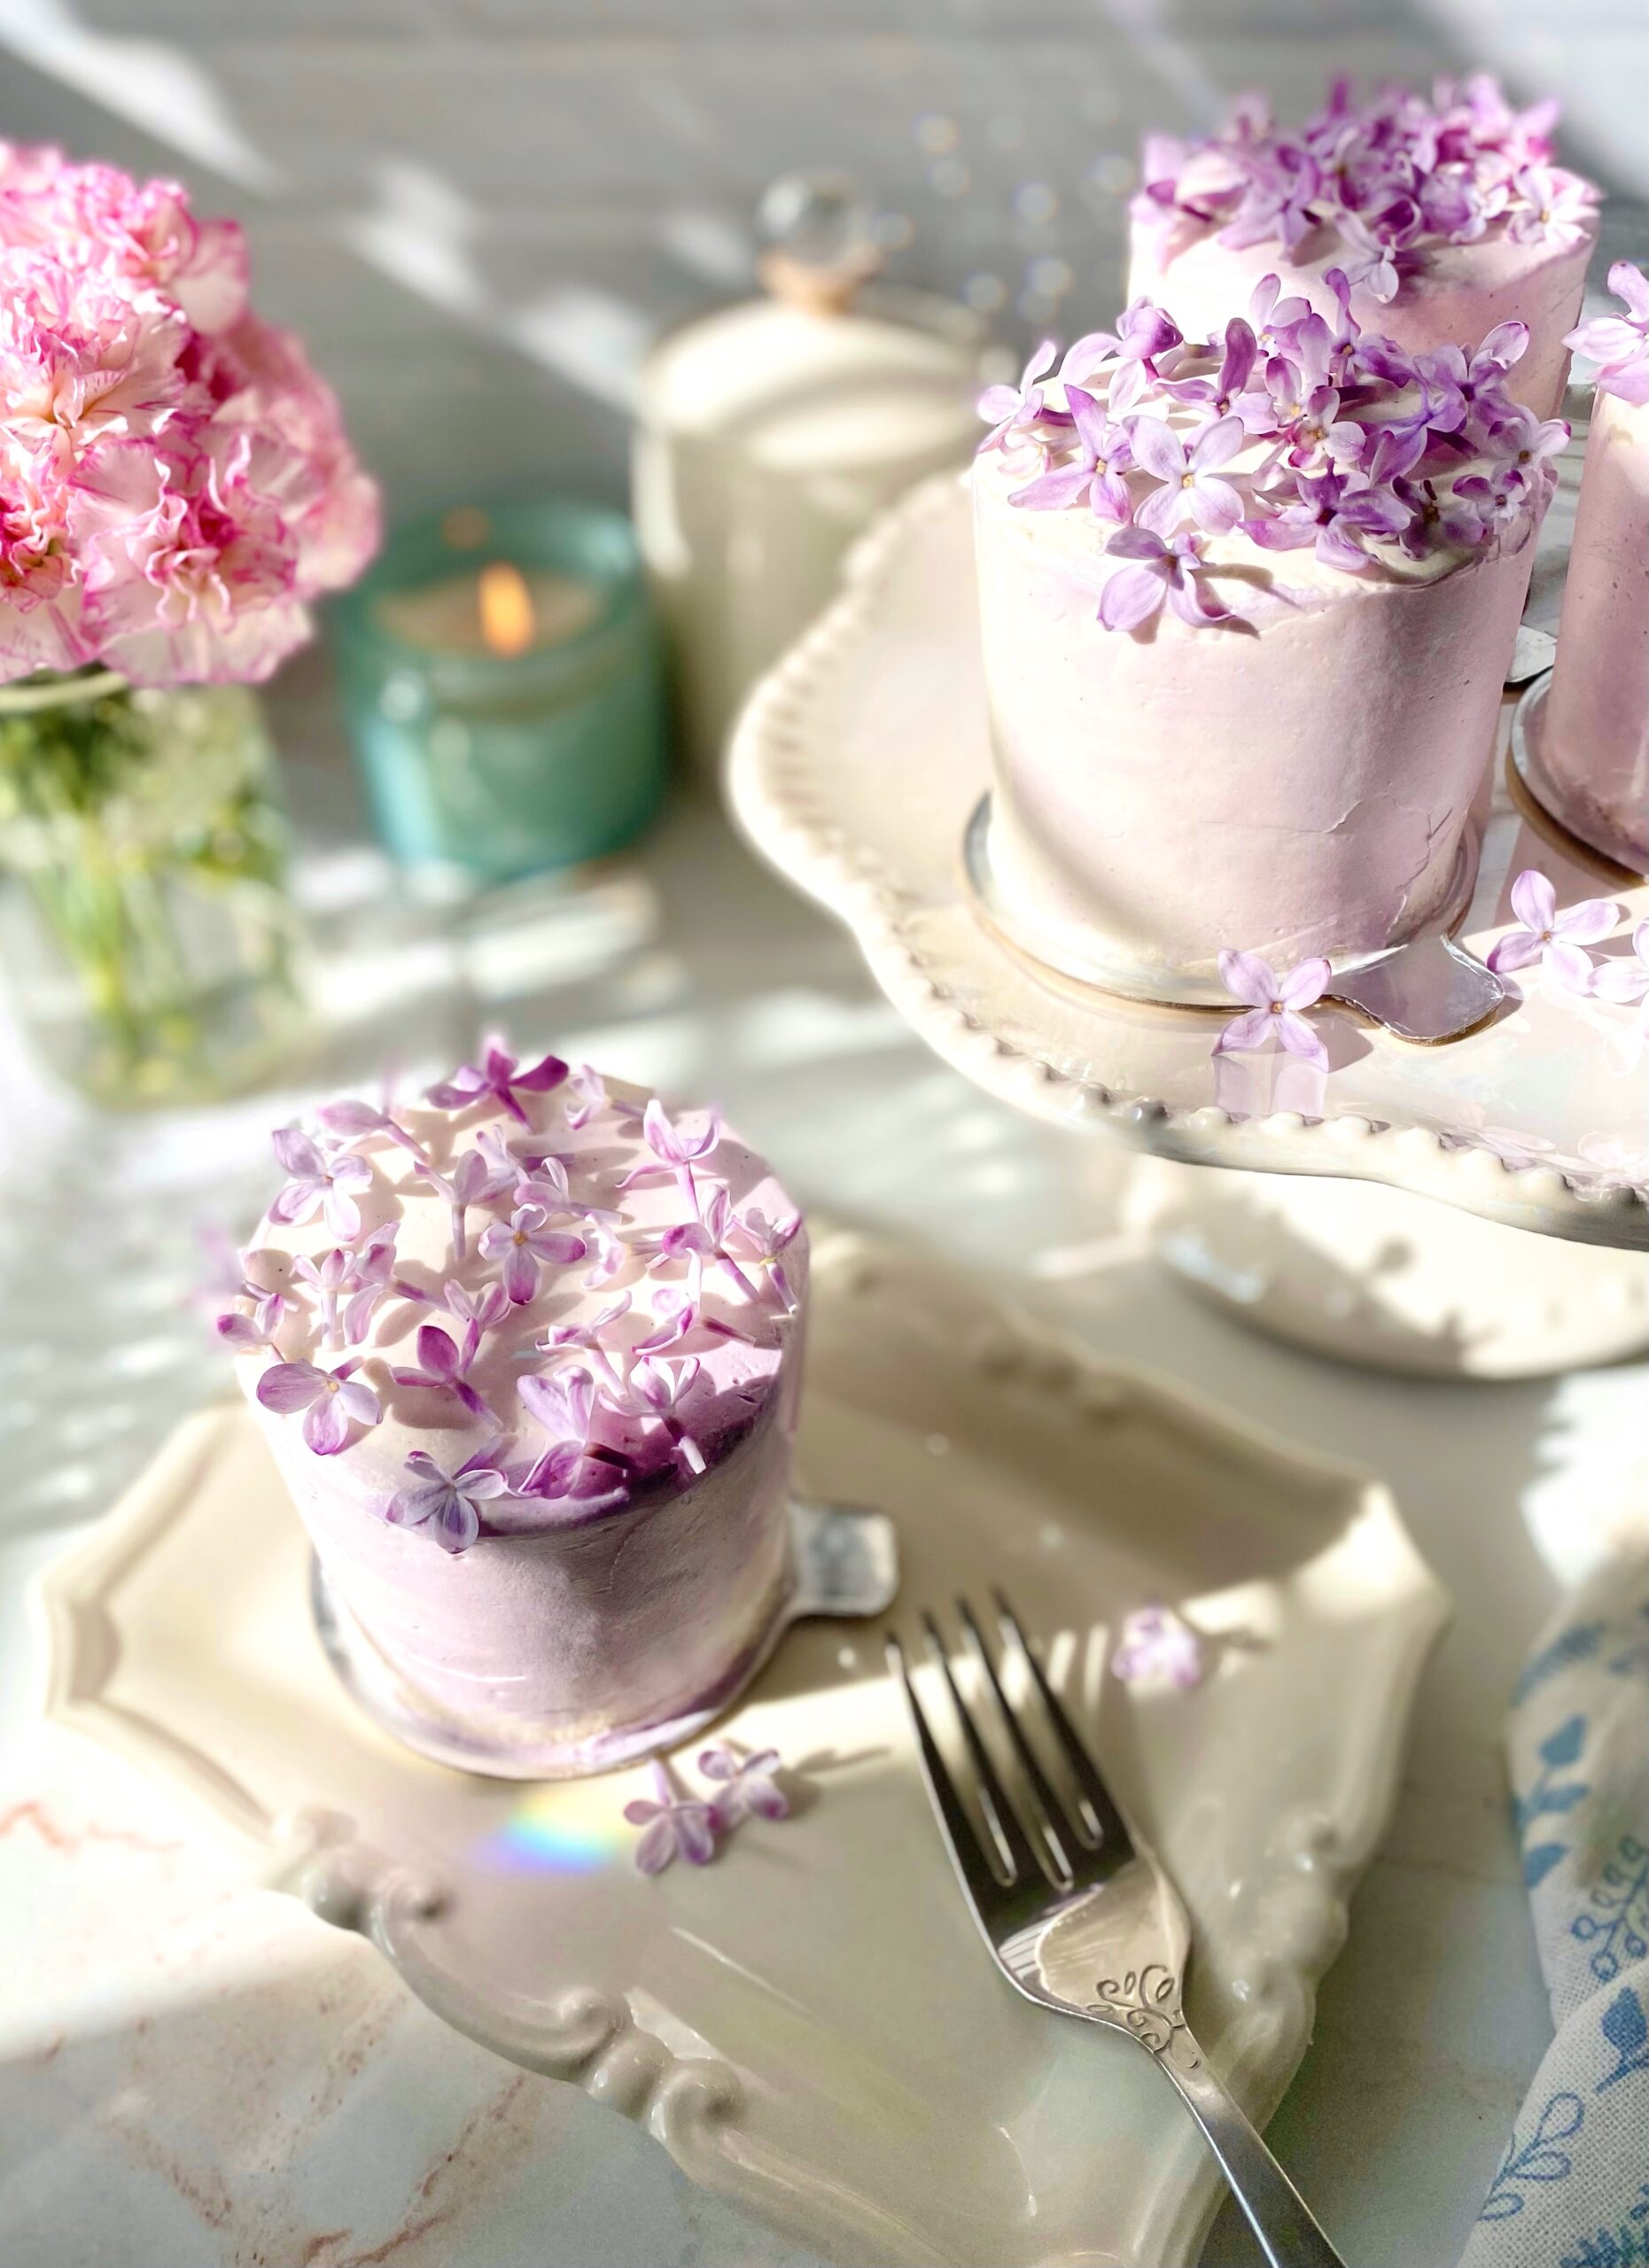
Bears, butterflies and bees know something good when they see it. We humans can also enjoy lilacs. I knew lilacs were edible, but I hadn’t tasted them until recently. The flavor reminds me of beets, slightly sweet with a vegetable aftertaste. I really wanted to try lilac syrup after seeing so many photos of pretty purple syrup online. I discovered that lilac syrup is not purple. It’s more of a dull, brownish blue-green. Many people use food coloring or blueberries to color their syrup. I also discovered that lilac syrup will turn a pretty shade of mauve by adding a small amount of lemon juice to the finished syrup. Since I would be using my lilac syrup inside of cake layers, I let it remain its natural color. I made a simple syrup with lilac blossoms and let them steep for a couple of hours. It was just long enough to give a subtle lilac flavor without being too floral. If you want a stronger lilac flavor, I suggest using more lilac blossoms rather than steeping longer to avoid bitterness.
I paired the lilac syrup with this soft, fluffy vanilla cake and silky Swiss meringue buttercream. If you aren’t a fan of lilac syrup, feel free to use vanilla simple syrup instead and just use the lilac blossoms to decorate your cakes. They look stunning on any cake or cupcakes.
Lilac Vanilla Mini Cakes
by Mari Vasseur
Soft, fluffy mini white vanilla cakes with lilac syrup and vanilla Swiss meringue buttercream, topped with lilac blossoms
½ cup (7g)lilac blossoms, rinsed and all stems removed
1teaspoonfresh lemon juiceoptional
White Vanilla Cake
2 ¾cups (319g))cake flour, sifted
2teaspoonsbaking powder
1teaspoonfine sea salt
½cup (113g)unsalted butter, softened
1 ¾cups (350g)ultra fine granulated sugar*Not powdered sugar
¼cup (2 oz or 57ml)vegetable oil or neutral oil of your choice
2teaspoonsvanilla bean paste or pure vanilla extract
4largeegg whites, room temperature
1largeegg, room temperature
½cup (118ml)sour cream, room temperature
1cup (237ml)whole milk, room temperature
Swiss Meringue Buttercream
4largeegg whites
1 ⅓cups (265g)ultra fine granulated sugar*Not powdered sugar
1 ½ cups (340g)softened, unsalted butter, cubed
1teaspoonvanilla bean paste or pure vanilla extract
¼teaspoon fine sea salt
1-2dropslilac gel good colorSee notes below
1dropviolet gel food colorSee notes below
Assembly
63-inch mini cake boards****See notes below
Lilac blossoms, rinsed and all stems removed
Instructions
Lilac Syrup
In a small saucepan combine the sugar and water. Bring to a boil over medium heat, stirring gently to dissolve the sugar. Add the the lilac blossoms and stir gently. Turn the heat down and simmer for 5 minutes.
Remove from heat and allow the lilac blossoms to steep for 2 hours. Pass the lilac syrup through a mesh sieve.
White Vanilla Cake
Preheat the oven to 350ºF (180ºC). Grease and flour two 9-inch round cake pans and line the bottoms with parchment paper.
In a medium-sized bowl, whisk together the cake flour, baking powder and salt until well blended.
In a large bowl, beat the butter, sugar, oil and vanilla bean paste with an electric mixer at medium speed, until pale and fluffy, about 3 minutes.
On medium speed, beat in the egg whites in two additions, then beat in the egg until incorporated. On low speed, beat in one third of the flour mixture, then beat in the sour cream just until combined. Beat in the remaining flour mixture in two additions, alternating with milk. Beat just until combined.
Transfer the batter to prepared cake pans. Bake until the tops of the cakes are light golden brown and a toothpick inserted in center comes out clean, about 28-33 minutes. Do not over bake.
Allow the cakes to cool in the pans for 10 minutes, then remove from the pans and transfer to a cooling rack.
Cut each cake into four 2 3/4-inch rounds using a cookie or biscuit cutter.
Using a pastry brush, brush the mini cakes generously with lilac syrup or vanilla simple syrup.
Swiss Meringue Buttercream
Combine the egg whites and sugar in a large heatproof bowl. Set over a pan of gently simmering water, making sure the water doesn't touch the bottom of the bowl.
Whisk constantly until the sugar is dissolved and a temperature of 160ºF (71ºC) is reached.
Transfer the mixture to the bowl of a stand mixer with a whisk attachment. Whisk on low speed, gradually increasing to medium-high speed. Whisk until glossy, stiff peaks form and the mixture reaches room temperature.
Turn the mixer to medium-low speed. Add the butter, a few pieces at a time, allowing it to fully incorporate before adding more. If the mixture looks curdled, keep mixing and it will correct itself.
Switch to a paddle attachment. On low speed, mix in the vanilla bean paste and salt. Continue mixing on low speed for a few minutes until smooth.
Remove about 3/4 cup of frosting and transfer it to a small bowl. Using a toothpick, place two tiny drops of lilac gel food color and one tiny drop of violet gel food color into the bowl. Mix with a spatula until well combined.
Assembly
Smear a bit of frosting on each mini cake board. Top each one with a cake round, a layer of frosting, then a second cake round. Frost with a crumb coat if desired. Refrigerate of 15 minutes. Frost the mini cakes with white Swiss meringue buttercream, then smear small amounts of lilac Swiss meringue buttercream around the sides and top. Smooth frosting with a bench scraper and smooth the tops with a small offset spatula. Decorate with lilac blossoms.
Vanilla Simple Syrup (optional)
Combine 1/2 cup sugar and 1/2 cup water in a small saucepan. Bring to a boil over medium heat, stirring gently to dissolve the sugar. When the sugar has dissolved, remove from heat and stir in 1 teaspoon vanilla bean paste or pure vanilla extract.
Notes
*If you can't find ultra fine granulated sugar, it's okay to substitute with regular granulated sugar.**To find the lilac gel food color I used, click here.***To find the violet gel food color I used, click here.****To find 3-inch mini cake boards, click here.