Bakery-Style PB & J Cookies

Bakery style PB & J cookies by Brownie Mischief

Many of us think of peanut butter & jelly as nostalgic comfort food. It brings back happy memories of childhood. A peanut butter & jelly sandwich in my school lunch box was a welcome favorite in the sandwich rotation. I created my ideal PB & J cookies with those nostalgic flavors in mind. These deluxe jumbo peanut butter cookies are worthy of packing in a grown-up lunch or enjoying as a comforting snack with a tall glass of ice-cold milk or with your favorite coffee drink.

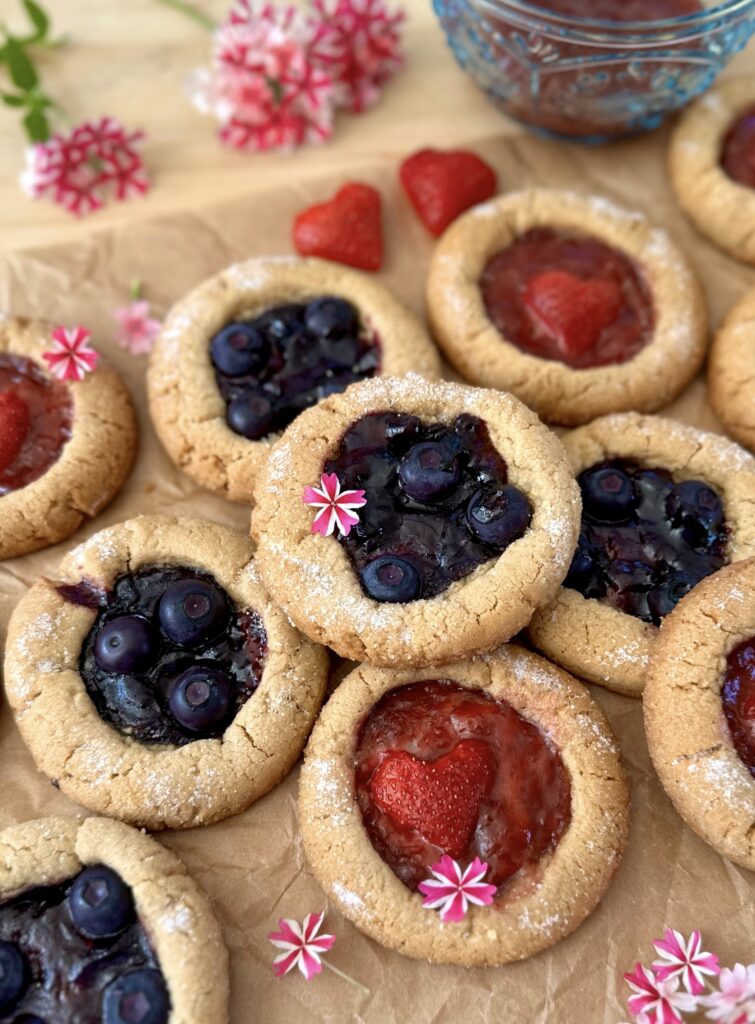
These cookies are a generous 3-inch size, but you can make them smaller if you wish. Keep in mind that the baking time will be shorter for smaller cookies. My favorite way to make these cookies is with blueberry jam and fresh blueberries. The strawberry ones took a few attempts to get right due to the juiciness of the strawberries. The instructions for the strawberry version of these cookies are in the notes below. Feel free to use your favorite jam flavor and have fun experimenting with different fruits or berries.


Bakery-Style PB & J Cookies

Jumbo bakery-style peanut butter cookies filled with jam & fresh fruit
Course Dessert
Cuisine American
Servings 12 3-inch cookies

Ingredients
  

  • 1 cup (128g) all purpose flour, sifted
  • ½ cup (57g) cake flour, sifted
  • ½ teaspoon baking soda
  • ½ teaspoon fine sea salt
  • ½ cup (113g) unsalted butter, room temperature
  • ¾ cup (191g) creamy peanut butter
  • ½ cup (100g) granulated sugar, divided
  • ½ cup (100g) packed brown sugar
  • 1 large egg, room temperature
  • 1 teaspoon pure vanilla extract
  • ¼ cup (76g) blueberry jam or preserves
  • 35-45 fresh blueberries

Instructions
 

  • Preheat the oven to 350ºF. Line 2 large cookie sheets with parchment paper.
  • In a medium-sized bowl, whisk together the all purpose flour, cake flour, baking powder and salt until well blended.
  • In a large bowl, beat the butter and peanut butter together, with an electric mixer on medium speed, until smooth. Place 2 tablespoons (25g) of the granulated sugar in a small, shallow bowl and set aside. Beat the remaining granulated sugar and the brown sugar into the butter mixture until light and fluffy. Beat in the egg, then the vanilla extract until well incorporated. On low speed, beat in the flour mixture just until combined.
  • Chill the cookie dough in the refrigerator, just until easier to work with, about 15 minutes. Divide the dough into 12 equal portions, (about 60g each). Form the portions into balls, then roll them in the reserved granulated sugar. Place them about 2 inches apart onto the cookie sheets. Make indentations in each ball using a 1-inch pastry tamper or use your thumbs. Fill each indentation with about a teaspoon of jam, then top with blueberries.
  • Bake the cookies until the edges start to turn golden brown and the jam begins to bubble, about 14-15 minutes. (The cookies will spread, but if your cookies spread too much, you can shape the hot cookies when they come out of the oven by immediately placing a large round cookie cutter onto the cookie sheet over each cookie and slide it around in a circular motion a couple of times. (Or you can refrigerate the dough balls until firm prior to baking to help reduce spreading.) Let the cookies cool on the cookie sheets for 1 minute, then transfer them to a cooling rack.

Notes

To make the strawberry version of these cookies, replace the blueberry jam with strawberry jam. Optional: Cut out 12 strawberry hearts (as shown in the photo). Place the strawberries in a small bowl. Sprinkle with 1 teaspoon of sugar and let macerate for 20-30 minutes to draw out the excess juices. If you skip this step, the juice from the strawberries may make the centers of your cookies soggy. Drain the strawberries, pat dry, then place them on the cookies with the jam before baking.
Keyword cookies, jam, peanut butter

Pink Raspberry Almond Cake

Pink Raspberry Almond Cake

My mother was allergic to strawberries so my father would make her raspberry desserts instead. He frequently made her a white cake topped with raspberries, which she adored. My parents are no longer with us, but baking this delicious cake brings back happy memories for me. This soft, plush almond cake is topped with naturally pink raspberry icing. The soft pink color makes it so lovely and perfect for Mother’s Day. It looks delightful topped with fresh raspberries and sliced almonds, which is an effortless way to add a touch of spring or summer.


Pink Raspberry Almond Cake

Soft, fluffy, single layer almond cake topped with naturally pink raspberry icing by Brownie Mischief
Course Dessert
Servings 8 servings

Ingredients
  

Almond Cake

  • 1 cup (113g) cake flour, sifted
  • â…“ cup (37g) almond flour
  • 1 teaspoon baking powder
  • ¼ teaspoon baking soda
  • ½ teaspoon fine sea salt
  • ¼ cup (57g) unsalted butter, room temperature
  • ¾ cup (150g) granulated sugar
  • 3 tablespoons (43ml) avocado oil or neutral oil of your choice
  • 1 large egg, room temperature
  • 1 large egg white, room temperature
  • 1 teaspoon pure vanilla extract
  • ½ teaspoon pure almond extract
  • ¼ cup (57g) sour cream, room temperature
  • ½ cup (118ml) whole milk, room temperature

Raspberry Icing

  • 8 large raspberries
  • 1 cup (120g) powdered sugar, sifted
  • 1 tablespoon (14g) unsalted butter, melted
  • 1 small dash fine sea salt
  • 1-2 tablespoons (15-30ml) whole milk, room temperature
  • Fresh raspberries for garnish optional
  • Sliced almonds for garnish optional

Instructions
 

Almond Cake

  • Preheat the oven to 350ºF (180ºC). Line the bottom of an 8-inch round cake pan with a parchment paper round.* Grease and flour the insides.
  • In a medium-sized bowl, whisk together the cake flour, almond flour, baking powder, baking soda and salt until well blended.
  • In a large bowl, beat the butter and sugar, with an electric mixer at medium speed, until light and fluffy. Gradually beat in the oil until incorporated. Beat in the egg and the egg white in two separate additions, beating until smooth and well combined. Beat in the extracts.
  • In a small bowl, whisk the sour cream and milk together until well blended. On low speed, add the flour mixture to the batter in two additions, followed by half of the milk mixture after each addition. Beat just until combined.
  • Transfer the batter to the prepared cake pan. Bake until a toothpick inserted into the center of the cake comes out clean, about 25-30 minutes, making sure not to over bake. Let the cake cool in the pan for 10 minutes, then turn the cake out and transfer it to a cooing rack to cool completely.

Raspberry Icing

  • In a small bowl, smash the raspberries with a fork. Press the smashed raspberries through a sieve to remove the seeds.
  • In a medium-sized bowl, whisk together the raspberries with the powdered sugar, melted butter, salt and 1 tablespoon (15ml) of milk until well combined. Add additional milk as needed to reach an easily spreadable consistency, but not watery. Whisk until smooth. Spread the icing over the cooled cake, letting it drip down the sides. Top with fresh raspberries and sliced almonds if desired.

Notes

*To find 8-inch parchment paper rounds, click here.
Keyword almond, cake, raspberry

Blueberry Crumb Cake Cookies

Blueberry Crumb Cake Cookies

Over the holidays, my Cranberry Orange Crumb Cake Cookies went viral, so I thought it was time to introduce a spring version of the popular cookies. Blueberry Crumb Cake Cookies have homemade blueberry filling with crumble topping and a touch of lemon zest in the dough to brighten them up. The sweet-tart lemon icing gives them the perfect balance. These delightful blueberry cookies are perfect alongside a cup of tea or a glass of lemonade.


Blueberry Crumb Cake Cookies

Vanilla cookies with a touch of lemon zest, topped blueberry filling, crumble topping and lemon icing by Brownie Mischief
Course Dessert
Cuisine American
Servings 14 cookies

Ingredients
  

Blueberry Filling

  • 6 ounces (170g) blueberries, divided about 1 1/4 cups
  • 2 tablespoons (25g) granulated sugar
  • 1 teaspoon corn starch
  • 1 teaspoon lemon juice

Crumb Topping

  • ¾ cup (96g) all purpose flour
  • ¼ cup (50g) granulated sugar
  • 3 tablespoons (38g) packed brown sugar
  • â…› teaspoon fine sea salt
  • 4 ½ tablespoons (64g) cold, unsalted butter, cubed

Cookies

  • 2 cups (255g) all purpose flour, sifted
  • 1 teaspoon baking powder
  • ½ teaspoon fine sea salt
  • ½ cup (113g) unsalted butter, room temperature
  • ½ cup (100g) granulated sugar
  • ¼ cup (50g) packed brown sugar
  • Zest of 1 medium lemon
  • 1 large egg, room temperature
  • 1 large egg yolk, room temperature
  • 1 ½ teaspoon pure vanilla extract
  • ½ cup (85g) white chocolate chips optional

Icing

  • â…” cup (80g) powdered sugar, sifted
  • 1 small dash fine sea salt
  • 2-3 tablespoons (30-45ml) lemon juice

Instructions
 

Blueberry Filling

  • Set aside 1/4 cup (34g) of blueberries. Combine the remaining blueberries with the sugar, cornstarch and lemon juice in a small saucepan.
  • Simmer over medium-low heat, stirring occasionally, until the blueberries are softened and the sauce is a thick jam consistency, about 5-7 minutes. Stir in the reserved 1/4 cup (34g) of blueberries and cook for 1 more minute. Remove from heat and set aside to cool completely.

Crumb Topping

  • In a medium-sized bowl, whisk together the flour, granulated sugar, brown sugar and salt until well blended. Work the butter into the flour mixture with your fingertips until it looks sandy with no large pieces of butter remaining. Press the mixture together to form chunks. Set aside in the refrigerator while you make the cookie dough.

Cookies

  • Preheat the oven to 350ºF (180ºC). Line 2 large cookies sheets with parchment paper.
  • In a medium-sized bowl, whisk together the flour, baking powder and salt until well blended.
  • In a large bowl, beat the butter, granulated sugar, brown sugar and lemon zest, with an electric mixer at medium speed, until light and fluffy. Beat in the egg and egg yolk in two separate additions, making sure each one is incorporated before adding the next. Beat in the vanilla extract. On low speed, beat the flour mixture into the batter, just until combined. Stir in the white chocolate chips, if using.
  • Form the cookie dough into 2-tablespoon size balls. Place them about 3 inches apart onto the cookie sheets. Press a 1-inch wide indentation into each cookie using your thumb or a pastry tamper. Fill each indentation with a generous teaspoon of the blueberry filling. Top each one generously with the crumb topping. Gently press the topping onto the cookies.
  • Bake until the topping and the edges start to turn light golden, about 11-13 minutes. (Be careful not to over bake to avoid drying out your cookies.) Let the cookies cool on the baking sheet for 1 minute, then transfer them to a cooling rack.

Icing

  • In a small bowl, whisk together the powdered sugar, salt, and 2 tablespoons (30ml) of lemon juice until well combined. Add additional lemon juice as needed to achieve the desired consistency. Whisk until smooth. Drizzle the icing over the cooled cookies.
Keyword blueberry, cookies

Bakery Style Marble Confetti Cookies

Bakery Style Marble Confetti Cookies

I think of April as one of the most festive months; spring flowers begin to bloom, we celebrate Easter and it’s also my birthday month. It’s a good time to make my big Bakery Style Marble Confetti Cookies. They have the perfect texture with soft, centers and crisp edges. The pretty pink cookie dough and the rainbow sprinkles make them so cheery and fun. They’re ideal for birthday parties and spring celebrations.

My method of adding in extra sprinkles gives the tops of the cookies extra sprinkles without hiding the pretty pink marbling. You can change up the colors of the dough to match your event. You can also add mix-ins, such as white chocolate chips, Easter candy or spring-themed sprinkles if you like. The possibilities are endless.

Bakery Style Marble Confetti Cookies

by Mari Vasseur
Large marbled bakery style cookies with rainbow sprinkles
Course Dessert
Servings 8 large cookies

Ingredients
  

  • 2 cups (255g) all purpose flour, sifted
  • 1 tablespoon (9g) cornstarch
  • ½ teaspoon fine sea salt
  • ½ teaspoon baking powder
  • ¼ teaspoon baking soda
  • 10 tablespoons (142g) unsalted butter, room temperature
  • â…” cup (132g) granulated suger
  • ¼ cup (50g) packed brown sugar
  • 1 large egg, room temperature
  • 1 large egg yolk, room temperature
  • 2 teaspoons pure vanilla extract
  • ¼ teaspoon pure almond extract
  • 3-4 drops pink gel food coloring I used Americolor deep pink
  • ½ cup (75g) rainbow sprinkles, divided

Instructions
 

  • Preheat the oven to 350ºF (180ºC). Line a large cookie sheet with parchment paper.
  • In a medium-sized bowl, whisk together the flour, cornstarch, salt, baking powder and baking soda until well blended.
  • In a large bowl, beat the butter, granulated sugar and brown sugar, with an electric mixer at medium speed, until pale and fluffy. Beat in the egg and egg yolk in 2 separate additions until well incorporated. Beat in the extracts. On low speed, beat in the flour mixture, just until combined.
  • Divide the dough into 2 equal portions, using a kitchen scale for accuracy. Place the dough into 2 separate bowls. Mix the food coloring into one of the dough portions, a little at a time until your desired shade is achieved.
  • Place 3 tablespoons of sprinkles into a small, shallow bowl and set aside. Divide the remaining sprinkles in half. Mix each half of the sprinkles into the 2 separate dough colors.
  • Divide each color of dough into 16 portions, approximately 1 tablespoon each. Roll them into balls. Dip each dough ball into the reserved bowl of sprinkles, pressing gently to adhere the sprinkles to the bottoms of the dough balls.
  • Take 2 balls of each color of dough (4 total) and arrange them in a checkerboard pattern, sprinkle side up. Roll them together to form a large ball. Repeat this process to make 8 large dough balls. Form the dough balls into cylinder shapes and place them sprinkle side up onto the cookie sheet, about 3 inches apart. You may need to bake them in 2 batches.
  • Bake until the cookies are slightly puffed and the tops are set, about 10-12 minutes. Let the cookies cool on the baking sheet for 5 minutes, then transfer them to a cooling rack.

Notes

To find the pink food coloring I used, click here.  
Keyword birthday cake, confetti, cookies

Gingerbread Friends Cookies

Gingerbread Friends Cookies

I got a set of the teeny tiniest cookie cutters last year. Ever since, I’ve been coming up with cute ways to use them. Since Christmas is coming, I made the littlest and cutest gingerbread people. They look so cute adorning my full size gingerbread cookies. Working with such small cookies can be challenging but I have a few tips to make it easier. The dough has to be rolled very thin, so I found it easier to manage by rolling it between sheets of parchment paper. Since the dough is so thin and fragile, it has to be kept very cold during the entire process , so pop it into the fridge if it becomes too warm. A toothpick dipped in melted white chocolate was the easiest way for me to draw on their little faces, but a black edible marker would work too. You can also use royal icing if you’re comfortable working with it.

Gingerbread Friends Cookies

Gingerbread cookies topped with white chocolate, mini gingerbread cookies and sprinkles
Course Dessert
Servings 18 cookies

Ingredients
  

  • 3 ¼ cups (415g) all purpose flour, sifted
  • 1 tablespoon (10g) cornstarch
  • ½ teaspoon baking powder
  • ½ teaspoon baking soda
  • ½ teaspoon fine sea salt
  • 2 ½ teaspoons ground ginger
  • 2 teaspoons ground cinnamon
  • ¼ teaspoon ground nutmeg, preferably freshly ground
  • ¼ teaspoon ground cloves
  • ½ cup (113g) unsalted butter, softened
  • 2 tablespoons (24g) vegetable shortening
  • ¾ cup (150g) packed dark brown sugar
  • 1 large egg, room temperature
  • 1 ½ teaspoons pure vanilla extract
  • ½ cup (163ml) unsulphured molasses
  • ¾ cup (128g) white chocolate chips, melted
  • assorted sprinkles I used candy cane sprinkles and green nonpareils

Instructions
 

  • In a large bowl, whisk the flour, cornstarch, salt, baking powder, baking soda, ginger, cinnamon, nutmeg, and cloves together until well blended.
  • In a separate large bowl, beat the butter, shortening and brown sugar together, with an electric mixer on medium speed, until light and fluffy. Beat in the egg until incorporated. Beat in the vanilla, then the molasses until well combined.
  • On low speed, beat in the flour mixture in two additions. Beat just until combined. Set aside about 1/4 of the dough for the mini cookies. Form it into a disk. Divide the remaining dough into 2 portions and form them into disks. Wrap all of the dough disks in plastic wrap and chill them in the refrigerator until firm, at least 2 hours or overnight.
  • Place the small portion of dough between 2 sheets of parchment paper. Roll to 1/16-inch thickness. Cut out 40-50 mini cookies using a 1-inch gingerbread man cookie cutter. Place the cut outs on a parchment paper lined tray. Freeze for 20-30 minutes. this will help the cookies keep their shape when baking.
  • Preheat the oven to 350ºF (180ºC). Line 2 large cookie sheets with parchment paper. On a lightly floured surface, roll the remaining dough to 1/4-inch thickness. Using a 2 3/4-inch or a 3-inch round cookie cutter, cut out 18 cookies. Re-roll the scraps as needed. place the cookies at least 1-inch apart onto the cookie sheets. Bake until the cookies are set and slightly puffed, about 8-10 minutes. Transfer the cookies to a cooling rack.
  • Place the mini cookies, about 1/2-inch apart onto a parchment lined cookie sheet. Bake until the cookies are set and slightly puffed, about 5-6 minutes. Let the cookies cool on the baking sheet. Decorate the cooled mini cookies with melted white chocolate, using a toothpick to make the eyes, smiles, etc.
  • Spread melted white chocolate onto one side of each round cookie. Top with the mini gingerbread cookies and the sprinkles of your choice.

Notes

*To find the mini gingerbread man cookie cutter I used, click here.
To find round cookie cutters, click here.
Keyword cookies, gingerbread

Cranberry Orange Crumb Cake Cookies

Cranberry Orange Crumb Cake Cookies

When you combine cranberry orange crumb cake with white chocolate chip cookies, you get these delicious, unique cookies that are perfect for the holiday season. They make a festive addition to your holiday cookie platter. I came up with these delightful cookies when I was looking for a way to use up leftover cranberry sauce. If your family is like mine, it’s rare for us to have leftover cranberry sauce because we love it so much. Click here to view my Cranberry Sauce recipe. Don’t worry, you can certainly use store bought whole berry cranberry sauce for this recipe and the cookies will be just as delicious.


Cranberry Orange Crumb Cake Cookies

by Mari Vasseur
Orange scented vanilla cookies with white chocolate chips, topped with cranberry sauce, crumb topping and orange icing
Course Dessert
Servings 16 cookies

Ingredients
  

Crumb Topping

  • ¾ cup (96g) all purpose flour
  • ¼ cup (50g) packed brown sugar
  • 3 tablespoons (38g) granulated sugar
  • â…› teaspoon fine sea salt
  • 4 ½ tablespoons (64g) cold, unsalted butter, cubed

Cookies

  • 2 cups (255g) all purpose flour, sifted
  • 1 teaspoon baking powder
  • ½ teaspoon fine sea salt
  • ½ cup (113g) unsalted butter, room temperature
  • ½ cup (100g) packed brown sugar
  • ¼ cup (50g) granulated sugar
  • Zest of 1 medium orange
  • 1 large egg, room temperature
  • 1 large egg yolk, room temperature
  • 1 ½ teaspoons pure vanila extract
  • ¾ cup (128g) white chocolate chips
  • ½ cup (113g) whole berry cranberry sauce, purchased or homemade

Icing

  • â…” cup (80g) powdered sugar, sifted
  • 1 pinch fine sea salt
  • 1 teaspoon lemon juice
  • 1-2 ½ tablespoons (15-38ml) orange juice

Instructions
 

Crumb Topping

  • In a medium-sized bowl, whisk together the flour, brown sugar, granulated sugar and salt until well blended. Work the butter into the flour mixture with your fingertips until it looks sandy with no large pieces of butter. Press the mixture together to form chunks. Set aside in the refrigerator while you make the cookie dough.

Cookies

  • Preheat the oven to 350ºF (180ºC). Line 2 large cookies sheets with parchment paper.
  • In a medium-sized bowl, whisk together the flour, baking powder and salt until well blended.
  • In a large bowl, beat the butter, brown sugar, granulated sugar and orange zest, with an electric mixer at medium speed, until pale and fluffy. Beat in the egg and egg yolk in two separate additions, making sure each one is incorporated before adding the next. Beat in the vanilla extract. On low speed, beat the flour mixture into the batter, just until combined. Stir in the white chocolate chips.
  • Form the cookie dough into sixteen 2-tablespoon size balls. Place them about 3 inches apart onto the cookie sheets. Press a 1-inch wide indentation into each cookie using your thumb or a pastry tamper. Fill each indentation with a generous teaspoon of cranberry sauce. Top each one generously with the crumb topping. Gently press the topping into the cookies.
  • Bake until the topping and the edges start to turn light golden, about 11-13 minutes. (Be careful not to over bake to avoid drying out your cookies.) Let the cookies cool on the baking sheet for 1 minute, then transfer them to a cooling rack.

Icing

  • In a small bowl, whisk together the powdered sugar, salt, lemon juice and 1 tablespoon of orange juice until well blended. Add additional orange juice as needed to achieve your desired consistency. Whisk until smooth. Drizzle the icing over the cooled cookies.
Keyword cookies, cranberry orange

Double Chocolate Marble Cookies

Double Chocolate Marble Cookies

If you like marble cookies, you’ll love my amazing deluxe version. They have crisp edges with soft, chewy centers and plenty of chocolate which makes them the best marble cookies ever! I used a combination of dark chocolate pieces and milk chocolate chips for the perfect balance. Set aside some of the dark chocolate pieces for the tops for the most beautiful, decadent pools of melted chocolate.


Double Chocolate Marble Cookies

by Mari Vasseur
Double chocolate marble cookies with crisp edges and soft, chewy centers. Chocolate dough with dark chocolate pieces is swirled together with vanilla dough with milk chocolate chips
Course Dessert
Servings 14 cookies

Ingredients
  

  • 2 cups (255g) all purpose flour, sifted
  • ½ teaspoon baking powder
  • ½ teaspoon baking soda
  • 1 teaspoon fine sea salt
  • 1 cup (227g) unsalted butter, room temperature
  • 1 cup (200g) packed brown sugar
  • ½ cup (100g) granulated sugar
  • 1 large egg, room temperature
  • 1 large egg yolk, room temperature
  • 1 ½ teaspoons pure vanilla extract, divided
  • 6 tablespoons (35g) unsweetened Dutch process cocoa powder, sifted
  • 1 3 1/2-4 oz (113g) dark chocolate bar* broken into bite size pieces
  • 2 tablespoons (20g) cornstarch
  • â…” cup (170g) milk chocolate chips or white chocolate chips

Instructions
 

  • Line 2 large cookie sheets with parchment paper. In a medium-sized bowl, whisk together the flour, baking powder, baking soda, and salt until well blended.
  • In a large bowl, beat the butter, brown sugar and granulated sugar, with an electric mixer at medium speed, until pale and fluffy. Beat in the egg, egg yolk and 1 teaspoon of vanilla extract in 3 separate additions, making sure each one is incorporated before adding the next. Add the flour mixture and mix just until combined.
  • Divide the cookie dough in half, using a kitchen scale for accuracy. Place half of the dough in a separate bowl. Add the cocoa powder into half of the dough, mixing just until combined. Set aside several pieces of dark chocolate for the tops of the cookies, then stir the remaining dark chocolate pieces into the chocolate dough.
  • Add the cornstarch and the remaining 1/2 teaspoon of vanilla extract to the other half of the cookie dough, mixing just until combined. Stir the milk chocolate chips into the vanilla dough.
  • Divide each type of dough into 28 portions, approximately 1 tablespoon each. Roll them into balls. Take 2 balls of each type of dough (4 total) and arrange them in a checkerboard pattern then roll them together to form a large ball. Repeat this process to make 14 large dough balls. Cover the dough balls and chill them in the refrigerator for 1 hour.
  • Preheat the oven to 350ºF (180ºC). Place the dough balls 3 inches apart onto the cookie sheets. Top each one with 1 or 2 pieces of the reserved dark chocolate. Bake until the edges are golden brown and the centers are set, but still soft, about 10-14 minutes. Do not over bake. The cookies will spread a bit. Remove the cookies from the oven and immediately use a large round cookie cutter to shape the hot cookies. Place the cookie cutter onto the cookie sheet over each cookie and slide it around each one a couple of times to achieve perfectly round cookies. Work quickly before the cookies set. Let the cookies cool on the cookie sheet for 5 minutes, then transfer them to a cooling rack.

Notes

To find dark Dutch process cocoa powder, click here.
Keyword cookies, double chocolate, marble

Apple Fritter Cake with Brown Butter Icing

If you love apple fritters, you’ll adore this moist, tender cake that’s loaded with fresh apples and topped with rich brown butter icing. This is the best Apple Fritter Cake recipe I’ve ever tasted! A couple of simple steps give it the most flavor and the best texture. The apples are cooked briefly on the stovetop before being added to the batter. This gives the apples a better flavor and texture and prevents soggy spots in your cake. The juices that the apples release during this step are saved to add to the icing. The browned butter in the icing adds a rich, nutty flavor that takes this cake over the top.

Apple Fritter Cake with Brown Butter Icing

A moist, tender, subtly spiced cake loaded with fresh apples and topped with rich brown butter icing
Course Brunch, Dessert
Servings 9 servings

Ingredients
  

Apples

  • 2 tablespoons (28g) butter
  • 3 cups (340g) peeled, chopped apples (1/2-inch pieces )
  • 2 tablespoons (25g) granulated sugar
  • ½ teaspoon cinnamon

Cake

  • 1 cup (128g) all purpose flour, sifted
  • ½ teaspoon cinnamon
  • ¼ teaspoon baking soda
  • ¼ teaspoon fine sea salt
  • â…› teaspoon nutmeg, preferably freshly ground
  • ¼ cup (57g) unsalted butter, softened
  • ¾ cup (150g) granulated sugar
  • 2 tablespoons (25g) packed brown sugar
  • 1 large egg, room temperature
  • 1 teaspoon pure vanila extract
  • 2 tablespoon (28g) sour cream, room temperature

Icing

  • 3 tablespoons (43g) unsalted butter, cubed
  • 1 cup (120g) powdered sugar, sifted
  • 1 ½ tablespoons (22ml) reserved juices from the apples
  • 1-3 tablespoons (15 ml-45ml) whole milk, room temperature
  • 1 pinch fine sea salt

Instructions
 

Apples

  • Melt the butter in a large skillet over medium heat. When the butter starts to bubble, add the apples. Sprinkle the sugar and cinnamon over the apples and cook, stirring occasionally until the apples release their juices and start to become tender, about 5-7 minutes. Remove from heat and set aside to cool to room temperature.
  • Drain the cooled apples, reserving the juice for the icing.

Cake

  • Preheat the oven to 350ºF (180ºC). Grease an 8-inch square baking dish. (I used a ceramic baking dish.*)
  • In a medium-size bowl, whisk together the flour, cinnamon, baking soda, salt and nutmeg until well combined.
  • In large bowl, beat the butter, granulated sugar and brown sugar together until light and fluffy. Beat in the egg until incorporated, then beat in the vanilla extract.
  • Stir in the flour mixture in 2 additions, followed by half of the sour cream after each addition. Mix just until combined. Do not over mix. Fold in the cooled, drained apples.
  • Transfer the batter to the baking dish. Smooth the top with a spatula. Bake until the cake is golden brown and springs back when lightly touched. A toothpick inserted into the center of the cake will be clean or have a few moist crumbs attached, about 23-28 minutes. Do not over bake.

Icing

  • In a small light-colored saucepan over medium heat, melt the butter and cook until it's deep golden and fragrant. When brown specks start to appear, remove it from the heat and immediately transfer it to a small bowl. Set aside to cool to room temperature.
  • In a medium bowl, mix the cooled brown butter with the powdered sugar, reserved apple juice, 1 tablespoon (15ml) of milk and the salt until well combined. Add additional milk as needed to achieve the desired consistency. Whisk until smooth. Spread the icing over the cooled cake.

Notes

*To find an 8-inch ceramic baking dish, click here.
Keyword apple, cake

Lemon Bubble Bread

Lemon Bubble Bread

This fun, summery Lemon Bubble Bread is a soft, sweet, brioche-style pull-apart bread. It’s made in the same way as monkey bread, but with lemon zest instead of cinnamon. Small balls of bread dough are coated in melted butter, rolled in lemon sugar, then baked until golden and fluffy. I like drenching the fluffy puffs of bread in fresh lemon icing which, adds a burst of sweet-tart flavor.

Lemon Bubble Bread

Soft, sweet lemon brioche-stye pull-apart bread
Course Breakfast, Brunch, Dessert
Servings 6

Ingredients
  

Lemon Bubble Bread

  • ¼ cup plus 2 tablespoons (89ml) warm milk (110ºF/
  • 2 tablespoons (25g) sugar, divided
  • ¾ teaspoon active dry yeast
  • 2 cups (255g) all purpose flour
  • ½ teaspoon fine sea salt
  • 1 large egg, room temperature
  • 1 large egg yolk, room temperature
  • 1 teaspoon pure vanilla extract
  • ¼ cup (57g) unsalted butter cubed, room temperature

Lemon Sugar

  • 6 tablespoons (75g) sugar
  • Zest of 2 medium lemons
  • 3 tablespoons (43g) unsalted butter, melted

Lemon Icing

  • 1 cup (120g) powdered sugar, sifted
  • 2 tablespoons (30ml) fresh lemon juice
  • 1 dash fine sea salt
  • 1-2 tablespoons (15-30m) half and half cream or whole milk

Instructions
 

Lemon Bubble Bread

  • In a small bowl, combine the milk with 1/2 teaspoon of sugar. Stir in the yeast and let it bloom until it's foamy, about 5 minutes.
  • In the bowl of a stand mixer fitted with a paddle attachment, mix the flour, salt and the remaining sugar until combined.
  • In a small bowl, lightly whisk the egg, egg yolk and vanilla together. On low speed, gradually add the egg mixture and the milk mixture to the flour. Beat until combined. Switch to the dough hook. On medium speed, add the butter a little at a time, making sure each addition is incorporated before adding the next. Knead with the mixter until the dough is smooth and elastic, about 8-10 minutes. To determine if the dough is ready, pinch off a small piece of dough. It should stretch easily without tearing and look translucent.
  • Form the dough into a ball and place it in a large oiled bowl. Turn the dough over to coat lightly with oil. Cover and let rise until doubled in size, about 1-1 1/2 hours. Meanwhile butter a 10-inch round baking dish* or a 10-inch cake pan.** (A 9-inch square baking dish also works.) Set aside and make the lemon sugar.
  • Divide the dough into 20 equal portions and form them into balls. Brush the dough balls all over with melted butter, then roll them in the lemon sugar. Arrange the dough balls in the baking dish. Brush the tops with melted butter and sprinkle with any remaining lemon sugar. Let rise until almost doubled in size, about 20-30 minutes.
  • Preheat the oven to 350ºF (180ºC). Bake until the top of the bubble bread is golden brown, about 20-25 minutes. Let cool for about 15-20 minutes, then top the warm bread with lemon icing.

Lemon Sugar

  • Mix the sugar and lemon zest together in a shallow bowl or plate.

Lemon Icing

  • In a small bowl, whisk the powdered sugar, lemon juice, salt and 1 tablespoon (15ml) of half & half together until smooth. Add additional half & half as needed to reach your desired consistency.

Notes

*To find a 10-inch round baking dish, click here.
*To find a 10-inch round cake pan, click here.
Keyword bread, lemon bubble, sweet

Mini Baklava Cheesecakes

Mini Baklava Cheesecakes

These Mini Baklava Cheesecakes are so cute and incredibly delicious that they actually made me mad! I’d been thinking about making them for awhile, so I was mad at myself for not making them sooner. They’re much quicker and easier to make than a full size cheesecake. I par-baked the buttered phyllo dough, then topped it with a nut mixture. I used a combination of pistachios and almonds, but you can use any combination of pistachios, almonds or walnuts of your choice. After I baked the cheesecakes, I soaked the phyllo shells with honey syrup.Yum!

I topped them with little nests made of kataifi, which are so cute and perfect for Easter. Kataifi is thinly shredded phyllo pastry. You can find it in the freezer section of supermarkets and international markets. Toasted coconut makes a good substitute if you can’t find kataifi. These cute cheesecakes are also pretty topped with edible flowers or rose petals, which would be perfect for Mother’s Day or any springtime celebration.

Mini Baklava Cheesecakes

Mini cheesecakes with a baklava base, topped with kataifi nests
Course Dessert
Servings 12 mini cheesecakes

Ingredients
  

Honey Syrup

  • ¾ cup (150g) granulated sugar
  • ¾ cup (177ml) water
  • 3 tablespoons (63g) honey
  • 1 teaspoon lemon juice
  • 1 teaspoon pure vanilla extract

Mini Cheesecakes

  • 1 cup (227g) unsalted butter, melted and divided
  • 10 9 x 14-inch phyllo dough sheets, thawed
  • ½ cup (57g) finely chopped toasted pistachios, almonds or walnuts or a combination of nuts of your choice (I used pistachios and almonds.)
  • ¼ teaspoon ground cinnamon
  • 8 ounces (227g) cream cheese, softened
  • 1 cup (200g) granulated sugar, divided
  • 1 teaspoon pure vanilla extract
  • 1 large egg, room temperature
  • 2 tablespoons (30ml) heavy whipping cream, room temperature

Kataifi Nests

  • 1 16 ounce (454g) package kataifi phyllo pastry, thawed You'll need about 1/4 of the package.
  • ¼ cup (57g) unsalted butter, melted
  • 18-24 candy eggs I used Cadbury Mini Eggs.

Instructions
 

Honey Syrup

  • In a medium saucepan over medium heat, cook the sugar, water, honey and lemon juice, stirring occasionally until the sugar is dissolved. Remove from heat and stir in the vanilla extract.

Mini Cheesecakes

  • Preheat the oven to 350ºF (180ºC). Brush the insides of a 12-serving muffin pan with melted butter.
  • Place a sheet of phyllo dough on your work surface. Brush it lightly with melted butter. Place another sheet of phyllo dough on top of the first one and brush it lightly with melted butter. Repeat this process until you have 5 sheets. Using a pastry wheel or a sharp knife, cut the phyllo into 6 squares, measuring about 4 1/2 x 4 1/2 inches each. Repeat this process with the five remaining phyllo sheets. Make sure to keep your unused phyllo sheets covered while you work to prevent them from drying out.
  • Place the phyllo squares into the cups of the muffin pan. Press them in with a pastry tamper or with the flat bottom of a small shot glass. Prick the bottoms of the phyllo with a fork. Bake until light golden brown, about 14-17 minutes.
  • Meanwhile, combine the nuts, 2 tablespoons of sugar, 2 tablespoons of melted butter and the cinnamon in a small bowl. Mix until well combined.
  • Turn the oven heat down to 325ºF (165ºF). Place about a tablespoon of the nut mixture into the baked pyllo shells and press lightly with the back of a spoon.
  • To make the cheesecake filling, in a large bowl, beat the cream cheese with an electric mixer on low speed, until smooth. Add the remaining 6 tablespoons of sugar, the egg, heavy cream and vanilla extract. Beat until smooth and well combined, but do not over beat.
  • Ladle the cheesecake mixture into the phyllo shells over the nuts. Fill them almost to the top. Bake until the cheesecakes are set, but still slightly jiggly in the centers, about 13-15 minutes.
  • Using a small offset spatula, gently loosen the cheesecakes from the muffin pan. Drizzle honey syrup generously along the perimeter of the outside of the cheesecakes, letting the syrup drip down the sides of the phyllo pastry. Let the cheesecakes cool in the pan. When the cheesecakes have cooled and the syrup has absorbed, transfer the cheesecakes to the refrigerator to chill for at least 1 hour.

Kataifi Nests

  • Turn the oven temperature up to 350ºF (180ºC). Brush an 8 x 8-inch or a 9 x 7-inch baking dish with melted butter. Roll clusters of kataifi stands into twelve 2-inch wide spiral shapes to form the nests. Place them in the baking dish. Drizzle the nests with melted butter. Gently brush more melted butter over the surface of the nests. Bake until golden brown, about 25-35 minutes. Immediately drizzle with honey syrup. Let the nests cool in the baking pan.
  • Place the nests onto the cheesecakes. Fill the nests with candy eggs.

Notes

To find the muffin pan I used, click here.
Keyword baklava, cheesecake

Blueberry Lemon Crumb Cakes

Blueberry Lemon Crumb Cakes

The texture and flavor of these cute Blueberry Lemon Crumb Cakes is immaculate. You’ll love them so much, you won’t want to share, but this recipe makes six 4-inch personal crumb cakes, so you’ll have one all to yourself. You’ll understand once you taste the soft, fluffy lemon scented cake with juicy blueberries, a generous amount of sweet crumb topping and a lemony cream cheese icing. I was a bit hesitant to share this recipe. But I was taught to share recipes by my two grandmothers who were amazing cooks and bakers. They shared their knowledge and recipes with anyone who asked. Recipes are a legacy that should be passed on to family and friends. If you’re reading this, I consider you a friend. So enjoy this recipe that’s especially dear to me, because it’s based on my Grandma’s Apple Crumb Cake recipe.

I used a six serving shallow jumbo muffin pan to bake the cakes. The muffin cups are 4 inches across by 1 inch deep. To find the pan, click here. A hamburger bun pan for 4-inch buns will work too. If you happen to have six 4-inch cake pans, those work nicely. I used jumbo muffin liners to line the muffin cups, which fit perfectly by pressing them in around the inside bottom edges.

Blueberry Lemon Crumb Cakes

Fluffy, soft lemon cakes with blueberries, crumb topping and lemon cream cheese icing
Course Breakfast, Brunch, Dessert
Servings 6 4-inch crumb cakes

Ingredients
  

Crumb Topping

  • ¾ cup (96g) all purpose flour
  • â…“ cup (66g) granulated sugar
  • 2 tablespoons (25g) packed brown sugar
  • â…› teaspoon fine sea salt
  • 4 ½ tablespoons (64g) cold, unsalted butter, cubed

Crumb Cakes

  • 1 ¼ cups (159g) all purpose flour, sifted
  • 1 ½ teaspoons baking powder
  • â…œ teaspoon fine sea salt
  • 6 tablespoons (85g) unsalted butter, softened
  • ¾ cup (150g) granulated sugar
  • Zest of two medium lemons
  • 1 large egg, room temperature
  • 1 large egg yolk, room temperature
  • 1 teaspoon pure vanilla extract
  • ½ teaspoon pure lemon extract
  • â…“ cup (78ml) whole milk, room temperature
  • ¼ cup (57g) sour cream, room temperature
  • 1 cup (170g) blueberries
  • 1 teaspoon all purpose flour for blueberries

Cream Cheese Icing

  • 1 tablespoon (14g) cream cheese, softened
  • 1 tablespoon (14g) unsalted butter, melted
  • ¾ cup (85g) powdered sugar, sifted
  • 1 pinch fine sea salt
  • 2-3 tablespoons (30-45ml) fresh lemon juice

Instructions
 

Crumb Topping

  • In a medium bowl, whisk the flour, sugar, brown sugar and salt together.
  • Work in the butter with your fingertips until the mixture looks like the consistency of wet sand. Press the mixture together to make chunks. Set aside in the refrigerator until ready to use.

Crumb Cakes

  • Preheat the oven to 350ºF (180ºC). Line a 6-serving shallow jumbo muffin pan* with jumbo muffin liners.** Jumbo muffin liners will fit by pressing them around the inside bottom edges.
  • In a medium bowl, whisk together the flour, baking powder and salt.
  • In a large bowl, cream the butter, sugar and lemon zest with an electric mixer on medium speed, until light and fluffy.
  • Beat the egg and egg yolk into the butter mixture in 2 separate additions, making sure each addition is incorporated before adding the next. Beat in the extracts until combined.
  • In a small bowl, whisk the milk and sour cream together.
  • On low speed, mix the flour mixture into the batter in 2 additions alternating with half of the milk mixture after each addition. Beat just until combined.
  • Transfer the batter to the prepared baking pan, evenly distributing the batter and filling the cups about half full.
  • In a medium bowl, toss the blueberries with 1 teaspoon of flour and place them into the cups on top of the batter, about 1 ounce (28g) in each. Top each one with crumb topping.
  • Bake until a toothpick inserted into the center of the cakes comes out clean, about 25-30 minutes. Let the cakes cool in the pan for 5 minutes, then transfer them to a cooling rack to cool completely.

Cream Cheese Icing

  • In a medium bowl, whisk together the cream cheese, melted butter, powdered sugar, salt and 1 tablespoon (30ml) of lemon juice. Add additional lemon juice, a little at a time until your desired consistency is reached. Drizzle over the cooled cakes.

Notes

*To find the muffin pan I used, click here.
**To find jumbo muffin liners, click here. To find 4-inch cake pans, click here.
Keyword blueberry lemon, cake

Chocolate Chip Cookie Bread

Chocolate Chip Cookie Bread

This is the ultimate chocolate chip bread! There are no cookies in this recipe, but it tastes so much like freshly baked chocolate chip cookies that Chocolate Chip Cookie Bread is the perfect name for it. Brown sugar, vanilla and semisweet chocolate chips really help to mimic that beloved chocolate chip cookie flavor. I love the big pockets of chocolate that come from using jumbo chocolate chips, but of course you can use regular or mini chocolate chips if you prefer.

I typically wait until a loaf is cooled off before slicing it, but in this case, I wanted to capture the melted pools of chocolate for the video. The fresh baked chocolate chip aroma was so heavenly, that it took all of my willpower not to immediately devour the entire loaf! It’s easier to slice a fresh baked loaf when it’s cooled off. But if you want to experience the melty chocolate chips, warm your slice in the microwave for 8-10 seconds.

Chocolate Chip Cookie Bread

A moist, tender loaf cake with brown sugar and chocolate chips that tastes just like chocolate chip cookies
Course Breakfast, Brunch, Dessert
Servings 1 loaf

Ingredients
  

  • 1 ¾ cups (223g) all purpose flour, sifted
  • 1 teaspoon baking powder
  • ½ teaspoon baking soda
  • ½ teaspoon fine sea salt
  • ½ cup (113g) unsalted butter, room temperature
  • 1 cup (200g) packed brown sugar
  • 1 large egg, room, temperature
  • 1 large egg yolk, room temperature
  • 2 teaspoons pure vanilla extract
  • ½ cup (118ml) whole milk, room temperature
  • ½ cup (113g) sour cream, room temperature
  • 1 ½ cups (9 oz or 255g) semisweet chocolate chips
  • 1 teaspoon all purpose flour

Instructions
 

  • Preheat oven to 375ºF (190ºC). Line the bottom of a 9 x 5-inch loaf pan with parchment paper. Grease and flour the insides.
  • In a medium-size bowl, whisk together the 1 3/4 cups (223g) flour, baking powder, baking soda and salt.
  • In a large bowl, cream the butter and brown sugar until light and fluffy. Beat in the egg, egg yolk and vanilla in 3 separate additions, making sure each one is fully incorporated before adding the next.
  • In a small bowl, whisk the milk and sour cream together.
  • Add the flour mixture to the batter in two additions, alternating with half of the milk mixture after each addition. Beat just until combined. Do not over mix.
  • Set aside a handful of chocolate chips for the top of the loaf. In a small bowl, toss the remaining chips with 1 teaspoon flour, making sure to coat them all, then fold them into the batter. This will help to prevent them from sinking. Transfer the batter to the prepared loaf pan. Top with the reserved chocolate chips.
  • Bake for 10 minutes. Turn the oven temperature down to 325ºF (165ºC) and continue baking until the loaf is golden brown and a toothpick inserted in center comes out clean, about 45-50 more minutes. Cool the loaf in pan for 10 minutes then turn the loaf out onto a cooling rack.

Notes

*If you want to use mini chocolate chips, use one cup (6 oz or 170g)
Keyword cake, chocolate chip