Fairy Puffs

Fairy Puffs sugared mini muffins wtih edible flowers

My dad used to take me on walks in the woods to look for fairy rings when I was a child. I wanted to see a real fairy so badly! I read a book about fairies, hoping to learn more about them. Fairies love little cakes, milk, honey and butter so I’m sure these Fairy Puffs would be fairy approved.

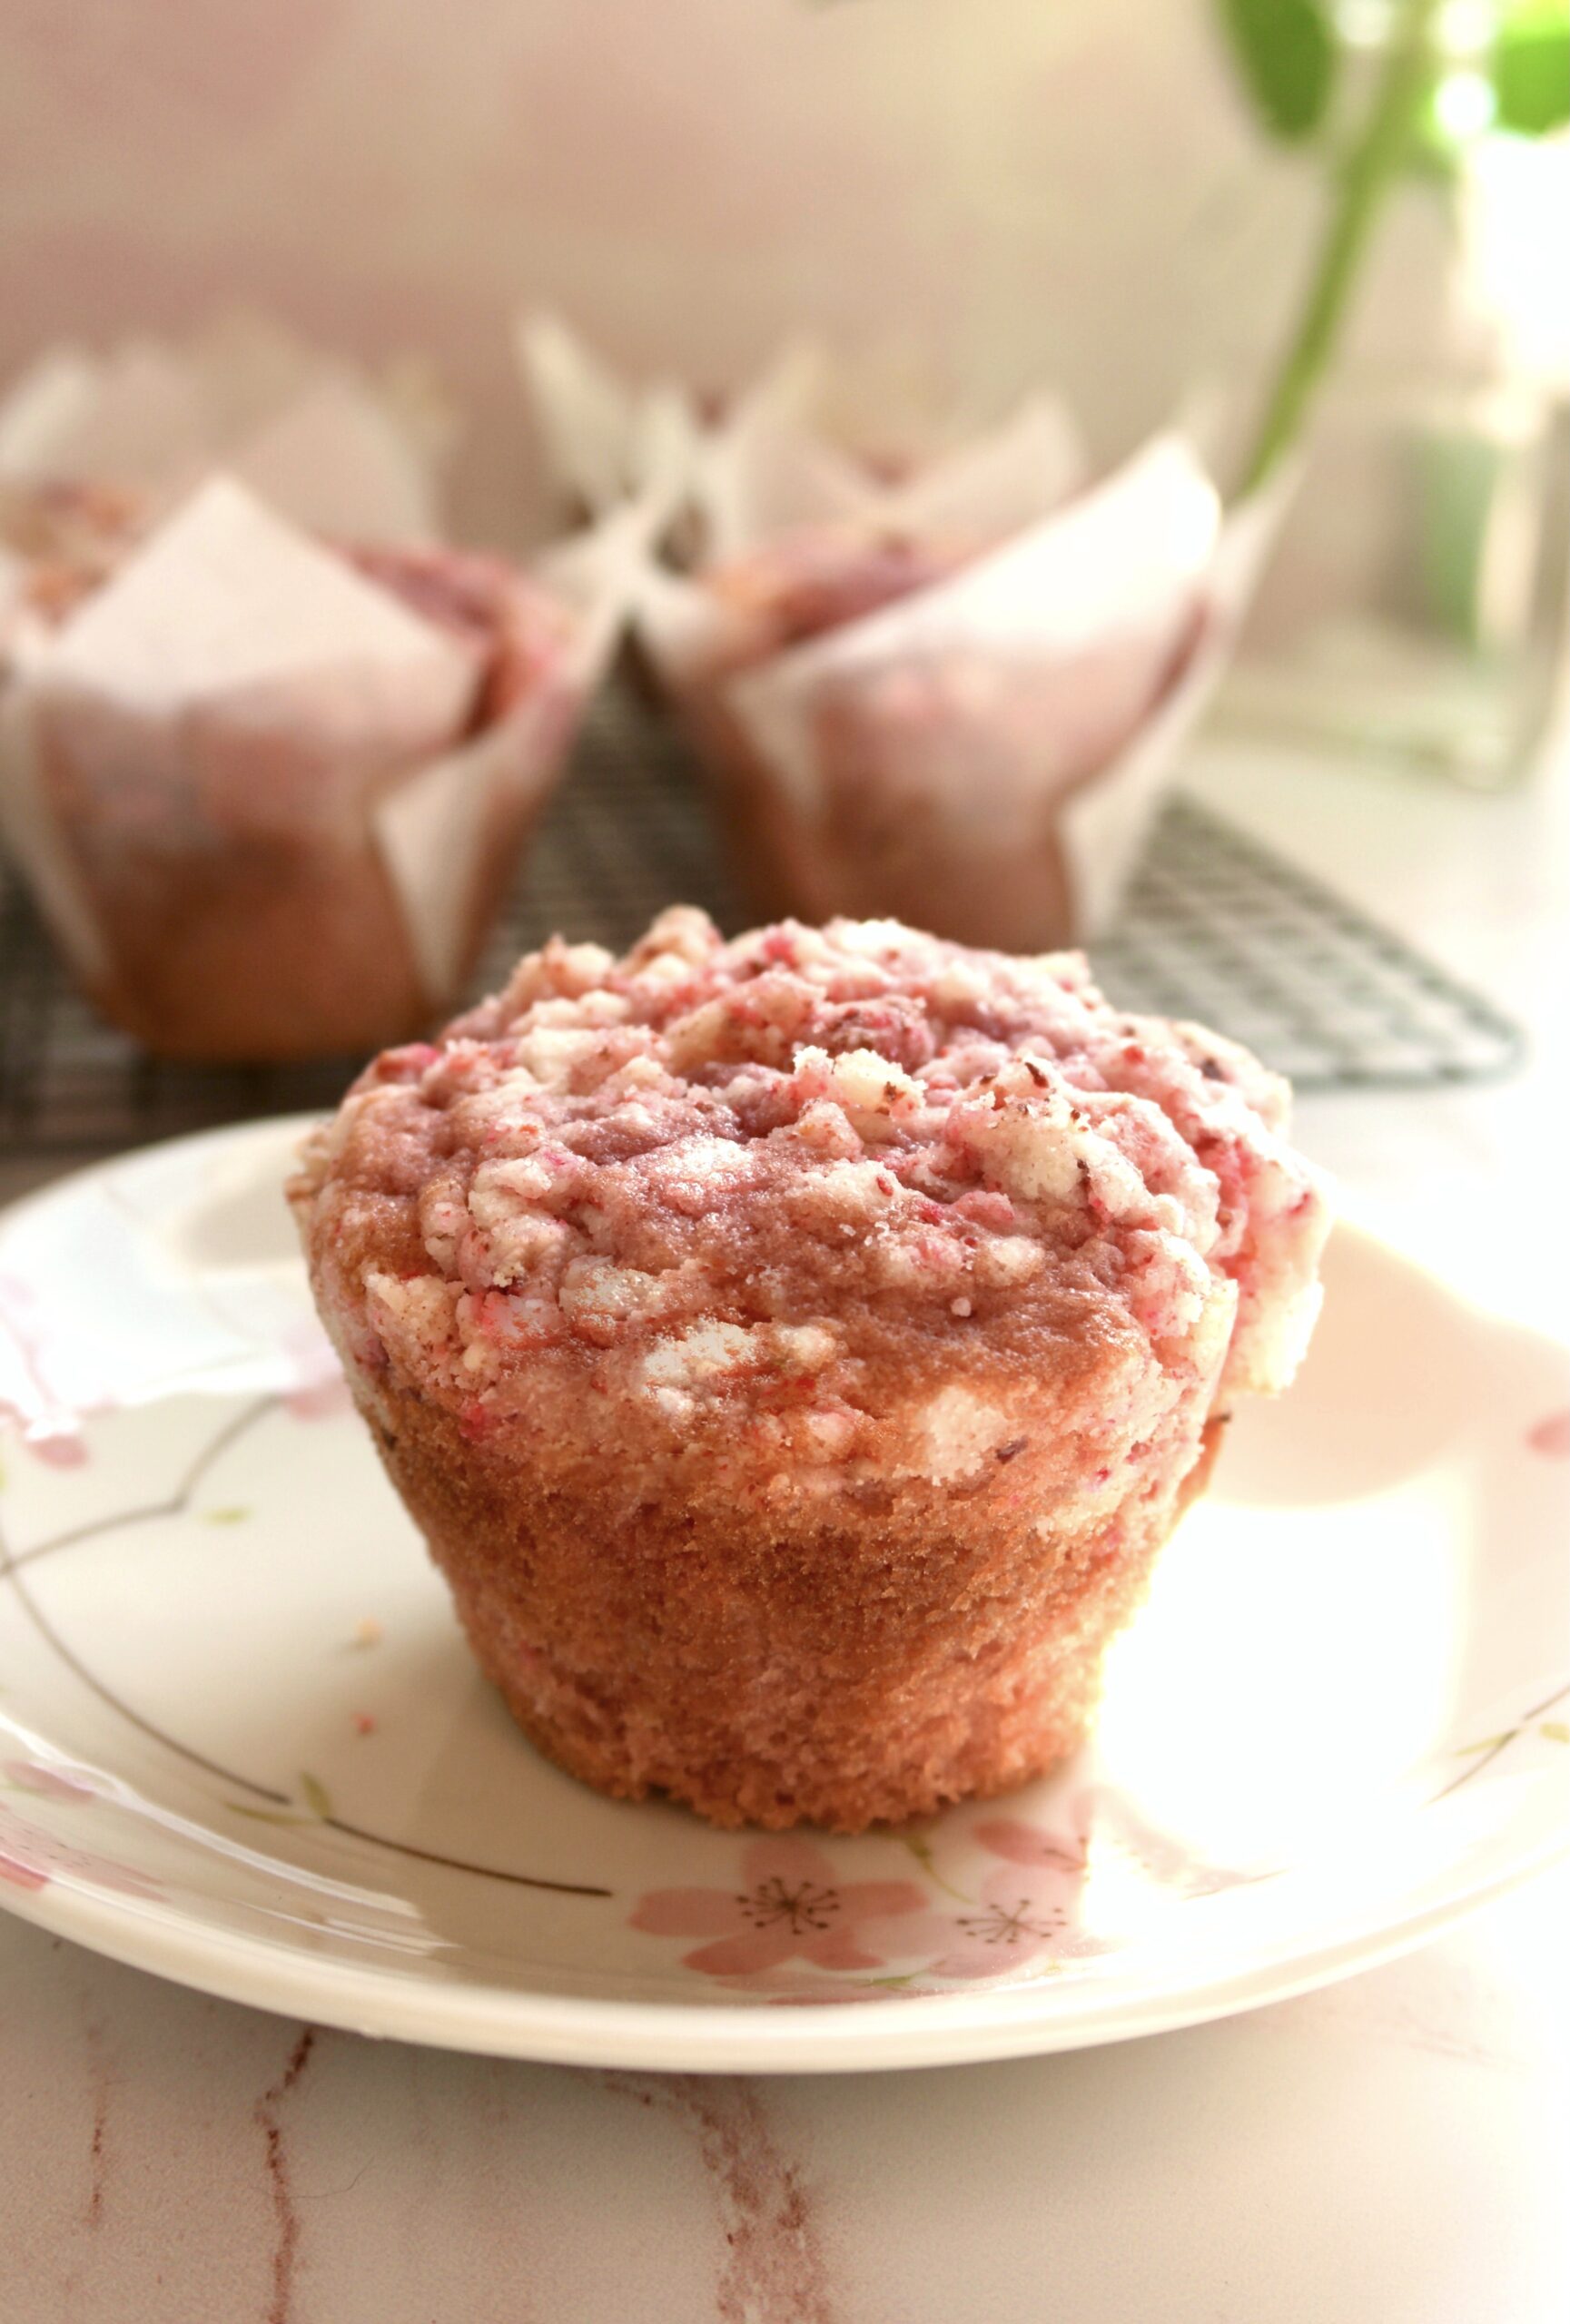
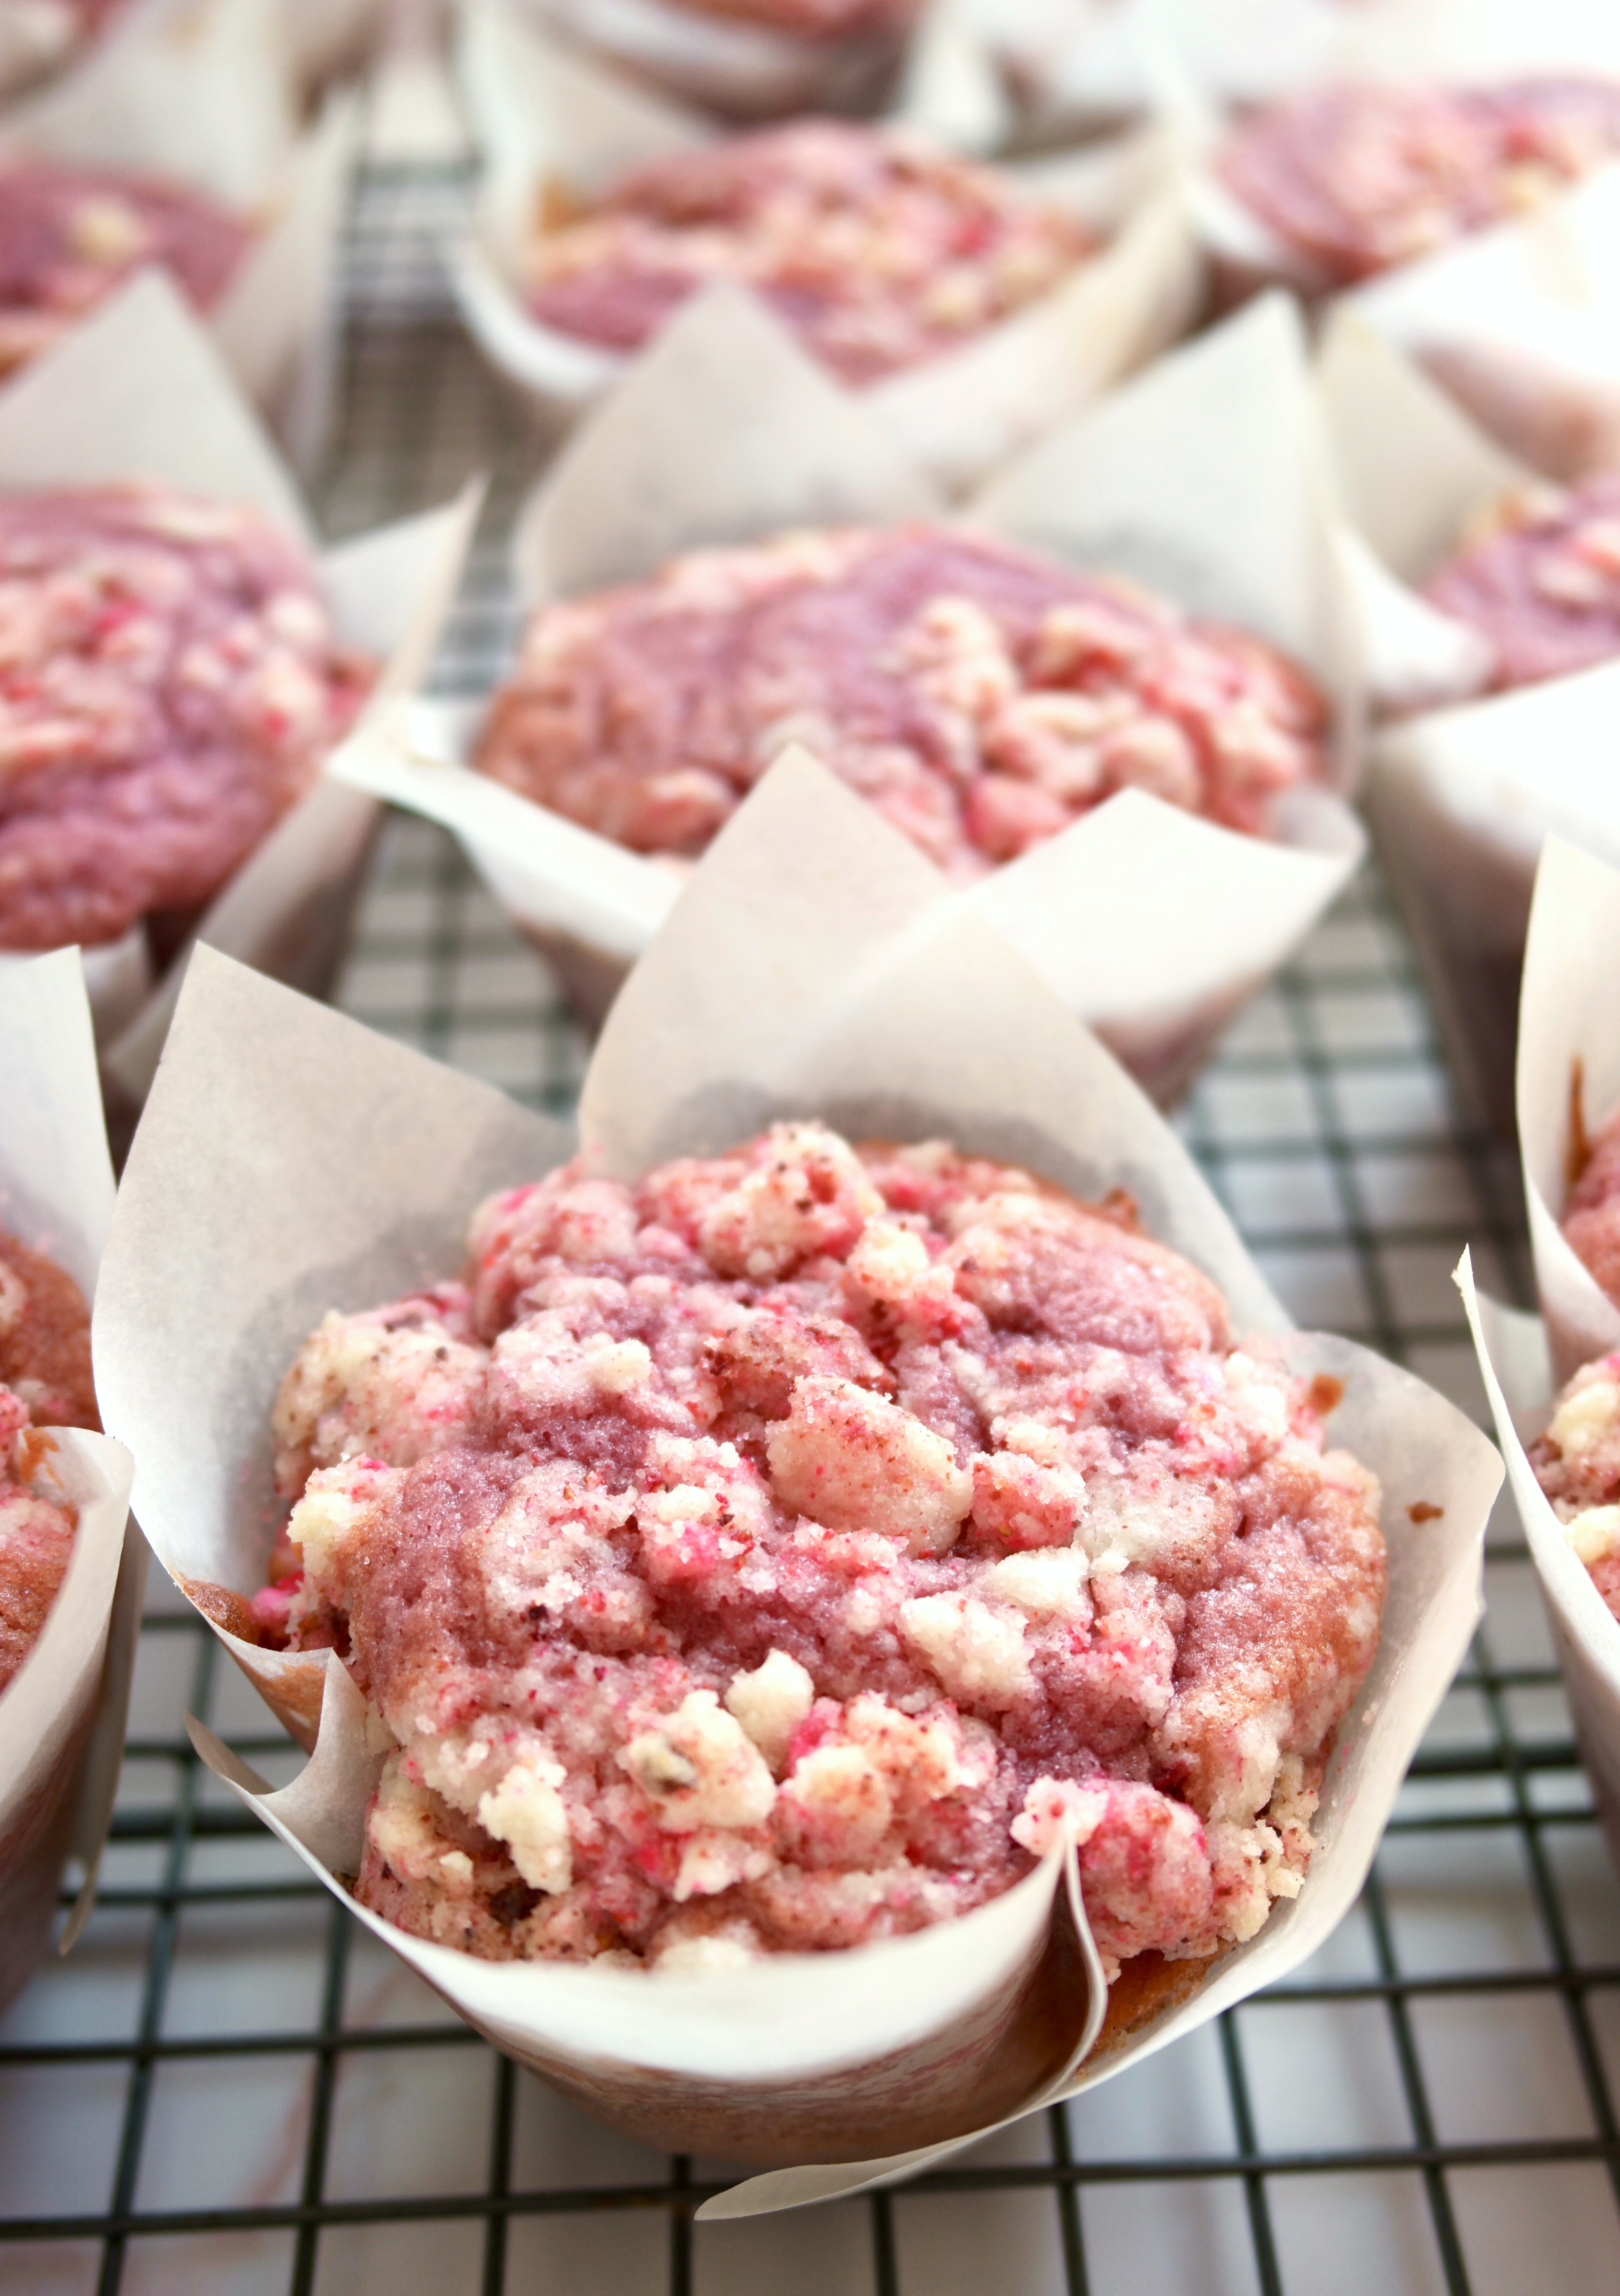
My Fairy Puffs recipe is loosely based on an old favorite mini muffin recipe. I tweaked it quite a bit, including the addition of pink dragonfruit powder. Dragonfruit has a subtle flavor, so the bright fuchsia powder is mostly for color. But oh what a beautiful color it is! You can find dragonfruit powder in healthy food stores or online. To find the dragonfruit powder, also known as pink pitaya powder, I used, click here.

fairy puff muffins

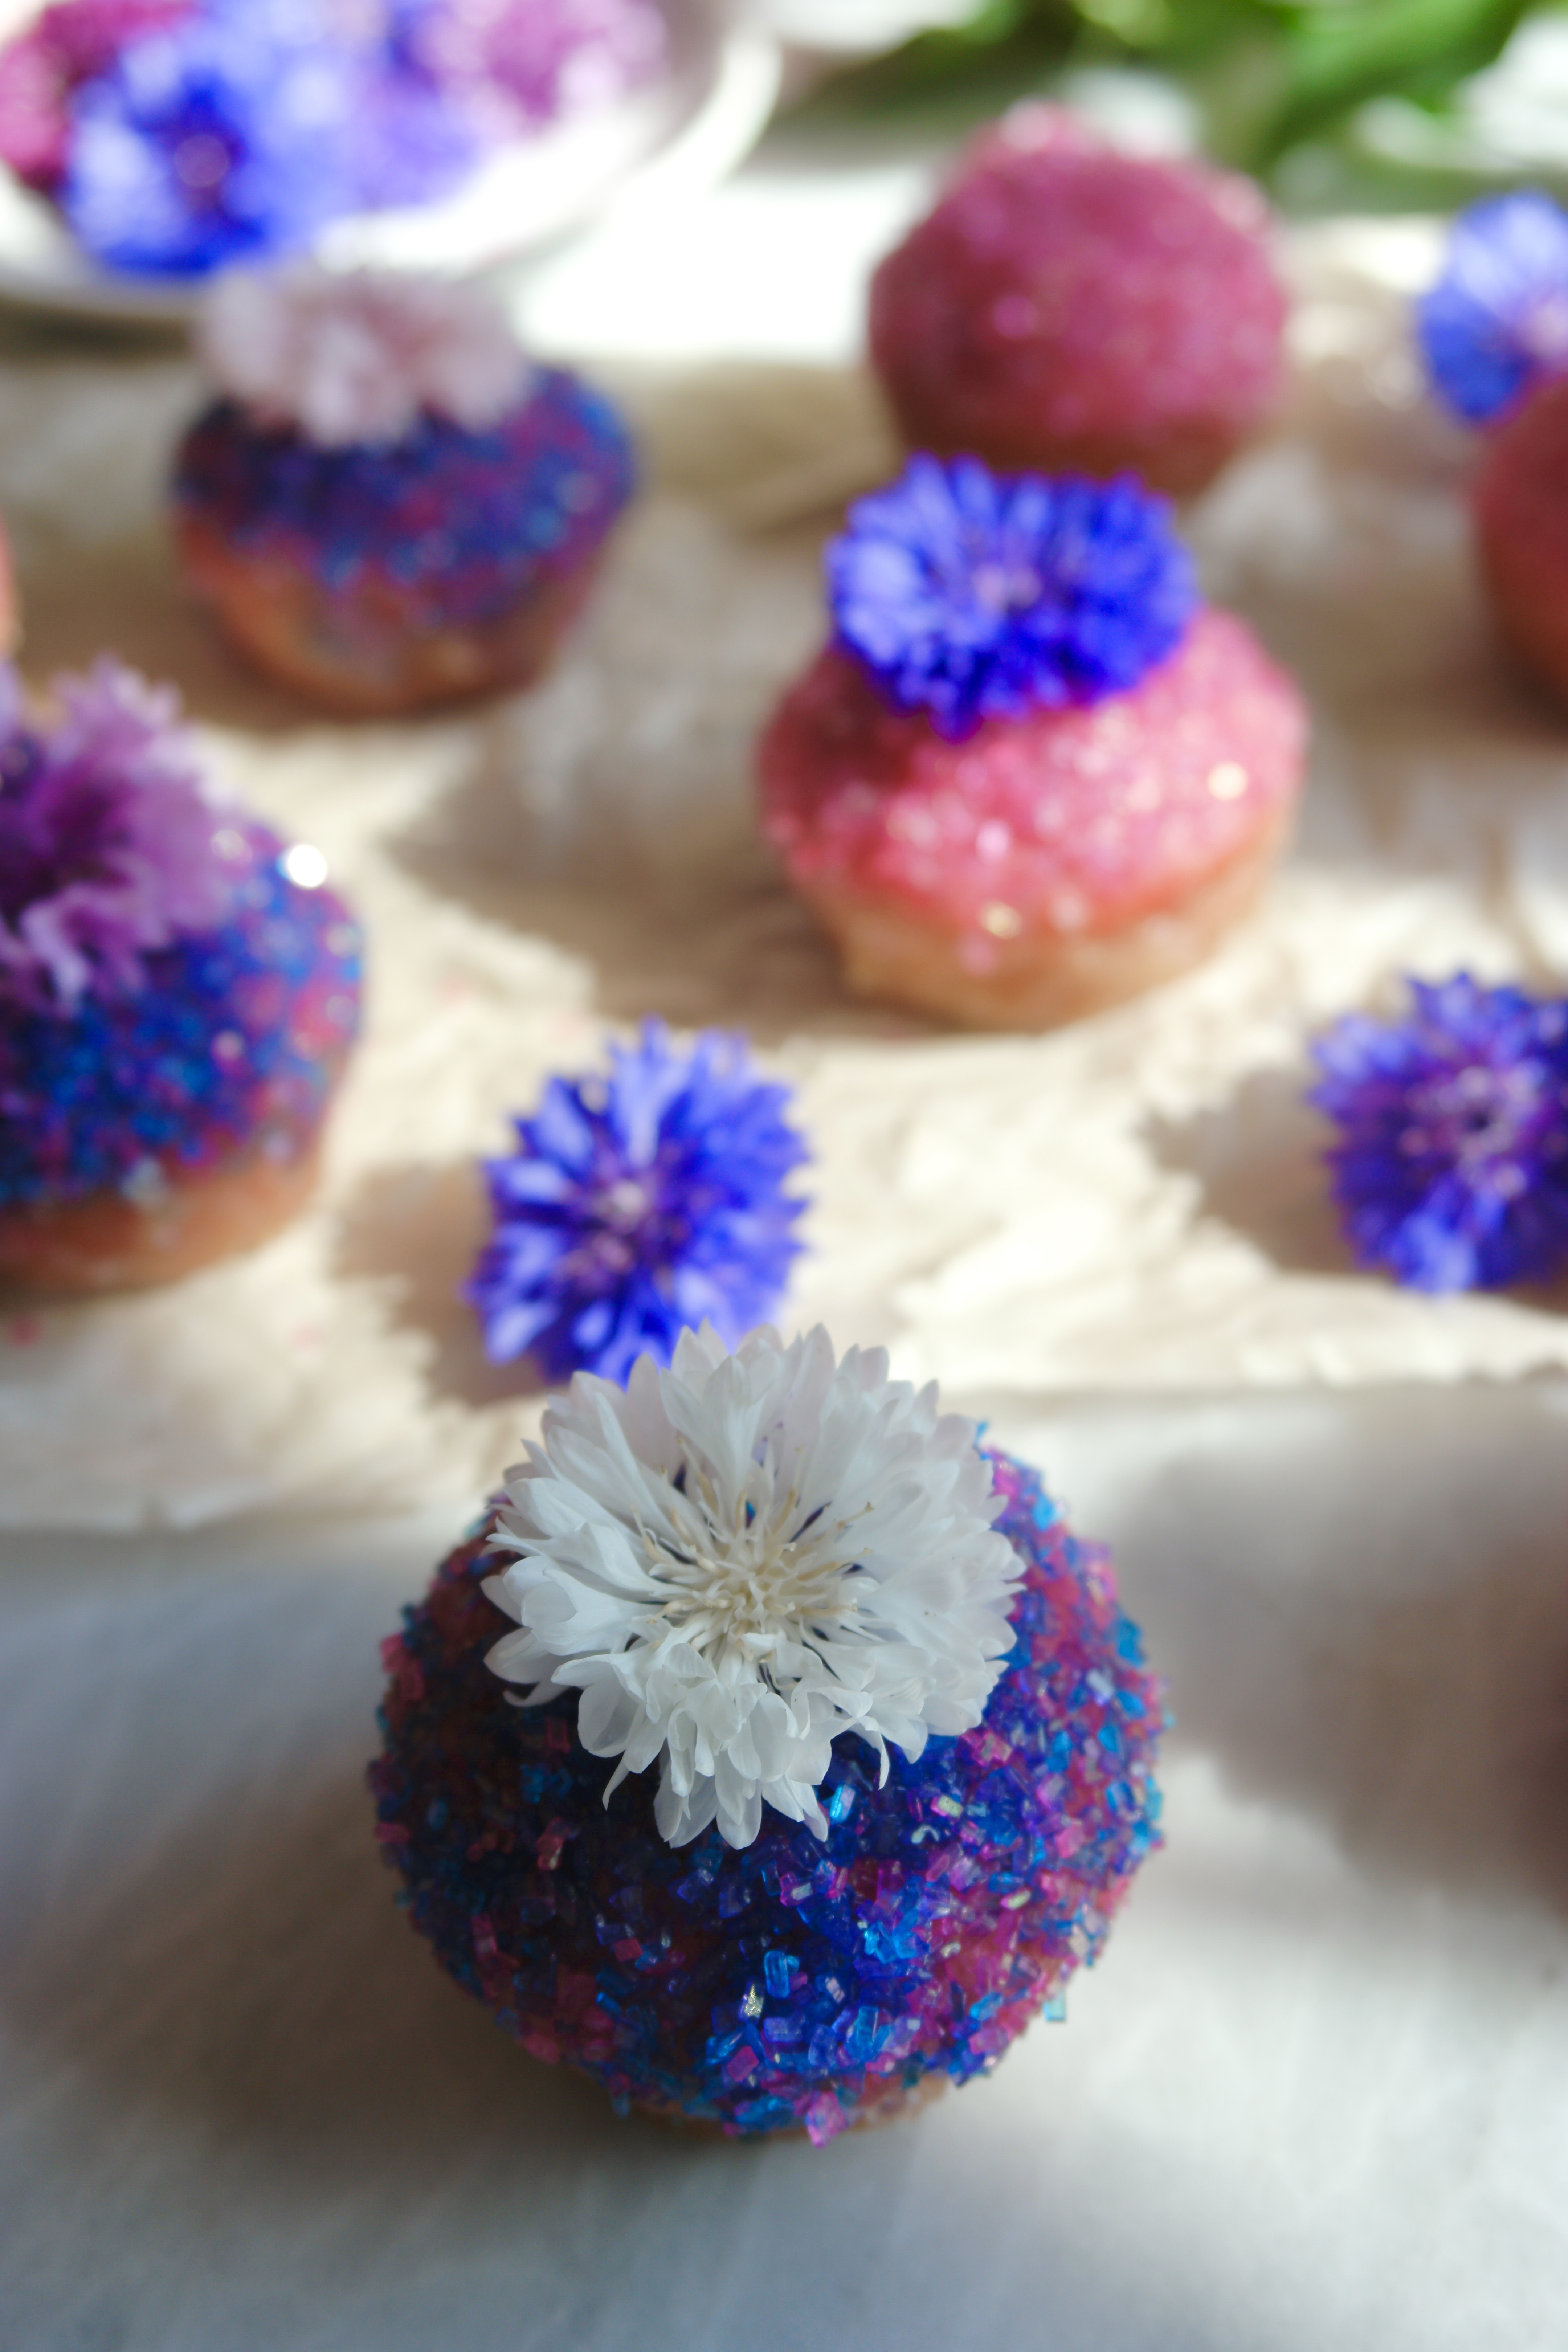
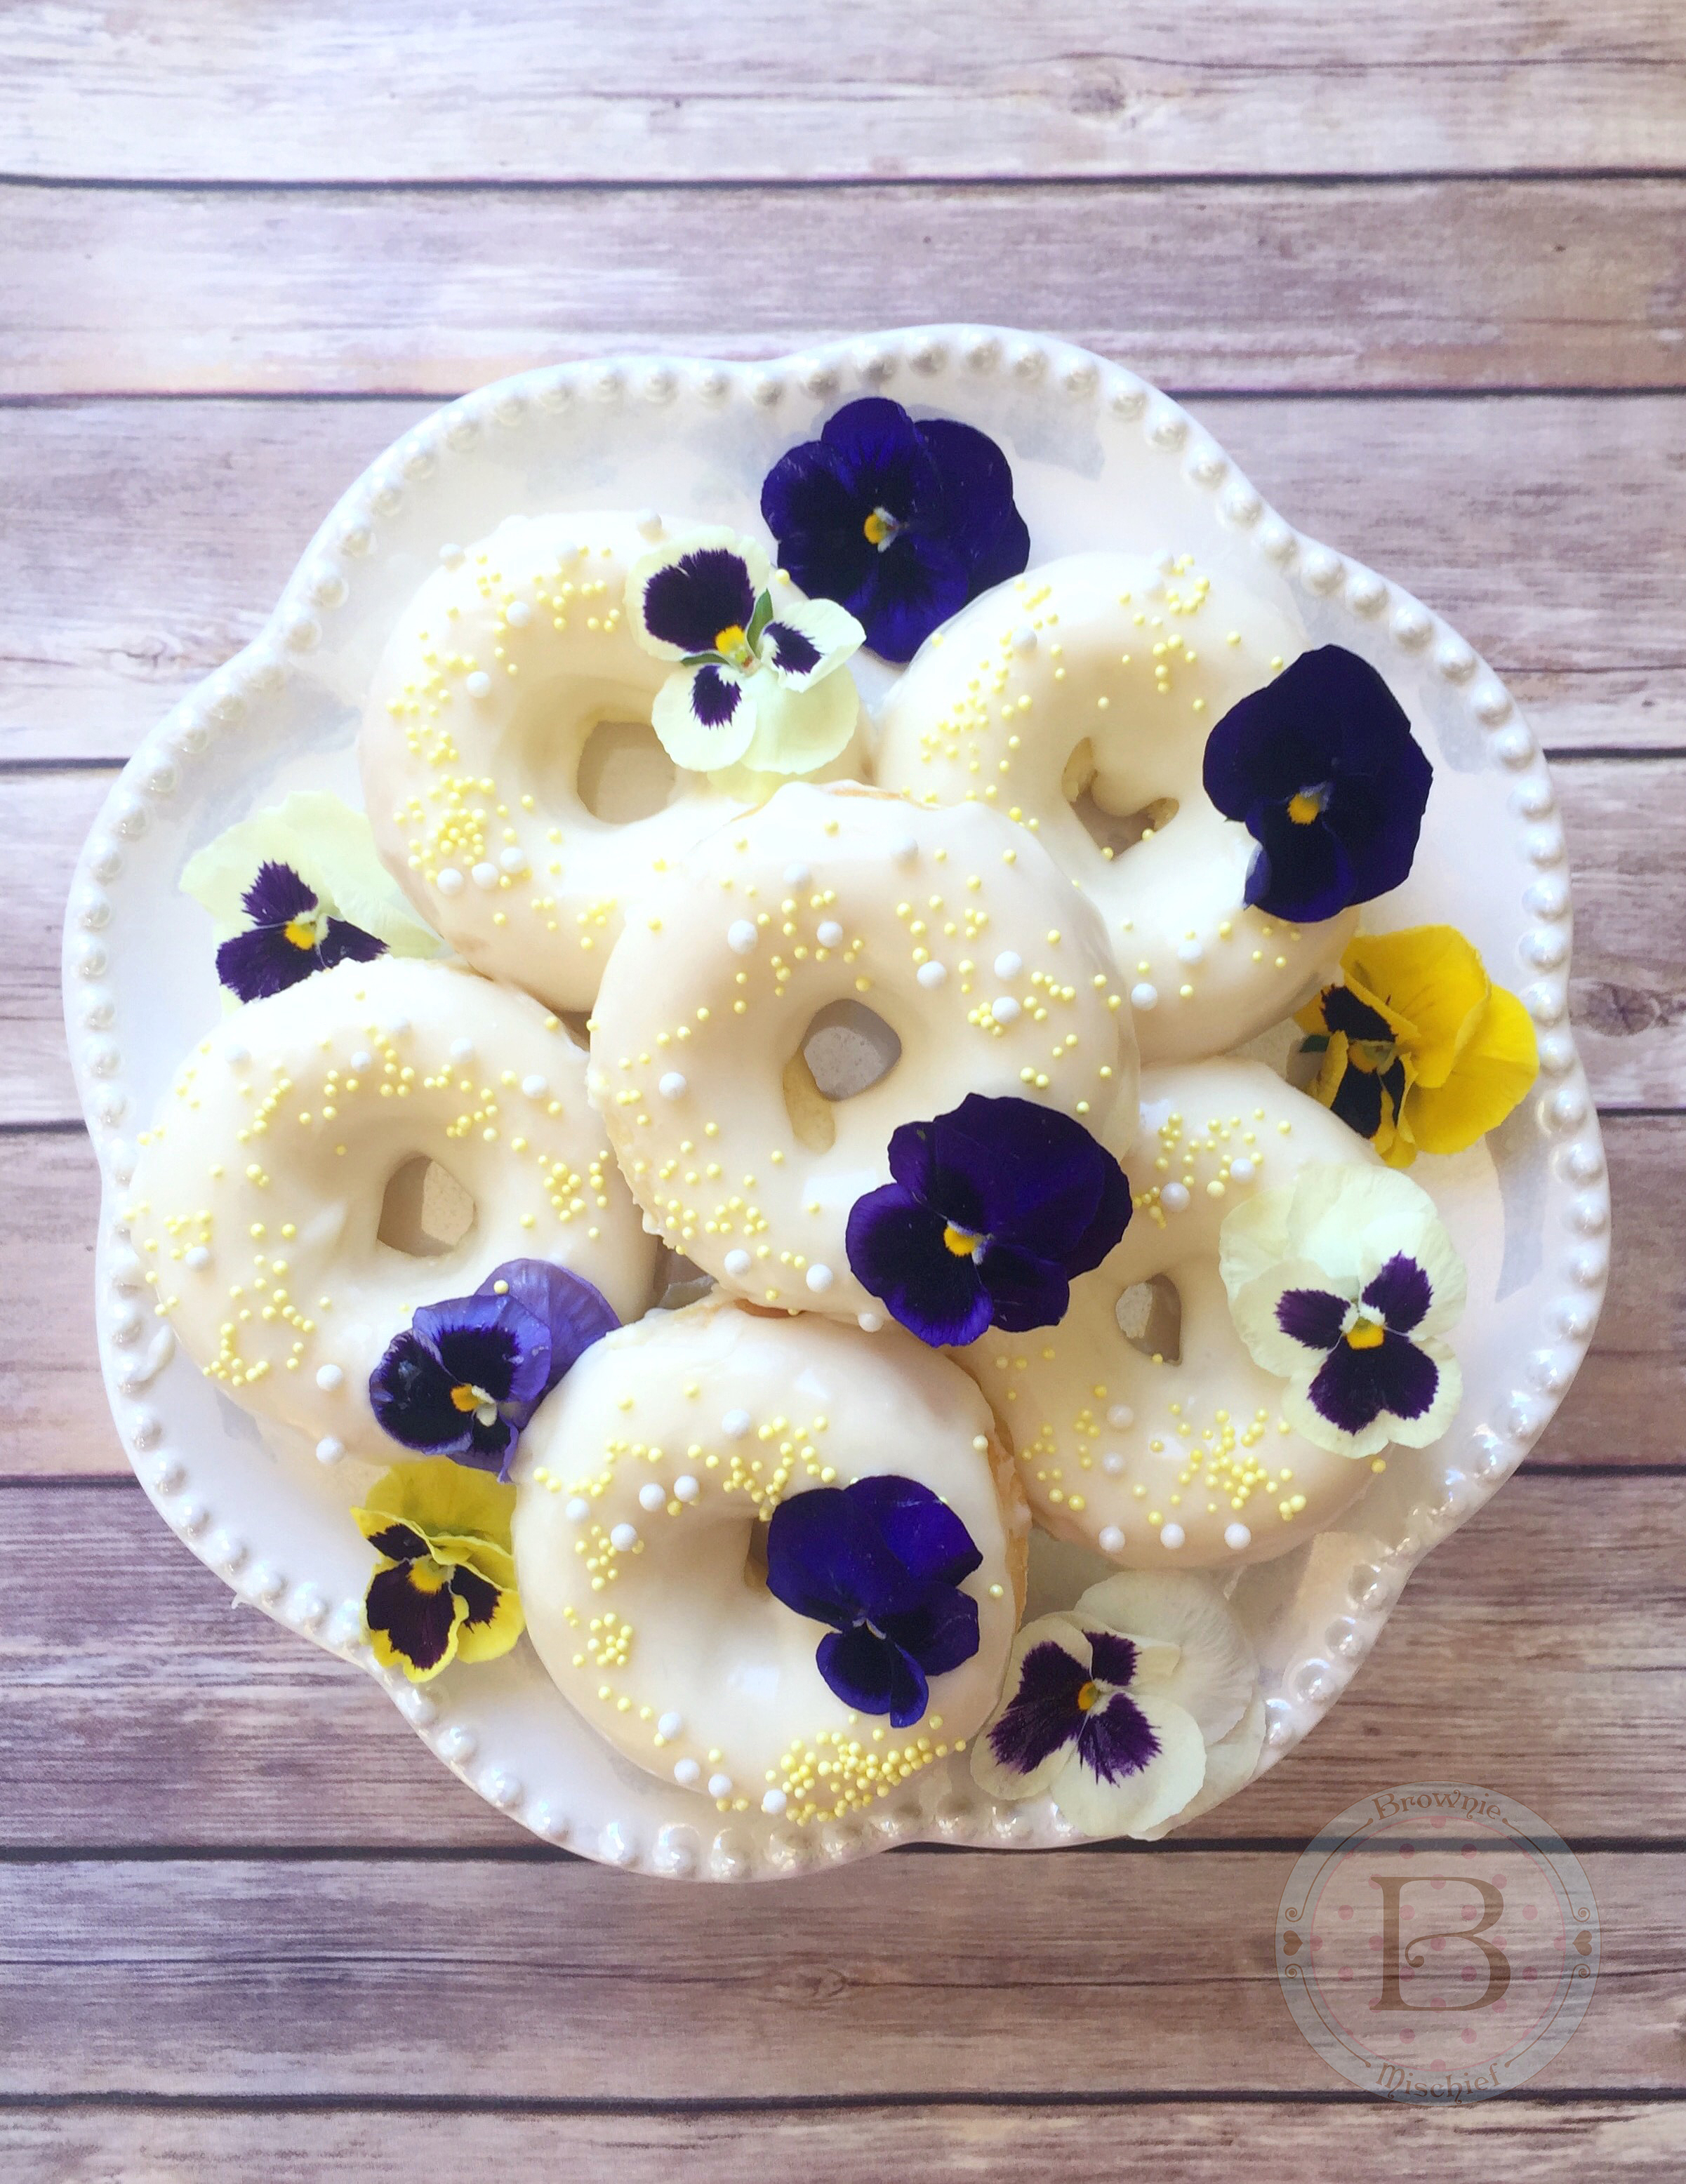
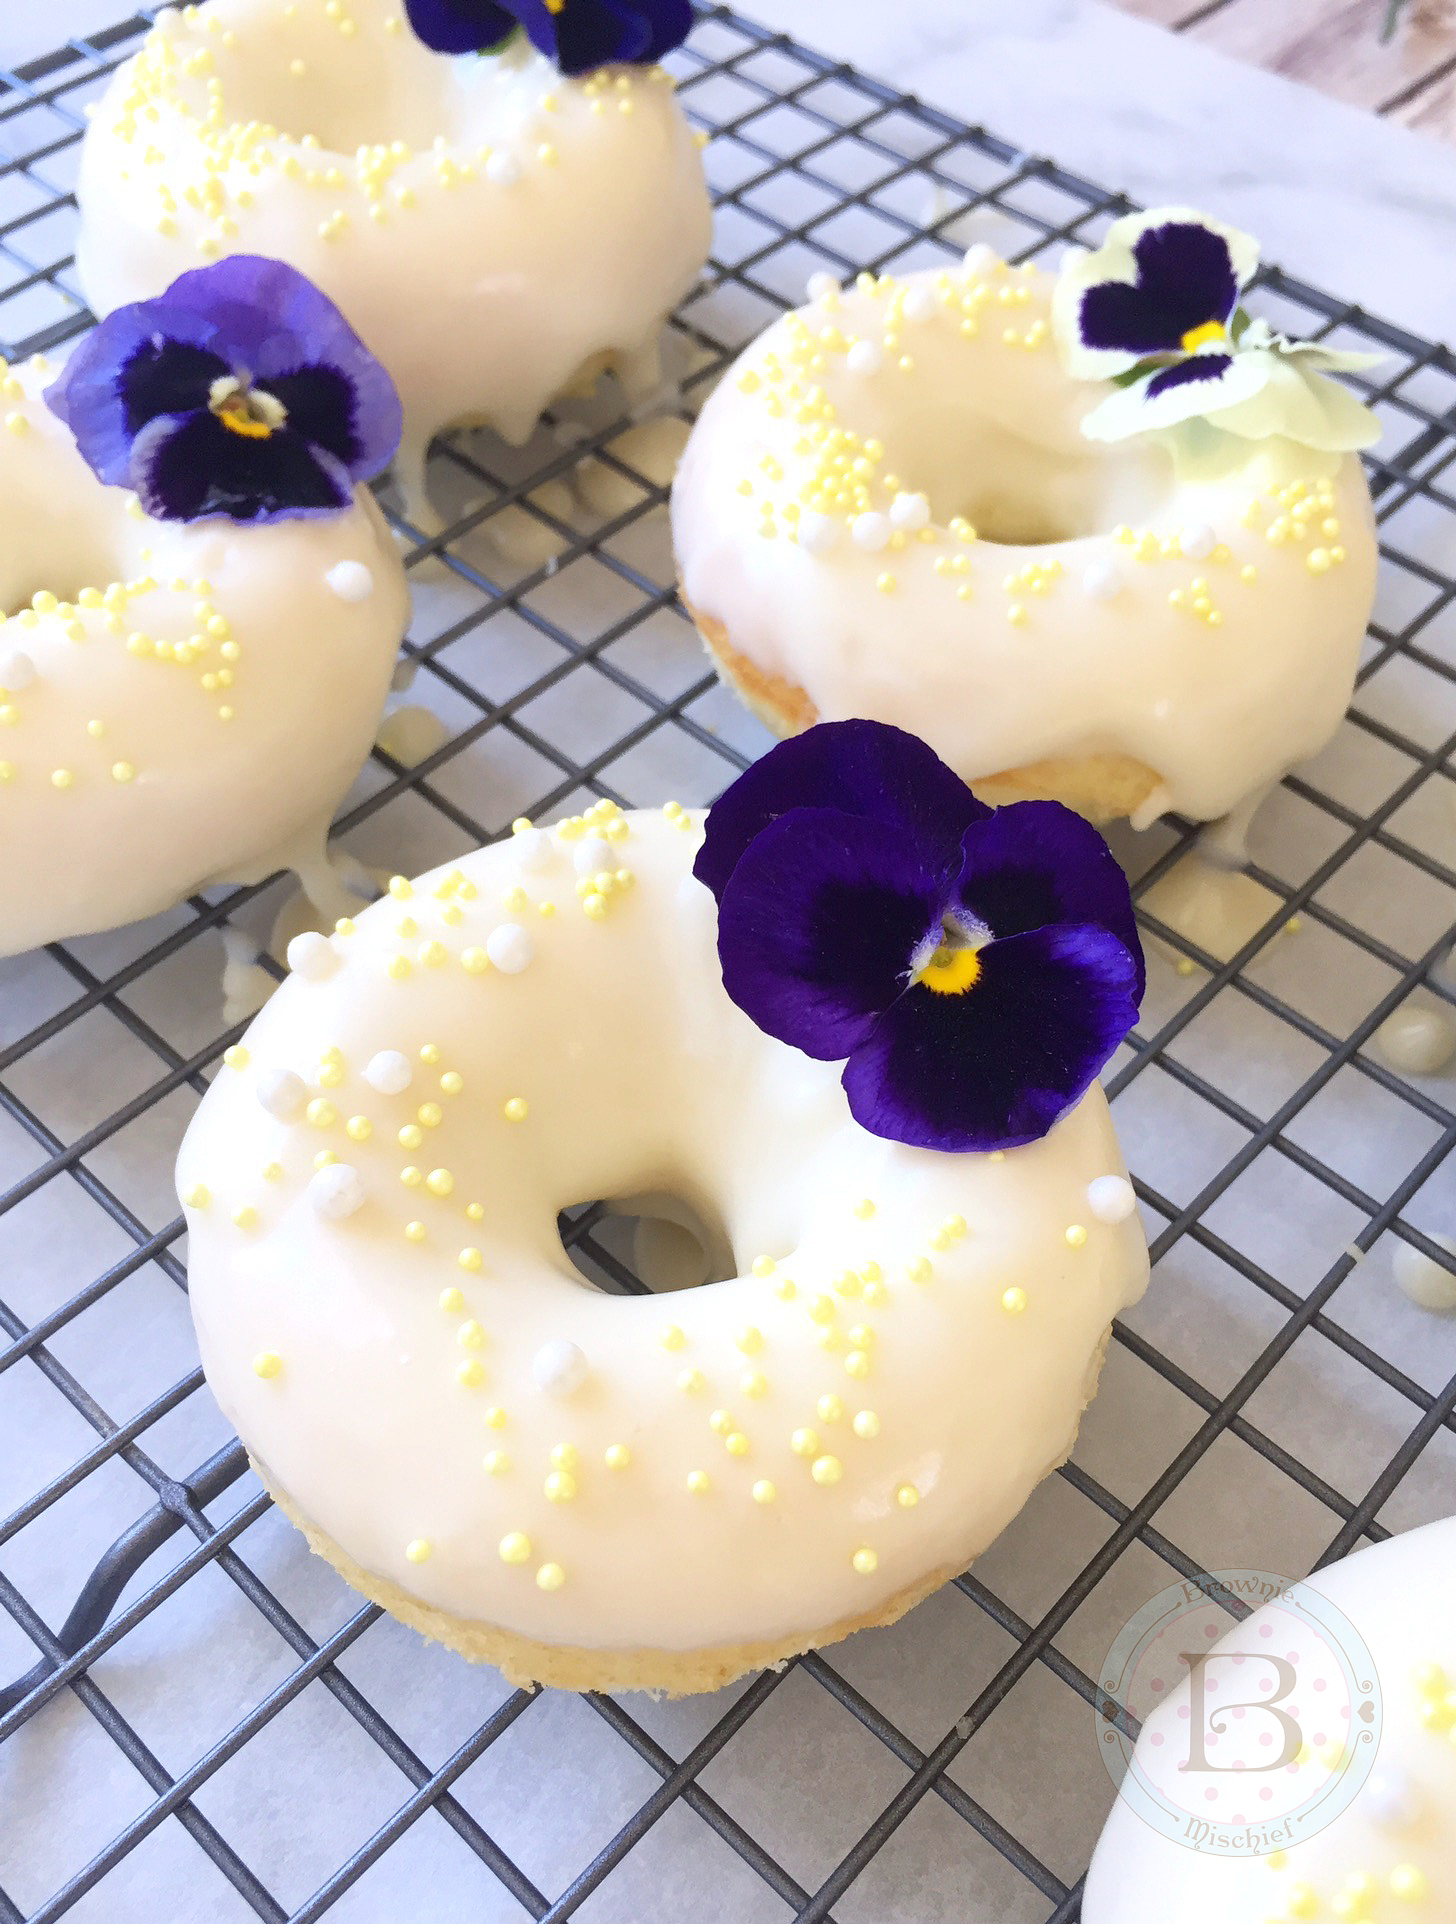
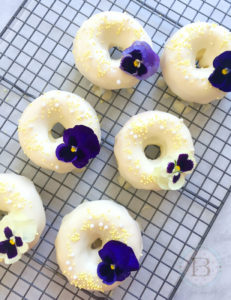
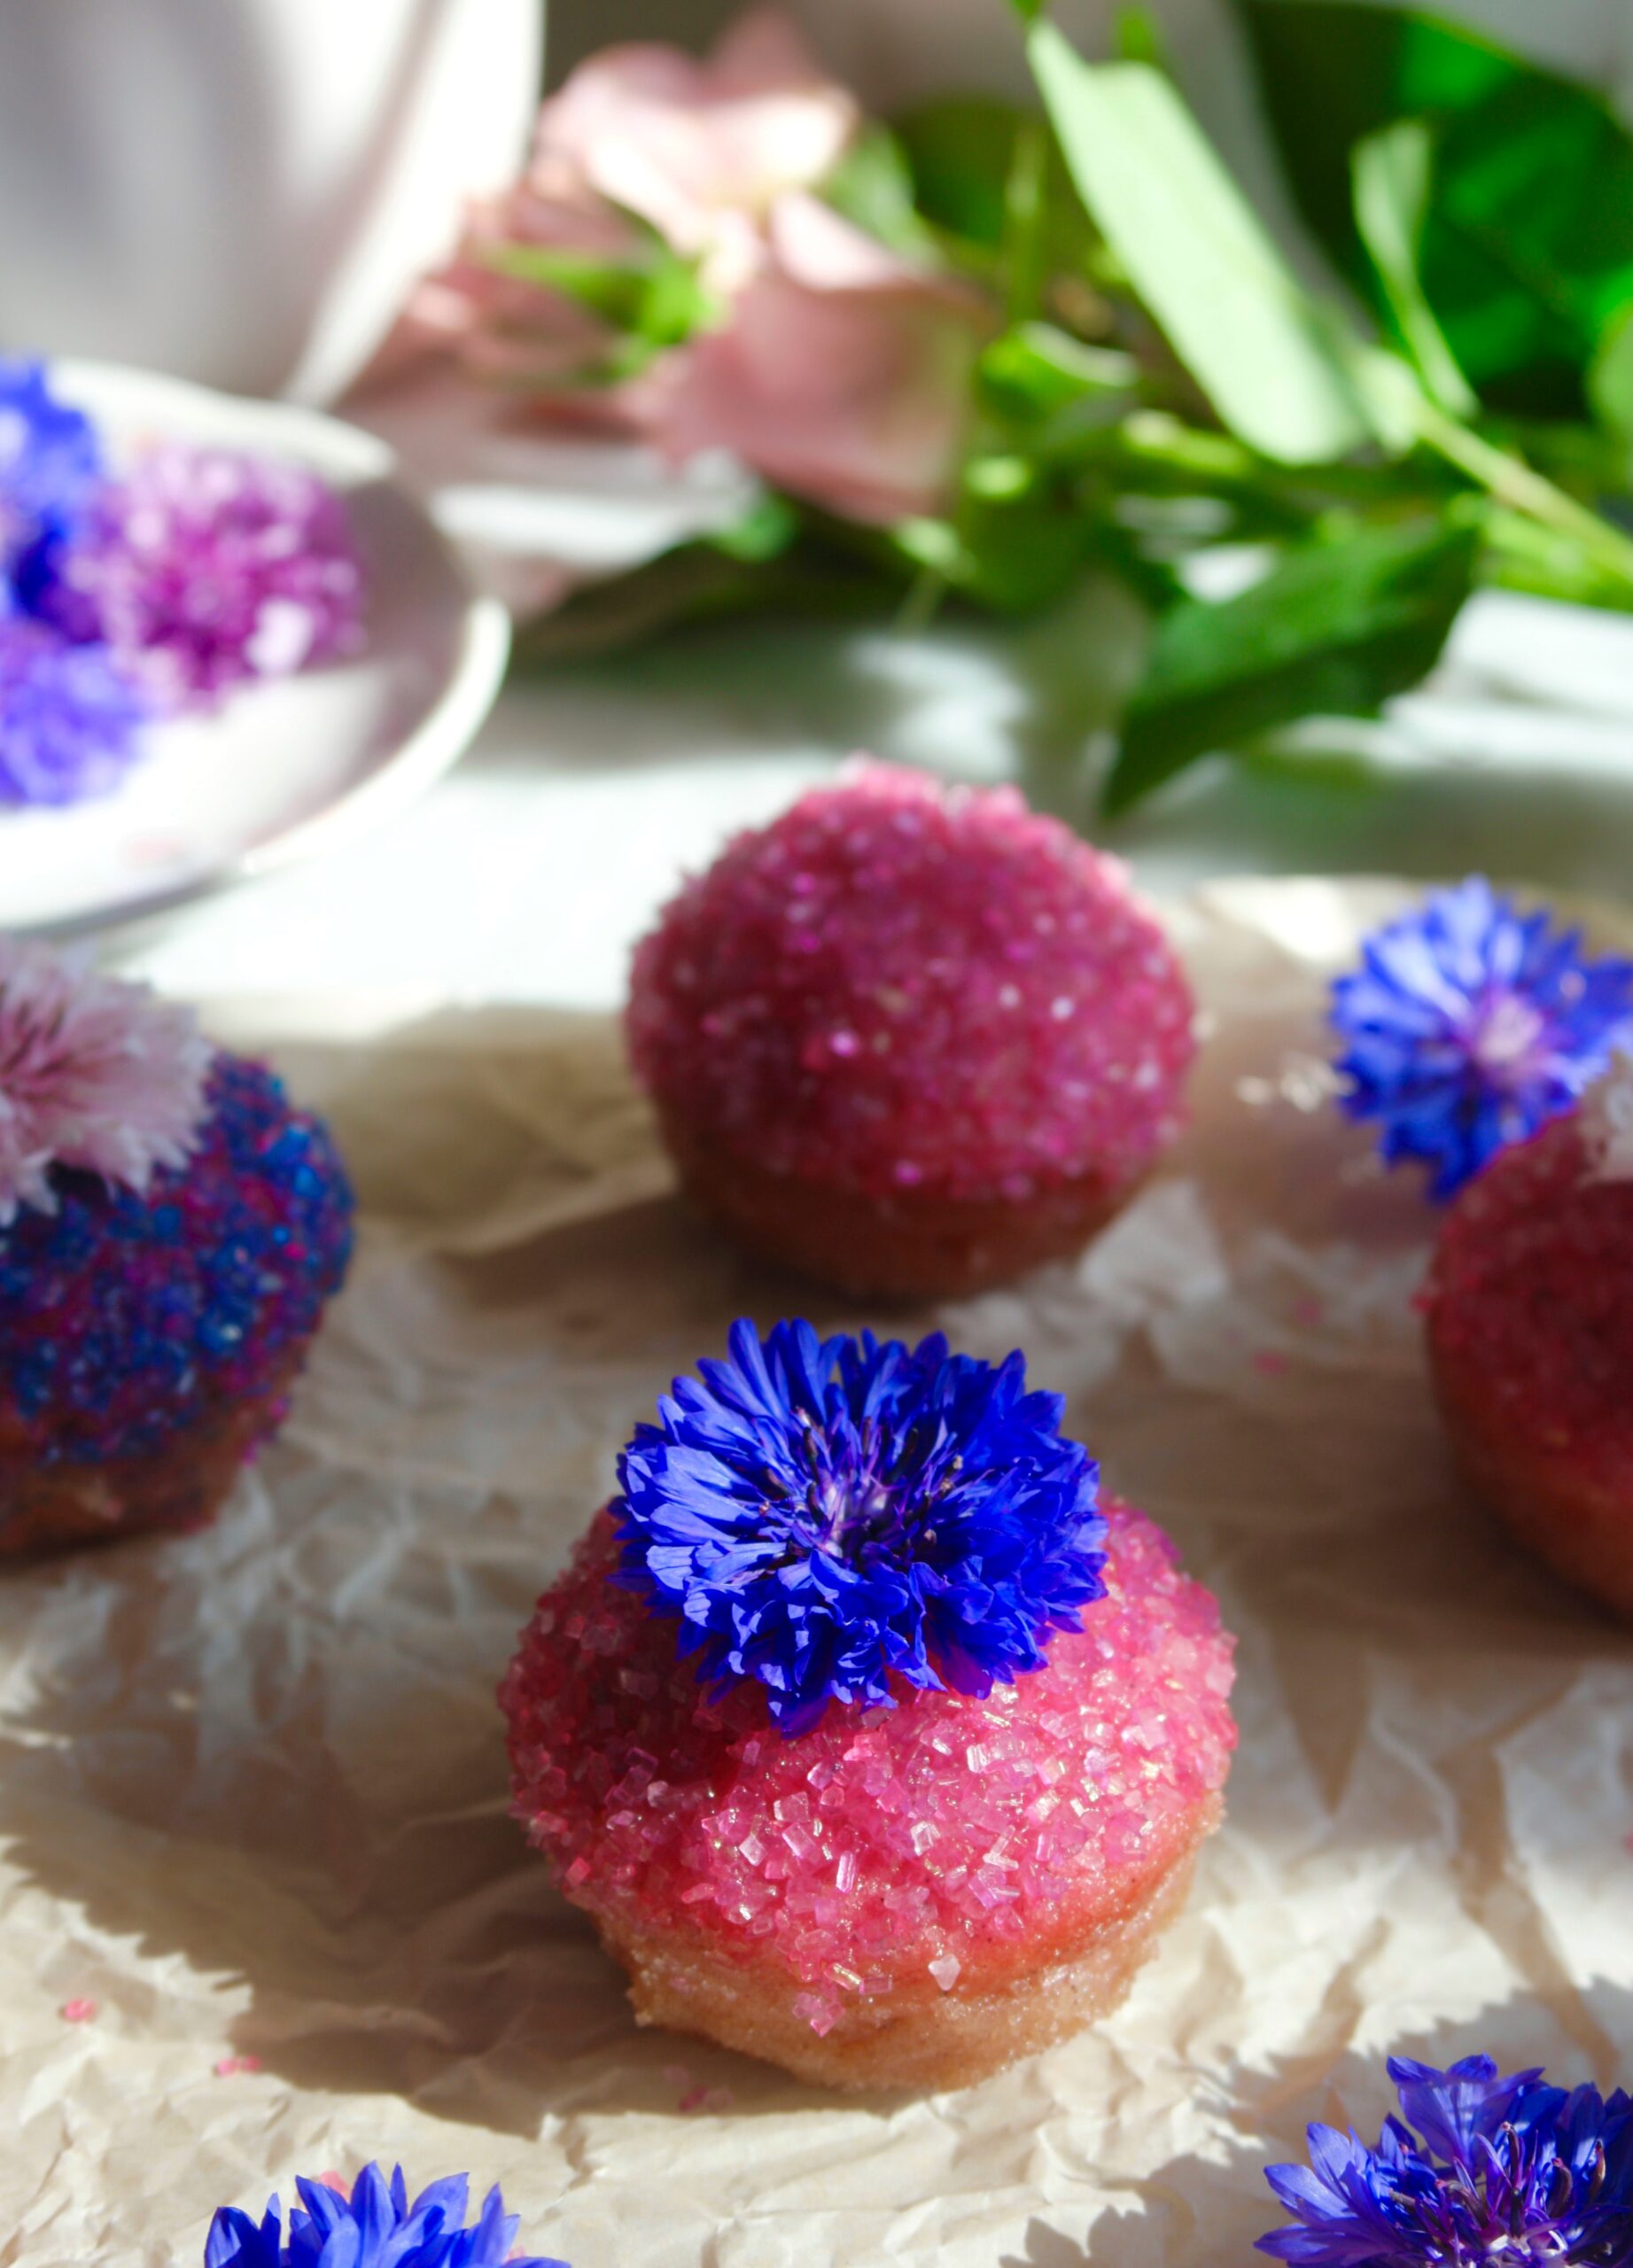
Decorating these little cuties was so entertaining! After sampling multiple variations of sparkling sugar and cinnamon sugar, I decided that dipping the bottoms of the muffins in butter and cinnamon sugar, then dipping the tops in butter and sparkling sugar gave them the perfect balance of sugar and spice. I had purchased some edible flowers a couple of days prior, and they added a pretty, magical touch. The flowers I used are called bachelor’s buttons and I got them at a local gourmet flower seller.

sugared mini muffins with edible flowers

Fairy Puffs

Course Breakfast, Brunch
Servings 24 mini muffins

Ingredients
  

Fairy Puffs

  • 1 â…“ cups (6 oz or 99g) all purpose flour, sifted
  • 3 tablespoons dragonfruit powder *See note below
  • 1 ½ teaspoons baking powder
  • ¼ teaspoon ground nutmeg
  • Scant ½ teaspoon fine sea salt
  • â…“ cup (2 5/8 oz or 75g) unsalted butter, softened
  • ½ cup (3 1/2 oz or 100g) granulated sugar
  • 1 large egg
  • ½ cup (4 oz or 118ml) whole milk

Topping

  • ½ cup (4 oz or 113g) unsalted butter, melted
  • ½ cup (3 1/2 oz or 100g) granulated sugar
  • ½ teaspoon ground cinnamon
  • ½ cup (3 1/2 oz or 100g) sparkling sugar crystals **I used combinations of white, pink, purple & blue
  • edible flowers (optional)

Instructions
 

Fairy Puffs

  • Preheat oven to 350ºF. Grease and flour a 24 serving mini muffin pan.
  • In a medium bowl, whisk together flour, dragonfruit powder, baking powder, salt and nutmeg. Set aside.
  • In a large bowl, cream butter and sugar with an electric mixer until light and fluffy.
  • Add egg and beat until smooth.
  • Add flour mixture and milk alternately in two additions and mix just until combined.
  • Transfer batter to prepared muffin pan, filling muffin cups about 3/4 full.
  • Bake until toothpick inserted in center of muffins comes out clean, about 12-14 minutes. (Be careful not to over bake. Check a few minutes early. Small muffins can dry out easily.)
  • Let cool in pan for 5 minutes. Remove puffs from pan and transfer to cooling rack. (Loosen puffs with a small offset spatula or butter knife if necessary.)

Topping

  • Combine granulated sugar and cinnamon in a shallow bowl.
  • Place colored sparkling sugar crystals in another shallow bowl.
  • Dip the bottoms of each puff in melted butter, then into cinnamon sugar mixture.
  • Dip the tops of each puff in melted butter, then into sparkling sugar.
  • Decorate with edible flowers if desired.

Notes

*To purchase dragonfruit powder, click here.
 **To purchase pink sparkling sugar crystals, click here.
 
Keyword cake, muffins

Happy Jam Tarts

Happy Jam Tarts

We’ve all needed a little cheering up at times, especially this past past year. These cute, happy tarts won’t take your problems away, but they can certainly make you smile, especially if you make them for someone else. They’re super easy to make and they taste better than the ones in the box we ate as kids. You can use store bought pie dough if you want to streamline the process. Any flavor of jam or preserves you have on hand works too!

Feel free to have fun decorating these little cuties. The possibilities are endless. You can use edible glitter, purchased candy eyes or even add mustaches. Happy baking!

Happy Jam Tarts

Jam-filled tarts with icing
Course Breakfast, Brunch, Dessert
Servings 8 tarts

Ingredients
  

Jam Tarts

  • 2 9-inch pie crusts, store bought or homemade
  • 1 cup strawberry jam or preserves or any flavor of your choice
  • 1 egg
  • 1 tablespoon milk or water

Icing

  • 1 ½ cups powdered sugar
  • 2 tablespoons milk
  • ½ teaspoon pure vanilla extract
  • 1 pinch salt
  • gel food color * I used Wilton Rose gel food color
  • ½ teaspoon meringue powder ** optional but helps icing to set

Decorations

  • sprinkles
  • black fondant
  • blue fondant or any color of your choice

Instructions
 

Jam Tarts

  • Preheat oven to 375º.
  • Line a large baking sheet with parchment paper.
  • Roll pie dough onto lightly floured surface. Cut into 8 6-inch by 4-inch rectangles, re-rolling dough as necessary.
  • Make egg wash by beating egg together with milk in a small bowl.
  • Spread 2 tablespoons of jam onto right half of each rectangle to within 1/2-inch of edges. Brush edges with egg wash.
  • Fold dough in half, left side over right. Seal edges by pressing with a fork
  • Poke several holes in the top of each tart with a toothpick.
  • Bake until golden, about 15-20 minutes.
  • Transfer to a cooling rack and let cool completely.

Icing

  • In a medium bowl, whisk powdered sugar, milk, vanilla extract and salt together until smooth.
  • Using a toothpick, add food color a little at a time until desired shade is achieved.
  • Stir in meringue powder, if using.
  • Spoon icing onto tarts.
  • Add sprinkles while icing is wet. When icing has set, add eyes, mouths and bows if desired.

Decorations

  • For the eyes, make 16 1/8-inch balls of black fondant. Flatten slightly. Adhere with a bit of water.
  • For the mouths, make 8 1/2-inch long, very thin strips of black fondant. Adhere with a tiny bit of water, using tweezers if necessary.
  • For the bows, roll out blue fondant to 1/16th-inch thickness. Cut out bows using ***bow cutter. Adhere with a bit of water.

Notes

*To find Wilton Rose gel food color, click here
**To find meringue powder, click here
***To find bow cutter, click here

Strawberry Shortcake Crumble Muffins

strawberrry shortcake crumble muffins

Have you noticed the strawberry shortcake crumble topping trend? I noticed many people sharing various versions of the crumble recipe all over Tiktok. I’ve seen the topping on cake, cupcakes and countless other desserts. Most people seem to make it using strawberry gelatin mix and vanilla pudding mix. The version I’m sharing here uses freeze dried strawberries instead. I’m not opposed to using gelatin mix, I just seriously love the tart, natural flavor of freeze dried strawberries.

This topping is irresistible on these tender strawberry muffins. I wanted to pile on as much crumble topping as possible so I used tulip baking cups. They’re made of grease-proof parchment paper squares. You can buy them online or make them yourself with squares of parchment. You can use the link provided at the end of the recipe to find the ones I used. Keep in mind, if you use standard muffin liners, you’ll use less batter and topping for each muffin, so you’ll end up with a few more muffins.

I used fresh strawberries for the puree in the muffins, but feel free to use frozen, defrosted strawberries if you cant get fresh ones.

Strawberry shortcake crumble muffins


Strawberry Shortcake Crumble Muffins

by Mari Vasseur
Strawberry muffins topped with strawberry shortcake crumble
Course Breakfast, Brunch, Dessert
Servings 12 muffins

Ingredients
  

Strawberry Shortcake Crumble Topping

  • 1 cup (128g) all purpose flour
  • ½ cup (100g) sugar
  • ¼ teaspoon salt
  • ½ cup (113g) cold, unsalted butter, cubed
  • 1 cup (14g) freeze-dried strawberries, finely crushed* (weigh or measure before crushing the strawberries)

Strawberry Muffins

  • 2 ¼ cups (287g) all purpose flour, sifted
  • 2 teaspoons baking powder
  • ½ teaspoon baking soda
  • ¾ teaspoon salt
  • ¾ cup (170g) unsalted butter, softened
  • 1 â…› cups (225g) sugar
  • 2 large eggs
  • 1 teaspoon strawberry extract
  • ½ cup (118ml) buttermilk
  • ½ cup (118ml) strawberry purée
  • 1-2 drops pink or red gel food coloring optional

Instructions
 

Strawberry Shortcake Crumble Topping

  • In a medium-sized bowl, combine the flour, sugar and salt until well blended. Work the butter into the flour mixture with your fingertips until it looks like sandy, with no large pieces of butter remaining.
  • Place half of crumble mixture into another medium-sized bowl and combine it with the crushed freeze dried strawberries. Mix well and press it together with your fingers to form pea sized pieces. Gently combine the two bowls of crumble together. Set aside in refrigerator while preparing the muffin batter.

Strawberry Muffins

  • Preheat the oven to 375ºF (190ºC). Line a 12 serving muffin pan with tulip baking liners or parchment squares.
  • In a medium-sized bowl, whisk together the flour, baking powder, baking soda and salt until well combined.
  • In a large bowl, beat the butter and sugar, with an electric mixer on medium speed, until pale and fluffy.
  • Beat in the eggs one at a time until incorporated. Beat in the extract until well combined. Add the flour mixture and beat on low speed, just until combined. Add the buttermilk, strawberry puree and food coloring. Beat on low speed, just until combined.
  • Divide batter evenly into the tulip muffin liners. (If using standard muffin liners, fill them 2/3 full.) Sprinkle crumble topping evenly over the batter.
  • Bake at 375ºF (190ºC) for 5 minutes, then turn oven temperature down to 350ºF (180º) and continue baking until topping is golden and a toothpick inserted in center is clean, about 12-17 more minutes. (If your topping starts to brown too quickly, you can cover the muffins with a bit of aluminum foil.) Let the muffins cool in the pan for 5 minutes, then transfer them to a cooling rack.

Notes

* A small food processor or a clean spice grinder is helpful to pulverize the freeze-dried strawberries. Pass the crushed strawberries through a sieve to remove seeds if desired.
To find tulip baking cups, click here
To find floral tulip baking cups, as seen on TikTok, click here
 
Keyword muffins, strawberry

(118ml)

Orange Vanilla Bean Donut Holes

Orange Vanilla Bean Donut Holes

During citrus season, in the heart of winter, my backyard orange tree is brimming over with fresh oranges. So I love bringing some fresh-picked sunshine to my family with these fluffy Orange Vanilla Bean Donut Holes from my childhood. When I was a child, my parents used to love taking our family to a smorgasbord. The owner would always come out from the kitchen and say hello to my parents. He made delicious fried donut holes that my brother and I looked forward to at the end of our meal. At home we duplicated the donut holes using a recipe from an old cookbook. Unfortunately the cookbook is lost, but this recipe is pretty close to the original. Tossing the little donuts in vanilla sugar makes them even more fragrant and delicious. The vanilla sugar can be used immediately, but for the best flavor, make it in advance.

The original recipe had vanilla and nutmeg in it, which are classic cake donut flavors. The addition of fresh orange zest and juice makes them vibrant and flavorful. I love making different flavors of these donut holes. To view Blueberry Donut Holes, click here.


Orange Vanilla Bean Donut Holes

by Mari Vasseur
Orange & vanilla donut holes, fluffy & fragrant on the inside, crisp & sugary on the outside
Course Breakfast, Brunch, Dessert
Servings 24 donut holes

Ingredients
  

Donut Holes

  • 2 cups (255g) all purpose flour, sifted
  • 2 teaspoons baking powder
  • ¼ teaspoon fine sea salt
  • 2 large eggs
  • ½ cup (100g) sugar
  • Zest of 1 large orange
  • 2 tablespoons (28g) melted butter
  • ½ cup (118ml) orange juice
  • 1 ½ teaspoons vanilla bean paste
  • ½ cup (100g) vanilla sugar Recipe below
  • Oil for frying

Vanilla Sugar

  • ½ split vanilla bean
  • ½ cup (100g) sugar

Instructions
 

Donut Holes

  • In a large, whisk together the flour, baking powder and salt until well blended.
  • In a medium-sized bowl, whisk the eggs, sugar, orange zest, melted butter, orange juice and vanilla bean paste until creamy and well combined. Add this mixture to the flour mixture and mix just until combined. Do not over mix. A few small lumps are okay.
  • In a heavy saucepan, heat 1 1/2 inches of oil to 340ºF (170ºC). Place the vanilla sugar in a medium-sized bowl.
  • Drop tablespoon-sized portions of batter into the hot oil. (I used a #60 portion scoop**) Don't over crowd the pan.
  • Fry the donut holes until golden brown on all sides, about 2-4 minutes, flipping halfway through. If the donut holes cook too quickly on the outside, turn heat down a bit.
  • Briefly drain the donut holes on paper towels, then toss them in vanilla sugar. Serve warm.

Vanilla Sugar

  • With the dull side of a knife, scrape the seeds out of the vanilla bean.
  • In a small bowl, whisk the vanilla seeds together with sugar, breaking up any clumps. Use immediately or make in advance and let the flavor develop 1-2 weeks in a covered container.

Notes

**To find vanilla beans, click here.
*To find the scoop I used, click here.
 
Keyword donuts, orange vanilla

Lemon Buttermilk Donuts with Honey Cream Cheese Icing

Lemon Buttermilk Donuts with Honey Cream Cheese Icing by Brownie Mischief

I was seriously happy when I started seeing donuts appearing at weddings, bridal showers and occasions other than work meetings. I’ve always felt those sweet, fluffy rings of dough had a higher calling. They had such potential! And honestly who doesn’t love donuts? They’re delicious, but they can also be beautiful. These Lemon Buttermilk Donuts could certainly win a beauty contest. They would make a gorgeous edition to any breakfast, brunch or dessert table. The fresh lemon zest and the earthy flavor of honey will bring springtime right into your kitchen.

Lemon Buttermilk Donuts with Honey Cream Cheese Frosting by Brownie Mischief

If you’re on the lookout for a Mother’s Day recipe, any mom will love these pretty, fragrant treats. This is a very easy recipe and the donuts bake up quickly, so you’ll have time to fix mom a cup of her favorite tea. If you don’t have a donut pan, and you’ve been reluctant to buy one, I can honestly say I love mine. It was very affordable and I’m pleased with the performance and ease of clean up with the pan I purchased. To find the donut pan click here.

In keeping with the springtime feel, I decorated my donuts with pesticide-free edible flowers. I used pansies, but if you’re unable to find them, you can substitute pesticide-free rose petals. I found these edible pansies at my local food market in the produce department, near the fresh herbs. You can also find edible flowers at farmers’ markets and online. For a list of edible flowers, click here.  Note:  The above pictured orange ranunculus flowers on the table are not edible.  

Lemon Buttermilk Donuts with Honey Cream Cheese Icing by Brownie Mischief

Lemon Buttermilk Donuts with Honey Cream Cheese Icing

Prep Time 20 minutes
Cook Time 7 minutes
Total Time 27 minutes
Course Breakfast, Brunch, Dessert
Servings 6

Ingredients
  

Lemon Buttermilk Donuts

  • 1 cup (113g) cake flour, sifted
  • ½ cup (100g) fine granulated sugar
  • 1 teaspoon baking powder
  • ¼ teaspoon fine sea salt
  • â…“ cup (78ml) buttermilk
  • 1 large egg
  • 2 tablespoons (28g) unsalted butter, melted
  • Zest of 1 medium lemon

Honey Cream Cheese Icing

  • ¼ cup (85g) cream cheese, softened
  • 2 tablespoons (28g) unsalted butter, softened
  • ¼ teaspoon vanilla extract
  • 1 pinch fine sea salt
  • 1 cup (120g) powdered sugar, sifted
  • 2 tablespoons honey
  • 2 teaspoons milk

Finishing Touches

  • Pesticide-free edible flowers
  • Sugar pearls*
  • Nonpareils**

Instructions
 

Lemon Buttermilk Donuts

  • Preheat oven to 375ºF (190ºC). Spray the wells of a donut pan*** with non-stick cooking spray.
  • In a medium-sized bowl, whisk together the cake flour, sugar, baking powder and salt until well blended.
  • In a separate medium-sized bowl, whisk the buttermilk, egg, melted butter, and lemon zest together until creamy and well combined. Add this mixture to the flour mixture and stir just until combined. Do not over mix.
  • Transfer the batter to a piping bag or plastic zip bag. Snip off the tip of the bag and pipe batter into the prepared donut pan, filling the wells 2/3 full.
  • Bake until a toothpick inserted into donuts comes out clean, about 7-8 minutes. Let cool in the pan for a couple of minutes, then remove the donuts to a cooling rack to cool completely.
  • Prepare Honey Cream Cheese Icing while the donuts are cooling. Dip the tops of the donuts into the icing and decorate as desired. Serve immediately.

Honey Cream Cheese Icing

  • In a medium-sized bowl, beat the cream cheese and butter together, with an electric mixer at medium speed, until smooth and well blended. Do not over beat. Add the vanilla extract and salt. Mix until combined.
  • On low speed, gradually add powdered sugar and mix until incorporated. Add the honey and beat on medium speed until smooth. Add milk, a little at a time until the desired consistency is reached. Beat on low speed until smooth.
  • Lemon Buttermilk Donuts with Honey Cream Cheese Frosting by Brownie Mischief