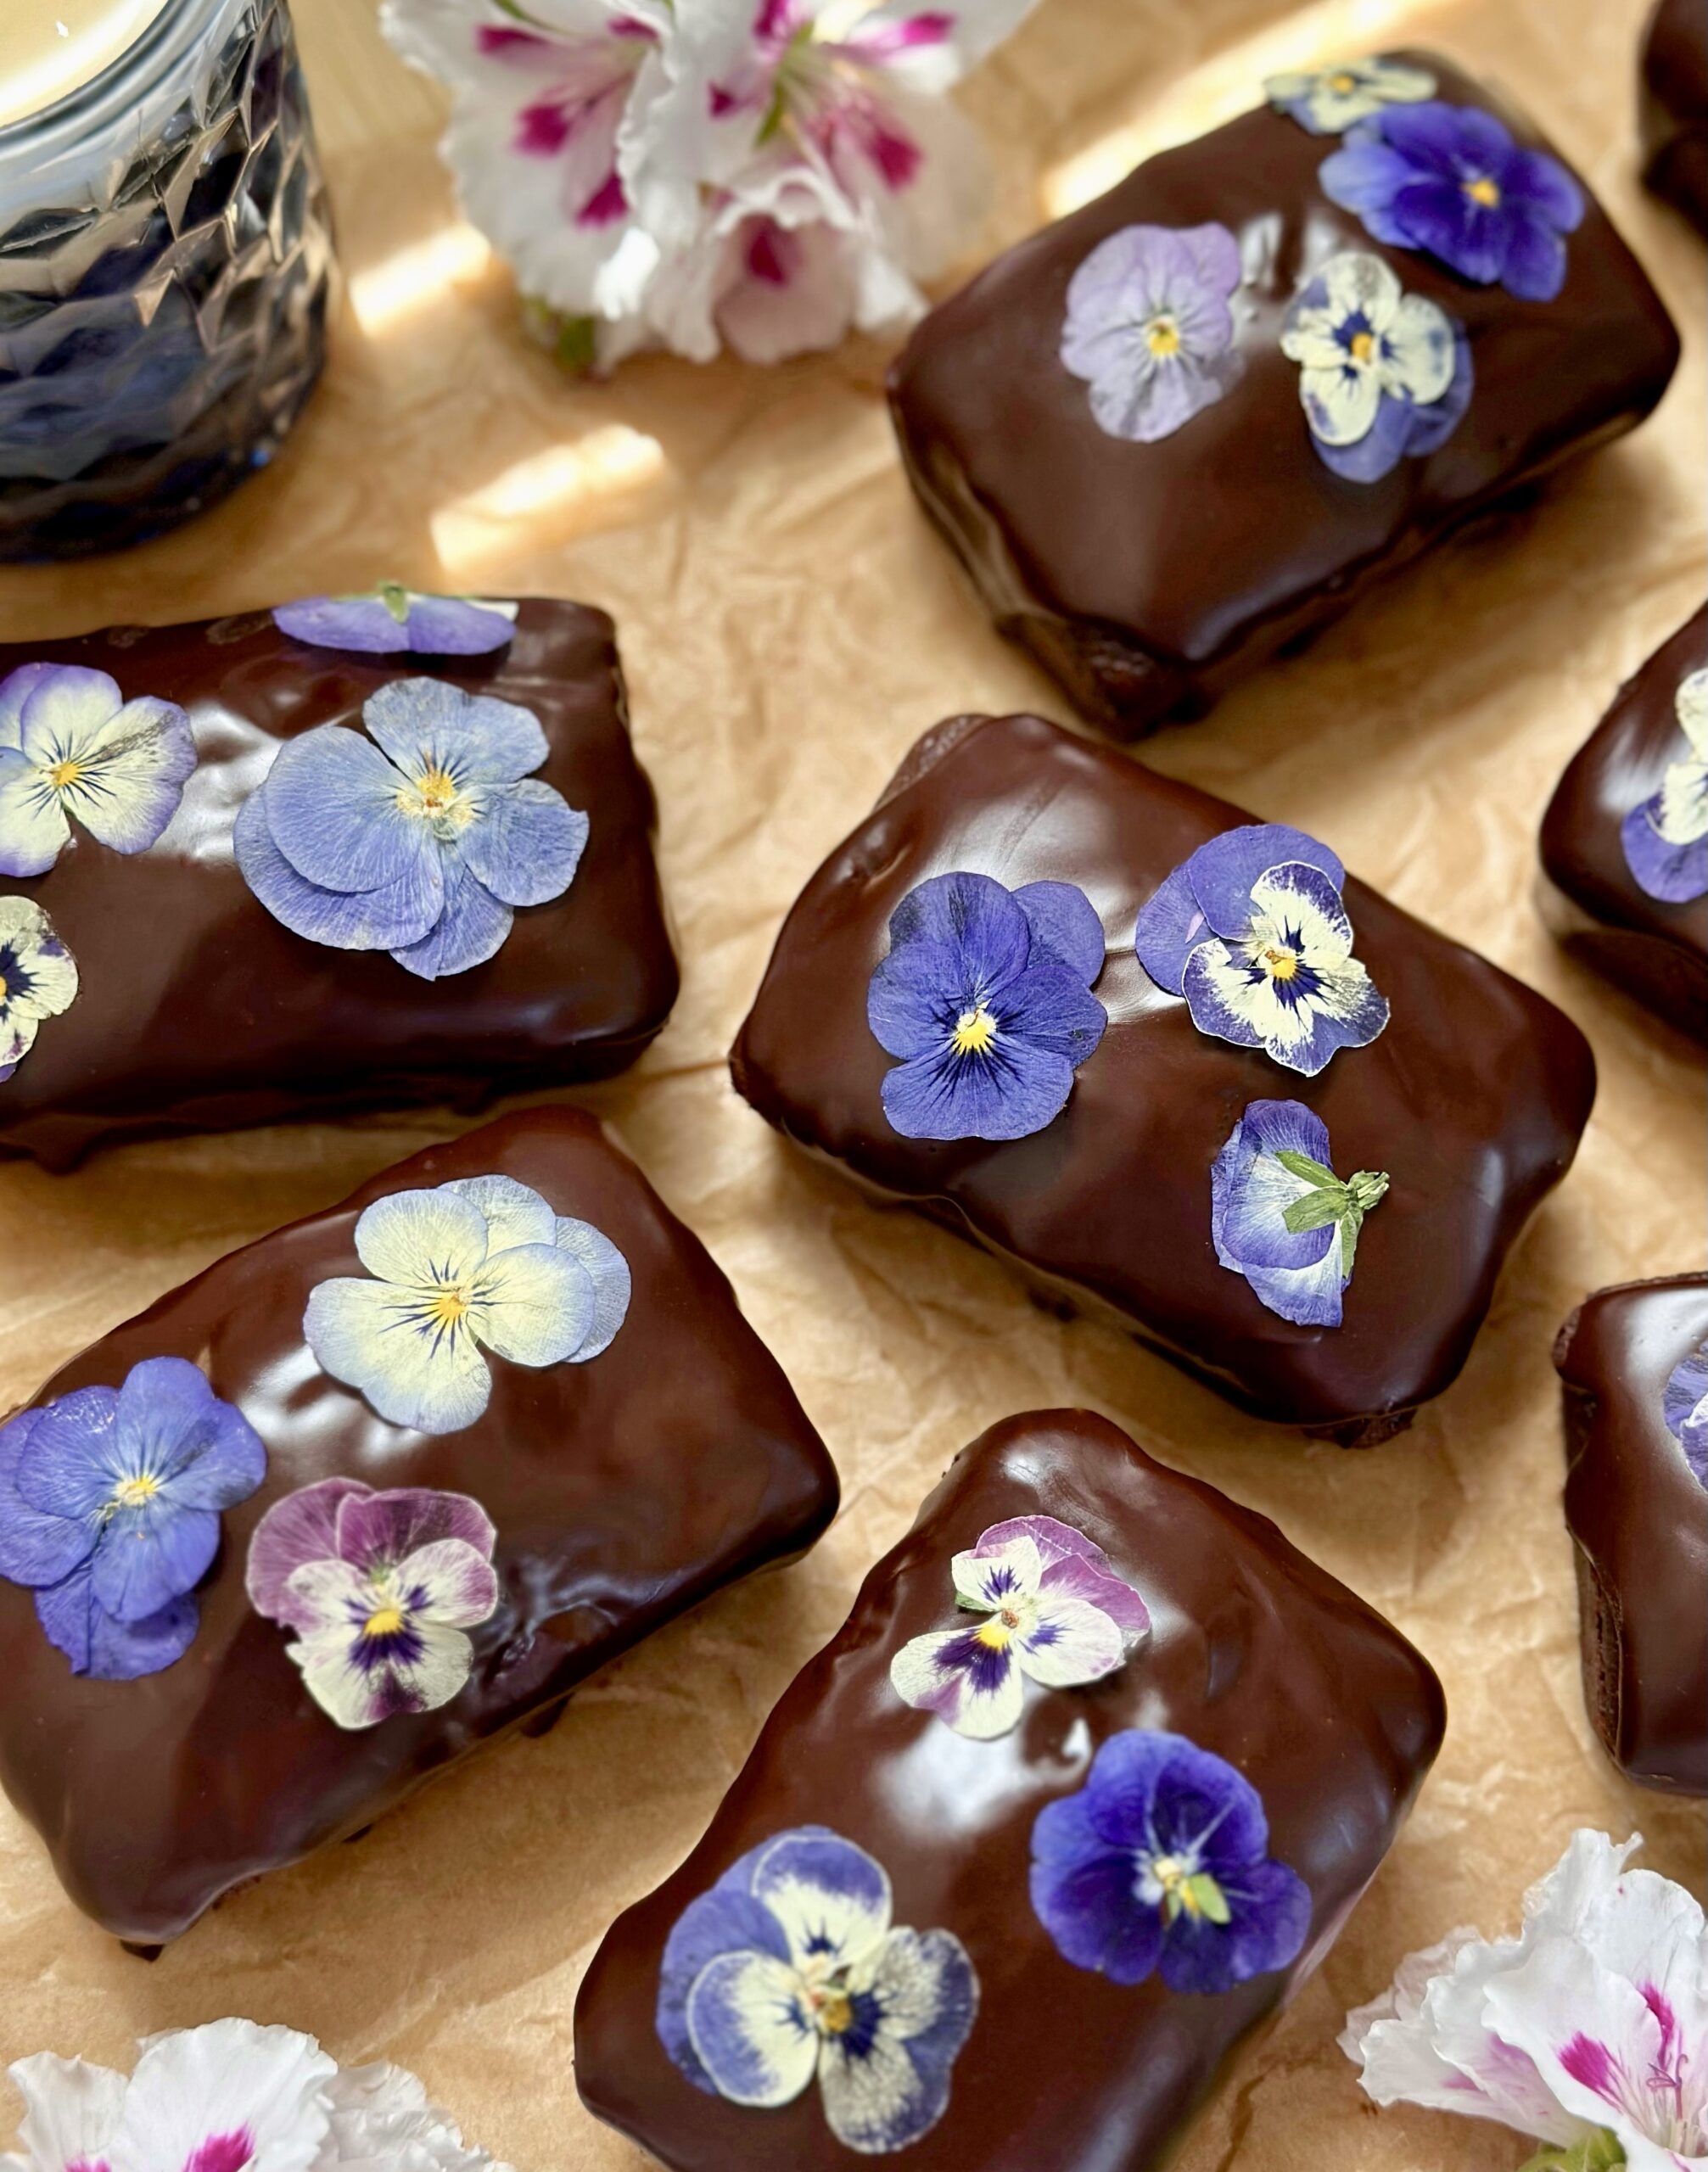
These soft, plush mini chocolate loaf cakes with a silky chocolate glaze are perfect for fairy picnics. They also make adorable Mother’s Day treats for moms who love chocolate. They’re easy to make and don’t require a mixer. I garnished them with edible pressed flowers for a magical finishing touch.
Chocolate Olive Oil Cakes
Chocolate olive oil mini loaf cakes with silky chocolate icing
⅓ cup (30g)unsweetened Dutch process or dark cocoa powder, sifted
¼cup (28g)almond flour
1teaspoon baking powder
½teaspoon baking soda
½teaspoonfine sea salt
⅔cup (133g)granulated sugar
⅓cup (67g)packed brown sugar
½cup (111ml)olive oil or neutral oil of your choice
2largeeggs
1teaspoonpure vanilla extract
½cup (113g)sour cream
½cup (118ml)whole milk
Chocolate Glaze
6tablespoons (85g)unsalted butter, cubed
4ounces (113g)semisweet or dark chocolate, chopped
2teaspoonscorn syrup or honey
24-30small edible pressed flowersoptional
Instructions
Chocolate Olive Oil Cakes
Preheat the oven to 350ºF (180ºC). Grease and flour the cavities of an 8-serving mini loaf pan,** I use a mixture of equal parts flour and cocoa powder to flour them. It's also helpful to line the bottoms of the cavities with parchment paper. I used a pan with eight 2 1/4-inch by 3 1/2-inch cavities.
In a medium bowl, whisk together the flour, cocoa powder, almond flour, baking powder, baking soda and salt until well combined.
In a large bowl, whisk together the sugar, brown sugar, oil, eggs and vanilla extract until smooth and well combined.
In a small bowl, whisk together the milk and sour cream.
Stir the flour mixture into the batter in two additions, followed by half of the milk mixture after each addition. Beat just until combined.
Transfer the batter to the prepared pan, filling the cavities half full. Bake until a toothpick inserted into the center of the cakes comes out clean or with a few moist crumbs attached, about 13-17 minutes. Be diligent and avoid over baking the cakes.
Cool the cakes in the pan for 7 minutes, then transfer to a cooling rack to cool.
Chocolate Glaze
Melt the butter, chocolate and corn syrup together in a large heatproof bowl set over a pan of barely simmering water, making sure the water doesn't touch the bottom of the bowl. Stir occasionally until smooth. Remove from heat and let cool slightly.
Spoon the glaze over the cooled cakes. When the glaze is almost set, garnish with edible pressed flowers if desired.
Notes
* I use a microwave flower press to make edible pressed flowers quickly. To find it, click here.**To find a mini loaf pan, click here.
The texture and flavor of these cute Blueberry Lemon Crumb Cakes is immaculate. You’ll love them so much, you won’t want to share, but this recipe makes six 4-inch personal crumb cakes, so you’ll have one all to yourself. You’ll understand once you taste the soft, fluffy lemon scented cake with juicy blueberries, a generous amount of sweet crumb topping and a lemony cream cheese icing. I was a bit hesitant to share this recipe. But I was taught to share recipes by my two grandmothers who were amazing cooks and bakers. They shared their knowledge and recipes with anyone who asked. Recipes are a legacy that should be passed on to family and friends. If you’re reading this, I consider you a friend. So enjoy this recipe that’s especially dear to me, because it’s based on my Grandma’s Apple Crumb Cake recipe.
I used a six serving shallow jumbo muffin pan to bake the cakes. The muffin cups are 4 inches across by 1 inch deep. To find the pan, click here. A hamburger bun pan for 4-inch buns will work too. If you happen to have six 4-inch cake pans, those work nicely. I used jumbo muffin liners to line the muffin cups, which fit perfectly by pressing them in around the inside bottom edges.
Blueberry Lemon Crumb Cakes
Fluffy, soft lemon cakes with blueberries, crumb topping and lemon cream cheese icing
In a medium bowl, whisk the flour, sugar, brown sugar and salt together.
Work in the butter with your fingertips until the mixture looks like the consistency of wet sand. Press the mixture together to make chunks. Set aside in the refrigerator until ready to use.
Crumb Cakes
Preheat the oven to 350ºF (180ºC). Line a 6-serving shallow jumbo muffin pan* with jumbo muffin liners.** Jumbo muffin liners will fit by pressing them around the inside bottom edges.
In a medium bowl, whisk together the flour, baking powder and salt.
In a large bowl, cream the butter, sugar and lemon zest with an electric mixer on medium speed, until light and fluffy.
Beat the egg and egg yolk into the butter mixture in 2 separate additions, making sure each addition is incorporated before adding the next. Beat in the extracts until combined.
In a small bowl, whisk the milk and sour cream together.
On low speed, mix the flour mixture into the batter in 2 additions alternating with half of the milk mixture after each addition. Beat just until combined.
Transfer the batter to the prepared baking pan, evenly distributing the batter and filling the cups about half full.
In a medium bowl, toss the blueberries with 1 teaspoon of flour and place them into the cups on top of the batter, about 1 ounce (28g) in each. Top each one with crumb topping.
Bake until a toothpick inserted into the center of the cakes comes out clean, about 25-30 minutes. Let the cakes cool in the pan for 5 minutes, then transfer them to a cooling rack to cool completely.
Cream Cheese Icing
In a medium bowl, whisk together the cream cheese, melted butter, powdered sugar, salt and 1 tablespoon (30ml) of lemon juice. Add additional lemon juice, a little at a time until your desired consistency is reached. Drizzle over the cooled cakes.
Once upon a time, there was a little black bear who woke up from a long nap. As she stretched, she felt her tummy growl. She ventured into the morning sunshine and smelled something sweet. She sniffed the air, following the sweet fragrance until she came upon a beautiful purple tree. She climbed up to a comfy branch and ate the tender, purple blossoms to her heart’s content.
Bears, butterflies and bees know something good when they see it. We humans can also enjoy lilacs. I knew lilacs were edible, but I hadn’t tasted them until recently. The flavor reminds me of beets, slightly sweet with a vegetable aftertaste. I really wanted to try lilac syrup after seeing so many photos of pretty purple syrup online. I discovered that lilac syrup is not purple. It’s more of a dull, brownish blue-green. Many people use food coloring or blueberries to color their syrup. I also discovered that lilac syrup will turn a pretty shade of mauve by adding a small amount of lemon juice to the finished syrup. Since I would be using my lilac syrup inside of cake layers, I let it remain its natural color. I made a simple syrup with lilac blossoms and let them steep for a couple of hours. It was just long enough to give a subtle lilac flavor without being too floral. If you want a stronger lilac flavor, I suggest using more lilac blossoms rather than steeping longer to avoid bitterness.
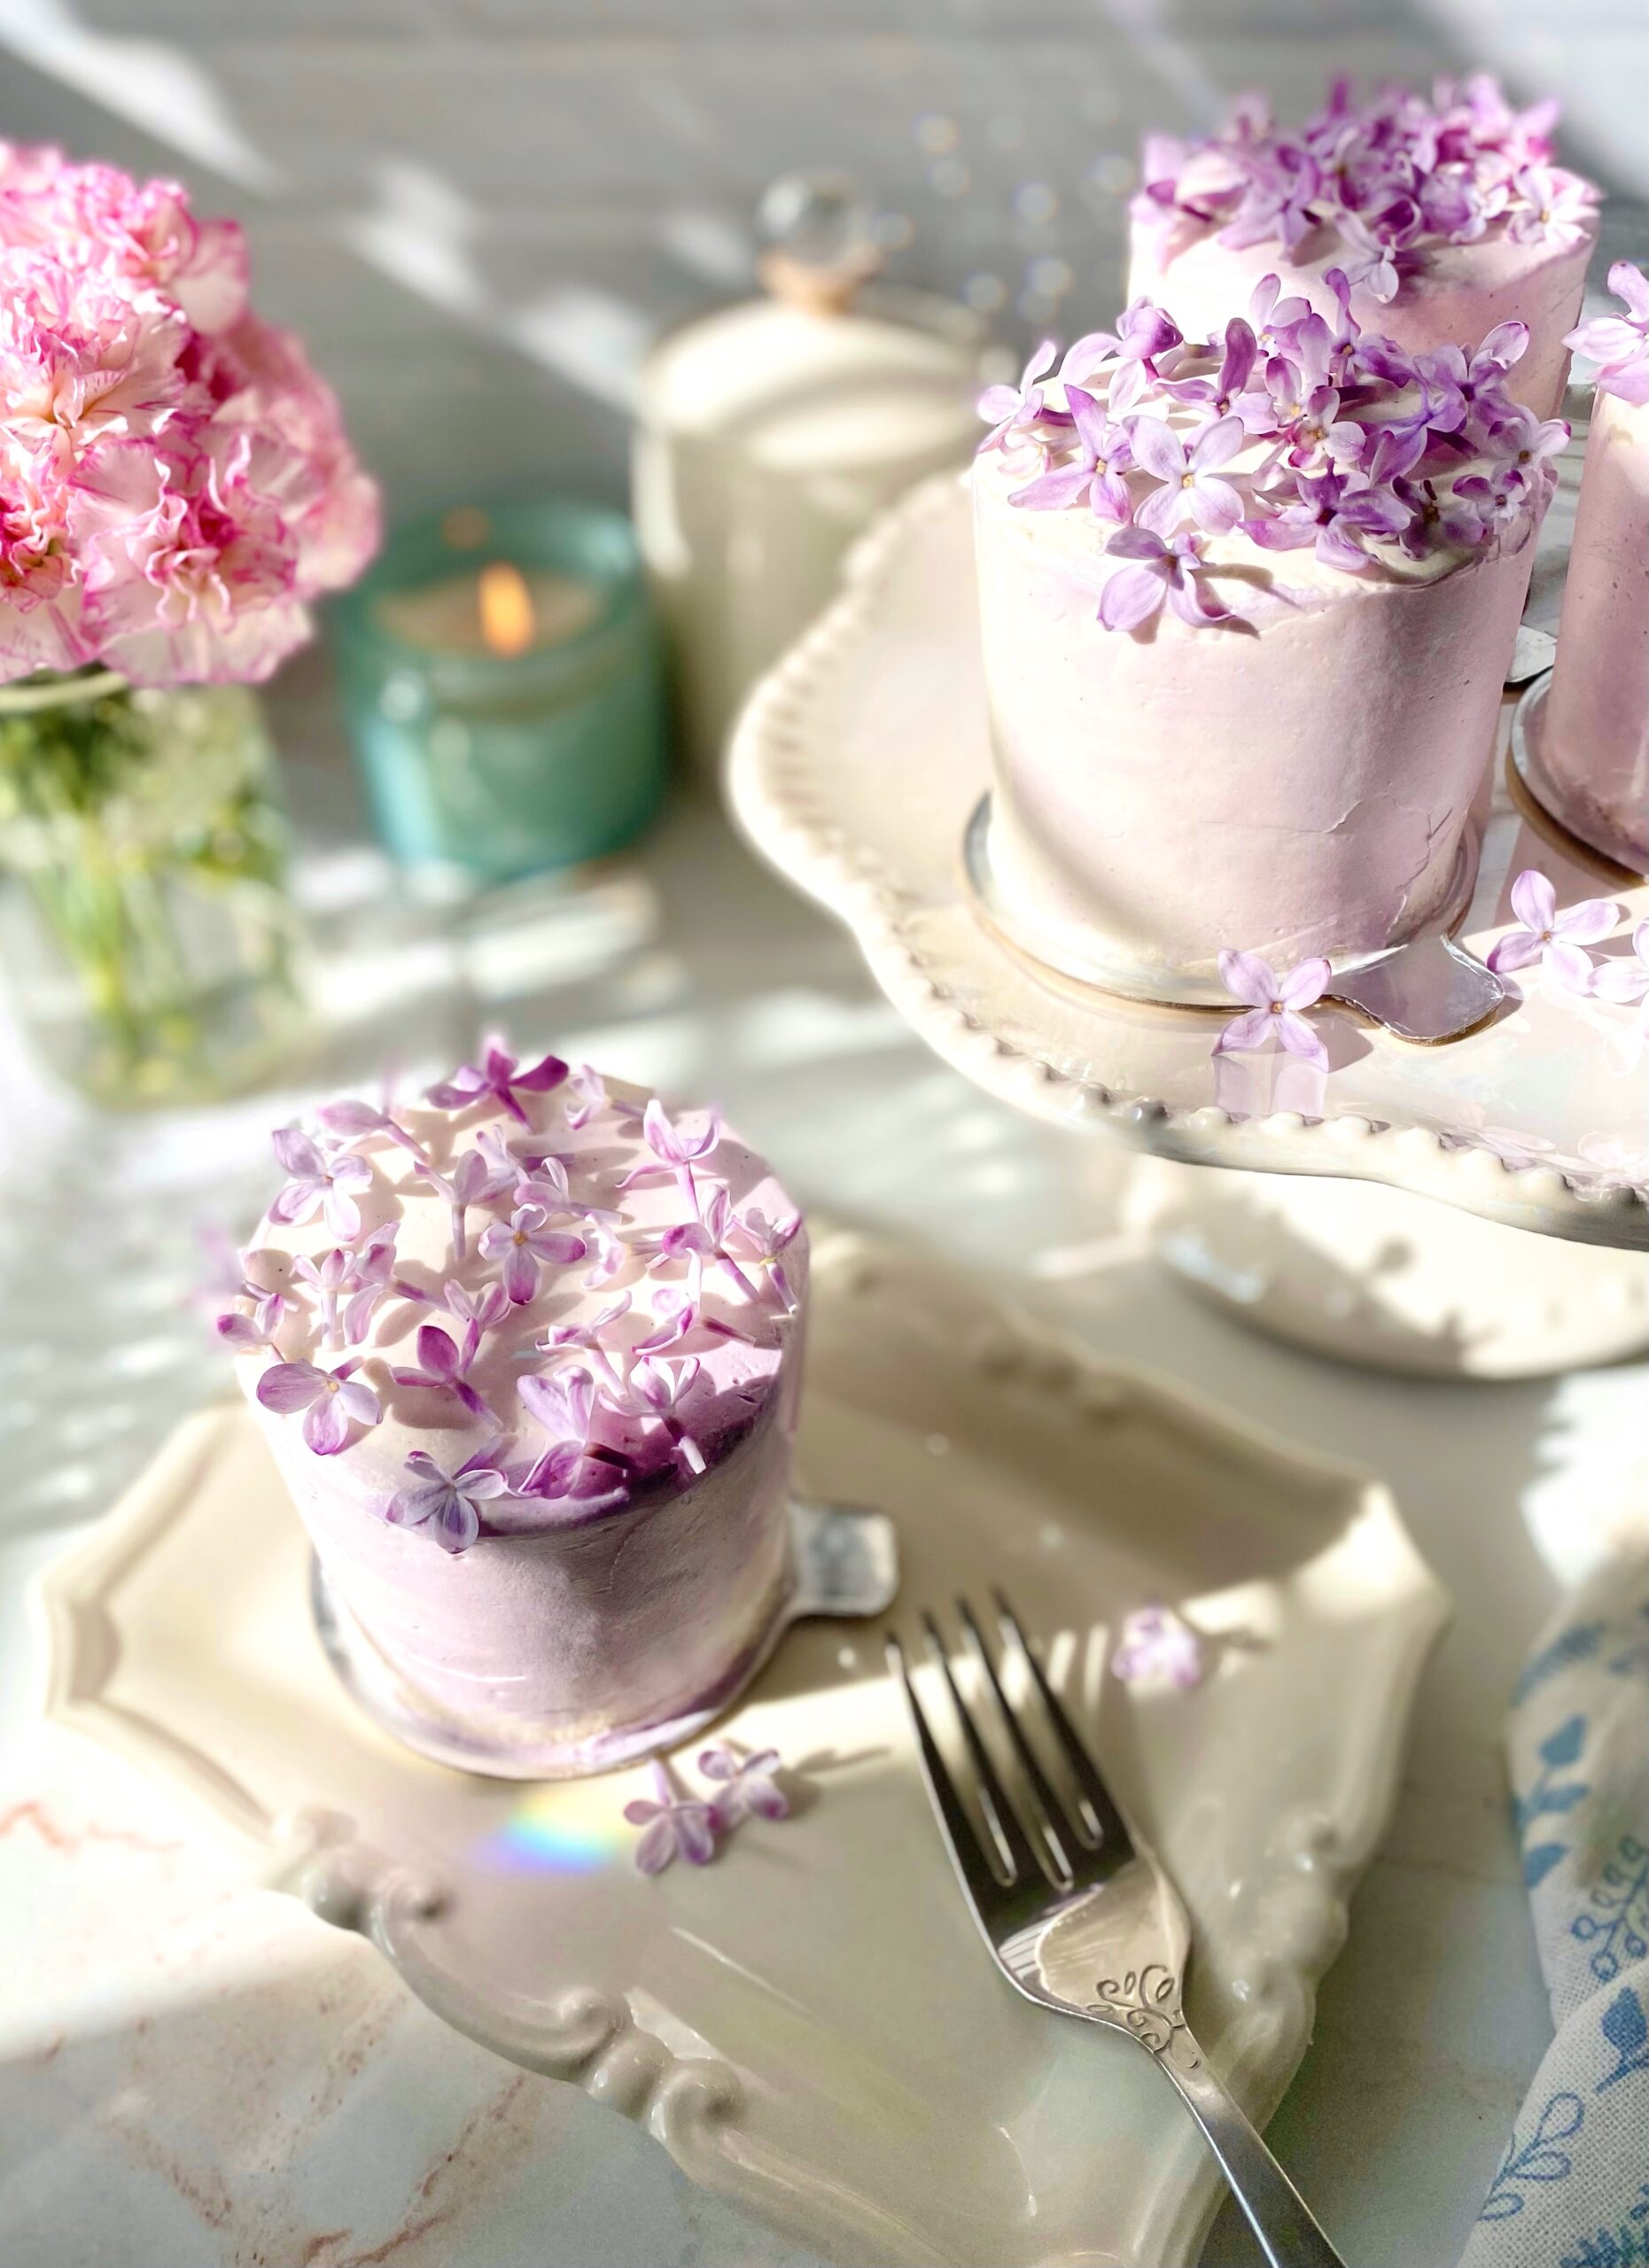
I paired the lilac syrup with this soft, fluffy vanilla cake and silky Swiss meringue buttercream. If you aren’t a fan of lilac syrup, feel free to use vanilla simple syrup instead and just use the lilac blossoms to decorate your cakes. They look stunning on any cake or cupcakes.
Lilac Vanilla Mini Cakes
by Mari Vasseur
Soft, fluffy mini white vanilla cakes with lilac syrup and vanilla Swiss meringue buttercream, topped with lilac blossoms
½ cup (7g)lilac blossoms, rinsed and all stems removed
1teaspoonfresh lemon juiceoptional
White Vanilla Cake
2 ¾cups (319g))cake flour, sifted
2teaspoonsbaking powder
1teaspoonfine sea salt
½cup (113g)unsalted butter, softened
1 ¾cups (350g)ultra fine granulated sugar*Not powdered sugar
¼cup (2 oz or 57ml)vegetable oil or neutral oil of your choice
2teaspoonsvanilla bean paste or pure vanilla extract
4largeegg whites, room temperature
1largeegg, room temperature
½cup (118ml)sour cream, room temperature
1cup (237ml)whole milk, room temperature
Swiss Meringue Buttercream
4largeegg whites
1 ⅓cups (265g)ultra fine granulated sugar*Not powdered sugar
1 ½ cups (340g)softened, unsalted butter, cubed
1teaspoonvanilla bean paste or pure vanilla extract
¼teaspoon fine sea salt
1-2dropslilac gel good colorSee notes below
1dropviolet gel food colorSee notes below
Assembly
63-inch mini cake boards****See notes below
Lilac blossoms, rinsed and all stems removed
Instructions
Lilac Syrup
In a small saucepan combine the sugar and water. Bring to a boil over medium heat, stirring gently to dissolve the sugar. Add the the lilac blossoms and stir gently. Turn the heat down and simmer for 5 minutes.
Remove from heat and allow the lilac blossoms to steep for 2 hours. Pass the lilac syrup through a mesh sieve.
White Vanilla Cake
Preheat the oven to 350ºF (180ºC). Grease and flour two 9-inch round cake pans and line the bottoms with parchment paper.
In a medium-sized bowl, whisk together the cake flour, baking powder and salt until well blended.
In a large bowl, beat the butter, sugar, oil and vanilla bean paste with an electric mixer at medium speed, until pale and fluffy, about 3 minutes.
On medium speed, beat in the egg whites in two additions, then beat in the egg until incorporated. On low speed, beat in one third of the flour mixture, then beat in the sour cream just until combined. Beat in the remaining flour mixture in two additions, alternating with milk. Beat just until combined.
Transfer the batter to prepared cake pans. Bake until the tops of the cakes are light golden brown and a toothpick inserted in center comes out clean, about 28-33 minutes. Do not over bake.
Allow the cakes to cool in the pans for 10 minutes, then remove from the pans and transfer to a cooling rack.
Cut each cake into four 2 3/4-inch rounds using a cookie or biscuit cutter.
Using a pastry brush, brush the mini cakes generously with lilac syrup or vanilla simple syrup.
Swiss Meringue Buttercream
Combine the egg whites and sugar in a large heatproof bowl. Set over a pan of gently simmering water, making sure the water doesn't touch the bottom of the bowl.
Whisk constantly until the sugar is dissolved and a temperature of 160ºF (71ºC) is reached.
Transfer the mixture to the bowl of a stand mixer with a whisk attachment. Whisk on low speed, gradually increasing to medium-high speed. Whisk until glossy, stiff peaks form and the mixture reaches room temperature.
Turn the mixer to medium-low speed. Add the butter, a few pieces at a time, allowing it to fully incorporate before adding more. If the mixture looks curdled, keep mixing and it will correct itself.
Switch to a paddle attachment. On low speed, mix in the vanilla bean paste and salt. Continue mixing on low speed for a few minutes until smooth.
Remove about 3/4 cup of frosting and transfer it to a small bowl. Using a toothpick, place two tiny drops of lilac gel food color and one tiny drop of violet gel food color into the bowl. Mix with a spatula until well combined.
Assembly
Smear a bit of frosting on each mini cake board. Top each one with a cake round, a layer of frosting, then a second cake round. Frost with a crumb coat if desired. Refrigerate of 15 minutes. Frost the mini cakes with white Swiss meringue buttercream, then smear small amounts of lilac Swiss meringue buttercream around the sides and top. Smooth frosting with a bench scraper and smooth the tops with a small offset spatula. Decorate with lilac blossoms.
Vanilla Simple Syrup (optional)
Combine 1/2 cup sugar and 1/2 cup water in a small saucepan. Bring to a boil over medium heat, stirring gently to dissolve the sugar. When the sugar has dissolved, remove from heat and stir in 1 teaspoon vanilla bean paste or pure vanilla extract.
Notes
*If you can't find ultra fine granulated sugar, it's okay to substitute with regular granulated sugar.**To find the lilac gel food color I used, click here.***To find the violet gel food color I used, click here.****To find 3-inch mini cake boards, click here.
Ever since a certain celebrity cut a hole from the middle of her favorite olive oil cake back in 2020, the internet has been obsessed with olive oil cakes. I must confess that I was a fan of olive oil cakes long before that. I first tasted one at a restaurant years ago and fell in love. The flavor and texture was so delightful, that all it needed was a dusting of powdered sugar on top. Now that the dust has settled, I’m sharing my favorite orange olive oil cake recipe. Not because it’s trendy, but because it’s a really delicious recipe that tastes like spring.
I made cute little orange scented, personal cakes that are really just elegant cupcakes. The recipe is easily adapted to your tastes. You can switch up the orange flavor and substitute with lemon or any citrus of your choice. Even if you don’t like olive oil, you’ll still like these little cakes. I used light olive oil, rather than extra virgin olive oil, for a more subtle olive oil flavor. It’s also able to withstand higher temperatures. Feel free to use your favorite olive oil or replace it with the oil you prefer. Grape seed, avocado, canola and vegetable oil are some examples of oils you can use as a replacement.
This recipe contains almond flour. It helps with texture and flavor, so it’s a necessary ingredient. Almond flour can be pricey, but it’s good to have on hand. Adding it to your baked goods will make them more moist and tender. To find almond flour click here,
Mini Orange Olive Oil Cakes
Mari Vasseur
Soft, tender mini orange cakes brushed with orange syrup & dusted with powdered sugar
Heat the oven to 350ºF (180ºC). Grease and flour a 12 serving muffin pan.
In a medium-sized bowl, whisk together the cake flour, almond flour, baking powder, baking soda and salt until well blended.
In a large bowl, beat the sugar, eggs, orange zest and vanilla extract together until smooth. Gradually mix in the olive oil and beat until creamy and well blended.
Stir in the dry ingredients in two additions, alternating with the milk and orange juice. Stir just until combined. Do not over mix.
Fill the prepared muffin pan cups 2/3 full with batter. Do not overfill or cakes will be more difficult to remove.
Bake for 10-12 minutes or until the tops look light golden, but still moist and a toothpick inserted comes out clean. They bake very quickly, so check them a few minutes early to avoid over baking.
Cool the cakes in pan for 5 minutes. Remove them from pan and transfer to a cooling rack. Brush the warm cakes with orange simple syrup and allow to cool completely. When the cakes have cooled, dust with powdered sugar.
Orange Simple Syrup
In a small saucepan, stir together the sugar, orange juice, lemon juice, and orange zest. Cook over low heat, stirring occasionally, just until the sugar is dissolved.
If you haven’t noticed already, I love little cakes. Mini cakes are not only cute and charming, they’re likely to make you very popular. This recipe makes two darling Mini Hummingbird Cakes, one to keep and one to share. Hummingbird Cake is a delightful way to use your ripe bananas. The version I’m sharing here also contains pineapple, pecans and coconut. This fruity, nutty combination reminds me of spring and would be perfect for Easter or a spring picnic.
Mini Hummingbird Cake
by Mari Vasseur
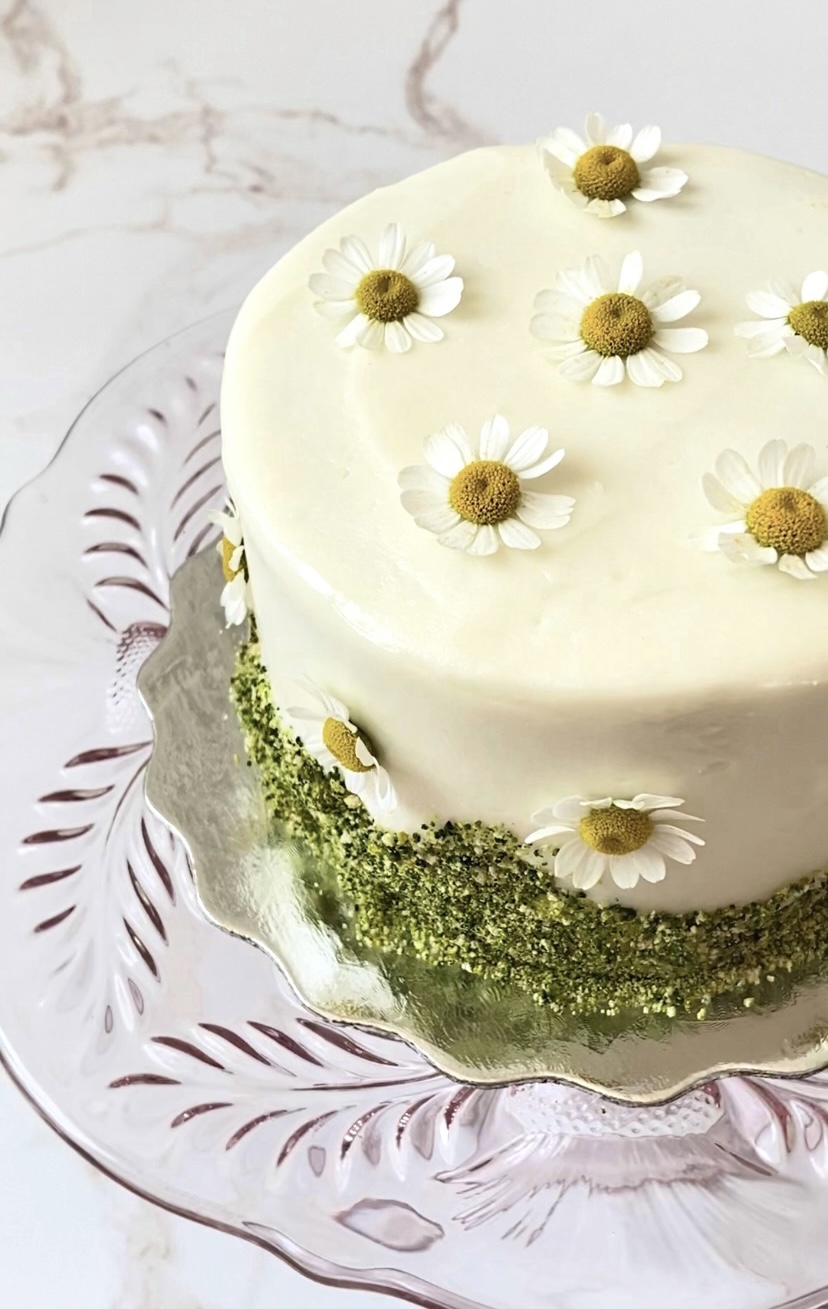
Hummingbird Cakes filled with bananas, pineapple, pecans and coconut, topped with cream cheese frosting and decorated with graham cracker crumb moss and fresh chamomile flowers.
Green gel food colorI used Americolor avocado green**
Yellow gel food coolI used Americolor lemon yellow***
Vodka
6graham crackers (two squares each), crushed
Fresh pesticide free chamomile flowers
Instructions
Hummingbird Cakes
Preheat oven to 350ºF (180ºC). Line the bottoms of four 4-inch cake pans**** with parchment paper. Grease and flour the insides.
In a medium-sized bowl, whisk together the flour, baking soda, salt and cinnamon until well blended.
In a large bowl, beat the butter, sugar, brown sugar and oil with an electric mixer, until pale and fluffy. Beat in the egg, egg yolk, and vanilla extract in three separate additions, making sure each one is incorporated before adding the next. Stir in the bananas, pineapple, pecans and coconut until combined.
Transfer the batter to prepared cake pans, about 1 cup of batter in each pan. Place the filled cake pans on a baking sheet.
Bake until toothpick inserted in centers comes out clean, about 25-28 minutes. Cool the cakes in pans 10 minutes then turn the cakes out onto a cooling rack.
Trim the cakes to 1-inch thickness. Fill, stack and frost the cakes with cream cheese frosting.
Cream Cheese Frosting
In a large bowl, beat the butter with an electric mixer until smooth and pale. Beat 1 tablespoon (15ml)of heavy cream, the vanilla extract and salt into the butter until well combined. On low speed, beat in the powdered sugar a half cup at a time, until well combined.
In a medium-sized bowl, mix cream the cheese with remaining 1 tablespoon (15ml) heavy cream, with a spatula until smooth. On low speed, beat the cream cheese mixture into the butter mixture until smooth and well blended. Smooth out any bubbles by stirring by hand with a spatula.
Decor
To make the graham cracker crumb moss: In two small bowls, dilute 1/8 teaspoon of each gel food color with a few drops of vodka. (Vodka will dissipate as the crumbs dry.) Place the graham cracker crumbs in a plastic food bag. Add diluted food colors a little at a time and seal the bag. Shake the bag and gently massage it to distribute the color. Add more diluted food color as needed until desired your shade of green is reached. Spread the crumbs out onto a parchment lined baking sheet to dry. Apply the crumbs to bottom edges of the frosted cakes.
Notes
*Chop the coconut flakes to achieve a finer texture. This step is optional.**To find the avocado green food color gel I used, click here.***To find the lemon yellow food color gel I used, click here.****To find the 4-inch cake pans I used, click here.
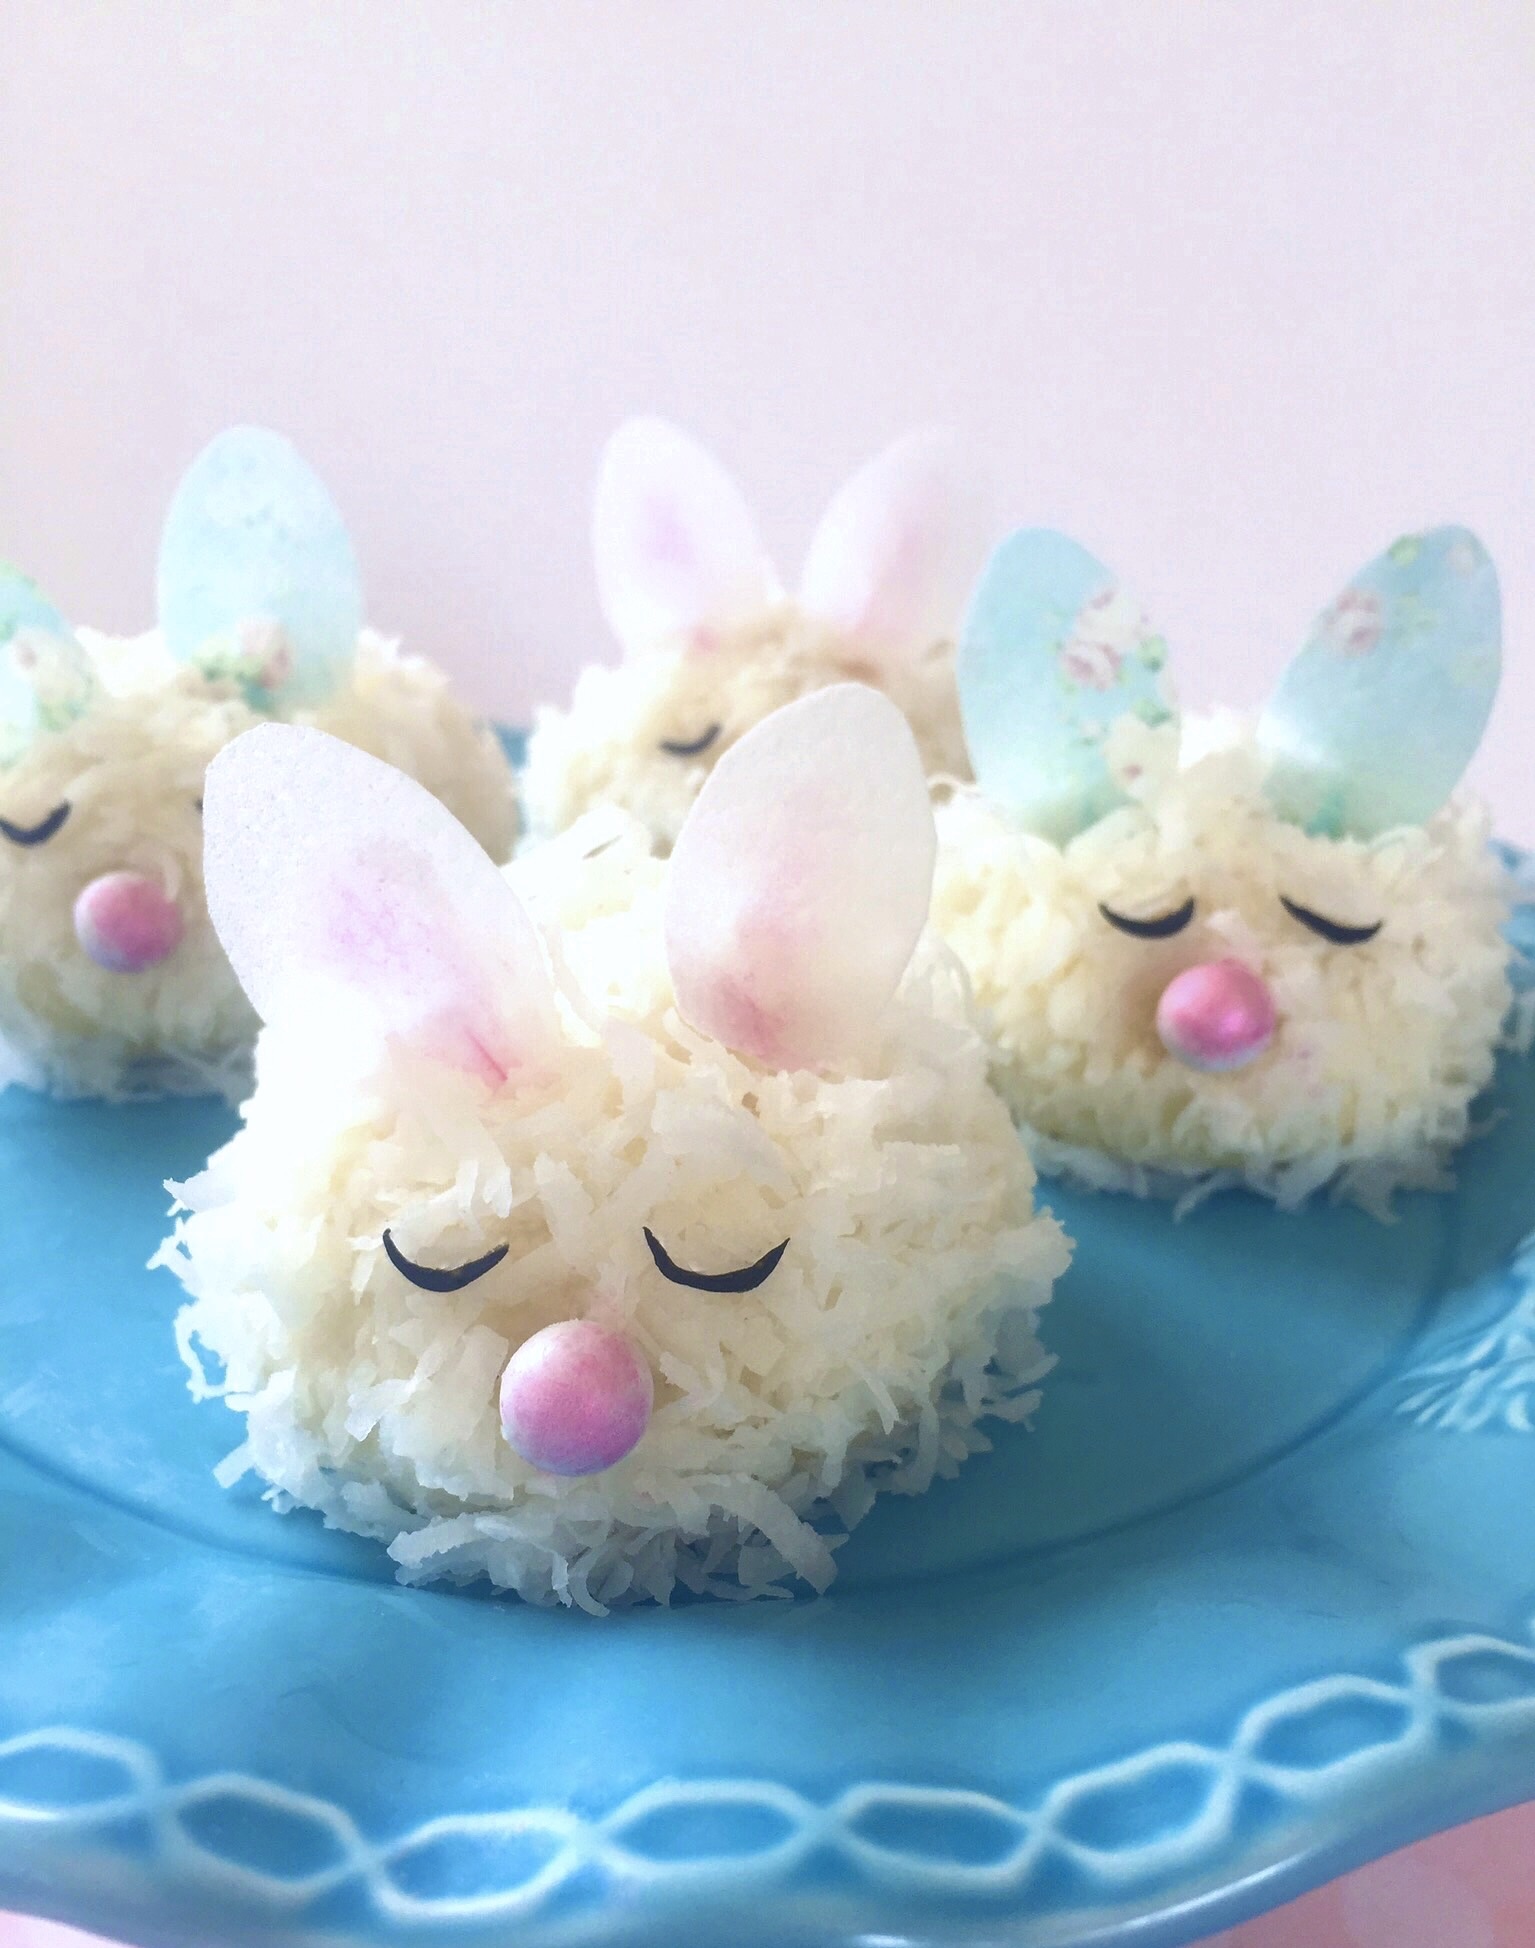
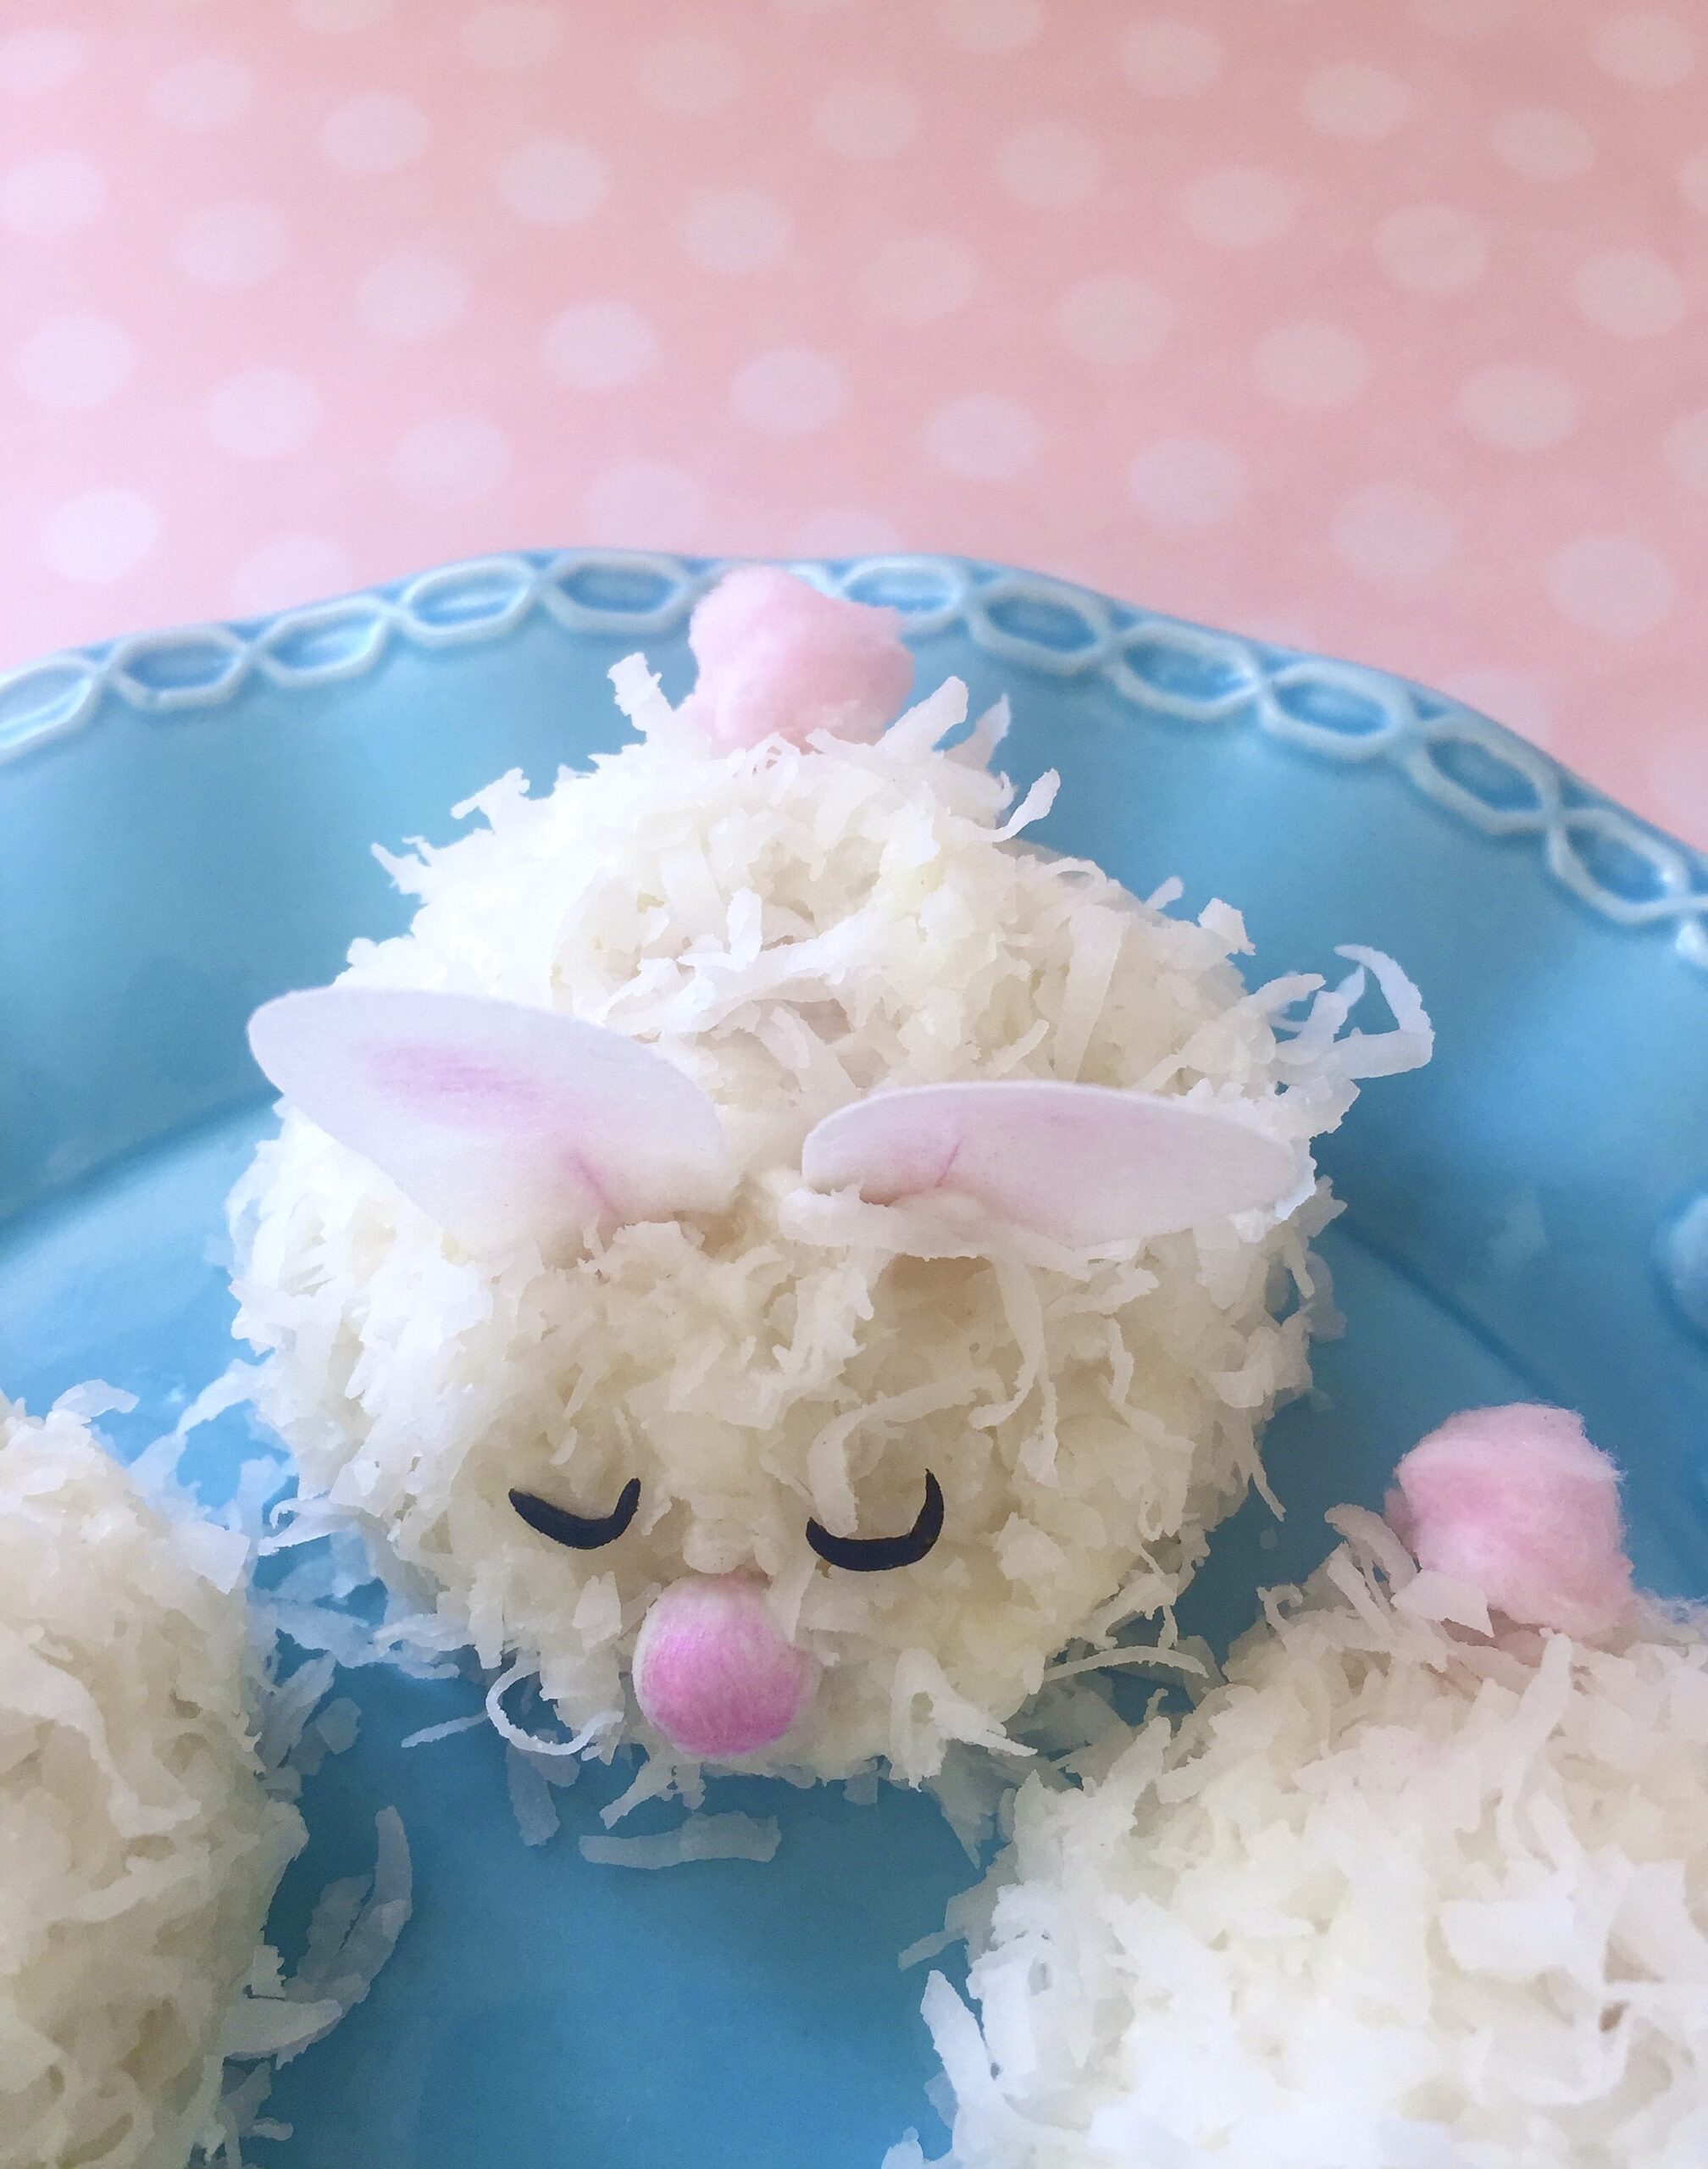
Spring is the time for blue skies, flowers blooming, bunnies scampering around and Easter celebrations. What better time to make cute Baby Bunny Coconut Cakes? I wanted to make them look like newborn bunnies curled up peacefully for a nap, so I decided to use a hemisphere pan.
When I was shopping around for hemisphere pans, also know as ball pans, I considered metal pans and silicone pans. In general, I prefer metal pans for baking cakes, but I decided on silicone, hoping to get more use out them. I plan on using them for frozen and refrigerated desserts as well. You can find hemisphere pans at kitchen stores, craft stores, baking supply stores and online. To find the pan I chose, click here.
My next dilemma was whether or not to coat the pans before baking. From what I’ve read, many people seem to have trouble getting their baked goods out of silicone pans, even though the majority of these pans claim to be non-stick. I decided to experiment, trying three different ways. I coated some of the wells with grease and flour, some with only grease, and some were left uncoated. I found that when I inverted the pan, the cakes released effortlessly from the coated wells. The cakes in the uncoated wells took a slight amount of prodding and a bit of residue was left behind, but the cakes were in tact. All three ways seem to work fine, but I decided that, for my own peace of mind, I will grease all of the wells in the future.
Decorating these bunny cakes is fun and easy, so this would make a great project for the little ones. You can use the candies of your choice to make eyes and noses. I used white candy pearls for the noses and colored them pink with edible petal dust. I made sleepy eyes out of black fondant. Black fondant is difficult to make, so I always buy it. It’s available for purchase in small quantities. I used edible wafer paper to make the bunny ears, but fondant would also work. A little puff of cotton candy makes a sweet tail. So many possibilities! Whether you make Baby Bunny Coconut Cakes for Easter, a child’s birthday party, a baby shower or simply to celebrate spring.
Baby Bunny Coconut Cakes
by Mari Vasseur
Fluffy, moist mini hemisphere coconut cakes with coconut buttercream frosting, topped with shredded coconut.
Preheat the oven to 325ºF (165ºC). Grease 2 silicone 6-serving mini hemisphere pans. Place the pans on large baking sheet.
In a medium-sized bowl, sift together the flour, baking powder and salt until well blended.
In a large bowl, beat the butter, sugar and oil together with an electric mixer at medium speed, until pale and fluffy. Beat in the coconut extract. Gradually beat in egg whites, until the mixture is well combined, stopping to scrape the sides of the bowl.
On low speed, beat in the flour mixture in three additions, alternating with the coconut milk, stopping to scrape the sides of the bowl as needed.
Fill the hemisphere pan wells, 2/3 full with batter. Bake for 20-24 minutes, until a toothpick inserted into the center of cakes comes out clean.
Place the silicone pans on a cooling rack to cool for 10 minutes. Invert the pans to remove mini cakes and place on cooling racks to cool completely.
Coconut Buttercream
In a large bowl, beat the the butter with an electric mixer on medium speed, until pale and fluffy.
On low speed, gradually add the powdered sugar and mix until smooth and well combined. Add the coconut extract and salt. Beat until combined. Add the coconut milk a little at a time until the desired consistency is reached. Continue beating at low speed until the buttercream is smooth.
Frost the domed tops of the mini cakes with a small offset spatula. Cover with shredded coconut, pressing lightly to adhere. Decorate as desired.
Finishing Touches
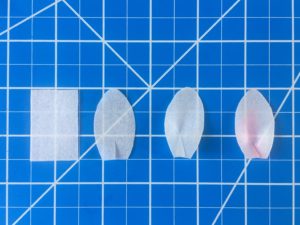
To make bunny ears, cut twenty-four 1 1/2-inch by 1-inch rectangles out of edible wafer paper. Cut each rectangle into a long football shape, flat at one end. Cut a 1/2-inch slit at the flat end. With a small paint brush, dab a bit of piping gel on one side of the slit. Overlap the cut ends of the slit and press together with your fingers. Let dry. Brush pink luster dust into the center of the ears. Skip this step if you are using floral wafer paper. Cut small slits into the bunny cakes and insert the ears.
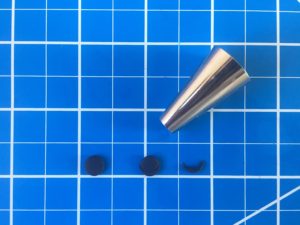
To make sleepy eyes, roll out a bit of black fondant to 1/16-inch thickness. Cut circles using the small end of a #12 piping tip. Cut thin crescent shapes from the circles using the small end of the piping tip. For easier handling, let eyes dry for a few minutes. If the coconut on your bunny cakes is still moist and tacky, the eyes will stick. If not, brush them with a small bit of water or piping gel.
To make noses, use the candy of your choice, such as candy pearls or candy hearts. I used white candy pearls, brushed with edible pink luster dust.
To make tails, you can use cotton candy or mini marshmallows attached with a bit of buttercream. If using cotton candy, keep in mind that it melts when exposed to air, so it's best applied right before serving.
Notes
*Do not substitute all-purpose flour. For best results, weigh your dry ingredients.**For best results, use natural coconut extract. Imitation coconut flavorings may give your baked goods an unpleasant flavor.***If your coconut milk is separated when you open the can, simply place it in a blender to emulsify it before using.To find the hemisphere pan I used, click here.To find white edible wafer paper, click here. Floral wafer paper can be found on Etsy.To find black fondant, click here.