Chocolate Olive Oil Cakes

Chocolate Olive Oil Cakes

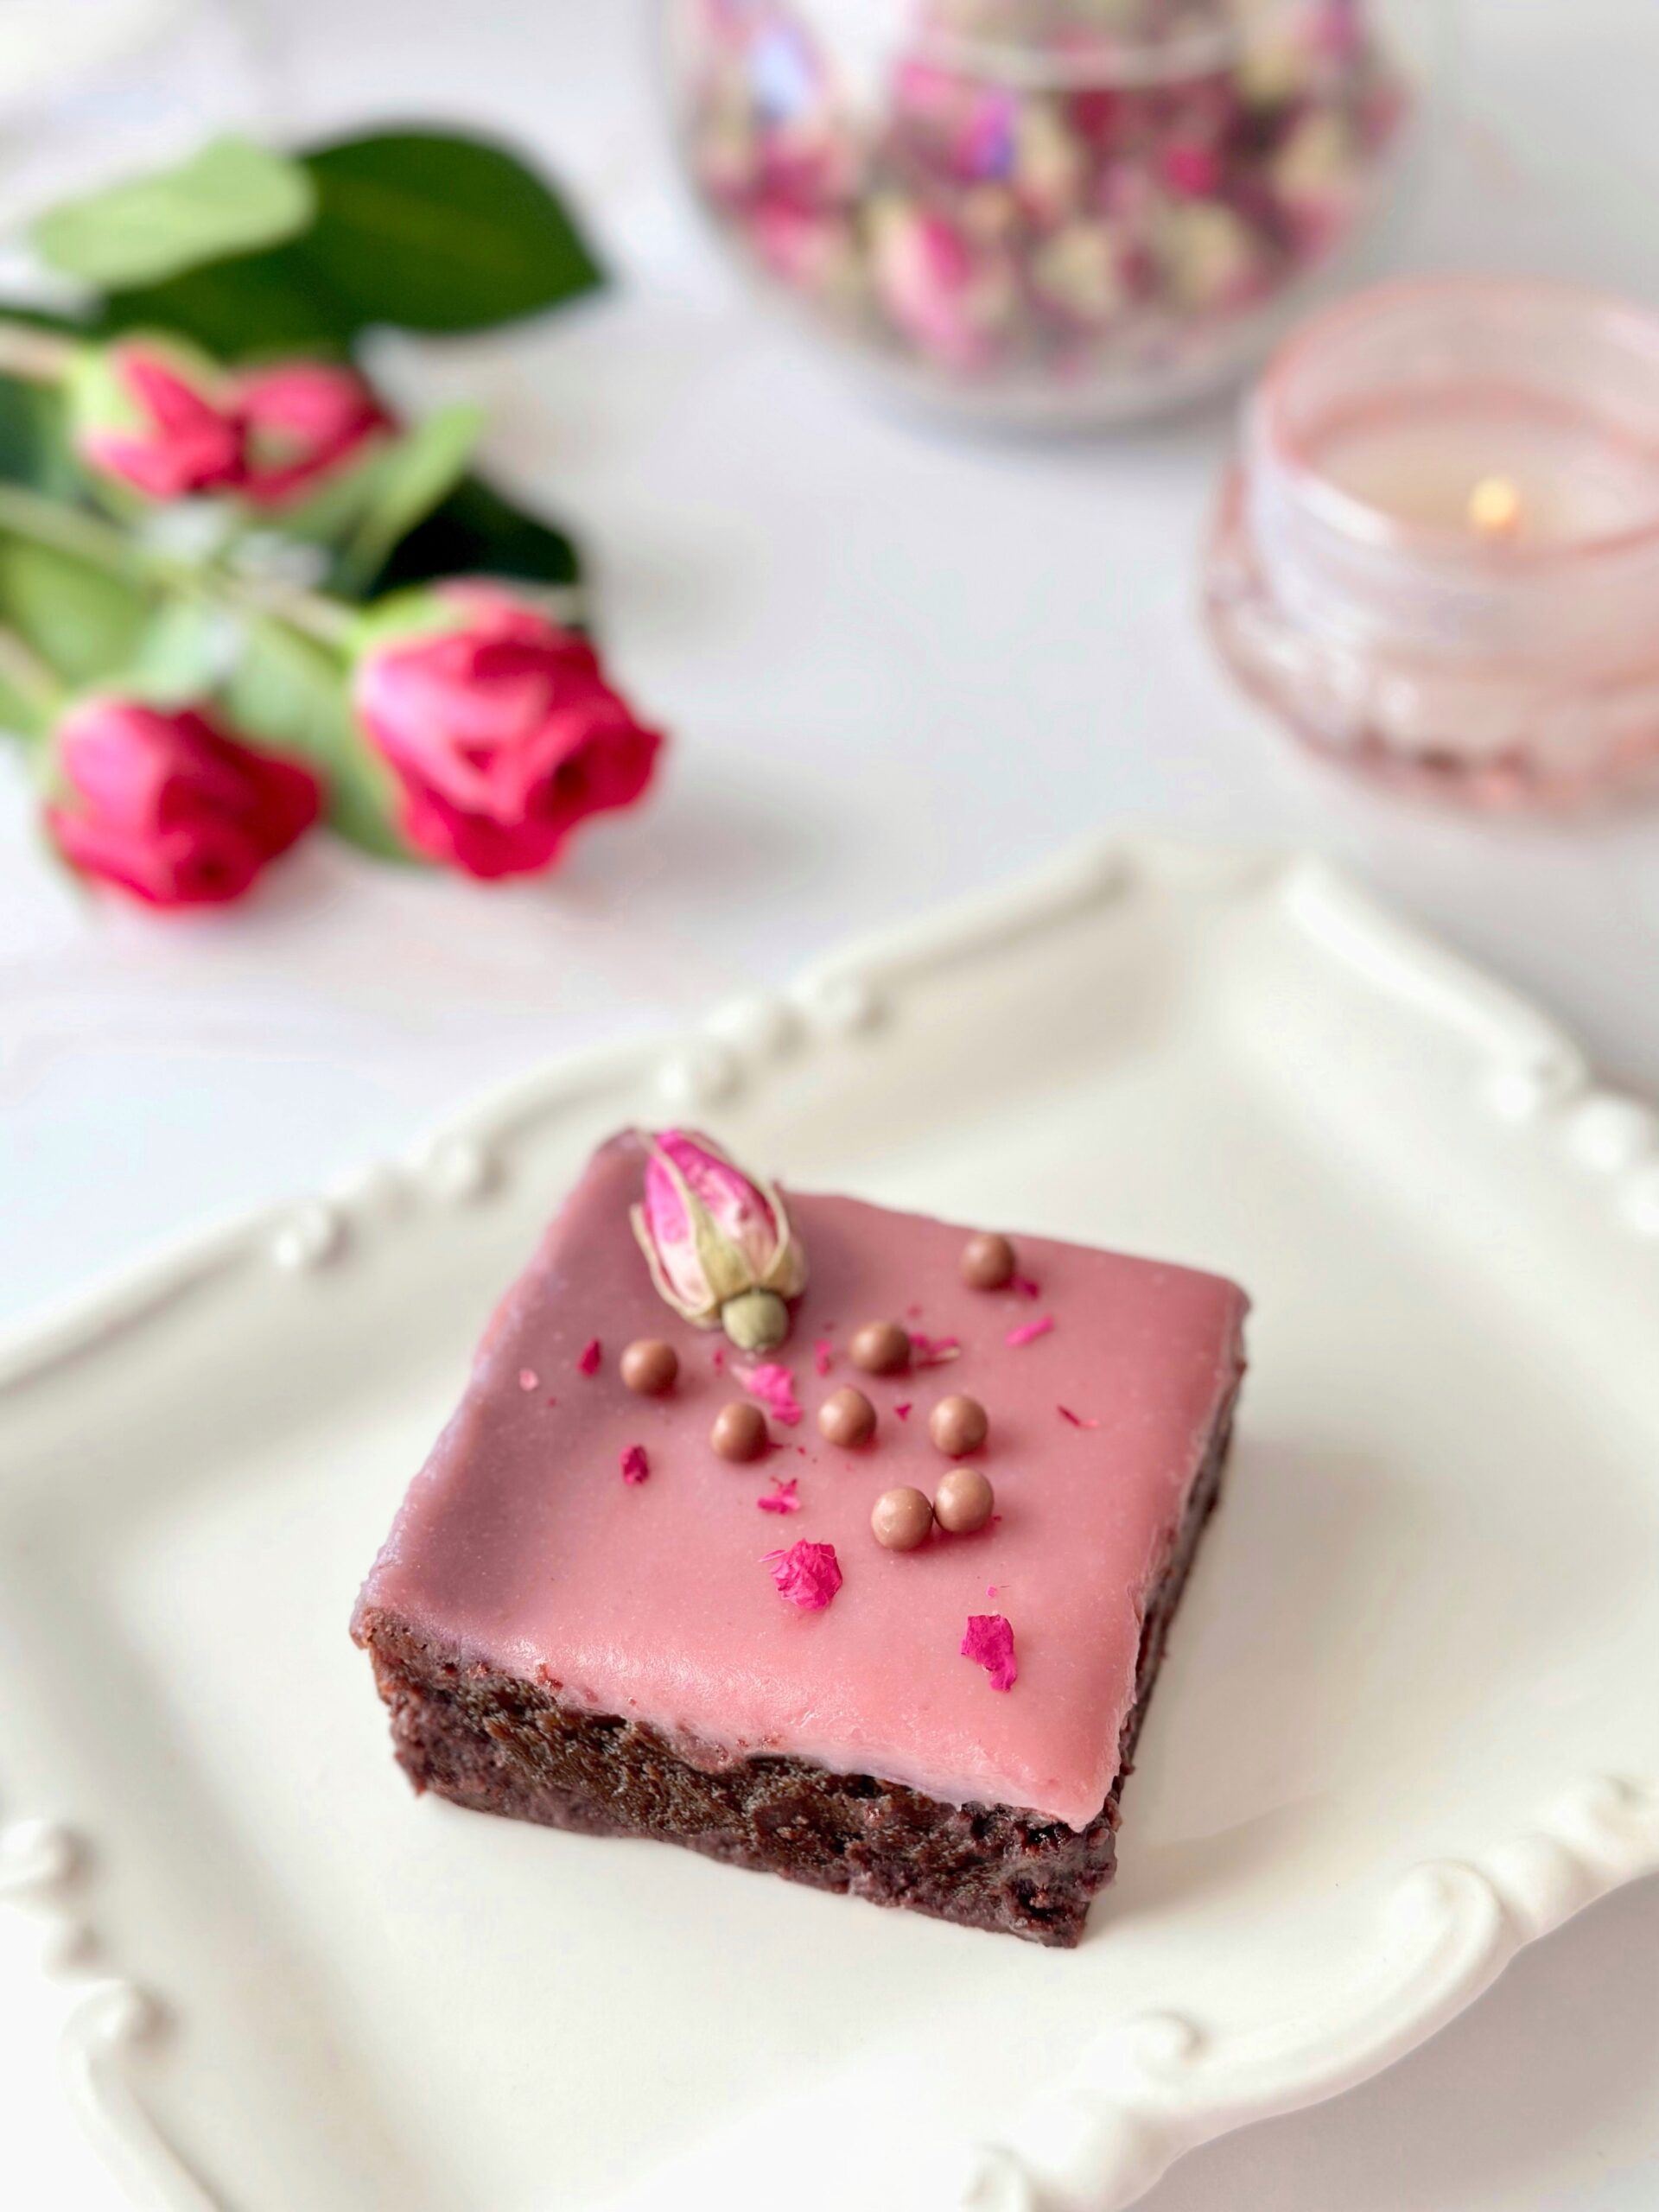
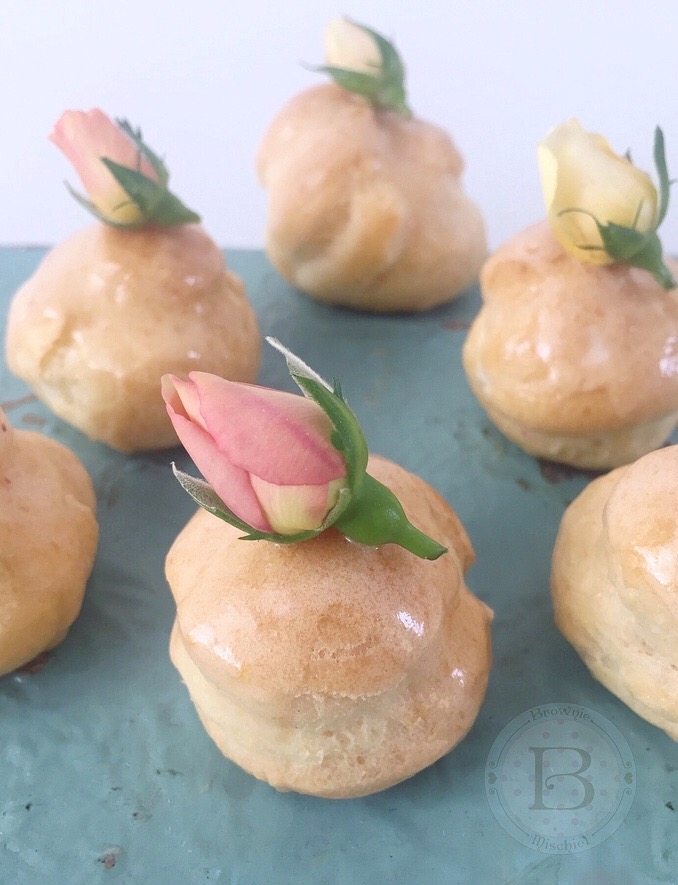
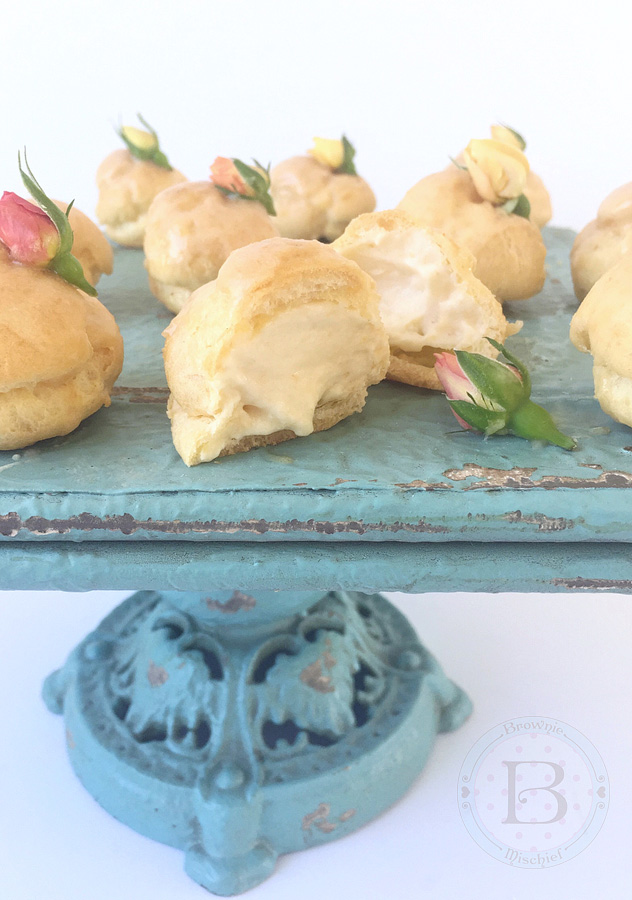
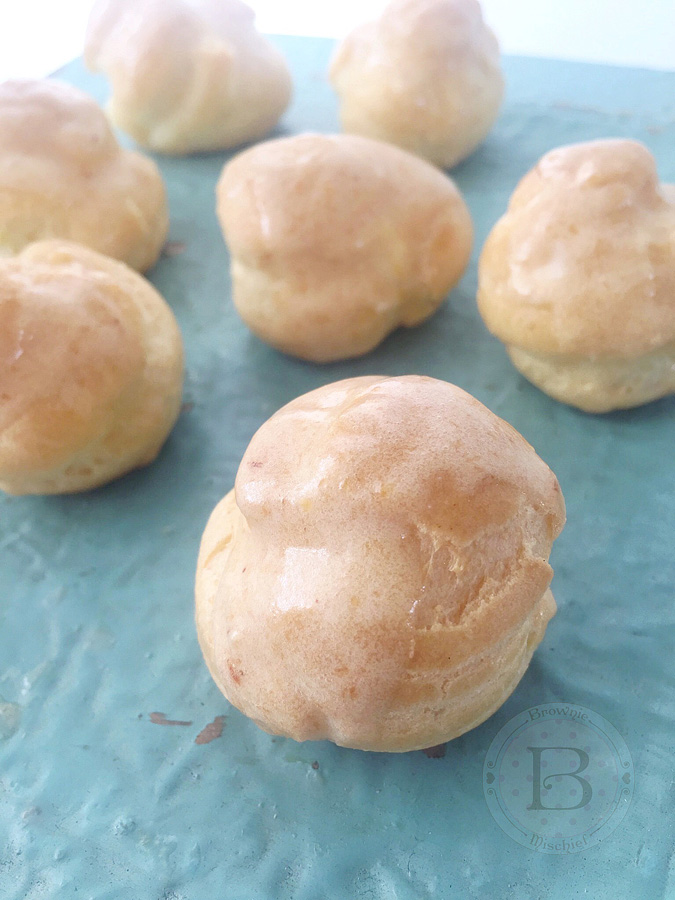
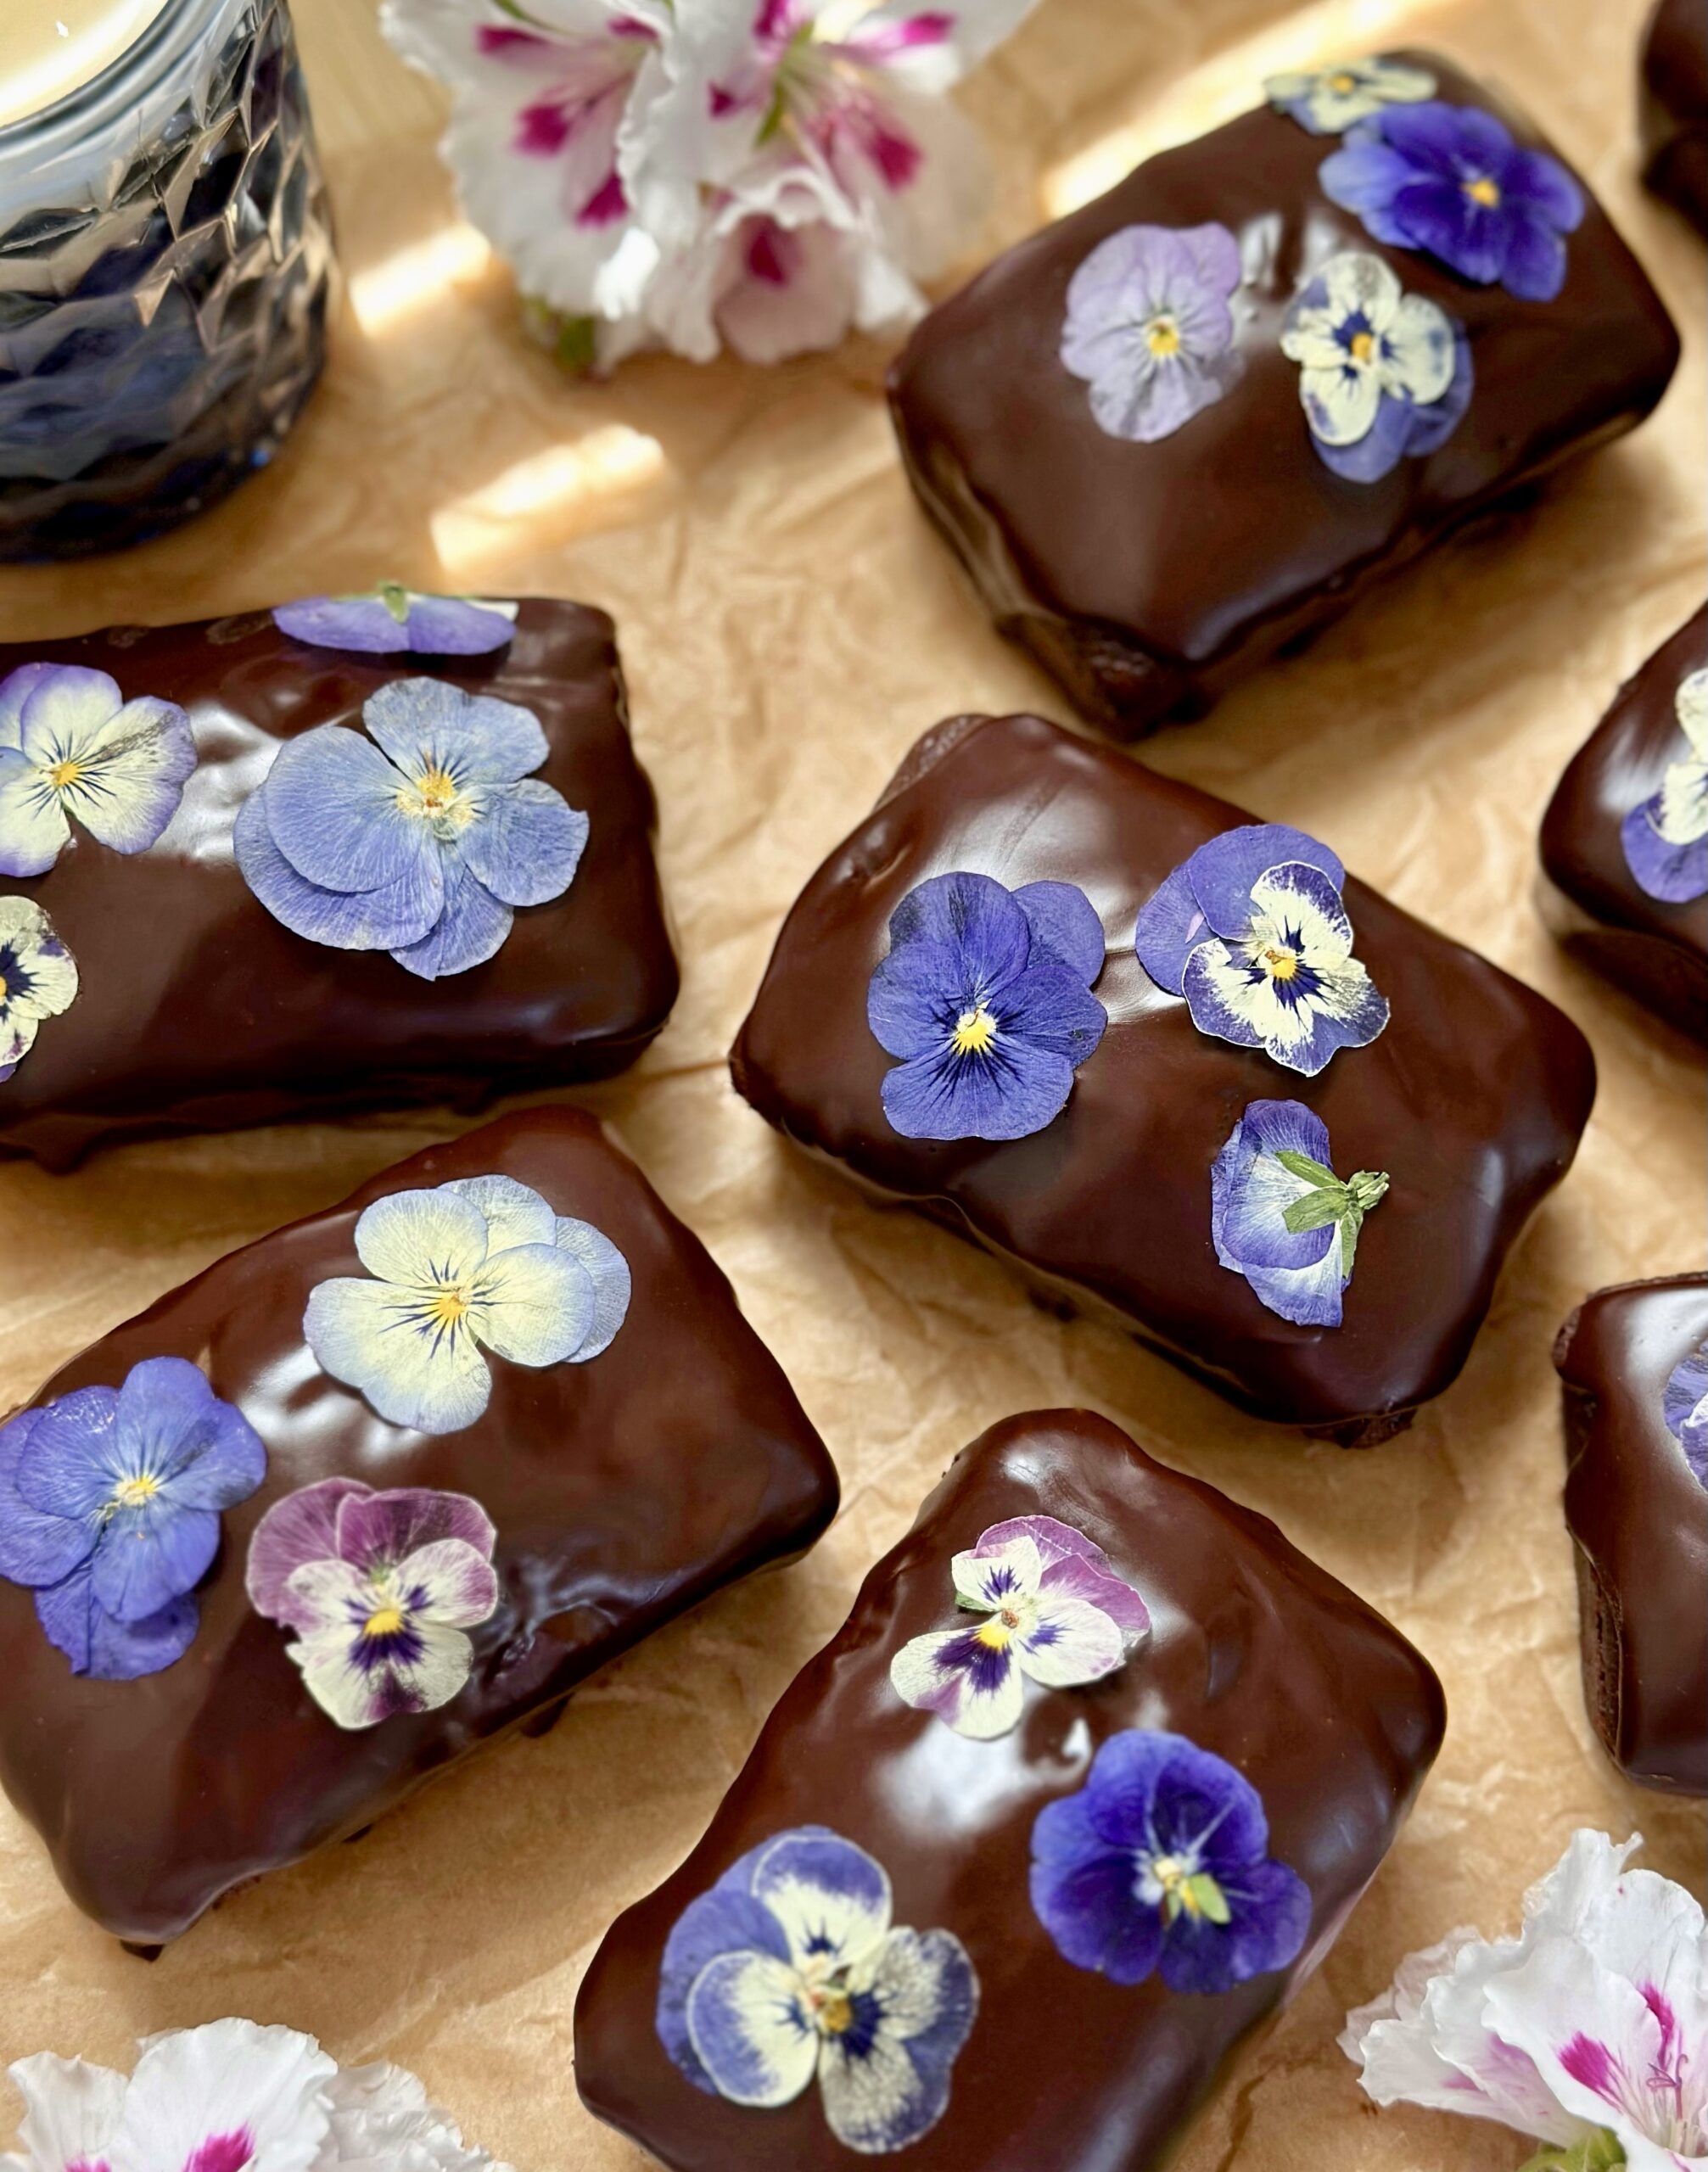
These soft, plush mini chocolate loaf cakes with a silky chocolate glaze are perfect for fairy picnics. They also make adorable Mother’s Day treats for moms who love chocolate. They’re easy to make and don’t require a mixer. I garnished them with edible pressed flowers for a magical finishing touch.

Chocolate Olive Oil Cakes

Chocolate olive oil mini loaf cakes with silky chocolate icing
Course Dessert
Servings 8 mini loaf cakes

Ingredients
  

Chocolate Olive Oil Cakes

  • 1 cup (128g) all purpose flour, sifted
  • â…“ cup (30g) unsweetened Dutch process or dark cocoa powder, sifted
  • ¼ cup (28g) almond flour
  • 1 teaspoon baking powder
  • ½ teaspoon baking soda
  • ½ teaspoon fine sea salt
  • â…” cup (133g) granulated sugar
  • â…“ cup (67g) packed brown sugar
  • ½ cup (111ml) olive oil or neutral oil of your choice
  • 2 large eggs
  • 1 teaspoon pure vanilla extract
  • ½ cup (113g) sour cream
  • ½ cup (118ml) whole milk

Chocolate Glaze

  • 6 tablespoons (85g) unsalted butter, cubed
  • 4 ounces (113g) semisweet or dark chocolate, chopped
  • 2 teaspoons corn syrup or honey
  • 24-30 small edible pressed flowers optional

Instructions
 

Chocolate Olive Oil Cakes

  • Preheat the oven to 350ºF (180ºC). Grease and flour the cavities of an 8-serving mini loaf pan,** I use a mixture of equal parts flour and cocoa powder to flour them. It's also helpful to line the bottoms of the cavities with parchment paper. I used a pan with eight 2 1/4-inch by 3 1/2-inch cavities.
  • In a medium bowl, whisk together the flour, cocoa powder, almond flour, baking powder, baking soda and salt until well combined.
  • In a large bowl, whisk together the sugar, brown sugar, oil, eggs and vanilla extract until smooth and well combined.
  • In a small bowl, whisk together the milk and sour cream.
  • Stir the flour mixture into the batter in two additions, followed by half of the milk mixture after each addition. Beat just until combined.
  • Transfer the batter to the prepared pan, filling the cavities half full. Bake until a toothpick inserted into the center of the cakes comes out clean or with a few moist crumbs attached, about 13-17 minutes. Be diligent and avoid over baking the cakes.
  • Cool the cakes in the pan for 7 minutes, then transfer to a cooling rack to cool.

Chocolate Glaze

  • Melt the butter, chocolate and corn syrup together in a large heatproof bowl set over a pan of barely simmering water, making sure the water doesn't touch the bottom of the bowl. Stir occasionally until smooth. Remove from heat and let cool slightly.
  • Spoon the glaze over the cooled cakes. When the glaze is almost set, garnish with edible pressed flowers if desired.

Notes

*  I use a microwave flower press to make edible pressed flowers quickly. To find it, click here.
**To find a mini loaf pan, click here.
Keyword cake, chocolate, olive oil

Triple Chocolate Brownie Cookies

Triple Chocolate Brownie Cookies

What’s your self care indulgence? Mine is chocolate. These Triple Chocolate Brownie Cookies are the ultimate brownie cookies with the perfect combination of chocolate to satisfy any craving. They taste just like brownies with rich, fudgy centers and crisp edges. A sprinkle of sea salt flakes gives them the perfect balance.

I was inspired to create these cookies after I paid $5 for one disappointing chocolate cookie at a posh bakery. That impressive looking cookie promised gooey decadence, but it was dry and crumbly. I set out to create a cookie that does not disappoint. To achieve the perfect fudgy texture, it’s important not to over bake your cookies. To avoid over baking, I suggest baking one cookie as a test to determine your optimal baking time.

Triple Chocolate Brownie Cookies

Course Dessert
Servings 18 cookies

Ingredients
  

  • 6 ounces (170g) semisweet chocolate, chopped
  • 2 ounces (57g) bittersweet chocolate (70-72%), chopped
  • ¼ cup (57g) unsalted butter, cubed
  • ¾ cup (97g) all purpose flour
  • 2 tablespoons (12g) unsweetened Dutch process cocoa powder
  • 1 teaspoon baking powder
  • ¾ teaspoon fine sea salt
  • ½ cup (100g) packed brown sugar
  • 6 tablespoons (75g) granulated sugar
  • 2 large eggs
  • 1 ½ teaspoons pure vanilla extract
  • ½ cup (85g) semisweet chocolate chips
  • ½ cup (85g) milk chocolate chips
  • sea salt flakes** for sprinkling

Instructions
 

  • Melt the chopped semisweet chocolate, the bittersweet chocolate and the butter together in large heatproof bowl set over a pan of barely simmering water, making sure the water doesn't touch the bottom of the bowl. Stir occasionally until smooth. Remove from heat and cool slightly. (Alternately you can melt the chocolate and butter in the microwave in short bursts, stirring after each one.)
  • In a medium bowl, whisk together the flour, cocoa powder, baking powder and salt until well combined.
  • In a large bowl, whisk together the brown sugar, sugar, eggs and vanilla extract until smooth and well combined, about 2-3 minutes. With a rubber spatula, stir in the melted chocolate mixture until combined.
  • Stir in the flour mixture just until combined. Fold in the chocolate chips. Refrigerate the cookie dough for about 5-10 minutes, just long enough to make the dough easier to work with.
  • Meanwhile, preheat the oven to 350ºF (180ºC). Line 2 large cookie sheets with parchment paper.
  • Roll 2-tablespoon (40g) size portions of cookie dough into balls. I used a #30 portion scoop.*** Place the dough balls on the cookie sheet, about 3 inches apart. Bake until the tops of the cookies are set and beginning to crack, about 9-11 minutes, being careful not to over bake. Cool the cookies on the cookie sheet for 1 minute, then transfer to a cooling rack. Sprinkle the warm cookies with sea salt flakes.

Notes

*To find Dutch process cocoa powder, click here.
**To find sea salt flakes, click here.
**To find the portion scoop I used, click here.
 
Keyword chocolate, cookies

Brown Butter Chocolate Chip Scones

Brown Butter Chocolate Chip Scones

Brown Butter Chocolate Chip Scones are the perfect spring transition bake. They’re cozy enough for rainy days with a cup of hot coffee or tea, but light enough to serve at a spring brunch. The brown butter gives them a fragrant, nuttiness which makes them so much more delicious than most other chocolate chip scones. I used extra large chocolate chips, but feel free to use your favorite chips.

Brown Butter Chocolate Chip Scones

Tender scones made with brown butter, studded with chocolate chips and topped with crunchy coarse sugar.
Course Breakfast, Brunch
Servings 8 scones

Ingredients
  

  • ½ cup (113g) unsalted butter, cubed
  • 2 cups (255g) all purpose flour, sifted
  • 1 tablespoon baking powder
  • ½ teaspoon fine sea salt
  • ¼ cup (50g) packed brown sugar
  • ½ cup (118ml) cold heavy cream plus extra for the tops
  • ¼ cup (57g) cold sour cream
  • 1 large egg yolk
  • 1 teaspoon vanilla bean paste or pure vanilla extract
  • ¾ cup semisweet or dark chocolate chips I used Ghirardelli grand chips
  • Demerara or turbinado coarse sugar for sprinkling

Instructions
 

  • In a small light colored saucepan over medium heat, melt the butter and cook it until it's deep golden and fragrant. When brown specks begin to appear, remove it from the heat and immediately transfer it to a small bowl. Cover and refrigerate the brown butter until firm, about 2-3 hours or overnight. When the butter has firmed up, cut it into cubes.
  • Preheat the oven to 375ºF (190ºC). Line a large baking sheet* with parchment paper.
  • In a large bowl, whisk together the flour, baking powder and salt. Whisk in the brown sugar.
  • Work the brown butter into the flour mixture with your fingertips or with a pastry blender until pea size pieces are formed.
  • In a small bowl, whisk together the heavy cream, sour cream, egg yolk and vanilla. Pure this mixture into the flour mixture. Stir just until a shaggy dough forms. Fold in the chocolate chips.
  • Turn the dough out onto a lightly floured surface. Fold the dough over onto itself a couple of times. Do not overwork the dough. Form the dough into a 7-inch wide, 1-inch thick round. Cut it into 8 wedges.
  • Place the scones onto the prepared baking sheet. Brush the tops of the scones with heavy cream and sprinkle with coarse sugar. Bake until the scones are golden brown, about 15-18 minutes. Serve warm.

Notes

*To find the baking sheet I used, click here.  
Keyword chocolate chip, scones

Caramel Latte Brownies

These rich, fudgy, coffee scented brownies, with caramel and whipped cream topping are inspired by one of my favorite coffee shop drinks, a caramel latte. I was thinking about how to get the caramel inside the brownies. With some methods, the caramel ends up over baked and chewy. Then I remembered poke cakes from my childhood. You poke holes all over a baked cake and pour whatever you like on top to soak into the holes. It worked beautifully with these brownies. To finish them off, I topped them with fluffy cream cheese whipped cream and a drizzle of caramel.

Caramel Latte Brownies

Rich, moist coffee scented brownies soaked with caramel, topped with fluffy cream cheese whipped cream and drizzled with more caramel.
Course Dessert
Servings 9

Ingredients
  

  • ¾ cup (6 oz or 170g) unsalted butter, cubed
  • 6 oz (170g) bittersweet chocolate (70-72%), finely chopped
  • 2 tablespoons unsweetened cocoa powder, preferably Dutch process or dark
  • 2 tablespoons hot water
  • 1 tablespoon espresso powder
  • 1 ½ cups (10 1/2 oz or 300g) sugar
  • ½ teaspoon fine sea salt
  • 3 large eggs
  • 1 large egg yolk
  • 1 ½ teaspoons pure vanilla extract, divided
  • 1 cup (4 1/2 oz or 128g) all purpose flour, sifted
  • â…“ cup (3 5/8 oz or 107ml) caramel sauce, purchased or homemade
  • 3 oz (85g) cream cheese, softened
  • 6 tablespoons (1 1/2 oz or 46g) powdered sugar, sifted
  • ¾ cup (6 oz or 177ml) cold heavy whipping cream

Instructions
 

  • Preheat your oven to 325ºF. Line an 8-inch square baking pan with parchment paper, leaving a couple of inches of overhang.
  • In a large heat safe bowl, melt the butter together with the chocolate, in the microwave or on the stovetop over a pan of barely simmering water. Stir until smooth.
  • In a small bowl, whisk together the cocoa powder, hot water and espresso powder until smooth.
  • Whisk the cocoa powder mixture, sugar and salt into the warm melted chocolate mixture until well combined.
  • Add the eggs, egg yolk and 1 teaspoon of vanilla to the chocolate mixture and whisk until smooth.
  • Stir in the flour just until combined, scraping the bottom of the bowl as needed.
  • Transfer the batter to the prepared baking pan. Bake until a toothpick inserted into the center of the brownies comes out with moist crumbs on it, about 25-28 minutes. Do not over bake. Let cool completely.
  • Once cool, remove the brownies from the pan and place on a serving platter. Using a chopstick, poke holes in the brownies, about 1 inch apart, to within 1 inch from the edges.
  • Spread caramel sauce over the surface of the brownies with a small offset spatula.
  • In a large bowl, beat the cream cheese, powdered sugar and 1/2 teaspoon of vanilla, with an electric mixer, until smooth. Gradually add the heavy cream and beat to stiff peaks.
  • Spread or pipe the whipped cream onto the brownies. Drizzle with additional caramel sauce.
Keyword brownies, caramel latte, chocolate

Strawberry Sweetheart Brownies

Strawberry Sweetheart Brownies

At the Brownie Mischief website, all types of brownies are welcome. We all know and love chocolate brownies. But there are other less common brownies in the universe, that deserve to shine too. Let me introduce you to Strawberry Sweetheart Brownies. These lovely pink creations aren’t strawberry cake or strawberry blondies. They contain white chocolate and they’re made with the same baking method as brownies. When you bake chocolate brownies, you want to be careful not to over bake them, to achieve the rich, fudgy texture. The same is true for these strawberry brownies. When you test for doneness, the toothpick should have a few moist crumbs attached to it. If the toothpick is clean, the brownies have baked too long and will likely be a little dry and cakey, although still edible. So make sure to test for doneness well before the end of the baking time!

The baking temperature for this recipe is 325ºF. I noticed that when baking in a heart shaped cake pan, things tend to bake unevenly because of the shape. So I used a lower temperature to help with even baking. If you don’t have an 8-inch heart shaped cake pan, you can also use an 8-inch round cake pan. To find the cake pan I used, click here.

Strawberry Sweetheart Brownies

To watch the Strawberry Sweetheart Brownies Instagram video, click here.

Strawberry Sweetheart Brownies

A heart shaped strawberry brownie made with fresh strawberries topped with strawberry icing.
Course Dessert
Servings 8

Ingredients
  

Strawberry Brownies

  • 7 tablespoons (3 1/2 ounces) unsalted butter, cubed
  • 6 ounces white chocolate, finely chopped
  • ¾ cup (5 1/4 ounces) sugar
  • ¼ teaspoon fine sea salt
  • 1 large egg
  • 2 large egg yolks
  • ½ cup (4 ounces) strawberry purée, divided
  • ½ teaspoon pure vanilla extract
  • ½ teaspoon pure strawberry extract
  • 1 petite pea size drop pink gel food color (optional) I used Americolor Deep Pink**
  • 1 ½ cups (6 3/4 ounces) all purpose flour, sifted

Strawberry Icing

  • ¾ cup (3 ounces) powdered sugar, sifted
  • 1 tablespoon unsalted butter, melted
  • 2 tablespoons reserved strawberry purée
  • ¼ teaspoon pure vanilla extract
  • ¼ teaspoon pure strawberry extract
  • dash fine sea salt

Instructions
 

Strawberry Brownies

  • Preheat oven to 325ºF. Line the bottom of an 8-inch heart shaped cake pan*** with parchment paper. Spray the insides with nonstick spray.
  • In a large heat safe bowl, melt butter and white chocolate together on the stovetop over a pan of barely simmering water or in the microwave for 20 seconds at time, stirring at each interval. White chocolate overheats easily, so be vigilant.
  • Add the sugar and salt to the butter mixture and mix until well combined.
  • Add egg and egg yolks. Whisk until smooth.
  • Pass strawberry purée through a sieve to remove seeds. Set aside 2 tablespoons of strawberry purée for icing. Add remaining purée to batter. Mix until well combined.
  • Add extracts and food color. Mix until combined.
  • Stir in flour until combined, scraping bowl as needed.
  • Transfer batter to prepared pan. Bake until toothpick inserted in center has a few moist crumbs on it, (not batter), about 25-30 minutes. Do not over bake. Let cool in pan. Remove from pan and top with strawberry icing.

Strawberry Icing

  • Whisk all icing ingredients together until smooth and well combined.

Notes

*To make strawberry purée:   Purée clean, hulled and quartered strawberries in a blender or food processor. **To find the food color I used, click here. **To find the heart cake pan I used, click here.
This recipe was updated on January 24th, 2023
Keyword brownies, strawberry

Raspberry Truffle Brownies

Raspberry Truffle Brownies

Who else loves those heart shaped boxes of chocolates we see at Valentine’s Day? That adventurous first bite of chocolate, when you don’t know which flavor you’re getting, is so much fun! I adore the fruit ganache filled chocolate bon bons. If you love bon bons too, you’ll love these brownies. They’re rich, fudgy and topped with a silky raspberry ganache that makes you feel like you’re biting into a raspberry truffle. The ganache adds an elegant touch to these brownies, so dried rose buds, rose petals and crispy chocolate pearls were my toppings of choice.

This isn’t the first time I’ve created elegant brownies. I displayed beautifully decorated brownies at two previous cookie conventions and they were well received. Elevated brownies are unexpected, but they’re definitely appreciated!

Raspberry Truffle Brownies

by Mari Vasseur
Rich, fudgy brownies topped with silky raspberry ganache
Course Dessert
Servings 9

Ingredients
  

  • 1 cup (128g) all purpose flour
  • 2 tablespoons unsweetened cocoa powder, preferably Dutch process
  • ½ teaspoon fine sea salt
  • ¾ cup (170g) unsalted butter, cubed
  • 8 ounces (227g) bittersweet chocolate (70-72%), chopped
  • 1 ½ cups (300g) sugar
  • 3 large eggs
  • 1 large egg yolk
  • 1 ½ teaspoons vanilla bean paste or pure vanilla extract
  • ½ cup (118ml) strained raspberry purée
  • ¼ cup (59ml) heavy cream
  • 4 ounces (113g) white chocolate, finely chopped

Instructions
 

  • Preheat oven to 325ºF (165ºC). Line an 8-inch square baking pan with parchment paper, leaving a couple of inches of overhang.
  • In a medium-sized bowl, sift together the flour, cocoa powder and salt.
  • In a medium-sized heat safe bowl set over a pot of barely simmering water, melt the chocolate, making sure the water doesn't touch the bottom of the bowl. Stir occasionally, until smooth. Remove from heat.
  • In a large heat safe bowl, melt the butter in the microwave or set the bowl over a pot of barely simmering water. Whisk the sugar, eggs, egg yolk and vanilla into butter until smooth and the sugar is mostly dissolved. Stir in the melted chocolate until well blended. Stir in the flour mixture just until combined.
  • Transfer the batter to the prepared baking pan. Bake until a toothpick inserted in the center comes out with moist crumbs on it, about 25-30 minutes. Do not over bake. Let cool completely.
  • Place the white chocolate in a medium-sized bowl.
  • In a small saucepan over medium-low heat, simmer the raspberry purée until reduced by half. Combine the heavy cream with the reduced purée in the saucepan. Heat until bubbles start to form around the edges. Do not boil.
  • Pour the hot cream mixture over the white chocolate, making sure its completely submerged, and let stand 5 minutes. Stir until smooth and well combined. Spread over the cooled brownies.

Notes

To find dried rosebuds, click here.
To find dried rose petals, click here.
 
Keyword brownies, raspberry truffle

Flourless Chocolate Cake with Raspberry Sauce

Flourless Chocolate Cake with Raspberry Sauce

This cake story has a happy ending. Once, many years ago, someone gave my grandparents’ neighbor a flourless chocolate cake. The neighbor had a slice and couldn’t finish it because it was too rich. She brought the cake over to my grandparents and they each had a slice and couldn’t finish them, because they were too rich. I had a slice and I couldn’t finish mine either and, well…you can guess why. So my grandparents, not wanting to be wasteful, put the cake in the freezer and forgot about it for a very long time. Whenever I opened the freezer and saw it, I wondered why none of us could eat more than a few bites of that rich cake. Although I don’t know for sure, it was probably because the ratio of chocolate to butter was off. But I do know that serving it with something acidic, like berries or raspberry sauce, would have helped immensely.

The happy ending to this story is that this flourless chocolate cake was created to be enjoyed to the last bite. It’s decadent, but not overly rich. It has a good balance, not too sweet or too bitter. The raspberry sauce and fresh raspberries compliment it perfectly. This luscious cake is also delicious with strawberries or any combination of berries you like. It’s also delicious served with salted caramel sauce. I wish my grandparents were still around to give my version of a flourless chocolate cake a try. I think they would have loved this cake and finished every last bite!

Flourless Chocolate Cake with Raspberry Sauce

Servings 8

Ingredients
  

Flourless Chocolate Cake

  • 8 ounces semisweet chocolate, chopped
  • 4 ounces bittersweet chocolate, chopped
  • 6 ounces unsalted butter, cubed
  • 6 large eggs, chalazae* removed
  • 1 teaspoon pure vanilla extract
  • ¼ teaspoon fine sea salt
  • boiling water
  • powdered sugar for sprinkling
  • fresh raspberries for top
  • raspberry sauce (Recipe below)

Raspberry Sauce

  • 3 cups (12 ounces) fresh raspberries
  • 2 teaspoons lemon juice
  • 1/4-1/3 cup (1 3/4-2 3/8 ounces) sugar
  • 1 tablespoon water
  • 1 teaspoon cornstarch

Instructions
 

Flourless Chocolate Cake

  • Preheat oven to 325ºF. Line a 6-inch springform pan** with parchment paper. Spray the parchment paper with nonstick spray. Wrap the bottom two inches of the pan tightly with aluminum foil. Set pan in a baking pan.
  • Combine chocolate and butter in a large stainless steel bowl set over a pot of barely simmering water. Stir until melted and smooth. Remove bowl from heat.
  • In a large bowl, beat eggs with an electric mixer until doubled in size, about 5 minutes. Beat in vanilla extract and salt.
  • With a large spatula, gently fold beaten eggs into chocolate mixture in three additions until no streaks of egg remain. Transfer batter to prepared pan. Smooth top of batter with a small offset spatula.
  • Pour 1 1/2 inches of boiling water into baking pan. Bake until top is set and internal temperature*** reaches 140ºF, about 28-37 minutes.
  • Remove cake pan from water bath. Cool to room temperature then cover and refrigerate for at least 4 hours (or up to overnight, but cake is best served the day it's made).
  • Remove cake from pan when chilled and set. Top with powdered sugar and fresh raspberries.
  • To serve, remove cake from refrigerator at least 30 minutes before serving and serve at room temperature for best texture. Serve with raspberry sauce.

Raspberry Sauce

  • Purée raspberries in blender or food processor. Pass purée through a fine mesh sieve**** to remove seeds.
  • In a small bowl, whisk together water and cornstarch.*****
  • In a small saucepan, heat raspberry purée with sugar and cornstarch slurry to a boil over medium heat. Turn heat down to low and simmer until slightly thickened, about 2-3 minutes.

Notes

*Chalazae are the opaque chords of egg white. Removing them is optional, but they do show up as white spots in the cake after baking.
**To find the 6-inch springform pan I used, click here.
***To find an instant read thermometer, click here.
****To find a fine mesh sieve, click here.
*****To find a mini whisk for whisking small amounts, click here.
Keyword cake, chocolate

Strawberries & Cream Profiteroles

Strawberries & Cream Profiteroles

Imagine you’re in a beautiful room, reclining on a plush velvet chaise lounge. There’s a dainty table nearby. On the table is a cake pedestal with a little pyramid of small, perfectly plump, pink pastries. They’re filled with sweet, luscious strawberry cream. And they’re all yours. This Strawberries & Cream Profiteroles recipe can make that dream come true. Maybe not the velvet chaise lounge, but really any comfortable chair will do while you indulge in these delicious little gems. Profiteroles have a way of making you feel regal and majestic. I think princesses and princes snack on them. Most of us don’t have a personal pastry chef or the budget to order from a French bakery every day, but we can certainly follow a recipe and make one of the easiest pastry doughs there is. Choux pastry or pate à choux is used to make profiteroles, cream puffs, eclairs, churros and other pastries. Once you get the hang of it, the possibilities are endless.

This recipe features fresh strawberries, but frozen strawberries will work too. You can also substitute raspberries or peaches. To find the recipe for Peaches & Cream Profiteroles, click here. The strawberry purée can be made a day or two ahead and stored in the refrigerator. To make it easy on myself, I like to make the strawberry purée on day one, the pastry cream on day two, then make the profiteroles and strawberry icing and assemble on day three. It’s also helpful to practice the French culinary style of prep, mise en place, which means to have all of your ingredients and equipment in place before you begin. Everything will go much smoother and prevent you from feeling overwhelmed.


Strawberries & Cream Profiteroles

Mari Vasseur
Bite sized choux pastry puffs filled with fresh strawberries and cream filling and topped with fresh strawberry icing
Course Dessert
Cuisine French
Servings 18 profiteroles

Ingredients
  

Strawberry Pureé

  • 12 ounces (340g) strawberries, hulled and sliced About 2 1/2 cups after hulling and slicing
  • 1 teaspoon lemon juice
  • ½ teaspoon strawberry extract

Strawberries and Cream Filling

  • 1 cup (237ml) whole milk
  • â…“ cup (66g) sugar
  • 2 tablespoons (17g) cornstarch
  • ¼ teaspoon fine sea salt
  • 1 large egg
  • 2 tablespoons (28g) unsalted butter, cubed
  • ½ teaspoon pure vanilla extract
  • Strawberry puree recipe above
  • â…” cup (156ml) heavy whipping cream

Profiteroles

  • ½ cup (118ml) water
  • ¼ cup (57g) unsalted butter, cubed
  • â…› teaspoon fine sea salt
  • ½ cup (64g) all purpose flour
  • 2 large eggs room temperature

Strawberry Icing

  • ¾ cup (90g) powdered sugar
  • 2 tablespoons (30ml) reserved strawberry purée
  • 1 tablespoon (15ml) heavy whipping cream
  • ¼ teaspoon strawberry extract

Instructions
 

Strawberry Purée

  • Purée the strawberries in a blender or food processor. Strain the puréed strawberries through a sieve into a small saucepan. Stir in the lemon juice.
  • Bring to a boil over medium heat. Reduce heat and simmer until the strawberry purée is reduced by half. Remove from heat. Stir in the strawberry extract. Set aside to cool completely

Strawberries and Cream Filling

  • Bring the milk to a boil in a small saucepan over medium heat.
  • Meanwhile, whisk the sugar, cornstarch and salt together in a medium bowl. Add the egg and whisk until smooth.
  • When the milk starts to boil, remove from heat and pour 1/3 of the hot milk into the egg mixture and whisk to combine.
  • Pour the egg mixture back into the remaining hot milk and cook over medium heat, whisking continuously, until the mixture comes to a boil and thickens.
  • Remove from heat. Stir in the butter and vanilla extract. Pour the mixture through a sieve placed over a bowl. Cover the surface with plastic wrap and let cool completely.
  • Set aside 2 tablespoons (30ml) of strawberry purée. Add the remaining strawberry purée to the cooled pastry cream and stir until well combined. Cover strawberry pastry cream and chill in refrigerator.
  • In a medium-sized bowl, whip the heavy cream, with an electric mixer at high speed, until stiff peaks begin to form. Fold the whipped cream into cooled strawberry pastry cream. Set aside in the refrigerator.

Profiteroles

  • Preheat oven to 400ºF (205ºC). Line 2 large baking sheets with parchment paper.
  • Combine the water, butter and salt in a medium-sized saucepan. Bring to a boil over medium heat. Reduce the heat. Add the flour and stir vigorously with a wooden spoon until the mixture pulls away from sides of pan and forms a ball.
  • Transfer the mixture to the bowl of a stand mixer. Mix on low speed until steam dissipates and mixture cools to lukewarm. Add the eggs one at a time and beat on medium speed until smooth, stopping to scrape down the bowl.
  • Transfer the mixture to a piping bag fitted with a large round tip. (I used Ateco tip 808.*) Pipe 1 1/4-inch mounds, about 2 inches apart, onto the prepared baking sheets. Smooth the tops lightly with a wet finger.
  • Bake for 15 minutes, then turn down the oven heat to 350ºF (180ºC) and continue baking until golden brown, about 8-10 more minutes. Using a toothpick or skewer, prick a small hole in each profiterole to allow steam to escape. Place on a wire rack to cool completely.
  • Use the tip of a paring knife to make a pilot hole in the bottom of each profiterole.
  • Place strawberries and cream filling into a piping bag fitted with a medium round piping tip. (I used Wilton tip 12**) Place the tip into the pilot holes and fill each profiterole with filling.

Strawberry Icing

  • In a medium -sized bowl, whisk all of the icing ingredients together until smooth. Spoon over the filled profiteroles. Refrigerate profiteroles until ready to serve.

Notes

*To find Ateco tip 808 click here.
**To find Wilton tip 12 click here.
Keyword profiteroles, strawberry

Raspberry Lemonade Brownies

Raspberry Lemonade Brownies by Brownie Mischief

Raspberry Lemonade Brownies are the perfect easy recipe for spring and summer. They’re so pretty and delightfully delicious! The fudgy lemon batter is brightened with fresh lemon zest and raspberries, then topped with a sweet-tart burst of flavor and color from fresh raspberries. The icing contains no food coloring. Just three raspberries will give you that luscious shade of pink!

I want to clarify that lemon brownies are not lemon bars. We all know what a lemon bar is. The one we all know and love has a lemon curd filling on a shortbread crust, possibly drizzled with lemon icing or sprinkled with powdered sugar. The lemon brownie is a whole different animal. Don’t mistake lemon brownies for lemon cake either. Lemon brownies contain white chocolate which gives them a rich, fudgy texture like their chocolate cousins. We may be tempted to call them blondies, but blondies have a butterscotch flavor and typically don’t contain chocolate. Now that we got that straightened out, we can sleep peacefully tonight.

Raspberry Lemonade Brownies

Course Dessert
Servings 16 bars

Ingredients
  

Raspberry Lemonade Bownies

  • 6 ounces (170g) white chocolate, finely chopped
  • ½ cup (113g) unsalted butter, cubed
  • ¾ cup (150g) granulated sugar
  • 2 large eggs
  • 1 large egg yolk
  • ¼ cup (59ml) fresh lemon juice
  • Zest of two medium lemons
  • ½ teaspoon fine sea salt
  • 1 ¾ cups (223g) all purpose flour, sifted
  • 1 cup (170g) raspberries plus extra for serving, if desired

Raspberry Lemonade Icing

  • 3 raspberries
  • 1 ¼ cups (142g) powdered sugar, sifted
  • 1 tablespoon (14g) melted butter
  • 2-3 tablespoons (30-45ml) fresh lemon juice

Instructions
 

Raspberry Lemonade Bownies

  • Preheat the oven to 325ºF (165ºC). Line an 8-inch square baking pan* with parchment paper.
  • In a medium microwaveable bowl, melt the white chocolate and butter in the microwave for 20 second bursts, stirring after each one. Alternately, melt the white chocolate and butter on the stovetop in a heat safe bowl set over a pan of barely simmering water. Stir gently until smooth.
  • In a large bowl, whisk together the sugar, eggs, egg yolk, lemon juice, zest and salt until smooth and well combined. Stir in the melted white chocolate mixture. Add the flour and mix just until combined. Gently stir in the raspberries.
  • Transfer the batter to the prepared baking pan. Bake until the top is set, the edges are light golden brown and a toothpick inserted into the center comes out with a few moist crumbs on it, about 23-28 minutes. Let the brownies cool in the pan.

Raspberry Lemonade Icing

  • In a medium-size bowl, smash the raspberries with a fork.
  • Add the powdered sugar, melted butter and 1 tablespoon of lemon juice. Whisk until smooth, adding more lemon juice as needed. Spread the icing over the cooled brownies.
  • Cut into 2-inch squares and serve with additional raspberries, if desired.

Notes

*To find the 8 x 8 inch pan I used, click here.
 

Peaches & Cream Profiteroles

Peaches & Cream Profiteroles by Brownie Mischief

Summer is nearly over, and after the recent heatwave here in Southern California, I’m more than ready to welcome fall weather. But before I put on my fluffy sweater and dive into pumpkin spice everything, I want to enjoy the tail end of peach season, don’t you? Farmer’s markets and stores near my home are still brimming over with fresh peaches, so I picked up some peaches and decided to give them a proper goodbye and send them off in style.

Peaches & Cream Profiteroles by Brownie Mischief

I created some luscious peaches and cream filled, bite-size puffs of choux pastry, called profiteroles. They’re like cream puffs, only smaller. The filling is creamy, but so light and airy that I’m convinced that these profiteroles have no calories! The recipe I’m sharing with you uses fresh peaches, but feel free to substitute frozen peaches if fresh peaches aren’t available. There are a lot of steps to this recipe, but the steps are done in stages and are very easy to do.

Peaches & Cream Profiteroles by Brownie Mischief

I decorated my profiteroles with fresh, pesticide-free miniature rosebuds, also known as spray roses. If you can’t find miniature rosebuds, pesticide-free rose petals would be a good substitute. You may not get a chance to embellish these little beauties. They have a way of popping into people’s mouths even before you can decorate them!

Peaches & Cream Profiteroles

Bite-sized puffs of choux pastry filled with a creamy, fresh peach filling and topped with fresh peach icing.
Course Dessert
Cuisine French
Servings 18

Ingredients
  

Peach Purée

  • 2 large fresh peaches, peeled, pitted and sliced *see note below
  • ½ teaspoon fresh lemon juice
  • ½ teaspoon natural peach flavoring

Peaches & Cream Filling

  • 1 cup whole milk
  • â…“ cup (2 ounces) granulated sugar
  • 2 tablespoons (1/2 ounce) cornstarch
  • ¼ teaspoon fine sea salt
  • 1 egg
  • 2 tablespoon (1 ounce) unsalted butter
  • ¼ teaspoon pure vanilla extract
  • â…› teaspoon pure almond extract
  • peach purée recipe above
  • â…” cup heavy whipping cream

Profiteroles

  • ½ cup water
  • 4 tablespoons (2 ounces) unsalted butter, cubed
  • â…› teaspoon fine sea salt
  • ½ cup (2 1/4 ounces) all purpose flour
  • 2 eggs room temperature

Peach Icing

  • ¾ cup (3 ounces) powdered sugar, sifted
  • 2 tablespoons reserved peach puree
  • 1 tablespoon heavy whipping cream
  • ¼ teaspoon natural peach flavoring

Instructions
 

Peach Purée

  • Purée peaches in a blender or food processor. Strain puréed peaches through a sieve. Stir in lemon juice.
  • Place puréed peaches in a small saucepan. Bring to a boil over medium heat.
  • Reduce heat and simmer until peach purée is reduced by half.
  • Remove from heat. Stir in peach flavoring and set aside to cool completely.

Peaches and Cream Filling

  • Bring milk to a boil in a small saucepan over medium heat.
  • Meanwhile, whisk sugar, cornstarch and salt together in a medium bowl. Add the egg and whisk until smooth.
  • When milk starts to boil, remove from heat and pour 1/3 of the hot milk into the egg mixture and whisk to combine.
  • Pour the egg mixture into the remaining hot milk and cook over medium heat, stirring continuously, until the mixture comes to a boil and thickens.
  • Remove from heat. Stir in butter and extracts.
  • Pour mixture through a sieve placed over a bowl. Cover the surface of pastry cream with plastic wrap. Let cool.
  • Set aside 2 tablespoons of cooled peach purée. Add remaining peach purée to cooled pastry cream and stir to combine. Chill in refrigerator.
  • In a medium bowl, whip heavy cream to stiff peaks with an electric mixer at high speed. Fold whipped cream into peach pastry cream mixture. Set aside in refrigerator.

Profiteroles

  • Preheat oven to 400ºF. Line two large baking sheets with parchment paper.
  • Combine water, butter and salt in a medium saucepan and bring to a boil over medium heat.
  • Reduce heat. Add flour and stir vigorously with a wooden spoon until mixture pulls away from sides of the pan and forms a ball.
  • Transfer mixture to the bowl of a stand mixer. Mix on low speed until steam dissipates and mixture cools to lukewarm.
  • Add eggs one at a time and beat with an electric mixer at medium speed, until smooth, stopping to scrape down bowl.
  • Transfer mixture to a piping bag, fitted with a large round tip. (**I used Ateco tip 808.)
  • Pipe 1 1/4 inch mounds, about 2 inches apart onto prepared baking sheets. Smooth tops with a wet finger.
  • Bake for 15 minutes, then turn oven temperature down to 350ºF and continue baking until golden brown, about 8-10 more minutes. Using a toothpick or skewer poke a small hole in each profiterole to let steam escape. Place on a wire rack to cool completely.
  • Using the tip of a paring knife, poke a pilot hole in the bottom of each profiterole.
  • Place peaches and cream filling into a piping bag fitted with a medium round piping tip. (***I used Wilton tip 12.)
  • Place piping tip into the pilot holes and fill each profiterole with filling.

Peach Icing

  • In a small bowl, whisk all icing ingredients together and spoon over filled profiteroles. Refrigerate until ready to serve.

Notes

*To make peaches easy to peel, blanch them  in boiling water for about 30 seconds, then dunk  in ice water.
**To find Ateco tip 808, click here. ***To find Wilton tip 12, click here.

Homemade Caramel Sauce

Homemade Caramel Sauce

Course Dessert

Ingredients
  

  • 1 cup (200g) granulated sugar
  • â…› teaspoon cream of tartar
  • 6 tablespoons (85g) unsalted butter, cubed
  • ½ cup (118ml) heavy whipping cream, room temperature
  • 1 teaspoon vanilla bean paste
  • 1/2 teaspoon fine sea salt or to taste

Instructions
 

  • In a medium-size stainless steel saucepan, stir the sugar and cream of tartar together with 2 tablespoons (30ml) of water. Turn the heat on to medium and cook, without stirring, until the mixture melts. Swirl the pan gently to move the sugar around to prevent hot spots as it cooks. When the sugar is melted and has turned deep golden, turn off the heat and whisk in the butter. The butter will bubble. Keep whisking until melted, smooth and well combined. Gradually whisk in the heavy cream until smooth. Pass the caramel through a fine mesh sieve into a bowl. Stir in the vanilla and salt. The sauce will thicken as it cools.

Notes

Store in a covered container in the refrigerator for up to a couple of weeks.
Keyword caramel sauce, condiments