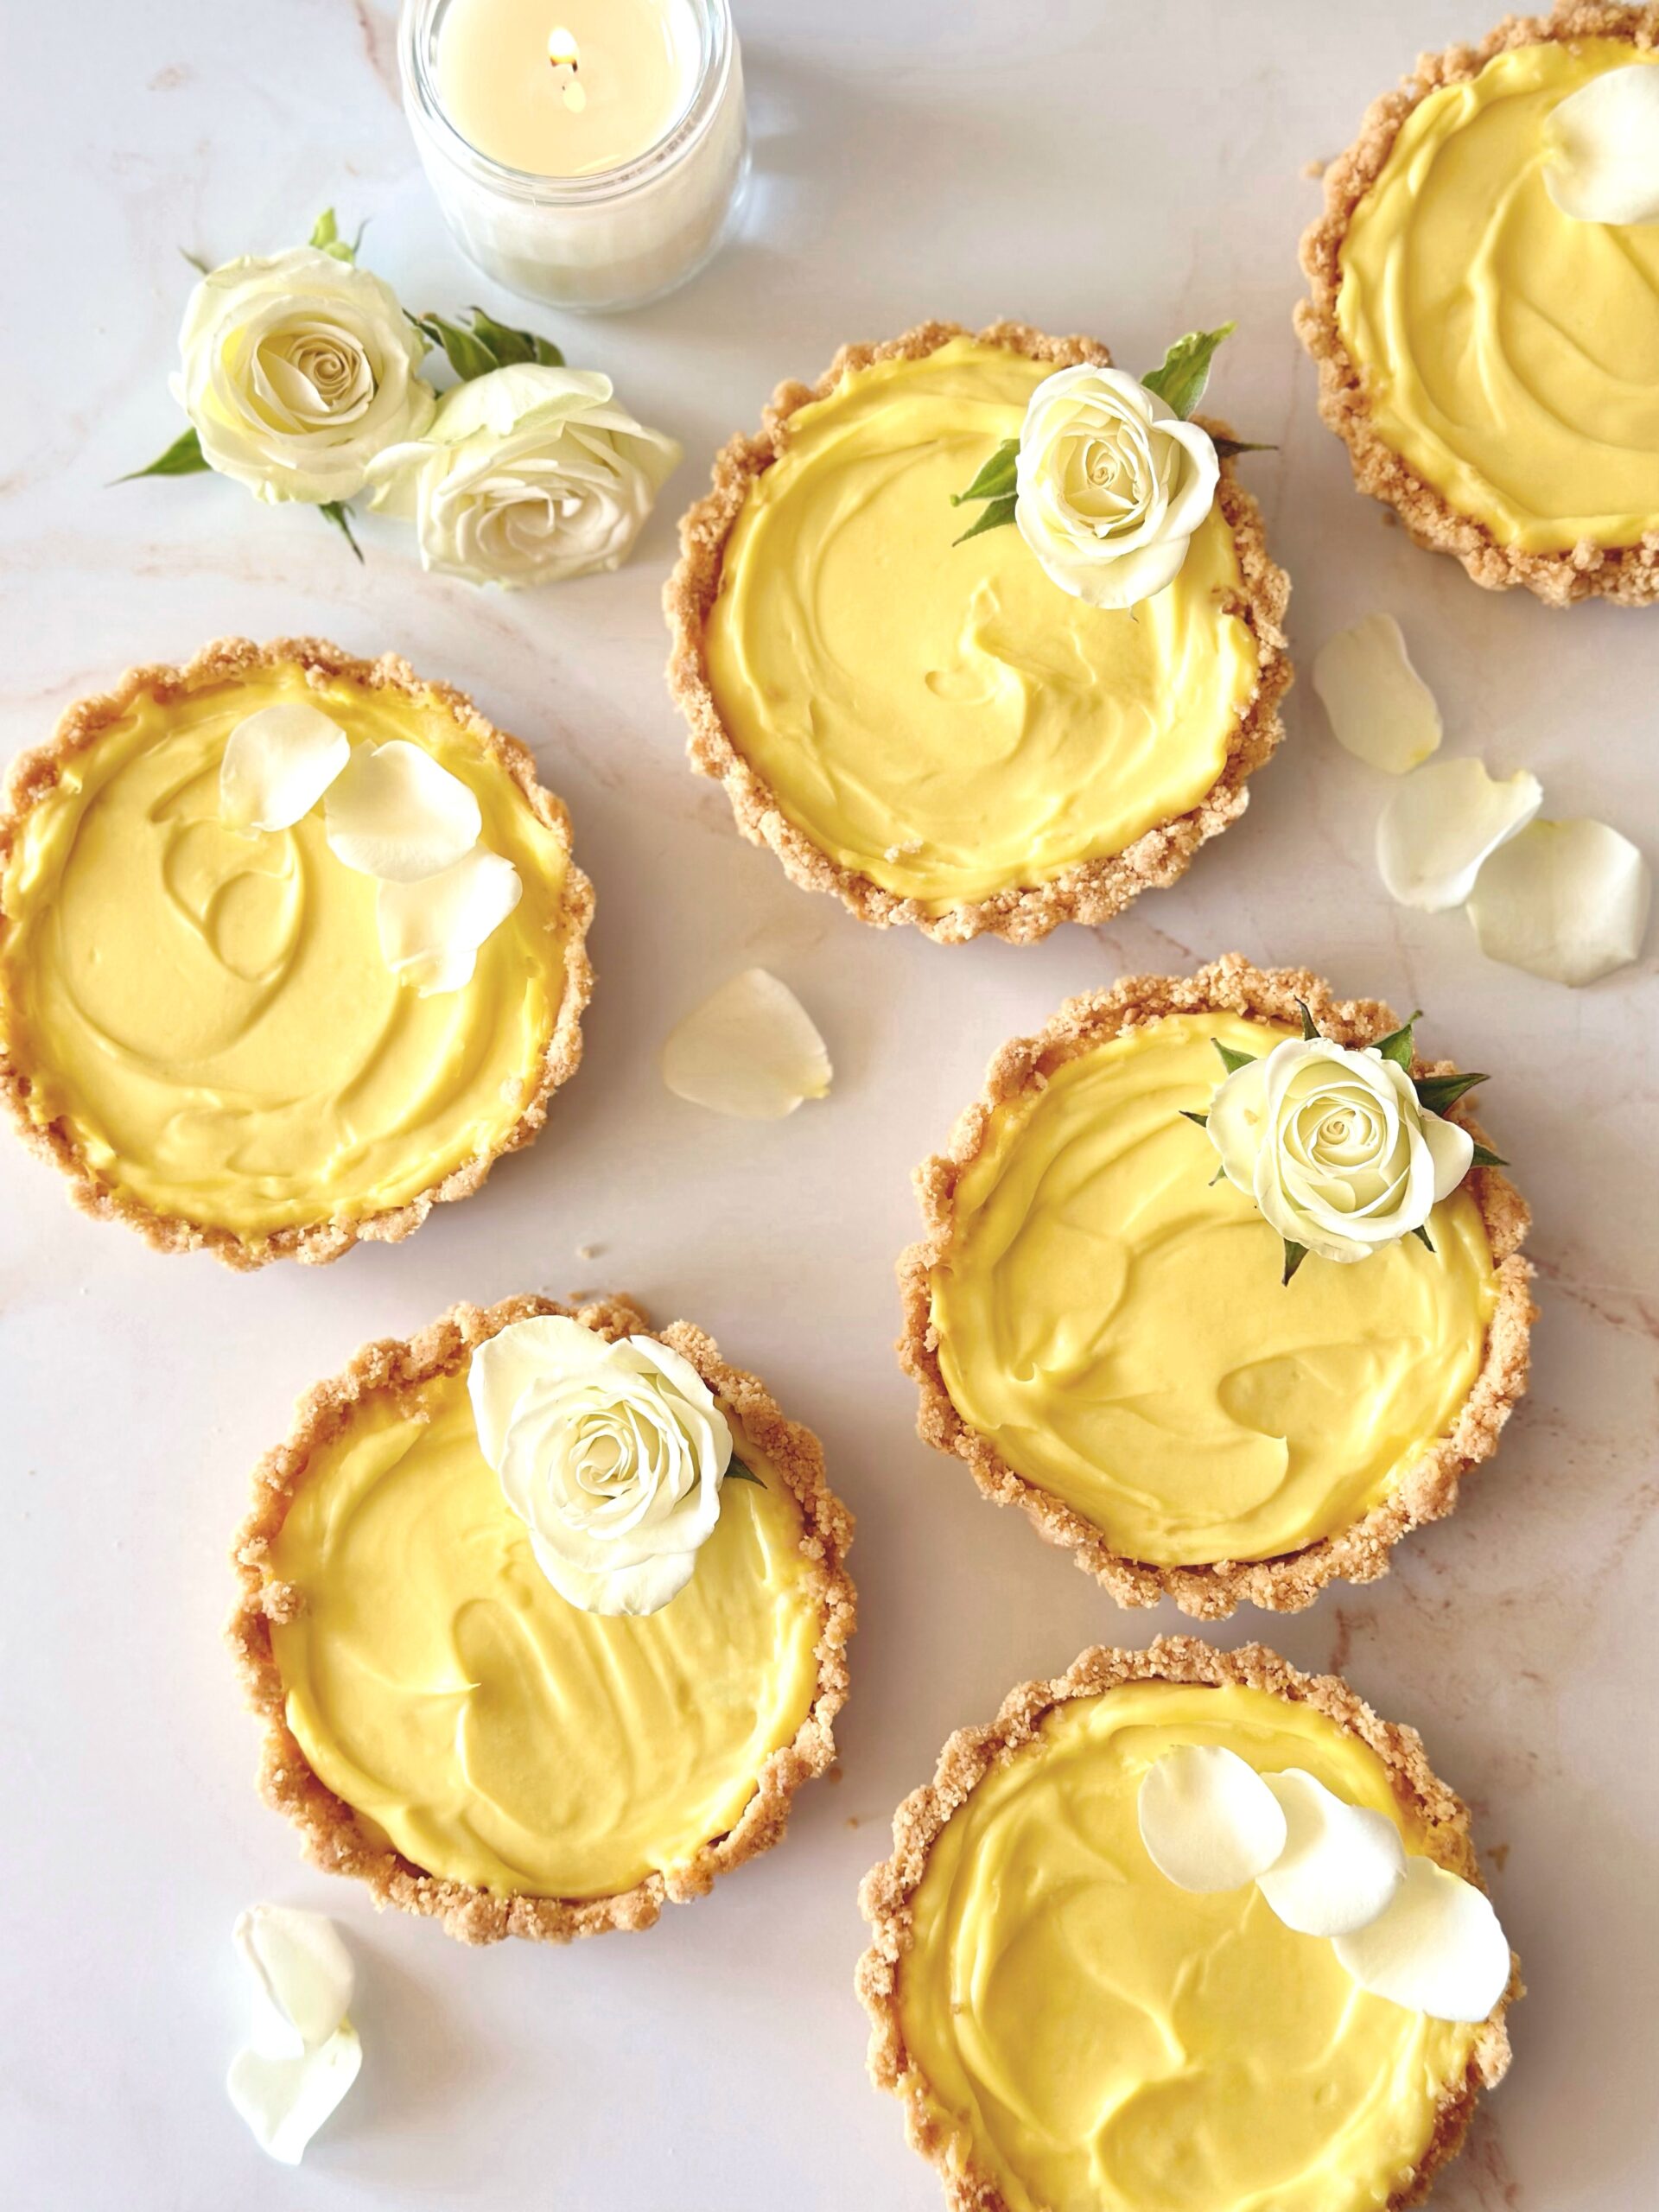
One of the reasons I love baking is because of the joy it brings. In this case it’s joy and sunshine. These vibrant, lemon tarts are pure sunshine. With only four ingredients, they’re so easy to make that you’ll be surprised at how silky and delicious they are.
22vanilla sandwich cookies, finely crushed (including the filling)I used Golden Oreos.
3tablespoons melted butter
1 ½cups (12 oz or 340g)mascarpone cheese, softened
1cup (10 oz or 283g)lemon curd, homemade or store bought
whipped creamoptional
Instructions
Preheat oven to 350ºF. Place six 4-inch tart pans with removable bottoms* on a baking sheet.
In a medium bowl, mix crushed cookies with melted butter until well combined.
Press crumb mixture firmly into tart pans with the back of a spoon or the bottom of a small cup. It's important to press firmly, especially on the sides.
Bake tart shells for 8 minutes. Let cool completely.
In a medium bowl, stir mascarpone cheese with a spatula until smooth. Fold in lemon curd until well combined.
Fill cooled tart shells with mascarpone mixture. Refrigerate tarts until set, about 2 hours.
Carefully remove tarts from tart pans. Serve with a dollop of whipped cream if desired.
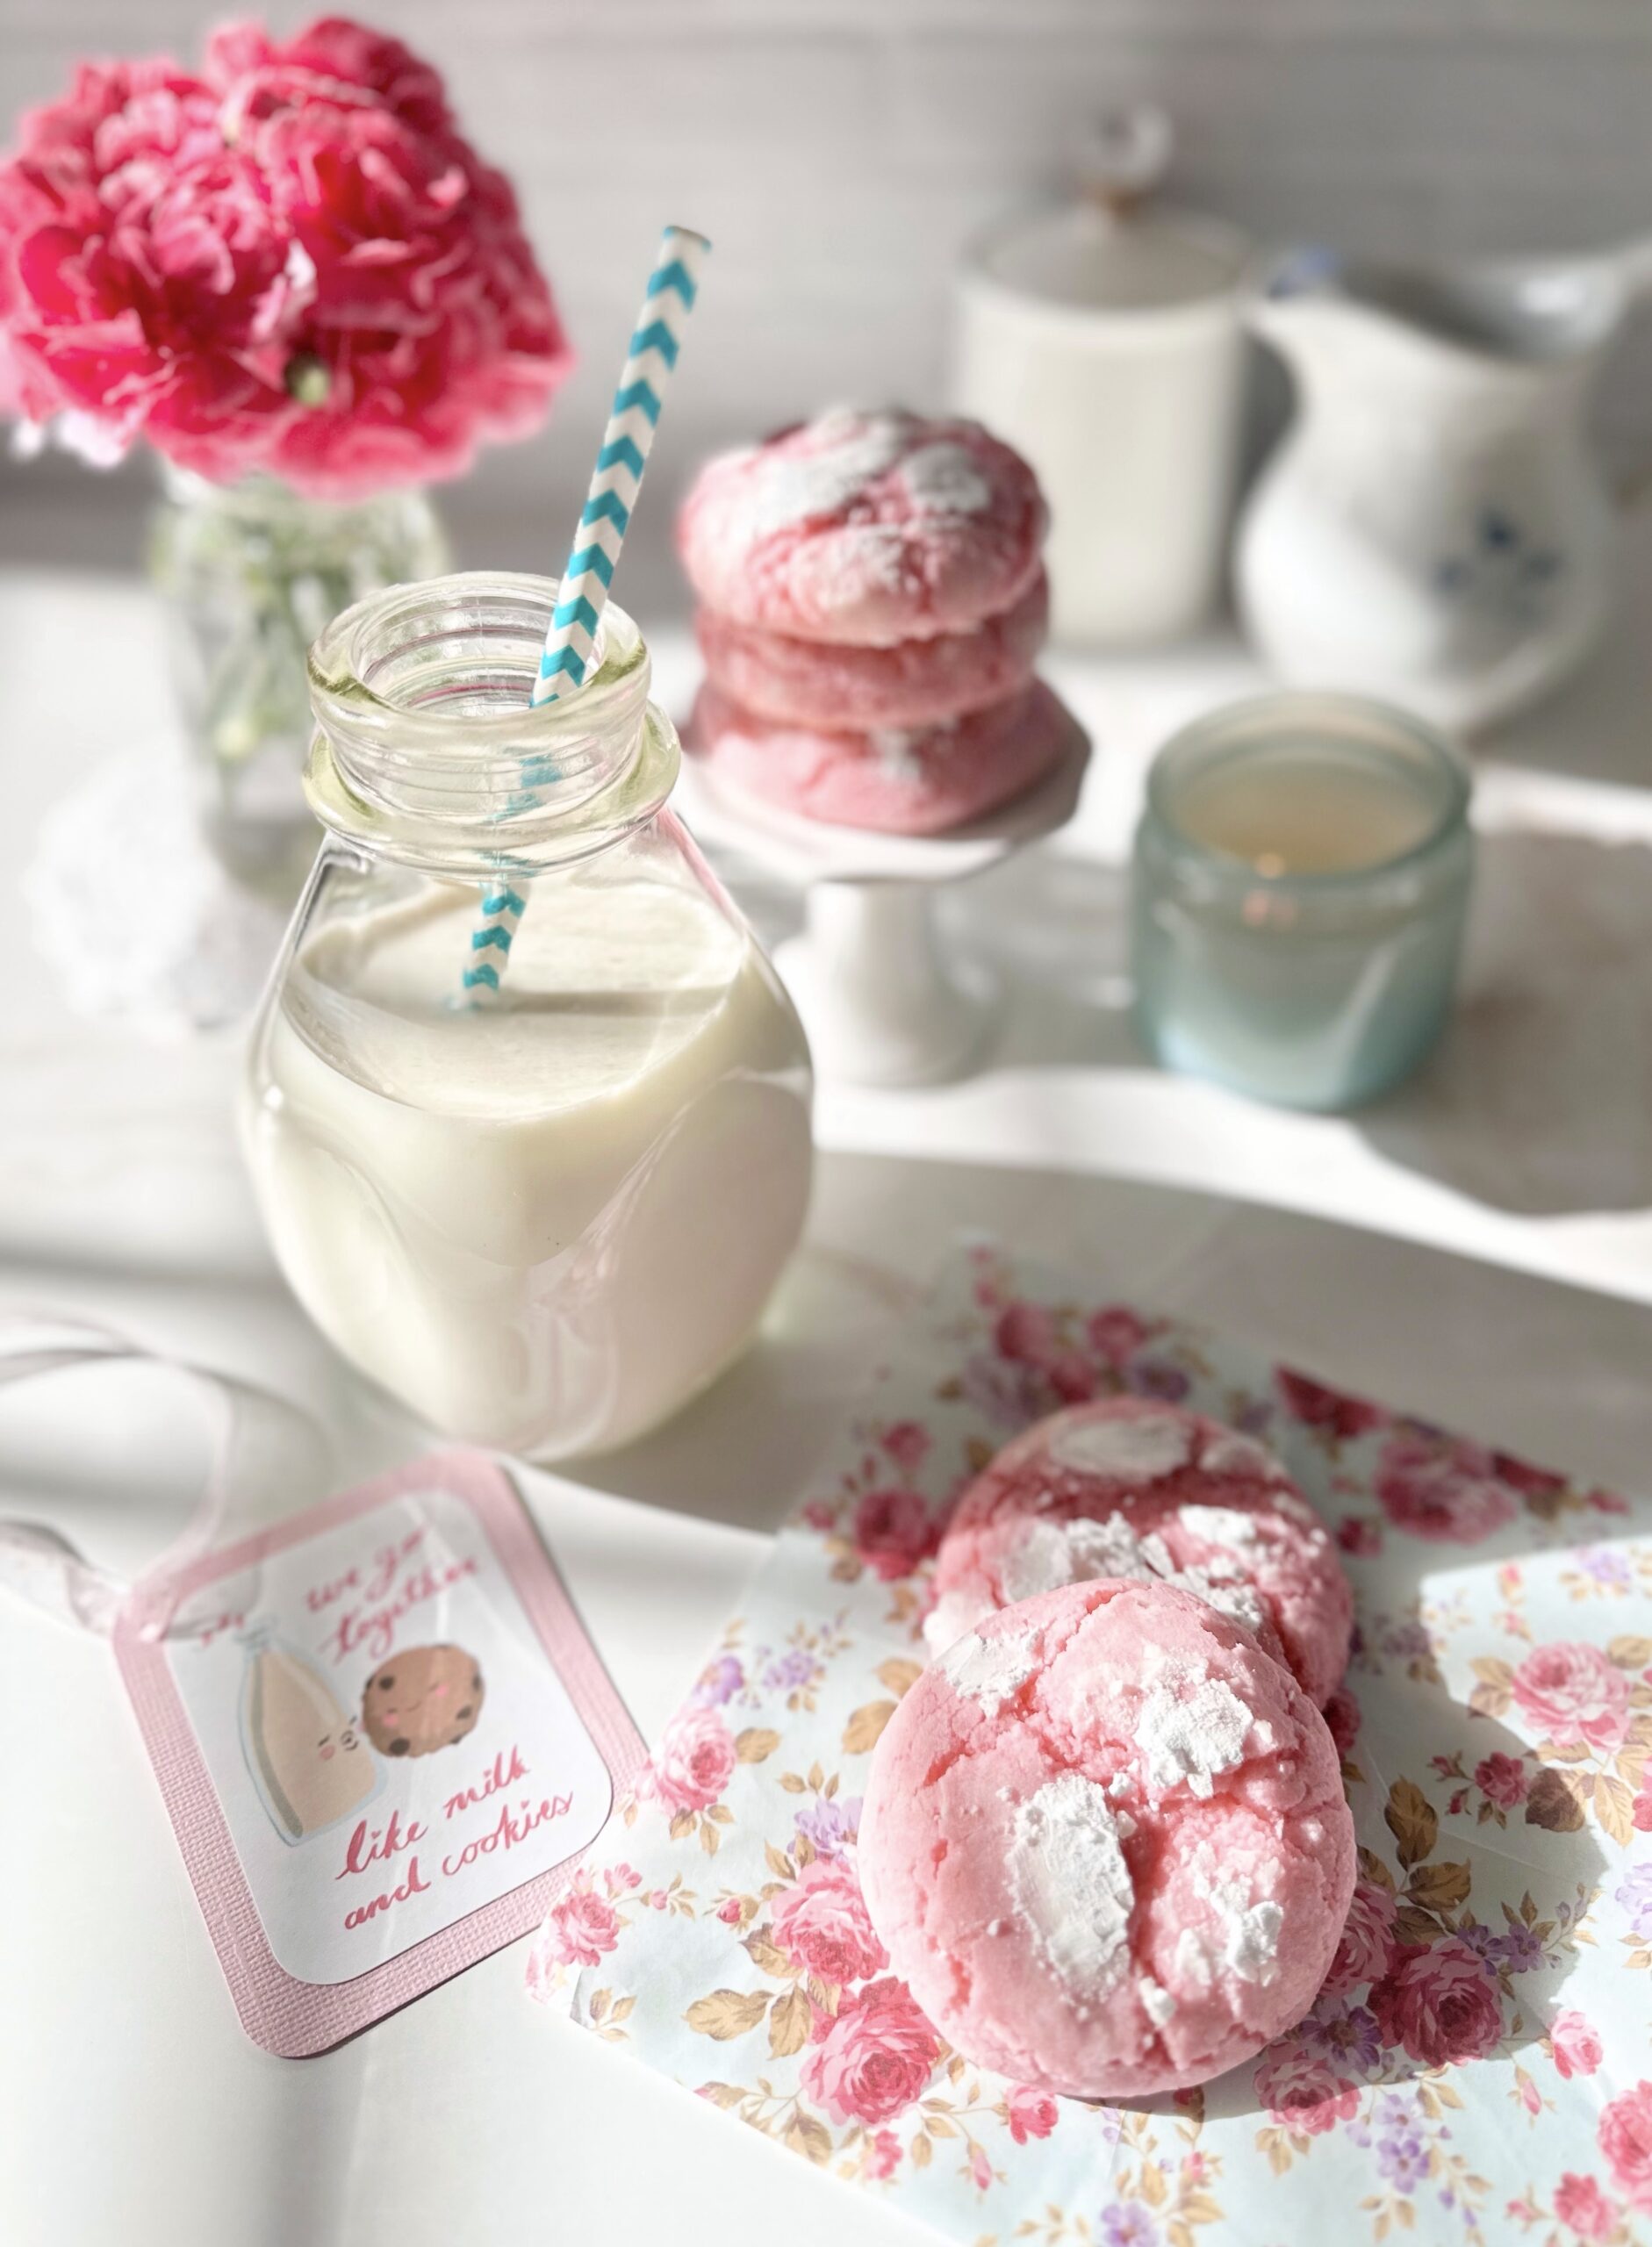
Whenever I walk into a bakery, my eyes are always drawn to anything pink. Pink cupcakes, cookies, donuts or anything with pink icing will inevitably come home with me. This probably started in childhood. Most bakeries back then, including the bakery my aunt always took me to, had pink boxes, so I associate it with delicious, freshly baked treats. Maybe pink desserts do taste better or maybe our minds just tell us that. Either way, if you love pink treats, you’ll love these cookies.
Pink velvet is similar to red velvet, but without the cocoa powder and red food color. The texture should be somewhat velvety, like red velvet cake. I have yet to taste a velvety red velvet cookie, but I think the texture of these cookies is pretty velvety as long as they’re not over baked. Pink velvet desserts are typically vanilla flavored. I upgraded the flavor by adding a touch of cherry flavoring. It’s not enough to give you cherry flavored cookies, but it will add depth to vanilla flavored treats. It’s an old bakery trick that I learned years ago that adds a fruity note in the background.
For best baking results, I recommend using a scale to weigh your ingredients, especially your dry ingredients. If you love baking, you should invest in a food scale if you don’t already have one.
To watch the Pink Velvet Cookies TikTok video, click here. To watch the Pink Velvet Cookies Instagram video, click here.
Pink Velvet Cookies
Pink vanilla flavored crinkle cookies with chewy exteriors and soft, velvety centers
1tablespoonvegetable oil or neutral oil of your choice
2largeegg whites
1teaspoonpure vanilla extract
½teaspoonnatural cherry flavoringSee notes below*
1small pea size droppink gel food colorI used Americolor deep pink**
Optional
½cupwhite chocolate chips
Instructions
Preheat oven to 350ºF. Line two large cookie sheets with parchment paper.
In a medium bowl, whisk together flour, cornstarch, baking powder, and salt.
In a large bowl, cream butter, sugar and oil until light and fluffy.
Beat egg whites into butter mixture in two addition, until well combined.
Beat in extracts until well combined.
Add gel food color, a little at a time with a toothpick, until desired shade of pink is reached. (Adding remaining ingredients will lighten the color slightly.) Beat until evenly distributed.
Add flour mixture to batter and beat just until combined. Mix in white chocolate chips if using.
Roll dough into balls, about 2 tablespoons each. I used a #30 portion scoop.*** Roll dough very generously in powdered sugar. Place two inches apart onto prepared cookie sheets.
Bake until cookies are puffed and tops are set, about 11-13 minutes. Transfer cookies to a cooling rack.
Notes
*The cherry flavoring in this recipe is not intended to make a cherry flavored cookie. The addition of cherry flavoring adds a subtle fruity note. You can also use pure cherry extract. Use a bit less (scant 1/2 teaspoon) because extracts tend to be stronger than flavorings. DO NOT use imitation cherry extract. It has a medicinal flavor that will disappoint you. If you want your cookies to be cherry or strawberry flavor, reduce vanilla extract to 1/2 teaspoon and use 1- 1 1/2 teaspoons of natural cherry or strawberry flavoring.**To find the pink gel food color I used, click here.***To find the portion scoop I used, click here.This recipe was updated on 2/14/23.
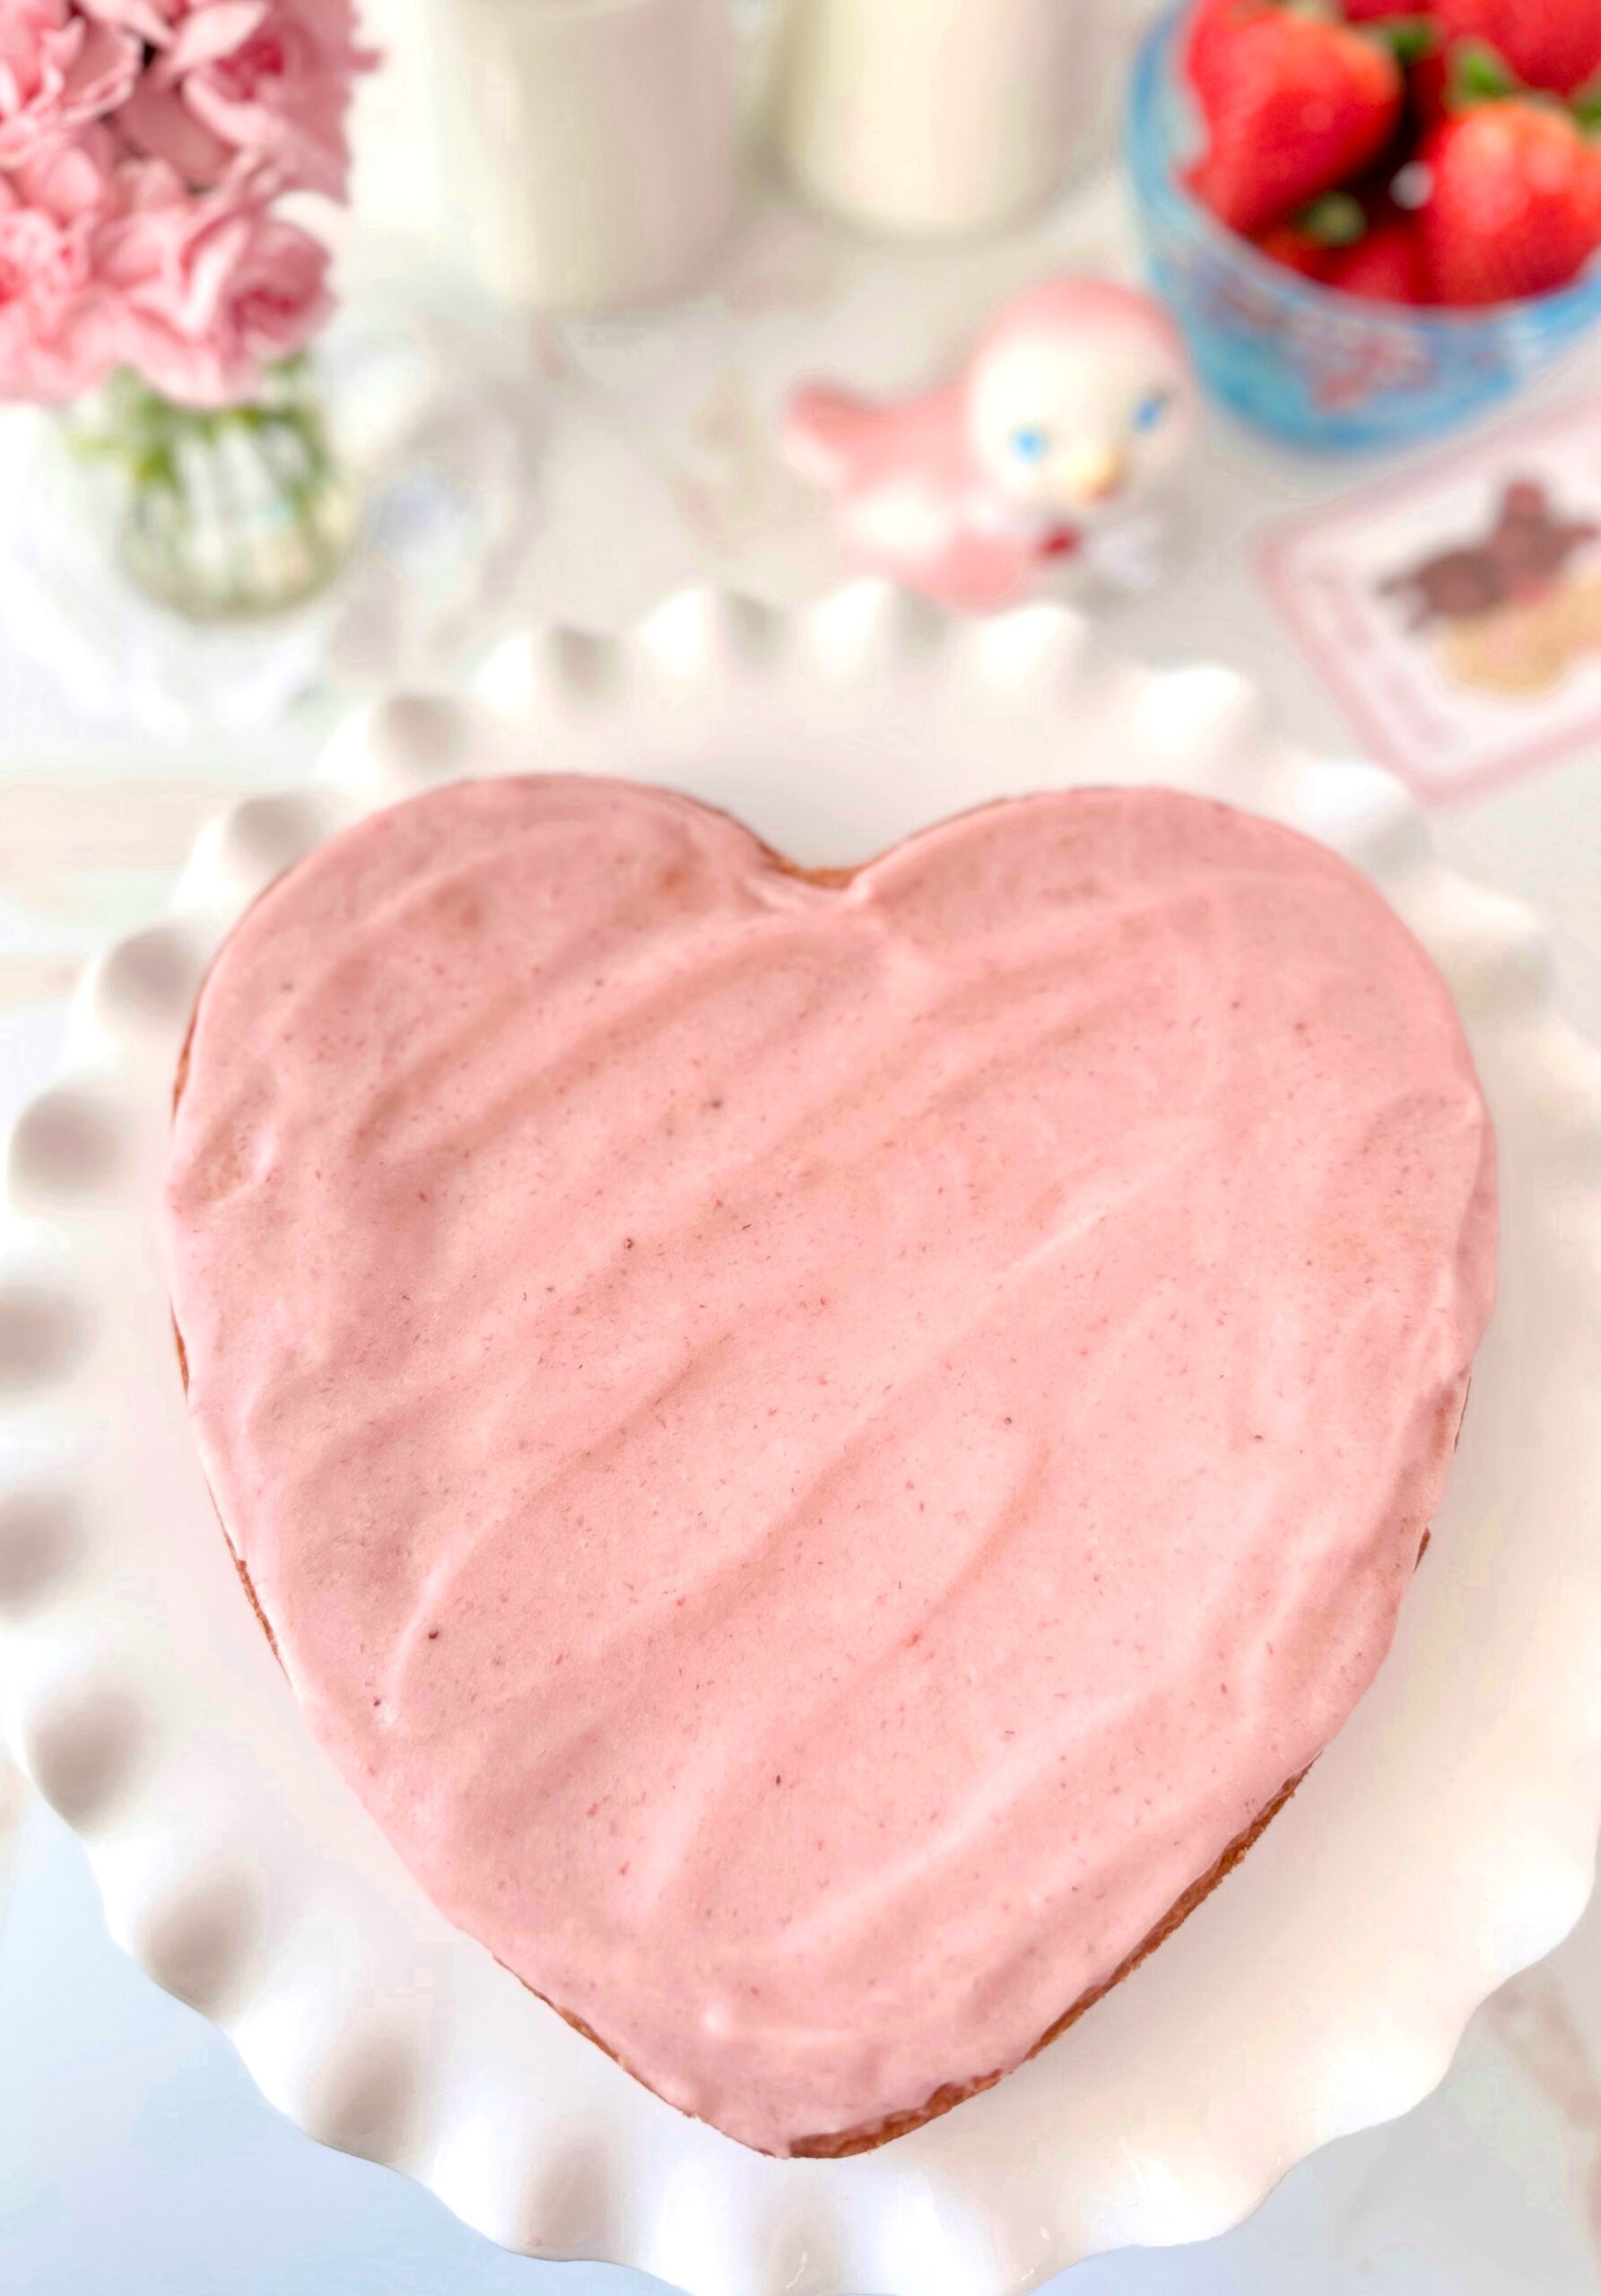
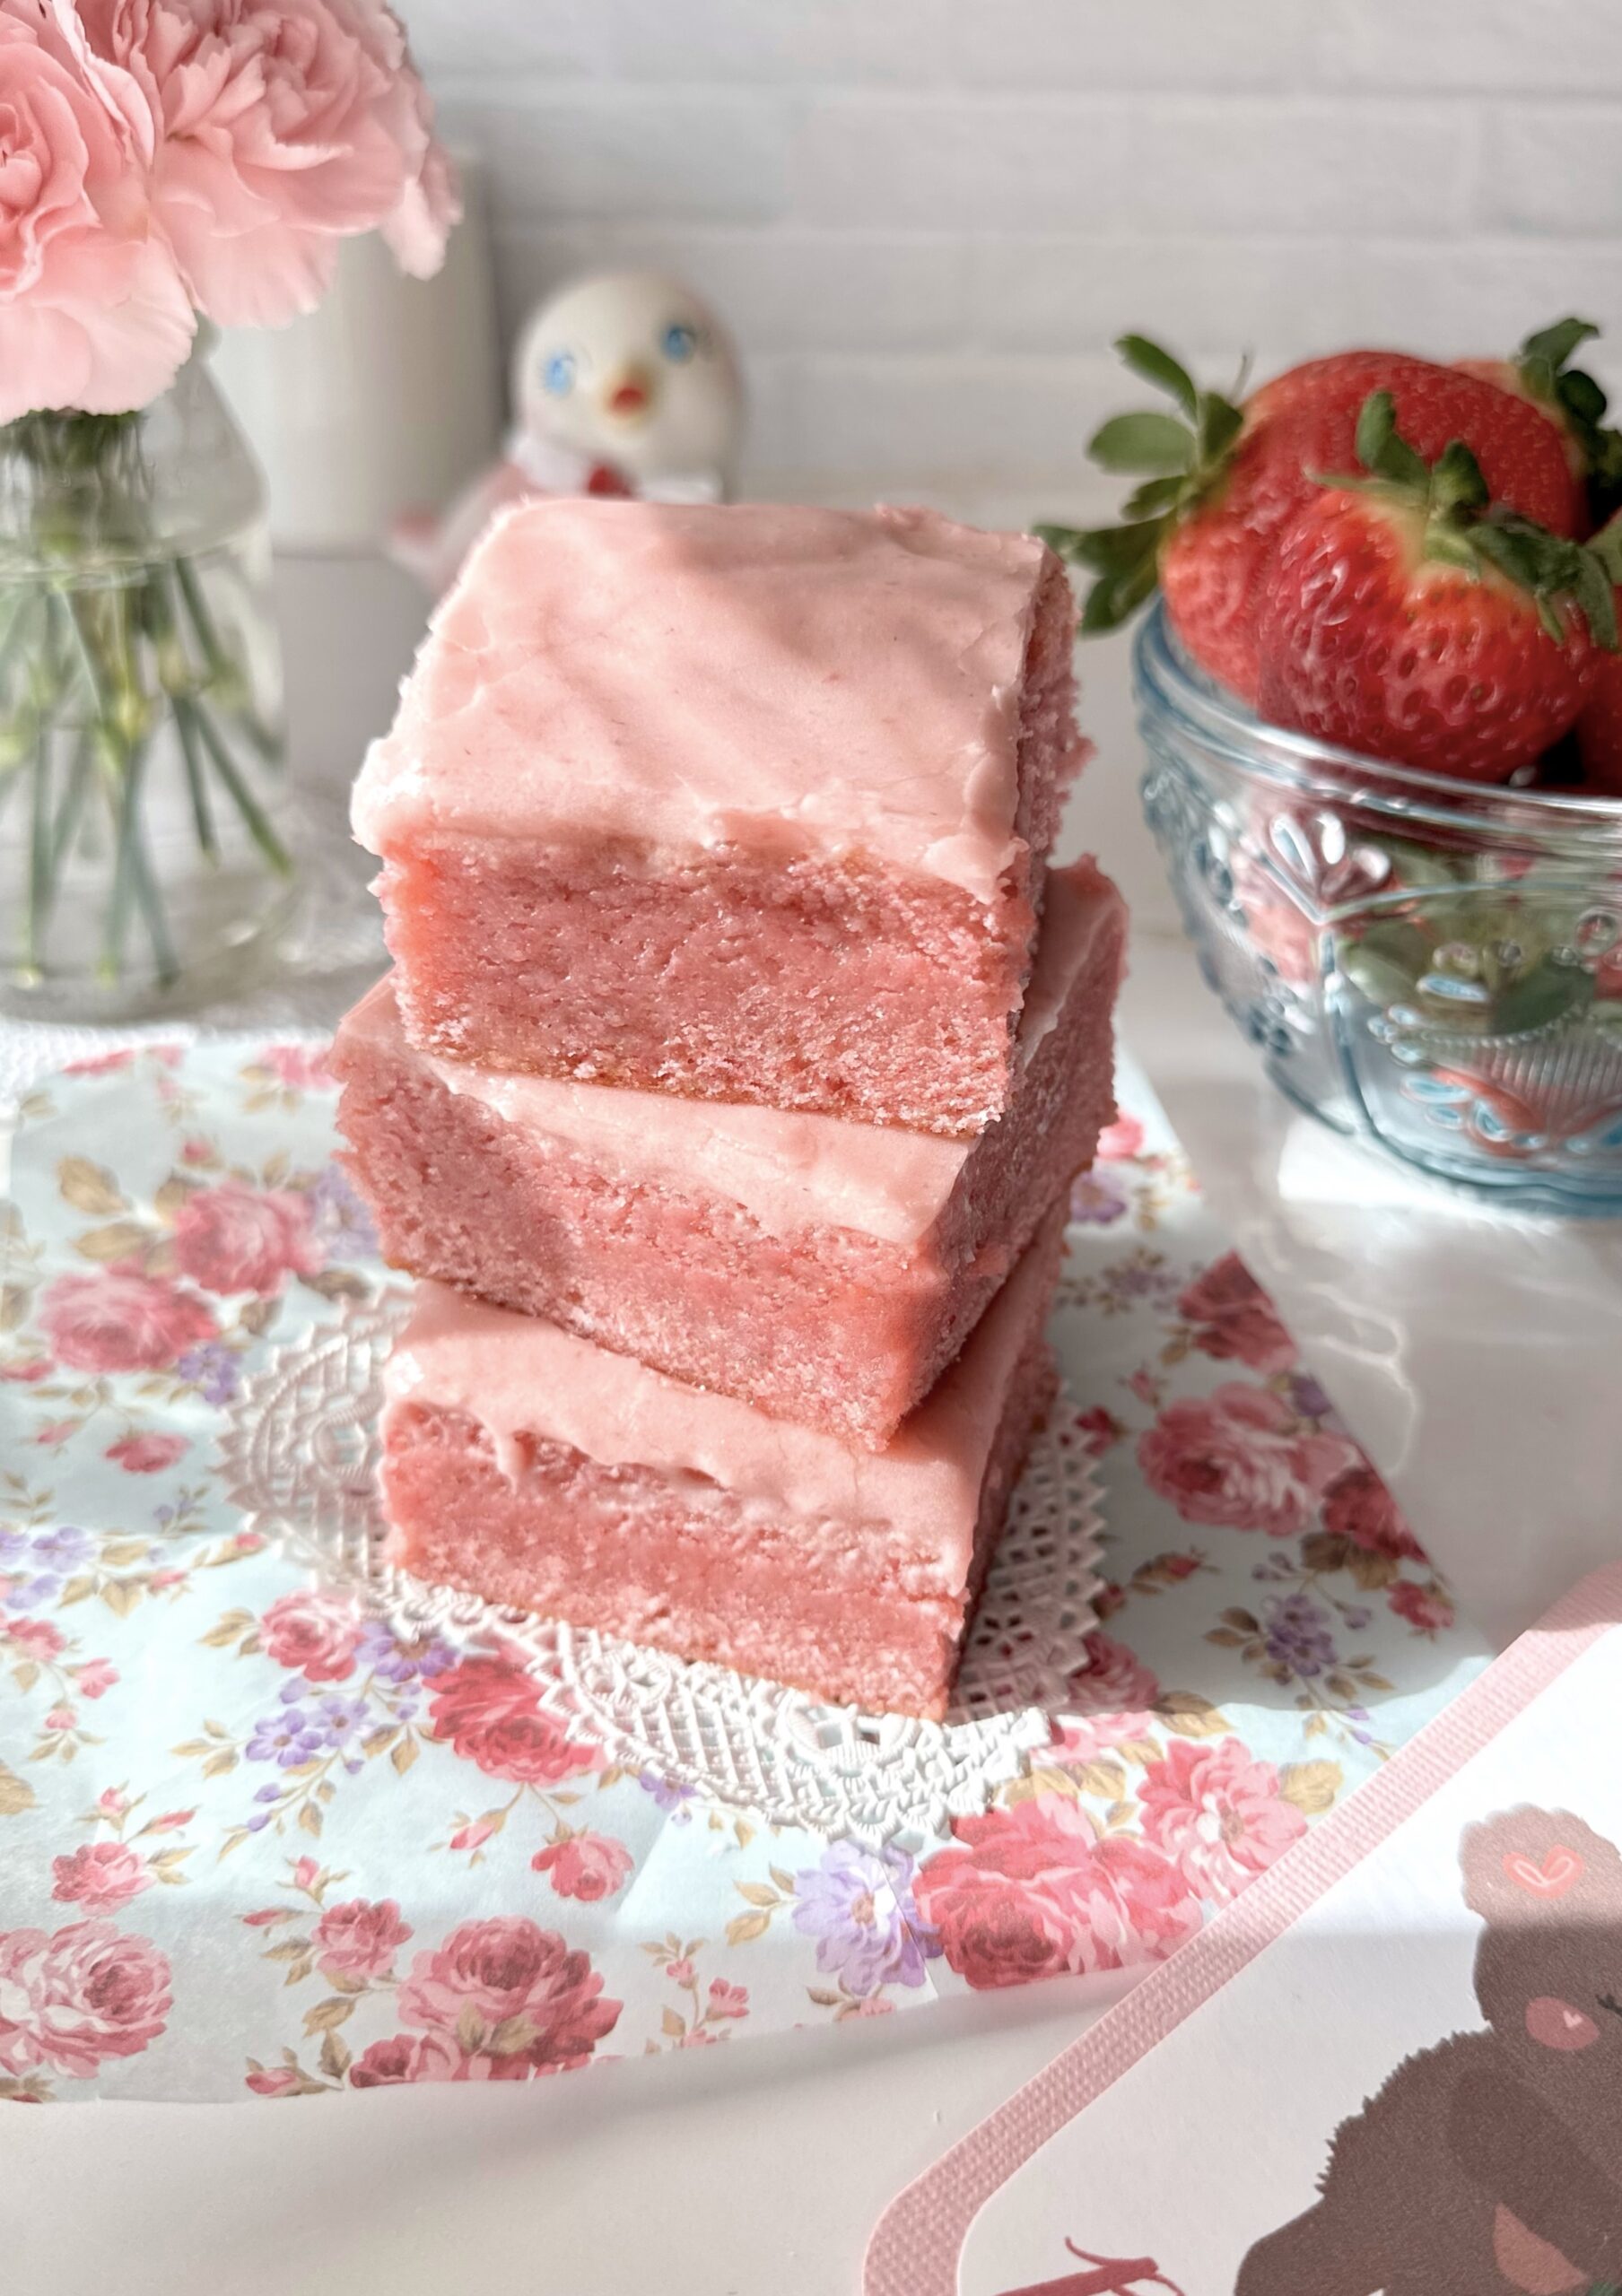
A cute little, stress-free, perfectly pink heart cake is my gift to you for Valentine’s Day. The vanilla cake is soft and fluffy. The frosting is super easy and delicious, with only two ingredients. It all comes together with fresh strawberries and it’s so good, you won’t want to share.
Little Strawberry Heart Cake
A six inch heart shaped vanilla cake with fresh strawberries and two-ingredient frosting
1tablespoonvegetable oil or neutral oil of your choice
1largeegg
½teaspoon pure vanilla extract
⅓cup whole milk, room temperature
3tablespoonssour cream, room temperature
8ouncescream cheese, softened
17.5 ounce jarMarshmallow Fluff
tiny droppink gel food colorI used Americolor deep pink*
Optional Decor
strawberries
meringue powder** or pasteurized egg whites
sugar
Instructions
In a small bowl, combine strawberries and 2 teaspoons sugar. Set aside to macerate for about 30 minutes.
Preheat oven to 350ºF. Line the bottom of a 6-inch heart shaped cake pan*** with parchment paper. Grease and flour the sides.
In a medium bowl, whisk together flour, baking powder and salt.
In a large bowl, cream butter, sugar and oil with an electric mixer, until light and fluffy.
Beat in egg and vanilla in two separate additions until well combined.
In a small bowl, whisk together milk and sour cream.
Beat flour mixture into batter in two additions, alternating with milk mixture.
Transfer batter to prepared cake pan. Bake until toothpick inserted in the center comes out clean, about 25-30 minutes. Let cake cool in pan 10 minutes then turn out onto a cooling rack to cool.
In a large bowl, stir cream cheese with a spatula to smooth out lumps.
Add marshmallow fluff and beat until well combined. Add food gel color with a toothpick and beat until evenly distributed.
Split cake into two layers. Top the bottom layer with frosting. Drain strawberries and spoon onto cake. Top with second layer, then more frosting.
Optional Decor
To make sugared strawberries, mix 1 part meringue powder with 3 parts water. Dip strawberries in meringue mixture, cover with sugar, then let dry. Alternately you can dip the strawberries in pasteurized egg whites, cover with sugar, then let dry.
Notes
*To find the gel food color I used, click here.**To find meringue powder, click here.***To find the heart cake pan I used, click here.
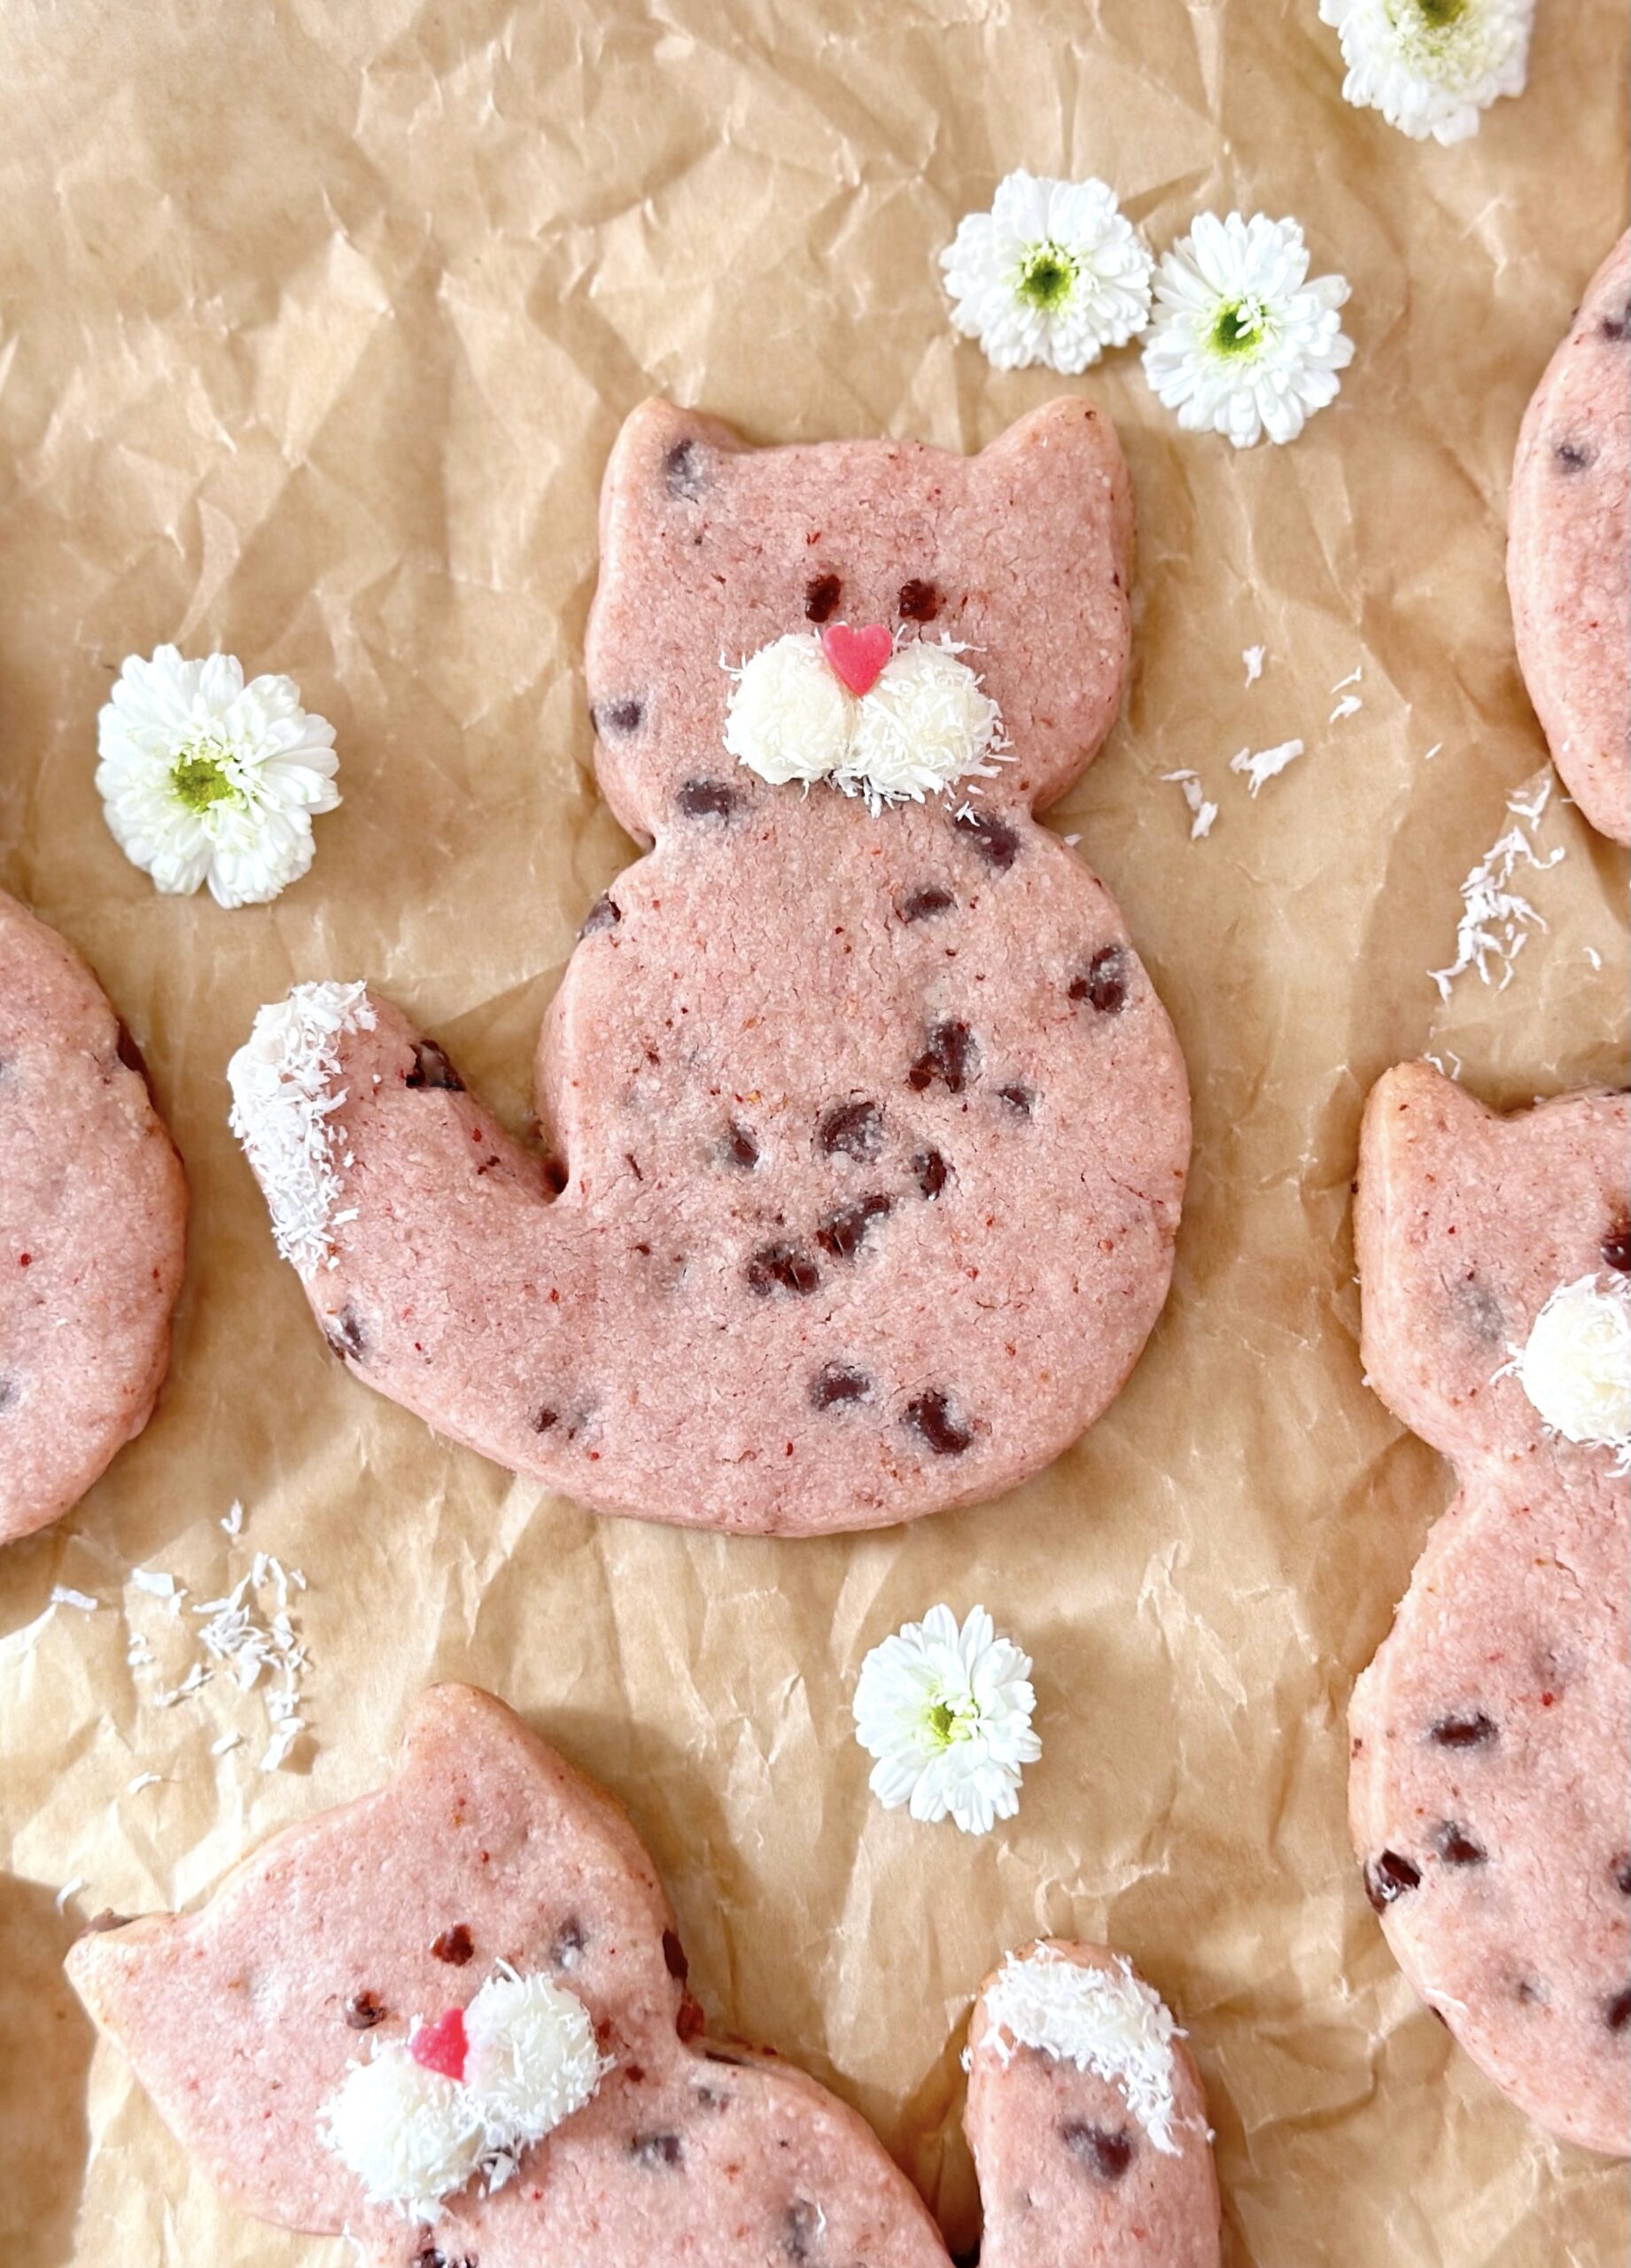
These cute kitties were created two years ago as a special request by someone who grew up playing with Webkinz. Do you remember the Strawberry Cloud Leopard? It was a cute pink Webkinz plushie. The cookies are made of tender, buttery shortbread dough. They get their natural color and flavor from freeze dried strawberries. Mini chocolate chips are added to make the adorable leopard spots. To watch the Strawberry Cloud Leopard Shortbread Cookies Instagram video, click here.
I recently brought back the heart-shaped version of these cookies on social media, just in time for Valentine’s Day. Currently, the price of eggs is very high. These cookies don’t contain eggs, which is so helpful right now. They make a perfect shareable Valentine treat.
Strawberry Chocolate Chip Shortbread Cookies
Tender strawberry shortbread cookies dotted with mini chocolate chips
Process the freeze dried strawberries to a powder with a small food processor or a clean spice grinder. Pass the powder through a sieve to strain out the seeds.
In a medium-size bowl, whisk the flour, powdered sugar and salt together.
In a large bowl, beat the butter until light and fluffy. Add the freeze dried strawberry powder and vanilla extract. Beat until well combined.
Add the flour mixture and beat just until dough comes together. Fold in 1/3 cup (57g) of mini chocolate chips for the leopards or 1/2 cup (85g) of mini chocolate chips for the hearts.
Divide the dough into two portions and form into disks. (Alternately, you can roll the dough between two sheets of parchment paper.) Wrap with plastic wrap and refrigerate for at least 1 hour or up to overnight.
Line two large cookie sheets with parchment paper. On a lightly floured surface, roll the dough to 1/4-inch thickness. Cut the cookies into your desired shapes. I used a 4-inch tall cat cookie cutter** for the leopards and a 3-inch tall heart cookie cutter for the hearts.
Place the cookies about 2-inches apart onto the prepared cookie sheets. To prevent excessive spreading, refrigerate the cut cookies for 30 minutes prior to baking, especially if your dough becomes warm as you work with it.
Preheat the oven to 325ºF (165ºC). Bake until the cookies are slightly puffed and the edges barely start to turn light golden brown, about 11-13 minutes. (Smaller cookies will need a shorter baking time.) Let the cookies cool on the cookie sheets for 3-4 minutes then transfer to a cooling rack to cool completely. Decorate as desired.
At the Brownie Mischief website, all types of brownies are welcome. We all know and love chocolate brownies. But there are other less common brownies in the universe, that deserve to shine too. Let me introduce you to Strawberry Sweetheart Brownies. These lovely pink creations aren’t strawberry cake or strawberry blondies. They contain white chocolate and they’re made with the same baking method as brownies. When you bake chocolate brownies, you want to be careful not to over bake them, to achieve the rich, fudgy texture. The same is true for these strawberry brownies. When you test for doneness, the toothpick should have a few moist crumbs attached to it. If the toothpick is clean, the brownies have baked too long and will likely be a little dry and cakey, although still edible. So make sure to test for doneness well before the end of the baking time!
The baking temperature for this recipe is 325ºF. I noticed that when baking in a heart shaped cake pan, things tend to bake unevenly because of the shape. So I used a lower temperature to help with even baking. If you don’t have an 8-inch heart shaped cake pan, you can also use an 8-inch round cake pan. To find the cake pan I used, click here.
To watch the Strawberry Sweetheart Brownies Instagram video, click here.
Strawberry Sweetheart Brownies
A heart shaped strawberry brownie made with fresh strawberries topped with strawberry icing.
1petite pea size drop pink gel food color (optional)I used Americolor Deep Pink**
1 ½ cups (6 3/4 ounces)all purpose flour, sifted
Strawberry Icing
¾cup (3 ounces)powdered sugar, sifted
1tablespoonunsalted butter, melted
2tablespoonsreserved strawberry purée
¼teaspoon pure vanilla extract
¼teaspoonpure strawberry extract
dashfine sea salt
Instructions
Strawberry Brownies
Preheat oven to 325ºF. Line the bottom of an 8-inch heart shaped cake pan*** with parchment paper. Spray the insides with nonstick spray.
In a large heat safe bowl, melt butter and white chocolate together on the stovetop over a pan of barely simmering water or in the microwave for 20 seconds at time, stirring at each interval. White chocolate overheats easily, so be vigilant.
Add the sugar and salt to the butter mixture and mix until well combined.
Add egg and egg yolks. Whisk until smooth.
Pass strawberry purée through a sieve to remove seeds. Set aside 2 tablespoons of strawberry purée for icing. Add remaining purée to batter. Mix until well combined.
Add extracts and food color. Mix until combined.
Stir in flour until combined, scraping bowl as needed.
Transfer batter to prepared pan. Bake until toothpick inserted in center has a few moist crumbs on it, (not batter), about 25-30 minutes. Do not over bake. Let cool in pan. Remove from pan and top with strawberry icing.
Strawberry Icing
Whisk all icing ingredients together until smooth and well combined.
Notes
*To make strawberry purée: Purée clean, hulled and quartered strawberries in a blender or food processor. **To find the food color I used, click here. **To find the heart cake pan I used, click here.This recipe was updated on January 24th, 2023
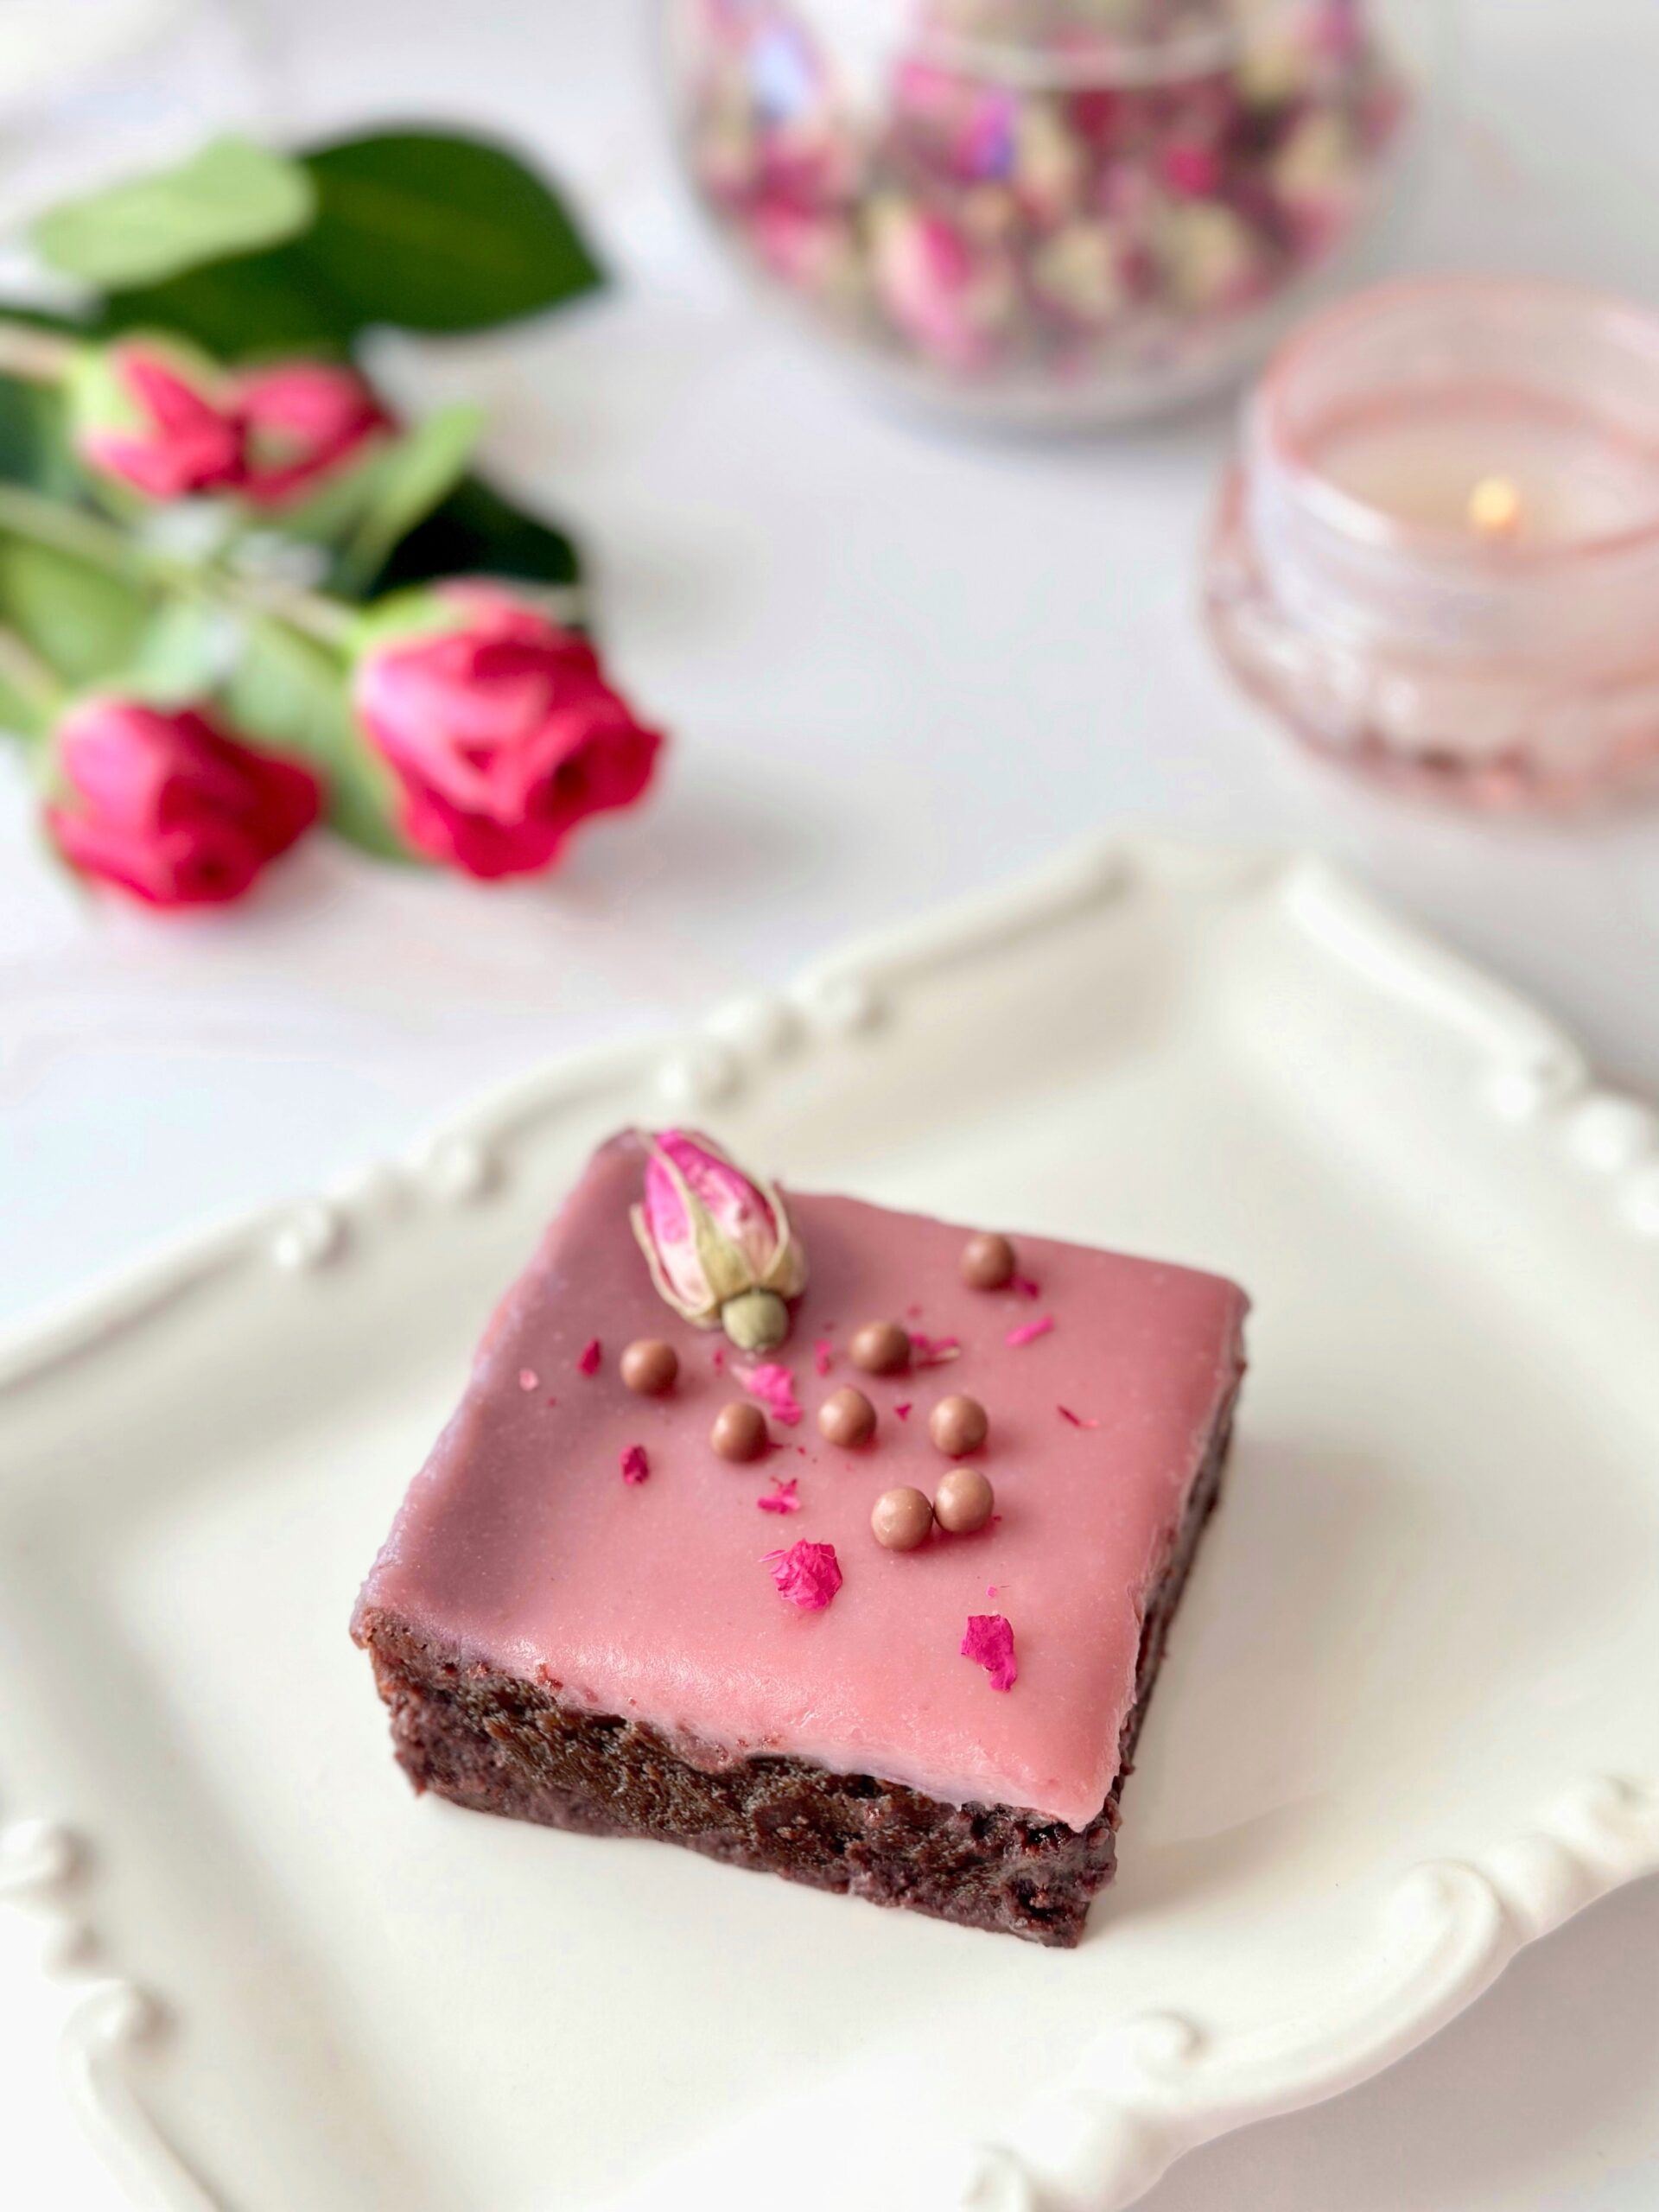
Who else loves those heart shaped boxes of chocolates we see at Valentine’s Day? That adventurous first bite of chocolate, when you don’t know which flavor you’re getting, is so much fun! I adore the fruit ganache filled chocolate bon bons. If you love bon bons too, you’ll love these brownies. They’re rich, fudgy and topped with a silky raspberry ganache that makes you feel like you’re biting into a raspberry truffle. The ganache adds an elegant touch to these brownies, so dried rose buds, rose petals and crispy chocolate pearls were my toppings of choice.
This isn’t the first time I’ve created elegant brownies. I displayed beautifully decorated brownies at two previous cookie conventions and they were well received. Elevated brownies are unexpected, but they’re definitely appreciated!
Raspberry Truffle Brownies
by Mari Vasseur
Rich, fudgy brownies topped with silky raspberry ganache
1 ½teaspoons vanilla bean paste or pure vanilla extract
½cup (118ml)strained raspberry purée
¼cup (59ml)heavy cream
4ounces (113g)white chocolate, finely chopped
Instructions
Preheat oven to 325ºF (165ºC). Line an 8-inch square baking pan with parchment paper, leaving a couple of inches of overhang.
In a medium-sized bowl, sift together the flour, cocoa powder and salt.
In a medium-sized heat safe bowl set over a pot of barely simmering water, melt the chocolate, making sure the water doesn't touch the bottom of the bowl. Stir occasionally, until smooth. Remove from heat.
In a large heat safe bowl, melt the butter in the microwave or set the bowl over a pot of barely simmering water. Whisk the sugar, eggs, egg yolk and vanilla into butter until smooth and the sugar is mostly dissolved. Stir in the melted chocolate until well blended. Stir in the flour mixture just until combined.
Transfer the batter to the prepared baking pan. Bake until a toothpick inserted in the center comes out with moist crumbs on it, about 25-30 minutes. Do not over bake. Let cool completely.
Place the white chocolate in a medium-sized bowl.
In a small saucepan over medium-low heat, simmer the raspberry purée until reduced by half. Combine the heavy cream with the reduced purée in the saucepan. Heat until bubbles start to form around the edges. Do not boil.
Pour the hot cream mixture over the white chocolate, making sure its completely submerged, and let stand 5 minutes. Stir until smooth and well combined. Spread over the cooled brownies.
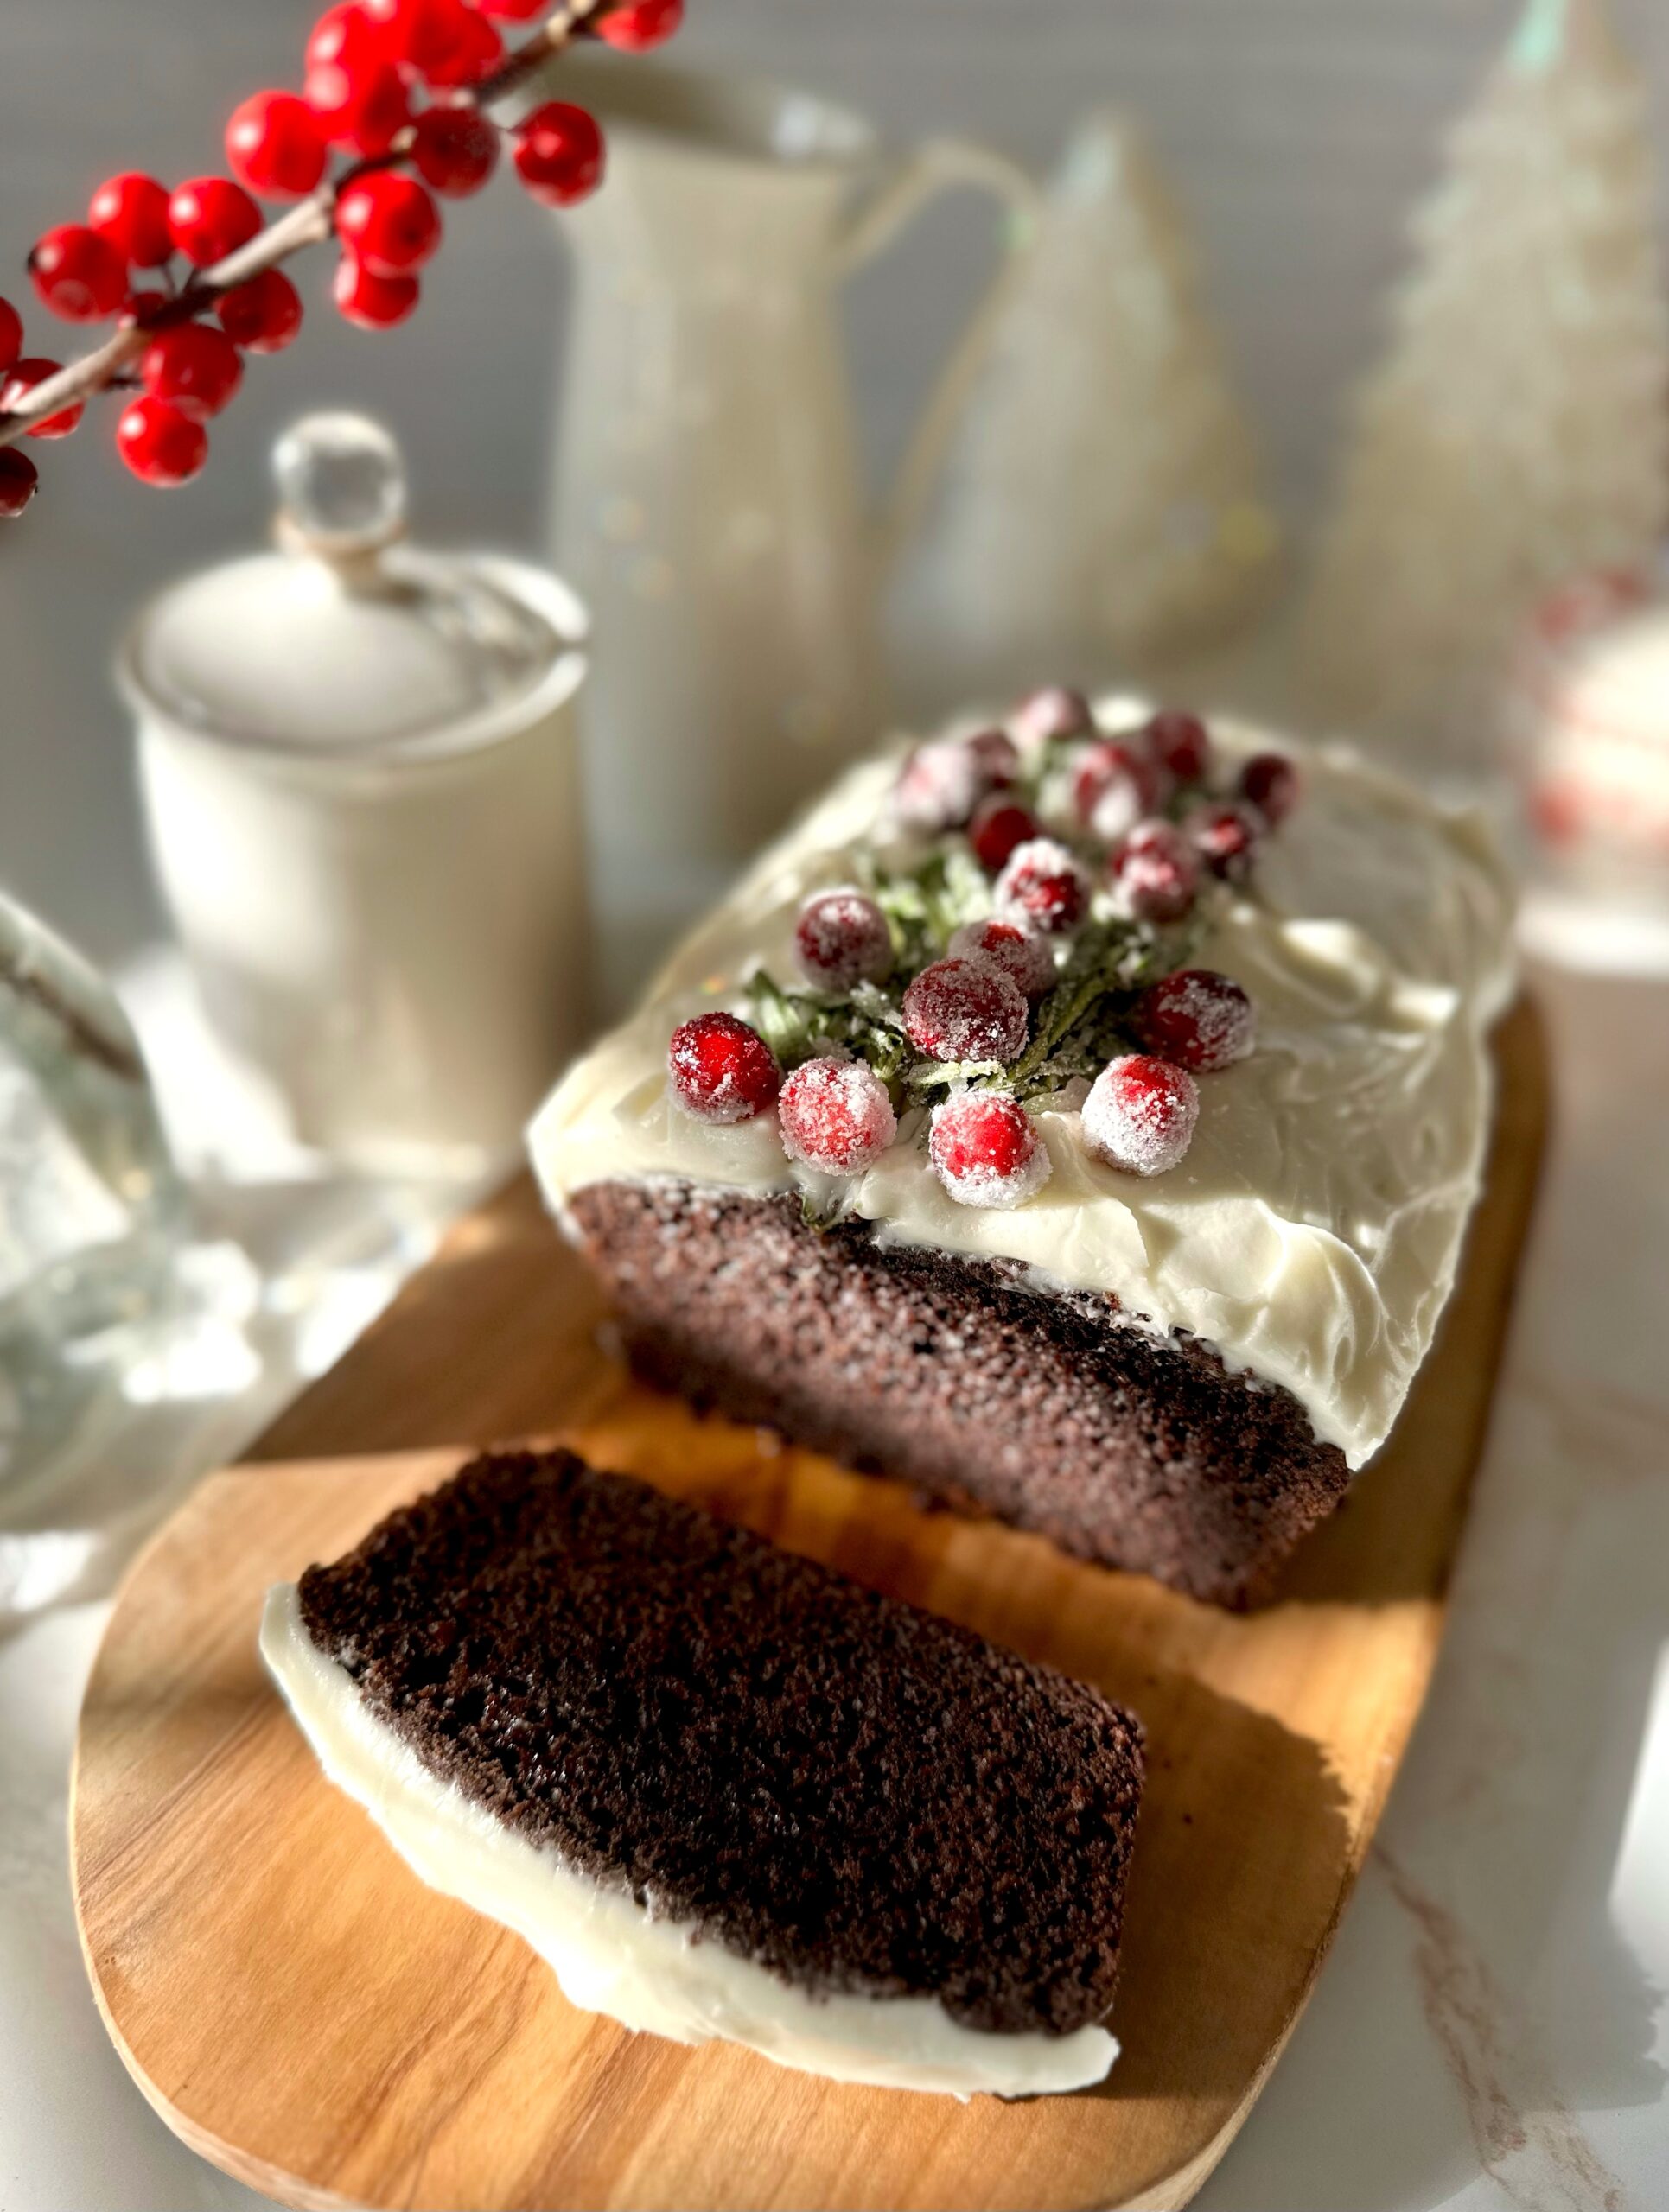
Chocolate gingerbread is gingerbread’s elegant sister. It has the warm spices we love in gingerbread combined with the earthy depth of chocolate. Topping this rich, tender loaf with silky cream cheese frosting is the best possible choice to take it over the top. It’s a lovely loaf to enjoy during the holiday season and beyond. Enjoy it with a hot drink for a cozy, comforting winter treat.
Make sure to check out my method for making sugared cranberries below. No raw eggs required!
½cup (115ml)vegetable oil or neutral oil of your choice
2largeeggs, room temperature
1teaspoonpure vanilla extract
½cup (113g)sour cream, room temperature
½cup (118ml)whole milk, room temperature
Cream Cheese Frosting
¼cup (57g)cream cheese, softened
2tablespoons (28g) unsalted butter, softened
2cups (234g)powdered sugar, sifted
2-3tablespoons (30-45ml)whole milk, room temperature
¼teaspoonpure vanilla extract
1pinchfine sea salt
Instructions
Chocolate Gingerbread
Preheat oven go 350ºF (180ºC). Line the bottom of a 9 x 5-inch loaf pan with parchment paper. Grease the insides and dust with a mixture of equal parts flour and cocoa powder.
In a medium-size bowl, whisk together the flour, cocoa powder, cinnamon, ginger, baking powder, baking soda, salt, nutmeg, and cloves until well blended
In a large bowl, beat the brown sugar, oil, eggs and vanilla together until smooth.
In a small bowl, whisk together the sour cream and milk.
Add flour the mixture to the batter in two additions, alternating with the milk mixture, beating just until combined.
Transfer the batter to the prepared pan. Bake until a toothpick inserted into the center comes out clean, about 38-45 minutes.
Cool the loaf in the pan for 10 minutes, then turn the loaf out onto a cooling rack to cool completely. Frost with cream cheese frosting.
Cream Cheese Frosting
In a medium bowl, beat the butter and cream cheese together until smooth.
Add the powdered sugar, 2 tablespoons (30 ml) of milk, the vanilla and salt. Beat until smooth. Add additional milk, if needed, until your desired consistency is reached.
Notes
To make sugared cranberries and rosemary for garnish: Mix 1 teaspoon of meringue powder* with 1 tablespoon of water. Place 1 cup of fresh cranberries in a bowl and coat them in the meringue powder mixture. Drain any excess liquid then coat the cranberries with granulated sugar. Place them on a parchment lined baking sheet to dry at room temperature for at least 1 hour. Use the same method for sprigs of rosemary.*To find meringue powder, click here.
2tablespoons (12g)unsweetened Dutch process cocoa powder
1 ½teaspoons baking powder
½teaspoon fine sea salt
⅓cup (75g)unsalted butter, softened
2 ½ cups (340g)powdered sugar, sifted and divided
2 largeeggs
½teaspoon pure vanilla extract
½teaspoonpure peppermint extract
2ounces (57g)unsweetened chocolate, melted and cooled to room temperature
Instructions
In a medium bowl, whisk together the flour, cocoa powder, baking powder and salt.
In a large bowl, beat the butter with an electric mixer at medium speed, until light and fluffy. Gradually beat in 2 cups (227g) powdered sugar until well combined. Set aside the remaining 1/2 cup (113g) of powdered sugar in a shallow dish.
Beat in eggs in two separate additions, making sure each one is incorporated before adding the next. Add the extracts and the melted chocolate and beat until well combined. Beat in the flour mixture just until combined.
Cover and refrigerate the dough for at least 2 hours or up to overnight.
Preheat the oven to 350ºF (180ºC). Line two large cookie sheets with parchment paper.
Roll the dough into 15 2-tablespoon size balls, 1 1/4 ounce (35g) each. Roll the dough balls generously in the reserved 1/2 cup of powdered sugar.
Place the dough balls 3 inches apart onto the prepared cookie sheets. Bak until the cookies puff and the tops are set, about 10-12 minutes. Transfer the cookies to a cooking rack to cool.
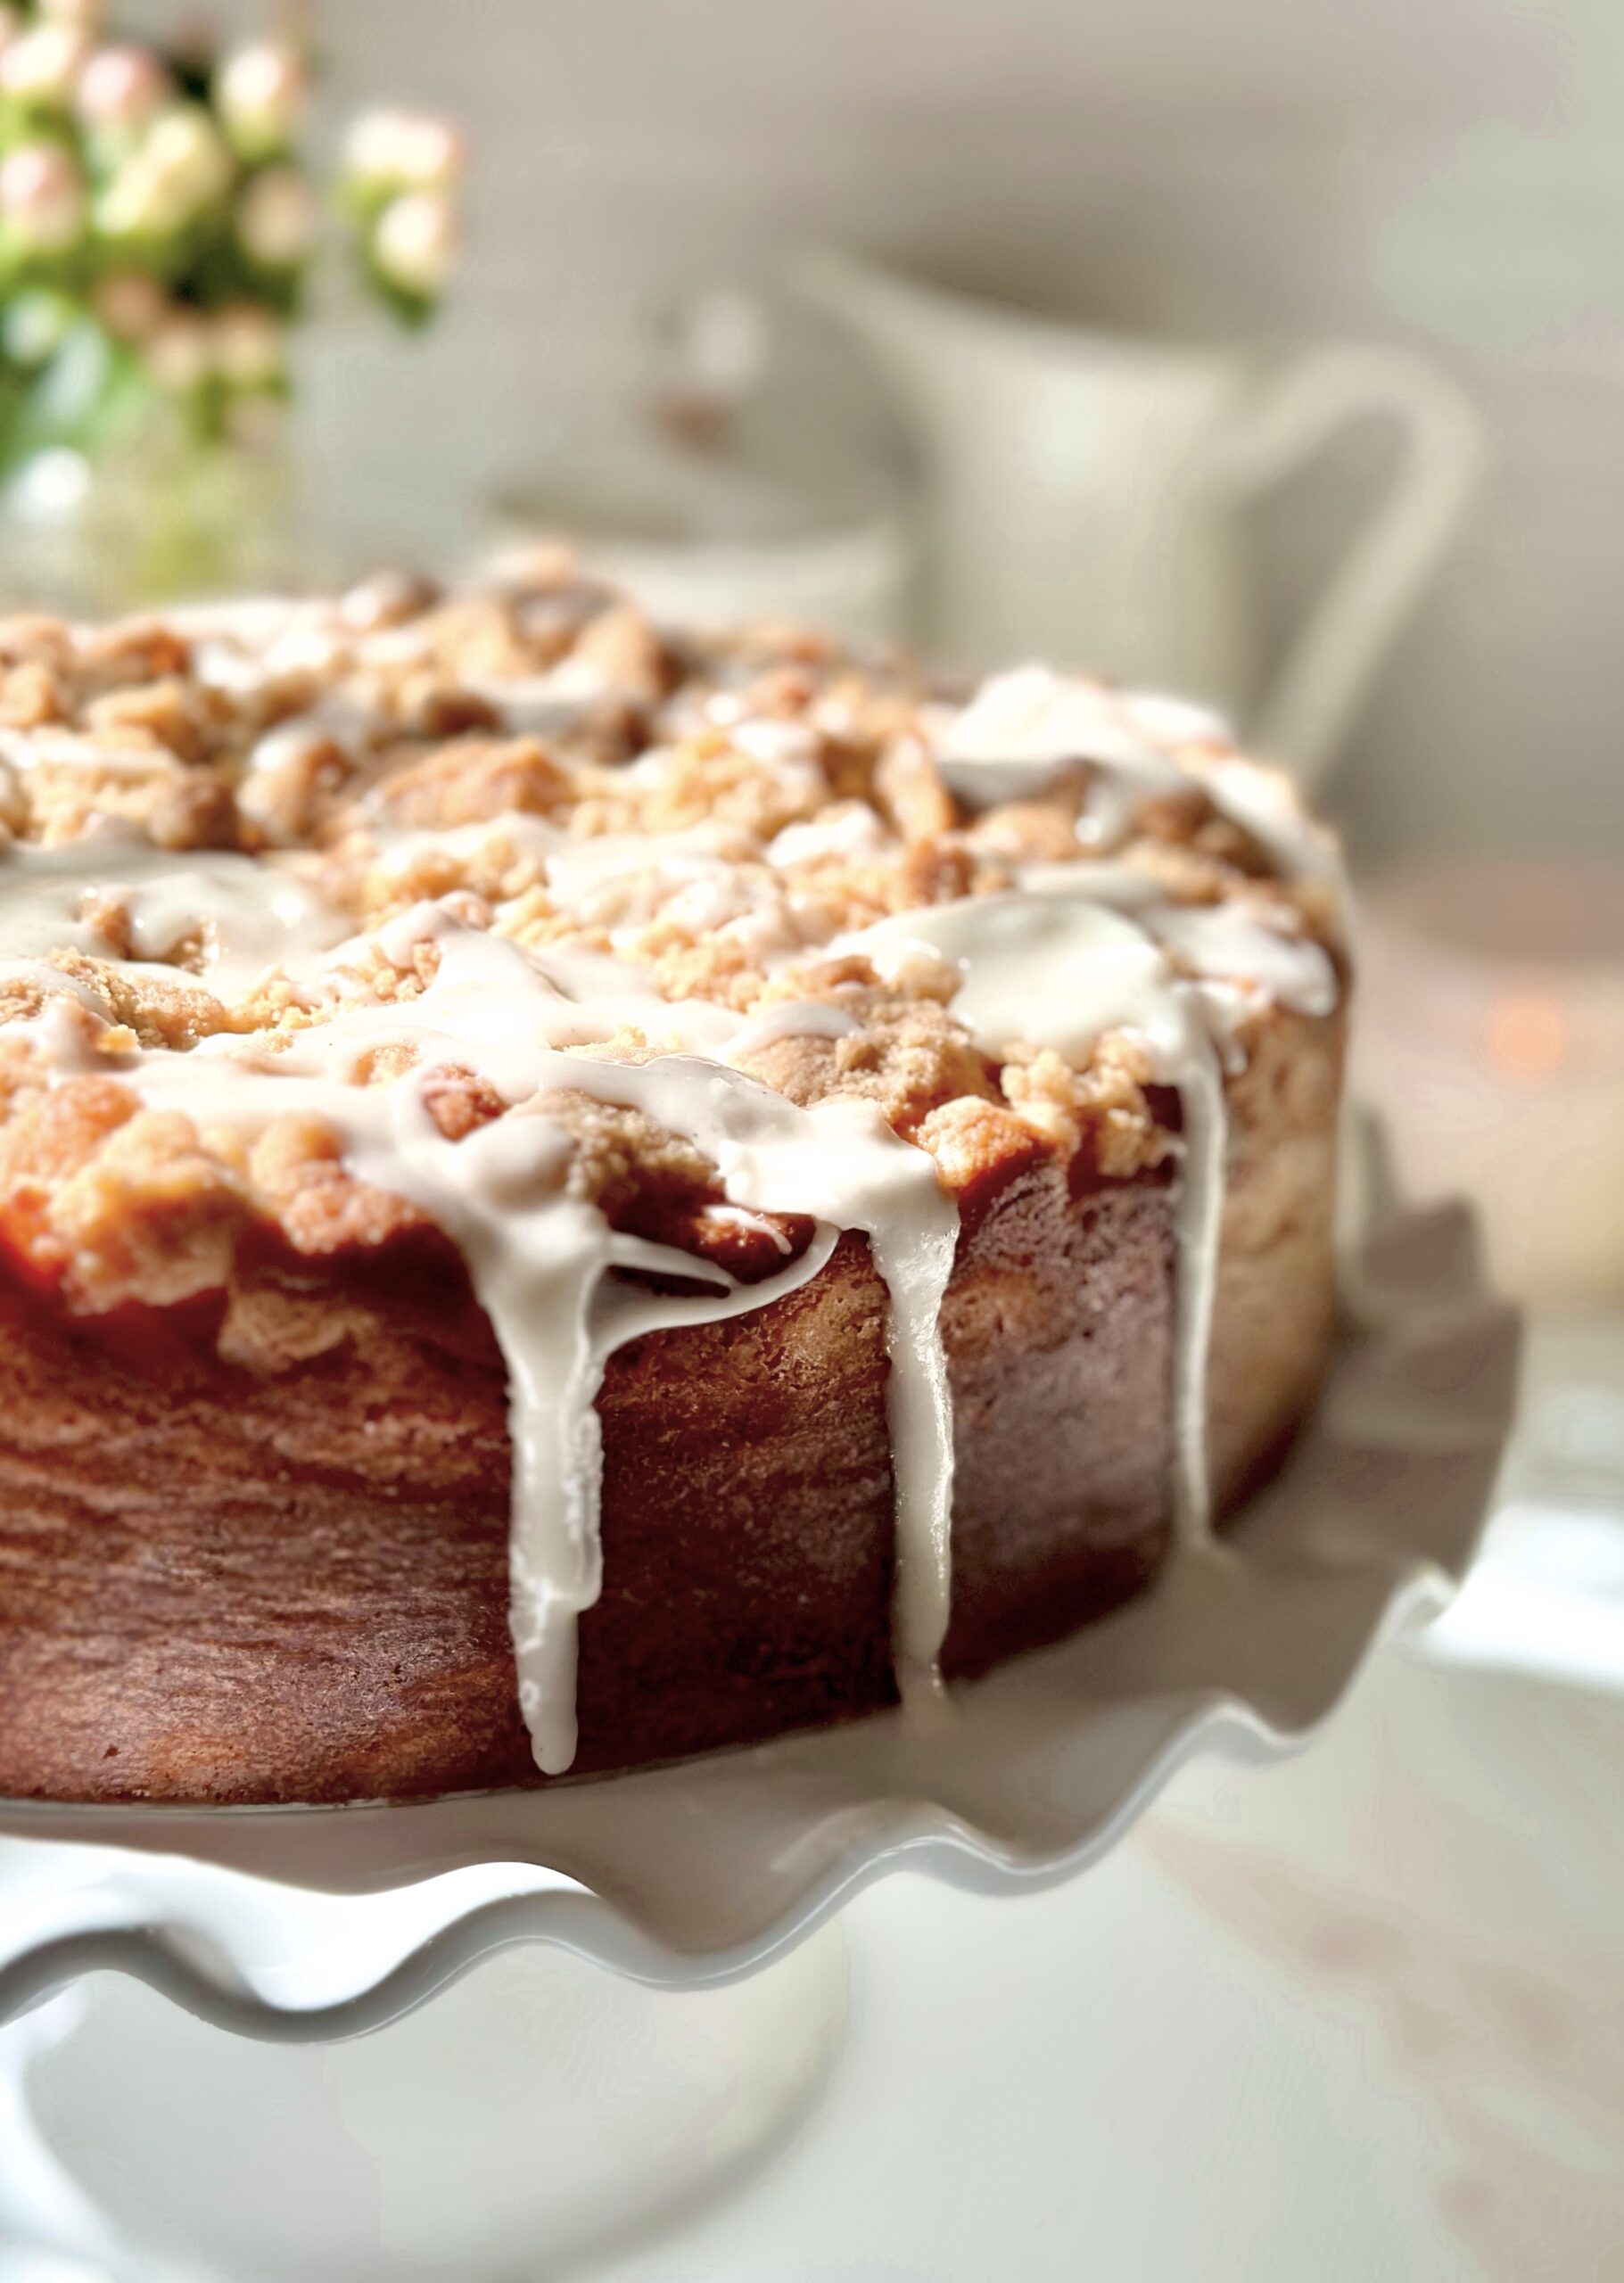
I remember my grandma making coffee cakes and sweet muffins for breakfast, along with eggs, sausages, hot coffee and a big pitcher of milk on the table. Why do most of our grandmothers cook and bake so well? Because they’ve had decades of trial and error to perfect their recipes, tweaking them here and there until they’re approved and loved by their families, neighbors and friends. This cake has had its share of trial and error. She has earned her place as a well-loved, delicious, beautiful queen of coffee cakes.
A classic coffee cake is usually a subtly sweet cake with cinnamon, crumb topping and maybe some icing. They’re called coffee cakes because they go so well with a cup of coffee, not necessarily because they contain coffee. This Apple Crumb Cake has the elements of a classic coffee cake, but so much better! The cake is fluffy and soft, the crumb topping is chunky and plentiful, and the apples are perfectly tender. And don’t get me started about the icing!
Grandma's Apple Crumb Cake
Tender vanilla cake with generous crumb topping and vanilla icing
3cups (340g)chopped apples (1/2-inch pieces)Use any combination of your favorite baking apples.
2tablespoons (25g)sugar
½teaspoonground cinnamon
Crumb Topping
1cup (128g)all purpose flour
⅓cup (67g)brown sugar
3tablespoons (38g)sugar
¼teaspoonground cinnamon
Scant ¼teaspoon fine sea salt
6tablespoons (85g)cold, unsalted butter, cubed
Cake
1 ⅔cups (213g)all purpose flour, sifted
2teaspoonsbaking powder
½teaspoonfine sea salt
½cup (113g)unsalted butter, softened
1cup (200g)sugar
2largeeggs, room temperature
1 ½teaspoonspure vanilla extract
½cup (118ml)whole milk, room temperature
⅓cup (75g)sour cream, room temperature
Icing
2cups (234g)powdered sugar, sifted
2 tablespoons (28g)unsalted butter, melted
½teaspoonvanilla bean paste or pure vanilla extract
1pinchfine sea salt
3-4tablespoons (45-60ml)half & half cream, room temperature
Instructions
Apples
In a large skillet, melt the butter over medium heat. Add the apples, sugar and cinnamon.
Cook, stirring occasionally, until the apples are tender, about 7-10 minutes. Transfer the apples to a bowl and let cool to room temperature.
Crumb Topping
In a medium bowl, mix the flour, brown sugar, sugar, cinnamon and salt.
Work in the butter with your fingertips until the mixture looks like wet sand with no large pieces of butter remaining. Press together to make 1/2-inch chunks.
Cake
Preheat the oven to 325ºF (165ºC). Line a 9-inch cake pan with a removable bottom*, or a 9-inch springform pan, with parchment paper. Wrap the bottom of the cake pan with aluminum foil and place pan on a baking sheet.
In a medium bowl, whisk together the flour, baking powder and salt until well blended.
In a large bowl, cream the butter and sugar, with an electric mixer on medium speed, until light and fluffy. Beat the eggs and vanilla into the butter mixture in three separate addition, making sure each addition is incorporated before adding the next.
In a small bowl, whisk the milk and sour cream together. On low speed, beat the flour mixture into batter in three additions, alternating with milk mixture. Mix just until combined.
Transfer the batter to the prepared cake pan. Smooth the top with a spatula. Drain any excess liquid from the apples. Top the cake batter evenly with apples, then the topping mixture.
Bake until a toothpick inserted into the center of the cake comes out clean, about 50-60 minutes. Cool the cake in pan for 10 minutes. Remove the cake from pan and transfer it to a cooling rack to cool completely.
Icing
In a medium bowl, whisk together the powdered sugar, melted butter, vanilla, salt and 2 tablespoons (30ml) of half & half. Add additional half & half until the desired consistency is reached. Drizzle over the cooled cake.
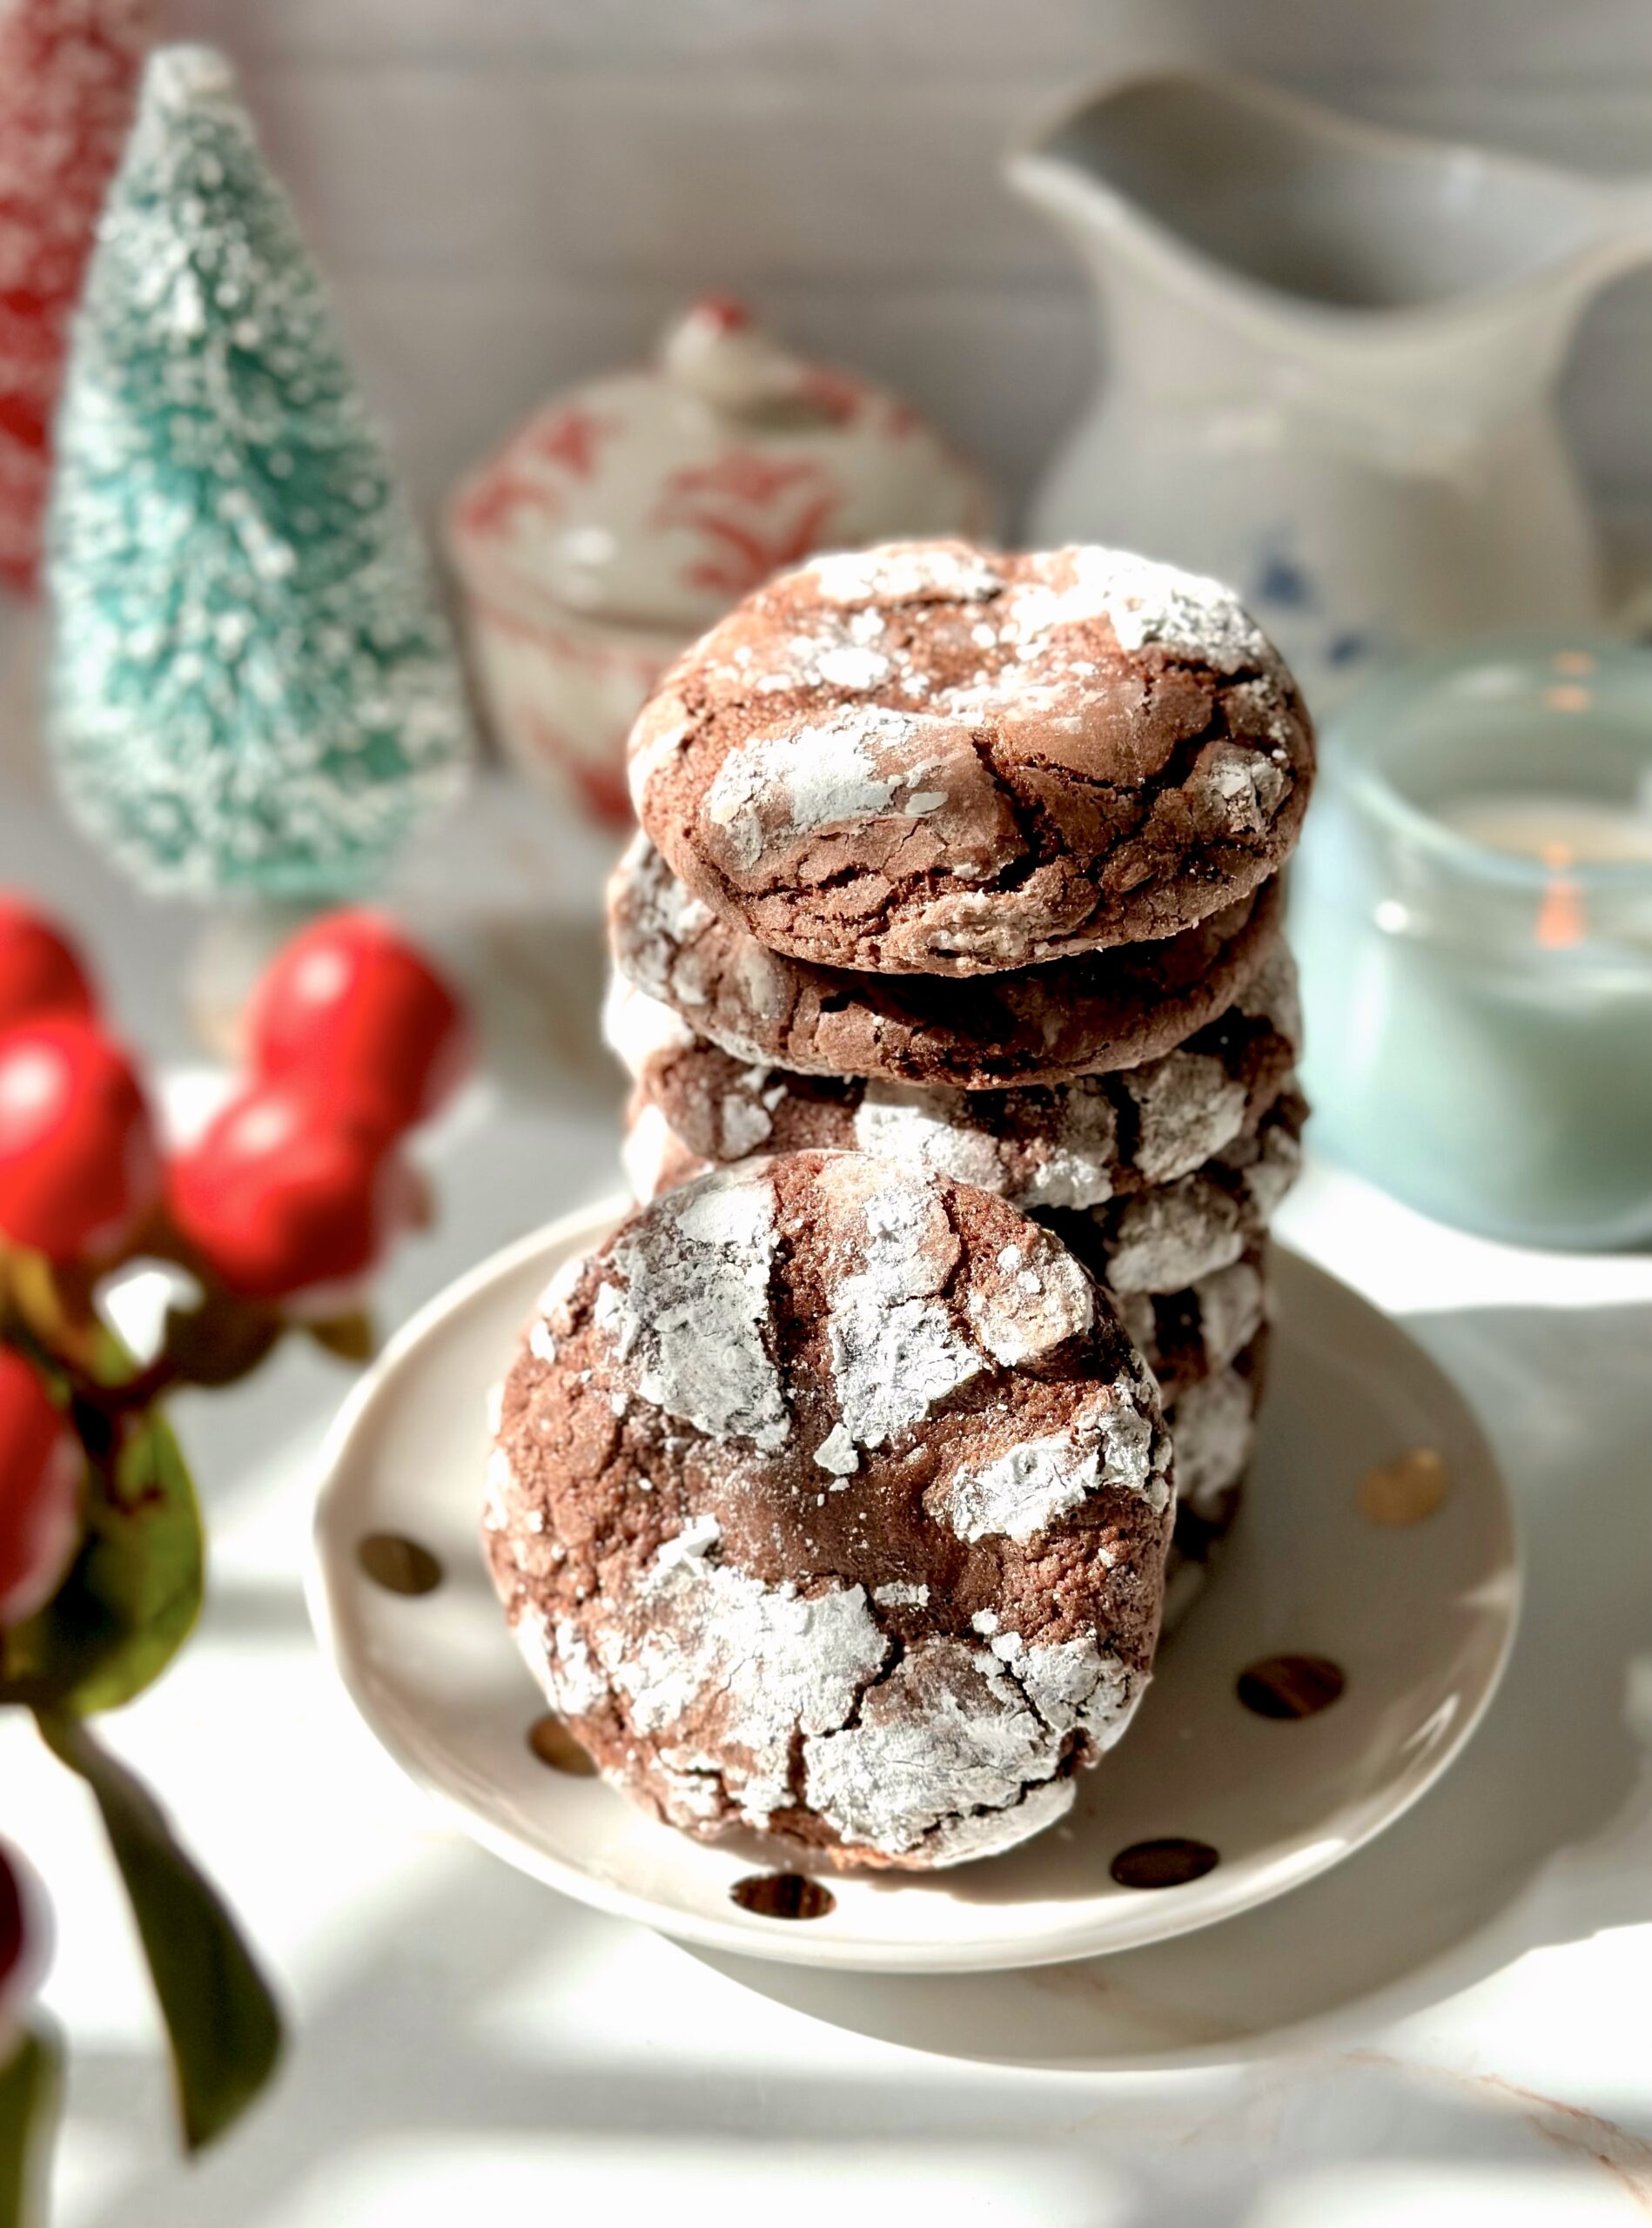
Chocolate Crinkle Cookies are traditional holiday cookies, probably because of the pretty, crackly powdered sugar covered exterior that reminds us of snow. They always seem to show up on cookie trays at Christmas time and I’ve loved them since I was a child. I decided to take my old favorites to another level by adding a surprise inside! Two years ago, I made some cookies with fudge filling that my family and friends raved over. They’re my Marshmallow Mudslide Cookies. To view the recipe, click here. I used the same concept for these Chocolate Crinkle Cookies. I filled them with a simple, smooth fudge filling that stays soft at room temperature. The results were absolutely delicious!
Fudge Filled Chocolate Crinkle Cookies
Chocolate crinkle cookies with a smooth fudge filling that stays soft at room temperature
2tablespoonsunsweetened cocoa powder, preferably Dutch process
1 ½teaspoonsbaking powder
½teaspoonfine sea salt
⅓cup (2 5/8 ounces)unsalted butter, softened
2 ½cups (9 5/8 ounces)powdered sugar, sifted and divided
2largeeggs
1 teaspoonpure vanilla extract
2ounces unsweetened chocolate, melted and cooled to room temperature
Instructions
Fudge Filling
In a double boiler or in the microwave*, melt chocolate chips and sweetened condensed milk together until smooth. Set aside to cool while preparing cookie dough.
Cover and refrigerate for two hours. Roll filling into 1-inch balls.
Chocolate Crinkle Cookies
In a medium bowl, whisk together flour, cocoa powder, baking powder and salt.
In a large bowl, beat butter with an electric mixer until light and fluffy.
Gradually beat in 2 cups (7 3/4 ounces) of powdered sugar until well combined. Set aside remaining 1/2 cup powdered sugar in a shallow dish.
Beat in eggs and vanilla in three separate additions, until smooth. Stop to scrape bowl as needed.
Beat in melted chocolate until combined. Beat in flour mixture just until combined.
Cover and refrigerate dough for 2 hours. Don't skip this step.
Preheat oven to 350ºF. Line two large baking sheets with parchment paper.
Roll dough into 15 2-inch balls, 1 1/4 ounce each. Flatten each ball into a 3-inch disk. Place a fudge ball in the center of each disk and wrap dough around it, pinching edges together to seal. Roll dough balls generously in remaining powdered sugar.
Place dough balls three inches apart on prepared baking sheets. Bake until cookies puff up and tops are set, about 11-13 minutes. Transfer cookies to a cooling rack.
Notes
*To melt fudge filling in microwave, heat for 30 seconds. Stir, then microwave for 10 second intervals, stirring until melted.MAKE AHEAD INSTRUCTIONS: To make cookie dough one day ahead, prepare cookie dough. Cover the surface with plastic wrap and refrigerate in a covered container up to 24 hours. To make fudge filling one day ahead, prepare filling and chill for 1 1/2 to 2 hours. Roll filling into 1-inch balls and place on a parchment lined tray. Cover tightly with plastic wrap and refrigerate up to 24 hours.
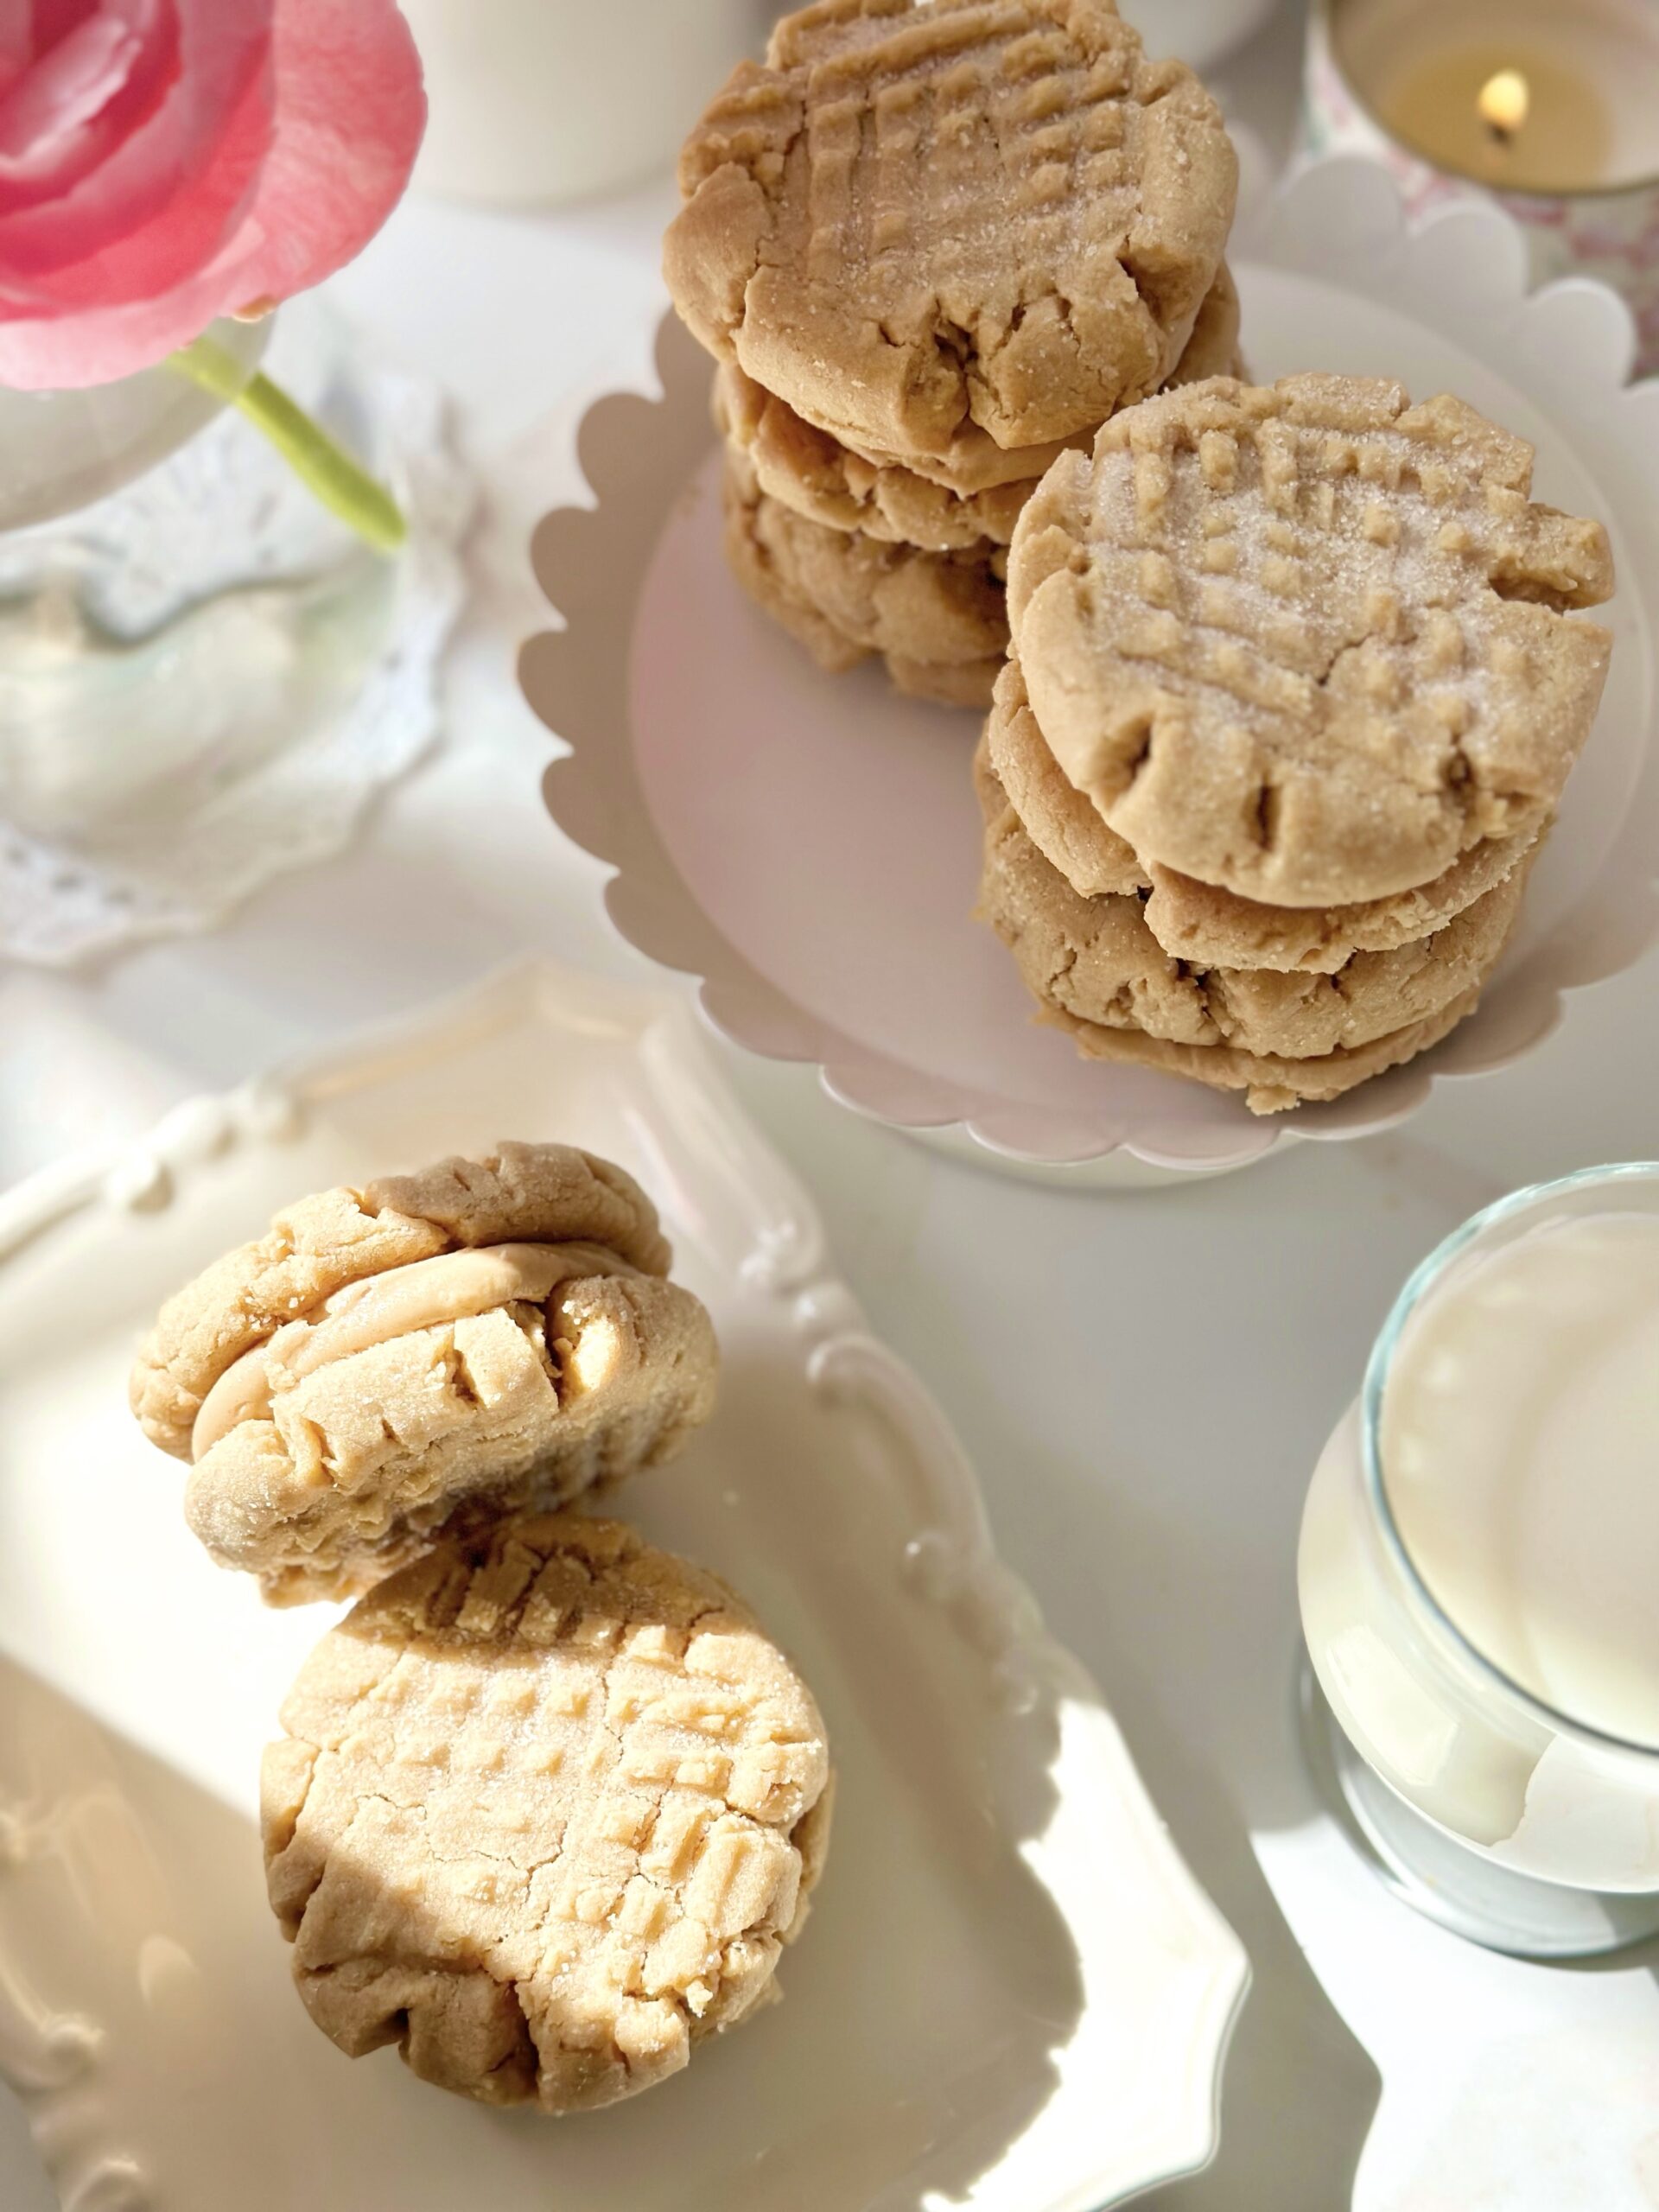
I never imagined that I’d ever be posting a peanut butter cookie recipe. There are already crunchy peanut butter cookies, soft ones, chewy ones, and those peanut shaped store bought ones out there. I mean, do we even need another peanut butter cookie recipe? After I tasted this one, it’s a resounding YES! These soft, tender cookies combined with a silky, smooth filling are a new peanut butter experience that I had to share.
The key to getting the soft texture in the cookie, without being dry, is cake flour. So don’t substitute it, because it’s vital to achieve the correct texture. Make sure to weigh your flour for the most accurate results. The second important ingredient is heavy whipping cream. Just a little added to the filling gives it a luxurious, silky texture.
This recipe makes sixteen medium size peanut butter cookies, which will give you eight sandwiches. If you want more, you can double the recipe or make the cookies smaller. Smaller cookies will have a shorter baking time.
2 ½tablespoons (37ml)heavy whipping cream, room temperature
¼teaspoonpure vanilla extract
1pinchfine sea salt
Instructions
Peanut Butter Cookies
Preheat the oven to 350ºF (180ºC). Line two large baking sheets with parchment paper.
In a medium-sized bowl, whisk together the all purpose flour, cake flour, baking soda and salt until well blended.
In a large bowl, beat the peanut butter, butter and shortening, with an electric mixer on low speed, until smooth. Beat in the egg and vanilla, on medium speed, until well combined.
Set aside 1/4 cup (50g) of the granulated sugar. Add the remaining granulate sugar and the brown sugar to the peanut butter mixture. Beat on medium speed, until light and fluffy. Add the flour mixture and beat on low speed, just until combined.
Roll the dough into 1 1/2-inch (3.8cm) diameter balls (about 1 1/4 oz or 35g each). Roll the dough balls in the reserved granulated sugar.
Place the dough balls 3 inches apart onto the prepared baking sheets. Flatten with a fork, making a criss cross pattern. Bake until the cookies are puffy and start to crack around the edges, about 9-11 minutes.
Let the cookies cool on baking sheet for 1 minute, then carefully transfer them to a cooling rack. The cookies will be fragile, but they will firm up as they cool.
Place a spoonful of filling on the bottoms of half of the cooled cookies. Top with remaining the remaining cookies.
Peanut Butter Filling
In medium-sized bowl, beat the peanut butter and butter together with an electric mixer until smooth and well blended. Beat in the powdered sugar, heavy cream, vanilla and salt until smooth.