Double Chocolate Oreo Muffins

Double Chocolate Oreo Muffins

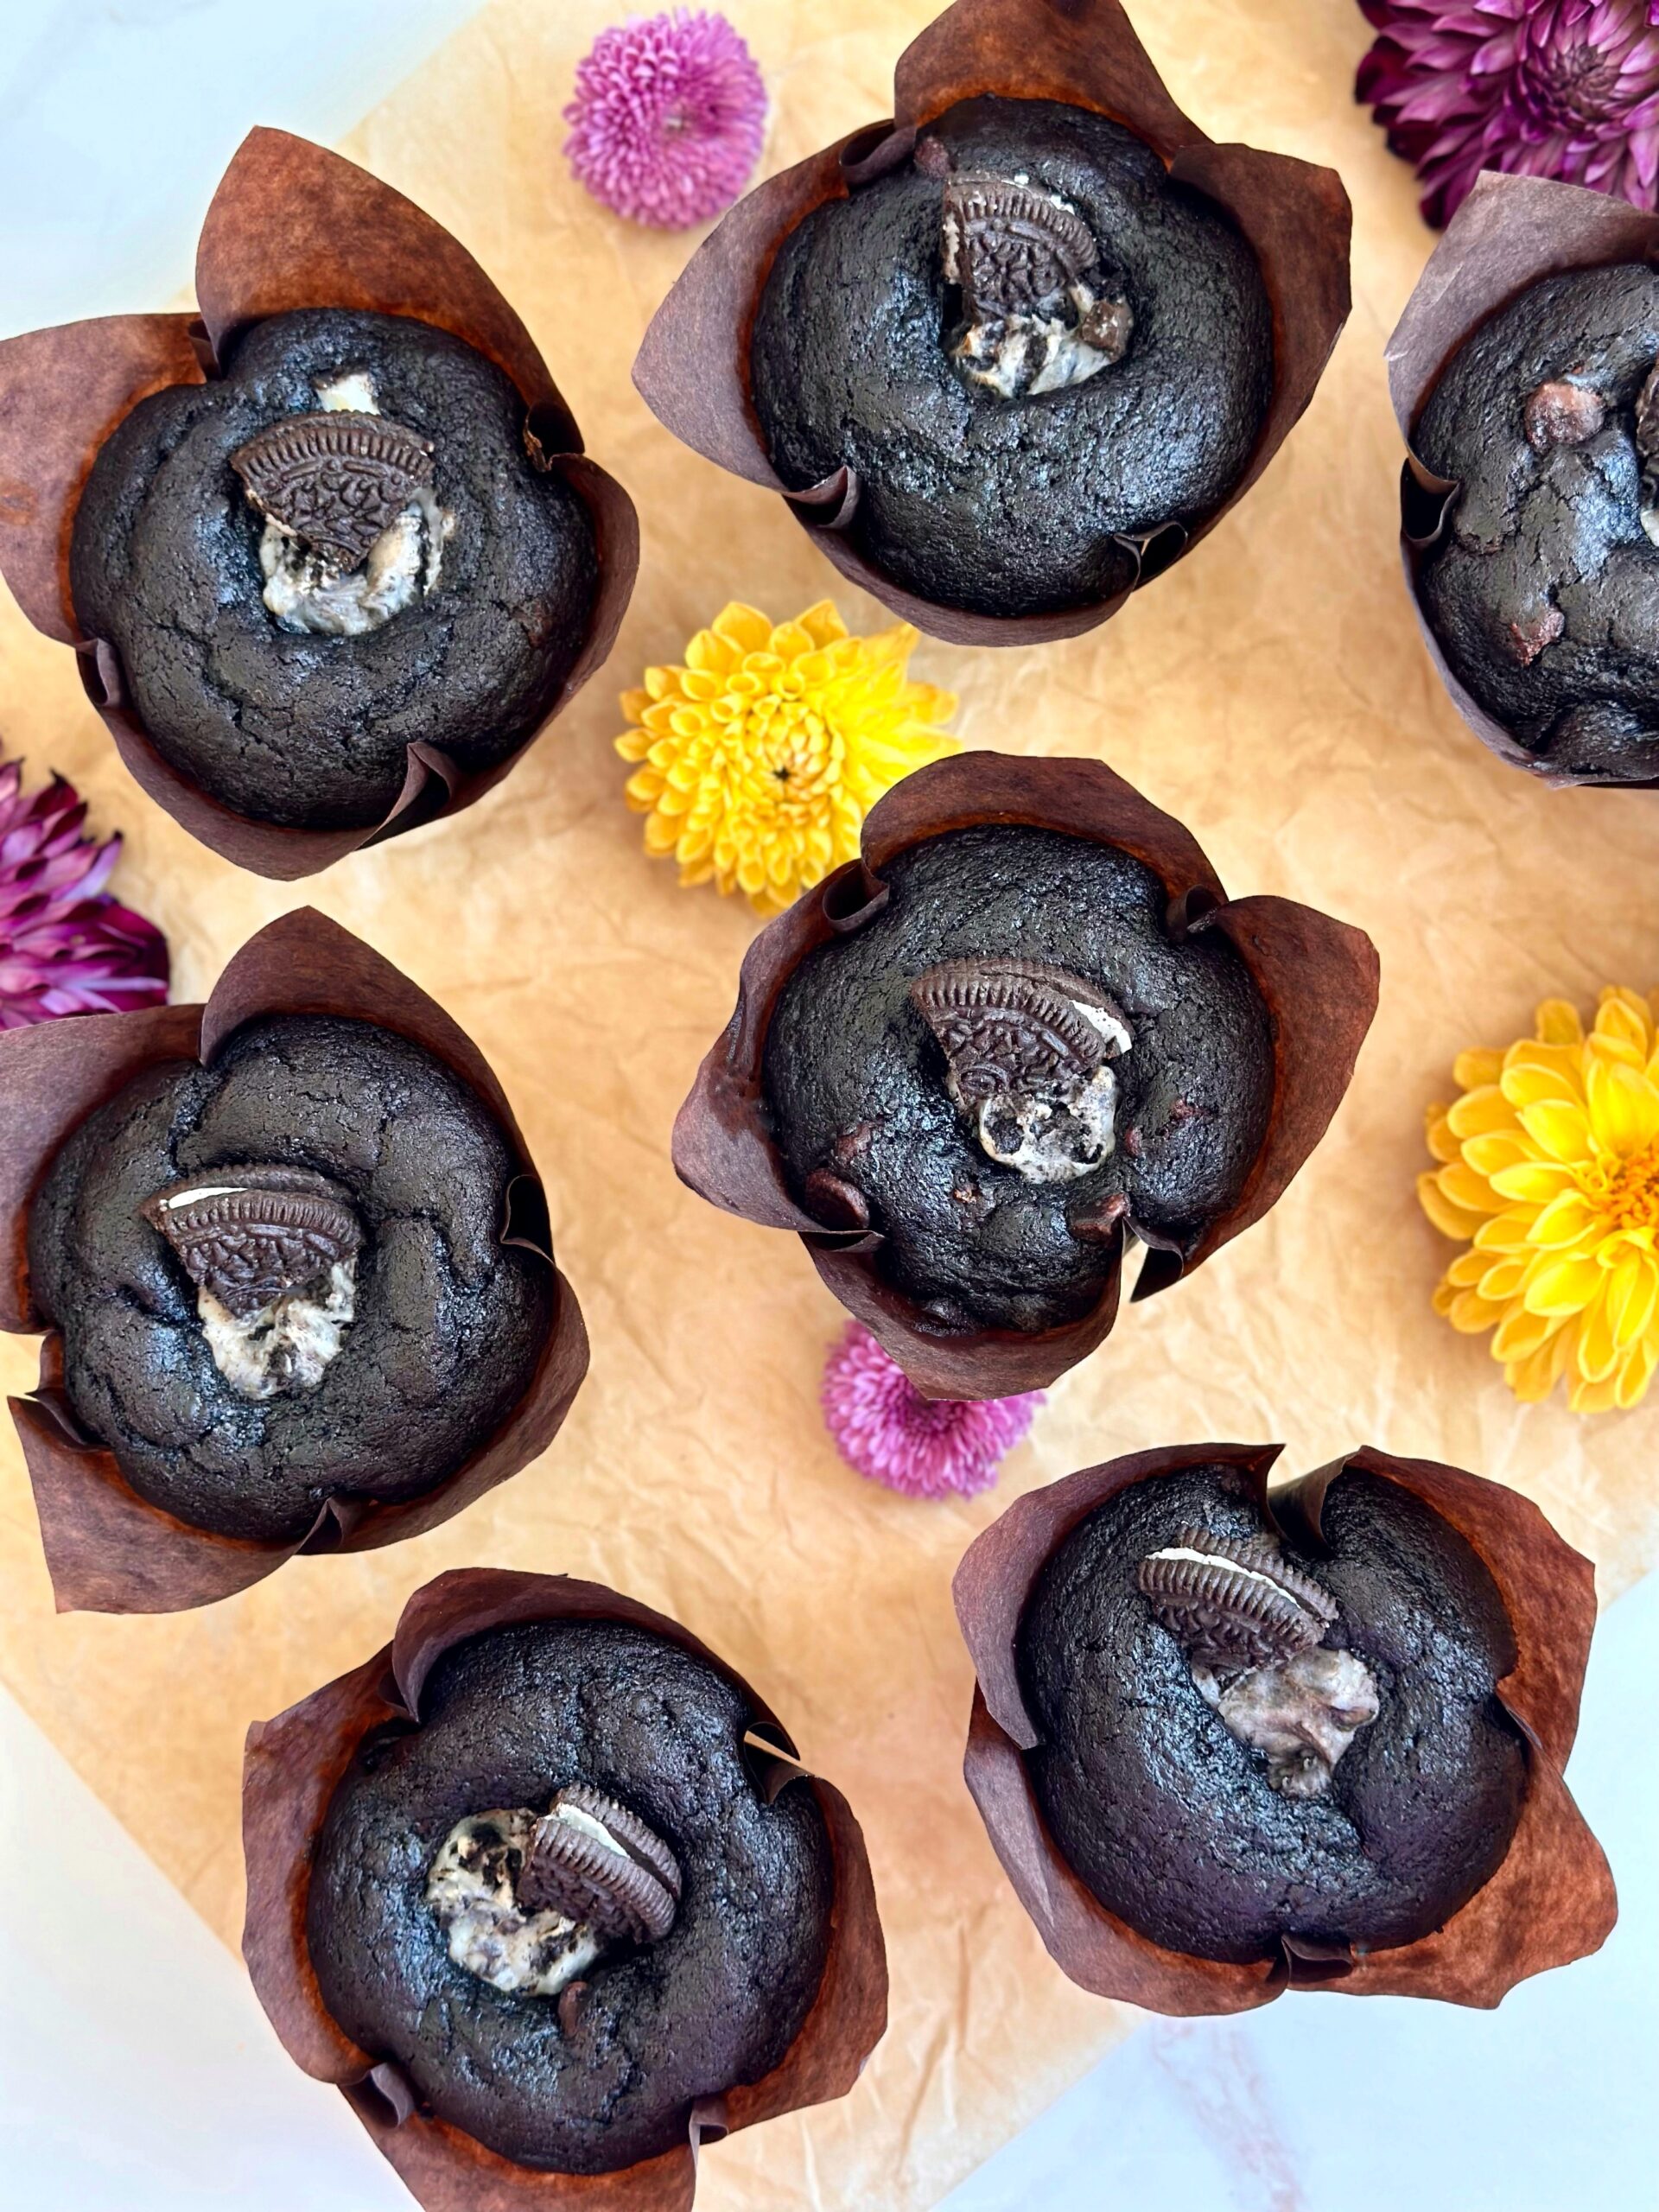
If you’re craving something sweet, decadent and intensely chocolate, these Double Chocolate Oreo Muffins might be just what you need. They were born when I had a craving for Double Chocolate Muffins, but I didn’t feel like driving all the way to my favorite cafe. I noticed the internet had an overwhelming number of chocolate muffin recipes, each one claiming to be the best. I said goodbye to the sea of chocolate muffin recipes and went to work on a muffin recipe that fulfilled my dream muffin wish. I used black cocoa powder to capture the Oreo essence, semisweet chocolate chips, for those little pools of melted chocolate throughout and a cookies and cream filling. I used tulip muffin liners* because they hold more batter so you end up with more generous sized muffins. They’re high recommended if you want to make the muffins exactly the way I made them.

The most challenging part of this recipe is testing for doneness, because you don’t want to over bake these. Insert a toothpick or a cake tester into the cake part of the muffins. If there are a few moist crumbs on it, that’s what you’re looking for. If there’s melted chocolate on it, you’ve likely hit a chocolate chip, so test again with a clean toothpick. If you see cake batter on the toothpick, the muffins need more time in the oven.

Double Chocolate Oreo Muffins

Dark chocolate muffins with semisweet chocolate chips and cookies and cream filling
Servings 12 muffins

Ingredients
  

Cookies & Cream Filling

  • ½ cup (113g) cream cheese, softened
  • 2 tablespoons (25g) sugar
  • ½ teaspoon pure vanilla extract
  • 4 Oreo chocolate sandwich cookies, coarsely chopped

Double Chocolate Muffins

  • 2 cups (255g) all purpose flour, sifted
  • ½ cup (56g) black or dark unsweetened cocoa powder, sifted
  • 2 teaspoons baking powder
  • ½ teaspoon baking soda
  • 1 teaspoon fine sea salt
  • 1 cup (200g) granulated sugar
  • ¼ cup (50g) packed brown sugar
  • â…” cup (152ml) vegetable oil or neutral oil of your choice
  • 2 large eggs, room temperature
  • 1 teaspoon pure vanilla extract
  • 1 cup (227g) sour cream, room temperature
  • â…“ cup (78ml) whole milk, room temperature
  • 1 â…“ cups (227g) semisweet chocolate chips
  • 3 Oreo chocolate sandwich cookies, quartered

Instructions
 

Cookies & Cream Filling

  • In a medium bowl, mix together the cream cheese, sugar and vanilla. Gently fold in the Oreos.

Double Chocolate Muffins

  • Preheat the oven to 400ºF (200ºC). Line a 12-serving muffin pan with tulip liners*
  • In a large bowl, whisk together the flour, cocoa powder, baking powder, baking soda and salt.
  • In a separate large bowl, whisk together the granulated sugar, brown sugar, oil, eggs, vanilla extract, sour cream and milk until well combined. Stir the wet ingredients into the dry ingredients just until combined. Do not over mix. Fold in the chocolate chips.
  • Scoop the batter evenly into the muffin cups, about 3 1/2 oz (99g) in each one. Scoop or spoon a scant tablespoon-size dollop of the filling into the center of each muffin.
  • Bake for 5 minutes, then turn the oven temperature down to 350ºF (180ºC). Continue baking until a toothpick inserted into the cake part of the muffins comes out with a few moist crumbs on it, about 7-10 more minutes. If the toothpick hits a melted chocolate chip, reinsert a clean toothpick and test again. Cool in the pan for 5 minutes, then transfer to a cooling rack. Top each muffin with a quarter piece of Oreo cookie.

Notes

*Tulip muffin liners are preferred. To find tulip muffin liners, click here. You can also make your own by pressing  6-inch squares of parchment paper into the muffin pan cups. If you want to use standard muffin liners, fill them 3/4 full and use less filling. Standard muffin liners hold less batter so you'll end up with a a couple of extra muffins.  Keep in mind that the baking time will be shorter.
Keyword double chocolate oreo, muffins

Caramel Apple Crumble Bars

Although we have access to apples year around, apple season is my favorite time to bake with apples. I love the opportunity to go apple picking or choosing fresh apples from the abundance of apples available at farmers markets. Baking with apples makes your home smell cozy and delightful, especially when paired with cinnamon. These Caramel Apple Crumble Bars have the autumn flavors you’re craving. They’re the apple version of my popular Blueberry Crumble Bars and they’re equally delicious.

This recipe requires multiple steps, but the steps are all very easy. The apples are cooked briefly on the stovetop to achieve the perfect texture. The crust is par-baked to keep it crisp. The caramel is drizzled over the apples which helps keep them juicy and we all know what a perfect match apples and caramel are! Adding the caramel to the apples, rather than drizzling it over the top of the crumble topping also keeps the topping crisp. I like using tart green apples for this recipe, such as Granny Smith or Golden Delicious, or a combination of green and red apples, but you can use any baking apples that you prefer.

Caramel Apple Crumble Bars

Fresh apple cinnamon filling and caramel on a crisp, buttery shortbread base with a generous crumble topping
Course Dessert
Servings 16 2-inch bars

Ingredients
  

Apples

  • 4 cups (16 oz or 454g) chopped, peeled fresh baking apples I used a combination of Granny Smith and Fuji
  • 1 tablespoon (15ml) lemon juice
  • 1 ½ tablespoons (21g) butter
  • 2 tablespoons (25g) granulated sugar
  • ½ teaspoon ground cinnamon
  • 1 pinch fine sea salt
  • ½ cup (160g) caramel sauce or salted caramel sauce* purchased or homemade

Crumb Topping

  • 1 cup (128g) all purpose flour
  • â…“ cup (67g) packed brown sugar
  • 3 tablespoons (38g) granulated sugar
  • ½ teaspoon ground cinnamon
  • ¼ teaspoon fine sea salt
  • 6 tablespoons (85g) cold, unsalted butter, cubed

Crust

  • 1 ½ cups (191g) all purpose flour
  • ¼ cup plus 2 tablespoons (43g) powdered sugar plus extra for sprinkling on top
  • 1 teaspoon baking powder
  • ½ teaspoon fine sea salt
  • ¾ cup (170g) unsalted butter, softened

Instructions
 

Filling

  • In a large bowl, toss the apples with the lemon juice.
  • In a large skillet, melt the butter over medium heat. Add the apples, sugar, cinnamon and salt. Cook, stirring occasionally until the apples are tender, about 10-12 minutes. Set aside to cool.

Crumble Topping

  • In a medium bowl, whisk together the flour, brown sugar, sugar, cinnamon and salt until well blended. Work the cold butter into the flour mixture with a pastry blender or with your fingertips until it looks sandy. Press together to form chunks. Set aside in the refrigerator until ready to use.

Crust and Assembly

  • Preheat the oven to 350ºF. (180ºC). Line an 8-inch square baking pan** with parchment paper.
  • In a medium bowl, whisk together the flour, powdered sugar, baking powder and salt until well blended.
  • In a large bowl, beat the butter, with an electric mixer at medium speed, until smooth. Add the flour mixture and beat just until the dough comes together.
  • Press the dough into the prepared baking pan. (To press the dough evenly into the pan, it's helpful to place a piece of parchment paper over the dough when you are pressing it into the pan. Remove the parchment before baking.) Bake until the surface looks evenly light golden brown, about 20-22 minutes. Remove from the oven. Top with the cooked apples. Drizzle with caramel sauce. Top with the crumb topping. Return the pan to the oven and continue baking until the topping looks golden brown and the filling starts to bubble, about 25-28 minutes.
  • Let cool completely in the pan. Dust the cooled bars with powdered sugar.

Notes

*For an easy caramel sauce recipe, click here. For my favorite homemade caramel sauce recipe, click here.
**To find the baking pan I used, click here.
Keyword bars, caramel apple

Blueberry Pecan Banana Bread

This banana bread was a happy accident. One morning, I wanted to make banana bread but my recipe called for three over-ripe bananas. I realized that I only had two, so I changed my recipe, adding blueberries, toasted pecans, a pecan crumb topping and a brown sugar cinnamon glaze. The results were so tender, moist and delicious that I can confidently say this is the best banana bread I’ve ever tasted. And I’ve tasted a lot of banana bread. I’ve tried many different recipes and tasted loaves baked by other people. I also like picking up a slice of banana bread at bakeries and coffee shops sometimes, alongside my coffee or tea.

The three biggest problems I typically see with banana bread are rubbery texture, dry texture or bland flavor. Over mixing can cause a rubbery loaf, so when you add your dry ingredients to the batter, mix it just until the flour is incorporated, to avoid excess gluten formation. To avoid a dry loaf, make sure not to over bake it. Test it before you think it might be done. When measuring your dry ingredients, weigh them for the best results. Sometimes people inadvertently add too much or too little flour when using measuring cups.

For the best flavor and sweetness, make sure to use very ripe bananas when making banana bread. I like to use bananas that are soft and covered with brown spots. I avoid the black, oozing bananas, even though you may see people on social media recommending them for use. These are technically rotten bananas and can give your banana bread an unpleasant fermented flavor. The toasted pecans in this recipe add texture and a rustic nutty flavor. Even people who don’t like nuts tend to appreciate them in this banana bread. But you can certainly leave them out if you like. The addition of cinnamon, nutmeg and vanilla also add lovely flavor to this loaf. This banana bread is quite delicious on its own, but the crumb topping and brown sugar glaze take it over the top!


Blueberry Pecan Banana Bread

by Mari Vasseur
Moist tender banana bread with blueberries and toasted pecans, topped with pecan crumb topping and brown sugar cinnamon glaze.
Course Breakfast, Brunch, Dessert
Servings 1 loaf

Ingredients
  

Crumb Topping

  • â…“ cup (1 1/2 oz 43g) all purpose flour
  • â…“ cup (67g) packed brown sugar
  • ¼ teaspoon ground cinnamon
  • pinch fine sea salt
  • 2 ½ tablespoons (64g) cold, unsalted butter, cubed
  • 2 tablespoons (14g) chopped pecans

Blueberry Pecan Banana Bread

  • 1 ½ cups (191g) all purpose flour, sifted (plus 2 teaspoons for the blueberries)
  • 1 teaspoon baking powder
  • ½ teaspoon baking soda
  • ½ teaspoon fine sea salt
  • ½ teaspoon ground cinnamon
  • ¼ teaspoon ground nutmeg, preferably freshly ground
  • 1 cup (200g) packed brown sugar
  • â…“ cup (70ml) vegetable oil or neutral oil of your choice
  • 2 large eggs
  • ½ cup (113g) sour cream or full fat Greek yogurt
  • 1 ½ teaspoons pure vanilla extract
  • ¾ cups ( 175g) mashed over-ripe bananas (about 2 medium bananas)
  • ½ cup (60g) coarsely chopped toasted pecans
  • Generous 1 cup (170g) blueberries
  • 1 teaspoon lemon juice

Brown Sugar Cinnamon Glaze

  • ¼ cup (50g) packed brown sugar
  • 2 tablespoons (28g) unsalted butter
  • ¼ teaspoon cinnamon
  • 1 pinch fine sea salt
  • 2 tablespoons (30ml) heavy whipping cream
  • ¼ teaspoon pure vanilla extract
  • 1 tablespoon powdered sugar, sifted

Instructions
 

Crumble Topping

  • In a medium bowl, combine the flour, brown sugar, cinnamon and salt. Work in the butter with your fingertips until the mixture looks sandy with no large pieces of butter remaining. Mix in the pecans. Press the mixture to together to form chunks. Set aside in the refrigerator until ready to use.

Blueberry Pecan Banana Bread

  • Preheat the oven to 325ºF (165ºC). Line the bottom a 9 x 5-inch loaf pan* with parchment paper. Grease and flour the insides.
  • In a medium bowl, whisk together the flour, baking powder, baking soda, salt, cinnamon and nutmeg until well blended.
  • In a large bowl, whisk together the brown sugar, oil, eggs, sour cream and vanilla until creamy and well blended. Stir in the bananas until incorporated. Mix in the flour mixture just until combined. Do not over mix. Stir in the pecans.
  • In a small bowl, gently toss the blueberries with the lemon juice, then toss them with 2 teaspoons of flour. Fold 3/4 of the blueberries into the batter. Transfer the batter to the prepared loaf pan. Top with the remaining blueberries, then the crumb topping.
  • Bake until a toothpick inserted into the center of the loaf comes out clean, about 55-60 minutes. Cool in the pan for 10 minutes, then remove the loaf from the pan and transfer to a cooling rack to cool completely.

Brown Sugar Cinnamon Glaze

  • In a small saucepan, whisk the brown sugar, butter, cinnamon and salt together over medium heat until the sugar dissolves and the edges start to bubble. Remove from heat and whisk in the heavy cream, vanilla and powdered sugar until smooth. Set aside to cool slightly. Drizzle over the cooled banana bread.

Notes

*To find the loaf pan I used, click here.
Keyword blueberry pecan banana, loaf

Mini Pumpkin Bear Muffins

Mini Pumpkin Bear Muffins

These cute little bear-shaped pumpkin muffins are almost too cute to eat. But if you try one, it’ll be gobbled up without hesitation because they’re so moist, fluffy and delicious! The cinnamon sugar coating gives them the perfect fall flavor and a subtle crunch. I used cream cheese icing to form the snouts and melted chocolate for the eyes and noses. You can also use melted chocolate chips or candy melts to decorate their faces if you prefer. I used a bear-shaped mini muffin pan, which is also called a Madeleine pan or a financier pan. To find a bear mini muffin pan, click here. A standard mini muffin pan will also work, but the muffins won’t be bear-shaped. If you end up using a standard mini muffin pan, you can add round, flat candies to form the ears.

To watch the TikTok video of Mini Pumpkin Bear Muffins being made, click here.

To watch the Instagram video of Mini Pumpkin Bear Muffins being made, click here.

Mini Pumpkin Bear Muffins

Moist, fluffy bear-shaped pumpkin mini muffins with cream cheese icing snouts
Course Breakfast, Brunch
Servings 18 mini muffins

Ingredients
  

Mini Pumpkin Bear Muffins

  • 1 cup (4 1/2 oz or 128g) all purpose flour, sifted
  • 1 teaspoon baking powder
  • ¼ teaspoon baking soda
  • ¼ teaspoon fine sea salt
  • 1 teaspoon ground cinnamon
  • ½ teaspoon ground ginger
  • ¼ teaspoon ground nutmeg preferably freshly ground
  • ½ cup (3 1/2 oz or 100g) packed brown sugar
  • ¼ cup (1 3/4 oz or 52ml) vegetable oil or neutral oil of your choice
  • 1 large egg
  • ¾ cup (6 oz or 170g) pure pumpkin purée not pie filling

Cinnamon Sugar

  • ½ cup (3 1/2 oz or 100g) sugar
  • 1 ¼ teaspoons ground cinnamon
  • ¼ cup (2 oz or 57g) melted butter

Bear Faces

  • 1 teaspoon butter, softened
  • 1 teaspoon cream cheese, softened
  • â…“ cup (1 3/8 oz or 38g) powdered sugar, sifted
  • â…› cup melted chocolate, chocolate chips or candy melts
  • 1/2-1 ½ teaspoons whole milk

Instructions
 

Mini Pumpkin Bear Muffins

  • Preheat the oven to 325ºF (165ºC). Grease and flour a bear-shaped mini muffin pan. (This recipe also works in a mini muffin pan but the muffins won't be bear shaped.)
  • In a medium bowl, whisk together the flour, baking powder, baking soda, salt, cinnamon, ginger and nutmeg.
  • In a large bowl, whisk together the brown sugar, oil and egg until smooth and well combined. Mix in the pumpkin purée until incorporated. Stir in the flour mixture just until combined.
  • Scoop or pipe the batter into the muffin pan, filling the cups 2/3 full (about 3/4 oz or 21g in each). Use a small offset spatula to smooth the top of the batter, making sure to get batter into the ears.
  • Bake until a toothpick inserted into the center of the muffins comes out clean, about 9-11 minutes. Let the muffins cool in the pan for 5 minutes then remove them from the pan and transfer to a cooling rack.
  • Clean the pan and repeat with the remaining batter.

Cinnamon Sugar

  • In a small bowl, whisk together the sugar and cinnamon until well combined. Brush the warm muffins with with melted butter using a small pastry brush. Coat them with the cinnamon sugar mixture.

Bear Faces

  • In a small bowl, beat the butter, cream cheese, powdered sugar and 1/2 teaspoon of milk until smooth. Add more milk as needed.
  • Transfer the icing to a piping bag fitted with a medium round tip or snip off the end of the piping bag making a 1/4-inch wide opening. Pipe a small blob of icing onto each bear's face to form the snouts.
  • Transfer the melted chocolate to a piping bag fitted with a small round tip or snip off the end of the piping bag making a 1/16-inch wide opening. Pipe dots of chocolate onto the snouts to make the noses. Pipe dots or curved lines to make the eyes. Alternately you can apply the melted chocolate dots with the tip of a toothpick

Notes

*To find a bear-shaped mini muffin pan, click here.
Keyword muffins, pumpkin

Pumpkin Cinnamon Roll Cakes

Summer was such a happy season for me as a child that I didn’t want it to end. I still love summer, but now that I’m an adult, I begin to anticipate fall right around the time when I’m tired of harsh, hot temperatures, rumbling air conditioners and flies buzzing around at cookouts. Now is that time for me. It’s so hot where I live right now, that I’m welcoming the cool, crisp fall weather and all it brings.

The beautiful warm flavors of fall are perfectly captured in these Pumpkin Cinnamon Roll Cakes. The moist, perfectly spiced cakes are topped with a cinnamon swirl which is basically cinnamon roll filling. I topped them with Vanilla Bean Icing, but you can also make it cream cheese icing by swapping out 1 tablespoon of the melted butter for 1 tablespoon of softened cream cheese, if you prefer. The optional addition of meringue powder helps the icing set up and gives it that crunch we love on glazed donuts. To find meringue powder, click here.

I used a shallow jumbo muffin pan to make these cakes. The muffin cups are 4 inches wide and 1 inch deep. A hamburger bun pan for 4-inch buns or six 4-inch cake pans will also work. To find the pan I used, click here.

Pumpkin Cinnamon Roll Cakes

Moist pumpkin cakes with cinnamon swirls and vanilla bean icing
Course Breakfast, Brunch, Dessert
Servings 6 4-inch cakes

Ingredients
  

Pumpkin Cakes

  • 1 cup (4 1/2 oz or 128g) all purpose flour, sifted
  • 1 teaspoon baking powder
  • ½ teaspoon baking soda
  • ½ teaspoon fine sea salt
  • 1 teaspoon ground cinnamon
  • ½ teaspoon ground ginger
  • ¼ teaspoon ground nutmeg preferably freshly ground
  • 1 cup (7 oz or 200g) sugar
  • â…” cup (4 5/8 oz or 145ml) vegetable oil or neutral oil of your choice
  • 2 large eggs
  • 1 teaspoon pure vanilla extract
  • 1 cup (8 1/4 oz or 234g) pure pumpkin purée (not pumpkin pie filling)

Cinnamon Swirl

  • ½ cup (3 1/2 oz or 100g) packed brown sugar
  • 1 tablespoon all purpose flour
  • 2 ½ teaspoons ground cinnamon
  • pinch fine sea salt
  • ¼ cup (2 oz or 57g) unsalted butter, melted

Vanilla Bean Icing

  • 2 tablespoons (1 oz or 28g) unsalted butter, melted
  • ½ teaspoon vanilla bean paste
  • ½ cup (2 1/8 oz or 60g) powdered sugar
  • ½ teaspoon meringue powder optional
  • pinch fine sea salt
  • 2-3 tablespoons (30-45ml) whole milk

Instructions
 

Pumpkin Cakes

  • Preheat the oven to 350ºF (180ºC). Line a 6-serving shallow jumbo muffin pan with jumbo muffin liners.* (The liners will fit by pressing them in around the inside bottom edges.) The muffin pan I used has cups that are 4-inches across by 1-inch deep. A hamburger bun pan for 4-inch buns or six 4-inch cake pans will also work.
  • In a medium-size bowl, whisk together the flour, baking powder, baking soda, salt, cinnamon, ginger and nutmeg until well combined.
  • In a large bowl, whisk together the sugar, oil, eggs and vanilla until smooth and well combined. Mix in the pumpkin purée. Stir in the flour in two additions, just until combined.
  • Transfer the batter to the muffin cups, evenly dividing the batter among the cups. Pipe the cinnamon swirl mixture in a spiral on the top of the batter of each one.
  • Bake until a toothpick inserted into the center of the cake part comes out clean, about 23-27 minutes. Let the cakes cool in the pan for 5 minutes, then transfer to a cooling rack.

Cinnamon Swirl

  • In a small bowl, whisk together the brown sugar, flour, cinnamon and salt. Add the melted butter and whisk until well combined.
  • Transfer the mixture to a piping bag fitted with a 1/4-inch wide round tip.

Vanilla Bean Icing

  • In a small bowl, whisk together the butter, vanilla bean paste, powdered sugar, meringue powder, salt and 1 tablespoon (15ml) of milk until well combined. Whisk in more milk as needed to reach your desired consistency.
  • Brush the icing on the cooled cakes with a small pastry brush or make the icing a little thinner and drizzle the icing on if you prefer.

Notes

*To find jumbo muffin liners, click here.
To find the baking pan I used, click here.
To find 4-inch cake pans, click here.
To find meringue powder click here.
Keyword cake, pumpkin cinnamon roll

Peanut Butter Chocolate Chip Bars

Peanut Butter Chocolate Chip Bars by Mari Vasseur

The combination of peanut butter and chocolate feels so nostalgic to me. This is a beloved recipe from my childhood with those comforting flavors. We used to make these delicious Peanut Butter Chocolate Chip Bars with melted chocolate chips on top, but I upgraded them with a silky chocolate glaze. My family always devours these easy-to-make, customizable bars. Feel free to add chopped peanuts, peanut butter chips or even a sprinkle of sea salt on top.

Peanut Butter Chocolate Chip Bars

by Mari Vasseur
Course Dessert
Servings 16 2-inch bars

Ingredients
  

Bars

  • 1 cup (128g) all purpose flour, sifted plus 1 teaspoon for the chocolate chips
  • 2 tablespoons (18g) cornstarch
  • 1 teaspoon baking powder
  • ¼ teaspoon fine sea salt
  • ¼ cup (57g) unsalted butter, room temperature
  • ½ cup (128g) creamy peanut butter
  • ¾ cup (150g) packed brown sugar
  • ¼ cup (50g) granulated sugar
  • 2 large eggs, room temperature
  • 1 ½ teaspoons pure vanilla extract
  • 1 cup (170g) semisweet chocolate chips

Glaze

  • ½ cup (71g) semisweet chocolate, chopped
  • 2 tablespoons (28g) unsalted butter
  • 1 teaspoon light corn syrup

Instructions
 

Bars

  • Preheat the oven to 350ºF (180ºC). Line the bottom of an 8-inch square baking pan with parchment paper. Grease and flour the insides.
  • In a medium-sized bowl, whisk together the flour, cornstarch, baking powder, and salt until well combined.
  • In a large bowl, beat the butter and peanut butter together, with an electric mixer, until smooth and well blended. Add the brown sugar and granulated sugar. Beat until light and fluffy. Beat in the eggs and vanilla extract in 3 separate additions, making sure each one is incorporated before adding the next. Stir in the flour mixture just until combined.
  • In a small bowl, toss the chocolate chips with 1 teaspoon of flour then stir them into the batter. Transfer the batter to the baking pan. Smooth the top with a spatula. Bake until the top is golden brown and a toothpick inserted into the center of the bars comes out with a few moist crumbs on it, about 20-25 minutes. Do not over bake. Let cool in the pan. Spread the chocolate glaze over the cooled bars.

Glaze

  • Combine the glaze ingredients in a heat-safe bowl set over a pan of gently simmering water, making sure the water doesn't touch the bottom of the bowl. Stir occasionally until melted and smooth.
Keyword bars, peanut butter chocolate chip

Pistachio Rose Croissants

Filled croissants are gaining more popularity due to social media. Bakeries and coffee shops offer croissants filled with fun and interesting fillings, but they can be pricey and hard to get. Have you ever stood in line at a popular bakery only to discover that the croissant you wanted was sold out? This recipe is a fun and easy way to duplicate a fancy bakery croissant using store bought croissants. This pistachio rose version is elegant and delicious!

Pistachio Rose Croissants

Croissants brushed with rose syrup, filled with buttery pistachio filling and topped with white chocolate, toasted pistachios and rose petals
Course Breakfast, Brunch, Dessert
Servings 4

Ingredients
  

  • ½ cup (100g) granulated sugar, divided
  • 1-1 ½ teaspoons rose water*
  • 4 medium croissants
  • 3 tablespoons (43g) unsalted butter, softened
  • â…› teaspoon fine sea salt
  • ½ teaspoon pure almond extract
  • ¼ teaspoon pure vanilla extract
  • ½ cup (56g) toasted pistachio flour
  • 1 tablespoon all purpose flour
  • 3 ounces (85g) white chocolate, chopped
  • 1 teaspoon coconut oil or vegetable oil
  • 1-2 drops oil based pink food coloring
  • 2 tablespoons (14g) chopped toasted pistachios for sprinkling
  • dried rose petals** for sprinkling

Instructions
 

  • Start by making the rose syrup. In a small saucepan combine 1/4 cup of the sugar with 1/4 cup of water over medium-low heat. Stir occasionally, just until the sugar dissolves. Remove from heat and stir in the rose water to taste.
  • Preheat the oven to 350ºF. (180ºC). Line a baking sheet with parchment paper.
  • In a medium bowl, beat the butter with the remaining 1/4 cup of sugar and the salt together by hand or with an eclectic mixer, until well combined. Beat in the egg, extracts, pistachio flour and all purpose flour until well combined.
  • Split the croissants in half with a serrated knife. Place the croissants on the prepared baking sheet, cut side up. Brush the croissants with the rose syrup. Spread the pistachio mixture on the bottom half of each croissant. Place the tops on the croissants.
  • Bake until the filling is set, about 25-30 minutes. If your croissants start to brown too much, cover them with aluminum foil tents during the last few minutes of baking. Transfer the croissants to a cooling rack.
  • Melt the white chocolate and oil together in a heat safe pan set over a pan of barely simmering water. Stir gently until smooth. Remove from heat. Stir in food coloring a little at a time until your desired shade is achieved. Drizzle the pink chocolate over the cooled croissants. Top with chopped pistachios and rose petals.

Notes

*To find rose water, click here.  If you don't like rose flavor, substitute the rose water with 1/2 teaspoon pure vanilla extract or 1/4 teaspoon pure almond extract.
**To find culinary rose petals, click here.
 
Keyword croissants, pistachio

Peach Crumble Pie Cookies

Peach Crumble Pie Cookies

I couldn’t decide whether to call these cookies or pies, so I made a compromise. They’re about the size of cookies, but they taste like little peach crumble pies. The base is tender like shortbread or pie crust and the filling is made with fresh peaches. I’ve seen people make something similar with jam and call them cookies, but since I used fresh fruit for these, they deserve to be elevated to pie status.

The peaches are macerated to draw out the excess juices, to help avoid making your cookies soggy. If you’re impatient, don’t be tempted to skip this step. It’ll go by fast as you prep the crumb topping and the remaining ingredients.

When I first made these, I used cupcake liners because I was worried that they might stick to the pan. It turns out that they stick to the cupcake liners more than the pan. So the next time I made them, I opted to lightly spray the pan with nonstick spray instead of using liners. I ran a small thin offset spatula around the perimeter of the cookies to loosen them from the pan and they popped out nicely.

I love topping these little peach delights with caramel sauce. Salted caramel is also a delicious addition. Or you can simply sprinkle them with powdered sugar if you prefer.

Peach Crumble Pie Cookies

Tender, peach-filled cookies with crumble topping and caramel drizzle
Servings 12 cookie tarts

Ingredients
  

Macerated Peaches

  • 1 ¼ cups (213g) chopped peaches
  • ¾ teaspoon lemon juice
  • ¼ cup (50g) packed brown sugar
  • ¼ teaspoon ground cinnamon
  • ¾ teaspoon cornstarch

Crumble Topping

  • ½ cup (64g) all purpose flour
  • 2 tablespoons sugar
  • 2 tablespoons packed brown sugar
  • ¼ teaspoon ground cinnamon
  • â…› teaspoon fine sea salt
  • 2 ½ tablespoons (35g) cold, unsalted butter, cubed

Cookies

  • 1 cup (128g) all purpose flour
  • ½ teaspoon baking powder
  • â…› teaspoon fine sea salt
  • 7 tablespoons ( 99g) unsalted butter, softened
  • ¼ cup (28g) powdered sugar

Topping

  • 3-4 tablespoons caramel sauce, purchased or homemade

Instructions
 

Macerated Peaches

  • In a medium bowl, toss the peaches with lemon juice. Add the brown sugar and cinnamon. Stir gently to combine. Let stand 30 minutes.
  • Drain the peaches, reserving 1 tablespoon of the juices. In a small bowl, whisk together the reserved peach juice with the corn starch. Mix with the drained peaches.

Crumble Topping

  • In a medium bowl, whisk together the flour, sugar, brown sugar, cinnamon and salt.
  • With your fingertips, work the butter into the flour mixture until it looks like wet sand. Press the mixture together to form chunks.

Cookies

  • Preheat the oven to 350ºF (180ºC). Lightly spray a 12-serving muffin pan with nonstick spray. (If you're concerned about the cookies sticking to the pan, see notes below.*)
  • In a medium bowl, whisk together the flour, baking powder and salt.
  • In a large bowl, beat the butter and powdered sugar with an electric mixer until light and fluffy.
  • Mix in the flour mixture on low speed or by hand, just until combined.
  • Press generous tablespoon size (about 20g each) portions of dough into the bottoms of the muffin pan cups with a pastry tamper dipped in flour. You can also use the bottom of a flat shot glass.
  • Top with the peaches, then the crumble topping mixture. Bake until the cookies are set and the topping is golden brown, about 15-17 minutes.
  • Cool the cookies completely in the pan. Once cool, remove the cookies from the pan by running a small offset spatula or paring knife around the inside perimeter of the muffin cups to loosen them. Drizzle with caramel sauce.

Notes

*You can line the bottoms of the muffin cups with 2-inch parchment circles to make sure your cookies release. I don't recommend cupcake liners because the cookies stick to the ridges of the liners. You can, however, cut the circles from the bottom of the cupcake liners if you don't have parchment paper.
Keyword cookies, peach

White Chocolate Peach Muffins

I have strong opinions about muffins. Maybe a little controversial too. When baked correctly, muffins should be soft, fluffy and tender. I get a little sad and disappointed when I buy a big, domed bakery muffin and the inside is rubbery. Many of the pretty muffins I see on social media are painfully rubbery too, as the creators break open a muffin in a dramatic moment of triumph. The muffin recipe I’m sharing here is tender and delicious if baked correctly.

One of the most important ways to achieve tender muffins is by not over mixing your batter once the flour is added. Muffins are technically cake, not bread, so we don’t want gluten formation. Another way to get tender muffins is to use an acidic ingredient such as sour cream, yogurt or buttermilk. Lastly, and very importantly, don’t over bake or under bake your muffins. Baking times in recipes are a guide and not necessarily exact because everyone’s ovens and baking pans are different. Keep an eye on your muffins and test them for doneness with a cake tester or a toothpick. My grandma used to say that when you start to smell them, they’re probably done or close to being done.

Soggy muffins also make me run the other way. Muffins loaded with too much fruit or fruit that hasn’t been macerated can make your muffins soggy or dense. In this recipe, I macerated the peaches to draw out some of the moisture, so it helps to avoid creating soggy spots in your muffins. The waiting time goes by fast as you prep the rest of your ingredients.

White Chocolate Peach Muffins

Tender muffins with white chocolate chips and chunks of fresh peaches.
Course Breakfast, Brunch
Servings 12 muffins

Ingredients
  

Macerated Peaches

  • 8 ounces (227g) chopped, ripe but firm peaches (about 1 1/3 cups)
  • 1 teaspoon lemon juice
  • 1 tablespoon packed brown sugar
  • ¼ teaspoon ground cinnamon
  • 1 teaspoon all purpose flour

Crumb Topping

  • ½ cup (2 1/4 oz or 64g) all purpose flour
  • 2 tablespoons sugar
  • 2 tablespoons packed brown sugar
  • â…› teaspoon ground cinnamon
  • â…› teaspoon fine sea salt
  • 2 ½ tablespoons cold, unsalted butter, cubed

Muffins

  • 2 ¼ cups (10 1/8 oz or 287g) all purpose flour, sifted, plus 1/2 teaspoon for the chips
  • 2 teaspoons baking powder
  • ½ teaspoon baking soda
  • ¾ teaspoon fine sea salt
  • â…œ teaspoon ground cinnamon
  • â…› teaspoon ground nutmeg, preferably freshly ground
  • ¾ cup (6 oz or 170g) unsalted butter, softened
  • 1 â…› cups (8 oz or 227g) sugar
  • 2 large eggs, room temperature
  • 1 teaspoon pure vanilla extract
  • ½ teaspoon pure almond extract
  • 1 cup (8 oz or 237ml) sour cream, room temperature
  • ¾ cup (4 1/2 oz or 128g) white chocolate chips
  • 1 or 2 squares white chocolate, broken into pieces optional

Instructions
 

Macerated Peaches

  • In a medium bowl, toss the peaches with lemon juice. Add the brown sugar and cinnamon and stir to combine. Let stand 30 minutes.
  • Drain the peaches well and toss with flour. Reserve 1/4 cup of peaches for the muffin tops.

Crumb Topping

  • In a medium bowl, whisk together the flour, sugar, brown sugar, cinnamon and salt.
  • With a pastry blender, or with your fingertips, work the butter into the flour mixture until it looks like wet sand. Press together to form chunks. Set aside in the refrigerator until ready to use.

Muffins

  • Preheat the oven to 375ºF (190ºC). Line a 12-serving muffin pan with tulip muffin liners.* (Tulip muffin liners are preferable because they hold more batter, but you can also use standard muffin liners.)
  • In a medium bowl, whisk together the flour, baking powder, baking soda, salt, cinnamon and nutmeg.
  • In a large bowl, beat the butter and sugar together until light and fluffy. Beat in the eggs and extracts in 3 separate additions, making sure each one is incorporated before adding the next.
  • Mix in the flour mixture with a wooden spoon or spatula, in two additions, followed by half of the sour cream after each addition. Mix just until combined. The batter will be thick.
  • Toss the white chocolate chips with flour, then fold them into the batter. Gently fold in the drained peaches.
  • Transfer batter to the prepared muffin pan, equally dividing the batter among the muffin cups. (If you're using standard muffin liners, fill them 2/3 full.) Top with the reserved peaches and the crumb topping. Optional: Top each muffin with a piece of white chocolate.
  • Bake muffins for 5 minutes. Turn down the oven heat to 350ºF (180ºC). Continue baking until the muffins are light golden brown and a toothpick inserted into the centers of the muffins comes out clean, about 15-20 more minutes. Cool in the pan for 5 minutes, then remove the muffins from the pan and continue cooling on a cooling rack.

Notes

*To find tulip muffin liners, click here.
 
Keyword muffins, white chocolate peach

Double Strawberry Mini Muffins

Double Strawberry Mini Muffins

These cute little pink muffins are the strawberriest muffins ever. I had to use a word that’s not even in the dictionary to describe them because these little gems are bursting with strawberry flavor. They’re made with fresh strawberry purée and finished with homemade strawberry sugar. The strawberry purée helps to make the muffins soft and moist on the inside and the strawberry sugar gives a nice crunchy texture and a bright strawberry flavor on the outside.

The strawberry sugar is made by pulverizing freeze dried strawberries together with sugar. Freeze dried strawberries are not the same as dried strawberries. You can find freeze dried strawberries at grocery markets, gourmet stores and online. They’re typically located near the nuts and dried fruit in most markets.

To watch the Instagram video of Double Strawberry Mini Muffins click here.

Double Strawberry Mini Muffins

Strawberry Mini Muffins Coated in Homemade Strawberry Sugar
Servings 24 mini muffins

Ingredients
  

  • 1 cup (200g) plus 2 tablespoons (25g) sugar, divided
  • ½ cup (14g) freeze dried strawberries not dried
  • 1 ½ cups (191g) all purpose flour, sifted
  • 1 ½ teaspoons baking powder
  • ½ teaspoon fine sea salt
  • â…“ cup (74ml) vegetable oil
  • 1 large egg
  • 1 teaspoon pure vanilla extract
  • ½ teaspoon pure strawberry extract
  • ½ cup (118ml) strawberry puree
  • 2 pea size drops pink gel food color optional
  • 6 tablespoons (85g) butter, melted

Instructions
 

  • Combine the freeze dried strawberries and 2 tablespoons (25g) of sugar in a small food processor or a clean spice grinder. Process until finely ground. Add 1/2 cup (3 1/2 oz or 100g) of sugar and pulse a few times until well combined. Place the strawberry sugar in a shallow bowl and set aside.
  • Preheat the oven to 350ºF (180ºC). Grease and flour a 24-serving mini muffin pan.** Do not skip this step and do not use liners. The muffins need to form a crust on the outside so they don't soak up too much butter in the final step.
  • In a medium bowl, whisk together the flour, baking powder and salt
  • In a large bowl, whisk together the remaining 1/2 cup (100g) of sugar with the oil, egg and extracts until smooth. Whisk in the strawberry purée until well combined.
  • Stir in the flour mixture with a rubber spatula, just until combined. The batter will be thick.
  • Transfer the batter evenly into the prepared muffin pan cups.
  • Bake until a toothpick inserted into the center of the muffins comes out clean, about 10-12 minutes. Do not over bake! Be diligent, since over baking can happen very quickly with mini muffins.
  • Let the muffins cool in the pan for 5 minutes. Turn the muffins out onto a cooling rack. Place the melted butter in a small bowl. Dunk the warm muffins briefly in the melted butter, then roll them in the strawberry sugar.

Notes

To find the gel food color I used, click here.
To find the mini muffin pan I used, click here.
Keyword muffins, strawberry

Brown Butter Nutella® Crispy Treats

Brown Butter Nutella® Crispy Treats

Course Dessert
Servings 12

Ingredients
  

  • ½ cup (113g) butter
  • 6 cups (170g) crispy rice cereal
  • 10 oz (283g) marshmallow
  • ¾ cup (198g) hazelnut cocoa spread such as Nutella®
  • ½ cup (85g) milk chocolate chips
  • 1 teaspoon coconut oil or any neutral oil of your choice
  • ½ cup (28g) chopped hazelnuts, toasted

Instructions
 

  • Butter an 8-inch square baking dish.
  • In a large light-colored saucepan, melt the butter over medium heat until golden brown and fragrant. When you start to see golden brown specks forming in the bottom of the pan, immediately turn the heat down to low and add the marshmallows. Stir until the marshmallows are melted, then stir in the rice cereal.
  • Using a sturdy buttered spatula, press the mixture into the baking dish.
  • Melt the hazelnut cocoa spread and the chocolate chips together in a heat safe bowl set over a pan of gently simmering water, making sure the water doesn't touch the bottom of the pan. Stir gently until melted and smooth. (Alternately, you can use the microwave to melt the mixture in short spurts.) Spread the melted chocolate mixture over the rice cereal treats. Sprinkle with hazelnuts.
Keyword bars, brown butter nutella crispy treats

Blueberry Lemon Crumb Cakes

Blueberry Lemon Crumb Cakes

The texture and flavor of these cute Blueberry Lemon Crumb Cakes is immaculate. You’ll love them so much, you won’t want to share, but this recipe makes six 4-inch personal crumb cakes, so you’ll have one all to yourself. You’ll understand once you taste the soft, fluffy lemon scented cake with juicy blueberries, a generous amount of sweet crumb topping and a lemony cream cheese icing. I was a bit hesitant to share this recipe. But I was taught to share recipes by my two grandmothers who were amazing cooks and bakers. They shared their knowledge and recipes with anyone who asked. Recipes are a legacy that should be passed on to family and friends. If you’re reading this, I consider you a friend. So enjoy this recipe that’s especially dear to me, because it’s based on my Grandma’s Apple Crumb Cake recipe.

I used a six serving shallow jumbo muffin pan to bake the cakes. The muffin cups are 4 inches across by 1 inch deep. To find the pan, click here. A hamburger bun pan for 4-inch buns will work too. If you happen to have six 4-inch cake pans, those work nicely. I used jumbo muffin liners to line the muffin cups, which fit perfectly by pressing them in around the inside bottom edges.

Blueberry Lemon Crumb Cakes

Fluffy, soft lemon cakes with blueberries, crumb topping and lemon cream cheese icing
Course Breakfast, Brunch, Dessert
Servings 6 4-inch crumb cakes

Ingredients
  

Crumb Topping

  • ¾ cup (96g) all purpose flour
  • â…“ cup (66g) granulated sugar
  • 2 tablespoons (25g) packed brown sugar
  • â…› teaspoon fine sea salt
  • 4 ½ tablespoons (64g) cold, unsalted butter, cubed

Crumb Cakes

  • 1 ¼ cups (159g) all purpose flour, sifted
  • 1 ½ teaspoons baking powder
  • â…œ teaspoon fine sea salt
  • 6 tablespoons (85g) unsalted butter, softened
  • ¾ cup (150g) granulated sugar
  • Zest of two medium lemons
  • 1 large egg, room temperature
  • 1 large egg yolk, room temperature
  • 1 teaspoon pure vanilla extract
  • ½ teaspoon pure lemon extract
  • â…“ cup (78ml) whole milk, room temperature
  • ¼ cup (57g) sour cream, room temperature
  • 1 cup (170g) blueberries
  • 1 teaspoon all purpose flour for blueberries

Cream Cheese Icing

  • 1 tablespoon (14g) cream cheese, softened
  • 1 tablespoon (14g) unsalted butter, melted
  • ¾ cup (85g) powdered sugar, sifted
  • 1 pinch fine sea salt
  • 2-3 tablespoons (30-45ml) fresh lemon juice

Instructions
 

Crumb Topping

  • In a medium bowl, whisk the flour, sugar, brown sugar and salt together.
  • Work in the butter with your fingertips until the mixture looks like the consistency of wet sand. Press the mixture together to make chunks. Set aside in the refrigerator until ready to use.

Crumb Cakes

  • Preheat the oven to 350ºF (180ºC). Line a 6-serving shallow jumbo muffin pan* with jumbo muffin liners.** Jumbo muffin liners will fit by pressing them around the inside bottom edges.
  • In a medium bowl, whisk together the flour, baking powder and salt.
  • In a large bowl, cream the butter, sugar and lemon zest with an electric mixer on medium speed, until light and fluffy.
  • Beat the egg and egg yolk into the butter mixture in 2 separate additions, making sure each addition is incorporated before adding the next. Beat in the extracts until combined.
  • In a small bowl, whisk the milk and sour cream together.
  • On low speed, mix the flour mixture into the batter in 2 additions alternating with half of the milk mixture after each addition. Beat just until combined.
  • Transfer the batter to the prepared baking pan, evenly distributing the batter and filling the cups about half full.
  • In a medium bowl, toss the blueberries with 1 teaspoon of flour and place them into the cups on top of the batter, about 1 ounce (28g) in each. Top each one with crumb topping.
  • Bake until a toothpick inserted into the center of the cakes comes out clean, about 25-30 minutes. Let the cakes cool in the pan for 5 minutes, then transfer them to a cooling rack to cool completely.

Cream Cheese Icing

  • In a medium bowl, whisk together the cream cheese, melted butter, powdered sugar, salt and 1 tablespoon (30ml) of lemon juice. Add additional lemon juice, a little at a time until your desired consistency is reached. Drizzle over the cooled cakes.

Notes

*To find the muffin pan I used, click here.
**To find jumbo muffin liners, click here. To find 4-inch cake pans, click here.
Keyword blueberry lemon, cake