Bakery Style Marble Confetti Cookies

Bakery Style Marble Confetti Cookies

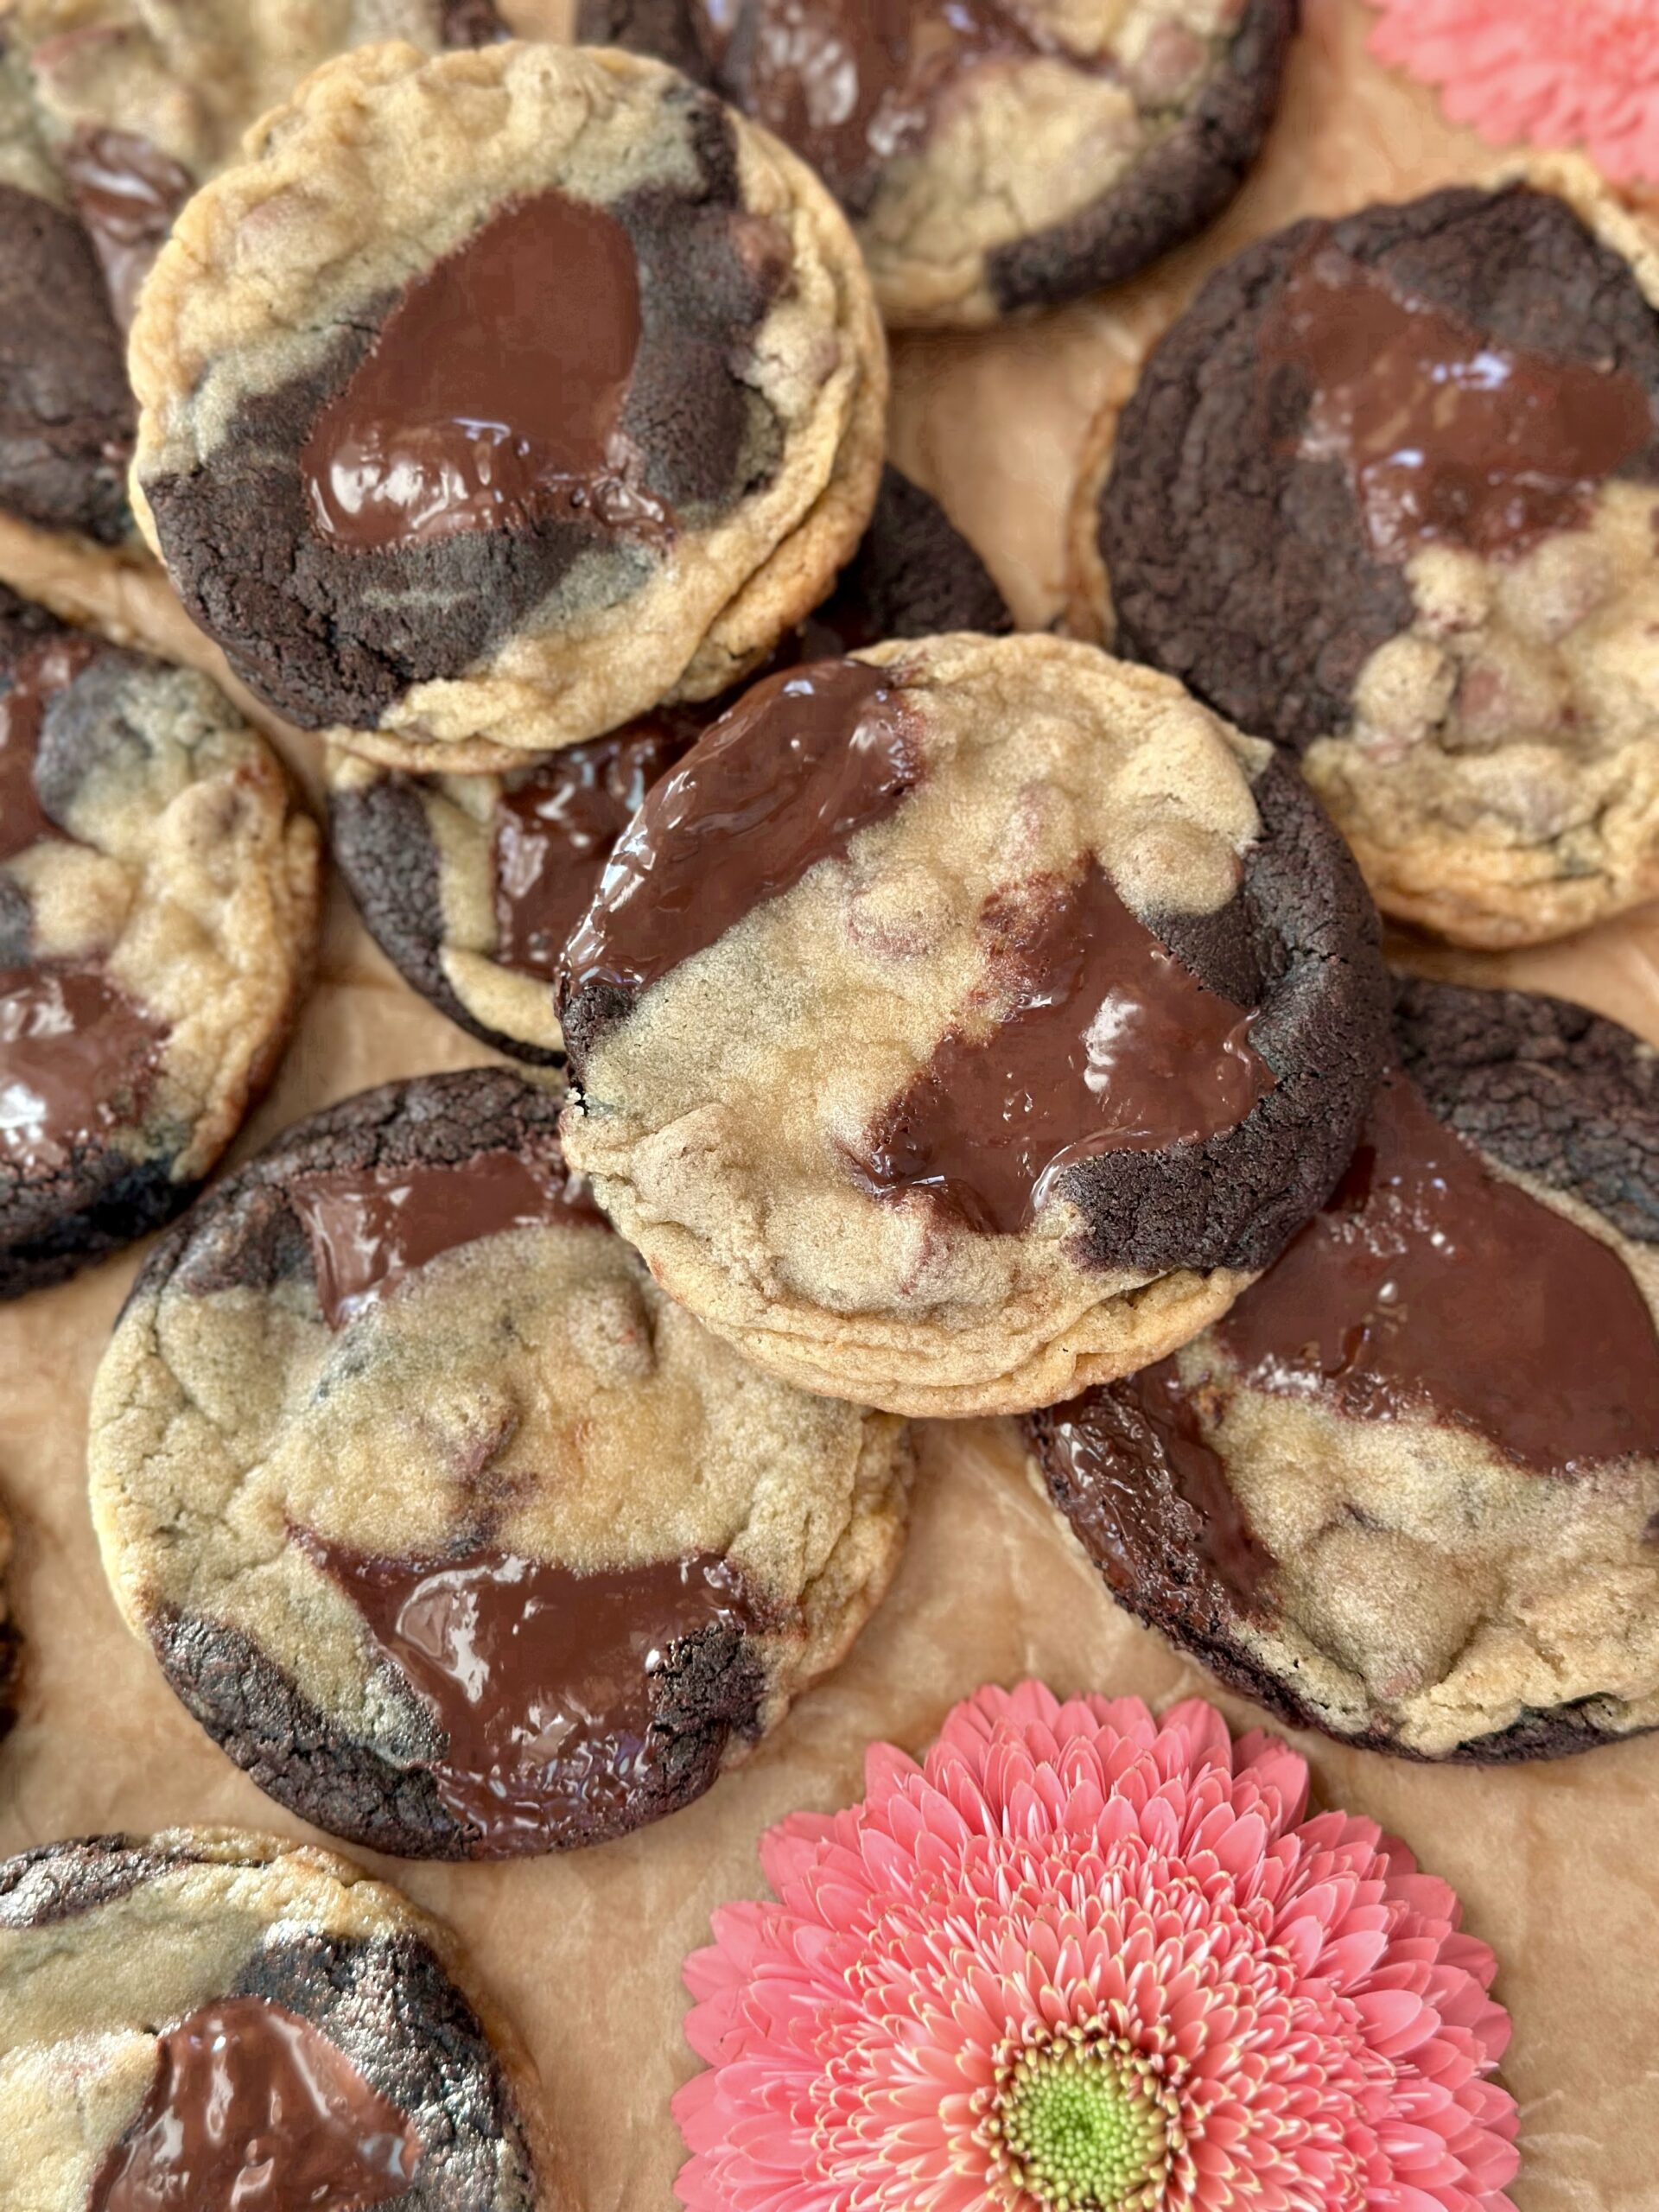
I think of April as one of the most festive months; spring flowers begin to bloom, we celebrate Easter and it’s also my birthday month. It’s a good time to make my big Bakery Style Marble Confetti Cookies. They have the perfect texture with soft, centers and crisp edges. The pretty pink cookie dough and the rainbow sprinkles make them so cheery and fun. They’re ideal for birthday parties and spring celebrations.

My method of adding in extra sprinkles gives the tops of the cookies extra sprinkles without hiding the pretty pink marbling. You can change up the colors of the dough to match your event. You can also add mix-ins, such as white chocolate chips, Easter candy or spring-themed sprinkles if you like. The possibilities are endless.

Bakery Style Marble Confetti Cookies

by Mari Vasseur
Large marbled bakery style cookies with rainbow sprinkles
Course Dessert
Servings 8 large cookies

Ingredients
  

  • 2 cups (255g) all purpose flour, sifted
  • 1 tablespoon (9g) cornstarch
  • ½ teaspoon fine sea salt
  • ½ teaspoon baking powder
  • ¼ teaspoon baking soda
  • 10 tablespoons (142g) unsalted butter, room temperature
  • â…” cup (132g) granulated suger
  • ¼ cup (50g) packed brown sugar
  • 1 large egg, room temperature
  • 1 large egg yolk, room temperature
  • 2 teaspoons pure vanilla extract
  • ¼ teaspoon pure almond extract
  • 3-4 drops pink gel food coloring I used Americolor deep pink
  • ½ cup (75g) rainbow sprinkles, divided

Instructions
 

  • Preheat the oven to 350ºF (180ºC). Line a large cookie sheet with parchment paper.
  • In a medium-sized bowl, whisk together the flour, cornstarch, salt, baking powder and baking soda until well blended.
  • In a large bowl, beat the butter, granulated sugar and brown sugar, with an electric mixer at medium speed, until pale and fluffy. Beat in the egg and egg yolk in 2 separate additions until well incorporated. Beat in the extracts. On low speed, beat in the flour mixture, just until combined.
  • Divide the dough into 2 equal portions, using a kitchen scale for accuracy. Place the dough into 2 separate bowls. Mix the food coloring into one of the dough portions, a little at a time until your desired shade is achieved.
  • Place 3 tablespoons of sprinkles into a small, shallow bowl and set aside. Divide the remaining sprinkles in half. Mix each half of the sprinkles into the 2 separate dough colors.
  • Divide each color of dough into 16 portions, approximately 1 tablespoon each. Roll them into balls. Dip each dough ball into the reserved bowl of sprinkles, pressing gently to adhere the sprinkles to the bottoms of the dough balls.
  • Take 2 balls of each color of dough (4 total) and arrange them in a checkerboard pattern, sprinkle side up. Roll them together to form a large ball. Repeat this process to make 8 large dough balls. Form the dough balls into cylinder shapes and place them sprinkle side up onto the cookie sheet, about 3 inches apart. You may need to bake them in 2 batches.
  • Bake until the cookies are slightly puffed and the tops are set, about 10-12 minutes. Let the cookies cool on the baking sheet for 5 minutes, then transfer them to a cooling rack.

Notes

To find the pink food coloring I used, click here.  
Keyword birthday cake, confetti, cookies

Blackberry Dark Chocolate Blondies

Blackberry Dark Chocolate Blondies

This past January and February were rough months. I insist that March will be much better. I’m starting this month off on a strong positive note by sharing my incredible, Blackberry Dark Chocolate Blondie recipe with you. This is one of the most uniquely delicious, perfectly balanced blondie recipes I’ve ever tasted. These rich, golden blondies are made with brown butter which makes the best blondies. The extra step of browning the butter is so worth it! And, rather than tossing a few blackberries into the batter, a quick homemade blackberry jam intensifies and elevates the blackberry flavor to another level. The fresh blackberry jam swirls together in the oven with pools of melted dark chocolate, creating a wildly delicious flavor experience.

Blackberry Dark Chocolate Blondies

by Mari Vasseur
Rich golden blondies made with brown butter, swirled with a quick homemade blackberry jam and pools of melted dark chocolate
Course Dessert
Servings 9 blondies

Ingredients
  

  • 1 ¾ cups (240g) blackberries, divided
  • 2 tablespoons (25g) granulated sugar
  • 1 teaspoon lemon juice
  • 1 teaspoon cornstarch
  • ¾ cup (170g) unsalted butter, cubed
  • 1 ½ cups (192g) all purpose flour, sifted
  • 1 teaspoon fine sea salt
  • ½ teaspoon baking powder
  • 1 ¼ cups (250g) packed brown sugar
  • 1 large egg
  • 1 large egg yolk
  • 1 ½ teaspoons pure vanilla extract
  • 3 ounces (85g) dark chocolate, broken into bite size pieces

Instructions
 

  • Set aside 3/4 cup (100g) of blackberries. Combine the remaining 1 cup (140g) of blackberries with the granulated sugar, lemon juice and cornstarch in a small saucepan. Bring to a boil, over medium heat. Boil for 1 minute. Turn the heat down to low and simmer, stirring occasionally, until the blackberries soften and break down, about 6-8 minutes. Smash the blackberries with the back of a spoon as they cook. Pass the blackberries through a sieve or a food mill to remove the seeds. Stir in the reserved blackberries and set aside to cool to room temperature.
  • In a medium-sized light-colored saucepan over medium heat, melt the butter and cook until it's deep golden and fragrant. When brown specks start to appear, remove it from the heat and immediately transfer the butter with the brown specks to a large bowl. Set aside.
  • Preheat the oven to 325ºF. (165ºC). Line an 8-inch square baking pan with parchment paper, leaving a couple of inches of overhang.
  • In a medium-sized bowl, whisk together the flour, salt, and baking powder until well blended.
  • Add the brown sugar to the browned butter. Whisk until smooth. Add the egg, egg yolk and vanilla extract. Whisk until smooth and well blended. Stir in the flour mixture just until combined.
  • Set aside a few of the larger chocolate pieces for the top of the blondies. Stir the remaining chocolate pieces into the batter. Spread half of the batter into the baking pan. Spoon generous 2 tablespoon-size portions of batter into the pan, distributing them all over the surface. Spoon the blackberry mixture in between the batter portions. Top with the reserved chocolate pieces.
  • Bake until the top of the batter is set and light golden brown and a toothpick inserted into the center of the bars comes out with a few moist crumbs on it, about 25-30 minutes.

Notes

Feel free to use frozen blackberries if fresh blackberries are unavailable.
Keyword bars, blackberry, blondies

Sunshine Picnic Cake

Sunshine Picnic Cake by Mari Vasseur

Out here in Southern California we have picnic weather in the middle of winter. Even if it’s snowing where you live, you might be craving something deliciously bright, like this Sunshine Picnic Cake made with fresh orange juice and orange zest. The soft, moist cake is topped with a subtly tart citrus icing. It’s perfect for a spring or summer picnic, a tea party, weekend brunch or even an anytime snack. This recipe is so versatile that you can easily switch it up to make it a lemon cake if you wish.*

Sunshine Picnic Cake

by Mari Vasseur
Soft, plush, moist orange scented cake with citrus icing
Course Brunch, Dessert
Servings 9

Ingredients
  

Cake

  • 1 ½ cups (192g) all purpose flour, sifted
  • 1 ½ teaspoons baking powder
  • ¼ teaspoon baking soda
  • ½ teaspoon fine sea salt
  • ¾ cup (150g) granulated sugar
  • Zest of 1 large orange
  • ½ cup (111ml) vegetable oil or neutral oil of your choice
  • 2 large eggs room temperature
  • ¼ cup (59ml) orange juice
  • 1 teaspoon pure orange extract**
  • 1 teaspoon pure vanilla extract
  • ¾ cup (170g) sour cream room temperature

Icing

  • 1 cup (120g) powdered sugar, sifted
  • 1 tablespoon (14g) unsalted butter, melted
  • 1 tablespoon (15ml) lemon juice
  • 1-2 tablespoons (15-30ml) orange juice
  • 1 pinch fine sea salt

Instructions
 

Cake

  • Preheat the oven to 350ºF (180ºC). Line the bottom of an 8-inch square baking pan with parchment paper. Grease and flour the insides.
  • In a medium-sized bowl, whisk together the flour, baking powder, baking soda, and salt until well blended.
  • In a large bowl, beat the sugar, orange zest, and oil, with an electric mixer at medium speed, until smooth and creamy. Add the orange juice and the extracts and beat until blended. With the mixer on low speed or by hand, beat in the flour mixture in two additions followed by half of the sour cream after each addition. Mix just until smooth and combined.
  • Transfer the batter to the baking pan. Bake until the top looks golden and a toothpick inserted into the center of the cake comes out clean, about 20-25 minutes. Do not over bake. Let the cake cool in the pan for 10 minutes, then remove it from the pan and transfer it to a cooling rack. Alternately, if you want to transport the cake in the pan, you can let it cool in the pan.

Icing

  • In a small bowl, whisk together the powdered sugar, butter, lemon juice, 1 tablespoon (15ml) of orange juice and the salt until well blended. Add additional orange juice as needed to achieve the desired consistency. Whisk until smooth. Spread the icing on the cooled cake, letting it drip down the sides.

Notes

*To make a lemon version of this cake, replace the orange juice with lemon juice. Replace the orange zest with the lemon zest of two medium lemons. Replace the orange extract with pure lemon extract. Reduce the vanilla extract to 1/2 teaspoon.
**To find pure orange extract, click here.
Keyword cake, orange

Raspberry Chocolate Crumble Bars

Raspberry Chocolate Crumble Bars

Crumb bars are easy-to-make, rustic dessert bars. These Raspberry Chocolate Crumble Bars might be the most sumptuous crumb bars I’ve ever made. They have a tender shortbread crust topped with a layer of raspberry jam, followed by chocolate chips, a generous crumb topping, then finished with a drizzle of icing. The raspberry jam and chocolate chips melt together in the oven creating a delicious filling that will remind you of raspberry truffles.


Raspberry Chocolate Crumble Bars

by Mari Vasseur
Tender shortbread crust topped with raspberry jam, chocolate chips, crumb topping and a drizzle of icing
Servings 16 2-inch bars

Ingredients
  

Crust

  • 1 ½ cups (191g) all purpose flour, sifted
  • ¼ cup plus 2 tablespoons (43g) powdered sugar, sifted
  • 1 teaspoon baking powder
  • ¼ teaspoon fine sea salt
  • ¾ cup (170g) unsalted butter, softened

Crumb Topping

  • 1 cup (128g) all purpose flour
  • â…“ cup (66g) packed brown sugar
  • 3 tablespoons (37g) granulated sugar
  • ¼ teaspoon fine sea salt
  • 6 tablespoons (85g) cold, unsalted butter, cubed

Filling

  • 1 cup (312g) raspberry jam or fruit spread
  • ¾ cup (128g) semisweet or dark chocolate chips

Icing

  • ¾ cup (90g) powdered sugar, sifted
  • 1 tablespoon (14g) unsalted butter, melted
  • ¼ teaspoon pure vanilla extract
  • â…› teaspoon pure almond extract
  • 1 pinch fine sea salt
  • 2 tablespoons (30ml) whole milk or half & half

Instructions
 

Crust

  • Preheat the oven to 350ºF (180ºC). Line an 8-inch square baking pan with parchment paper leaving a couple of inches of overhang.
  • In a medium-sized bowl, whisk together the flour, powdered sugar, baking powder and salt until well blended.
  • In a large bowl, beat the butter, with an electric mixer at medium speed, until smooth. Add the flour mixture and beat just until the dough comes together.
  • Press the dough evenly into the baking pan. Bake until the surface is light golden brown, about 20-23 minutes.

Crumb Topping

  • Meanwhile, in a medium-sized bowl, stir together the flour, brown sugar, granulated sugar and salt. Work the butter into the flour mixture with your fingertips until it looks sandy, with no large pieces of butter remaining. Press the mixture together to form chunks. Set aside in the refrigerator until ready to use.

Filling

  • Spread the raspberry jam evenly over the warm crust. Top with the chocolate chips. Sprinkle the crumb topping evenly over the filling. Return the pan to the oven and bake until the topping is golden brown and the filling starts to bubble, about 23-28 minutes. Let cool in the pan.

Icing

  • In a small bowl, whisk the powdered sugar, butter, extracts, salt and 1 tablespoon (15ml) of milk together. Add more milk as needed to reach the desired consistency. Whisk until smooth. Remove the cooled bars from the pan and drizzle with icing. Cut the bars into 2 inch squares.
Keyword bars, raspberry chocolate

Little Chocolate Donuts

Little Chocolate Donuts with pink icing

Little chocolate donuts are a fun, nostalgic treat from my childhood. I’m talking about the ones at the local market that come in a plastic sleeve. I remember sharing the waxy little donuts with a friend, and at the time we thought they were delicious. Now that I’m an adult, I realize that homemade ones taste soo much better and they’re surprisingly quick and easy to make. They’re delicious with either naturally pink strawberry icing or chocolate glaze. I shared the recipe for both options below.

For Valentine’s Day, I used a heart-shaped mini donut pan for the donuts shown in the photo, but a standard round mini donut pan works too. A sprinkle of pink sparkling sugar makes them extra special, especially for Galentine’s Day.

Little Chocolate Donuts

Course Breakfast, Brunch, Dessert
Servings 14 mini donuts

Ingredients
  

Little Chocolate Donuts

  • â…” cup (85g) all purpose flour, sifted
  • 3 tablespoons (17g) unsweetened cocoa powder
  • ¼ teaspoon fine seat salt
  • ¼ teaspoon baking powder
  • ¼ teaspoon baking soda
  • ½ cup (100g) packed brown sugar
  • ½ cup (115ml) vegetable oil or neutral oil of your choice
  • 1 large egg
  • ½ cup (128ml) buttermilk
  • ½ teaspoon pure vanilla extract
  • Strawberry icing or chocolate glaze recipes below
  • Pink sparkling sugar, optional

Pink Strawberry Icing

  • 1 ½ cups (181g) powdered sugar, sifted
  • 2 tablespoons (30ml) puréed strawberries, strained fresh or frozen
  • 1 tablespoon (14g) unsalted butter, melted
  • 1 pinch fine sea salt
  • 1-2 tablespoons (15-30ml) whole milk, room temperature

Chocolate Glaze

  • 6 tablespoons (85g) unsalted butter
  • 4 ounces (113g) semisweet chocolate, chopped
  • 2 teaspoons light corn syrup

Instructions
 

Little Chocolate Donuts

  • Preheat the oven to 350ºF (180ºC). Spray a mini donut pan with nonstick spray. (I used a heart-shaped mini donut pan** but a standard round mini donut pan***works too.)
  • In a medium-size bowl, whisk together the flour, cocoa powder, salt, baking powder and baking soda until well combined.
  • In a large bowl, whisk together the brown sugar, oil, egg, buttermilk and vanilla until smooth. Add the flour mixture and stir just until combined.
  • Transfer the batter to the donut pan, using a piping bag or a plastic food storage bag with the corner cut off. Bake until a toothpick inserted into the centers of the donuts comes out clean, about 6-8 minutes. Do not over bake or the donuts will dry out. Transfer the donuts to a cooling rack. Clean the pan and repeat with the remaining batter.

Strawberry Icing

  • In a medium-size bowl, whisk together the powdered sugar, pureéd strawberries, melted butter, salt and 1 tablespoon (15ml) of milk until well combined. Add additional milk as needed to reach your desired consistency. Whisk until smooth. Dunk the top surface of the cooled donuts into the icing.

Chocolate Glaze

  • In a heat safe bowl set over a pan of barely simmering water, melt the butter, chocolate and corn syrup together, stirring occasionally, until smooth. Remove from heat and set aside to cool slightly. Dunk the top surface of the cooled donuts into the glaze or spoon it over the tops.

Notes

*To find pink sparkling sugar, click here.
**To find the heart-shaped mini donut pan I used, click here.
***To find a standard mini donut pan, click here.
 
Keyword chocolate, donuts

Fudgy Chocolate Crumb Cake

Fudgy Chocolate Crumb Cake

This moist, fudgy chocolate cake with a generous amount of melt-in-your-mouth chocolate crumb topping and powdered sugar snow is perfect for frosty mornings with a cup of hot coffee or tea. It’s also perfect for a holiday breakfast or brunch served with fresh raspberries and/or raspberry sauce.*

Fudgy Chocolate Crumb Cake

Rich, moist, fudgy chocolate cake with melt-in-your mouth crumb topping and sprinkled with powdered sugar.
Course Breakfast, Brunch, Dessert
Cuisine American
Servings 9 servings

Ingredients
  

Crumb Topping

  • 1 cup (128g) all purpose flour
  • â…“ cup (66g) packed brown sugar
  • 3 tablespoons (38g) granulated suger
  • 2 tablespoons (12g) Dutch process unsweetened dark cocoa powder
  • â…› teaspoon fine sea salt
  • 7 tablespoons (99g) cold, unsalted butter, cubed

Cake

  • 1 ¼ cups (160g) all purpose flour, sifted
  • 6 tablespoons (35g) Dutch process unsweetened dark cocoa powder, sifted
  • ¾ teaspoon baking powder
  • ½ teaspoon baking soda
  • ½ teaspoon fine sea salt
  • ½ cup (113g) unsalted butter, softened
  • â…” cup (132g) granulated sugar
  • ¼ cup (50g) packed brown sugar
  • 2 tablespoons (30ml) vegetable oil or neutral oil of your choice
  • 1 large egg
  • 1 large egg yolk
  • 1 ½ teaspoons pure vanilla extract
  • â…” cup (150g) sour cream
  • â…” cup (118ml) hot coffee or espresso
  • â…“ cup (85g) semisweet mini chocolate chips
  • Powered sugar for sprinkling

Instructions
 

Crumb Topping

  • In a medium-size bowl, whisk together the flour, granulated sugar, brown sugar, cocoa powder and salt until well combined. Work the butter into the flour mixture with your fingertips until it looks like dirt, with no large pieces of butter remaining. Press the mixture together to form chunks. Set aside in the refrigerator until ready to use.

Cake

  • Preheat the oven to 350ºF (180ºC). Line an 8-inch square cake pan** with parchment paper, leaving a couple of inches of overhang to serve as handles to lift the cake out of the pan. If you want to serve the cake directly from the pan, you can skip the parchment paper and simply spray the pan with nonstick spray.
  • In a medium-size bowl, whisk the flour, cocoa powder, baking powder, baking soda and salt together until well combined.
  • In a large bowl, beat the butter, granulated sugar and brown sugar together, with an electric mixer at medium speed, until light and fluffy. Beat in the oil until combined. Beat in the egg, egg yolk, and vanilla in 3 separate additions, making sure each one is incorporated before adding the next.
  • On low speed, beat the flour mixture into the batter in 2 additions, alternating with half of the sour cream after each addition. Beat just until combined. Gradually beat in the hot coffee just until smooth and well combined. Fold in the mini chocolate chips.
  • Transfer the batter to the prepared cake pan. Top the batter evenly with the crumb topping. Bake until a toothpick inserted into the center of the cake comes with a few moist crumbs attached (not wet batter), about 28-37 minutes.
  • Cool the cake in the pan for 15 minutes, then remove the cake from the pan and continue cooling on a cooling rack. Sprinkle powdered sugar over the cooled cake.

Notes

*To find my raspberry sauce recipe, click here.
**To find my favorite 8-inch square cake pan, click here.
 
Keyword cake, chocolate, crumb

Gingerbread Friends Cookies

Gingerbread Friends Cookies

I got a set of the teeny tiniest cookie cutters last year. Ever since, I’ve been coming up with cute ways to use them. Since Christmas is coming, I made the littlest and cutest gingerbread people. They look so cute adorning my full size gingerbread cookies. Working with such small cookies can be challenging but I have a few tips to make it easier. The dough has to be rolled very thin, so I found it easier to manage by rolling it between sheets of parchment paper. Since the dough is so thin and fragile, it has to be kept very cold during the entire process , so pop it into the fridge if it becomes too warm. A toothpick dipped in melted white chocolate was the easiest way for me to draw on their little faces, but a black edible marker would work too. You can also use royal icing if you’re comfortable working with it.

Gingerbread Friends Cookies

Gingerbread cookies topped with white chocolate, mini gingerbread cookies and sprinkles
Course Dessert
Servings 18 cookies

Ingredients
  

  • 3 ¼ cups (415g) all purpose flour, sifted
  • 1 tablespoon (10g) cornstarch
  • ½ teaspoon baking powder
  • ½ teaspoon baking soda
  • ½ teaspoon fine sea salt
  • 2 ½ teaspoons ground ginger
  • 2 teaspoons ground cinnamon
  • ¼ teaspoon ground nutmeg, preferably freshly ground
  • ¼ teaspoon ground cloves
  • ½ cup (113g) unsalted butter, softened
  • 2 tablespoons (24g) vegetable shortening
  • ¾ cup (150g) packed dark brown sugar
  • 1 large egg, room temperature
  • 1 ½ teaspoons pure vanilla extract
  • ½ cup (163ml) unsulphured molasses
  • ¾ cup (128g) white chocolate chips, melted
  • assorted sprinkles I used candy cane sprinkles and green nonpareils

Instructions
 

  • In a large bowl, whisk the flour, cornstarch, salt, baking powder, baking soda, ginger, cinnamon, nutmeg, and cloves together until well blended.
  • In a separate large bowl, beat the butter, shortening and brown sugar together, with an electric mixer on medium speed, until light and fluffy. Beat in the egg until incorporated. Beat in the vanilla, then the molasses until well combined.
  • On low speed, beat in the flour mixture in two additions. Beat just until combined. Set aside about 1/4 of the dough for the mini cookies. Form it into a disk. Divide the remaining dough into 2 portions and form them into disks. Wrap all of the dough disks in plastic wrap and chill them in the refrigerator until firm, at least 2 hours or overnight.
  • Place the small portion of dough between 2 sheets of parchment paper. Roll to 1/16-inch thickness. Cut out 40-50 mini cookies using a 1-inch gingerbread man cookie cutter. Place the cut outs on a parchment paper lined tray. Freeze for 20-30 minutes. this will help the cookies keep their shape when baking.
  • Preheat the oven to 350ºF (180ºC). Line 2 large cookie sheets with parchment paper. On a lightly floured surface, roll the remaining dough to 1/4-inch thickness. Using a 2 3/4-inch or a 3-inch round cookie cutter, cut out 18 cookies. Re-roll the scraps as needed. place the cookies at least 1-inch apart onto the cookie sheets. Bake until the cookies are set and slightly puffed, about 8-10 minutes. Transfer the cookies to a cooling rack.
  • Place the mini cookies, about 1/2-inch apart onto a parchment lined cookie sheet. Bake until the cookies are set and slightly puffed, about 5-6 minutes. Let the cookies cool on the baking sheet. Decorate the cooled mini cookies with melted white chocolate, using a toothpick to make the eyes, smiles, etc.
  • Spread melted white chocolate onto one side of each round cookie. Top with the mini gingerbread cookies and the sprinkles of your choice.

Notes

*To find the mini gingerbread man cookie cutter I used, click here.
To find round cookie cutters, click here.
Keyword cookies, gingerbread

Sweet Potato Cake with Marshmallow Cream Cheese Frosting and Salted Caramel

This incredibly easy-to-make cake is like a sleeper that takes you by surprise. The two-ingredient frosting is an unlikely winner, but will end up pleasantly surprising you, especially when the salted caramel is added as a finishing touch. The combination of sweet potatoes and marshmallows is a classic pairing that will remind you of a sweet potato casserole in cake form. My family adores it and I think you will too. If you’re not a fan of marshmallows you can frost this cake with my silky cream cheese frosting instead. Click here for the recipe.


Sweet Potato Cake with Marshmallow Cream Cheese Frosting and Salted Caramel

by Mari Vasseur
Soft moist, single layer sweet potato cake topped with a luscious 2-ingredient frosting and drizzled with salted caramel
Course Dessert
Servings 9 servings

Ingredients
  

Sweet Potato Cake

  • 1 cup (128g) all purpose flour, sifted
  • 1 teaspoon ground cinnamon
  • 1 teaspoon baking powder
  • ½ teaspoon baking soda
  • ½ teaspoon fine sea salt
  • ½ teaspoon ground ginger
  • ¼ teaspoon ground nutmeg preferably freshly ground
  • ¾ cup (150g) granulated sugar
  • ¼ cup (50g) packed brown sugar
  • â…” cup (148ml) vegetable oil or neutral oil of your choice
  • 2 large eggs
  • 1 teaspoon pure vanilla extract
  • 1 cup (240g) mashed cooked sweet potatoes*
  • 1 batch Marshmallow Cream Cheese Frosting recipe below
  • 1/3-1/2 cup (98-148g) salted caramel sauce homemade or store bought

Marshmallow Cream Cheese Frosting

  • 8 ounces (227g) cream cheese, room temperature
  • 1 7.5 ounce (213g) jar of Marshmallow Fluff

Instructions
 

Sweet Potato Cake

  • Preheat the oven to 350ºF (180ºC). Line the bottom of an 8-inch square cake pan with parchment paper. Grease and flour the insides.
  • In a medium-sized bowl, whisk together the flour, cinnamon, baking powder, baking soda, salt, ginger and nutmeg until well blended.
  • In a large bowl, beat the granulated sugar, brown sugar, oil, eggs and vanilla, with an electric mixer or whisk by hand until creamy and well blended. Stir in the sweet potatoes until incorporated. Stir in the flour mixture just until combined.
  • Transfer the batter to the prepared cake pan. Bake until a toothpick inserted into the center of the cake comes out clean, about 23-28 minutes. Let the cake cool in the pan for 10 minutes then remove the cake from the pan and transfer it to a cooling rack.

Marshmallow Cream Cheese Frosting

  • In a large bowl, stir the cream cheese with a spatula until smooth. Add the Marshmallow Fluff and beat with an electric mixer just until smooth and well blended. Don't over beat. Over beating can cause the cream cheese to curdle.
  • Spread the frosting over the cooled cake. Drizzle the caramel over the top of the cake or top each piece of cake with a spoonful of caramel.

Notes

*It's okay to use canned sweet potatoes if you don't have fresh ones. Make sure to rinse them before using.
Keyword cake, sweet potato

Cranberry Orange Crumb Cake Cookies

Cranberry Orange Crumb Cake Cookies

When you combine cranberry orange crumb cake with white chocolate chip cookies, you get these delicious, unique cookies that are perfect for the holiday season. They make a festive addition to your holiday cookie platter. I came up with these delightful cookies when I was looking for a way to use up leftover cranberry sauce. If your family is like mine, it’s rare for us to have leftover cranberry sauce because we love it so much. Click here to view my Cranberry Sauce recipe. Don’t worry, you can certainly use store bought whole berry cranberry sauce for this recipe and the cookies will be just as delicious.


Cranberry Orange Crumb Cake Cookies

by Mari Vasseur
Orange scented vanilla cookies with white chocolate chips, topped with cranberry sauce, crumb topping and orange icing
Course Dessert
Servings 16 cookies

Ingredients
  

Crumb Topping

  • ¾ cup (96g) all purpose flour
  • ¼ cup (50g) packed brown sugar
  • 3 tablespoons (38g) granulated sugar
  • â…› teaspoon fine sea salt
  • 4 ½ tablespoons (64g) cold, unsalted butter, cubed

Cookies

  • 2 cups (255g) all purpose flour, sifted
  • 1 teaspoon baking powder
  • ½ teaspoon fine sea salt
  • ½ cup (113g) unsalted butter, room temperature
  • ½ cup (100g) packed brown sugar
  • ¼ cup (50g) granulated sugar
  • Zest of 1 medium orange
  • 1 large egg, room temperature
  • 1 large egg yolk, room temperature
  • 1 ½ teaspoons pure vanila extract
  • ¾ cup (128g) white chocolate chips
  • ½ cup (113g) whole berry cranberry sauce, purchased or homemade

Icing

  • â…” cup (80g) powdered sugar, sifted
  • 1 pinch fine sea salt
  • 1 teaspoon lemon juice
  • 1-2 ½ tablespoons (15-38ml) orange juice

Instructions
 

Crumb Topping

  • In a medium-sized bowl, whisk together the flour, brown sugar, granulated sugar and salt until well blended. Work the butter into the flour mixture with your fingertips until it looks sandy with no large pieces of butter. Press the mixture together to form chunks. Set aside in the refrigerator while you make the cookie dough.

Cookies

  • Preheat the oven to 350ºF (180ºC). Line 2 large cookies sheets with parchment paper.
  • In a medium-sized bowl, whisk together the flour, baking powder and salt until well blended.
  • In a large bowl, beat the butter, brown sugar, granulated sugar and orange zest, with an electric mixer at medium speed, until pale and fluffy. Beat in the egg and egg yolk in two separate additions, making sure each one is incorporated before adding the next. Beat in the vanilla extract. On low speed, beat the flour mixture into the batter, just until combined. Stir in the white chocolate chips.
  • Form the cookie dough into sixteen 2-tablespoon size balls. Place them about 3 inches apart onto the cookie sheets. Press a 1-inch wide indentation into each cookie using your thumb or a pastry tamper. Fill each indentation with a generous teaspoon of cranberry sauce. Top each one generously with the crumb topping. Gently press the topping into the cookies.
  • Bake until the topping and the edges start to turn light golden, about 11-13 minutes. (Be careful not to over bake to avoid drying out your cookies.) Let the cookies cool on the baking sheet for 1 minute, then transfer them to a cooling rack.

Icing

  • In a small bowl, whisk together the powdered sugar, salt, lemon juice and 1 tablespoon of orange juice until well blended. Add additional orange juice as needed to achieve your desired consistency. Whisk until smooth. Drizzle the icing over the cooled cookies.
Keyword cookies, cranberry orange

Melt-in-Your-Mouth Pecan Pie Cookies

Pecan Pie Cookies

My Peach Crumble Pie Cookies were so popular that I decided to make a Pecan Pie version. These buttery little cookie tarts have a sweet, gooey pecan filling that’s the perfect contrast to the tender shortbread crusts. They taste like autumn and Thanksgiving in a cute little pie. They also make a delightful addition to your Christmas cookie platter or cookie box. Make sure to use good quality butter, so your shortbread crusts will be melt-in-your-mouth delicious.

Melt-in-Your-Mouth Pecan Pie Cookies

by Mari Vasseur
Tender, buttery shortbread crusts filled with sweet, gooey pecan pie filling in a cute mini size
Course Dessert
Servings 12 cookie tarts

Ingredients
  

Shortbread Crusts

  • 1 cup (128g) all purpose flour, sifted
  • ½ teaspoon baking powder
  • â…› teaspoon fine sea salt
  • 7 tablespoons (99g) good quality unsalted butter, room temperature
  • ¼ cup (28g) powdered sugar, sifted

Pecan Filling

  • 1 cup (113g) coarsely chopped pecans
  • ¼ cup (57g) unsalted butter, cubed
  • ¼ cup (50g) packed brown sugar
  • ¼ cup (60ml) pure maple syrup
  • ¼ cup (60ml) heavy cream
  • ¼ teaspoon cinnamon
  • 1 pinch fine sea salt
  • ½ teaspoon pure vanilla extract

Instructions
 

Shortbread Crusts

  • Lightly spray a 12-serving muffin pan* with nonstick spray. (I had no problems releasing the cookies from the pan, but you can also line the muffin cups with 2-inch parchment circles for a foolproof release. I don't recommend cupcake liners since the cookies will stick to the ridges of the liners.)
  • In a medium-sized bowl, whisk together the flour, baking powder and salt until well blended.
  • In a large bowl, beat the butter and powdered sugar with an electric mixer until pale and fluffy. Mix in the flour mixture on low speed or by hand, just until combined.
  • Press generous tablespoon size (about 20g each) portions of dough into the bottoms and 1/4-inch up the insides of the muffin pan cups with a pastry tamper dipped in flour. You can also use the bottom of a flat shot glass. Set aside in the refrigerator while you prepare the pecan filling.

Pecan Filling

  • Preheat the oven to 350ºF (180ºC). In a medium-sized saucepan, combine the pecans, butter, brown sugar and maple syrup over medium heat. Bring to a simmer and let the mixture bubble gently for 2 minutes. Remove the pan from the heat and stir in the heavy cream, cinnamon and salt. Return the pan to the heat and let the mixture bubble gently on low heat for 2 more minutes. Stir in the vanilla and let the mixture cool to lukewarm.
  • Top the cookie crusts evenly with the pecan filling mixture. Bake until the cookies are set and the topping is golden brown and bubbly, about 14-16 minutes. Cool the cookies completely in the pan. Once cool, remove the cookies from the pan by running a small offset spatula or paring knife around the inside perimeter of the muffin cups to loosen them.

Notes

*To find the 12-serving  muffin pan I used, click here.
Keyword cookies, pecan, shortbread

Double Chocolate Marble Cookies

Double Chocolate Marble Cookies

If you like marble cookies, you’ll love my amazing deluxe version. They have crisp edges with soft, chewy centers and plenty of chocolate which makes them the best marble cookies ever! I used a combination of dark chocolate pieces and milk chocolate chips for the perfect balance. Set aside some of the dark chocolate pieces for the tops for the most beautiful, decadent pools of melted chocolate.


Double Chocolate Marble Cookies

by Mari Vasseur
Double chocolate marble cookies with crisp edges and soft, chewy centers. Chocolate dough with dark chocolate pieces is swirled together with vanilla dough with milk chocolate chips
Course Dessert
Servings 14 cookies

Ingredients
  

  • 2 cups (255g) all purpose flour, sifted
  • ½ teaspoon baking powder
  • ½ teaspoon baking soda
  • 1 teaspoon fine sea salt
  • 1 cup (227g) unsalted butter, room temperature
  • 1 cup (200g) packed brown sugar
  • ½ cup (100g) granulated sugar
  • 1 large egg, room temperature
  • 1 large egg yolk, room temperature
  • 1 ½ teaspoons pure vanilla extract, divided
  • 6 tablespoons (35g) unsweetened Dutch process cocoa powder, sifted
  • 1 3 1/2-4 oz (113g) dark chocolate bar* broken into bite size pieces
  • 2 tablespoons (20g) cornstarch
  • â…” cup (170g) milk chocolate chips or white chocolate chips

Instructions
 

  • Line 2 large cookie sheets with parchment paper. In a medium-sized bowl, whisk together the flour, baking powder, baking soda, and salt until well blended.
  • In a large bowl, beat the butter, brown sugar and granulated sugar, with an electric mixer at medium speed, until pale and fluffy. Beat in the egg, egg yolk and 1 teaspoon of vanilla extract in 3 separate additions, making sure each one is incorporated before adding the next. Add the flour mixture and mix just until combined.
  • Divide the cookie dough in half, using a kitchen scale for accuracy. Place half of the dough in a separate bowl. Add the cocoa powder into half of the dough, mixing just until combined. Set aside several pieces of dark chocolate for the tops of the cookies, then stir the remaining dark chocolate pieces into the chocolate dough.
  • Add the cornstarch and the remaining 1/2 teaspoon of vanilla extract to the other half of the cookie dough, mixing just until combined. Stir the milk chocolate chips into the vanilla dough.
  • Divide each type of dough into 28 portions, approximately 1 tablespoon each. Roll them into balls. Take 2 balls of each type of dough (4 total) and arrange them in a checkerboard pattern then roll them together to form a large ball. Repeat this process to make 14 large dough balls. Cover the dough balls and chill them in the refrigerator for 1 hour.
  • Preheat the oven to 350ºF (180ºC). Place the dough balls 3 inches apart onto the cookie sheets. Top each one with 1 or 2 pieces of the reserved dark chocolate. Bake until the edges are golden brown and the centers are set, but still soft, about 10-14 minutes. Do not over bake. The cookies will spread a bit. Remove the cookies from the oven and immediately use a large round cookie cutter to shape the hot cookies. Place the cookie cutter onto the cookie sheet over each cookie and slide it around each one a couple of times to achieve perfectly round cookies. Work quickly before the cookies set. Let the cookies cool on the cookie sheet for 5 minutes, then transfer them to a cooling rack.

Notes

To find dark Dutch process cocoa powder, click here.
Keyword cookies, double chocolate, marble

Orange Chocolate Chip Scones

Orange Chocolate Chip Scones

These Orange Chocolate Chip scones have everything I love in a good scone. Let’s start with their buttery, crisp edges and soft, tender centers. Plenty of mini chocolate chips are enhanced with the vibrant flavor of fresh orange zest. These melt-in-your-mouth scones are perfectly delicious on their own, but I went ahead and glazed them with some tangy orange icing which took them over the top. The baking method is so easy too. You simply mix them by hand, then scoop them onto the baking sheet. They’re a perfect alongside a warm, cozy cup of tea or coffee.


Orange Chocolate Chip Scones

by Mari Vasseur
Tender orange-scented scones dotted with mini chocolate chips and glazed with tangy orange icing
Course Breakfast, Brunch
Servings 9 scones

Ingredients
  

Scones

  • 1 ¾ cups (224g) all purpose flour, sifted
  • 2 tablespoons (25g) granulated suger
  • 1 tablespoon (14g) baking powder
  • ½ teaspoon fine sea salt
  • 7 tablespoons (99g) cold, unsalted butter, cubed
  • Zest of 1 large orange
  • ½ cup (85g) semisweet mini chocolate chips
  • ½ cup (113g) cold sour cream
  • ¼ cup (60ml) cold heavy cream plus extra for the tops*
  • 2 tablespoons (30ml) cold orange juice
  • 1 teaspoon pure vanilla extract

Icing

  • ¾ cup (90g) powdered sugar, sifted
  • 1 tablespoon (14g) unsalted butter, melted
  • 1 dash fine sea salt
  • 1 teaspoon lemon juice
  • 2-3 tablespoons (30-45ml) orange juice, room temperature

Instructions
 

Scones

  • Preheat the oven to 375ºF (190ºC). Line a large baking sheet with parchment paper.
  • In a large bowl, whisk together the flour, sugar, baking powder and salt until well combined. Work the butter and the orange zest into the flour mixture with your fingertips or with a pastry blender until pea sized pieces are formed. Stir in the mini chocolate chips.
  • In a small bowl, whisk together the sour cream, heavy cream, orange juice and vanilla extract. Stir the sour cream mixture into the flour mixture just until a shaggy dough is formed. Do not over mix.
  • Scoop 1/4 cup-sized rounded portions of dough and place them about 2 inches apart onto the prepared baking sheet. (If your dough has become a bit warm, refrigerate the dough portions for 15 minutes, then proceed with the recipe. This will prevent excess spreading.) Brush the tops of the scones with heavy cream. Bake until golden brown, about 20-25 minutes. Transfer the scones to a cooling rack.

Icing

  • In a medium-sized bowl, whisk together the powdered sugar, melted butter, salt, lemon juice, and 1 tablespoon (15ml) of orange juice until well blended. Add additional orange juice as needed to achieve your desired consistency. Whisk until smooth.
  • Brush the icing onto the cooled scones with a small pastry brush or drizzle the icing onto the scones if you prefer.

Notes

* If you want your scones to be more golden brown, you can brush them with egg wash instead of heavy cream before baking. To make egg wash, whisk together 1 egg with 1 tablespoon of water.
 
To find the portion scoop I used, click here.
Keyword orange chocolate chip, scones